深入理解Spring IOC容器
本文将从纯xml模式、xml和注解结合、纯注解的方式讲解Spring IOC容器的配置和相关应用。
纯XML模式
实例化Bean的三种方式:
- 使用无参构造函数
默认情况下,会使用反射调用无参构造函数来创建对象。
<bean id="connectionUtils" class="com.mmc.ioc.utils.ConnectionUtils"></bean>
- 使用静态方法创建
在实际开发中,我们使用的方法有时候不是通过构造函数创建出来的,他可能在创建的时候会做很多额外的操作。此时会提供一个创建对象的方法,如果这个方法是static修饰的,就是用这种配置方式。
<bean id="druidUtils" class="com.mmc.ioc.utils.DruidUtils" factory-method="getInstance"></bean>
- 使用实例化方法创建
当方法不是静态的时候,用这种方式
 <bean id="connectionUtils" class="com.mmc.ioc.utils.ConnectionUtils"></bean>

 <bean id="account" factory-bean="connectionUtils" factory-method="createAccount"></bean>
bean的作用范围和声明周期
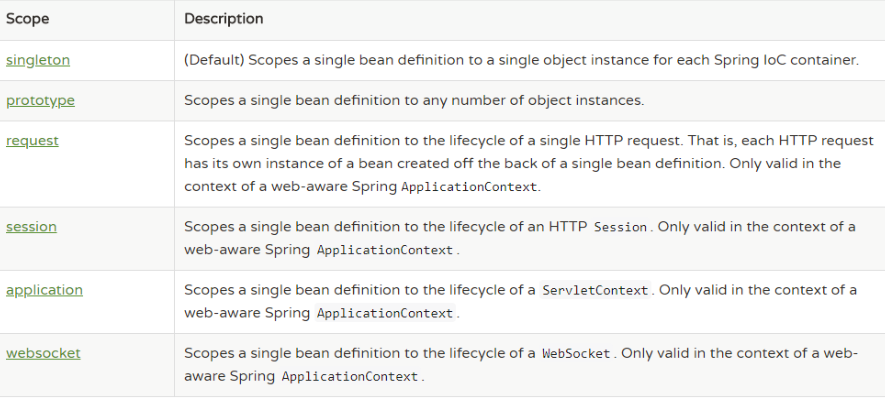
常用的是singleton【默认】(单例模式)和prototype(原型模式或多例模式)。通过scope属性可以进行配置
<bean id="account" factory-bean="connectionUtils" factory-method="createAccount" scope="singleton"></bean>
不同作用范围的生命周期
单例模式:singleton
对象创建:当创建容器时,对象就被创建
对象活着:只要容器在,对象一直活着
对象死亡:当容器销毁,对象就被销毁
总结:单例模式的bean对象生命周期与容器相同
多例模式:prototype
对象创建:当使用对象时,创建新的对象实例
对象活着:只要对象在使用中,就一直活着
对象死亡:当对象长时间不用时,被垃圾回收器回收
总结:多例模式的bean对象,spring框架只负责创建,不负责销毁。
Bean的标签属性
- id属性: ⽤于给bean提供⼀个唯⼀标识。在⼀个标签内部,标识必须唯⼀。
- class属性:⽤于指定创建Bean对象的全限定类名。
- name属性:⽤于给bean提供⼀个或多个名称。多个名称⽤空格分隔。
- factory-bean属性:⽤于指定创建当前bean对象的⼯⼚bean的唯⼀标识。当指定了此属性之后,
class属性失效。 - factory-method属性:⽤于指定创建当前bean对象的⼯⼚⽅法,如配合factory-bean属性使⽤,
则class属性失效。如配合class属性使⽤,则⽅法必须是static的。 - scope属性:⽤于指定bean对象的作⽤范围。通常情况下就是singleton。当要⽤到多例模式时,
可以配置为prototype。 - init-method属性:⽤于指定bean对象的初始化⽅法,此⽅法会在bean对象装配后调⽤。必须是
⼀个⽆参⽅法。 - destory-method属性:⽤于指定bean对象的销毁⽅法,此⽅法会在bean对象销毁前执⾏。它只
能为scope是singleton时起作⽤。
DI依赖注入
- 按照注入的方式分类
- 构造函数注入:就是利用带参构造函数实现对类成员的属性赋值
<bean id="account" class="com.mmc.ioc.bean.Account">

        <constructor-arg name="cardNo" value="123"></constructor-arg>

        <constructor-arg name="money" value="23"></constructor-arg>

        <constructor-arg name="name" value="aa"></constructor-arg>

    </bean>
- set方法注入:通过类成员的set方法实现数据注入
 <bean id="account" class="com.mmc.ioc.bean.Account">

        <property name="name" value="mmc"></property>

        <property name="cardNo" value="abc"></property>

        <property name="money" value="22"></property>

    </bean>
- 按照注入的数据类型分类
- 基本数据类型和String
- 其他Bean类型
- 复杂类型(集合类型)
基本类型使用value,其他bean类型使用ref,复杂类型使用对应的array、map、set标签
<bean id="user" class="com.mmc.ioc.bean.User">

        <property name="id" value="1"></property>

        <property name="account" ref="account"></property>

        <property name="list">

            <array>

                <value>aa</value>

                <value>bb</value>

            </array>

        </property>

        <property name="map">

            <map>

                <entry key="a" value="1"></entry>

                <entry key="b" value="2"></entry>

            </map>

        </property>

    </bean>
web.xml
<!DOCTYPE web-app PUBLIC

 "-//Sun Microsystems, Inc.//DTD Web Application 2.3//EN"

 "http://java.sun.com/dtd/web-app_2_3.dtd" >

<web-app>

  <display-name>Archetype Created Web Application</display-name>

  <!--配置spring ioc容器的配置文件-->

  <context-param>

    <param-name>contextConfigLocation</param-name>

    <param-value>classpath:applicationContext.xml</param-value>

  </context-param>

  <!--使用监听器启动Spring的IOC容器-->

  <listener>

    <listener-class>org.springframework.web.context.ContextLoaderListener</listener-class>

  </listener>

</web-app>
xml与注解结合的方式
注意:实际开发中,纯xml模式使用已经很少了,引入注解功能,不需要引入额外的jar包。xml+注解结合模式中,xml文件依然存在,所以Spring IOC容器的启动仍然从加载xml开始。
一般来说第三方jar包里面的bean定义在xml里面,自己开发的bean使用注解。
将第三方jar包的bean放入容器
<?xml version="1.0" encoding="UTF-8"?>

<beans xmlns="http://www.springframework.org/schema/beans"

       xmlns:xsi="http://www.w3.org/2001/XMLSchema-instance"

       xmlns:context="http://www.springframework.org/schema/context"

       xsi:schemaLocation="http://www.springframework.org/schema/beans

        https://www.springframework.org/schema/beans/spring-beans.xsd

    http://www.springframework.org/schema/context

       https://www.springframework.org/schema/context/spring-context.xsd

">

    <!--包扫描-->

    <context:component-scan base-package="com.mmc.ioc"></context:component-scan>

    <!--引入配置文件-->

    <context:property-placeholder location="classpath:jdbc.properties"></context:property-placeholder>

    <bean id="dataSource" class="com.alibaba.druid.pool.DruidDataSource">

        <property name="driverClassName" value="${jdbc.driver}"></property>

        <property name="url" value="${jdbc.url}"></property>

        <property name="username" value="${jdbc.username}"></property>

        <property name="password" value="${jdbc.password}"></property>

    </bean>

</beans>
xml中标签与注解的对应
| xml形式 | 注解 |
|---|---|
| 标签 | @Component,注解加在类上。默认情况下bean的id为类名(首字母小写)。另外,针对分层代码开发提供了@Componenet的三种别名@Controller、 |
@Service、@Repository分别⽤于控制层类、服务层类、dao层类的bean定义,这
四个注解的⽤法完全⼀样,只是为了更清晰的区分⽽已
标签的scope属性 | @Scope("prototype")
DI依赖注入的注解实现方式
- @Autowired(推荐使用)
@Autowired为Spring提供的注解。策略是按类型注入
public class TransferServiceImpl implements TransferService {

    @Autowired

    private AccountDao accountDao;

}
如上代码所示,这样装配会去spring容器中找到类型为AccountDao的bean,然后将其中如。但如果一个类型有多个bean怎么办呢?可以配合@Qualifier("bean的id")使用。
public class TransferServiceImpl implements TransferService {

    @Autowired

    @Qualifier("jdbcAccountDao")

    private AccountDao accountDao;

}
- @Resource
@Resource注解由j2EE提,如果指定了name或type就会根据指定的来,如果都没有指定就自动按照ByName方式装配。
注意:@Resource在Jdk11中已经移除,如果要使用,需要单独引入jar包。
<dependency>

    <groupId>javax.annotation</groupId>

    <artifactId>javax.annotation-api</artifactId>

    <version>1.3.2</version>

</dependency>
在Servlet类里面获取applicationContext
public class TransferServlet extends HttpServlet {

    @Override

    public void init() throws ServletException {

        WebApplicationContext webApplicationContext = WebApplicationContextUtils.getWebApplicationContext(this.getServletContext());

        ProxyFactory proxyFactory = (ProxyFactory) webApplicationContext.getBean("proxyFactory");

        transferService= (TransferService) proxyFactory.getJdkProxy(webApplicationContext.getBean("transferService"));

    }

}
纯注解模式
将xml配置改为java代码:
在配置类上声明@Configuration,表明是配置类。
@Configuration

@ComponentScan("com.mmc.ioc")

@PropertySource("classpath:jdbc.properties")

public class SpringConfig {

    @Value("${jdbc.driver}")

    private String driverClass;

    @Value("${jdbc.url}")

    private String url;

    @Value("${jdbc.username}")

    private String username;

    @Value("${jdbc.password}")

    private String password;

    @Bean

    public DataSource dataSource(){

        DruidDataSource druidDataSource=new DruidDataSource();

        druidDataSource.setDriverClassName(driverClass);

        druidDataSource.setUrl(url);

        druidDataSource.setUsername(username);

        druidDataSource.setPassword(password);

        return druidDataSource;

    }

}
如果还有其他配置类,可以通过@Import引入进来。
web.xml配置如下:
<!DOCTYPE web-app PUBLIC

 "-//Sun Microsystems, Inc.//DTD Web Application 2.3//EN"

 "http://java.sun.com/dtd/web-app_2_3.dtd" >

<web-app>

  <display-name>Archetype Created Web Application</display-name>

   <!--告诉ContextLoaderListener是注解方式启动ioc容器-->

   <context-param>

     <param-name>contextClass</param-name>

     <param-value>org.springframework.web.context.support.AnnotationConfigWebApplicationContext</param-value>

   </context-param>

  <!--配置spring ioc容器的配置文件-->

  <context-param>

    <param-name>contextConfigLocation</param-name>

    <param-value>com.mmc.ioc.SpringConfig</param-value>

  </context-param>

  <!--使用监听器启动Spring的IOC容器-->

  <listener>

    <listener-class>org.springframework.web.context.ContextLoaderListener</listener-class>

  </listener>

</web-app>
高频面试题:
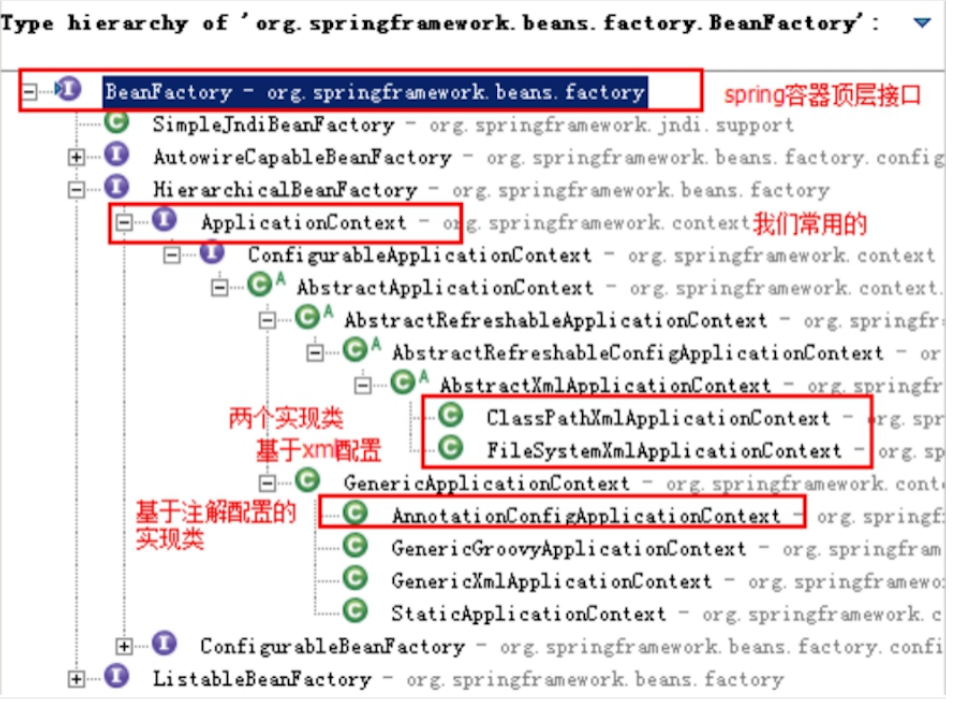
BeanFactory、FactoryBean、ApplicationContext的区别
- BeanFactory是Spring框架中IOC容器的顶层接口,它只是用来定义一些基础功能
- ApplicationContext是它的一个子接口,它拥有更多的功能,如国际化支持和资源访问等等。
- FactoryBean:一般情况下,Spring通过反射机制实例化Bean,在某些情况下,实例化bean过程比较复杂,这时配置起来就比较麻烦。如果采用编码的方式会简单一些。于是Spring给我们提供了FactoryBean的接口,用户就可以通过实现这个接口来自定义实例化Bean的逻辑。
总结:BeanFactory是负责生产和管理Bean的一个工厂接口,提供一个Spring Ioc容器规范。FactoryBean是一种Bean创建的方法,对Bean的一种扩展。
类图如下:
深入理解Spring IOC容器的更多相关文章
- 理解 Spring IoC 容器
控制反转与大家熟知的依赖注入同理, 这是通过依赖注入对象的过程. 创建 Bean 后, 依赖的对象由控制反转容器通过构造参数 工厂方法参数或者属性注入. 创建过程相对于普通创建对象的过程是反向, 称之 ...
- 深入理解Spring IoC容器和动态代理机制
Deployment期间验证 实现一: <bean id="theTargetBean" class="..."/> <bean id=&qu ...
- 深入理解Spring IOC容器及扩展
本文将从纯xml模式.xml和注解结合.纯注解的方式讲解Spring IOC容器的配置和相关应用. 纯XML模式 实例化Bean的三种方式: 使用无参构造函数 默认情况下,会使用反射调用无参构造函数来 ...
- 【转】Spring学习---Spring IoC容器的核心原理
[原文] Spring的两个核心概念:IoC和AOP的雏形,Spring的历史变迁和如今的生态帝国. IoC和DI的基本概念 IoC(控制反转,英文含义:Inverse of Control)是Spr ...
- 对Spring IoC容器实现的结构分析
本文的目标:从实现的角度来认识SpringIoC容器. 观察的角度:从外部接口,内部实现,组成部分,执行过程四个方面来认识SpringIoC容器. 本文的风格:首先列出SpringIoC的外部接口及内 ...
- Spring源码分析:Spring IOC容器初始化
概述: Spring 对于Java 开发来说,以及算得上非常基础并且核心的框架了,在有一定开发经验后,阅读源码能更好的提高我们的编码能力并且让我们对其更加理解.俗话说知己知彼,百战不殆.当你对Spri ...
- 【死磕 Spring】----- IOC 之深入理解 Spring IoC
在一开始学习 Spring 的时候,我们就接触 IoC 了,作为 Spring 第一个最核心的概念,我们在解读它源码之前一定需要对其有深入的认识,本篇为[死磕 Spring]系列博客的第一篇博文,主要 ...
- Spring IOC容器基本原理
2.2.1 IOC容器的概念IOC容器就是具有依赖注入功能的容器,IOC容器负责实例化.定位.配置应用程序中的对象及建立这些对象间的依赖.应用程序无需直接在代码中new相关的对象,应用程序由IOC容器 ...
- 【spring源码分析】spring ioc容器之前生今世--DefaultListableBeanFactory源码解读
spring Ioc容器的实现,从根源上是beanfactory,但真正可以作为一个可以独立使用的ioc容器还是DefaultListableBeanFactory,因此可以这么说, DefaultL ...
随机推荐
- 鸿蒙内核源码分析(中断切换篇) | 系统因中断活力四射 | 百篇博客分析OpenHarmony源码 | v42.02
百篇博客系列篇.本篇为: v42.xx 鸿蒙内核源码分析(中断切换篇) | 系统因中断活力四射 | 51.c.h .o 硬件架构相关篇为: v22.xx 鸿蒙内核源码分析(汇编基础篇) | CPU在哪 ...
- 【理解OS】1.保护模式概述
这个系列文章主要目的是为了记录我个人学习保护模式后的总结与一点点的思考.我也是一个学习者,其中由错误在所难免,若各位朋友指出将不胜感激. 1. Intel CPU的运行模式概述 这里我将粗略介绍Int ...
- 常见错误0xCCCCCCCCC 读取字符串的字符时出错及其引申。
问题描述在一个函数调用中,使用二级指针作为函数参数,传递一个字符串指针数组,但是在访问的时候,却出现了运行时错误,具体表现为"0xCCCCCCCC 读取字符串的字符时出错". 第一 ...
- 细说JUC的线程池架构
前言 线程的创建是需要JVM和OS(操作系统)相互配合的,一次的创建要花费许多的资源. 1.首先,JVM要为该线程分配堆栈和初始化大量内存块,栈内存至少是1MB. 2.其次便是要进行系统的调用,在OS ...
- 极简SpringBoot指南-Chapter00-学习SpringBoot前的基本知识
仓库地址 w4ngzhen/springboot-simple-guide: This is a project that guides SpringBoot users to get started ...
- C++核心编程 2 引用
引用的基本使用 作用:给变量起别名 ,语法:数据类型 & 别名 = 原名 注意:引用必须初始化,且初始化之后,就不可更改. 引用做函数参数 作用:函数传参时,可以利用引用的技术让形参修饰实参 ...
- 从零入门 Serverless | 函数计算如何粘合云服务,提供端到端解决方案
作者 | 西流 阿里云技术专家 导读:阿里云 Serverless 产品函数计算可以作为粘合剂,串联其他云服务提供端到端解决方案,从而简化编程模型,快速实现最上层的业务目标. 传统单体应用的拆解 首先 ...
- DRF的action装饰器
1.action装饰器 Django默认的路由分发规则决定了视图函数只能以get.post等请求方式命名,如果想要使用自定义的方式命名,我们可以使用action去映射请求方法名与自定义方法 view. ...
- Spring的JDK动态代理如何实现的(源码解析)
前言 上一篇文章中提到了SpringAOP是如何决断使用哪种动态代理方式的,本文接上文讲解SpringAOP的JDK动态代理是如何实现的.SpringAOP的实现其实也是使用了Proxy和Invoca ...
- Protocol handler start failed
问题描述: 启动项目的时候出现的中文大体意思是:协议处理程序启动失败看着这个启动失败,下意识就想是不是端口占用了,结果换个端口还是不行,于是百度了一个办法 问题解决: 打开任务管理器,找到Java的后 ...