MyBatis 3学习笔记
MyBatis 3
一、MyBatis简介
优秀的持久层框架,支持支持自定义 SQL、存储过程以及高级映射,专注于SQL的编写。

为什么不使用工具类进行数据库操作:
功能简单,sql语句编写在Java代码里面,是一种硬编码高耦合的方式,不推荐。
Hibernate:
另一种持久层框架,全自动全映射ORM(Object Relation Mapping)框架,旨在消除SQL。

主要特点:一个JavaBean对象与数据库中一条记录建立映射,中间过程对于程序员来讲是黑箱操作,无须关注SQL语句的编写。
缺点:框架自动生成SQL语句,程序员无法进行SQL优化;JavaBean中每一个字段都在数据库中有相应映射,加重了数据库的负担。
需求:SQL语句交给我们开发人员编写,希望SQL不失去灵活性。于是,诞生了MyBatis:
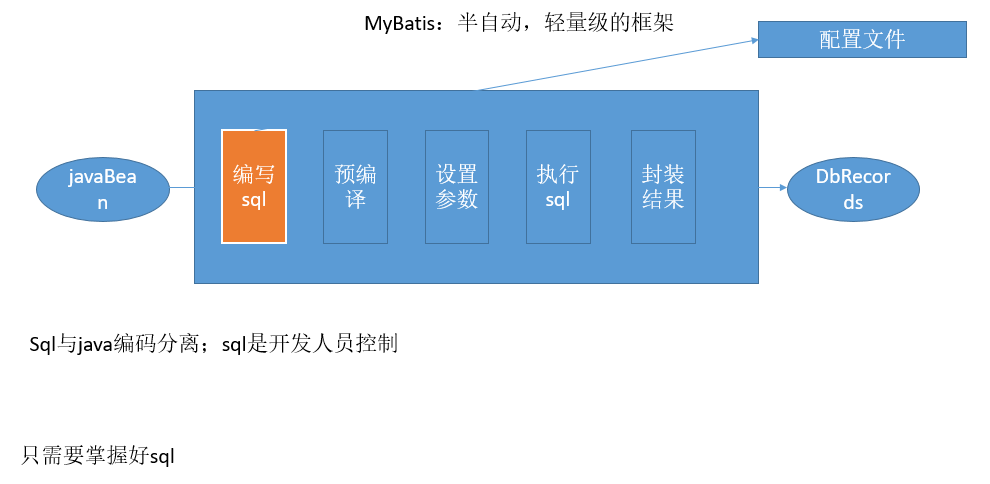
二、MyBatis接口式编程 Hello World
1. 搭建环境
lombok介绍:
Lombok 是一种 Java 实用工具,可用来帮助开发人员消除 Java 的冗长,尤其是对于简单的 Java 对象(POJO)。它通过注解实现这一目的。
通过@Data注解,让被修饰的类自动生成getter和setter方法、构造器、equals方法、或者hash方法等。
如果觉得@Data这个注解有点简单粗暴的话,Lombok提供一些更精细的注解,比如@Getter,@Setter,(这两个是field注解),@ToString,@AllArgsConstructor(这两个是类注解)。
log4j介绍:
Apache的开源项目log4j是一个功能强大的日志组件,提供方便的日志记录。可以查看在debug时候的sql语句。
一般在resources目录下创建log4j.properties文件,进行配置。
1.1 Maven
导入依赖:
  <dependencies>

    <!--单元测试框架 Junit-->

    <dependency>

      <groupId>junit</groupId>

      <artifactId>junit</artifactId>

      <version>4.11</version>

      <scope>test</scope>

    </dependency>

    <!--lombok-->

    <dependency>

      <groupId>org.projectlombok</groupId>

      <artifactId>lombok</artifactId>

      <version>RELEASE</version>

      <scope>compile</scope>

    </dependency>

    <!--引入Mybatis-->

    <dependency>

      <groupId>org.mybatis</groupId>

      <artifactId>mybatis</artifactId>

      <version>3.4.6</version>

      <scope>compile</scope>

    </dependency>

    <dependency>

      <groupId>org.junit.jupiter</groupId>

      <artifactId>junit-jupiter</artifactId>

      <version>RELEASE</version>

      <scope>compile</scope>

    </dependency>

    <!-- 日志 -->

    <dependency>

      <groupId>log4j</groupId>

      <artifactId>log4j</artifactId>

      <version>1.2.17</version>

    </dependency>

    <!-- https://mvnrepository.com/artifact/mysql/mysql-connector-java -->

     <!-- 注意与mysql版本的对应 -->

    <dependency>

      <groupId>mysql</groupId>

      <artifactId>mysql-connector-java</artifactId>

      <version>8.0.26</version>

    </dependency>

  </dependencies>
1.2 Bean
@Data

public class Employee {

    private int id;

    private String name;

    private String age;

}
1.3 配置文件
放在resources目录下:
<?xml version="1.0" encoding="UTF-8" ?>

<!DOCTYPE configuration

        PUBLIC "-//mybatis.org//DTD Config 3.0//EN"

        "http://mybatis.org/dtd/mybatis-3-config.dtd">

<!-- configuration: 核心配置文件 -->

<configuration>

    <!-- 导入外部数据库配置文件, 放在最前面 -->

    <properties resource="jdbc.properties"/>

    <!--

    environments配置项目的运行环境, 可以配置多个

    default: 启用的环境

    -->

    <environments default="development">

        <environment id="development">

            <transactionManager type="JDBC"/>

            <dataSource type="POOLED">

                <!-- 数据库连接信息 -->

                <property name="driver" value="${driver}"/>

                <property name="url" value="${url}"/>

                <property name="username" value="${username}"/>

                <property name="password" value="${password}"/>

            </dataSource>

        </environment>

    </environments>

    <!-- 每一个Mapper.xml映射文件,都需要在MyBatis全局配置文件中注册!!! -->

    <mappers>

        <mapper resource="EmployeeMapper.xml"/>

    </mappers>

</configuration>
数据库配置文件properties,同样也存放在resources目录下
driver=com.mysql.cj.jdbc.Driver

url=jdbc:mysql://localhost:3306/mybatisdb

username=root

password=zouwenhao
日志的配置文件properties,resources目录下:
log4j.rootLogger=DEBUG,A1

log4j.appender.A1=org.apache.log4j.ConsoleAppender

log4j.appender.A1.layout=org.apache.log4j.PatternLayout

log4j.appender.A1.layout.ConversionPattern=[%t] [%c]-[%p] %m%n
mapper配置文件,在这里面编写sql:
<!--

    namespace:名称空间,对应接口的全类名

    id:唯一标识

    resultType:返回值类型,使用类的全路径

    #{id}:从传递过来的参数中取出id值,用于作为数据查询条件的值

-->

<mapper namespace="com.atguigu.mybatis.mapper">

    <select id="selectEmp" resultType="com.atguigu.mybatis.bean.Employee">

        select * from info where id = #{id}

    </select>

</mapper>
1.4 通过SqlSession建立与数据库的会话
老版本的编程方法:
    /* MyBatis操作数据库的整体思路:

     * 1、根据xml配置文件(全局配置文件)创建一个SqlSessionFactory对象,有数据源一些运行环境信息 (config)

     * 2、sql映射配置文件;配置了每一个sql,以及sql的封装规则等。 (mapper)

     * 3、将sql映射文件注册在全局配置文件中 (config配置文件中的mapper标签进行注册)

     * 4、写代码:

     * 		1)、根据全局配置文件得到SqlSessionFactory;

     * 		2)、使用sqlSession工厂,获取到sqlSession对象使用他来执行增删改查(一个与数据库操作的代理对象)

     * 			一个sqlSession就是代表和数据库的一次会话,用完关闭,使用close方法

     * 		3)、使用sql的唯一标志来告诉MyBatis执行哪个sql。sql都是保存在sql映射文件中的。

     */

    // 返回SqlSessionFactory对象

    public SqlSessionFactory getSqlSessionFactory() throws IOException {

        // MyBatis全局配置文件路径

        String resource = "mybatis_config.xml";

        // 获取MyBatis全局配置文件的输入流

        InputStream inputStream = Resources.getResourceAsStream(resource);

        // 获取SqlSessionFactory对象

        SqlSessionFactory sqlSessionFactory = new SqlSessionFactoryBuilder().build(inputStream);

        return  sqlSessionFactory;

    }

    // 查询测试,老的方法

    @Test

    public void testHello() throws IOException {

        // 1.获取SqlSessionFactory实例

        SqlSessionFactory sqlSessionFactory = getSqlSessionFactory();

        // 2.获取SqlSession实例,能直接执行已经映射的sql语句

        SqlSession sqlSession = sqlSessionFactory.openSession();

        try {

            // 为了避免mapper映射出现重名的情况,一般使用 命名空间+查询id

            /*

            *   第一个参数:sql的唯一标识,statement Unique identifier matching the statement to use.

            *   第二个参数:执行sql要用的参数,parameter A parameter object to pass to the statement.

            * */

            Employee employee = sqlSession.selectOne("com.atguigu.mybatis.mapper.selectEmp", 1001);

            System.out.println(employee);

        } finally {

            // sqlSession表示与数据库的一次对话,用完之后必须手动关闭

            sqlSession.close();

        }

    }
1.5 接口式编程(推荐)
使用接口与配置文件进行动态绑定,接口中的方法与select标签进行绑定
第一步:创建接口,getEmpById方法返回Employee对象
public interface EmployeeMapper {

    public Employee getEmpById(Integer id);

}
第二步:修改原EmployeeMapper.xml文件
<!--

    namespace:名称空间,对应接口的全类名

    id:唯一标识

    resultType:返回值类型,使用类的全路径

    #{id}:从传递过来的参数中取出id值,用于作为数据查询条件的值

    public Employee getEmpById(Integer id);

-->

<mapper namespace="com.atguigu.mybatis.mapper.EmployeeMapper.java"> <!--绑定接口-->

    <select id="getEmpById" resultType="com.atguigu.mybatis.bean.Employee"><!--绑定id-->

        select * from info where id = #{id}

    </select>

</mapper>
第三步:编写测试类
思路是:拿到接口的实现类对象,然后调用接口的方法,进行数据库的查询操作
    @Test

    public void testHelloByInterface() throws IOException {

        // 1.获取SqlSessionFactory实例

        SqlSessionFactory sqlSessionFactory = getSqlSessionFactory();

        // 2.获取SqlSession实例,与数据库建立会话

        SqlSession sqlSession = sqlSessionFactory.openSession();

        try {

            // 3. 获取接口的实现类对象

            // 会为接口自动的创建一个代理对象,代理对象去执行增删改查方法

            EmployeeMapper mapper = sqlSession.getMapper(EmployeeMapper.class);//获取代理对象

            Employee emp = mapper.getEmpById(1001);

            System.out.println(emp);

        } finally {

            sqlSession.close();

        }

    }
使用接口式编程的好处:
拥有更强的类型检查,以及返回值的限制,能够将DAO层与实现进行分离出来。
1.6 总结
SqlSession和connection一样都不是线程安全的,因此不能共享,每次使用都应该去获取新的对象。
SqlSession代表和数据库的一次会话,用完就必须关闭。
mapper接口没有实现类,但是MyBatis会为这个接口生成一个代理对象:(将接口与xml进行绑定)
EmployeeMapper mapper = sqlSession.getMapper(EmployeeMapper.class);
两个重要的配置文件:
mybatis的全局配置文件:包含数据库连接池的信息、事务管理器信息等
sql映射文件:保存了每一个sql语句的映射信息,包括这个sql语句的标识、返回的信息类型(select标签)
三、MyBatis-全局配置文件
全局配置文件中的dtd约束,对应了语法规则,在编写时,会有相关提示信息
<!DOCTYPE configuration

        PUBLIC "-//mybatis.org//DTD Config 3.0//EN"

        "http://mybatis.org/dtd/mybatis-3-config.dtd">
1. properties_引入外部配置文件
<configuration>

	<!--

		1、mybatis可以使用properties来引入外部properties配置文件的内容;

		resource:引入类路径下的资源

		url:引入网络路径或者磁盘路径下的资源

	  -->

	<properties resource="jdbc.properties"></properties> <!--资源文件夹下,直接使用,否则应该添加全类名+名称-->

    ......

</configuration>
如果属性在不只一个地方进行了配置,那么 MyBatis 将按照下面的顺序来加载:
– 在 properties 元素体内指定的属性首先被读取。
– 然后根据 properties 元素中的 resource 属性读取类路径下属性文件或根据 url 属性指定的路径读取属性文件,并覆盖已读取的同名属性。
– 最后读取作为方法参数传递的属性,并覆盖已读取的同名属性。
2. settings_运行时行为设置
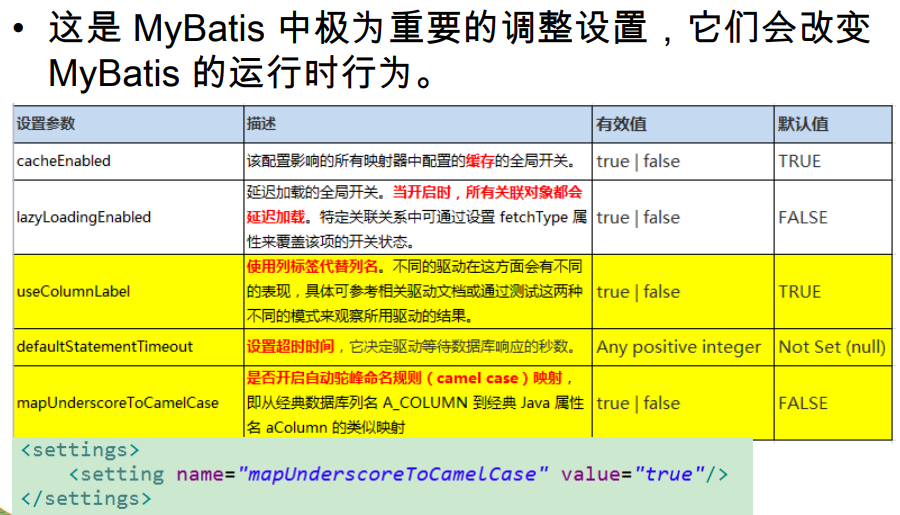
以是否开启驼峰命名规则映射为例:
	<!--

		2、settings包含很多重要的设置项

		setting:用来设置每一个设置项

			name:设置项名

			value:设置项取值

	 -->

	<settings>

		<setting name="mapUnderscoreToCamelCase" value="true"/>

	</settings>
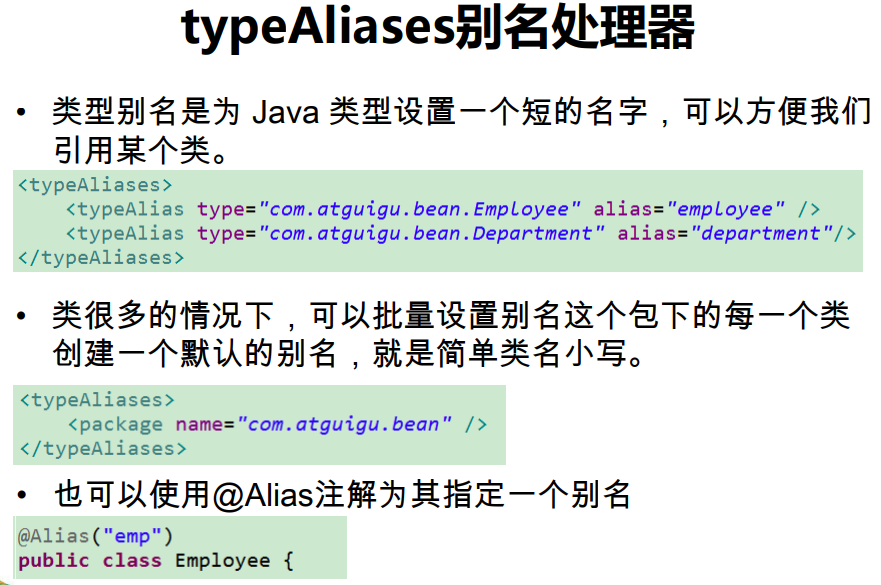
3. typeAliases_别名处理器(不推荐使用)
将全类名与别名建立映射关系,这样在一些使用全类名的条件下,可以使用别名。
	<!-- 3、typeAliases:别名处理器:可以为我们的java类型起别名

			别名不区分大小写(注意)

	-->

	<typeAliases>

		<!-- 1、typeAlias:为某个java类型起别名

				type:指定要起别名的类型全类名; 默认别名就是类名小写: employee

				alias:指定新的别名

		 -->

		<typeAlias type="com.atguigu.mybatis.bean.Employee" alias="emp"/>

		<!-- 2、package:为某个包下的所有类批量起别名

				name:指定包名(为当前包以及下面所有的后代包的每一个类都起一个默认别名(类名小写))

		-->

		<package name="com.atguigu.mybatis.bean"/>

		<!-- 3、批量起别名的情况下,使用@Alias注解为某个类型指定新的别名(在类名前使用注解标签) -->

	</typeAliases>
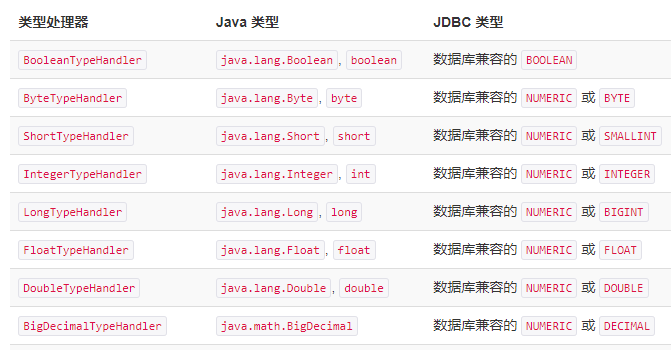
4. typeHandlers_类型处理器(了解)
MyBatis 在设置预处理语句(PreparedStatement)中的参数或从结果集中取出一个值时, 都会用类型处理器将获取到的值以合适的方式转换成 Java 类型。部分如下所示:
5. plugins_插件(本章了解)
MyBatis 允许你在映射SQL语句执行过程中的某一过程进行拦截调用。默认情况下,MyBatis 允许使用插件来拦截的方法调用包括:
Executor (update, query, flushStatements, commit, rollback, getTransaction, close, isClosed)
ParameterHandler (getParameterObject, setParameters)
ResultSetHandler (handleResultSets, handleOutputParameters)
StatementHandler (prepare, parameterize, batch, update, query)
通常使用插件来修改MyBatis的一些核心行为,插件通过动态代理机制。
6. environments_运行环境
MyBatis可以配置多种环境,比如开发、测试和生 产环境需要有不同的配置。
每种环境使用一个environment标签进行配置并指 定唯一标识符。
可以通过environments标签中的default属性指定一个环境的标识符来快速的切换环境。
配置当前运行环境,比如数据库、事务管理器的信息,可以创建多个运行环境,如下所示:有MySQL和Oracle两种数据库环境。
	<!--

		4、environments:环境们,mybatis可以配置多种环境 ,default指定使用某种环境。可以达到快速切换环境。

			environment:配置一个具体的环境信息;必须有两个标签;id代表当前环境的唯一标识

				transactionManager:事务管理器;

					type:事务管理器的类型:JDBC(JdbcTransactionFactory.class)|MANAGED(ManagedTransactionFactory.class)

						自定义事务管理器:实现TransactionFactory接口,type指定为全类名

				dataSource:数据源;

					type:三种数据源类型:UNPOOLED(UnpooledDataSourceFactory)

								|POOLED(PooledDataSourceFactory) 连接池技术

								|JNDI(JndiDataSourceFactory)

					自定义数据源:实现DataSourceFactory接口,type是全类名

		 -->

	<environments default="dev_mysql"> <!--指定当前运行的环境,根据下面environment标签中id值属性指定-->

		<environment id="dev_mysql">

			<transactionManager type="JDBC"></transactionManager>

			<dataSource type="POOLED">

				<property name="driver" value="${jdbc.driver}" />

				<property name="url" value="${jdbc.url}" />

				<property name="username" value="${jdbc.username}" />

				<property name="password" value="${jdbc.password}" />

			</dataSource>

		</environment>

		<environment id="dev_oracle">

			<transactionManager type="JDBC" />

			<dataSource type="POOLED">

				<property name="driver" value="${orcl.driver}" />

				<property name="url" value="${orcl.url}" />

				<property name="username" value="${orcl.username}" />

				<property name="password" value="${orcl.password}" />

			</dataSource>

		</environment>

	</environments>
• type: JDBC | MANAGED | 自定义
– JDBC:使用了 JDBC 的提交和回滚设置,**依赖于从数据源得到的连接来管理事务范围**。
JdbcTransactionFactory
– MANAGED:不提交或回滚一个连接,让容器来管理事务的整个生命周期(比如 JEE 应用服务器的上下 文)。
ManagedTransactionFactory
– 自定义:实现TransactionFactory接口,type=全类名/ 别名
• type: UNPOOLED | POOLED | JNDI | 自定义
– UNPOOLED:不使用连接池, UnpooledDataSourceFactory
– POOLED:使用连接池, PooledDataSourceFactory
– JNDI: 在EJB或应用服务器这类容器中查找指定的数据源
– 自定义:实现DataSourceFactory接口,定义数据源的获取方式。
• 实际开发中我们使用Spring管理数据源,并进行事务控制的配置来覆盖上述配置。
7. databaseProvider_多数据库支持
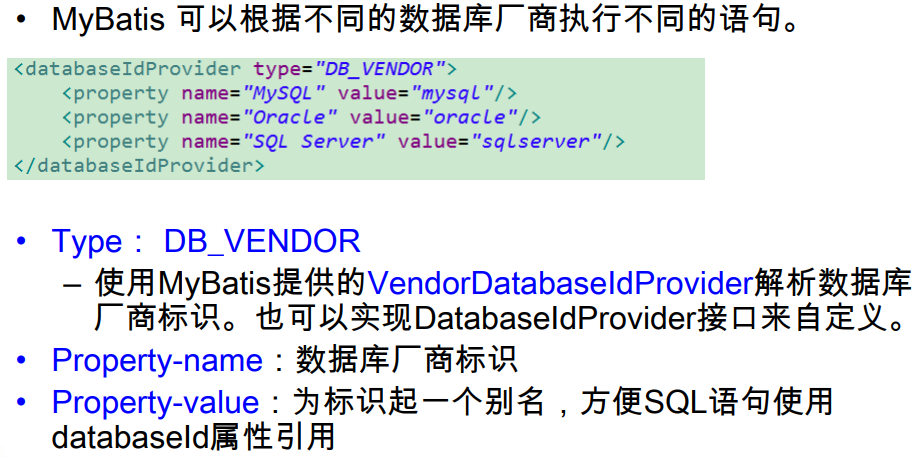
下图databaseId指定了在什么数据库环境下,才会执行这条sql语句。至于当前是在什么环境下,则在environments标签下设置default属性值,用于设置当前数据库运行环境。
例如:当前在MySQL环境下,因此一旦需要执行这条语句,那么就会执行这条语句,如果是Oracle环境下,就不会执行这条语句,而是会执行另一条databaseId为oracle的语句。
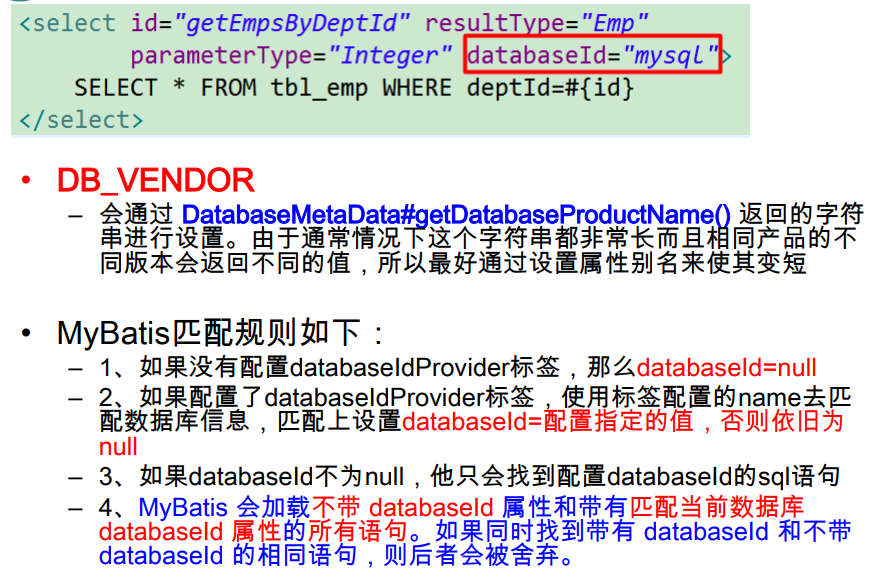
	<!-- 5、databaseIdProvider:支持多数据库厂商的;

		 type="DB_VENDOR":VendorDatabaseIdProvider

		 	作用就是得到数据库厂商的标识(驱动getDatabaseProductName()),mybatis就能根据数据库厂商标识来执行不同的sql;

		 	MySQL,Oracle,SQL Server,xxxx

	  -->

	<databaseIdProvider type="DB_VENDOR">

		<!-- 为不同的数据库厂商起别名 -->

		<property name="MySQL" value="mysql"/>

		<property name="Oracle" value="oracle"/>

		<property name="SQL Server" value="sqlserver"/>

	</databaseIdProvider>
8. mappers_sql映射注册
将sql映射注册到全局配置中来
	<!-- 将我们写好的sql映射文件(EmployeeMapper.xml)一定要注册到全局配置文件(mybatis-config.xml)中 -->

	<!-- 6、mappers:将sql映射注册到全局配置中 -->

	<mappers>

		<!--

			mapper:注册一个sql映射

				注册配置文件

				resource:引用类路径下的sql映射文件

					mybatis/mapper/EmployeeMapper.xml

				url:引用网路路径或者磁盘路径下的sql映射文件

					file:///var/mappers/AuthorMapper.xml

				注册接口

				class:引用(注册)接口,

					1、有sql映射文件,映射文件名必须和接口同名,并且配置文件放在与接口同一目录下;

					2、没有sql映射文件,所有的sql都是利用注解写在接口上;

					推荐:

						比较重要的,复杂的Dao接口我们来写sql映射文件

						不重要,简单的Dao接口为了开发快速可以使用注解;

		-->

		<mapper resource="mybatis/mapper/EmployeeMapper.xml"/>

		<mapper class="com.atguigu.mybatis.dao.EmployeeMapperAnnotation"/>

		<!-- 批量注册: -->

		<package name="com.atguigu.mybatis.dao"/>

	</mappers>
注解方式的举例:将sql语句写在注解上,注意在全局配置文件中使用class属性进行接口注册
public interface EmployeeMapperAnnotation {

  @Select({"select * from tbl_employee where id=#{id}"})

  Employee getEmpById(Integer paramInteger);

}
测试方法的编写:
    @Test

    public void testHelloByAnno() throws IOException {

        // 1.获取SqlSessionFactory实例

        SqlSessionFactory sqlSessionFactory = getSqlSessionFactory();

        // 2.获取SqlSession实例,与数据库建立会话

        SqlSession sqlSession = sqlSessionFactory.openSession();

        try {

            // 3. 获取接口的实现类对象

            EmployeeMapperAnnotation mapper = sqlSession.getMapper(EmployeeMapperAnnotation.class);

            Employee emp = mapper.getEmpById(1001);

            System.out.println(emp);

        } finally {

            sqlSession.close();

        }

    }
四、MyBatis-映射文件(重要)
1. 增删改查
前提,MyBatis配置环境已经像前文一样配置完毕!
1.1 接口方法
public interface EmployeeMapper {

    Employee getEmpById(Integer paramInteger);

    // mybatis允许增删改直接定义以下类型返回值

    //      Integer、Long、Boolean、void

    Long addEmp(Employee employee);

    Long updateEmp(Employee employee);

    Long deleteEmp(Integer id);

}
1.2 Mapper配置文件
在mapper配置文件中,建立与接口方法的映射,同时记得在MyBatis全局配置文件中,进行注册:
    <mappers>

         <mapper resource="EmployeeMapper.xml"/>

    </mappers>
EmployeeMapper.xml:
	<!--如果要返回的是一个集合,那么就要写集合中元素的类型,用resultType进行设置-->

    <select id="getEmpById" resultType="com.atguigu.mybatis.bean.Employee">

        select * from info where id = #{id}

    </select>

    <!--    void addEmp(Employee employee);-->

    <!-- parameterType: 可以省略,设置形参参数类型

            因为id为自增,所以只需要传入其他字段值即可-->

    <insert id="addEmp" parameterType="com.atguigu.mybatis.bean.Employee">

        insert into info(name, age) values (#{name}, #{age})

    </insert>

    <!--    void updateEmp(Employee employee);-->

    <update id="updateEmp" >

        update info

        set name=#{name}, age=#{age}

        where id=#{id}

    </update>

    <!--    void deleteEmp(Integer id);-->

    <delete id="deleteEmp">

        delete from info where id=#{id}

    </delete>
1.3 测试
    @Test

    public void EmpTest() throws IOException {

        // 1. 获取sqlSessionFactory对象

        SqlSessionFactory sqlSessionFactory = getSqlSessionFactory();

        // 2. 获取sqlSession对象,但并不会自动提交

        SqlSession sqlSession = sqlSessionFactory.openSession();

        // 自动提交:sqlSessionFactory.openSession(true);

        try {

            // 3. 获取接口的代理对象

            EmployeeMapper mapper = sqlSession.getMapper(EmployeeMapper.class);

            // 4. 更新数据

//            Long result = mapper.updateEmp(new Employee(1001, "Paul", 23));

            // 4. 添加数据,id是自增的,所以可以传一个null

            Long result = mapper.addEmp(new Employee(null, "Dick", 21));

            // 4. 删除操作,指定id值

//            Long result = mapper.deleteEmp(1005);

            System.out.println(result > 0 ? "操作成功!" : "操作失败!");

            // 5. 手动提交事务

            sqlSession.commit();

        } finally {

            // 5. 关闭会话

            sqlSession.close();

        }

    }
注意:
openSession()获取到的SqlSession实例是不会自动提交的,需要在sql语句执行完,手动commit提交,如果想自动提交,则使用openSession(true)方法获取实例。
关于MySQL数据库使用自增id,当我们需要使用自增id时,类对象只需要将自增id传入一个null值即可,但一定要保证数据库中该键是开启了自动增长。如果报以下错误:
java.sql.SQLException: Field 'id' doesn't have a default value
说明没有开启自动增长,开启后,需要重启以下数据库!
2. Insert
- MySQL数据库获取自增主键的值:
	<!-- public void addEmp(Employee employee); -->

	<!-- parameterType:参数类型,可以省略,

		获取自增主键的值:

			mysql支持自增主键,自增主键值的获取,mybatis也是利用statement.getGenreatedKeys();

			useGeneratedKeys="true";使用自增主键获取主键值策略

			keyProperty;指定对应的主键属性,也就是mybatis获取到主键值以后,将这个值封装给javaBean的哪个属性

	-->

	<insert id="addEmp" parameterType="com.atguigu.mybatis.bean.Employee"

		useGeneratedKeys="true" keyProperty="id" databaseId="mysql">

		insert into tbl_employee(last_name,email,gender)

		values(#{lastName},#{email},#{gender})

	</insert>
Oracle数据库不支持自增:
使用序列来模拟自增,就需要手动执行sql语句,才查询下一个应该自增的值。
有两种解决思路:
先执行查询sql,获取到自增主键值后,再进行insert插入语句。
用BEFORE修饰selectKey标签,并通过 .nextva 获取自增后的主键值,再进行插入操作
先执行insert插入语句,使用 .nextval 表示新记录自增主键值,然后执行AFTER修饰的selectKey标签,使用 .currval 获取当前新纪录自增后的主键值。
	<!--

	获取非自增主键的值:

		Oracle不支持自增;Oracle使用序列来模拟自增;

			每次插入的数据的主键是从序列中拿到的值(类似于执行一条语句,使得主键自增,得到序列的值);

			如何获取到这个值;

	 -->

	<insert id="addEmp" databaseId="oracle">

		<!--

		keyProperty:查出的主键值封装给javaBean的哪个属性

		order="BEFORE":当前sql在插入sql之前运行

			   AFTER:当前sql在插入sql之后运行

		resultType:查出的数据的返回值类型

		BEFORE运行顺序:

			1.先运行selectKey查询id的sql;查出id值封装给javaBean的id属性 nextval

			2.再运行插入的sql;就可以取出id属性对应的值

		AFTER运行顺序:

			1.先运行插入的sql(从序列中取出新值作为id);

			2.再运行selectKey查询id的sql;currval

		 -->

		<selectKey keyProperty="id" order="BEFORE" resultType="Integer">

			<!-- 编写查询主键的sql语句,必须得先执行,得到主键值 -->

			<!-- BEFORE-->

			select EMPLOYEES_SEQ.nextval from dual

			<!-- AFTER:

			 select EMPLOYEES_SEQ.currval from dual -->

		</selectKey>

		<!-- 插入时的主键是从序列中拿到的,查出的id结果,会用integer进行封装 -->

		<!-- BEFORE:-->

		insert into employees(EMPLOYEE_ID,LAST_NAME,EMAIL)

		values(#{id},#{lastName},#{email<!-- ,jdbcType=NULL -->})

		<!-- AFTER:id值先使用employees_seq.nextval,当插入sql结束之后,再获取id值(查询当前id,而不是nextval)

		insert into employees(EMPLOYEE_ID,LAST_NAME,EMAIL)

		values(employees_seq.nextval,#{lastName},#{email}) -->

	</insert>
3. 参数处理
3.1 单个参数/多个参数/命名参数
在mapper配置文件中,在将接口方法与CRUD标签进行映射的时候,需要使用接口方法中的参数作为sql语句查询的条件。MyBatis对于单个参数和多个参数有着不一样的处理:
单个参数:
MyBatis不会做特殊处理,
#{参数名/任意名}:取出参数值。
多个参数:
Mybatis会做特殊处理。
多个参数会被封装成 一个map,规则如下:
key:param1...paramN,或者参数的索引也可以
value:传入的参数值
#{}就是从map中获取指定的key的值;
异常:

org.apache.ibatis.binding.BindingException:

Parameter 'id' not found.

Available parameters are [1, 0, param1, param2]

错误操作:

	方法:public Employee getEmpByIdAndLastName(Integer id,String lastName);

	取值:#{id}, #{lastName} (正确取值操作:#{param1}, #{param2})
命名参数:
明确指定封装参数时map的key;在接口方法中使用@Param注解;@Param("id")
多个参数会被封装成 一个map,
key:使用@Param注解指定的值
value:参数值
#{指定的key}取出对应的参数值,如 #{id}, #{lastName}
Long deleteEmp(@Param("id") Integer id, @Param("name") String name)
3.2 POJO/Map/TO
POJO:
如果多个参数正好是我们业务逻辑的数据模型,我们就可以直接传入pojo;
#{属性名}:取出传入的pojo的属性值
就像上文中测试,因为数据参数传入的是一个实例对象,就可以直接使用属性值来获取值。
Map:
如果多个参数不是业务模型中的数据,没有对应的pojo,不经常使用,为了方便,我们也可以传入map
#{key}:取出map中对应的值
示例:


TO:
如果多个参数不是业务模型中的数据,但是经常要使用,推荐来编写一个TO(Transfer Object)数据传输对象:
Page{
int index;
int size;
}
3.3 MyBatis的参数封装(源码理解)
MyBatis如何处理参数的:
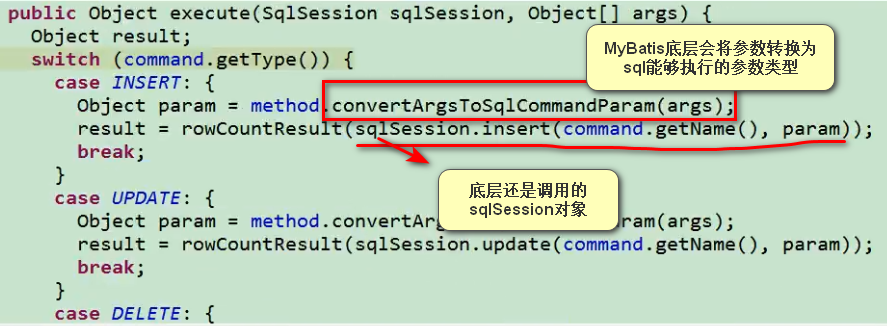
底层调用的sqlSession对象的一些增删改查的API
总结:参数多的时候,MyBatis会封装map,但为了不混乱,我们可以使用@Param来指定封
装时使用的key;
#{key}就可以取出map中的值;
(@Param("id")Integer id,@Param("lastName")String lastName);
ParamNameResolver解析参数封装map的:
该类有参构造器:
/**  names参数的确定流程:

        1.获取每一个被@Param注解修饰的参数的值,如:id,lastName的值,并赋值给name;

		2.每次解析一个参数给map中保存信息:(key:参数索引,value:name的值)

    		name的值要分两种情况:

    			第一种:标注了param注解,那么name的值就是注解指定的值。

    			第二种:没有标注(下面代码)

            		1.全局配置:useActualParamName(jdk1.8):name=参数名

					2.name=map.size();相当于当前元素的索引,所以最终保存形式如下:

    					{0=id, 1=lastName,2=2}

*/

    public ParamNameResolver(Configuration config, Method method) {

        ................

                if (name == null) {

                    if (config.isUseActualParamName()) { // 全局配置过没有?

                        name = this.getActualParamName(method, paramIndex);

                    }

                    if (name == null) {

                        name = String.valueOf(map.size());

                    }

                }

                map.put(paramIndex, name);

            }

        }

        this.names = Collections.unmodifiableSortedMap(map);

    }
getNamedParams()方法:对args参数,用map类型进行封装
在遍历names集合的时候,进行了两次封装:
第一次封装:使得用户可以使用指定的key去获取参数,往往是用@Param进行修饰的,满足用户自定义param的需求。
第二次封装:是使用MyBatis提供的一种默认的方式,通过#{param1...paramN}这种方式进行参数值的获取。
// args传的参数:args[1,"Tom",'hello']

public Object getNamedParams(Object[] args) {

    final int paramCount = names.size();

    //1、参数为null直接返回

    if (args == null || paramCount == 0) {

      return null;

    //2、如果只有一个元素,并且没有Param注解;args[0]:单个参数直接返回

    } else if (!hasParamAnnotation && paramCount == 1) {

      return args[names.firstKey()];

    //3、多个元素或者有Param标注

    } else {

      final Map<String, Object> param = new ParamMap<Object>();

      int i = 0;

      //4、遍历names集合;{0=id, 1=lastName, 2=2}

      for (Map.Entry<Integer, String> entry : names.entrySet()) {

        // 封装一次:@Param指定key

      	// key:names集合的value

        // value:names集合的key又作为取值的参考args[0]:args【1,"Tom"】:

      	// 封装效果:Map集合param = {id=args[0]:1, lastName=args[1]:Tom, 2=args[2]:2}

        param.put(entry.getValue(), args[entry.getKey()]);//相当于将args参数集合用map进行封装了

        // 封装一次:默认方式,Param1...ParamN

        // add generic param names (param1, param2, ...)param

        // 额外的将每一个参数也保存到map中,使用新的key:param1...paramN

        final String genericParamName = GENERIC_NAME_PREFIX + String.valueOf(i + 1);

        // ensure not to overwrite parameter named with @Param

        if (!names.containsValue(genericParamName)) {

          param.put(genericParamName, args[entry.getKey()]);

        }

        i++;

      }

      // 效果:有Param注解可以#{指定的key},或者#{param1}

      return param;

    }

  }

}
3.4 参数值的获取——#与$取值的区别
#{}:可以获取map中的值或者pojo对象属性的值;
${}:可以获取map中的值或者pojo对象属性的值;
主要区别:$是先拼接后编译,#是先编译后拼接,所以#没有SQL注入的风险。
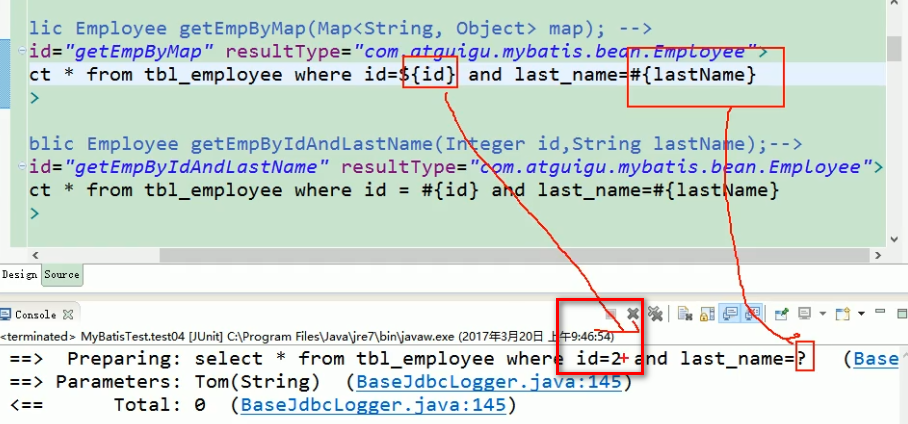
select * from tbl_employee where id=${id} and last_name=#{lastName}

Preparing: select * from tbl_employee where id=2 and last_name=?
对比:
#{}:是以预编译的形式,将参数设置到sql语句中;PreparedStatement;防止sql注入
${}:取出的值直接拼装在sql语句中;会有安全问题;
大多情况下,我们去取参数的值都应该去使用 #{} ;
原生jdbc不支持占位符的地方,我们就可以使用 ${} 进行取值
比如分表、排序。。。。;按照年份分表拆分
select * from ${year}_salary where xxx;

select * from tbl_employee order by ${f_name} ${order}
# 取值时指定参数相关规则
{}:更丰富的用法:
规定参数的一些规则:
javaType、 jdbcType、 mode(存储过程)、 numericScale、
resultMap、 typeHandler、 jdbcTypeName、 expression(未来准备支持的功能);
jdbcType通常需要在某种特定的条件下被设置:
在我们数据为null的时候,有些数据库可能不能识别mybatis对null的默认处理。比如Oracle(报错);
JdbcType OTHER:无效的类型;因为mybatis对所有的null都映射的是原生Jdbc的OTHER类型,oracle不能
正确处理;
由于全局配置中:jdbcTypeForNull=OTHER;Oracle并不支持,解决的两种办法:
1、#{email, jdbcType=NULL}; 在sql语句中进行设置
2、jdbcTypeForNull=NULL:直接在全局配置文件中,通过setting标签配置
<setting name="jdbcTypeForNull" value="NULL"/>
4. Select
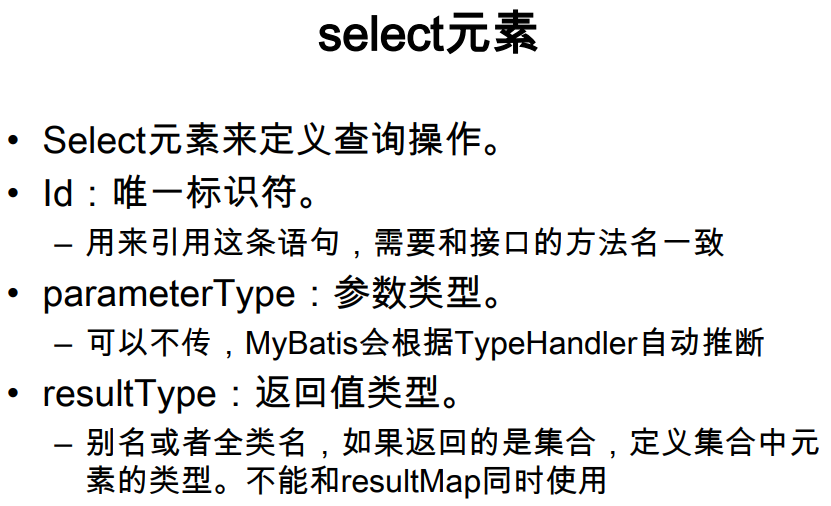
4.1 返回记录封装在List
接口方法
public interface EmployeeMapper {

    Employee getEmpById(Integer paramInteger);

    Long addEmp(Employee employee);

    Long updateEmp(Employee employee);

    // List

    List<Employee> getEmpByAge(String paramName);

}
Mapper配置文件中的sql
使用模糊查询
    <!--List<Employee> getEmpByAge(Integer paramInteger);-->

    <!--如果返回的是集合的话,只需要定义集合中的泛型类型即可-->

    <select id="getEmpByAge" resultType="com.atguigu.mybatis.bean.Employee">

        select * from info where name like #{paramName}

    </select>
测试方法
在测试方法中,传入模糊查询的条件:查姓名是J开头的记录
    @Test

    public void ListTest() throws IOException {

        SqlSessionFactory sqlSessionFactory = getSqlSessionFactory();

        SqlSession sqlSession = sqlSessionFactory.openSession(true);

        try {

            EmployeeMapper mapper = sqlSession.getMapper(EmployeeMapper.class);

            List<Employee> employeeList = mapper.getEmpByAge("J%");

            System.out.println(employeeList);

        } finally {

            sqlSession.close();

        }

    }
结果
[main] [com.atguigu.mybatis.dao.EmployeeMapper.getEmpByAge]-[DEBUG] ==>  Preparing: select * from info where name like ?

[main] [com.atguigu.mybatis.dao.EmployeeMapper.getEmpByAge]-[DEBUG] ==> Parameters: J%(String)

[main] [com.atguigu.mybatis.dao.EmployeeMapper.getEmpByAge]-[DEBUG] <==      Total: 2

[Employee(id=1005, name=Jack, age=23), Employee(id=1006, name=James, age=26)]
4.2 返回记录封装在Map
接口方法
    // 封装到map对象中,单个对象

    Map<String, Object> getEmpByMap(Integer paramId);

    // 多条记录封装到map对象中,Map

    @MapKey("id") // 这个注解设置了mybatis在封装为map的过程中,将查询结果的id属性作为map的key

    Map<Integer, Employee> getEmpByNameReturnMap(String name);
Mapper配置xml文件
    <!--Map<String, Object> getEmpByMap(Integer paramId);-->

    <!--注意使用map作为返回值类型,因为只是封装了单个记录-->

    <select id="getEmpByMap" resultType="map">

        select * from info where id = #{paramId}

    </select>

    <!--Map<Integer, Employee> getEmpByNameReturnMap(String name);-->

    <!--由于返回多条记录,所以resultType设置返回记录的类型即可-->

    <select id="getEmpByNameReturnMap" resultType="com.atguigu.mybatis.bean.Employee">

        select * from info where name like #{name}

    </select>
测试方法
    @Test

    public void MapTest() throws IOException {

        SqlSessionFactory sqlSessionFactory = getSqlSessionFactory();

        SqlSession sqlSession = sqlSessionFactory.openSession(true);

        try {

            EmployeeMapper mapper = sqlSession.getMapper(EmployeeMapper.class);

            // Map<String, Object> employeeMap = mapper.getEmpByMap(1003); // 单条记录

            Map<Integer, Employee> employeeMap = mapper.getEmpByNameReturnMap("J%"); // 返回名字为J开头的记录

            System.out.println(employeeMap); // 打印map,调用的是实现子类的toString()方法

        } finally {

            sqlSession.close();

        }

    }
结果
// 单条记录封装在Map中

[main] [com.atguigu.mybatis.dao.EmployeeMapper.getEmpByMap]-[DEBUG] ==>  Preparing: select * from info where id = ?

[main] [com.atguigu.mybatis.dao.EmployeeMapper.getEmpByMap]-[DEBUG] ==> Parameters: 1003(Integer)

[main] [com.atguigu.mybatis.dao.EmployeeMapper.getEmpByMap]-[DEBUG] <==      Total: 1

{name=Mary, id=1003, age=21}
// 多条记录封装在Map中,在接口方法中,设置了map中id值作为key键

[main] [com.atguigu.mybatis.dao.EmployeeMapper.getEmpByNameReturnMap]-[DEBUG] ==>  Preparing: select * from info where name like ?

[main] [com.atguigu.mybatis.dao.EmployeeMapper.getEmpByNameReturnMap]-[DEBUG] ==> Parameters: J%(String)

[main] [com.atguigu.mybatis.dao.EmployeeMapper.getEmpByNameReturnMap]-[DEBUG] <==      Total: 2

{1005=Employee(id=1005, name=Jack, age=23), 1006=Employee(id=1006, name=James, age=26)}
4.3 自定义结果集映射规则(重要)

resultType:是跟自动封装有关的,在mapper配置文件中指定封装为什么类型,MyBatis就将查询结果封装为对应类型的数据格式。
但存在这样的情况,就是查询出来的结果集中,列名跟JavaBean的属性字段名不一样,这个时候是封装不成功的(打印出来,属性值为null),对此上文提到过有两种解决方案:
第一种:使用@Param注解,起别名
第二种:开启驼峰命名法,如果符合要求的话
第三种:使用自定义结果集映射
自定义resultMap,实现高级结果集的映射。
    <!--自定义某个javaBean的封装规则

            type:需要自定义规则的JavaBean

            id:唯一id,方便引用sql语句标签引用这个规则

    -->

    <resultMap type="com.atguigu.mybatis.bean.Employee" id="MySimpleEmp">

        <!--指定主键列的封装规则

                id标签定义的主键,MyBatis底层会有优化;

                column:指定哪一列

                property:指定对应的JavaBean属性

          -->

        <id column="id" property="id"/> <!--建立新规则下,主键与对象中主键属性的映射关系-->

        <!-- 定义普通列封装规则,非主键属性使用result标签进行映射 -->

        <result column="last_name" property="lastName"/>

        <!-- 其他不指定的列会自动封装:我们只要写resultMap就把全部的映射规则都写上。 -->

        <result column="email" property="email"/>

        <result column="gender" property="gender"/>

    </resultMap>

    <!-- resultMap:自定义结果集映射规则;它的值,使用resultMap自定义标签中的id,进行引用-->

    <!-- public Employee getEmpById(Integer id); -->

    <select id="getEmpById"  resultMap="MySimpleEmp">

        select * from tbl_employee where id=#{id}

    </select>
4.4 关联查询
级联属性封装结果
Mapper配置文件:
	<!--

	场景一:

		查询Employee的同时查询员工对应的部门

		Employee===Department

		一个员工有与之对应的部门信息;

		id  last_name  gender    d_id     did  dept_name (private Department dept;)

	 -->

	<!--

		联合查询:级联属性封装结果集

	  -->

	<resultMap type="com.atguigu.mybatis.bean.Employee" id="MyDifEmp">

		<id column="id" property="id"/>

		<result column="last_name" property="lastName"/>

		<result column="gender" property="gender"/>

		<result column="did" property="dept.id"/> <!--使用级联属性-->

		<result column="dept_name" property="dept.departmentName"/> <!--使用级联属性-->

	</resultMap>

	<!--  public Employee getEmpAndDept(Integer id);-->

	<select id="getEmpAndDept" resultMap="MyDifEmp">

		SELECT e.id id,e.last_name last_name,e.gender gender,e.d_id d_id,

		d.id did,d.dept_name dept_name FROM tbl_employee e,tbl_dept d

		WHERE e.d_id=d.id AND e.id=#{id}

	</select>
association定义关联对象封装规则
association可以指定联合的JavaBean对象:在resultType标签中
<!--association可以指定联合的javaBean对象

		property="dept":指定哪个属性是联合的对象

		javaType:指定这个属性对象的类型[不能省略]

-->

<association property="dept" javaType="com.atguigu.mybatis.bean.Department">

	<id column="did" property="id"/>

	<result column="dept_name" property="departmentName"/>

</association>
相当于使用嵌套的方式:在mapper配置文件中完整的代入如下所示:
	<!--

		使用association定义关联的单个对象的封装规则;

	 -->

	<resultMap type="com.atguigu.mybatis.bean.Employee" id="MyDifEmp2">

		<id column="id" property="id"/>

		<result column="last_name" property="lastName"/>

		<result column="gender" property="gender"/>

		<!--  association可以指定联合的javaBean对象

				property="dept":指定哪个属性是联合的对象

				javaType:指定这个属性对象的类型[不能省略]

		-->

		<association property="dept" javaType="com.atguigu.mybatis.bean.Department">

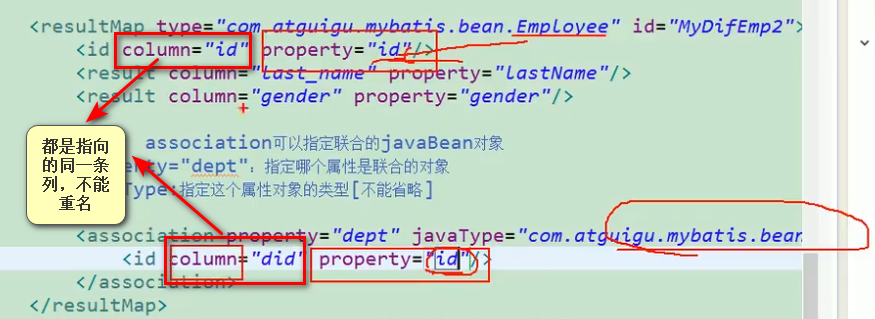
			<id column="did" property="id"/><!--column指定列名,也就是别名,property属性字段值,两者进行绑定-->

			<result column="dept_name" property="departmentName"/>

		</association>

	</resultMap>

	<!--  public Employee getEmpAndDept(Integer id);-->

	<select id="getEmpAndDept" resultMap="MyDifEmp">

		SELECT e.id id,e.last_name last_name,e.gender gender,e.d_id d_id,

		d.id did,d.dept_name dept_name FROM tbl_employee e,tbl_dept d

		WHERE e.d_id=d.id AND e.id=#{id}

	</select>
association分步查询
注意分步查询与级联封装中,association的用法区别。主要是根据sql语句来的。
JavaBean对象:
@Data

public class Department {

    private Integer id;

    private String departmentName;

    private List<Employee> emps;

    public Department(Integer id, String departmentName, List<Employee> emps) {

        this.id = id;

        this.departmentName = departmentName;

        this.emps = emps;

    }

}
@Data

public class Employee {

    private Integer id;

    private String name;

    private Integer age;

    private Department dept;

    public Employee(Integer id, String name, Integer age) {

        this.id = id;

        this.name = name;

        this.age = age;

    }

}
Department:
接口方法:
public interface DepartmentMapper {

    Department getDeptById(Integer id);

}
mapper配置文件:将查询department信息的sql语句与接口方法进行绑定,准备后面的分步查询
<?xml version="1.0" encoding="UTF-8" ?>

<!DOCTYPE mapper

        PUBLIC "-//com.atguigu.mybatis.org//DTD Mapper 3.0//EN"

        "http://mybatis.org/dtd/mybatis-3-mapper.dtd">

<mapper namespace="com.atguigu.mybatis.dao.DepartmentMapper">

    <!--public Department getDeptById(Integer id);  -->

    <select id="getDeptById" resultType="com.atguigu.mybatis.bean.Department">

        select id,dept_name departmentName from tbl_dept where id=#{id}

    </select>

</mapper>
在EmployeeMapper的配置文件中:
<!-- 使用association进行分步查询步骤:

		1、先按照员工id查询员工信息

		2、根据查询员工信息中的d_id值去部门表查出部门信息(调用另一条sql语句)

		3、部门设置到员工中;

	 -->

	 <!--  id  last_name  email   gender    d_id   -->

	 <resultMap type="com.atguigu.mybatis.bean.Employee" id="MyEmpByStep">

	 	<id column="id" property="id"/><!--设置主键-->

	 	<result column="last_name" property="lastName"/>

	 	<result column="email" property="email"/>

	 	<result column="gender" property="gender"/>

	 	<!-- association定义关联对象的封装规则

	 		select:表明当前属性是调用select指定的方法查出的结果(调用哪条sql,接口方法已经绑定了对应的sql语句)

	 		column:指定将哪一列的值传给这个方法

	 		流程:使用select指定的方法(传入column指定的这列参数的值)查出对象,并封装给property指定的属性

	 	 -->

 		<association property="dept"

	 		select="com.atguigu.mybatis.dao.DepartmentMapper.getDeptById"

	 		column="d_id">

 		</association>

	 </resultMap>

	 <!--  public Employee getEmpByIdStep(Integer id);-->

	 <select id="getEmpByIdStep" resultMap="MyEmpByStep">

	 	select * from tbl_employee where id=#{id}

	 	<if test="_parameter!=null">

	 		and 1=1

	 	</if>

	 </select>
结果:
查1号员工信息,在执行第一条查询sql语句的时候,也去执行了查部门信息的sql语句,然后获取到该员工的部门信息,最后打印输出。


延迟加载
当前的问题:
因为在Employee这个Bean对象中,有一个Department类属性Dept,而我们每次查询Employee对象的时候,都会将其Dept属性一起查询出来,如果我们并不立即使用这个属性的信息的话,这样会导致性能的下降。所以想在使用部门信息的时候,再去查询。用延迟加载解决:
延迟加载,就是按需加载,当需要使用某个关联属性的时候,如输出打印操作,才会进行执行。
在分段查询的基础上,全局配置中设置两个参数:

对aggressiveLazyLoading:开启时候,所有属性都会加载,关闭时,才会按需加载。
	<settings>

		<!--显示的指定每个我们需要更改的配置的值,即使他是默认的。防止版本更新带来的问题  -->

		<setting name="lazyLoadingEnabled" value="true"/>

		<setting name="aggressiveLazyLoading" value="false"/>

	</settings>
注意如果报异常:
Error creating lazy proxy. Cause: java.lang.NullPointerException
需要把mybatis的包换成Mybatis-3.5.1.jar及其以上的版本
collection定义关联集合封装规则
association:定义关联对象封装规则。
collection:定义关联集合封装规则。
上文都是只关联一个对象,现在是这个类的某个属性,关联多个对象的情况:
场景二:
查询部门的时候将部门对应的所有员工信息也查询出来
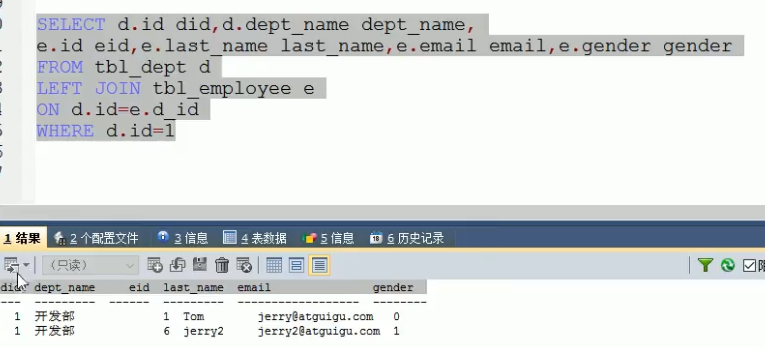
使用传统SQL语句:查询开发部的员工信息
mapper配置文件:
	<!--

	public class Department {

			private Integer id;

			private String departmentName;

			private List<Employee> emps;

			......

	}

	  did  dept_name  || emps (eid  last_name  email   gender)

			部门表			员工信息表(Emp对象,需要封装Emp对象集合)

	 -->

	<!--嵌套结果集的方式,使用collection标签定义关联的集合类型的属性封装规则  -->

	<resultMap type="com.atguigu.mybatis.bean.Department" id="MyDept">

		<id column="did" property="id"/>

		<result column="dept_name" property="departmentName"/>

		<!--

			collection定义关联集合类型的属性的封装规则(association只能定义一个关联对象)

			ofType:指定集合里面元素的类型

		-->

		<collection property="emps" ofType="com.atguigu.mybatis.bean.Employee">

			<!-- 定义这个集合中元素的封装规则 -->

			<id column="eid" property="id"/>

			<result column="last_name" property="lastName"/>

			<result column="email" property="email"/>

			<result column="gender" property="gender"/>

		</collection>

	</resultMap>

	<!-- public Department getDeptByIdPlus(Integer id); -->

	<select id="getDeptByIdPlus" resultMap="MyDept">

		SELECT d.id did,d.dept_name dept_name,

				e.id eid,e.last_name last_name,e.email email,e.gender gender

		FROM tbl_dept d

		LEFT JOIN tbl_employee e

		ON d.id=e.d_id

		WHERE d.id=#{id}

	</select>
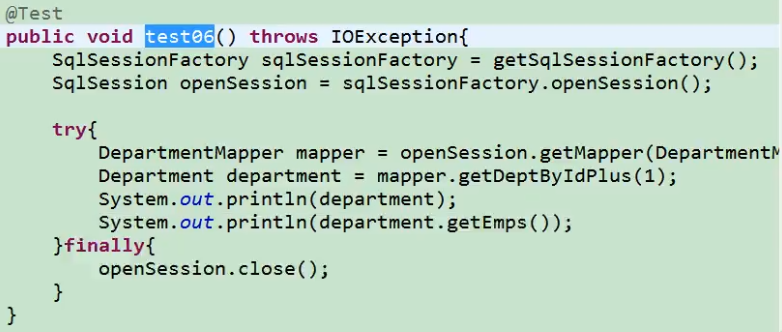
测试:
collection分步查询
场景二:
查询部门的时候将部门对应的所有员工信息也查询出来,用分步查询的方法
MySQL数据库
info表:员工信息表
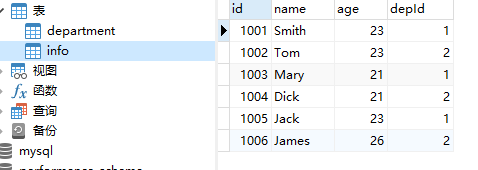
department表:部门信息表

大致思路
- 先执行查询特定部门的sql语句
- 然后嵌套查询在这个部门里面的员工信息
Bean代码
@Data

public class Department {

    private Integer id;

    private String departmentName;

    private List<Employee> emps;

    public Department() {

    }

    public Department(Integer id, String departmentName, List<Employee> emps) {

        this.id = id;

        this.departmentName = departmentName;

        this.emps = emps;

    }

}
@Data

public class Employee {

    private Integer id;

    private String name;

    private Integer age;

    private Department dept;

    public Employee() {

    }

    public Employee(Integer id, String name, Integer age) {

        this.id = id;

        this.name = name;

        this.age = age;

    }

    @Override

    public String toString() {

        return "Employee{" +

                "id=" + id +

                ", name='" + name + '\'' +

                ", age=" + age +

                '}';

    }

}
Dao与其映射配置文件
DepartmentMapper接口方法:
public interface DepartmentMapper {

    Department getDeptById(Integer id);

    Department getDeptByIdStep(Integer id);

}
建立DepartmentMapper接口与其mapper配置文件的映射:
<?xml version="1.0" encoding="UTF-8" ?>

<!DOCTYPE mapper

        PUBLIC "-//com.atguigu.mybatis.org//DTD Mapper 3.0//EN"

        "http://mybatis.org/dtd/mybatis-3-mapper.dtd">

<mapper namespace="com.atguigu.mybatis.dao.DepartmentMapper">

    <!-- collection:分段查询 -->

    <resultMap type="com.atguigu.mybatis.bean.Department" id="MyDeptStep">

        <id column="id" property="id"/>

        <result column="departmentName" property="departmentName"/>

        <collection property="emps"

                    select="com.atguigu.mybatis.dao.EmployeeMapperPlus.getEmpsByDeptId"

                    column="{depId=id}"> <!--key=depId, value=id-->

        </collection>

    </resultMap>

    <!-- public Department getDeptByIdStep(Integer id); -->

    <select id="getDeptByIdStep" resultMap="MyDeptStep">

        select id, departmentName from department where id=#{id}

    </select>

    <!-- 扩展:多列的值传递过去:

         将多列的值封装map传递;

        	column="{key1=column1,key2=column2}"

   		 fetchType="lazy":表示使用延迟加载;

            - lazy:延迟

            - eager:立即

    -->

</mapper>
嵌套:EmployeeMapperPlus接口方法:用于查询某部门的员工信息
public interface EmployeeMapperPlus {

    List<Employee> getEmpsByDeptId(Integer paramInteger);

}
建立EmployeeMapperPlus接口与其mapper配置文件的映射:
<?xml version="1.0" encoding="UTF-8" ?>

<!DOCTYPE mapper

        PUBLIC "-//com.atguigu.mybatis.org//DTD Mapper 3.0//EN"

        "http://mybatis.org/dtd/mybatis-3-mapper.dtd">

<mapper namespace="com.atguigu.mybatis.dao.EmployeeMapperPlus">

    <!--

    场景二:

        查询部门的时候将部门对应的所有员工信息也查询出来

     -->

    <!-- public List<Employee> getEmpsByDeptId(Integer deptId); -->

    <select id="getEmpsByDeptId" resultType="com.atguigu.mybatis.bean.Employee">

        select * from info where depId = #{depId}

    </select>

</mapper>
测试
    @Test

    public void CollectionTest() throws IOException {

        SqlSessionFactory sqlSessionFactory = getSqlSessionFactory();

        SqlSession sqlSession = sqlSessionFactory.openSession(true);

        try {

            DepartmentMapper mapper = sqlSession.getMapper(DepartmentMapper.class);

            Department deptByIdStep = mapper.getDeptByIdStep(1); // 查询部门ID为1的部门信息

            System.out.println(deptByIdStep); // 打印部门信息

        } finally {

            sqlSession.close();

        }

    }
结果
[main] [com.atguigu.mybatis.dao.DepartmentMapper.getDeptByIdStep]-[DEBUG] ==>  Preparing: select id, departmentName from department where id=?

[main] [com.atguigu.mybatis.dao.DepartmentMapper.getDeptByIdStep]-[DEBUG] ==> Parameters: 1(Integer)

[main] [com.atguigu.mybatis.dao.DepartmentMapper.getDeptByIdStep]-[DEBUG] <==      Total: 1

[main] [com.atguigu.mybatis.dao.EmployeeMapperPlus.getEmpsByDeptId]-[DEBUG] ==>  Preparing: select * from info where depId = ?

[main] [com.atguigu.mybatis.dao.EmployeeMapperPlus.getEmpsByDeptId]-[DEBUG] ==> Parameters: 1(Integer)

[main] [com.atguigu.mybatis.dao.EmployeeMapperPlus.getEmpsByDeptId]-[DEBUG] <==      Total: 3

Department(id=1, departmentName=业务部, emps=[Employee{id=1001, name='Smith', age=23}, Employee{id=1003, name='Mary', age=21}, Employee{id=1005, name='Jack', age=23}])
discriminator鉴别器(了解)
判断某列的值,然后进行重新封装,改变原来的封装行为。
	<!-- =======================鉴别器============================ -->

	<!-- <discriminator javaType=""></discriminator>

		鉴别器:mybatis可以使用discriminator判断某列的值,然后根据某列的值改变封装行为

		封装Employee:

			如果查出的是女生:就把部门信息查询出来,否则不查询;

			如果是男生,把last_name这一列的值赋值给email;

	 -->

	 <resultMap type="com.atguigu.mybatis.bean.Employee" id="MyEmpDis">

	 	<id column="id" property="id"/>

	 	<result column="last_name" property="lastName"/>

	 	<result column="email" property="email"/>

	 	<result column="gender" property="gender"/>

	 	<!--

	 		column:指定判定的列名

	 		javaType:列值对应的java类型  -->

	 	<discriminator javaType="string" column="gender">

	 		<!--如果是女生,进入一种封装。resultType:指定封装的结果类型;不能缺少。/resultMap-->

            <!--这里使用的是分步查询,注意association的用法-->

	 		<case value="0" resultType="com.atguigu.mybatis.bean.Employee">

	 			<association property="dept" select="com.atguigu.mybatis.dao.DepartmentMapper.getDeptById"

			 		column="d_id"><!--绑定关联对象dept,并将id传到getDeptById接口方法映射的sql语句中-->

		 		</association>

	 		</case>

	 		<!--如果是男生,把last_name这一列的值赋值给email; 重新封装 -->

	 		<case value="1" resultType="com.atguigu.mybatis.bean.Employee">

		 		<id column="id" property="id"/>

			 	<result column="last_name" property="lastName"/>

			 	<result column="last_name" property="email"/>

			 	<result column="gender" property="gender"/>

	 		</case>

	 	</discriminator>

	 </resultMap>
五、MyBatis-动态SQL
动态 SQL 是 MyBatis 的强大特性之一。如果你使用过 JDBC 或其它类似的框架,你应该能理解根据不同条件拼接 SQL 语句有多痛苦,例如拼接时要确保不能忘记添加必要的空格,还要注意去掉列表最后一个列名的逗号。利用动态 SQL,可以彻底摆脱这种痛苦。
是基于OGNL表达式的
<!--

    • if:判断

    • choose (when, otherwise):分支选择;带了break的swtich-case

        如果带了id就用id查,如果带了lastName就用lastName查;只会进入其中一个

    • trim 字符串截取(where(封装查询条件), set(封装修改条件))

    • foreach 遍历集合

-->
1. if
<!-- 查询员工,要求,携带了哪个字段查询条件就带上这个字段的值,也就是拼接sql语句 -->
<!-- public List<Employee> getEmpsByConditionIf(Employee employee); -->
<select id="getEmpsByConditionIf" resultType="com.atguigu.mybatis.bean.Employee">
select * from tbl_employee where
<!-- test:判断表达式(OGNL)
OGNL参照PPT或者官方文档。
c:if test
从参数中取值进行判断
遇见特殊符号应该去写转义字符:
&&:&&
-->
<if test="id!=null">
id=#{id}
</if>
<if test="lastName!=null && lastName!=""">
and last_name like #{lastName}
</if>
<if test="email!=null and email.trim()!=""">
and email=#{email}
</if>
<!-- ognl会进行字符串与数字的转换判断 "0"==0 -->
<if test="gender==0 or gender==1">
and gender=#{gender}
</if>
</select>
2. where
引出问题:
在上一节中,如果在测试方法中,没有传入id 的值但传入了lastName的值,那么就会出现类似于:
... where and last_name like #{lastName}
这样的sql语句,肯定是错误的。两个解决方法:
第一种:第一条语句where后面加上 1 = 1,而下面的每条if标签,最前面都写上and,如下
<select id="getEmpsByConditionIf" resultType="com.atguigu.mybatis.bean.Employee">
select * from tbl_employee where 1 = 1
<if test="id!=null">
and id=#{id}
</if>
<if test="lastName!=null && lastName!=""">
and last_name like #{lastName}
</if>
<if test="email!=null and email.trim()!=""">
and email=#{email}
</if>
<!-- ognl会进行字符串与数字的转换判断 "0"==0 -->
<if test="gender==0 or gender==1">
and gender=#{gender}
</if>
</select>
第二种:MyBatis推荐!使用where标签
用where标签会将所有的查询条件包括在内,MyBatis就会对where标签中拼接的sql语句进行处理,将sql语句多出来的and或or去掉。(仅限于sql语句的开头,即where标签中只会去掉第一个多出来的and或者or)
<select id="getEmpsByConditionIf" resultType="com.atguigu.mybatis.bean.Employee">
select * from tbl_employee
<!-- where -->
<where>
<if test="id!=null">
id=#{id}
</if>
<if test="lastName!=null && lastName!=""">
and last_name like #{lastName}
</if>
<if test="email!=null and email.trim()!=""">
and email=#{email}
</if>
<!-- ognl会进行字符串与数字的转换判断 "0"==0 -->
<if test="gender==0 or gender==1">
and gender=#{gender}
</if>
</where>
</select>
3. trim_自定义字符串截取
在上一节的情况下,如果用户在if标签的内的sql语句的末尾加上and,即使在where标签内,mybatis并不会处理sql语句尾巴的and,此时会出现sql语句的错误:
<select id="getEmpsByConditionIf" resultType="com.atguigu.mybatis.bean.Employee">
select * from tbl_employee
<!-- where -->
<where>
<if test="id!=null">
id=#{id}
</if>
<if test="lastName!=null && lastName!=""">
and last_name like #{lastName}
</if>
<if test="email!=null and email.trim()!=""">
and email=#{email} and
</if>
<!-- ognl会进行字符串与数字的转换判断 "0"==0 -->
<if test="gender==0 or gender==1">
and gender=#{gender}
</if>
</where>
</select>
若id、lastName和gender均为空,而email有值,则sql:
... where last_name like #{lastName} and
sql出错!
trim标签的介绍:
<!--public List<Employee> getEmpsByConditionTrim(Employee employee); -->
<select id="getEmpsByConditionTrim" resultType="com.atguigu.mybatis.bean.Employee">
select * from tbl_employee
<!-- 后面多出的and或者or where标签不能解决
trim标签的四个属性:
prefix="":前缀:trim标签体中是整个字符串拼串后的结果。
加前缀,prefix给拼串后的整个字符串加一个前缀
prefixOverrides="":
去前缀,去掉整个字符串前面多余的字符
suffix="":后缀
加后缀,suffix给拼串后的整个字符串的结果加一个后缀
suffixOverrides=""
去后缀,去掉整个字符串后面多余的字符
-->
<!-- 自定义字符串的截取规则 -->
<trim prefix="where" suffixOverrides="and">
<if test="id!=null">
id=#{id} and
</if>
<if test="lastName!=null && lastName!=""">
last_name like #{lastName} and
</if>
<if test="email!=null and email.trim()!=""">
email=#{email} and
</if>
<!-- ognl会进行字符串与数字的转换判断 "0"==0 -->
<if test="gender==0 or gender==1">
gender=#{gender}
</if>
</trim>
</select>
4. choose_分支选择
相当于Java中的 switch-case
	 <!-- public List<Employee> getEmpsByConditionChoose(Employee employee); -->

	 <select id="getEmpsByConditionChoose" resultType="com.atguigu.mybatis.bean.Employee">

	 	select * from tbl_employee

	 	<where>

	 		<!-- 如果带了id就用id查,如果带了lastName就用lastName查;只会进入其中一个 -->

	 		<choose>

	 			<when test="id!=null">

	 				id=#{id}

	 			</when>

	 			<when test="lastName!=null">

	 				last_name like #{lastName}

	 			</when>

	 			<when test="email!=null">

	 				email = #{email}

	 			</when>

	 			<otherwise>

	 				gender = 0

	 			</otherwise>

	 		</choose>

	 	</where>

	 </select>
如果在测试方法中,传入了多个参数,此时就类似于switch-case一样,哪个参数在前面先判断,只会进入一个分支,会选择该参数条件成立下的sql语句,并拼接执行,结束。
5. set与if结合的动态更新
原来的更新,是写死了,必须提供sql语句set后的字段的值,下面举个例子:
    <!--    void updateEmp(Employee employee);-->

    <update id="updateEmp" >

        update info

        set name=#{name}, age=#{age}

        where id=#{id}

    </update>
现在要实现动态更新,即测试方法中,只需要提供需要更新的字段属性名称,实现效果:
第一种方法:使用set标签
	 <!--public void updateEmp(Employee employee);-->

	 <update id="updateEmp">

	 	<!-- Set标签的使用 -->

	 	update info

		<set>

			<if test="lastName!=null">

				name=#{name},

			</if>

			<if test="email!=null">

				age=#{age}

			</if>

		</set>

		where id=#{id}

	 </update>
set标签会自动去掉sql语句末尾多的逗号,如果有逗号的话。
第二种方法:使用trim标签
添加前缀set,后缀覆盖,去掉所有的逗号
	 <!--public void updateEmp(Employee employee);-->

	 <update id="updateEmp">

		update info

		<trim prefix="set" suffixOverrides=","><!--增加前缀set,去掉后缀逗号-->

			<if test="lastName!=null">

				last_name=#{lastName},

			</if>

			<if test="email!=null">

				email=#{email},

			</if>

			<if test="gender!=null">

				gender=#{gender}

			</if>

		</trim>

		where id=#{id}

	 </update>
6. foreach_遍历集合
	 <!--public List<Employee> getEmpsByConditionForeach(List<Integer> ids);  -->

	 <select id="getEmpsByConditionForeach" resultType="com.atguigu.mybatis.bean.Employee">

	 	select * from tbl_employee

	 	<!--

	 		collection:指定要遍历的集合:

	 			list类型的参数会特殊处理封装在map中,map的key就叫list

	 		item:将当前遍历出的元素赋值给指定的变量

	 		separator:每个元素之间的分隔符

	 		open:遍历出所有结果拼接一个开始的字符(以什么开始)

	 		close:遍历出所有结果拼接一个结束的字符(以什么结束)

	 		index:索引。遍历list的时候是index就是索引,item就是当前值

	 				      遍历map的时候index表示的就是map的key,item就是map的值

	 		#{变量名}就能取出变量的值也就是当前遍历出的元素

	 	  -->

	 	<foreach collection="ids" item="item_id" separator=","

	 		open="where id in(" close=")">

	 		#{item_id}

	 	</foreach>

	 </select
想实现的动态sql效果:
select * from tbl_employee where id in(?, ..., ?)

用户传入参数:两个或多个

select * from tbl_employee where id in(1, 2)

select * from tbl_employee where id in(2, 3, 4)
7. MySQL下foreach批量插入的两种方式
实现一条sql语句插入多个value值,根据用户输入的value值数目,进行动态插入。

第一种方式:有多少条想插入的记录,就执行多少次insert插入语句,或者执行一次,一次插入多条记录
注意:
第一种方法:执行多条插入语句的方法中,foreeach间隔符是分号 ; ,因为多条插入语句sql用分号进行隔开。
第二种方法:而执行一条插入语句但values有多条记录的方法中,foreeach的间隔符是逗号, ,因为是分隔多条value记录。
第一种方式:需要这种方式需要数据库连接属性allowMultiQueries=true

	 <!-- 批量保存 -->

	 <!--public void addEmps(@Param("emps")List<Employee> emps);  -->

<insert id="addEmps">

	<foreach collection="emps" item="emp" separator=";"><!--注意这里的间隔符是分号-->

		insert into tbl_employee(last_name,email,gender,d_id)

		values(#{emp.lastName},#{emp.email},#{emp.gender},#{emp.dept.id})

	</foreach>

</insert>
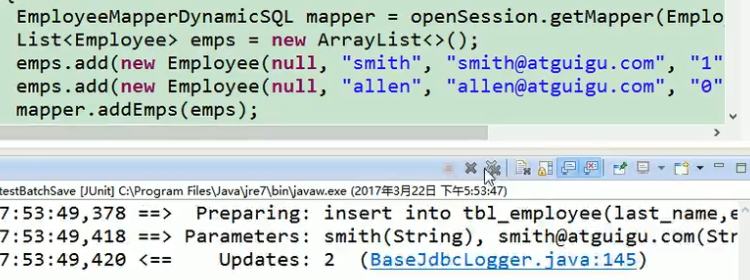
第二种方式:推荐这种方法,效率更高!
<insert id="addEmps">

	insert into tbl_employee()

    values

	<foreach collection="emps" item="emp" separator=","><!--注意这里的间隔符是逗号-->

		(#{emp.lastName},#{emp.email},#{emp.gender},#{emp.dept.id})

	</foreach>

</insert
8. Oracle下foreach批量插入的两种方式(了解)
	 <!-- Oracle数据库批量保存:

	 	Oracle不支持values(),(),()  即,不支持一条sql语句插入多个value记录

	 	Oracle支持的批量方式

	 	1、多个insert放在begin - end里面

	 		begin

			    insert into employees(employee_id,last_name,email)

			    values(employees_seq.nextval,'test_001','test_001@atguigu.com');

			    insert into employees(employee_id,last_name,email)

			    values(employees_seq.nextval,'test_002','test_002@atguigu.com');

			end;

		2、利用中间表:

			insert into employees(employee_id,last_name,email)

		       select employees_seq.nextval,lastName,email from(

		              select 'test_a_01' lastName,'test_a_e01' email from dual

		              union

		              select 'test_a_02' lastName,'test_a_e02' email from dual

		              union

		              select 'test_a_03' lastName,'test_a_e03' email from dual

		       )

	 -->

	<!-- oracle第一种批量方式 -->

	 <insert id="addEmps" databaseId="oracle">

         <!-- 其实就是把多条插入sql语句一起执行 -->

	 	<foreach collection="emps" item="emp" open="begin" close="end;">

	 		insert into employees(employee_id,last_name,email)

			    values(employees_seq.nextval,#{emp.lastName},#{emp.email});

	 	</foreach>

     </insert>

	<!-- oracle第二种批量方式  -->

	<insert id="addEmps" databaseId="oracle">

	 	insert into employees(employee_id,last_name,email)

        	select employees_seq.nextval,lastName,email from(

	 		<foreach collection="emps" item="emp" separator="union">

	 			select #{emp.lastName} lastName,#{emp.email} email from dual

	 		</foreach>

        )

	 </insert>

	<--或者-->

     <insert id="addEmps" databaseId="oracle">

         insert into employees(employee_id,last_name,email)

	 		<foreach collection="emps" item="emp" separator="union"

	 			open="select employees_seq.nextval,lastName,email from("

	 			close=")">

	 			select #{emp.lastName} lastName,#{emp.email} email from dual

	 		</foreach>

	 </insert>
9. _parameter & _databaseId & bind
	 <!-- 两个内置参数:

	 	不只是方法传递过来的参数或者取值,可以被用来判断

	 	mybatis默认还有两个内置参数,可以被使用或者取值:

            _parameter:代表整个参数

                单个参数:_parameter就是这个参数

                多个参数:参数会被封装为一个map,那么_parameter就是代表这个map

            _databaseId:如果配置了databaseIdProvider标签。

                _databaseId就是代表当前数据库的别名oracle

	  -->

	  <!--public List<Employee> getEmpsTestInnerParameter(Employee employee);-->

	  <select id="getEmpsTestInnerParameter" resultType="com.atguigu.mybatis.bean.Employee">

	  		<!-- bind:可以将OGNL表达式的值绑定到一个变量中,方便后来引用这个变量的值

				但是模糊查询的话,建议在测试方法中,直接传一个模糊字符串

			-->

	  		<bind name="_lastName" value="'%'+lastName+'%'"/>

          	<!--可以判断当前数据库类型,然后执行对应的sql语句,不用分开单独写多个方法-->

	  		<if test="_databaseId=='mysql'">

	  			select * from tbl_employee

	  			<if test="_parameter!=null"><!--这里可以使用 '%${lastName}%' ,但使用$存在SQL注入的风险,所以要使用#{},就需要使用bind标签-->

	  				where last_name like #{_lastName}

	  			</if>

	  		</if>

	  		<if test="_databaseId=='oracle'">

	  			select * from employees

	  			<if test="_parameter!=null">

	  				where last_name like #{_parameter.lastName}

	  			</if>

	  		</if>

	  </select>
10. sql_抽取可重用的sql片段
定义sql抽取:
	  <!--

	  	抽取可重用的sql片段。方便后面引用

	  	1、sql抽取:经常将要查询的列名,或者插入用的列名抽取出来方便引用

	  	2、include来引用已经抽取的sql:

	  	3、include还可以自定义一些property,sql标签内部就能使用自定义的属性

	  			include-property:取值的正确方式${prop},

	  			#{不能使用这种方式}

	  -->

	  <sql id="insertColumn">

	  		<if test="_databaseId=='oracle'">

	  			employee_id,last_name,email

	  		</if>

	  		<if test="_databaseId=='mysql'">

	  			last_name,email,gender,d_id

	  		</if>

	  </sql>
使用示例:
	<insert id="addEmps">

	 	insert into tbl_employee(

	 		<include refid="insertColumn"></include>

	 	)

		values

		<foreach collection="emps" item="emp" separator=",">

			(#{emp.lastName},#{emp.email},#{emp.gender},#{emp.dept.id})

		</foreach>

	 </insert>
六、MyBatis-缓存机制
MyBatis 包含一个非常强大的查询缓存特性,它可以非常方便地配置和定制。缓存可以极大的提升查询效率。
MyBatis系统中默认定义了两级缓存。

一级缓存和二级缓存。
1、默认情况下,只有一级缓存(SqlSession级别的缓存,也称为本地缓存)开启。
2、二级缓存需要手动开启和配置,他是基于namespace级别的缓存。
3、为了提高扩展性。MyBatis定义了缓存接口Cache。我们可以通过**实现Cache接口来自定**
义二级缓存。
1. 体验封装的存在

都是来查1号员工,最后判断输出 true,说明emp02是直接使用之前查询的结果,使用了缓存。
2. 两级缓存
两级缓存:
一级缓存:(本地缓存)sqlSession级别的缓存,一级缓存是一直开启的;类似于一个Map,查询之前去看看这个要查的数据,有没有在map中。
与数据库同一次会话期间查询到的数据,将会放在本地缓存中
以后如果需要获取相同数据的话,直接就会去缓存中拿去,就没必要再去访问数据库
如果开启新的sqlSession,那么两个sqlSession会有属于自己的缓存
一级缓存失效的四种情况:(没有使用到当前一级缓存的情况,还需要再向数据库发出查询)
1. sqlSession不同,数据存放在各自的缓存中
2. sqlSession相同,查询条件不同(当前缓存中没有这个数据)
3. sqlSession相同,但两次查询之间执行了增删改操作(因为这次增删改操作可能会对当前数据有影响,所以不能选择还继续用缓存中的数据)
4. sqlSession相同,但手动清除了一级缓存。( openSession.clearCache() )
二级缓存:(全局缓存)基于namespace级别的缓存,一个namespace对应一个二级缓存。
工作机制:
1. 一个会话,查询一条数据,这个数据就会被放在当前会话的一级缓存中
2. 如果会话关闭,那么一级缓存中的数据会被保存到二级缓存中,新的会话查询信息,就可以先去参照二级缓存
3. sqlSession == EmployeeMapper ==》Employee数据
DepartmentMapper==》Department数据
不同namespace查出来的数据,会放在自己对应的缓存中,如上面的两个mapper配置文件,由于定义了各自的命名空间,所以也就是两个二级缓存(底层实现其实是map)
3. 二级缓存使用&细节
默认是开启二级缓存的,但为了防止被版本更新改为默认关闭,所以还是最好在MyBatis全局配置中手动开启。
需要注意的,只有会话关闭之后,一级缓存的数据才会写入到二级缓存中去。
使用步骤:
第一步:在MyBatis全局配置文件中,显示开启全局二级缓存配置
    <settings>

        <setting name="cacheEnabled" value="true"/>

    </settings>
第二步:在mapper配置xml文件中,配置使用二级缓存
<mapper namespace="com.atguigu.mybatis.dao.DepartmentMapper">

    <cache></cache>

</mapper>
cache标签属性:
	<cache type="org.mybatis.caches.ehcache.EhcacheCache"></cache>

	<!-- <cache eviction="FIFO" flushInterval="60000" readOnly="false" size="1024"></cache> -->

	<!--

	eviction:缓存的回收策略:

		• LRU – 最近最少使用的:移除最长时间不被使用的对象。

		• FIFO – 先进先出:按对象进入缓存的顺序来移除它们。

		• SOFT – 软引用:移除基于垃圾回收器状态和软引用规则的对象。

		• WEAK – 弱引用:更积极地移除基于垃圾收集器状态和弱引用规则的对象。

		• 默认的是 LRU。

	flushInterval:缓存刷新间隔

		缓存多长时间清空一次,默认不清空,设置一个毫秒值

	readOnly:是否只读:

		true:只读;mybatis认为所有从缓存中获取数据的操作都是只读操作,不会修改数据。

				 mybatis为了加快获取速度,直接就会将数据在缓存中的引用交给用户。不安全,速度快

		false:非只读:mybatis觉得获取的数据可能会被修改。

				mybatis会利用序列化&反序列的技术克隆一份新的数据给你。安全,速度慢

	size:缓存存放多少元素;

	type="":指定自定义缓存的全类名;

			实现Cache接口即可;

	-->
和缓存有关的设置/属性:
1)默认cacheEnabled=true;
如果false的话:关闭缓存(二级缓存关闭,一级缓存一直可用)
2)每个select标签都默认useCache="true";
如果false的话:不使用缓存(二级缓存关闭,一级缓存依然可以使用)
3)每个增删改标签默认flushCache="true";查询标签是默认为false,查询完不清空缓存
增删改执行完成后就会清除缓存
如果flushCache="false"的话, 一级缓存、二级缓存都会被清空,虽然去查了,也就是命中了key,但没有对应value值
4)openSession.clearCache();只会清除当前sqlSession的一级缓存
5)localCacheScope:全局设置setting中的属性,本地缓存作用域(相当于一级缓存)
SESSION:当前会话的所有数据都会被保存到一级缓存中
STATEMENT:禁用一级缓存
第三步:我们的POJO需要实现序列化接口
测试一级缓存的测试方法:
  @Test

  public void testFirstLevelCache() throws IOException {

    SqlSessionFactory sqlSessionFactory = getSqlSessionFactory();

    SqlSession openSession = sqlSessionFactory.openSession();

    try {

      EmployeeMapper mapper = (EmployeeMapper)openSession.getMapper(EmployeeMapper.class);

      Employee emp01 = mapper.getEmpById(Integer.valueOf(1));

      System.out.println(emp01);

      Employee emp02 = mapper.getEmpById(Integer.valueOf(1));

      System.out.println(emp02);

      System.out.println((emp01 == emp02));

    } finally {

      openSession.close();

    }

  }
如果一级缓存开启的话,最终结果会打印 true 。
测试二级缓存的测试方法:
  @Test

  public void testSecondLevelCache() throws IOException {

    SqlSessionFactory sqlSessionFactory = getSqlSessionFactory();

    SqlSession openSession = sqlSessionFactory.openSession();

    SqlSession openSession2 = sqlSessionFactory.openSession();

    EmployeeMapper mapper = (EmployeeMapper)openSession.getMapper(EmployeeMapper.class);

    EmployeeMapper mapper2 = (EmployeeMapper)openSession2.getMapper(EmployeeMapper.class);

    Employee emp01 = mapper.getEmpById(Integer.valueOf(1));

    System.out.println(emp01);

    openSession.close();

    Employee emp02 = mapper2.getEmpById(Integer.valueOf(1));

    System.out.println(emp02);

    openSession2.close();

  }
如果二级缓存开启的话,那么在debug打印的信息中,可以发现只执行了一条sql语句并显示有命中信息,也就是第二条语句去查询的时候,命中了二级缓存中的数据。
需要注意的是,由于sqlSession会话只有关闭的时候,才会把一级缓存的数据写入到二级缓存中,因为如果将上面测试方法中两个session会话给放到最后查询执行完才关闭的话,那么debug显示出来的信息是执行了两条sql语句。
4. 缓存原理示意图

5. 第三方缓存框架EhCache整合
MyBatis缓存的底层就是map,由于在MyBatis中cache是接口类型,往往需要使用第三方强大的缓存框架进行整合。
EhCache:
EhCache 是一个纯Java的进程内缓存框架,具有快速、精干等特点,是Hibernate中默认
CacheProvider。Ehcache是一种广泛使用的开源Java分布式缓存。主要面向通用缓存,Java EE和轻量级容器。它具有内存和磁盘存储,缓存加载器,缓存扩展,缓存异常处理程序,一个gzip缓存servlet过滤器,支持REST和SOAP api等特点。
Spring 提供了对缓存功能的抽象:即允许绑定不同的缓存解决方案(如Ehcache),但本身
不直接提供缓存功能的实现。它支持注解方式使用缓存,非常方便。
pom.xml引入依赖:
<!-- https://mvnrepository.com/artifact/net.sf.ehcache/ehcache -->

<dependency>

    <groupId>net.sf.ehcache</groupId>

    <artifactId>ehcache</artifactId>

    <version>2.10.6</version>

</dependency>
七、MyBatis-Spring整合(SSM整合)
后面会更新SSM整合的学习文档,翻翻我博客看看,如果没有就说明还没有更新
八、MyBatis-逆向工程(代码生成器)
MyBatis Generator:
简称MBG,是一个专门为MyBatis框架使用者定制的代码生成器,可以快速的根据表生成对
应的映射文件、接口、以及bean类。支持基本的增删改查,以及QBC风格的条件查询。但是表连
接、 存储过程等这些复杂sql的定义需要我们手工编写。
maven导入依赖:
<!-- https://mvnrepository.com/artifact/org.mybatis.generator/mybatis-generator-core -->

<dependency>

    <groupId>org.mybatis.generator</groupId>

    <artifactId>mybatis-generator-core</artifactId>

    <version>1.3.7</version>

</dependency>
简单来说,就是能够根据数据库的表,然后生成对应的JavaBean、mapper接口方法以及sql与接口映射配置文件。
1. MBG配置文件
注意:
1. 根据项目需求生成不同级别的CRUD版本

2. 注意生成文件的输出地址
<?xml version="1.0" encoding="UTF-8"?>

<!DOCTYPE generatorConfiguration

        PUBLIC "-//mybatis.org//DTD MyBatis Generator Configuration 1.0//EN"

        "http://mybatis.org/dtd/mybatis-generator-config_1_0.dtd">

<generatorConfiguration>

    <properties resource="jdbc.properties"></properties>

    <!--

        targetRuntime="MyBatis3Simple":生成简单版的CRUD

        MyBatis3:豪华版 用于复杂的数据库CRUD操作

     -->

    <context id="DB2Tables" targetRuntime="MyBatis3Simple">

        <!-- jdbcConnection:指定如何连接到目标数据库 -->

        <jdbcConnection driverClass="${jdbc.driver}"

                        connectionURL="${jdbc.url}"

                        userId="${jdbc.username}"

                        password="${jdbc.password}">

        </jdbcConnection>

        <!--类型解析器-->

        <javaTypeResolver >

            <property name="forceBigDecimals" value="false" />

        </javaTypeResolver>

        <!-- javaModelGenerator:指定javaBean的生成策略

            targetPackage="test.model":目标包名

            targetProject="\MBGTestProject\src":目标工程

        -->

        <javaModelGenerator targetPackage="com.atguigu.mybatis.bean"

                            targetProject=".\src\main\java">

            <property name="enableSubPackages" value="true" />

            <property name="trimStrings" value="true" />

        </javaModelGenerator>

        <!-- sqlMapGenerator:sql语句与接口方法映射生成策略 xml配置文件 -->

        <sqlMapGenerator targetPackage="resources"

                         targetProject=".\src\main\">

            <property name="enableSubPackages" value="true" />

        </sqlMapGenerator>

        <!-- javaClientGenerator:指定mapper接口方法所在的位置 -->

        <javaClientGenerator type="XMLMAPPER" targetPackage="com.atguigu.mybatis.dao"

                             targetProject=".\src\main\java">

            <property name="enableSubPackages" value="true" />

        </javaClientGenerator>

        <!-- 指定要逆向分析数据库中的哪些表:根据表要创建javaBean -->

        <table tableName="department" domainObjectName="Department"></table>

        <table tableName="info" domainObjectName="Employee"></table>

    </context>

</generatorConfiguration>
2. 执行逆向生成
    @Test

    public void testMBG() throws XMLParserException, IOException, InvalidConfigurationException, SQLException, InterruptedException {

        List<String> warnings = new ArrayList<String>();

        boolean overwrite = true;

        File configFile = new File("src/main/resources/mbg.xml");

        ConfigurationParser cp = new ConfigurationParser(warnings);

        Configuration config = cp.parseConfiguration(configFile);

        DefaultShellCallback callback = new DefaultShellCallback(overwrite);

        MyBatisGenerator myBatisGenerator = new MyBatisGenerator(config, callback, warnings);

        myBatisGenerator.generate(null);

    }
3. 测试
targetRuntime="MyBatis3Simple"
效果展示:
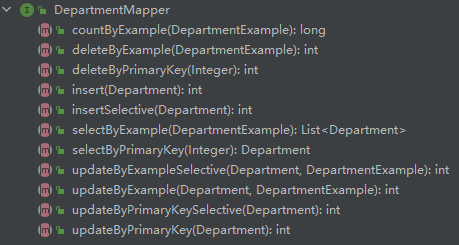
主要看接口类,生成了哪些支持的CRUD操作:
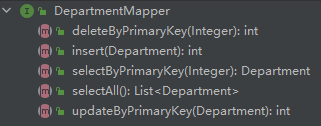
sql映射配置xml文件:
<?xml version="1.0" encoding="UTF-8"?>

<!DOCTYPE mapper PUBLIC "-//mybatis.org//DTD Mapper 3.0//EN" "http://mybatis.org/dtd/mybatis-3-mapper.dtd">

<mapper namespace="com.atguigu.mybatis.dao.DepartmentMapper">

  <resultMap id="BaseResultMap" type="com.atguigu.mybatis.bean.Department">

    <!--

      WARNING - @mbg.generated

      This element is automatically generated by MyBatis Generator, do not modify.

      This element was generated on Sat Nov 06 21:39:59 CST 2021.

    -->

    <id column="id" jdbcType="INTEGER" property="id" />

    <result column="departmentName" jdbcType="VARCHAR" property="departmentname" />

  </resultMap>

  <delete id="deleteByPrimaryKey" parameterType="java.lang.Integer">

    <!--

      WARNING - @mbg.generated

      This element is automatically generated by MyBatis Generator, do not modify.

      This element was generated on Sat Nov 06 21:39:59 CST 2021.

    -->

    delete from department

    where id = #{id,jdbcType=INTEGER}

  </delete>

  <insert id="insert" parameterType="com.atguigu.mybatis.bean.Department">

    <!--

      WARNING - @mbg.generated

      This element is automatically generated by MyBatis Generator, do not modify.

      This element was generated on Sat Nov 06 21:39:59 CST 2021.

    -->

    insert into department (id, departmentName)

    values (#{id,jdbcType=INTEGER}, #{departmentname,jdbcType=VARCHAR})

  </insert>

  <update id="updateByPrimaryKey" parameterType="com.atguigu.mybatis.bean.Department">

    <!--

      WARNING - @mbg.generated

      This element is automatically generated by MyBatis Generator, do not modify.

      This element was generated on Sat Nov 06 21:39:59 CST 2021.

    -->

    update department

    set departmentName = #{departmentname,jdbcType=VARCHAR}

    where id = #{id,jdbcType=INTEGER}

  </update>

  <select id="selectByPrimaryKey" parameterType="java.lang.Integer" resultMap="BaseResultMap">

    <!--

      WARNING - @mbg.generated

      This element is automatically generated by MyBatis Generator, do not modify.

      This element was generated on Sat Nov 06 21:39:59 CST 2021.

    -->

    select id, departmentName

    from department

    where id = #{id,jdbcType=INTEGER}

  </select>

  <select id="selectAll" resultMap="BaseResultMap">

    <!--

      WARNING - @mbg.generated

      This element is automatically generated by MyBatis Generator, do not modify.

      This element was generated on Sat Nov 06 21:39:59 CST 2021.

    -->

    select id, departmentName

    from department

  </select>

</mapper>
测试查询所有记录:
    @Test

    public void test() throws IOException {

        SqlSessionFactory sqlSessionFactory = getSqlSessionFactory();

        SqlSession sqlSession = sqlSessionFactory.openSession();

        try {

            EmployeeMapper mapper = sqlSession.getMapper(EmployeeMapper.class);

            List<Employee> list = mapper.selectAll();

            System.out.println(list);

        } finally {

            sqlSession.close();

        }

    }
结果:
[main] [com.atguigu.mybatis.dao.EmployeeMapper.selectAll]-[DEBUG] ==>  Preparing: select id, name, age, depId from info

[main] [com.atguigu.mybatis.dao.EmployeeMapper.selectAll]-[DEBUG] ==> Parameters:

[main] [com.atguigu.mybatis.dao.EmployeeMapper.selectAll]-[DEBUG] <==      Total: 6

[Employee{id=1001, name='Smith', age=23, depid=1}, Employee{id=1002, name='Tom', age=23, depid=2}, Employee{id=1003, name='Mary', age=21, depid=1}, Employee{id=1004, name='Dick', age=21, depid=2}, Employee{id=1005, name='Jack', age=23, depid=1}, Employee{id=1006, name='James', age=26, depid=2}]
targetRuntime="MyBatis3"
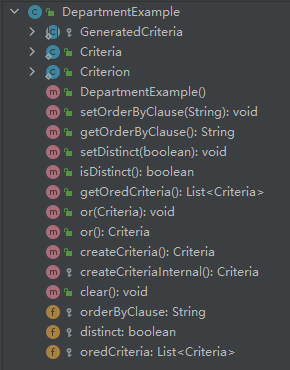
支持复杂的CRUD操作
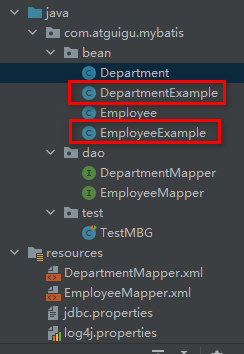
与simple的最明显差别,就是多了个两个Example的bean对象。
支持的操作:
测试:
  @Test

  public void testMyBatis3() throws IOException {

    SqlSessionFactory sqlSessionFactory = getSqlSessionFactory();

    SqlSession openSession = sqlSessionFactory.openSession();

    try {

      EmployeeMapper mapper = (EmployeeMapper)openSession.getMapper(EmployeeMapper.class);

      // xxxExample这个类,是用来封装查询条件的

      EmployeeExample example = new EmployeeExample();

      // criteria是用来拼接查询条件的

      EmployeeExample.Criteria criteria = example.createCriteria();

      // 拼接Name的模糊查询,%a%

      criteria.andNameLike("%a%"); // 查询员工名字中有字母a的

      // 拼接部门id为1

      criteria.andDepidEqualTo("1"); // 查询部门id为1的

      // 如果查询条件由or连接两个条件组成,则还需要创建criteria用来拼接另一个条件

      EmployeeExample.Criteria criteria2 = example.createCriteria();

      criteria2.andAgeBetween(22, 23); // age在22到23岁

      // 用 or 连接

      example.or(criteria2);

      List<Employee> list = mapper.selectByExample(example);

	  System.out.println(list);

    } finally {

      openSession.close();

    }

  }
最后的sql语句如下:

通过上面的例子,就可以举一反三,使用框架进行复杂的CRUD操作。
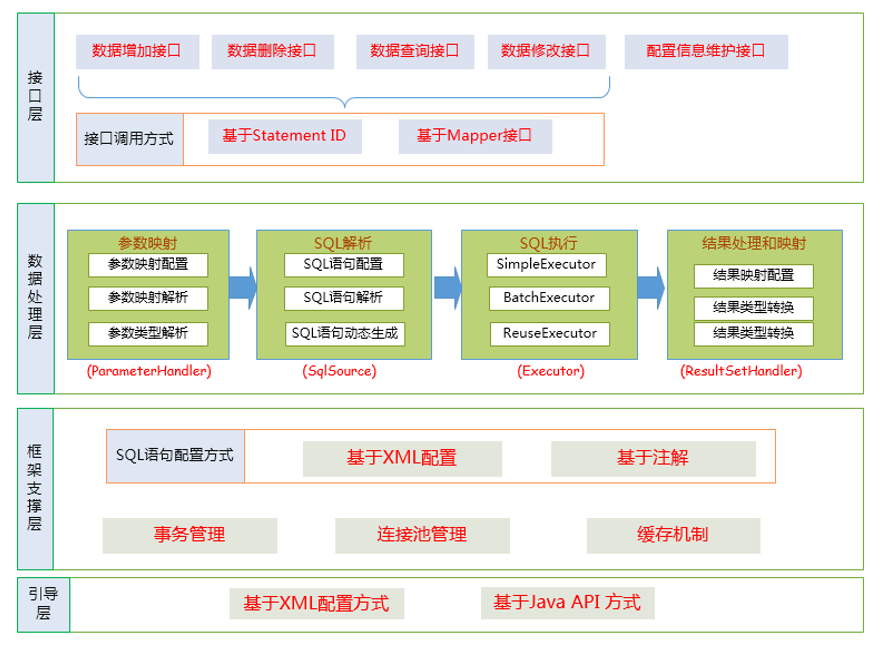
九、MyBatis-运行原理
1. 框架分层架构
2. SQLSessionFactory的初始化
		// 获取SqlSessionFactory对象

        SqlSessionFactory sqlSessionFactory = new SqlSessionFactoryBuilder().build(inputStream);
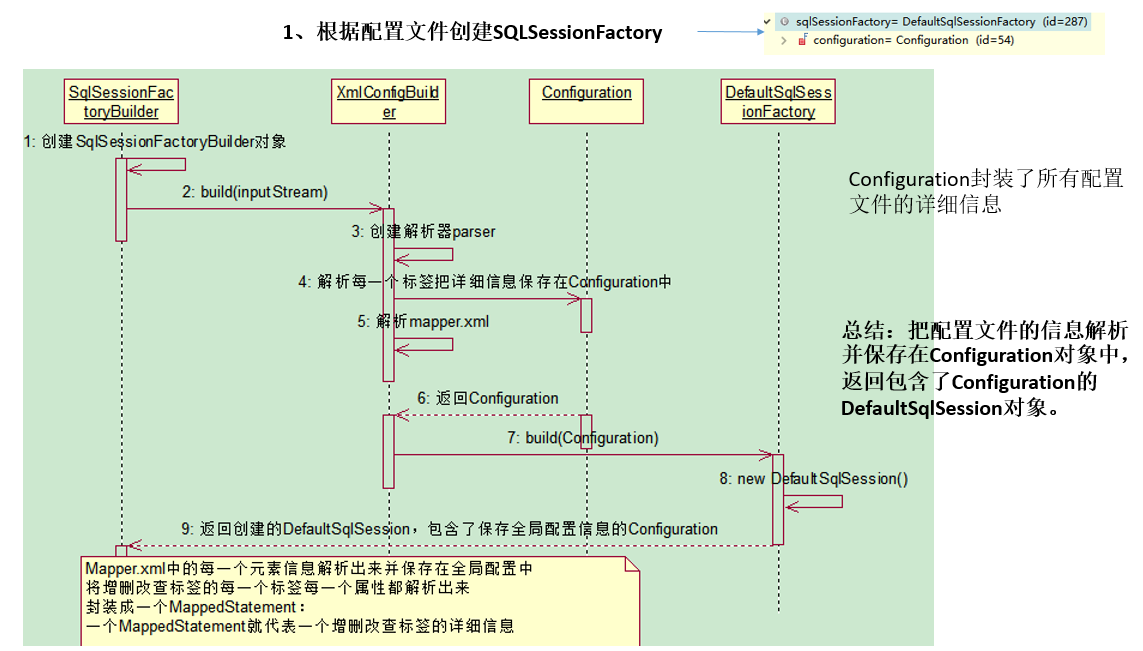
测试过程:
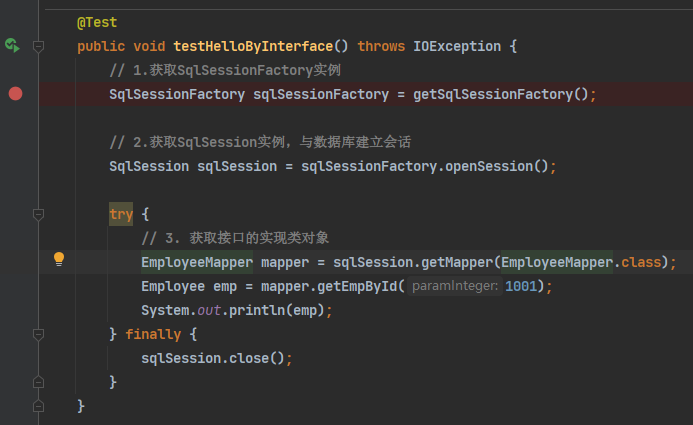
1)进入SqlSessionFactoryBuilder()

2)调用SqlSessionFactoryBuilder().build(),创建解析器parser,进入XMLConfigBuilder(),对配置文件进行解析


3)XMLConfigBuilder()中,调用parseConfiguration()方法

解析全局配置文件,其中this.mapperElement将会解析mapper映射配置文件
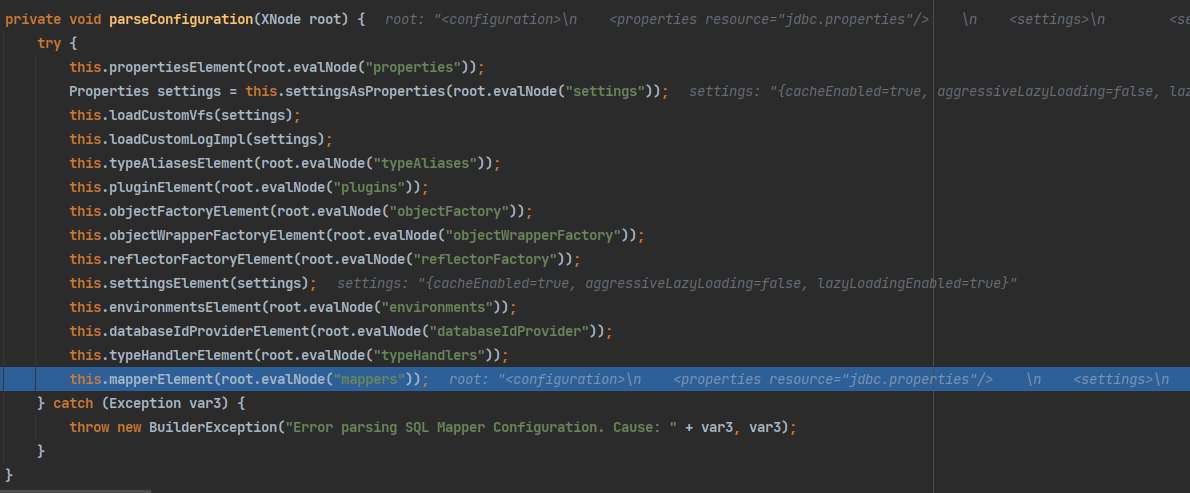

创建mapperParse解析器,然后调用parse()方法解析映射xml配置文件:

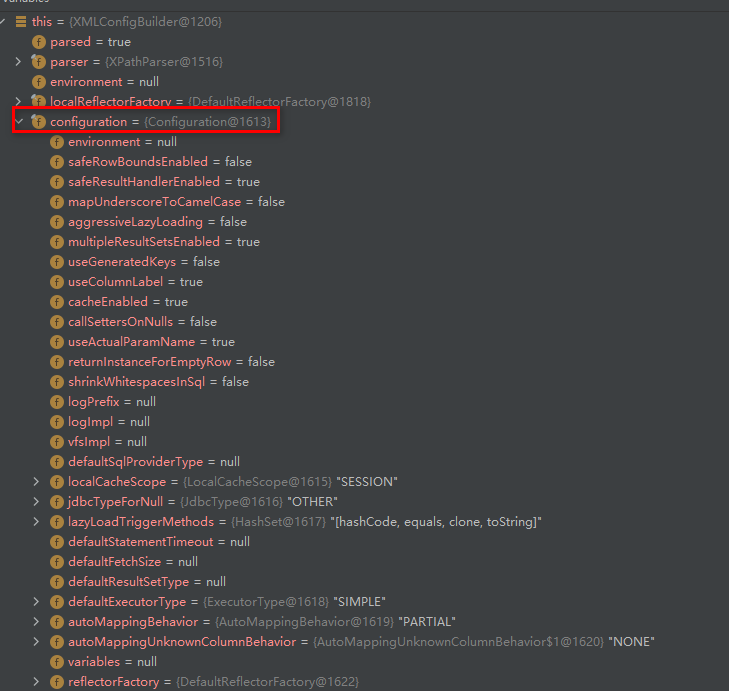
configuration对象保存了所有配置文件的详细信息:
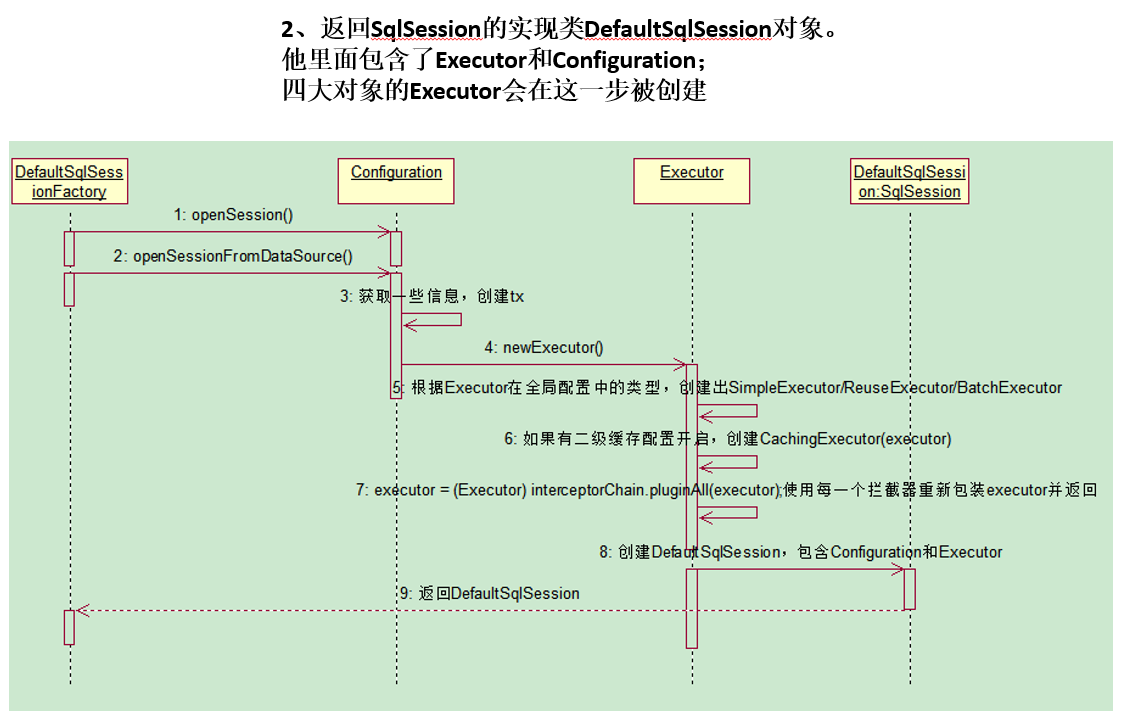
3. openSession获取SqlSession对象
        // 2.获取SqlSession实例,与数据库建立会话

        SqlSession sqlSession = sqlSessionFactory.openSession();
4. getMapper获取到接口的代理对象
            // 3. 获取接口的实现类对象

            EmployeeMapper mapper = sqlSession.getMapper(EmployeeMapper.class);

5. 查询实现
Employee emp = mapper.getEmpById(1001);
底层其实是JDBC操作,MyBatis对其进行封装
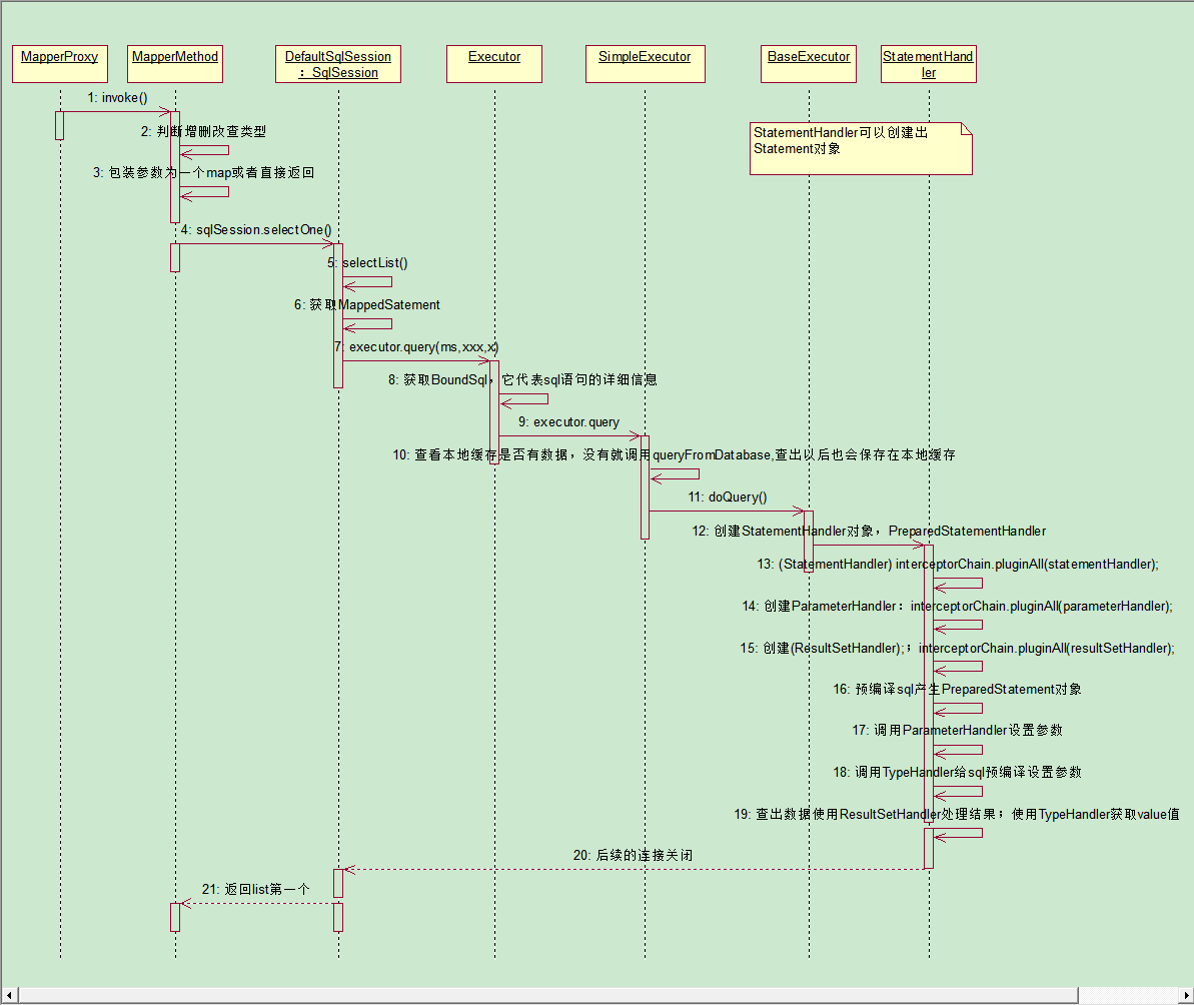
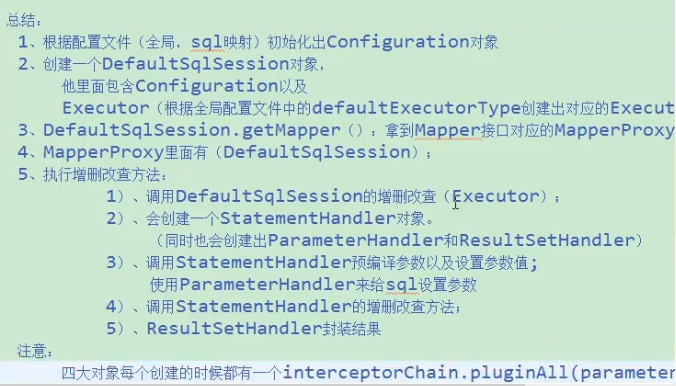
查询流程总结:重要
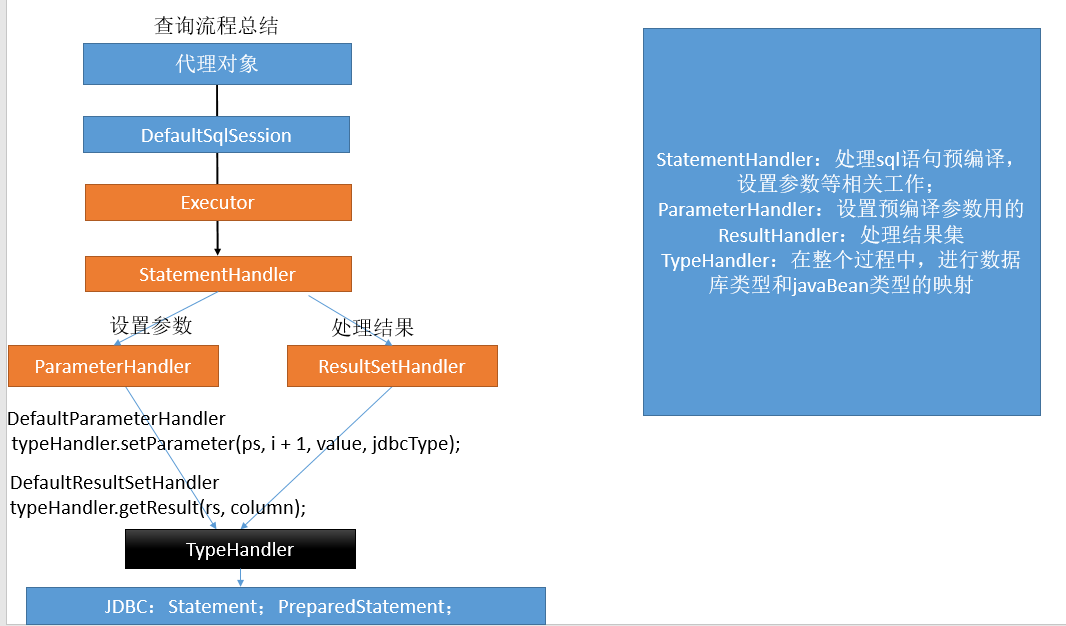
首先,创建一个代理对象进行增删改查操作,但实际上这个代理对象是用DefaultSqlSession进行增删改查,而这个DefaultSqlSession是通过Executor进行增删改查,而Executor会创建一个StatementHandler对象,用于处理sql语句、预编译和设置参数等相关工作。StatementHandler对象在进行处理工作的时候,创建了ParameterHandler和ResultSetHandler,前者是用来设置预编译参数用的,执行操作,此时,后者是用来处理执行返回的结果集。而设置参数和处理结果集执行,实际上是二者是通过TypeHandler进行设置参数并执行。而TypeHandler实际执行,是通过调用底层原生JDBC操作。
十、MyBatis-插件
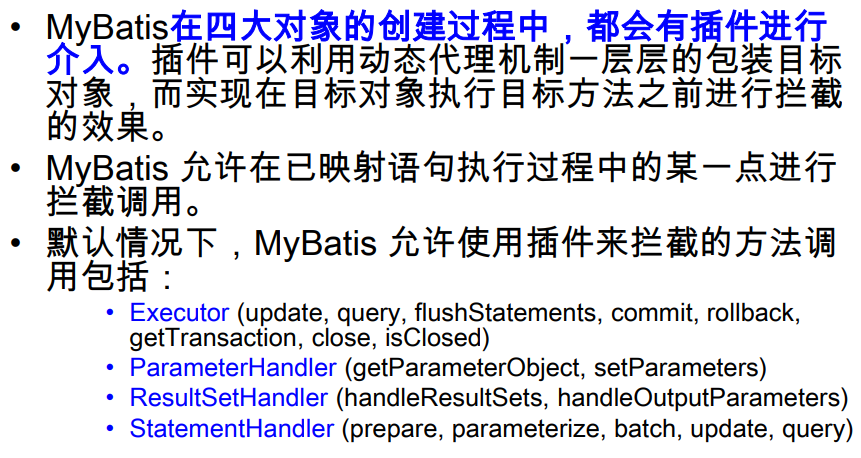
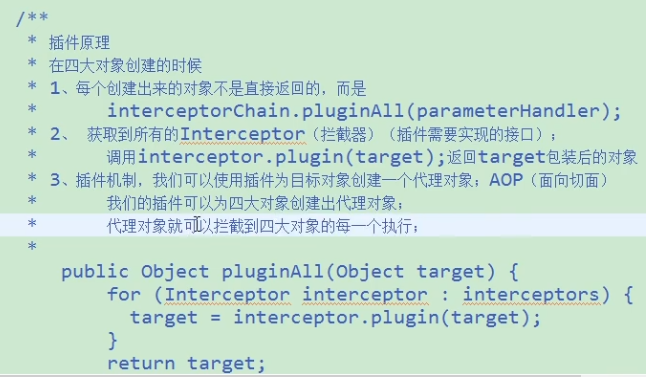
拦截目标对象,用插件为目标对象创建一个动态代理,然后使用AOP的思想,通过动态代理对目标对象的目标方法进行拦截,同时对目标方法可以进行增强的操作,然后执行。从而实现控制sql语句执行的过程。
十一、MyBatis-扩展
1. PageHelper插件进行分页
首先需要在全局配置文件中添加依赖:
    <!--

    plugins在配置文件中的位置必须符合要求,否则会报错,顺序如下:

    properties?, settings?,

    typeAliases?, typeHandlers?,

    objectFactory?,objectWrapperFactory?,

    plugins?,

    environments?, databaseIdProvider?, mappers?

    -->

    <plugins>

        <!-- com.github.pagehelper为PageHelper类所在包名 -->

        <plugin interceptor="com.github.pagehelper.PageInterceptor">

            <!-- 使用下面的方式配置参数,后面会有所有的参数介绍 -->

            <property name="param1" value="value1"/>

        </plugin>

    </plugins>
测试方法:
    @Test

    public void testSelectAll() throws IOException {

        SqlSessionFactory sqlSessionFactory = getSqlSessionFactory();

        SqlSession sqlSession = sqlSessionFactory.openSession();

        try {

            EmployeeMapper mapper = sqlSession.getMapper(EmployeeMapper.class);

            Page<Object> page = PageHelper.startPage(3, 2);

            List<Employee> list = mapper.getEmpAll();

            // 传入要连续显示多少页

            PageInfo<Employee> info = new PageInfo<>(list, 2);

            for (Employee employee : list) {

                System.out.println(employee);

            }

            System.out.println("当前页码:" + page.getPageNum());

            System.out.println("总记录数:" + page.getTotal());

            System.out.println("每页记录数:" + page.getPageSize());

            System.out.println("总页码:" + page.getPages());

            System.out.println();

            System.out.println("当前页码:" + info.getPageNum());

            System.out.println("总记录数:" + info.getTotal());

            System.out.println("每页记录数:" + info.getPageSize());

            System.out.println("总页码:" + info.getPages());

            System.out.println("是否是第一页:" + info.isIsFirstPage());

            System.out.println("连续显示的页码:");

            int[] nums = info.getNavigatepageNums();

            for (int i : nums) {

                System.out.println(i);

            }

        } finally {

            sqlSession.close();

        }

    }
查询结果展示:
[main] [com.atguigu.mybatis.dao.EmployeeMapper.getEmpAll_COUNT]-[DEBUG] ==>  Preparing: SELECT count(0) FROM info

[main] [com.atguigu.mybatis.dao.EmployeeMapper.getEmpAll_COUNT]-[DEBUG] ==> Parameters:

[main] [com.atguigu.mybatis.dao.EmployeeMapper.getEmpAll_COUNT]-[DEBUG] <==      Total: 1

[main] [com.atguigu.mybatis.dao.EmployeeMapper.getEmpAll]-[DEBUG] ==>  Preparing: select * from info LIMIT ?, ?

[main] [com.atguigu.mybatis.dao.EmployeeMapper.getEmpAll]-[DEBUG] ==> Parameters: 4(Long), 2(Integer)

[main] [com.atguigu.mybatis.dao.EmployeeMapper.getEmpAll]-[DEBUG] <==      Total: 2

Employee{id=1005, name='Jack', age=23}

Employee{id=1006, name='James', age=26}

当前页码:3

总记录数:6

每页记录数:2

总页码:3

当前页码:3

总记录数:6

每页记录数:2

总页码:3

是否是第一页:false

连续显示的页码:

2

3
2. 批量操作
openSession(ExecutorType.BATCH); 开启一个批处理的session
  @Test

  public void testBatch() throws IOException {

    SqlSessionFactory sqlSessionFactory = getSqlSessionFactory();

      // 在创建sqlSession的时候,设置这是一个批处理的session

    SqlSession openSession = sqlSessionFactory.openSession(ExecutorType.BATCH);

    long start = System.currentTimeMillis();

    try {

      EmployeeMapper mapper = (EmployeeMapper)openSession.getMapper(EmployeeMapper.class);

      for (int i = 0; i < 10000; i++)

        mapper.addEmp(new Employee(UUID.randomUUID().toString().substring(0, 5), "b", "1"));

      openSession.commit();

      long end = System.currentTimeMillis();

      System.out.println("+ (end - start));

    } finally {

      openSession.close();

    }

  }
非批处理:执行流程是,每进行一次插入语句,就 发送sql语句—》预编译设置参数—》执行 ,每一次的插入都是一次完成的数据库访问操作,消耗大量的预编译时间。
批处理:发一条sql语句给数据库,数据库预编译好之后,批处理不断传参数,数据库只需要等待这条sql语句需要执行多少遍的参数,然后再一次性执行。
MyBatis 3学习笔记的更多相关文章
- MyBatis:学习笔记(4)——动态SQL
MyBatis:学习笔记(4)——动态SQL 如果使用JDBC或者其他框架,很多时候需要你根据需求手动拼装SQL语句,这是一件非常麻烦的事情.MyBatis提供了对SQL语句动态的组装能力,而且他只有 ...
- mybatis的学习笔记
前几天学习了mybatis,今天来复习一下它的内容. mybatis是一个基于Java的持久层框架,那就涉及到数据库的操作.首先来提出第一个问题:java有jdbc连接数据库,我们为什么还要使用框架呢 ...
- 关于mybatis的学习笔记
配置文件 贴出mybatis的配置文件,这里mybatis还未与spring做整合: <?xml version="1.0" encoding="UTF-8&quo ...
- mybatis缓存学习笔记
mybatis有两级缓存机制,一级缓存默认开启,可以在手动关闭:二级缓存默认关闭,可以手动开启.一级缓存为线程内缓存,二级缓存为线程间缓存. 一提缓存,必是查询.缓存的作用就是查询快.写操作只能使得缓 ...
- 3、MyBatis.Net学习笔记之增删改
增删改之前先说一下笔记1里提到的一个无法创建ISqlMapper对象的问题. <resultMaps> <resultMap id="FullResultMap" ...
- MyBatis基础学习笔记--摘录
1.MyBatis是什么? MyBatis源自于IBatis,是一个持久层框架,封装了jdbc操作数据库的过程,使得开发者只用关心sql语句,无需关心驱动加载.连接,创建statement,手动设置参 ...
- MyBatis基础学习笔记--自总结
一.MyBatis和jdbc的区别 jdbc的过程包括: 1.加载数据库驱动. 2.建立数据库连接. 3.编写sql语句. 4.获取Statement:(Statement.PrepareStatem ...
- Mybatis进阶学习笔记——动态代理方式开发Dao接口、Dao层(推荐第二种)
1.原始方法开发Dao Dao接口 package cn.sm1234.dao; import java.util.List; import cn.sm1234.domain.Customer; pu ...
- MyBatis入门学习笔记(一)
一.什么是MyBatis? Mybatis是一种“半自动化”的ORM实现,支持定制化 SQL.存储过程以及高级映射. 二.hibernate和mybatis对比 共同:采用ORM思想解决了实体和数据库 ...
随机推荐
- N皇后问题解法
// // Created by Administrator on 2021/8/5. // #ifndef C__TEST01_NQUEENS_HPP #define C__TEST01_NQUEE ...
- MongoDB 安装/启动/基本操作命令
1.MongoDB简介 MongoDB是一个基于分布式文件存储的数据库,由C++语言编写,旨在为WEB应用提供可扩展的高性能数据存储解决方案. MongoDB是一个介于关系型数据库和非关系数据库之间的 ...
- 【Perl示例】整合多个文件
这个需求是在生信分析中几乎天天用到,各种语言都能实现,也都各有特点.这次以perl为例. 已知 文件CT-VS-CON.All.xls为全部蛋白表达矩阵及其差异分析结果. 文件Homo_sapiens ...
- R语言与医学统计图形-【21】ggplot2标题
ggplot2绘图系统--标题 在期刊杂志中,需要设置的图形标题并不多. 除了图形标题,还有坐标轴标题(标签).图例标题.脚注等. 标题函数:ggtitle,labs 坐标轴标题函数:xlab,yla ...
- Scrapy-Redis的安装和使用
Scrapy-Redis是Scrapy的分布式扩展模块,有了它,我们就可以方便地实现Scrapy分布式爬虫的搭建.GitHub:https://github.com/rmax/scrapy-redis ...
- Django结合Echarts在前端展示数据
前言 最近在用Django写UI自动化测试平台,基本快要弄完了,但是首页只有项目列表展示,一直感觉很空旷,所以想把一些关键数据在首页展示出来. 这时就想到利用Echarts这个开源项目,但是Djang ...
- 单元测试在Unity中的应用
项目描述:简单演示单元测试在Unity中的应用 项目地址:UnityTestRunner_Tutorial - SouthBegonia 项目版本:2020.3.20f1 项目用法:打开就用,代码都放 ...
- MySQL8.0配置文件详解
mysql8.0配置文件一.关键配置1. 配置文件的位置 MySQL配置文件 /etc/my.cnf 或者 /etc/my.cnf.d/server.cnf几个关键的文件:.pid文件,记录了进程id ...
- 系列好文 | Kubernetes 弃用 Docker,我们该何去何从?
作者 | 张攀(豫哲) 来源 | 尔达 Erda 公众号 导读:Erda 作为一站式云原生 PaaS 平台,现已面向广大开发者完成 70w+ 核心代码全部开源!**在 Erda 开源的同时,我们计划编 ...
- Vue框架,computed和watch的区别
computed和watch定义 1.computed是计算属性,类似于过滤器,对绑定到视图的数据进行处理.官网的例子: <div id="example"> < ...
