Docker手动配置Lamp镜像
在Docker Hub上找了很多Lamp的镜像
网上都说tutum的镜像做的还是不错的

试试
折腾了一上午无果。。。

算了,自己动手吧
- pull一个官方的ubuntu镜像下来作为最基础的镜像
root@VM-149-127-debian:~# docker pull ubuntu:latest
- 从这个镜像运行一个容器
root@VM-149-127-debian:~# docker run -itd ubuntu /bin/bash
从这个容器里搭建一个Lamp环境
- 首先更新一下
root@6b7e6d0e6c52:/# apt-get update
- 安装一些可能会用到的工具
root@6b7e6d0e6c52:/# apt-get –y install vim wget curl python2.7 python3 default-jdk git openssh-server
- 建议换成国内源,速度比较快
root@6b7e6d0e6c52:/# vim /etc/apt/source.list
#中科大:
deb http://mirrors.ustc.edu.cn/ubuntu/ xenial main restricted universe multiverse
deb http://mirrors.ustc.edu.cn/ubuntu/ xenial-security main restricted universe multiverse
deb http://mirrors.ustc.edu.cn/ubuntu/ xenial-updates main restricted universe multiverse
deb http://mirrors.ustc.edu.cn/ubuntu/ xenial-proposed main restricted universe multiverse
deb http://mirrors.ustc.edu.cn/ubuntu/ xenial-backports main restricted universe multiverse
deb-src http://mirrors.ustc.edu.cn/ubuntu/ xenial main restricted universe multiverse
deb-src http://mirrors.ustc.edu.cn/ubuntu/ xenial-security main restricted universe multiverse
deb-src http://mirrors.ustc.edu.cn/ubuntu/ xenial-updates main restricted universe multiverse
deb-src http://mirrors.ustc.edu.cn/ubuntu/ xenial-proposed main restricted universe multiverse
deb-src http://mirrors.ustc.edu.cn/ubuntu/ xenial-backports main restricted universe multiverse#清华大学:
# deb cdrom:[Ubuntu 16.04 LTS _Xenial Xerus_ - Release amd64 (20160420.1)]/ xenial main restricted deb http://mirrors.tuna.tsinghua.edu.cn/ubuntu/ xenial main restricted
deb http://mirrors.tuna.tsinghua.edu.cn/ubuntu/ xenial-updates main restricted
deb http://mirrors.tuna.tsinghua.edu.cn/ubuntu/ xenial universe
deb http://mirrors.tuna.tsinghua.edu.cn/ubuntu/ xenial-updates universe
deb http://mirrors.tuna.tsinghua.edu.cn/ubuntu/ xenial multiverse
deb http://mirrors.tuna.tsinghua.edu.cn/ubuntu/ xenial-updates multiverse
deb http://mirrors.tuna.tsinghua.edu.cn/ubuntu/ xenial-backports main restricted universe multiverse
deb http://mirrors.tuna.tsinghua.edu.cn/ubuntu/ xenial-security main restricted
deb http://mirrors.tuna.tsinghua.edu.cn/ubuntu/ xenial-security universe
deb http://mirrors.tuna.tsinghua.edu.cn/ubuntu/ xenial-security multiverse
#阿里云
# deb cdrom:[Ubuntu 16.04 LTS _Xenial Xerus_ - Release amd64 (20160420.1)]/ xenial main restricted deb-src http://archive.ubuntu.com/ubuntu xenial main restricted #Added by software-properties
deb http://mirrors.aliyun.com/ubuntu/ xenial main restricted
deb-src http://mirrors.aliyun.com/ubuntu/ xenial main restricted multiverse universe #Added by software-properties
deb http://mirrors.aliyun.com/ubuntu/ xenial-updates main restricted
deb-src http://mirrors.aliyun.com/ubuntu/ xenial-updates main restricted multiverse universe #Added by software-properties
deb http://mirrors.aliyun.com/ubuntu/ xenial universe
deb http://mirrors.aliyun.com/ubuntu/ xenial-updates universe
deb http://mirrors.aliyun.com/ubuntu/ xenial multiverse
deb http://mirrors.aliyun.com/ubuntu/ xenial-updates multiverse
deb http://mirrors.aliyun.com/ubuntu/ xenial-backports main restricted universe multiverse
deb-src http://mirrors.aliyun.com/ubuntu/ xenial-backports main restricted universe multiverse #Added by software-properties
deb http://archive.canonical.com/ubuntu xenial partner
deb-src http://archive.canonical.com/ubuntu xenial partner
deb http://mirrors.aliyun.com/ubuntu/ xenial-security main restricted
deb-src http://mirrors.aliyun.com/ubuntu/ xenial-security main restricted multiverse universe #Added by software-properties
deb http://mirrors.aliyun.com/ubuntu/ xenial-security universe
deb http://mirrors.aliyun.com/ubuntu/ xenial-security multiverse
- 安装pip
root@6b7e6d0e6c52:/# wget https://bootstrap.pypa.io/get-pip.py && python2.7 ./get-pip.py && python3 ./get-pip.py && rm ./get-pip.py
- 安装Maven
root@6b7e6d0e6c52:/# cd /usr/local && wget http://mirrors.tuna.tsinghua.edu.cn/apache/maven/maven-3/3.5.0/binaries/apache-maven-3.5.0-bin.tar.gz
root@6b7e6d0e6c52:/# tar xzf apache-maven-3.5.0-bin.tar.gz && ln -s apache-maven-3.5.0 apache-maven
root@6b7e6d0e6c52:/# vim /etc/profile.d/apache-maven.sh
export JAVA_HOME=/usr/lib/jvm/java-8-openjdk-amd64/jreexport M2_HOME=/usr/local/apache-maven
export PATH=${M2_HOME}/bin:${PATH}root@6b7e6d0e6c52:/# source /etc/profile.d/apache-maven.sh
- 可以开始搭建Lamp环境了
- 安装Mysql
root@6b7e6d0e6c52:/# apt-get –y install mysql-server mysql-client
- 安装Apache2
root@6b7e6d0e6c52:/# apt-get –y install apache2
- 安装PHP
root@6b7e6d0e6c52:/# apt-get –y install php7.0
- 安装PHP扩展
root@6b7e6d0e6c52:/# apt-get –y install libapache2-mod-php7.0 libapache2-mod-php php7.0-mysql php7.0-curl php7.0-json php7.0-cgi php7.0-gd php7.0-intl php-pear php-imagick php7.0-imap php7.0-mcrypt php-memcache php7.0-pspell php7.0-recode php7.0-snmp php7.0-tidy php7.0-xmlrpc php7.0-xsl
- 安装phpmyadmin
root@6b7e6d0e6c52:/# apt-get install phpmyadmin && cp /usr/share/phpmyadmin /var/www/html -a
- 重启Apache
root@6b7e6d0e6c52:/# service apache2 restart
- Lamp环境已经搭建完成了,测试一下
root@6b7e6d0e6c52:/# curl 127.0.0.1
Good!
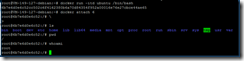
- 退出这个容器,使用commit命令从这个容器创建一个镜像
Ctrl+p+q
root@VM-149-127-debian:~# docker commit 6b7e srpopty/lamp
6b7e是刚才创建的容器,后面是镜像的标签
过程比较慢。。。。。
- 成功!

f67b7ba76dca63c2a25babc666340c3148dea08c64c400eadbb9b25b34d0e480
就是生成的镜像
772MB,可能装的库有点多
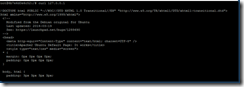
- 测试一下
root@VM-149-127-debian:~# docker run –itd –p 1234:80 f67b /bin/bash
进容器看看
root@VM-149-127-debian:~# docker attach d553
原来服务没开,嗯。。。或许可以设定成自启动
打开服务
root@d5534be976a6:/# service apache2 start
出现报错
* Starting Apache httpd web server apache2 AH00558: apache2: Could not reliably determine the server's fully qualified domain name, using 172.17.0.3. Set the 'ServerName' directive globally to suppress this message
*
解决办法
root@d5534be976a6:/# vim /etc/apache2/apache2.conf
在最后一行加上
#Server Name
ServerName 127.0.0.1:80
保存退出,重启apache再试试

Good!
- 现在Lamp镜像就做好了,别忘记删除中间容器

这个方法有个很大的缺点,因为自己动手制作的lamp镜像是基于ubuntu的子镜像,所以原来的ubuntu镜像是不能删除的,不过留着就留着吧,以后制作基于ubuntu的其他镜像的时候也方便。
Docker手动配置Lamp镜像的更多相关文章
- Docker中配置国内镜像
1. 为什么要为docker配置国内镜像 在正常情况下,docker有一个默认连接的国外官方镜像,在国外的网友访问该官方镜像自然不成问题,但是国内毕竟不是国外,由于国情不同,中国的网络访问国外官方 ...
- 利用Docker手动构建WebLogic镜像的步骤
info 我的Docker环境信息如下: [root@localhost ~]# docker info -f " OSType: {{.OperatingSystem}} {{.Archi ...
- Docker 配置国内镜像加速器,加速下载速度
文章首发自个人微信公众号:小哈学Java 个人网站地址:https://www.exception.site/docker/docker-configuration-of-mirror-acceler ...
- Docker 配置国内镜像加速器
Docker 默认是从官方镜像地址 Docker Hub 下下载镜像,由于服务器在国外的缘故,导致经常下载速度非常慢.为了提升镜像的下载速度,我们可以手动配置国内镜像加速器,让下载速度飚起来. 国内的 ...
- docker 配置国内镜像源 linux/mac/windows
部分内容来自:http://guide.daocloud.io/dcs/daocloud-9153151.html 加速器官方DaoCloud承诺:加速器服务永久免费且无流量限制 使用前提:注册Dao ...
- docker拉取oracle11g镜像配置
开始拉取oracle11g镜像 下载过程稍长,镜像大小6.8G(之前拉取过了,所以就不截图了) #docker pull registry.cn-hangzhou.aliyuncs.com/helow ...
- windows环境安装docker,并下载lamp镜像
1.PC系统:windows10专业版 2.开启Hyper-V 此电脑->右击->属性->控制面板主页->(查看方式为小图标)程序和功能->右上方启动或关闭windows ...
- Docker配置本地镜像与容器的存储位置
默认情况下Docker的存放位置为:/var/lib/docker 可以通过下面命令查看具体位置: sudo docker info | grep "Docker Root Dir" ...
- 为docker配置国内镜像加速器
docker官方镜像仓库地址为:https://hub.docker.com/search?q=&type=image 因为是国外地址,因此下载镜像时速度很慢. 我们需要配置国内镜像加速, 可 ...
随机推荐
- Code First约定-Fluent API配置
转自:http://blog.163.com/m13864039250_1/blog/static/2138652482015283397609/ 用Fluent API 配置/映射属性和类型 简介 ...
- ABPZero中的Name和SurName处理
使用ABPzero的朋友们都知道,User表中有Name和Surname两个字段,这两个字段对于国内的用户来说相当的不友好. 我们在尝试了很多的方法之后,发现无法完美将他们干掉. 所以尝试使用了一个比 ...
- 人生第一次hash
人生的第一次hash交给了模板题. 讲道理,还没有别人快排要快,就比暴力快那么一点... 难道我写的hash就那么菜么? 我想了想,光是处理字符串就O(n*len).. 这是hash的正确写法吗?我都 ...
- JS和CSS中引号的使用
font-family属性值如果是英文可以不加引号,如果是中文按照CSS标准则应该加引号,但不加引号也没关系.比如:font-family:Arial,"宋体"," ...
- 关于 __proto__和prototype的一些理解
var Person = function(name) {}; Person.prototype.say = function() { console.log("Person say&quo ...
- java类集框架(ArrayList,LinkedList,Vector区别)
主要分两个接口:collection和Map 主要分三类:集合(set).列表(List).映射(Map)1.集合:没有重复对象,没有特定排序方式2.列表:对象按索引位置排序,可以有重复对象3.映射: ...
- sqoop关系型数据迁移原理以及map端内存为何不会爆掉窥探
序:map客户端使用jdbc向数据库发送查询语句,将会拿到所有数据到map的客户端,安装jdbc的原理,数据全部缓存在内存中,但是内存没有出现爆掉情况,这是因为1.3以后,对jdbc进行了优化,改进j ...
- IOS中的UIScrollView
要引用UIScrollView 首先要遵循UIScrollViewDelegate协议 然后重写 //1.拖拽方法 -(void)scrollViewDidScroll:(UIScrollView * ...
- poj 1001 分析
1) n = 0; return 1: 2) n = 1; bool standardizeNumNoDot(string &s){标准化是一定要得} _将‘.’前后的〇全部去除,正常retu ...
- ASP.NET MVC知识点总结
一直都有把MVC的知识点总结出来的打算,今日终于得偿所愿.话不多说,开工!!! 一· MVC MVC设计模式->MVC框架(前端开发框架),asp.net(webform) aspx M:Mo ...