Django App(三) View+Template
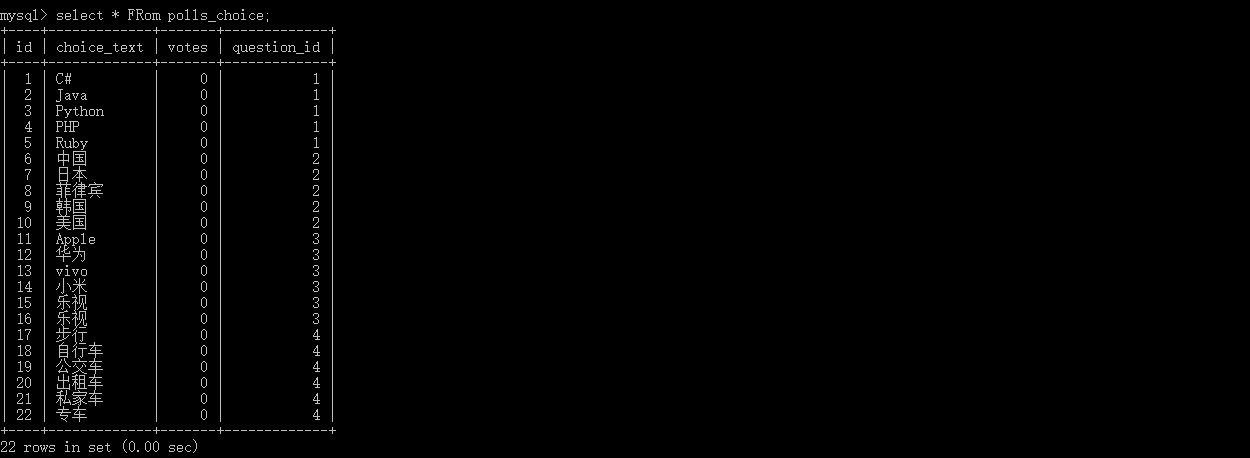
接着上一节(二)的内容,首先启动站点,通过界面添加Question和Choice两张表的数据,因为接下来,要向polls app里面添加views.
1.添加数据如下(这里是通过界面操作添加的数据)
Question

Choice

2.添加views
编写polls/views.py,添加detail(指定question的详情),results(指定question的投票结果),vote(指定question投票),每个view指定question_id作为参数,添加如下代码:
 def detail(request, question_id):

     return HttpResponse("You're looking at question %s." % question_id)

 def results(request, question_id):

     response = "You're looking at the results of question %s."

     return HttpResponse(response % question_id)

 def vote(request, question_id):

     return HttpResponse("You're voting on question %s." % question_id)
实际上这里所说的view,就是指polls/views.py中定义的一个一个的函数(action),python中函数名要全小写,如果必须有大写,不会报错,但是在路由体系中,是大小写敏感的,如果url中有大写自动转换成小写,但是如果,在定义urls.py中出现大写的定义,该view就无法访问,这个在下面会验证,这里全部采用小写.接下来把新定义的view添加到polls/urls.py路由中:
 from django.urls import path

 from . import views

 urlpatterns=[

     path('first/',views.index,name='index'),

     path('<int:question_id>/detail',views.detail,name="detail"), #定义detail view

     path('<int:question_id>/results',views.results,name='results'),#定义格式:/参数[参数类型为int]/results

     path('vote/<int:question_id>',views.vote,name='vote')  #定义格式:vote/参数[参数类型为int]

 ]
根据刚刚定义的路由格式,分别查看
http://localhost:8008/polls/1/detail

http://localhost:8008/polls/vote/1

http://lcoalhost:8008/polls/vote/abce

接下来验证路由大小写的问题,修改polls/urls.py如下:
    #这里将原来的vote/<int:question_id>改成<Vote/<int:question_id>

    path('Vote/<int:question_id>',views.vote,name='Vote')  #定义格式:vote/参数[参数类型为int]
http://localhost:8008/polls/vote/1 #url即使输入的有大写,也会自动转换成小写,所以在定义ulrs.py的时候 全部采用小写

3.添加views模板
上面用了大篇幅完成了向app polls中添加view(action),但是我们并不是每一次都希望view就返回一句话,更多时候我们需要他返回的是一个动态的,完整的页面
接下来的事情,view的主要任务是负责准备页面需要展示的数据,而由模板负责数据绑定和页面渲染,模板和view一般是一对一的
新建路径及文件 polls/templates/polls/index,现在polls目录如下:

改造polls/views.py view index 如下:
 from django.http import HttpResponse

 from django.template import loader

 from .models import Question

 def index(request):

     latest_question_list = Question.objects.order_by('-pub_date')[:5]

     template = loader.get_template('polls/index.html')

     context = {

         'latest_question_list': latest_question_list,

     }

     return HttpResponse(template.render(context, request))
通过上一节的配置,和本节开始部分的努力,models 中的Question的对象已经和数据库绑定,并且带有数据:
 latest_question_list = Question.objects.order_by('-pub_date')[:5]  #按照pub_date排序,取前五条

 template = loader.get_template('polls/index.html')  #加载模板

 HttpResponse(template.render(context, request))   #使用loader填充数据
编写polls/templates/polls/index.html如下:
{% if latest_question_list %}

    <ul>

    {% for question in latest_question_list %}

        <li><a href="/polls/{{ question.id }}/detail">{{ question.question_text }}</a></li>

    {% endfor %}

    </ul>

{% else %}

    <p>No polls are available.</p>

{% endif %}
在html中直接取出view中loader填充的数据:'latest_question_list': latest_question_list在界面循环展示出来

在绑定数据到界面的时候,也可以使用render(),似乎更简洁,便捷polls/views.py:
 from django.shortcuts import render

 from .models import Question

 def index(request):

     latest_question_list = Question.objects.order_by('-pub_date')[:5]

     context = {'latest_question_list': latest_question_list}

     return render(request, 'polls/index.html', context)
4.处理404的错误
上面通过模板生成的每一连接,连接到 http://localhost:8000/polls/(question_id)/detail,如果传入的question_id在数据库中不存在,我们就要在代码中提前处理,编辑polls/views.py/detail 如下:
 from django.http import Http404

 from django.shortcuts import render

 from .models import Question

 # ...

 def detail(request, question_id):

     try:

         question = Question.objects.get(pk=question_id)

     except Question.DoesNotExist:

         raise Http404("Question does not exist")

     return render(request, 'polls/detail.html', {'question': question})
官网后面还介绍了 Template System ,防止硬编码Url,Url命名空间等,请参考[https://docs.djangoproject.com/en/2.0/intro/tutorial03/]
Django App(三) View+Template的更多相关文章
- frist Django app — 三、 View
前面已经说过了Django中model的一些用法,包括orm,以及操作的api,接下来就是搭一些简单的界面学习view——Django中的view.主要介绍以下两个方面: url映射 请求处理 模板文 ...
- django notes 三:Template 的查找
django 中有 2种 Template Loader django.template.loaders.filesystem.Loader django.template.loaders.app_d ...
- django基础PROJECT APP View template
project 和 app 的区别就是一个是配置另一个是代码: 一个project包含很多个Django app以及对它们的配置. 一个project的作用是提供配置文件,比方说哪里定义数据库连接信息 ...
- Django 2.0.1 官方文档翻译: 编写你的第一个 Django app,第三部分(Page 8)
编写你的第一个 Django app,第三部分(Page 8)转载请注明链接地址 本页教程接前面的第二部分.我们继续开发 web-poll app,我们会专注于创建公共接口上 -- "视图& ...
- Django 基础二(View和urls)
上一篇博文已经成功安装了python环境和Django,并且新建了一个空的项目.接下来就可以正式开始进行Django下 的Web开发了.首先进入项目的主目录: cd ./DjangoLearn/hol ...
- Python-Django 第一个Django app
第一个Django app by:授客 QQ:1033553122 测试环境: Python版本:python-3.4.0.amd64 下载地址:https://www.python.org/do ...
- python django基础三 模版渲染
request对象 当一个页面被请求时,Django就会创建一个包含本次请求原信息的HttpRequest对象.Django会将这个对象自动传递给响应的视图函数,一般视图函数约定俗成地使用 reque ...
- Django基础三之视图函数
一 Django的视图函数view 一个视图函数(类),简称视图,是一个简单的Python 函数(类),它接受Web请求并且返回Web响应. 响应可以是一张网页的HTML内容,一个重定向,一个404错 ...
- python3开发进阶-Django视图(View)的常见用法
阅读目录 简述Django的View(视图) CBV和FBV Request对象和Response对象 Django组件(render,redirect)详解 一.简述Django的View(视图) ...
随机推荐
- 2、转载一篇,浅析人脸检测之Haar分类器方法
转载地址http://www.cnblogs.com/ello/archive/2012/04/28/2475419.html 浅析人脸检测之Haar分类器方法 [补充] 这是我时隔差不多两年后, ...
- 伽罗瓦域(有限域)GFq^12上元素的1→2→4→12塔式扩张(1)------第一次扩张
伽罗瓦域是抽象代数下的域论分支中的内容,这部分想必很多人都比较熟悉,此处不再赘述. 最近,国密算法中的SM2和SM9已经成为国际标准,其中SM9算法在椭圆曲线离散对数难题的基础上,添加了若干个双线性配 ...
- springMVC(5)---导入excel文件数据到数据库
springMVC(5)---导入excel文件数据到数据库 上一篇文章写了从数据库导出数据到excel文件,这篇文章悄悄相反,写的是导入excel文件数据到数据库.上一篇链接:springMVC(4 ...
- NestedScrollingParent, NestedScrollingChild 详解
之前听同事提起过 NestedScrollingView,但是一直没有时间去了解,最近一段时间比较空,才开始去了解.先点开,看 NestedScrollingView 源码: public class ...
- java内存溢出问题
相信有一定java开发经验的人或多或少都会遇到OutOfMemoryError的问题,这个问题曾困扰了我很长时间,随着解决各类问题经验的积累以及对问题根源的探索,终于有了一个比较深入的认识. 在解决j ...
- zabbix借助onealert实现微信报警
官网:http://wiki.110monitor.com/integration/zabbix-manual.html) Zabbix安装包部署方式 1)下载agent软件包 请在Zabbix服务器 ...
- rpc之thrift
rpc之thrift 一.介绍 thrift是一个rpc(remove procedure call)框架,可以实现不同的语言(java.c++.js.python.ruby.c#等)之间的相互调用. ...
- golang 数组反转
我做hackerearth上题目记录,具体的题目描述是这样的: Given the size and the elements of array A, print all the elements i ...
- Hibernate学习笔记(1)---hibernate快速上手与准备工作
持久层介绍 持久化:将内存中的数据保存在磁盘等存储设备中. 持久化对象:指已经存储在数据库护着磁盘的业务对象 经典的软件应用体系结构(三层结构) 在三层结构中,由于业务逻辑除了负责业务逻辑以外,还要负 ...
- Wechat 微信端调用“微信支付接口”的正确方式
微信端的项目中,比如微信商城之类的,肯定会涉及到微信支付这一块: 下面直接上详细的代码: var data = {--}; // 调用微信支付需要的数据 function onBridgeReady( ...
