linux-2.6.38 input子系统(简析)
一、输入子系统简介
引入输入子系统这种机制可以对不同的输入设备进行管理。各种输入设备如:鼠标、键盘、触摸屏等有一套相同的处理机制,输入子系统将其共性提取出来,
对于驱动开发人员只用实现其差异即可,实现其差异性即是完成各种设备的设备驱动程序。
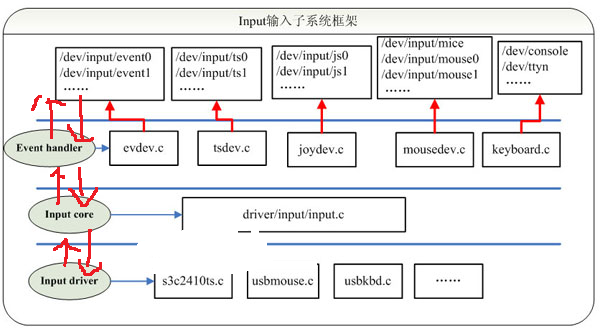
整个输入子系统有:设备驱动层、输入核心层、事件处理层三部分组成。这里借用别人的一张图 https://www.cnblogs.com/libra13179/p/10325058.html 来说明这三层的关系。

驱动层:将硬件输入转化为统一的事件形式,向输入核心Input core 汇报
输入核心层:为驱动层提供设备注册于操作函数,如:input_register_device;并通知事件处理层对事件进行处理;并在proc下产生相应的设备信息
事件处理层:主要是和用户空间交互(Linux中在用户空间将所有的设备都当作文件来处理,由于在一般的驱动程序中都有提供fops接口,以及在/dev下生成相应的设备文件nod,
这些操作在输入子系统中由事件处理层完成)。
二、输入子系统代码分析
2.1 输入子系统核心层代码:
2.1.1 输入子系统的入口函数:
  static int __init input_init(void)

  {

      int err;

      err = class_register(&input_class);                        // 1. 注册一个类  /sys/class/input

      if (err) {

          pr_err("unable to register input_dev class\n");

          return err;

      }

     err = input_proc_init();                                   // 2. 在proc目录下创建bus/input/devices 和handlers

     if (err)

         goto fail1;

     err = register_chrdev(INPUT_MAJOR, "input", &input_fops);  // 3. 注册字符设备,主设备号是13 ,文件相关操作结构体input_fops

     if (err) {

         pr_err("unable to register char major %d", INPUT_MAJOR);

         goto fail2;

     }

     return ;

  fail2:    input_proc_exit();

  fail1:    class_unregister(&input_class);

     return err;

 }
由输入子系统的入口函数看,输入子系统其实也是一个字符设备。通过15行的字符设备注册函数可以看出输入设备的主设备号是13,输入设备文件操作的结构体是input_fops

这就有点让人感到奇怪了为什么输入设备文件相关主要操作只有一个open,而没有read、write、poll、fasync 等操作呢? 只有一个open函数,那么当我打开随便打开一个输入设备的时候,肯定会调用这个open函数
static int input_open_file(struct inode *inode, struct file *file)

{

    struct input_handler *handler;

    const struct file_operations *old_fops, *new_fops = NULL;

    int err;

    err = mutex_lock_interruptible(&input_mutex);

    if (err)

        return err;

    /* No load-on-demand here? */

    handler = input_table[iminor(inode) >> ];    // inminor(inode) >> 5 : 获取子设备号, 然后将子设备号除以32, 然后在input_table 中找到相应的事件处理结构体input_handler

    if (handler)

                                // input_handler 中有关于文件操作的结构体fops, 得到input_handler中文件操作结构体

        new_fops = fops_get(handler->fops);

    mutex_unlock(&input_mutex);

    if (!new_fops || !new_fops->open) {

        fops_put(new_fops);

        err = -ENODEV;

        goto out;

    }

    old_fops = file->f_op;

    file->f_op = new_fops;                       // 把当前文件操作的结构体换成input_handler中的文件操作结构体

    err = new_fops->open(inode, file);

    if (err) {

        fops_put(file->f_op);

        file->f_op = fops_get(old_fops);

    }

    fops_put(old_fops);

out:

    return err;

}
从input_open_file函数中可以看出来,原来输入设备的文件操作结构体不是统一的input_fops,而是不同的输入设备有属于自己的文件操作方式,这种对应方式就是:
设备文件的子设备号--->input_handler结构体--->新的fops结构体--->替换旧的fops
这也就解决了为什么输入设备文件相关主要操作只有一个open,而没有read、write、poll、fasync 等操作,这些其他操作都有可能在一个对应的input_handler 中的一个fops结构体中。
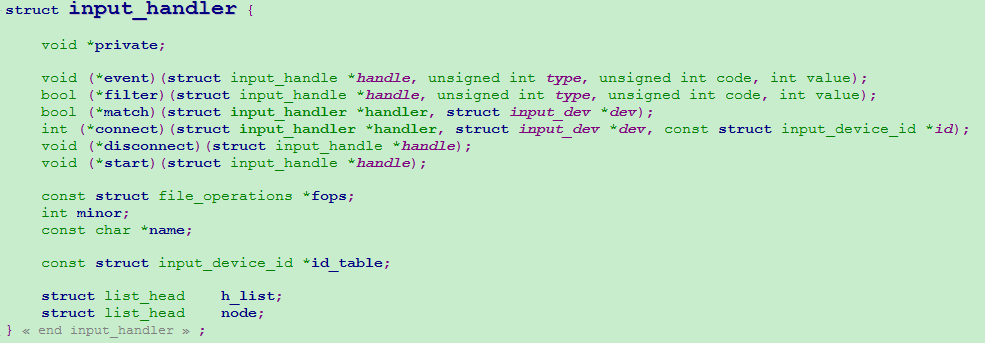
现在看一下这个input_handler 到底是什么?

这个结构体和input_dev 是一对成对的结构体。输入子系统分为:设备驱动层、核心层、事件处理层。我想这里input_handler对应的是事件处理层的结构体,input_dev 对应的是设备驱动层的结构体。
2.1.2 input_register_handler 函数分析
在2.1.1中说了是在nput_table[]数组中找到input_handler 结构体的,那么问题来了这个结构体是什么时候被放到input_table中的?
int input_register_handler(struct input_handler *handler)

{

    struct input_dev *dev;

    int retval;

    retval = mutex_lock_interruptible(&input_mutex);

    if (retval)

        return retval;

    INIT_LIST_HEAD(&handler->h_list);

    if (handler->fops != NULL) {

        if (input_table[handler->minor >> ]) {

            retval = -EBUSY;

            goto out;

        }

        input_table[handler->minor >> ] = handler;     // 这里就是把一个input_handler 放到input_table中的,

    }

    list_add_tail(&handler->node, &input_handler_list); // 这里是链表操作,把handler 这个结构体挂在input_handler_list 这个连表上(input_handler_list应该是一个input_hanler 链表)

    list_for_each_entry(dev, &input_dev_list, node)     // 遍历input_dev_list这个链表,进行input_handler 和 input_device 的 attach 操作

        input_attach_handler(dev, handler);

    input_wakeup_procfs_readers();

 out:

    mutex_unlock(&input_mutex);

    return retval;

}
可以看到在注册一个input_handler结构体的时候,将这个input_handler放入到input_table中,并将这个input_handler结构体挂在input_handler_list 上,方便遍历操作。
同时这里还遍历了input_dev_list 链表里的每一个input_dev结构体,进行input_handler 和 input_dev 的attach 操作。
input_attach_handler 函数分析
input_handler 和 input_dev 的 attach 操作到底进行了什么操作?我们可以看一下 input_attach_handler这个函数。
static int input_attach_handler(struct input_dev *dev, struct input_handler *handler)

{

    const struct input_device_id *id;

    int error;

    id = input_match_device(handler, dev);      // 进行匹配操作, 匹配成功返回一个id

    if (!id)

        return -ENODEV;

    error = handler->connect(handler, dev, id); // 然后连接这个input_handler 和 input_dev

    if (error && error != -ENODEV)

        pr_err("failed to attach handler %s to device %s, error: %d\n",

               handler->name, kobject_name(&dev->dev.kobj), error);

    return error;

}
先看第一步:input_match_device(handler, dev); id匹配操作
static const struct input_device_id *input_match_device(struct input_handler *handler,

                            struct input_dev *dev)

{

    const struct input_device_id *id;

    int i;

    for (id = handler->id_table; id->flags || id->driver_info; id++) {

                //  这四个if 判断的是id中bustype、vendor、product、version这四个标识匹配否, 注意 若是 id->flags =0  那么 下面的4 的判断就不同执行了

                ......

                //  接下来的match_bit是看hander与 dev  id中的关于事件操作的一些位匹配   这些位代表什么含义在后序解释

                ......

                //  接下来执行handler->match 函数

             if (!handler->match || handler->match(handler, dev))

            return id;

    }

    return NULL;

}
在看第二步:在执行为完 input_match_device之后,在input_attach_handler中执行一个重要的函数handler->connect ,这个函数建立了input_dev 和 input_handler 这两个结构体之间的桥梁,即把事件处理和设备驱动联系起来了。
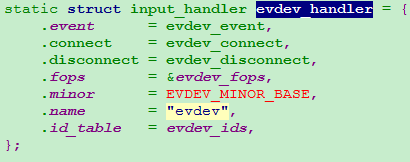
要看handler->connect 这个函数具体干了什么,必须借助一个具体的handler,在evdev.c中中有一个事件处理器结构体:evdev_handler

可以看到在evdev_handler中函数evdev_connect,在第三节借助evdev.c 这个文件来分析这些涉及到事件处理的函数。
2.1.3 input_register_device 函数分析
前边分析了注册事件处理器input_handler的函数,这里分析注册设备驱动的函数,这两个函数可以说是一对函数
int input_register_device(struct input_dev *dev)

{

       .....// 这里分析重点函数

    list_add_tail(&dev->node, &input_dev_list);  // 把input_dev 挂到input_dev_list 链表中,方便遍历

    list_for_each_entry(handler, &input_handler_list, node)

        input_attach_handler(dev, handler);    // 遍历input_handler_list 链表进行dev和handler的attach操作

    .....

}
input_register_device 和 input_register_handler是非常对称的一对函数,都有链表操作,都有遍历链表attach的操作。这说明了,不管是先注册handler 还是先注册 device 都会进行input_attach_handler操作,在里边进行匹配、连接操作。
2.4 input_event 函数
该函数的分析需结合下一节《用输入子系统实现按键操作》来分析。
3 evdev.c 中相关的事件处理函数分析
3.1 evdev_connect 函数
这个函数是建立一个evdev_handler (事件处理器)和一个(input_dev)输入设备之间关系的桥梁。
  static int evdev_connect(struct input_handler *handler, struct input_dev *dev,

               const struct input_device_id *id)

  {

      struct evdev *evdev;

      int minor;

      int error;

      for (minor = ; minor < EVDEV_MINORS; minor++)    // EVDEV_MINORS = 32 表示 在 evdev 事件下只能有 32 个输入设备和 evdev_handler 建立连接,建立新的evdev设备

          if (!evdev_table[minor])                      // 找一个还没有用的次设备号

             break;

     if (minor == EVDEV_MINORS) {

         pr_err("no more free evdev devices\n");

         return -ENFILE;

     }

     evdev = kzalloc(sizeof(struct evdev), GFP_KERNEL); // 分配一个evdev 结构体

     if (!evdev)

         return -ENOMEM;

     INIT_LIST_HEAD(&evdev->client_list);

     spin_lock_init(&evdev->client_lock);

     mutex_init(&evdev->mutex);

     init_waitqueue_head(&evdev->wait);                     // 初始化等待对列

     dev_set_name(&evdev->dev, "event%d", minor);           // 设置evdev->dev 的名字

     evdev->exist = true;

     evdev->minor = minor;

     evdev->handle.dev = input_get_device(dev);            // evdev->handle 的初始化

     evdev->handle.name = dev_name(&evdev->dev);

     evdev->handle.handler = handler;

     evdev->handle.private = evdev;

     evdev->dev.devt = MKDEV(INPUT_MAJOR, EVDEV_MINOR_BASE + minor);  //设置evdev的的主设备号和次设备号:主设备号13 表示一个输入设备、 次设备号64+minor

     evdev->dev.class = &input_class;

     evdev->dev.parent = &dev->dev;

     evdev->dev.release = evdev_free;

     device_initialize(&evdev->dev);

     error = input_register_handle(&evdev->handle);                // 注册handle结构体   注意区分 input_register_handler

     if (error)

         goto err_free_evdev;

     error = evdev_install_chrdev(evdev);                          // 将新分配的evdev 放入到evdev_table中

     if (error)

         goto err_unregister_handle;

     error = device_add(&evdev->dev);                              // 添加设备

     if (error)

         goto err_cleanup_evdev;

     return ;

  err_cleanup_evdev:

     evdev_cleanup(evdev);

  err_unregister_handle:

     input_unregister_handle(&evdev->handle);

  err_free_evdev:

     put_device(&evdev->dev);

     return error;

 }
(1)在每一次调用evdev_connect 函数的时候,都会创建一个新的evdev设备, 在第8~10 行就是找一个可以用的次设备号
(2)input_register_handle函数分析:
int input_register_handle(struct input_handle *handle)

{

    struct input_handler *handler = handle->handler;

    struct input_dev *dev = handle->dev;

    int error;

    error = mutex_lock_interruptible(&dev->mutex);

    if (error)

        return error;

    if (handler->filter)

        list_add_rcu(&handle->d_node, &dev->h_list);     //  把evdev->handle挂到input_dev->h_list链表中

    else

        list_add_tail_rcu(&handle->d_node, &dev->h_list);

    mutex_unlock(&dev->mutex);

    list_add_tail_rcu(&handle->h_node, &handler->h_list); // 把evdev->handle 挂到input_handler->h_list链表中

    if (handler->start)

        handler->start(handle);

    return ;

}
这两个链表操作把要连接的input_dev和input_handler 通过 evdev->handle 串在了一起。
3.2 evdev_read 函数分析
在input_dev 和 evdev_handler建立了连接之后,若是要读取设备文件的数据,那么就会调用evdev_handler->fops.read 函数
static ssize_t evdev_read(struct file *file, char __user *buffer,

              size_t count, loff_t *ppos)

{

    struct evdev_client *client = file->private_data;

    struct evdev *evdev = client->evdev;

    struct input_event event;

    int retval;

    if (count < input_event_size())

        return -EINVAL;

       // 在非阻塞情况下,环形队列中没有数据的时候,立即返回给应用程序-EAGAIN,提醒用户重新读取数据

    if (client->head == client->tail && evdev->exist &&

        (file->f_flags & O_NONBLOCK))

        return -EAGAIN;

       //  若唤醒队列中没有数据或者evdev不存在时进入睡眠状态等待其他程序来唤醒

    retval = wait_event_interruptible(evdev->wait,

        client->head != client->tail || !evdev->exist);

    if (retval)

        return retval;

    if (!evdev->exist)

        return -ENODEV;

       //  上传数据到应用程序

    while (retval + input_event_size() <= count &&

           evdev_fetch_next_event(client, &event)) {

        if (input_event_to_user(buffer + retval, &event))

            return -EFAULT;

        retval += input_event_size();

    }

    return retval;

}
这里是哪个程序来唤醒这个evdev_read函数的呢?有可能是中断,还有可能其他函数,这里可以看一下evdev_event函数, 这个函数可以唤醒evdev_read 函数。
3.3 evdev_event 函数分析
当设备驱动程序中上报事件时,若是该设备的input_dev和evdev_handler连接好了之后,就会调用evdev_event函数。这些东西在设备驱动编写过程中再分析调用流程。
static void evdev_event(struct input_handle *handle,

            unsigned int type, unsigned int code, int value)

{

    struct evdev *evdev = handle->private;

    struct evdev_client *client;

    struct input_event event;

    do_gettimeofday(&event.time);

    event.type = type;

    event.code = code;

    event.value = value;

    rcu_read_lock();

    client = rcu_dereference(evdev->grab);

    if (client)

        evdev_pass_event(client, &event);

    else

        list_for_each_entry_rcu(client, &evdev->client_list, node)

            evdev_pass_event(client, &event);

    rcu_read_unlock();

    wake_up_interruptible(&evdev->wait);      // 这里即可以唤醒evdev_read函数

}
linux-2.6.38 input子系统(简析)的更多相关文章
- 【Linux高级驱动】input子系统框架【转】
转自:http://www.cnblogs.com/lcw/p/3802617.html [1.input子系统框架(drivers\input)] 如何得出某个驱动所遵循的框架? 1) 通过网 ...
- 【Linux高级驱动】input子系统框架
[1.input子系统框架(drivers\input)] 如何得出某个驱动所遵循的框架? 1) 通过网络搜索 2) 自己想办法跟内核代码! 2.1 定位此驱动是属于哪种类 ...
- Linux驱动之输入子系统简析
输入子系统由驱动层.输入子系统核心.事件处理层三部分组成.一个输入事件,如鼠标移动.键盘按下等通过Driver->Inputcore->Event handler->userspac ...
- driver: Linux设备模型之input子系统详解
本节从整体上讲解了输入子系统的框架结构.有助于读者从整体上认识linux的输入子系统.在陷入代码分析的过程中,通过本节的知识能够找准方向,明白原理. 本节重点: 输入子系统的框架结构 各层对应内核中的 ...
- driver: Linux设备模型之input子系统具体解释
本节从总体上解说了输入子系统的框架结构.有助于读者从总体上认识linux的输入子系统.在陷入代码分析的过程中,通过本节的知识可以找准方向,明确原理. 本节重点: 输入子系统的框架结构 各层相应内核中的 ...
- linux-2.6.38 input子系统(用输入子系统实现按键操作)
一.设备驱动程序 在上一篇随笔中已经分析,linux输入子系统分为设备驱动层.核心层和事件层.要利用linux内核中自带的输入子系统实现一个某个设备的操作,我们一般只需要完成驱动层的程序即可,核心层和 ...
- Linux 下网络性能优化方法简析
概述 对于网络的行为,可以简单划分为 3 条路径:1) 发送路径,2) 转发路径,3) 接收路径,而网络性能的优化则可基于这 3 条路径来考虑.由于数据包的转发一般是具备路由功能的设备所关注,在本文中 ...
- linux开发各种I/O操作简析,以及select、poll、epoll机制的对比
作者:良知犹存 转载授权以及围观:欢迎添加微信公众号:羽林君 IO 概念区分 四个相关概念: 同步(Synchronous) 异步( Asynchronous) 阻塞( Blocking ) 非阻塞( ...
- Linux进程的睡眠和唤醒简析
COPY FROM:http://www.2cto.com/os/201204/127771.html 1 Linux进程的睡眠和唤醒 在Linux中,仅等待CPU时间的进程称为就绪进程,它们被放置在 ...
随机推荐
- 【算法导论】--分治策略Strassen算法(运用下标运算)【c++】
由于偷懒不想用泛型,所以直接用了整型来写了一份 ①首先你得有一个矩阵的class Matrix ②Matrix为了方便用下标进行运算, Matrix的结构如图:(我知道我的字丑...) Matrix. ...
- tensorflow搭建神经网络
最简单的神经网络 import tensorflow as tf import numpy as np import matplotlib.pyplot as plt date = np.linspa ...
- 最新 小米java校招面经 (含整理过的面试题大全)
从6月到10月,经过4个月努力和坚持,自己有幸拿到了网易雷火.京东.去哪儿.小米等10家互联网公司的校招Offer,因为某些自身原因最终选择了小米.6.7月主要是做系统复习.项目复盘.LeetCode ...
- Guava源码阅读-base-Charsets
package com.google.common.base; 今天在找base包下的源码阅读时,看到了Charsets,肯定是定义字符集的类,本来就想简单的看一下.(部分内容摘抄自:http://b ...
- PYTHON 100days学习笔记008-4:错误和异常
目录 Day008_04:python错误和异常 1.语法错误 2.异常 3.异常处理 4.抛出异常 5.用户自定义异常 6.定义清理行为 7.预定义的清理行为 参考文章: python3错误和异常 ...
- 澎湃新闻速览版UWP 隐私策略
ThePaper UWP 此为 澎湃新闻速览版 的隐私策略,本隐私策略内容会不定期更新,以最新内容为主. 若您已经阅读并了解以下内容后,并继续使用该软件,即表示您已同意该协议. 内容: 这是澎湃新闻的 ...
- Vue ---- Vuex 的第一次接触
在 Vue.js 的项目中,如果项目结构简单, 父子组件之间的数据传递可以使用 props 或者 $emit 等方式 http://www.cnblogs.com/wisewrong/p/62660 ...
- 使用power designer,PL/SQL,cmd建立oracle数据库
这一系列操作需要powerDesigner,PL/SQL工具 1.首先使用powerDesigner建立概念模型 2.概念模型界面例子 3.其中建立概念模型操作图标详解 4.建立物理模型 5.生成数据 ...
- 粒子群算法(PSO)
这几天看书的时候看到一个算法,叫粒子群算法,这个算法挺有意思的,下面说说我个人的理解: 粒子群算法(PSO)是一种进化算法,是一种求得近似最优解的算法,这种算法的时间复杂度可能会达到O(n!),得到的 ...
- Educational Codeforces Round 74 (Rated for Div. 2)补题
慢慢来. 题目册 题目 A B C D E F G 状态 √ √ √ √ × ∅ ∅ //√,×,∅ 想法 A. Prime Subtraction res tp A 题意:给定\(x,y(x> ...
