Vue + ElementUI的电商管理系统实例02 主页
1、打开Element网站,找到主页需要的布局格式
修改Home.vue:
<template>

  <el-container class="home-container">

    <!-- 头部 -->

    <el-header>

      Header

      <el-button type="info" @click="logout">退出</el-button>

    </el-header>

    <!-- 主体 -->

    <el-container>

      <!-- 侧边栏 -->

      <el-aside width="200px">Aside</el-aside>

      <!-- 右侧内容主体 -->

      <el-main>Main</el-main>

    </el-container>

  </el-container>

</template>

<script>

export default {

  methods: {

    logout() {

      // 清空token

      window.sessionStorage.clear('token')

      // 跳转到登录页

      this.$router.push('/login')

    }

  }

}

</script>

<style lang="less" scoped>

.home-container {

  height: 100%;

}

.el-header {

  background: #373d41;

  color: #fff;

}

.el-aside {

  background: #333744;

}

.el-main {

  background: #eaedf1;

}

</style>
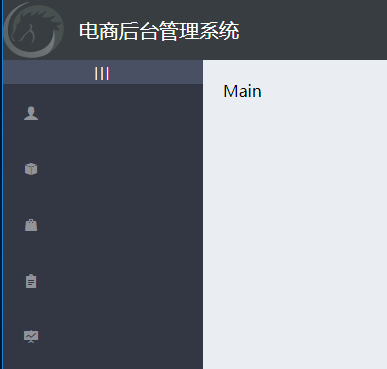
效果图如下:

2、美化Header区域布局样式
<template>

  <el-container class="home-container">

    <!-- 头部 -->

    <el-header>

      <div>

          <img src="../assets/heima.png" alt="">

          <span>电商后台管理系统</span>

      </div>

      <el-button type="info" @click="logout">退出</el-button>

    </el-header>

    <!-- 主体 -->

    <el-container>

      <!-- 侧边栏 -->

      <el-aside width="200px">Aside</el-aside>

      <!-- 右侧内容主体 -->

      <el-main>Main</el-main>

    </el-container>

  </el-container>

</template>

<style lang="less" scoped>

.home-container {

  height: 100%;

}

.el-header {

  background: #373d41;

  color: #fff;

  display: flex;

  justify-content: space-between;

  padding-left: 0;

  align-items: center;

  font-size: 20px;

  > div {

      display: flex;align-items: center;

      span {margin-left: 15px;}

  }

}

.el-aside {

  background: #333744;

}

.el-main {

  background: #eaedf1;

}

</style>
3、左侧导航菜单
菜单分为二级,并且可以折叠
找到Element里的导航菜单代码:
<!--左侧导航菜单-->

     <el-menu

      default-active="2"

      class="el-menu-vertical-demo"

      @open="handleOpen"

      @close="handleClose"

      background-color="#545c64"

      text-color="#fff"

      active-text-color="#ffd04b">

          <el-submenu index="1">

            <template slot="title">

              <i class="el-icon-location"></i>

              <span>导航一</span>

            </template>

            <el-menu-item-group>

              <template slot="title">分组一</template>

              <el-menu-item index="1-1">选项1</el-menu-item>

              <el-menu-item index="1-2">选项2</el-menu-item>

            </el-menu-item-group>

            <el-menu-item-group title="分组2">

              <el-menu-item index="1-3">选项3</el-menu-item>

            </el-menu-item-group>

            <el-submenu index="1-4">

              <template slot="title">选项4</template>

              <el-menu-item index="1-4-1">选项1</el-menu-item>

            </el-submenu>

          </el-submenu>

          <el-menu-item index="2">

            <i class="el-icon-menu"></i>

            <span slot="title">导航二</span>

          </el-menu-item>

          <el-menu-item index="3" disabled>

            <i class="el-icon-document"></i>

            <span slot="title">导航三</span>

          </el-menu-item>

          <el-menu-item index="4">

            <i class="el-icon-setting"></i>

            <span slot="title">导航四</span>

          </el-menu-item>

        </el-menu>
然后在element.js里添加:
import Vue from 'vue'

import { Button, Form, FormItem, Input, Message, Container, Header, Aside, Main,

  Menu, Submenu, MenuItemGroup, MenuItem } from 'element-ui'

Vue.use(Button)

Vue.use(Form)

Vue.use(FormItem)

Vue.use(Input)

Vue.use(Container)

Vue.use(Header)

Vue.use(Aside)

Vue.use(Main)

Vue.use(Menu)

Vue.use(Submenu)

Vue.use(MenuItemGroup)

Vue.use(MenuItem)

// 挂载到Vue全局

Vue.prototype.$message = Message
简单修改导航菜单代码:
<!--左侧导航菜单-->

        <el-menu background-color="#333744" text-color="#fff" active-text-color="#ffd04b">

          <!-- 一级菜单 -->

          <el-submenu index="1">

            <!-- 一级菜单模板区域 -->

            <template slot="title">

              <i class="el-icon-location"></i>

              <span>导航一</span>

            </template>

            <!-- 二级菜单-->

            <el-menu-item index="1-1">

              <template slot="title">

                <i class="el-icon-location"></i>

                <span>选项1</span>

              </template>

            </el-menu-item>

          </el-submenu>

        </el-menu>
4、通过axios拦截器添加token验证
接口说明里:
修改main.js文件:
import Vue from 'vue'

import App from './App.vue'

import router from './router'

import store from './store'

import './plugins/element.js'

// 导入全局样式表

import './assets/css/global.css'

// 导入字体样式

import './assets/fonts/iconfont.css'

import axios from 'axios'

// 配置请求的根路径

axios.defaults.baseURL = 'http://127.0.0.1:8888/api/private/v1/'

// axios请求拦截

axios.interceptors.request.use(config => {

  console.log(config)

  // 为请求头对象,添加token验证的Authorization字段

  config.headers.Authorization = window.sessionStorage.getItem('token')

  // 最后必须return config

  return config

})

Vue.prototype.$http = axios

Vue.config.productionTip = false

new Vue({

  router,

  store,

  render: h => h(App)

}).$mount('#app')
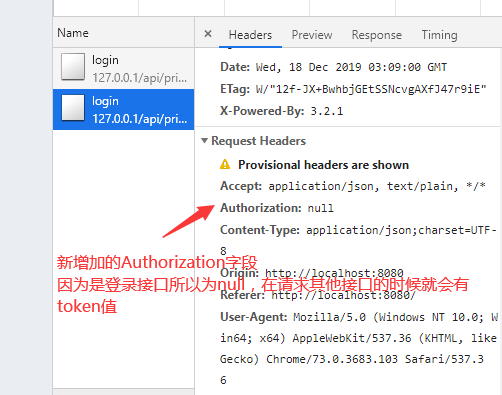
重新退出,再登录,打开浏览器Network会发现:
5、获取左侧菜单数据
打开接口文档,发现请求路径:menus,请求方法:get
// 获取左侧菜单数据

    async getMenuList() {

      const { data: res } = await this.$http.get('menus')

      console.log(res)

      if (res.meta.status !== 200) return this.$message.error(res.meta.msg)

      this.menuList = res.data

   }
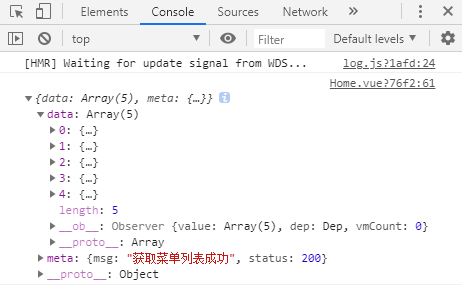
控制台:
6、双层for循环渲染左侧菜单列表
一级菜单:
<el-submenu :index="item.id + ''" v-for="item in menuList" :key="item.id">

<!--index前面加: 变为动态绑定数据,这时会报错,因为index只接受字符串,最简单的办法是后面 +'' -->
二级菜单:
<el-menu-item :index="subItem.id + ''" v-for="subItem in item.children" :key="subItem.id">

  <template slot="title">

       <i class="el-icon-location"></i>

       <span>{{subItem.authName}}</span>

   </template>

</el-menu-item>
效果图:

7、为选中菜单设置字体颜色并添加分类图标
active-text-color="#409eff"

//激活的文本颜色 替换成自己想要的颜色就行了
先把二级菜单的图标替换为:
<i class="el-icon-menu"></i>
给每个一级菜单替换不同的图标:
新建一个图标对象,每一个菜单项都有一个唯一的id,我们就以id为key,对应的图标当做value,然后绑定:class
<!-- 一级菜单模板区域 -->

<template slot="title">

    <i :class="iconsObject[item.id]"></i>

    <span>{{item.authName}}</span>

</template>

<script>

export default {

  data() {

    return {

      menuList: [], // 左侧菜单数据

      iconsObject: { //一级菜单图标对象 125 103这些是menuList一级菜单的id

        '125': 'iconfont icon-user',

        '103': 'iconfont icon-tijikongjian',

        '101': 'iconfont icon-shangpin',

        '102': 'iconfont icon-danju',

        '145': 'iconfont icon-baobiao'

      }

    }

  },

}

</script>

<style lang="less" scoped>

.iconfont {

  margin-right: 10px;

}

</style>
效果图:

8、每次只允许展开一个一级菜单
Menu Attribute里有个unique-opened属性: 表示是否只保持一个子菜单的展开 默认为false
<el-menu background-color="#333744" text-color="#fff" active-text-color="#409eff" :unique-opened="true">

<!--如果把某个值重置为true的话,可以简写-->

<el-menu background-color="#333744" text-color="#fff" active-text-color="#409eff" unique-opened>
注意:如果unique-opened="true"这样写,这个true只是字符串,必须前面加上:才表示布尔值。
边框线问题:
.el-aside {

  background: #333744;

  /*el-menu边框线*/

  .el-menu {

    border-right: none;

  }

}
9、实现左侧菜单折叠与展开效果
在侧边栏与左侧菜单之间添加div和样式:
<el-aside width="200px">

      <div class="toggle-button">|||</div>

<style lang="less" scoped>

.toggle-button {

  background: #4a5064;

  color:#fff;

  font-size: 10px;

  line-height:24px;

  text-align: center;

  letter-spacing: 0.2em;

  cursor: pointer;

}

</style>
然后添加点击事件:
Menu Attribute里有个collapse属性: 表示是否水平折叠收起菜单(仅在 mode 为 vertical 时可用) 默认为false
<div class="toggle-button" @click="toggleCollapse">|||</div>

<el-menu background-color="#333744" text-color="#fff" active-text-color="#409eff" :unique-opened="true" :collapse="isCollapse">

<script>

export default {

   data() {

      return {

         isCollapse: false // 菜单是否折叠

      }

   },

   methods: {

      // 点击切换左侧菜单的折叠与展开

      toggleCollapse() {

         this.isCollapse = !this.isCollapse

      }

   }

}

</script>
现在点击按钮已经有切换效果了,不过有点卡顿。
Menu Attribute里有个collapse-transition属性: 表示是否开启折叠动画 默认是true开启状态,我们把它关闭就好了
<el-menu background-color="#333744" text-color="#fff" active-text-color="#409eff"

          :unique-opened="true" :collapse="isCollapse" :collapse-transition="false">
这时候发现菜单折叠后,效果如下:
检查代码发现侧边栏宽度是写死的200px,我们想要的效果是,当菜单折叠起来后,侧边栏也跟着缩小。
查看元素发现菜单折叠后的宽度是64px,我们就可以根据是否折叠来动态赋值。当isCollapse为真时宽度64,否则200
<el-aside :width="isCollapse ? '64px' : '200px'">
这时折叠后效果:

10、实现首页路由的重定向
新建Welcome.vue:
<template>

<div>

  <h3>Welcome</h3>

</div>

</template>
修改路由文件,建立Welcome路由在Home子路由中:
import Welcome from '../components/Welcome.vue'

const routes = [

  { path: '/', redirect: '/login' }, // 重定向

  { path: '/login', component: Login },

  {

    path: '/home',

    component: Home,

    redirect: '/welcome', // 重定向

    children: [ // 子路由

      { path: '/welcome', component: Welcome }

    ]

  }

]
修改Home.vue中的main区域代码,添加路由占位符:
<!-- 右侧内容主体 -->

<el-main>

     <!--路由占位符-->

     <router-view></router-view>

</el-main>
此时效果图:重新登录后Home重定向到了Welcome页

11、实现侧边栏的路由链接的改造
Menu Attribute里有个router属性: 表示是否使用 vue-router 的模式,启用该模式会在激活导航时以 index 作为 path 进行路由跳转 默认为false
为侧边栏开启路由模式:
<el-menu background-color="#333744" text-color="#fff" active-text-color="#409eff"

          :unique-opened="true" :collapse="isCollapse" :collapse-transition="false" :router="true">

<!--或者-->

<el-menu background-color="#333744" text-color="#fff" active-text-color="#409eff"

          unique-opened :collapse="isCollapse" :collapse-transition="false" router>
此时点击二级菜单就发生了跳转。例如:http://localhost:8080/#/110
我们知道110是二级菜单的id值,这时我们要修改二级菜单的index为path的值,不过后端数据没有加/,我们要自己补上:
<!-- 二级菜单-->

<el-menu-item :index="'/' + subItem.path" v-for="subItem in item.children"  :key="subItem.id">
此时点击二级菜单跳转地址就变成了:http://localhost:8080/#/users
Vue + ElementUI的电商管理系统实例02 主页的更多相关文章
- Vue + ElementUI的电商管理系统实例01 登录表单
效果图: 1.首先来根据Element网站实现布局: <template> <div class="login_container"> <div cl ...
- Vue + ElementUI的电商管理系统实例03 用户列表
1.通过路由展示用户列表页 新建user文件夹,里面新建Users.vue文件: <template> <div> <h3>用户列表组件</h3> &l ...
- Django REST framework+Vue 打造生鲜电商项目(笔记十)
(from:https://www.cnblogs.com/derek1184405959/p/8877643.html 有修改) 十三.首页.商品数量.缓存和限速功能开发 首先把pycharm环境 ...
- Django REST framework+Vue 打造生鲜电商项目(笔记九)
(from:http://www.cnblogs.com/derek1184405959/p/8859309.html) 十二.支付宝沙箱环境配置 12.1.创建应用 进入蚂蚁金服开放平台(https ...
- Django REST framework+Vue 打造生鲜电商项目(笔记七)
十.购物车.订单管理和支付功能 1.添加商品到购物车 (1)trade/serializer.py 这里的serializer不继承ModelSerializer,是因为自己写的Serializer更 ...
- Django REST framework+Vue 打造生鲜电商项目(笔记五)
一.viewsets实现商品详情页接口 (1)商品详情页只需要多继承一个类(mixins.RetrieveModelMixin)就可以了,(它的功能就是展示商品详情) class GoodsListV ...
- Django REST framework+Vue 打造生鲜电商项目(笔记四)
(PS:部分代码和图片来自博客:http://www.cnblogs.com/derek1184405959/p/8813641.html.有增删) 一.用户登录和手机注册 1.drf的token功能 ...
- Django REST framework+Vue 打造生鲜电商项目(笔记三)
(PS:转载自http://www.cnblogs.com/derek1184405959/p/8810591.html 有修改) 一.drf的过滤 (1)添加到app里面 INSTALLED_AP ...
- Django REST framework+Vue 打造生鲜电商项目(笔记二)
(转自https://www.cnblogs.com/derek1184405959/p/8768059.html)(有修改) 接下来开始引入django resfulframework,体现它的强大 ...
随机推荐
- CF696B Puzzles 概率期望
有一棵树,共有 $N$ 个节点,他会使用下列 $DFS$ 算法对该树进行遍历: starting_time是一个容量为n的数组current_time = 0dfs(v): current_time ...
- 阿里开源线上应用调试利器 Arthas的背后
Arthas是一个功能非常强大的诊断工具,功能点很多,例如:jvm信息.线程信息.搜索类中的方法.跟踪代码执行.观测方法的入参和返回参数等等. 作为有追求的程序员,你不仅要知道它能做什么,更要思考它是 ...
- C++问题--Reis连接redisContext *pRedisContext = redisConnectWithTimeout("127.0.0.1", 6379, tv);pRedisContext->errstr返回错误磁盘空间不足
一.问题 使用C++连接Redis的时候出错,错误String为磁盘空间不足,连接代码如下: //reids默认监听端口6387 ; struct timeval tv; tv.tv_sec = iT ...
- 【dp】p1025数的划分
题目描述] 将整数n分成k份,且每份不能为空,任意两份不能相同(不考虑顺序). 例如:n=7,k=3,下面三种分法被认为是相同的. 1,1,5: 1,5,1: 5,1,1: 问有多少种不同的分法. 输 ...
- 2017.10.6 国庆清北 D6T1 排序
题目描述 小Z 有一个数字序列a1; a2; .... ; an,长度为n,小Z 只有一个操作:选 定p(1<p<n),然后把ap 从序列中拿出,然后再插⼊到序列中任意位置. 比如a 序列 ...
- linux 日志写入到指定文件中
php /data/xxx/aaa.php > test.log 2>&1 >覆盖, >>追加 2>&1 表示不仅命令行正常的输出保存到test. ...
- 《挑战30天C++入门极限》C++中类的多态与虚函数的使用
C++中类的多态与虚函数的使用 类的多态特性是支持面向对象的语言最主要的特性,有过非面向对象语言开发经历的人,通常对这一章节的内容会觉得不习惯,因为很多人错误的认为,支持类的封装的语言就是支持 ...
- 项目发布到tomcat后,通过项目名称访问报404
查看tomcat发布地址发现和项目名称不一致 如果直接拷贝项目,可能也需要修改此选项 解决方案: 经过排查发现了原因: 首先说明一下项目 Maven+SSM 需要使用到 maven tomcat 7 ...
- 第02组 Alpha冲刺(2/6)
队名:無駄無駄 组长博客 作业博客 组员情况 张越洋 过去两天完成了哪些任务 任务分配.进度监督 提交记录(全组共用) 接下来的计划 沟通前后端成员,监督.提醒他们尽快完成各自的进度 还剩下哪些任务 ...
- 怎么判断是qq浏览器还是uc浏览器?
这里我画红框的是不正确的,最好的办法就是打印出navigator.userAgent出来.uc浏览器检验是正确的.