SDN上机第三次作业
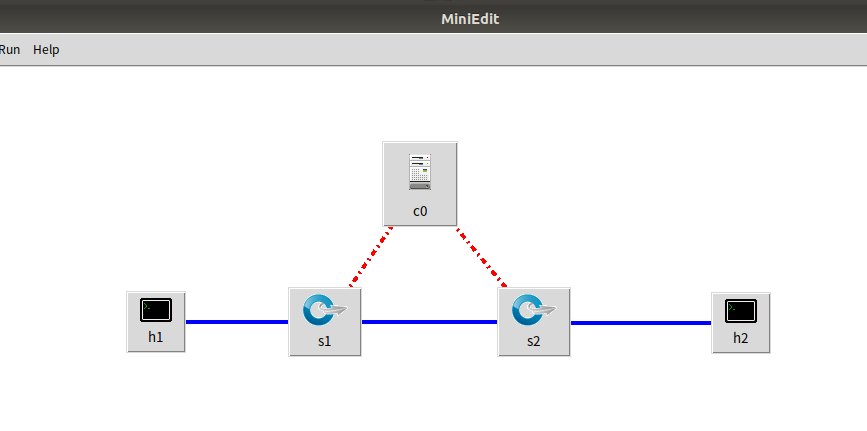
1. 利用Mininet仿真平台构建如下图所示的网络拓扑,配置主机h1和h2的IP地址(h1:10.0.0.1,h2:10.0.0.2),测试两台主机之间的网络连通性

使用miniedit进行创建操作,前两次均用到了,不再赘述,给出自己的操作图片。


2. 利用Wireshark工具,捕获拓扑中交换机与控制器之间的通信数据,对OpenFlow协议类型的各类报文(hello, features_request, features_reply, set_config, packet_in, packet_out等)进行分析,对照wireshark截图写出你的分析内容。
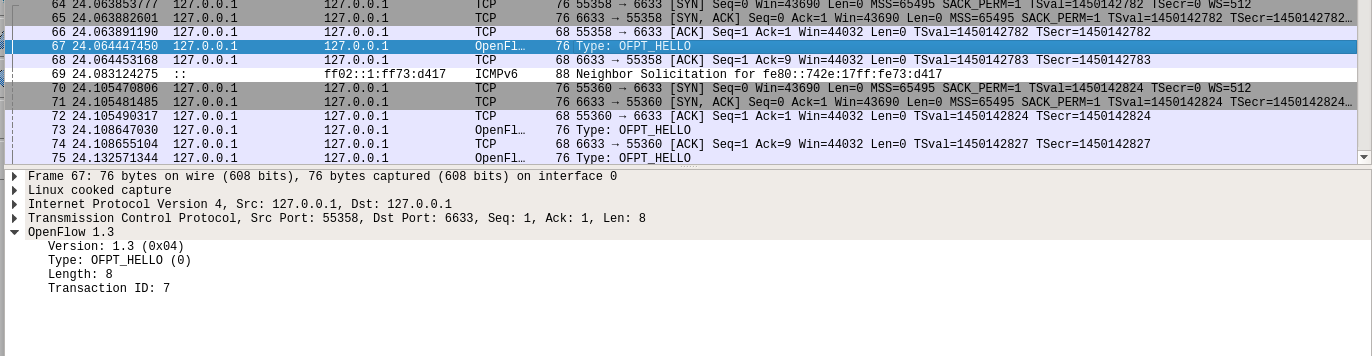
1.hello
控制器6633端口(最高能支持OpenFlow 1.0) ---> 交换机32862端口

交换机32862端口(最高能支持OpenFlow 1.3)--- 控制器6633端口

于是双方建立连接,并使用OpenFlow 1.0
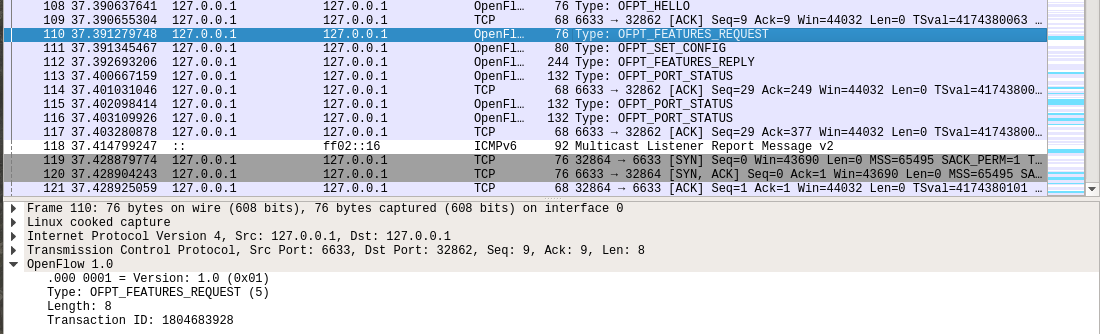
2.Features Request
控制器6633端口(需要特征信息) ---> 交换机32862端口
3.Set Config
控制器6633端口(请按照我给你的flag和max bytes of packet进行配置) ---> 交换机32862端口

4.Features Reply
交换机32862端口(这是我的特征信息,请查收)--- 控制器6633端口

Features 消息包括 OpenFlow Header 和 Features Reply Message

对照Features Reply Message结构
struct ofp_switch_features{

    struct ofp_header header;

    uint64_t datapath_id; /*唯一标识 id 号*/

    uint32_t n_buffers; /*交缓冲区可以缓存的最大数据包个数*/

    uint8_t n_tables; /*流表数量*/

    uint8_t pad[3]; /*align to 64 bits*/

    uint32_t capabilities; /*支持的特殊功能,具体见 ofp_capabilities*/

    uint32_t actions; /*支持的动作,具体见 ofp_actions_type*/

    struct ofp_phy_port ports[0]; /*物理端口描述列表,具体见 ofp_phy_port*/

};
对应到抓取到的报文,逐项查看报文内容
OpenFlow 1.0

    .000 0001 = Version: 1.0 (0x01)

    Type: OFPT_FEATURES_REPLY (6)

    Length: 176

    Transaction ID: 1804683928

    Datapath unique ID: 0x0000000000000002

        MAC addr: 00:00:00_00:00:00 (00:00:00:00:00:00)

        Implementers part: 0x0002

    n_buffers: 0

    n_tables: 254

    Pad: 000000

    capabilities: 0x000000c7

        .... .... .... .... .... .... .... ...1 = Flow statistics: True

        .... .... .... .... .... .... .... ..1. = Table statistics: True

        .... .... .... .... .... .... .... .1.. = Port statistics: True

        .... .... .... .... .... .... .... 0... = Group statistics: False

        .... .... .... .... .... .... ..0. .... = Can reassemble IP fragments: False

        .... .... .... .... .... .... .1.. .... = Queue statistics: True

        .... .... .... .... .... ...0 .... .... = Switch will block looping ports: False

    actions: 0x00000fff

        .... .... .... .... .... .... .... ...1 = Output to switch port: True

        .... .... .... .... .... .... .... ..1. = Set the 802.1q VLAN id: True

        .... .... .... .... .... .... .... .1.. = Set the 802.1q priority: True

        .... .... .... .... .... .... .... 1... = Strip the 802.1q header: True

        .... .... .... .... .... .... ...1 .... = Ethernet source address: True

        .... .... .... .... .... .... ..1. .... = Ethernet destination address: True

        .... .... .... .... .... .... .1.. .... = IP source address: True

        .... .... .... .... .... .... 1... .... = IP destination address: True

        .... .... .... .... .... ...1 .... .... = IP ToS (DSCP field, 6 bits): True

        .... .... .... .... .... ..1. .... .... = TCP/UDP source port: True

        .... .... .... .... .... .1.. .... .... = TCP/UDP destination port: True

        .... .... .... .... .... 1... .... .... = Output to queue: True

    Port data 1

        Port number: 65534

        HW Address: 26:97:c9:61:e4:1e (26:97:c9:61:e4:1e)

        Port Name: s2

        Config flags: 0x00000001

            .... .... .... .... .... .... .... ...1 = Port is administratively down: True

            .... .... .... .... .... .... .... ..0. = Disable 802.1D spanning tree on port: False

            .... .... .... .... .... .... .... .0.. = Drop all packets except 802.1D spanning tree packets: False

            .... .... .... .... .... .... .... 0... = Drop received 802.1D STP packets: False

            .... .... .... .... .... .... ...0 .... = Do not include this port when flooding: False

            .... .... .... .... .... .... ..0. .... = Drop packets forwarded to port: False

            .... .... .... .... .... .... .0.. .... = Do not send packet-in msgs for port: False

        State flags: 0x00000001

            .... .... .... .... .... .... .... ...1 = No physical link present: True

        Current features: 0x00000000

            .... .... .... .... .... .... .... ...0 = 10 Mb half-duplex rate support: False

            .... .... .... .... .... .... .... ..0. = 10 Mb full-duplex rate support: False

            .... .... .... .... .... .... .... .0.. = 100 Mb half-duplex rate support: False

            .... .... .... .... .... .... .... 0... = 100 Mb full-duplex rate support: False

            .... .... .... .... .... .... ...0 .... = 1 Gb half-duplex rate support: False

            .... .... .... .... .... .... ..0. .... = 1 Gb full-duplex rate support: False

            .... .... .... .... .... .... .0.. .... = 10 Gb full-duplex rate support: False

            .... .... .... .... .... .... 0... .... = Copper medium: False

            .... .... .... .... .... ...0 .... .... = Fiber medium: False

            .... .... .... .... .... ..0. .... .... = Auto-negotiation: False

            .... .... .... .... .... .0.. .... .... = Pause: False

            .... .... .... .... .... 0... .... .... = Asymmetric pause: False

        Advertised features: 0x00000000

        Features supported: 0x00000000

        Features advertised by peer: 0x00000000

    Port data 2

        Port number: 1

        HW Address: 72:17:f0:28:7b:5e (72:17:f0:28:7b:5e)

        Port Name: s2-eth1

        Config flags: 0x00000000

            .... .... .... .... .... .... .... ...0 = Port is administratively down: False

            .... .... .... .... .... .... .... ..0. = Disable 802.1D spanning tree on port: False

            .... .... .... .... .... .... .... .0.. = Drop all packets except 802.1D spanning tree packets: False

            .... .... .... .... .... .... .... 0... = Drop received 802.1D STP packets: False

            .... .... .... .... .... .... ...0 .... = Do not include this port when flooding: False

            .... .... .... .... .... .... ..0. .... = Drop packets forwarded to port: False

            .... .... .... .... .... .... .0.. .... = Do not send packet-in msgs for port: False

        State flags: 0x00000000

            .... .... .... .... .... .... .... ...0 = No physical link present: False

        Current features: 0x000000c0

            .... .... .... .... .... .... .... ...0 = 10 Mb half-duplex rate support: False

            .... .... .... .... .... .... .... ..0. = 10 Mb full-duplex rate support: False

            .... .... .... .... .... .... .... .0.. = 100 Mb half-duplex rate support: False

            .... .... .... .... .... .... .... 0... = 100 Mb full-duplex rate support: False

            .... .... .... .... .... .... ...0 .... = 1 Gb half-duplex rate support: False

            .... .... .... .... .... .... ..0. .... = 1 Gb full-duplex rate support: False

            .... .... .... .... .... .... .1.. .... = 10 Gb full-duplex rate support: True

            .... .... .... .... .... .... 1... .... = Copper medium: True

            .... .... .... .... .... ...0 .... .... = Fiber medium: False

            .... .... .... .... .... ..0. .... .... = Auto-negotiation: False

            .... .... .... .... .... .0.. .... .... = Pause: False

            .... .... .... .... .... 0... .... .... = Asymmetric pause: False

        Advertised features: 0x00000000

        Features supported: 0x00000000

        Features advertised by peer: 0x00000000

    Port data 3

        Port number: 2

        HW Address: 2a:e8:0b:d1:58:7b (2a:e8:0b:d1:58:7b)

        Port Name: s2-eth2

        Config flags: 0x00000000

            .... .... .... .... .... .... .... ...0 = Port is administratively down: False

            .... .... .... .... .... .... .... ..0. = Disable 802.1D spanning tree on port: False

            .... .... .... .... .... .... .... .0.. = Drop all packets except 802.1D spanning tree packets: False

            .... .... .... .... .... .... .... 0... = Drop received 802.1D STP packets: False

            .... .... .... .... .... .... ...0 .... = Do not include this port when flooding: False

            .... .... .... .... .... .... ..0. .... = Drop packets forwarded to port: False

            .... .... .... .... .... .... .0.. .... = Do not send packet-in msgs for port: False

        State flags: 0x00000000

            .... .... .... .... .... .... .... ...0 = No physical link present: False

        Current features: 0x000000c0

            .... .... .... .... .... .... .... ...0 = 10 Mb half-duplex rate support: False

            .... .... .... .... .... .... .... ..0. = 10 Mb full-duplex rate support: False

            .... .... .... .... .... .... .... .0.. = 100 Mb half-duplex rate support: False

            .... .... .... .... .... .... .... 0... = 100 Mb full-duplex rate support: False

            .... .... .... .... .... .... ...0 .... = 1 Gb half-duplex rate support: False

            .... .... .... .... .... .... ..0. .... = 1 Gb full-duplex rate support: False

            .... .... .... .... .... .... .1.. .... = 10 Gb full-duplex rate support: True

            .... .... .... .... .... .... 1... .... = Copper medium: True

            .... .... .... .... .... ...0 .... .... = Fiber medium: False

            .... .... .... .... .... ..0. .... .... = Auto-negotiation: False

            .... .... .... .... .... .0.. .... .... = Pause: False

            .... .... .... .... .... 0... .... .... = Asymmetric pause: False

        Advertised features: 0x00000000

        Features supported: 0x00000000

        Features advertised by peer: 0x00000000
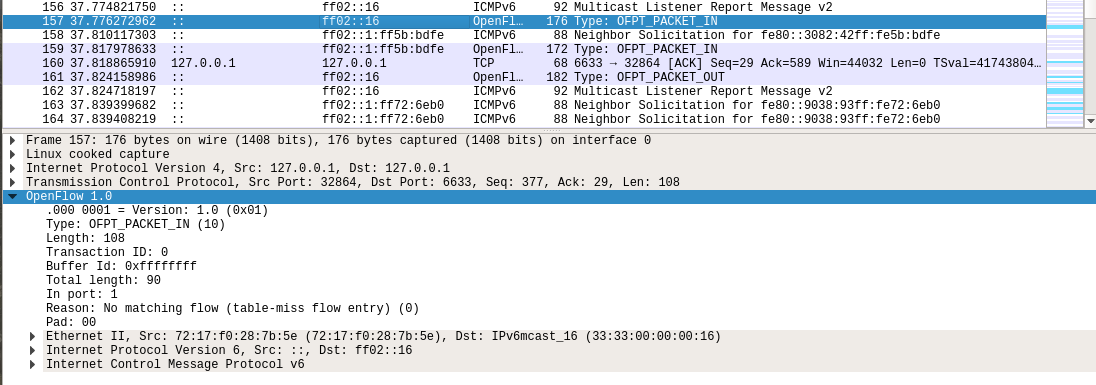
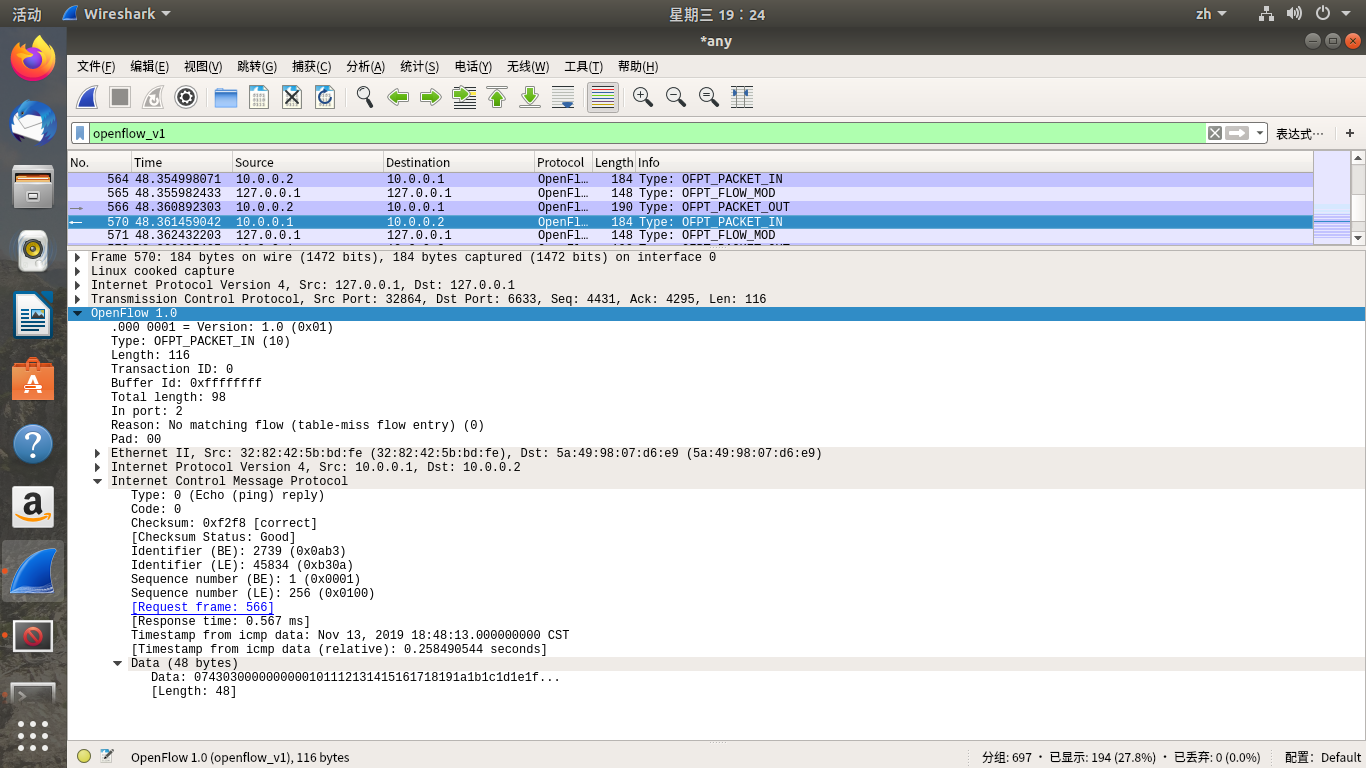
5.Packet_in
交换机32864端口(有数据包进来,请指示)--- 控制器6633端口
结合Packet_in的结构
struct ofp_packet_in {

    struct ofp_header header;

    uint32_t buffer_id; /*Packet-in消息所携带的数据包在交换机缓存区中的ID*/

    uint16_t total_len; /*data字段的长度*/

    uint16_t in_port; /*数据包进入交换机时的端口号*/

    uint8_t reason; /*发送Packet-in消息的原因,具体见 ofp_packet_in_reason*/

    uint8_t pad;

    uint8_t data[0]; /*携带的数据包*/

};
分析抓取的数据包,可以发现是因为交换机发现此时自己并没有匹配的流表(Reason: No matching flow (table-miss flow entry) (0)),所以要问控制器如何处理
OpenFlow 1.0

    .000 0001 = Version: 1.0 (0x01)

    Type: OFPT_PACKET_IN (10)

    Length: 108

    Transaction ID: 0

    Buffer Id: 0xffffffff

    Total length: 90

    In port: 1

    Reason: No matching flow (table-miss flow entry) (0)

    Pad: 00

    Ethernet II, Src: 72:17:f0:28:7b:5e (72:17:f0:28:7b:5e), Dst: IPv6mcast_16 (33:33:00:00:00:16)

        Destination: IPv6mcast_16 (33:33:00:00:00:16)

            Address: IPv6mcast_16 (33:33:00:00:00:16)

            .... ..1. .... .... .... .... = LG bit: Locally administered address (this is NOT the factory default)

            .... ...1 .... .... .... .... = IG bit: Group address (multicast/broadcast)

        Source: 72:17:f0:28:7b:5e (72:17:f0:28:7b:5e)

            Address: 72:17:f0:28:7b:5e (72:17:f0:28:7b:5e)

            .... ..1. .... .... .... .... = LG bit: Locally administered address (this is NOT the factory default)

            .... ...0 .... .... .... .... = IG bit: Individual address (unicast)

        Type: IPv6 (0x86dd)

    Internet Protocol Version 6, Src: ::, Dst: ff02::16

        0110 .... = Version: 6

        .... 0000 0000 .... .... .... .... .... = Traffic Class: 0x00 (DSCP: CS0, ECN: Not-ECT)

            .... 0000 00.. .... .... .... .... .... = Differentiated Services Codepoint: Default (0)

            .... .... ..00 .... .... .... .... .... = Explicit Congestion Notification: Not ECN-Capable Transport (0)

        .... .... .... 0000 0000 0000 0000 0000 = Flow Label: 0x00000

        Payload Length: 36

        Next Header: IPv6 Hop-by-Hop Option (0)

        Hop Limit: 1

        Source: ::

        Destination: ff02::16

        IPv6 Hop-by-Hop Option

            Next Header: ICMPv6 (58)

            Length: 0

            [Length: 8 bytes]

            Router Alert

                Type: Router Alert (0x05)

                    00.. .... = Action: Skip and continue (0)

                    ..0. .... = May Change: No

                    ...0 0101 = Low-Order Bits: 0x05

                Length: 2

                Router Alert: MLD (0)

            PadN

                Type: PadN (0x01)

                    00.. .... = Action: Skip and continue (0)

                    ..0. .... = May Change: No

                    ...0 0001 = Low-Order Bits: 0x01

                Length: 0

                PadN: <none>

    Internet Control Message Protocol v6

        Type: Multicast Listener Report Message v2 (143)

        Code: 0

        Checksum: 0xf403 [correct]

        [Checksum Status: Good]

        Reserved: 0000

        Number of Multicast Address Records: 1

        Multicast Address Record Changed to exclude: ff02::1:ff28:7b5e

            Record Type: Changed to exclude (4)

            Aux Data Len: 0

            Number of Sources: 0

            Multicast Address: ff02::1:ff28:7b5e
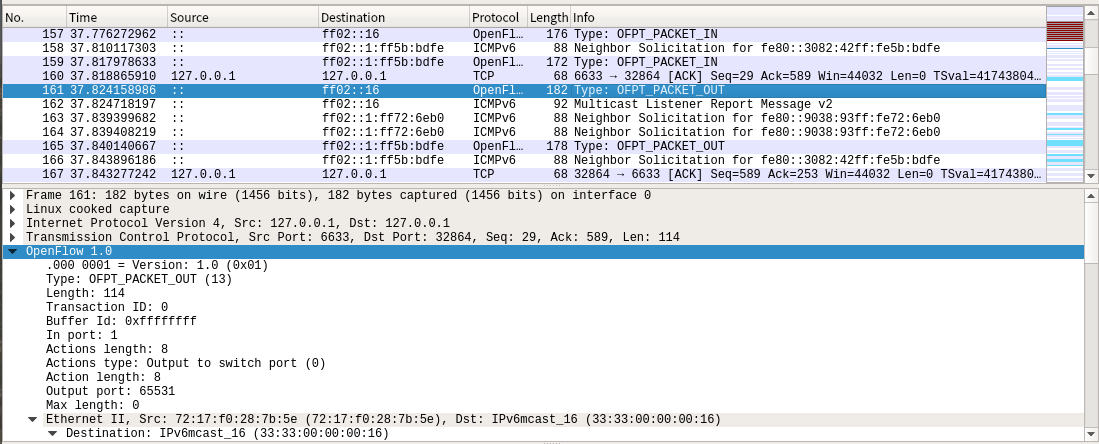
6.Packet_out
控制器6633端口(请按照我给你的action进行处理) ---> 交换机32864端口
结合Packet_out的结构
struct ofp_packet_out {

    struct ofp_header header;

    uint32_t buffer_id; /*交换机缓存区id,如果为-1则指定的为packet-out消息携带的data字段*/

    uint16_t in_port; /*如果buffer_id为‐1,并且action列表中指定了Output=TABLE的动作,in_port将作为data段数据包的额外匹配信息进行流表查询*/

    uint16_t actions_len; /*action列表的长度,可以用来区分actions和data段*/

    struct ofp_action_header actions[0]; /*动作列表*/

    uint8_t data[0]; /*数据缓存区,可以存储一个以太网帧,可选*/

}
告诉输出到交换机的65531端口
OpenFlow 1.0

    .000 0001 = Version: 1.0 (0x01)

    Type: OFPT_PACKET_OUT (13)

    Length: 114

    Transaction ID: 0

    Buffer Id: 0xffffffff

    In port: 1

    Actions length: 8

    Actions type: Output to switch port (0)

    Action length: 8

    Output port: 65531

    Max length: 0

    Ethernet II, Src: 72:17:f0:28:7b:5e (72:17:f0:28:7b:5e), Dst: IPv6mcast_16 (33:33:00:00:00:16)

    Internet Protocol Version 6, Src: ::, Dst: ff02::16

    Internet Control Message Protocol v6
接下来是另一台交换机(端口35536)与控制器(端口6633)的交互过程
h1 ping h2
1.packet_in
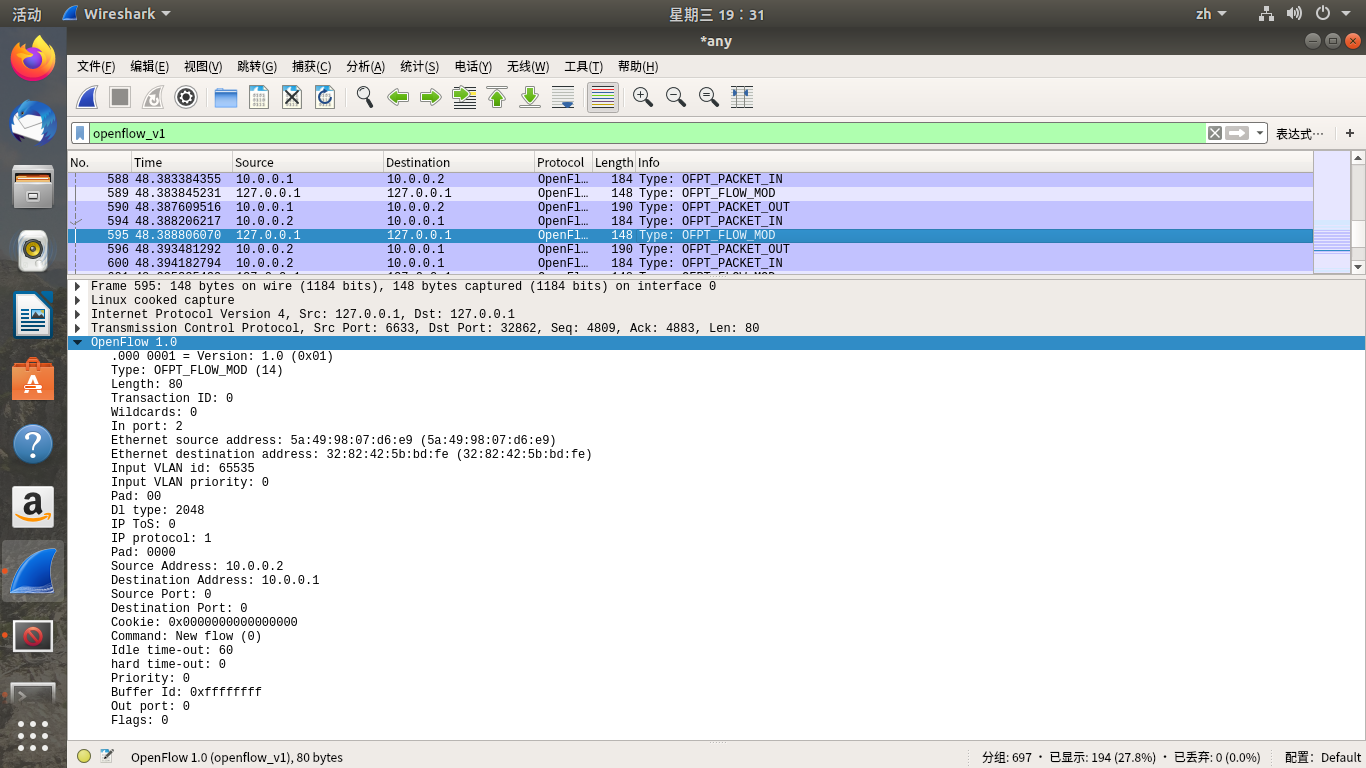
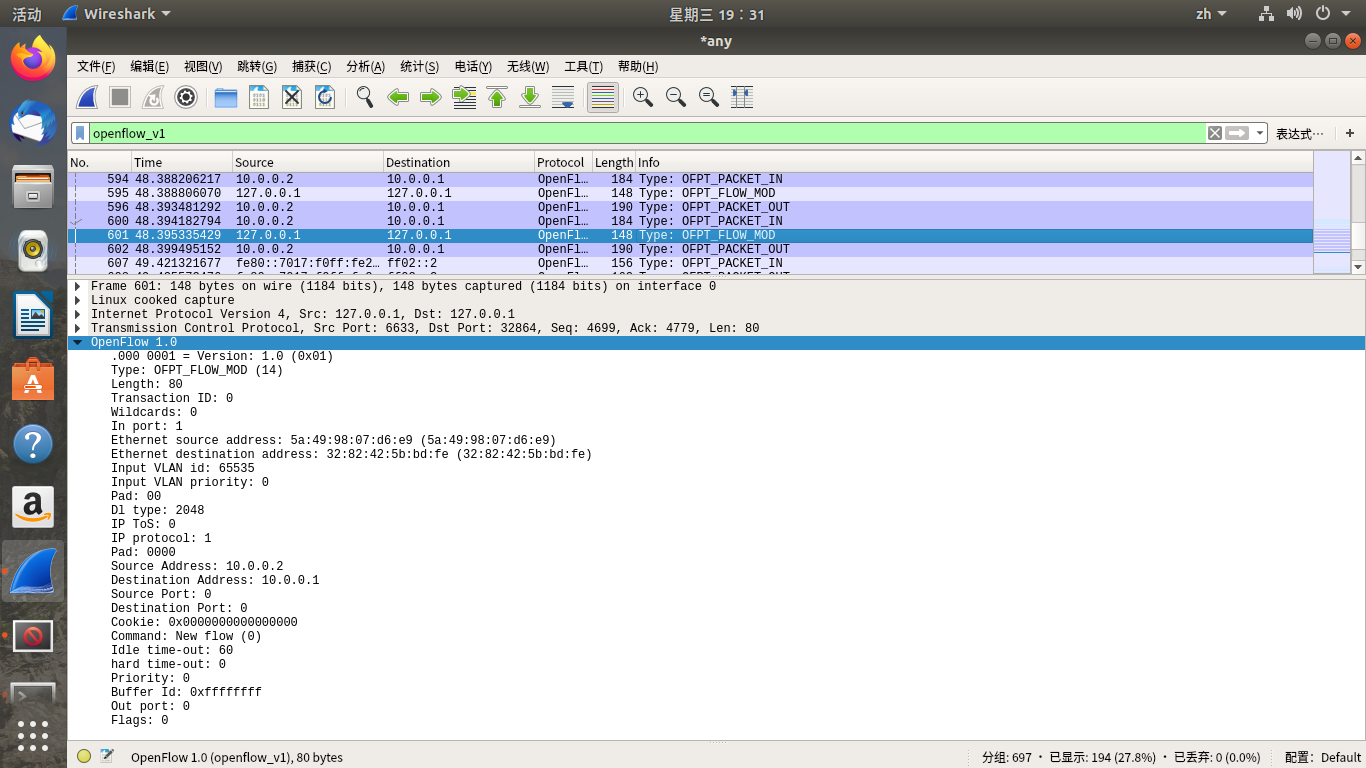
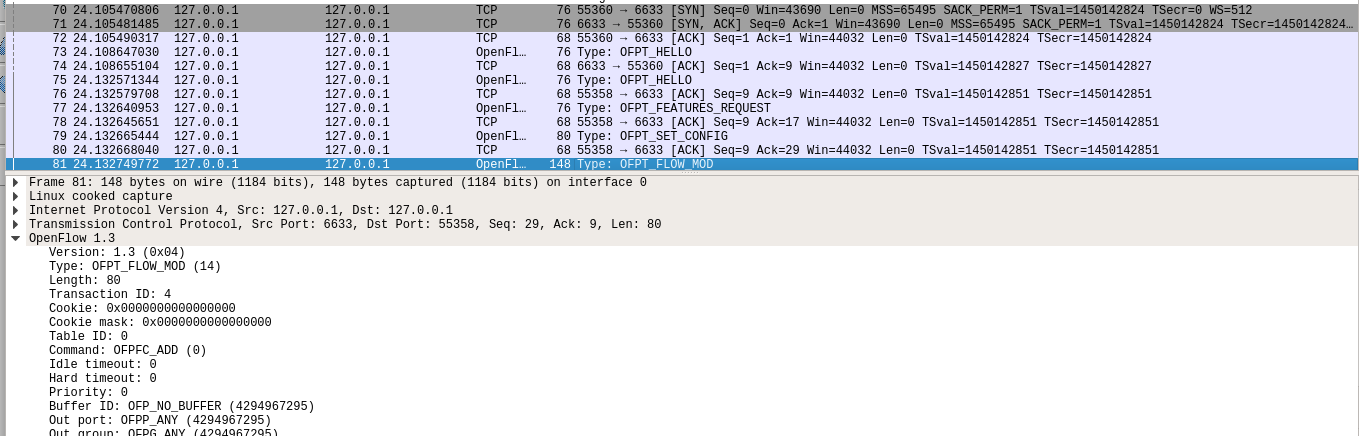
2.flow_mod
结合flow_mod结构
struct ofp_flow_mod {

    struct ofp_header header;

    struct ofp_match match; /*流表的匹配域*/

    uint64_t cookie; /*流表项标识符*/

    uint16_t command; /*可以是ADD,DELETE,DELETE-STRICT,MODIFY,MODIFY-STRICT*/

    uint16_t idle_timeout; /*空闲超时时间*/

    uint16_t hard_timeout; /*最大生存时间*/

    uint16_t priority; /*优先级,优先级高的流表项优先匹配*/

    uint32_t buffer_id; /*缓存区ID ,用于指定缓存区中的一个数据包按这个消息的action列表处理*/

    uint16_t out_port; /*如果这条消息是用于删除流表则需要提供额外的匹配参数*/

    uint16_t flags; /*标志位,可以用来指示流表删除后是否发送flow‐removed消息,添加流表时是否检查流表重复项,添加的流表项是否为应急流表项。*/

    struct ofp_action_header actions[0]; /*action列表*/

};
分析抓取的flow_mod数据包,控制器通过6633端口向交换机32862端口、交换机32864端口下发流表项,指导数据的转发处理


PS.把控制器从openflow reference改成ovs controller
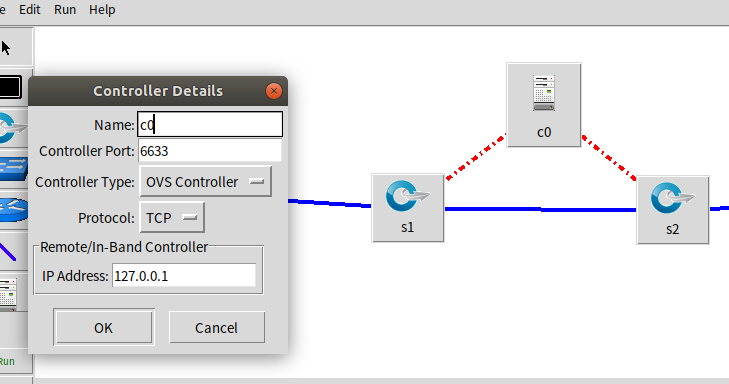
在hello报文中可以发现控制器支持的OpenFlow版本从1.0变成了1.3,因此,经过协商交换机和控制器之间将通过1.3版本的OpenFlow协议进行通信
SDN上机第三次作业的更多相关文章
- 2019 SDN上机第三次作业
2019 SDN上机第三次作业 实验一 利用Mininet仿真平台构建如下图所示的网络拓扑,配置主机h1和h2的IP地址(h1:10.0.0.1,h2:10.0.0.2),测试两台主机之间的网络连通性 ...
- 2019 SDN上机第7次作业
2019 SDN上机第7 次作业 basic补充`/* -- P4_16 -- */ include <core.p4> include <v1model.p4> const ...
- 2019 SDN上机第6次作业
2019 SDN上机第6次作业 1.实验拓扑 (1)实验拓扑 (2)使用Python脚本完成拓扑搭建 from mininet.topo import Topo from mininet.net im ...
- 2019 SDN上机第5次作业
2019 SDN上机第5次作业 1.浏览RYU官网学习RYU控制器的安装和RYU开发入门教程,提交你对于教程代码的理解,包括但不限于: 描述官方教程实现了一个什么样的交换机功能? 答:官方教程实现了一 ...
- 2019 SDN上机第四次作业
2019 SDN上机第4次作业 1. 解压安装OpenDayLight控制器(本次实验统一使用Beryllium版本) 修改环境变量 2. 启动并安装插件 3. 用Python脚本搭建如下拓扑,连接O ...
- SDN上机第五次作业
2019 SDN上机第五次作业 1.浏览RYU官网学习RYU控制器的安装和RYU开发入门教程,提交你对于教程代码的理解,包括但不限于: 1.1描述官方教程实现了一个什么样的交换机功能? 答:官方教程实 ...
- 2019 SDN上机第1次作业
一.安装轻量级网络仿真工具Mininet 克隆github上的Mininet源 git clone https://github.com/mininet/mininet 选择默认全部安装 cd min ...
- 2019 SDN上机第六次作业
1.实验拓扑 (1)实验拓扑 (2)使用python脚本完成拓扑搭建 from mininet.topo import Topo class Mytopo(Topo): def __init__(se ...
- 2019 SDN上机第五次作业
1.浏览RYU官网学习RYU控制器的安装和RYU开发入门教程,提交你对于教程代码的理解,包括但不限于: 描述官方教程实现了一个什么样的交换机功能? 实现将接收到的数据包发送到所有端口 控制器设定交换机 ...
随机推荐
- 必须掌握的Linux用户组知识
在 Linux 系统中用户组起着重要作用.用户组提供了一种简单方法供一组用户互相共享文件.用户组也允许系统管理员更加有效地管理用户权限,因为管理员可以将权限分配给用户组而不是逐一分配给单个用户. 尽管 ...
- How do you run an interactive process in Dart?
https://stackoverflow.com/questions/12682269/how-do-you-run-an-interactive-process-in-dart The test ...
- vue-cli 移动端项目如何在手机上调试预览
这里分享下如何在webpack工具构建下的vue项目,在手机端调试和预览,言归正传. 1.电脑和手机连接到同一个WIFI a.台式电脑和手机同时链接一个路由器,使用同一个wifi: b.笔记本也可以直 ...
- SQL Server 用一张表的数据更新另一张表的数据(转载)
文章一:SQL Server中如何基于一个表的数据更新另一个表的对应数据的SQL语句脚本 https://codedefault.com/2017/sql-server-update-from-a-s ...
- PHP提示 Notice: Undefined variable
PHP提示Notice: Undefined variable,意思是:你的程序中有未定义的变量 为什么在其他地方好好的程序,换个环境报这个Notice,因为php.ini提醒级别设置的问题 场景复原 ...
- go调度: 第二部分-go调度器
前言 这个博客是三部分中提供go调度器的语义和机制的部分. 博客三部分的顺序: 1) go调度: 第一部分-操作系统调度 2) go调度: 第二部分-go调度器 3) go调度: 第三部分-并发 介绍 ...
- springdata jpa 关于分页@Query问题
关于springdata jpa 分页问题相信很多小伙伴都遇到过,只要表中数量到达分页条件就会报错 废话少说直接上代码: @Query(nativeQuery = true, value = &quo ...
- git指令集合
原网页:https://www.linuxidc.com/Linux/2018-04/151809.htm Git 是一个很强大的分布式版本控制系统.它不但适用于管理大型开源软件的源代码,管理私人的文 ...
- 《大象 Thinking in UML》读书笔记:软件开发——从现实世界到对象世界
参考:Process-oriented vs. Object-oriented 前言 软件行业在采用OO的思想后,从一开始只对编码使用OO,到现在“分析-设计-编码”全部环节使用OO,形成了OOA.O ...
- python read PDF for chinese
import sys import importlib importlib.reload(sys) from pdfminer.pdfparser import PDFParser,PDFDocume ...