glusterfs安装配置简单使用
GlusterFS是一种分布式分布式文件系统,默认采用无中心完全对等架构,搭建维护使用十分简单,是很受欢迎的分布式文件系统。
官网https://www.gluster.org/,官网上表示Gluster 5是最新版本,点进去发现CentOS 8的,有点超前,不过RHCE8测试版1发布了。那么我们还是要用长期支持版本Gluster 4.1了。
1.基本环境的准备
 在三台机器上都执行

 [root@g1 ~]# yum install -y centos-release-gluster glusterfs-server glusterfs-fuse glusterfs-rdma glusterfs

 [root@g1 ~]# ls /etc/yum.repos.d/

 CentOS7-Base-.repo  CentOS-Base.repo  CentOS-CR.repo  CentOS-Debuginfo.repo  CentOS-fasttrack.repo  CentOS-Gluster-4.1.repo  CentOS-Media.repo  CentOS-Sources.repo  CentOS-Storage-common.repo  CentOS-Vault.repo  epel.repo  salt-latest.repo

 [root@g1 ~]# cat /etc/hosts

 127.0.0.1   localhost localhost.localdomain localhost4 localhost4.localdomain4

 ::         localhost localhost.localdomain localhost6 localhost6.localdomain6

 192.168.56.11 g1

 192.168.56.12 g2

 192.168.56.13 g3

 [root@g1 ~]# mkdir -p /glusterfs/data{,,}            # 我直接使用这三个目录了,因为虚拟机

 [root@g1 ~]# systemctl start glusterfsd.service

 [root@g1 ~]# systemctl enable glusterfsd.service

 正规情况请先格式化磁盘并分别挂载

 [root@g1 ~]# mkfs.xfs -i size= /dev/sdb

 [root@g1 ~]# echo "/dev/sdb /glusterfs/data1 xfs defaults 1 2" >>/etc/fstab
2.池相关
我们将每一台机器看做一个池,池会提供后续块资源(某个磁盘空间),若干个池组成一个glusterfs集群
 在任意一台机器上

 [root@g1 ~]# gluster pool list             # 只有自己一个

 UUID                    Hostname     State

 ce160a74-6f02--862c-1daf6cfa4300    localhost    Connected

 [root@g1 ~]# gluster peer status             # 没有同等的小伙伴

 Number of Peers:

 [root@g1 ~]# gluster peer probe g2        # 将g2添加进来,这里主机名要解析,当然直接写ip添加也是可以的

 peer probe: success.

 [root@g1 ~]# gluster peer probe g3        # 将g3添加进来,这里注意不需要添加自己

 peer probe: success.

 [root@g1 ~]# gluster peer status             # 此时集群内对等的池数量有2个

 Number of Peers:

 Hostname: g2

 Uuid: 1da148ac-0c81--830e-ab3f66c046ea

 State: Peer in Cluster (Connected)

 Hostname: g3

 Uuid: aff7232f-a731-4def-b996-db3723c1fc97

 State: Peer in Cluster (Connected)

 [root@g1 ~]# gluster pool list             # 池则为3个

 UUID                    Hostname     State

 1da148ac-0c81--830e-ab3f66c046ea    g2           Connected

 aff7232f-a731-4def-b996-db3723c1fc97    g3           Connected

 ce160a74-6f02--862c-1daf6cfa4300    localhost        Connected

 [root@g1 ~]# gluster peer detach g3        # 从集群中去掉一个池
3.卷相关
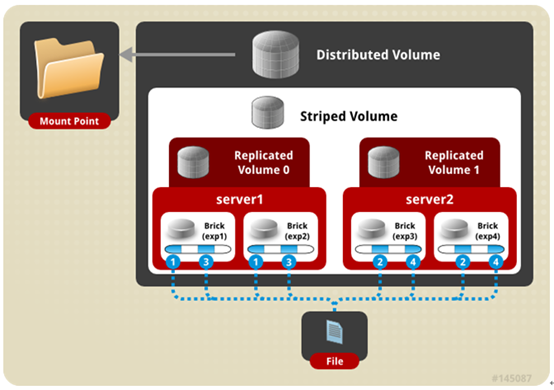
池是集群内部资源,无法直接提供给外部使用,我们将池中的块资源组成一个卷,卷是对外提供挂载使用的。一个集群可以提供多个卷。
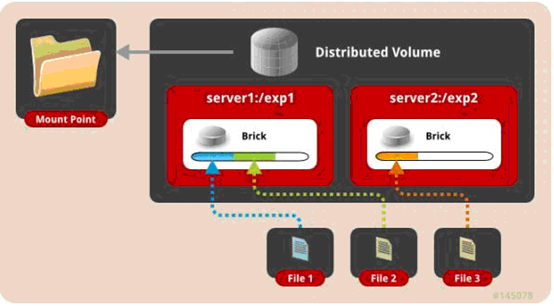
一、分布卷: 将文件已hash算法随机分布到 一台服务器节点中存储
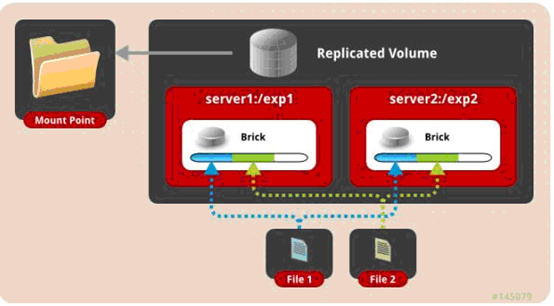
二、复制卷: 将文件复制到 replica x 个节点中。
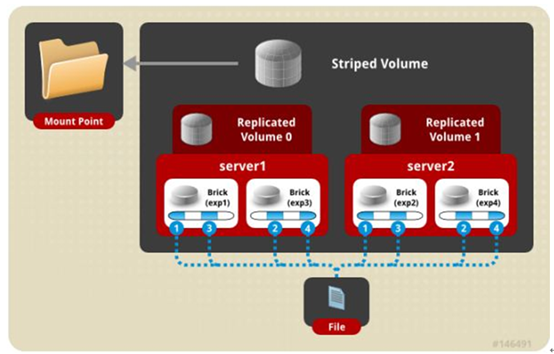
三、条带卷:将文件切割成数据块,分别存储到 stripe x 个节点中,类似于raid0。条带卷的理念很好,将大文件分散至若干个磁盘后提升IO速度,但是实际情况中偶尔会出现丢失块情况,因此与条带卷相关的所以卷类型在生产都不可以使用!!!

四、分布式条带卷:分布卷与条带卷的组合。生产不使用。

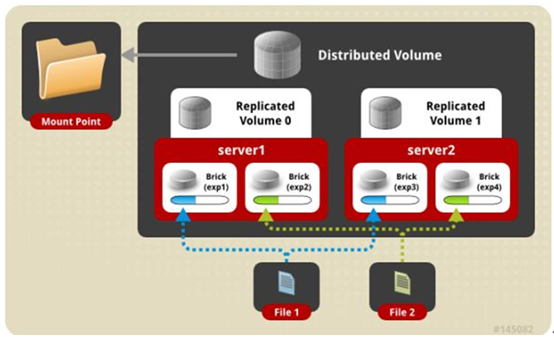
五、分布式复制卷:分布卷与复制卷的组合。这是我们最常用的类型!!!
六、条带复制卷:条带卷与复制卷的组合。生产不使用。
七、混合卷:三种卷模式的组合。生产不使用。
 [root@g1 ~]# gluster volume list                 # 目前集群没有卷

 No volumes present in cluster

 [root@g1 ~]# gluster volume create test replica  g1:/glusterfs/data1 g2:/glusterfs/data1 g3:/glusterfs/data1 g1:/glusterfs/data2 g2:/glusterfs/data2            # 我们用池内5块盘创建一个分布式复制卷,复制数为2

 Replica  volumes are prone to split-brain. Use Arbiter or Replica  to avoid this. See: http://docs.gluster.org/en/latest/Administrator%20Guide/Split%20brain%20and%20ways%20to%20deal%20with%20it/.

 Do you still want to continue?

  (y/n) y

 number of bricks is not a multiple of replica count

 Usage:

 volume create <NEW-VOLNAME> [stripe <COUNT>] [replica <COUNT> [arbiter <COUNT>]] [disperse [<COUNT>]] [disperse-data <COUNT>] [redundancy <COUNT>] [transport <tcp|rdma|tcp,rdma>] <NEW-BRICK>?<vg_name>... [force]        # 一共出现了2次问题,第一次提示说,复制数为2可能会造成脑裂,推荐复制三份,是否继续?生产要使用3,现在我就继续了。第二个说使用的块设备数量不是复制分数的倍数。因此像复制数为2的卷我们需要使用2468个块,复制数为3则为369,以此类推

 [root@g1 ~]# gluster volume create test replica  g1:/glusterfs/data1 g2:/glusterfs/data1 g3:/glusterfs/data1 g1:/glusterfs/data2

 Replica  volumes are prone to split-brain. Use Arbiter or Replica  to avoid this. See: http://docs.gluster.org/en/latest/Administrator%20Guide/Split%20brain%20and%20ways%20to%20deal%20with%20it/.

 Do you still want to continue?

  (y/n) y

 volume create: test: failed: The brick g1:/glusterfs/data1 is being created in the root partition. It is recommended that you don't use the system's root partition for storage backend. Or use 'force' at the end of the command if you want to override this behavior.        # 第一个还是提示警告,第二个是因为我直接使用了/下的目录并不是挂载的盘,所以会有这个提示,正常挂载的磁盘不会有此报错

 [root@g1 ~]# gluster volume create test replica  g1:/glusterfs/data1 g2:/glusterfs/data1 g3:/glusterfs/data1 g1:/glusterfs/data2 force        # 强制操作一波

 volume create: test: success: please start the volume to access data

 [root@g1 ~]# gluster volume list                     # 可以看见我们的集群中存在的卷

 test

 [root@g1 ~]# gluster volume info test                 # 查看卷的信息

 Volume Name: test

 Type: Distributed-Replicate

 Volume ID: 92ffe586-ea14-4b7b-9b89-5dfd626cb6d4

 Status: Created

 Snapshot Count:

 Number of Bricks:  x  =

 Transport-type: tcp

 Bricks:

 Brick1: g1:/glusterfs/data1

 Brick2: g2:/glusterfs/data1

 Brick3: g3:/glusterfs/data1

 Brick4: g1:/glusterfs/data2

 Options Reconfigured:

 transport.address-family: inet

 nfs.disable: on

 performance.client-io-threads: off

 [root@g1 ~]# gluster volume start test             # 将卷启动

 volume start: test: success

 [root@g1 ~]# gluster volume status test             # 查看卷的状态

 Status of volume: test

 Gluster process                             TCP Port  RDMA Port  Online  Pid

 ------------------------------------------------------------------------------

 Brick g1:/glusterfs/data1                                  Y

 Brick g2:/glusterfs/data1                                  Y

 Brick g3:/glusterfs/data1                                  Y

 Brick g1:/glusterfs/data2                                  Y

 Self-heal Daemon on localhost              N/A       N/A        Y

 Self-heal Daemon on g2                    N/A       N/A        Y

 Self-heal Daemon on g3                    N/A       N/A        Y

 Task Status of Volume test

 ------------------------------------------------------------------------------

 There are no active volume tasks

 [root@g1 ~]# netstat -tpln|grep gluster

 tcp               0.0.0.0:           0.0.0.0:*               LISTEN      /glusterfsd                # 为磁盘打开的通讯端口

 tcp               0.0.0.0:           0.0.0.0:*               LISTEN      /glusterfsd                # 为磁盘打开的通讯端口

 tcp               0.0.0.0:           0.0.0.0:*               LISTEN      /glusterd                   # 服务本身

 [root@g1 ~]# ps -ef|grep

 root               : ?        :: /usr/sbin/glusterfsd -s g1 --volfile-id test.g1.glusterfs-data1 -p /var/run/gluster/vols/test/g1-glusterfs-data1.pid -S /var/run/gluster/643869d38d7edd70.socket --brick-name /glusterfs/data1 -l /var/log/glusterfs/bricks/glusterfs-data1.log --xlator-option *-posix.glusterd-uuid=ce160a74-6f02--862c-1daf6cfa4300 --process-name brick --brick-port  --xlator-option test-server.listen-port=

 root           : pts/    :: grep --color=auto

 服务端在默认情况卷已经打开了很多的优化参数,我们只需要根据服务器自身资源修改一些值即可

 [root@g1 ~]# gluster volume set test performance.cache-size 1GB        # 读缓存大小1G,如果此值超过机器内存,则在挂载时会报错

 volume set: success

 [root@g1 ~]# gluster volume set test performance.io-thread-count     # 设置io线程

 volume set: success

  [root@g1 ~]# gluster volume quota test enable                        # 打开限额功能,内部机房一般不用

 quota command failed : Quota is already enabled

 [root@g1 ~]# gluster volume quota test limit-usage / 10GB                # 设置最多可使用量

 volume quota : success

 [root@g1 ~]# gluster volume set test performance.cache-refresh-timeout     # 设置缓存刷新时间

 volume set: success

 [root@g1 ~]# gluster volume info test

 Volume Name: test

 Type: Distributed-Replicate

 Volume ID: 92ffe586-ea14-4b7b-9b89-5dfd626cb6d4

 Status: Started

 Snapshot Count:

 Number of Bricks:  x  =

 Transport-type: tcp

 Bricks:

 Brick1: g1:/glusterfs/data1

 Brick2: g2:/glusterfs/data1

 Brick3: g3:/glusterfs/data1

 Brick4: g1:/glusterfs/data2

 Options Reconfigured:

 performance.cache-refresh-timeout:

 performance.io-thread-count:

 performance.cache-size: 1GB

 features.quota-deem-statfs: on

 nfs.disable: on

 features.inode-quota: on

 features.quota: on

 .挂载相关

 我们在一台可以进行主机名解析的机器上进行挂载测试

 [root@c4 /]# yum install -y glusterfs glusterfs-fuse

 [root@c4 /]# mount -t glusterfs -o backup-volfile-servers=g2:g3,log-level=WARNING g1:/test /mnt        # 挂载时指定备用服务器

 [root@c4 /]# df -h|grep mnt                # 很明显我们的限额起了作用

 g1:/test                  10G        10G   % /mnt

 [root@c4 ~]# cd /mnt

 [root@c4 mnt]# touch file{..}

 可以看到确实均匀分布在了我们卷里的4块盘之上

 [root@g1 glusterfs]# tree .

 .

 ├── data1

 │   ├── file10

 │   ├── file3

 │   ├── file4

 │   ├── file7

 │   └── file9

 ├── data2

 │   ├── file1

 │   ├── file2

 │   ├── file5

 │   ├── file6

 │   └── file8

 └── data3

 [root@g2 glusterfs]# tree .

 .

 ├── data1

 │   ├── file10

 │   ├── file3

 │   ├── file4

 │   ├── file7

 │   └── file9

 ├── data2

 └── data3

 [root@g3 glusterfs]# tree .

 .

 ├── data1

 │   ├── file1

 │   ├── file2

 │   ├── file5

 │   ├── file6

 │   └── file8

 ├── data2

 └── data3

 当然我们还有nfs挂载与cifs挂载,只是这两种挂载我们几乎使用不到的,而且使用方法也很简单,就不多写了。使用常规的原生挂载方式是很不错的选择,可以获得更高的并发性能和透明的失效转移功能
4.运维相关
扩容操作
 [root@g1 ~]# gluster peer probe g3                # 将新节点添加到集群里,如果是原本集群内的机器操作则省略

 peer probe: success. Host g3 port  already in peer list        # 这台机器添加过了

 [root@g1 ~]# gluster volume info test                             # 此时该卷块设备为4个

 Volume Name: test

 Type: Distributed-Replicate

 Volume ID: 92ffe586-ea14-4b7b-9b89-5dfd626cb6d4

 Status: Started

 Snapshot Count:

 Number of Bricks:  x  =

 Transport-type: tcp

 Bricks:

 Brick1: g1:/glusterfs/data1

 Brick2: g2:/glusterfs/data1

 Brick3: g3:/glusterfs/data1

 Brick4: g1:/glusterfs/data2

 [root@g1 ~]# gluster volume add-brick test g2:/glusterfs/data2 g3:/glusterfs/data2 g1:/glusterfs/data3 g2:/glusterfs/data3 g3:/glusterfs/data3

 volume add-brick: failed: Incorrect number of bricks supplied  with count         # 很明显又是之前的块设备与复制数备份问题。因此注意服务器上的磁盘数量要与卷复制数匹配问题,比如一个复制数为3的卷,买了10块盘其中一块是加不进来的

 [root@g1 ~]# gluster volume add-brick test g2:/glusterfs/data2 g3:/glusterfs/data2 g1:/glusterfs/data3 g2:/glusterfs/data3

 volume add-brick: failed: The brick g1:/glusterfs/data3 is being created in the root partition. It is recommended that you don't use the system's root partition for storage backend. Or use 'force' at the end of the command if you want to override this behavior.        # 我还是用的/所以要强制

 [root@g1 ~]# gluster volume add-brick test g2:/glusterfs/data2 g3:/glusterfs/data2 g1:/glusterfs/data3 g2:/glusterfs/data3 force

 volume add-brick: success

 [root@g1 ~]# gluster volume info test                 # 卷的块设备变多了

 Volume Name: test

 Type: Distributed-Replicate

 Volume ID: 92ffe586-ea14-4b7b-9b89-5dfd626cb6d4

 Status: Started

 Snapshot Count:

 Number of Bricks:  x  =

 Transport-type: tcp

 Bricks:

 Brick1: g1:/glusterfs/data1

 Brick2: g2:/glusterfs/data1

 Brick3: g3:/glusterfs/data1

 Brick4: g1:/glusterfs/data2

 Brick5: g2:/glusterfs/data2

 Brick6: g3:/glusterfs/data2

 Brick7: g1:/glusterfs/data3

 Brick8: g2:/glusterfs/data3

 [root@g1 ~]# gluster volume rebalance test start                # 让以前的数据再次均匀分布

 volume rebalance: test: success: Rebalance on test has been started successfully. Use rebalance status command to check status of the rebalance process.

 ID: a2f4b603-283a--8ad0-84db00adb5a5

 [root@g1 ~]# gluster volume rebalance test status            # 查看任务状态,要均衡文件较大时需要一段时间

                                     Node Rebalanced-files          size       scanned      failures       skipped               status  run time in h:m:s

                                ---------      -----------   -----------   -----------   -----------   -----------         ------------     --------------

                                localhost                        0Bytes                                                  completed        ::

                                       g2                        0Bytes                                                   completed        ::

                                       g3                        0Bytes                                                   completed        ::

 volume rebalance: test: success

 [root@g1 ~]# gluster volume rebalance test stop                # 等所有状态completed就可以停了

                                     Node Rebalanced-files          size       scanned      failures       skipped               status  run time in h:m:s

                                ---------      -----------   -----------   -----------   -----------   -----------         ------------     --------------

                                localhost                        0Bytes                                                  completed        ::

                                       g2                        0Bytes                                                   completed        ::

                                       g3                        0Bytes                                                   completed        ::

 volume rebalance: test: success: rebalance process may be in the middle of a file migration.

 The process will be fully stopped once the migration of the file is complete.

 Please check rebalance process for completion before doing any further brick related tasks on the volume.

 [root@g1 ~]# gluster volume rebalance test status        # 现在该卷上已经没有在均衡的任务了

 volume rebalance: test: failed: Rebalance not started for volume test.
缩容操作
 [root@g1 ~]# gluster volume remove-brick test g2:/glusterfs/data2 g3:/glusterfs/data2 g1:/glusterfs/data3 g2:/glusterfs/data3 start                # 去掉复制倍数的块设备,此时去除的设备上的数据会开始迁移

 Running remove-brick with cluster.force-migration enabled can result in data corruption. It is safer to disable this option so that files that receive writes during migration are not migrated.

 Files that are not migrated can then be manually copied after the remove-brick commit operation.

 Do you want to continue with your current cluster.force-migration settings? (y/n) y

 volume remove-brick start: success

 ID: 9b4657c0-ed29-4c75-8bb6-7b8f277f02ec

 [root@g1 ~]# gluster volume remove-brick test g2:/glusterfs/data2 g3:/glusterfs/data2 g1:/glusterfs/data3 g2:/glusterfs/data3 status            # 查看迁移状态

                                     Node Rebalanced-files          size       scanned      failures       skipped               status  run time in h:m:s

                                ---------      -----------   -----------   -----------   -----------   -----------         ------------     --------------

                                localhost                        0Bytes                                                  completed        ::

                                       g2                        0Bytes                                                   completed        ::

                                       g3                        0Bytes                                                   completed        ::

 [root@g1 ~]# gluster volume remove-brick test g2:/glusterfs/data2 g3:/glusterfs/data2 g1:/glusterfs/data3 g2:/glusterfs/data3 commit            # completed后从卷中将块设备去除掉

 volume remove-brick commit: success

 Check the removed bricks to ensure all files are migrated.

 If files with data are found on the brick path, copy them via a gluster mount point before re-purposing the removed brick.

 [root@g1 ~]# gluster volume remove-brick test g2:/glusterfs/data2 g3:/glusterfs/data2 g1:/glusterfs/data3 g2:/glusterfs/data3 status            # 没有任务

 volume remove-brick status: failed: remove-brick not started for volume test.

 [root@g1 ~]# gluster volume info test                 # 又变回了以前的4块盘

 Volume Name: test

 Type: Distributed-Replicate

 Volume ID: 92ffe586-ea14-4b7b-9b89-5dfd626cb6d4

 Status: Started

 Snapshot Count:

 Number of Bricks:  x  =

 Transport-type: tcp

 Bricks:

 Brick1: g1:/glusterfs/data1

 Brick2: g2:/glusterfs/data1

 Brick3: g3:/glusterfs/data1

 Brick4: g1:/glusterfs/data2

 [root@g1 ~]# ls -a /glusterfs/data3        # 将刚才所有被去除的块设备下隐藏目录删除,否则可能会影响到以后再次使用此块设备加入其它卷

 .  ..  .glusterfs

 [root@g1 ~]# rm -fr /glusterfs/data3/.glusterfs/
更换操作
 [root@g1 ~]# gluster volume replace-brick test g3:/glusterfs/data2 g3:/glusterfs/data3 commit force                    # 使用g3:/glusterfs/data3替换掉g3:/glusterfs/data2

 volume replace-brick: success: replace-brick commit force operation successful

 [root@g1 ~]# gluster volume info test

 Volume Name: test

 Type: Distributed-Replicate

 Volume ID: 92ffe586-ea14-4b7b-9b89-5dfd626cb6d4

 Status: Started

 Snapshot Count:

 Number of Bricks:  x  =

 Transport-type: tcp

 Bricks:

 Brick1: g1:/glusterfs/data1

 Brick2: g2:/glusterfs/data1

 Brick3: g3:/glusterfs/data1

 Brick4: g1:/glusterfs/data2

 Brick5: g2:/glusterfs/data2

 Brick6: g3:/glusterfs/data3                    # 被换掉了

 Brick7: g1:/glusterfs/data3

 Brick8: g2:/glusterfs/data3
glusterfs安装配置简单使用的更多相关文章
- 2.GlusterFS 安装配置
2.1 GlusterFS 安装前的准备 服务器规划:(vmware 实验) 操作系统 IP 主机名 数据盘(2 块) CentOS 6.8 x86_64 10.1.0.151 mystorage1 ...
- saltstack master minion安装配置简单使用
首先先了解下saltstack是什么,为什么使用它 它与Ansible.Puppet都属于集中管理工具,由于现在企业规模的不断庞大及业务的增长,所需要管理的服务器数量增多,而且大部分机器都属于同类业务 ...
- glusterfs安装配置
目标: 原有的k8s的集群磁盘容量不够,数据迁移无法完成,数据迁移是物理机无法由于采购磁盘流程过程,申请虚拟机搭建glusterfs做分布式存储 磁盘规划: # 查看盘符 $ lsblk # 然后创建 ...
- puppet yum安装配置,简单证书维护
Puppet学习之puppet的安装和配置 一.Puppet简介 Puppet基于ruby语言开发的自动化系统配置工具,可以C/S模式或独立运行,支持对所有UNIX及类UNIX系统的配置管理,最新版本 ...
- GlusterFS 安装配置
1.磁盘格式化 mkfs.xfs -i size=512 /dev/vdb1 mkdir -p /data/brick1 cat > /etc/fstab <<EOF /dev/vd ...
- Jenkins安装配置简单使用
安装启动是十分简单的,直接去https://jenkins.io/download/下载对应的rpm包就好了,需要注意的是我们的机器上要提前有java环境,相对应要选择你java环境可以支持的jenk ...
- ELK安装配置简单使用
ELK是三款软件的总称,包括了elasticsearch.logstash.kibana,其实在生产使用中,我们还需要使用到其他的更多辅助软件来更好更合理的收集展示数据. Elasticsearch: ...
- Katalon Studio 安装 配置 简单使用
本教程只针对Katalon Studio进行演示操作. 一.下载 Katalon 官网下载地址:https://www.katalon.com/download/ (需要注册账号) 二.解压.配置 直 ...
- Cobbler安装配置简单使用
安装Cobbler [root@linux-node3 ~]# yum -y install epel-release [root@linux-node3 ~]# yum -y install cob ...
随机推荐
- [note]fhq_treap
fhq_treap 这东西据说是某个叫范浩强的神仙搞出来的, 他的这种treap可以不用旋转并且资磁很多平衡树操作, 复杂度通过随机的键值来保证(树大致平衡,期望一次操作复杂度\(logn\)) 依靠 ...
- PAT 1058. 选择题(20)
批改多选题是比较麻烦的事情,本题就请你写个程序帮助老师批改多选题,并且指出哪道题错的人最多. 输入格式: 输入在第一行给出两个正整数N(<=1000)和M(<=100),分别是学生人数和多 ...
- ABAP制作密码输入框
[转自 http://blog.csdn.net/saphome/article/details/6956911] 这几天做一个系统维护的程序,需要用户输入用户名和密码登录.可怎样实现输入密码显示星号 ...
- mysql 5.5 安装配置方法图文教程(转发)
MySQL下载地址:http://dev.mysql.com/downloads/installer/ 1.首先进入的是安装引导界面 2.然后进入的是类型选择界面,这里有3个类型:Typical(典型 ...
- python实例3-天气小模块
调用中国天气的一小段代码,抓取 #! /usr/bin/python # coding = utf-8 # ToDo: get weather info from weather.com.cn # A ...
- shell 日期加减运算
比如今日是2012-04-22 $ date -d "+1 day" +%Y-%m-%d 2012-04-23 $ date -d "-1 day" +%Y ...
- PHP网页导出Word文档的方法分离
今天要探讨的是PHP网页导出Word文档的方法,使用其他语言的朋友也可以参考,因为原理是差不多的. 原理 一般,有2种方法可以导出doc文档,一种是使用com,并且作为php的一个扩展库安装到服务器上 ...
- (转载)《C#高级编程》读书笔记
C#类型的取值范围 名称 CTS类型 说明 范围 sbyte System.SByte 8位有符号的整数 -128~127(−27−27~27−127−1) short System.Int16 16 ...
- 有关java之反射的使用
1 public class Demo02 { 2 @SuppressWarnings("all") 3 public static void main(String[] args ...
- Gem简介
Rubyems:简称gems是一个用于对rails组建近些年个打包的ruby打包系统,它提供了一个分发ruby程序喝库的标准格式,还提供了一个管理程序包的工具.Rubyems的功能类似于linux下的 ...