Jumpserver是国内一款开源的轻便的跳板机系统,他们的官网:http://www.jumpserver.org/
环境要求
Jumpserver作为生产环境的主要入口,生产服务器的网络只打通到这台跳板机
我使用centos 7.1版本安装
8核8G内存40G硬盘
使用办公内网服务器比如(10.40.150.90)
jumpserver v0.3.0-2
内网的dnsmasq作一个解析地址:jumpserver.venic.com 10.40.150.90
生产服务器的网络只打到这台跳板机,IPsec VPN的ACL作规则permit放行,jumpserver不放开外网访问进来权限。只允许内网访问,如有外网登录跳板的,建议其通地拨号VPN,先连办公网,再登录跳板。
基础环境配置
修改系统内核句柄
修改ulimit打开文件的大小
/etc/security/limits.conf 尾部添加两行
* soft nofile 65536
* hard nofile 65536
关闭自动写入key的功能,在
/etc/ssh/ssh_config
StrictHostKeyChecking no
UserKnownHostsFile /dev/null
重启服务器
修改时钟同10.40.42.10 controller步为其它内网服务器,比如controller
vi /etc/hosts
10.40.42.10 controller
vi /etc/chrony.conf
server controller iburst
service chronyd start
安装数据库
yum install mariadb mariadb-server -y
修改数据库连接数
vi /etc/my.cnf
max_connections = 10000
vi /usr/lib/systemd/system/mariadb.service 或者vi /usr/lib/systemd/system/mysqld.service
在以下增加红色字体部份
[Service]
Type=simple
User=mysql
Group=mysql
LimitNOFILE=65535
LimitNPROC=65535
重启服务
systemctl daemon-reload
systemctl restart mariadb
初始化
mysql_secure_installation
create database jumpserver DEFAULT CHARSET utf8 COLLATE utf8_general_ci;
grant all on jumpserver .* to 'jumpserver '@'%' identified by 'jumpserver@123';
flush privileges;
上jumpserver.org官网下载他们的git.zip
在电脑上解压使用SSHclient上传至服务器10.40.150.90(刚新创建空虚拟机)
将文件件移至/opt目录下
/opt/jumpserver-master/install目录
直接执行python install.py
它会自动下载数据库和依赖包和pip包
按提示操作
Successfully installed MySQL-python-1.2.5 ansible-1.9.4 argparse-1.4.0 backports-abc-0.4 certifi-2016.8.8 django-1.6 django-bootstrap-form-3.2 django-crontab-0.6.0 django-smtp-ssl-1.0 paramiko-1.16.0 passlib-1.6.5 psutil-3.3.0 pycrypto-2.4.1 pyinotify-0.9.6 pyte-0.5.2 singledispatch-3.4.0.3 tornado-4.3 wcwidth-0.1.7 xlrd-0.9.4 xlsxwriter-0.7.7
开始关闭防火墙和selinux
setenforce: SELinux is disabled
请输入您服务器的IP地址,用户浏览器可以访问 [10.40.150.90]:
是否安装新的MySQL服务器? (y/n) [y]: n
请输入数据库服务器IP [127.0.0.1]:
请输入数据库服务器端口 [3306]:
请输入数据库服务器用户 [jumpserver]:
请输入数据库服务器密码: jumpserver@123
请输入使用的数据库 [jumpserver]:
连接数据库成功
请输入SMTP地址:
请输入SMTP端口 [25]:
请输入账户:
请输入密码:
please run connect() first
是否跳过(y/n) [n]? : y
请登陆邮箱查收邮件, 然后确认是否继续安装
是否继续? (y/n) [y]: y
请输入管理员用户名 [admin]: admin
请输入管理员密码: [5Lov@wife]: venic8888
请再次输入管理员密码: [5Lov@wife]: venic8888
Starting jumpserver service: [ 确定 ]
安装成功,Web登录请访问http://ip:8000, 祝你使用愉快。
请访问 https://github.com/jumpserver/jumpserver/wiki 查看文档
[root@jumpserver install]#
[root@jumpserver install]# netstat -tunl
Active Internet connections (only servers)
Proto Recv-Q Send-Q Local Address Foreign Address State
tcp 0 0 0.0.0.0:10050 0.0.0.0:* LISTEN
tcp 0 0 0.0.0.0:3306 0.0.0.0:* LISTEN
tcp 0 0 0.0.0.0:22 0.0.0.0:* LISTEN
tcp 0 0 127.0.0.1:25 0.0.0.0:* LISTEN
tcp 0 0 0.0.0.0:8000 0.0.0.0:* LISTEN
tcp6 0 0 :::10050 :::* LISTEN
tcp6 0 0 :::22 :::* LISTEN
tcp6 0 0 ::1:25 :::* LISTEN
udp 0 0 0.0.0.0:68 0.0.0.0:*
udp 0 0 127.0.0.1:323 0.0.0.0:*
udp 0 0 0.0.0.0:49683 0.0.0.0:*
udp6 0 0 ::1:323 :::*
udp6 0 0 :::48824 :::*
如果启动失败,请返回上层目录/opt/jumpserver-master,手动运行 python run_server.py 或 ./service.sh restart启动
重启
./service.sh restart
问题记录一:
默认跳板机的上传文件有限制大小为256M,可以修改dropzone.js
vi /opt/jumpserver-master/static/js/dropzone/dropzone.js ,296 行
maxFilesize: 5000,
还要安装一个nginx代理,以用来改善它的80端口访问和改善WEB大文件上传,加上一个http://jumpserver.venic.com/doc
来链接使用说明
[root@jumpserver http]# vi uploadbigfile.conf
server {
listen 80;
client_max_body_size 5g;
proxy_connect_timeout 300;
proxy_read_timeout 300;
proxy_send_timeout 300;
proxy_buffer_size 64k;
proxy_buffers 4 32k;
proxy_busy_buffers_size 64k;
proxy_temp_file_write_size 64k;
location ^~ /ws/ {
proxy_set_header X-Real-IP $remote_addr;
proxy_set_header Host $host;
proxy_set_header X-Forwarded-For $proxy_add_x_forwarded_for;
proxy_http_version 1.1;
proxy_set_header Upgrade $http_upgrade;
proxy_set_header Connection "upgrade";
proxy_pass http://127.0.0.1:8000/ws/;
}
location / {
proxy_pass http://127.0.0.1:8000;
}
location /file/upload/ {
proxy_pass http://127.0.0.1:8083;
}
location ^~ /doc/ {
proxy_pass http://127.0.0.1:8088/;
}
}
server {
listen 8088;
location / {
root /opt/jumpserver-master/docs/;
index index.html index.htm;
}
}
由于多了一个8083端口,还要启动这个
cd /opt/jumpserver-master
python manage.py runserver 127.0.0.1:8083 &
*************************************************
xshell工具的上传大小还没解决,以下是刚才修改配置的位置,但测试最终提示不超过2G的单文件。
上传文件有限制大小为256M,可以修改dropzone.js
vi /opt/jumpserver-master/static/js/dropzone/dropzone.js ,296 行
maxFilesize: 5000,
./service.sh restart
~
加一些开机自启动
chkconfig mariadb on
vi /etc/rc.d/rc.local
/home/local/nginx1.9/sbin/nginx
/opt/jumpserver-master/service.sh restart
/bin/python /opt/jumpserver-master/manage.py runserver 127.0.0.1:8083 &
chmod +x /etc/rc.d/rc.local
问题记录二:
Web console登录机器,会产生过大的CPU,单开一个WEB console就消耗了44%的CPU,2核中占满一个。而使用Xshell公钥匙则没有问题
如果要禁用Web Console的话,修改Web前端,但我没有删掉
进入/opt/jumpserver-master/templates/jasset/asset_cu_list.html -----修改130行 这个是修改普通用户界面的
进入/opt/jumpserver-master/templates/jasset/asset_list.html 135行 --------这个是修改管理员界面的
比如我把它修改成跳转方式到其它网站连接去
<a value="{{ asset.id }}" class="conn btn btn-xs btn-warning">连接</a>
<a href="http://jumpserver.venic.com/doc" class="conn btn btn-xs btn-warning">连接</a>
而我没有取消,是因我调高CPU配置为8核后,发现开了8个窗口,最终还是最多消耗2个核,所以我没有禁用web console
-------------------------------------------------------------------------------------------------------------
修改web console的窗口宽一点
/opt/jumpserver-master/static/js/webterminal.js
改里面所有100值为160的值
修改webconsole 窗口,加个注释,禁用用户修改窗口大小
<!--
<div class="termChangBar">
<input type="number" min="100" value="100" placeholder="col" id="term-col"/>
<input type="number" min="35" value="35" placeholder="row" id="term-row"/>
<button id="col-row">修改窗口大小</button>
</div>
-->
修改弹窗的窗口体大小(非terminal),
进入/opt/jumpserver-master/templates/jasset/asset_cu_list.html -----修改237行和249行 这个是修改普通用户界面的
进入/opt/jumpserver-master/templates/jasset/asset_list.html 248行和259 --------这个是修改管理员界面的
window.open(new_url+data, "_blank", 'width=1000, height=600');
------------------------------------------------------
需求变更二:
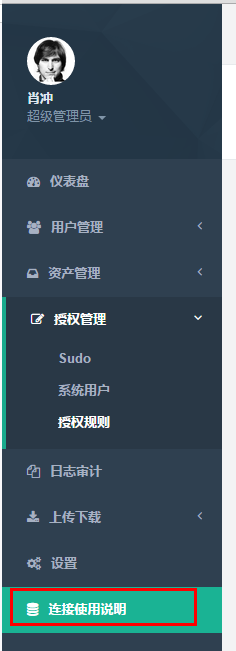
修改左侧导航栏的访问官网链接
进入/opt/jumpserver-master/templates/nav.html 52行和80行
<a href="http://jumpserver.venic.com/doc" target="_blank"><i class="fa fa-database"></i> <span class="nav-label">访问官网</span></a>
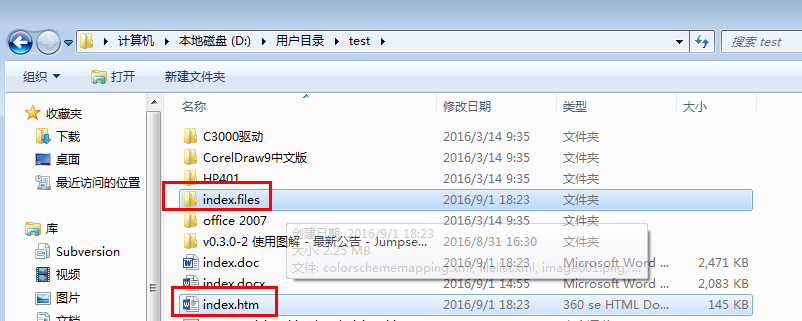
上传一个用word文档写的“操作指引”到如下链接,
这个word文档转成html,我只是使用另存为html自己保存成2个新文件(index.files和index.htm)
然后我在htm文件的<head></head>标签中,添加了一个<style></style>如下标签,目的是让图片自动伸缩和居中
<style>
html{
}
body{width:800px;
margin:auto;
}
img {max-width:800px;}
</style>
然后把这2个文件上传至服务器的/opt/jumpserver-master/docs目录下。所以才上面的nginx多一条跳转的配置
然后我们还要修改首页的前代码,让“连接使用说明”指到这个 http://jumpserver.venic.com/doc/
修改处在
/opt/jumpserver-master/templates/nav.html

测试跳转后的显示界面样式如下,


