Python图形编程探索系列-08-再次认识标签
标签的各种属性
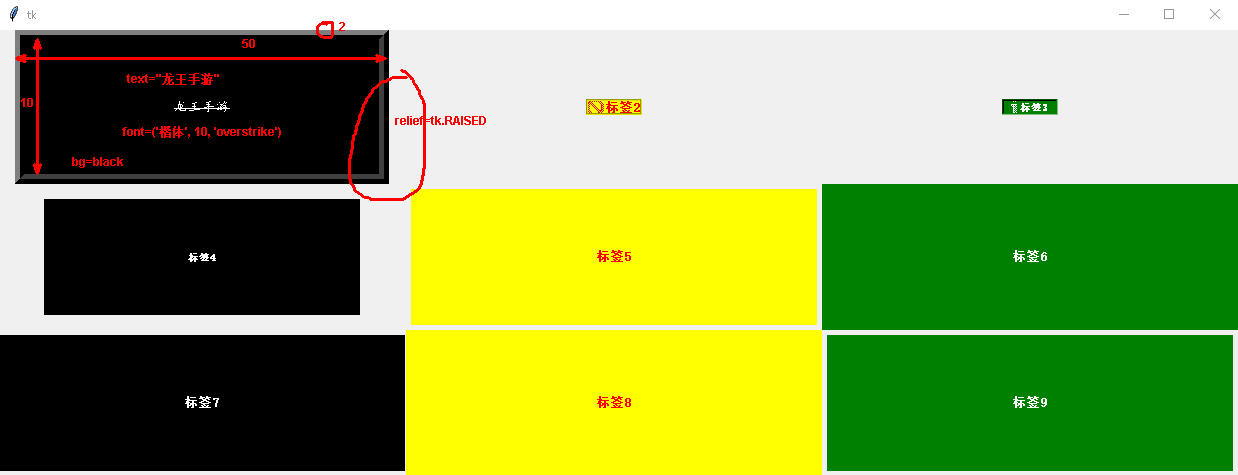
**代码展示:**
```
import tkinter as tk
root = tk.Tk()
root.geometry = '500x300'
label1 = tk.Label(root, text='龙王手游', width=50, height=10, bd=10)
label1.config(fg='white', bg='black', relief=tk.RAISED, font=('楷体', 10, 'overstrike'))
label2 = tk.Label(root, text='标签2', relief=tk.GROOVE, width=50, height=10, bd=2)
label2.config(fg='red', compound=tk.LEFT, bitmap='error', bg='yellow', font=('隶书', 10, 'bold'))
label3 = tk.Label(root, text='标签3', compound=tk.LEFT, bitmap='info', relief=tk.SUNKEN, width=50, height=10, bd=2)
label3.config(fg='white', bg='green', font=('隶书', -10, 'bold'))
label4 = tk.Label(root, text='标签4', width=50, height=10, bd=2)
label4.config(fg='white', bg='black', font=('楷书', -10, 'bold'))
label5 = tk.Label(root, text='标签5', width=50, height=10)
label5.config(fg='red', bg='yellow', bd=2, font=('隶书', 10, 'bold'))
label6 = tk.Label(root, text='标签6', width=50, height=10, bd=2)
label6.config(fg='white', bg='green', font=('隶书', 10, 'bold'))
label7 = tk.Label(root, text='标签7', width=50, height=10, bd=2)
label7.config(fg='white', bg='black', font=('隶书', 10, 'bold'))
label8 = tk.Label(root, text='标签8', width=50, height=10, bd=2)
label8.config(fg='red', bg='yellow', font=('隶书', 10, 'bold'))
label9 = tk.Label(root, text='标签9', width=50, height=10)
label9.config(fg='white', bg='green', bd=2, font=('隶书', 10, 'bold'))
label1.grid(row=0, column=0, ipadx=1, ipady=1)
label2.grid(row=0, column=1, padx=5, pady=5)
label3.grid(row=0, column=2, padx=1, pady=1)
label4.grid(row=1, column=0, ipadx=5, ipady=5)
label5.grid(row=1, column=1, padx=1, pady=1)
label6.grid(row=1, column=2, ipadx=5, ipady=5)
label7.grid(row=2, column=0, padx=1, pady=1)
label8.grid(row=2, column=1, ipadx=5, ipady=5)
label9.grid(row=2, column=2, padx=1, pady=1)
root.mainloop()
**结果:**
<h1 style="background:cyan;">标签按钮合作案例</h1>
单击按钮是从新设置标签上的显示内容
import tkinter as tk # 导入tkinter库
root = tk.Tk() # 建立程序主窗口
root.title("Button按钮的使用") # 设置主窗口的标题
root.geometry('600x500')
------功能函数
def f1():
var.set("单击按钮1")
def f2():
var.set("单击按钮2")
def f3():
var.set("单击按钮3")
------建立标签
labelx = tk.Label(root)
labelx.config(width=10, height=5)
labelx.config(activebackground='red')
labelx.config(activeforeground='yellow')
labelx.config(relief=tk.SUNKEN)
labelx.config(anchor=tk.CENTER)
定义字符串变量
var = tk.StringVar()
labelx.config(textvariable=var)
------建立第一个按钮
button1 = tk.Button(root, text='按钮1')
button1.config(width=5, height=2)
button1.config(activebackground='red')
button1.config(activeforeground='yellow')
button1.config(anchor=tk.CENTER)
button1.config(bd=2)
button1.config(relief=tk.RAISED)
button1.config(font=('隶书', -20))
button1.config(command=f1)
------建立第二个按钮
button2 = tk.Button(root, text='按钮2')
button2.config(width=5, height=2)
button2.config(activebackground='red')
button2.config(activeforeground='yellow')
button2.config(anchor=tk.CENTER)
button2.config(bd=2)
button2.config(relief=tk.RAISED)
button2.config(font=('隶书', -20))
button2.config(command=f2)
------建立第三个按钮
button3 = tk.Button(root, text='按钮3')
button3.config(width=5, height=2)
button3.config(activebackground='red')
button3.config(activeforeground='yellow')
button3.config(anchor=tk.CENTER)
button3.config(bd=2)
button3.config(relief=tk.RAISED)
button3.config(font=('隶书', -20))
button3.config(command=f3)
各个组件排兵布阵
labelx.grid(row=0, column=1)
button1.grid(row=1, column=0)
button2.grid(row=1, column=1)
button3.grid(row=1, column=2)
root.mainloop()
<h1 style="background:cyan;">标签案例</h1>

在主窗口中定义了三个标签
import tkinter as tk
root = tk.Tk()
label1 = tk.Label(root, text='标签1')
label1.config(fg='white', bg='black')
label2 = tk.Label(root, text='标签2')
label2.config(fg='red', bg='yellow')
label3 = tk.Label(root, text='标签3')
label3.config(fg='white', bg='green')
label1.grid(row=0, column=3)
label2.grid(row=1, column=2)
label3.grid(row=1, column=1)
root.mainloop()
Python图形编程探索系列-08-再次认识标签的更多相关文章
- Python图形编程探索系列-09-tkinter与matplotlib结合案例
案例1 案例来自于:https://bbs.csdn.net/topics/390326088 代码示例: import matplotlib matplotlib.use('TkAgg') from ...
- Python图形编程探索系列-07-程序登录界面设计
设计任务 初步设计程序登录界面,详细分析设计步骤. 程序详细分析 基本框架设计 import tkinter as tk import tkinter.messagebox root = tk.Tk( ...
- Python图形编程探索系列-04-网上图片与标签组件的结合
跳转到自己的博客 任务设定 任务:从网上找到一张图片,然后将其显示在标签上? 网上图片网站:http://pic.58pic.com/58pic/17/56/38/52w58PICtER_1024.j ...
- Python图形编程探索系列-03-标签组件(Label)
跳转到自己的博客 tkinter.Label介绍 什么是标签? 通俗的将就相当于word的功能,能够进行显示不可修改的文字.图片或者图文混排. 直观体会一下 图1 背景图构成:内容区(黑色),填充区( ...
- Python图形编程探索系列-06-按钮批量生产函数
设计任务 初步设计一个批量生产按钮的函数,根据需要的按钮数量,自动生成多少按钮. 函数设计 import tkinter as tk # 导入tkinter库 root = tk.Tk() # 建立程 ...
- Python图形编程探索系列-05-用控制变量构建对话程序
跳转到自己的博客 控制变量 变量 符号 意义 默认值 1 var = tk.BooleanVar() 布尔型 0 2 var = tk.StringVar() 字符串控制变量 空字符串 3 var = ...
- Python图形编程探索系列-02-框架设计
跳转到我的博客 设计任务 在主窗口root中放置三个容器用于容纳组件,容器采用框架设计. 代码初步设计 import tkinter as tk root = tk.Tk() root.geometr ...
- Python图形编程探索系列-01-初级任务
设计任务 设计一个主窗口,在其中添加三个标签和三个按钮,当点击按钮时,对标签的内容和色彩进行修改. 代码初步设计 import tkinter as tk root = tk.Tk() def f1( ...
- linux python 图形编程 qt开发环境搭建
我的系统是 ubuntu14.04 我们使用的是python2.7,建议安装qt4+pyqt4+eric4 eric是pyqt的界面设计器的代码生成软件. 1.安装sip 这个是python和qt之间 ...
随机推荐
- Linux文件系统2---VFS的四个主要对象
1.引言 本文所述关于文件管理的系列文章主要是对陈莉君老师所讲述的文件系统管理知识讲座的整理. Linux可以支持不同的文件系统,它源于unix文件系统,也是unix文件系统的一大特色. Linux文 ...
- Linux内核驱动基础(一)常用宏定义【转】
转自:http://blog.csdn.net/tommy_wxie/article/details/9427081 一: __init和__initdata : __exit和__exitdata ...
- ES系列一、CentOS7安装ES 6.3.1、集成IK分词器
Elasticsearch 6.3.1 地址: wget https://artifacts.elastic.co/downloads/elasticsearch/elasticsearch-6.3. ...
- sqlserver2008 链接服务器 2000
背景 这个项目就有意思了,我用的是sqlserver2008,对方用的是sqlserver2000,还装在windows2000上,是个很老的系统了.两方要对接,对方技术太菜,自己竟然不会转2000. ...
- GitHub上优秀的Go开源项目
近一年来,学习和研究Go语言,断断续续的收集了一些比较优秀的开源项目,这些项目都非常不错,可以供我们学习和研究Go用,从中可以学到很多关于Go的使用.技巧以及相关工具和方法.我把他们整理发出来,大家有 ...
- javascript 练习题目答案
//廖雪峰的博客的这个教程的答案//https://www.liaoxuefeng.com/wiki/001434446689867b27157e896e74d51a89c25cc8b43bdb300 ...
- OneNET麒麟座应用开发之五:获取加速度传感器ADXL345数据
由于数据采集站基本都安装在野外或者楼顶,安装位置以及震动对检测数据的准确性有一定影响.所以想要有一个位置状态数据,正好发现麒麟作上有ADXL345,这样一个数字输出的加速度传感器.如图中红框所示: 1 ...
- LeetCode(46):全排列
Medium! 题目描述: 给定一个没有重复数字的序列,返回其所有可能的全排列. 示例: 输入: [1,2,3] 输出: [ [1,2,3], [1,3,2], [2,1,3], [2,3,1], [ ...
- PHP时间类完整实例
<?php header("Content-type:text/html;Charset=utf-8"); class time{ private $year;//年 pri ...
- iOS学习笔记之Reachability简单使用
写在前面 在学习异步图片下载的Demo过程中,由于需要实时检测网路状态,因此用到了苹果提供的Reachability库.Reachability的功能包括:检测目标网络是否可用.检测当前网络的链接方式 ...