Android Hal 分析
本文是基于android4.0.3.对应其他低版本的代码,可能有所差异,但基本大同小异。
Android的HAL是为了保护一些硬件提供商的知识产权而提出的,是为了避开linux的GPL束缚。思路是把控制硬件的动作都放到了Android HAL中,而linux driver仅仅完成一些简单的数据交互作用,甚至把硬件寄存器空间直接映射到user space。而Android是基于Aparch的license,因此硬件厂商可以只提供二进制代码,所以说Android只是一个开放的平台,并不是一个开源的平台。也许也正是因为Android不遵从GPL,所以Greg Kroah-Hartman才在2.6.33内核将Andorid驱动从linux中删除。GPL和硬件厂商目前还是有着无法弥合的裂痕。Android想要把这个问题处理好也是不容易的。
总结下来,Android HAL存在的原因主要有:
1. 并不是所有的硬件设备都有标准的linux kernel的接口
2. KERNEL DRIVER涉及到GPL的版权。某些设备制造商并不原因公开硬件驱动,所以才去用HAL方 式绕过GPL。
3. 针对某些硬件,An有一些特殊的需求
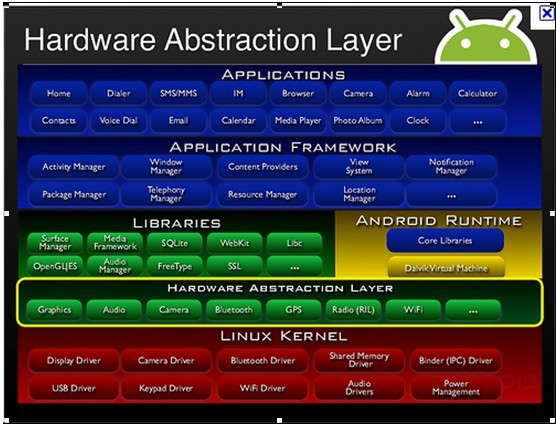
现有HAL架构由Patrick Brady (Google) 在2008 Google I/O演讲中提出的,如下图:
一、 源码位置
/hardware/libhardware_legacy/ - 旧的架构、采取链接库模块的方式
/hardware/libhardware 新架构、调整为 HAL stub 目录的结构如下:
/hardware/libhardware/hardware.c 编译成libhardware.s置于/system/lib
/hardware/libhardware/include/hardware目录下包含如下头文件:
hardware.h 通用硬件模块头文件
copybit.h copybit模块头文件
gralloc.h gralloc模块头文件
lights.h 背光模块头文件
overlay.h overlay模块头文件
qemud.h qemud模块头文件
sensors.h 传感器模块头文件
/hardware/libhardware/modules 目录下定义了很多硬件模块
/hardware/msm7k /hardware/qcom /hardware/ti /device/Samsung
/device/moto 各个厂商平台相关的hal
这些硬件模块都编译成xxx.xxx.so,目标位置为/system/lib/hw目录
二、 HAL层的实现方式
目前HAL存在两种构架,位于libhardware_legacy目录下的“旧HAL架构”和位于libhardware目录下的“新HAL架构”。两种框架如下图所示:
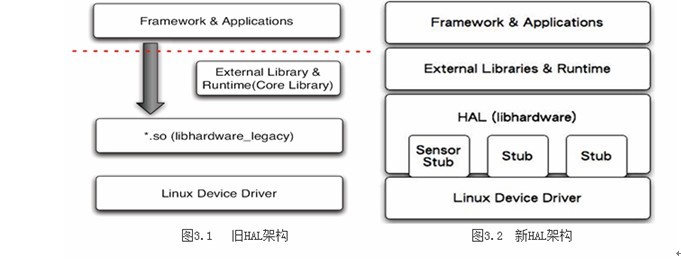
libhardware_legacy 是将 *.so 文件当作shared library来使用,在runtime(JNI 部份)以 direct function call 使用 HAL module。通过直接函数调用的方式,来操作驱动程序。当然,应用程序也可以不需要通过 JNI 的方式进行,直接加载 *.so (dlopen)的做法调用*.so 里的符号(symbol)也是一种方式。总而言之是没有经过封装,上层可以直接操作硬件。
现在的libhardware 架构,就有stub的味道了。HAL stub 是一种代理人(proxy)的概念,stub 虽然仍是以 *.so檔的形式存在,但HAL已经将 *.so 档隐藏起来了。Stub 向 HAL提供操作函数(operations),而 runtime 则是向 HAL 取得特定模块(stub)的 operations,再 callback 这些操作函数。这种以 indirect function call 的架构,让HAL stub 变成是一种包含关系,即 HAL 里包含了许许多多的
stub(代理人)。Runtime 只要说明类型,即 module ID,就可以取得操作函数。对于目前的HAL,可以认为Android定义了HAL层结构框架,通过几个接口访问硬件从而统一了调用方式。
Android的HAL的实现需要通过JNI(Java Native Interface),JNI简单来说就是java程序可以调用C/C++写的动态链接库,这样的话,HAL可以使用C/C++语言编写,效率更高。JNI->通用硬件模块->硬件模块->内核驱动接口,具体一点:JNI->libhardware.so->xxx.xxx.so->kernel,具体来说:android frameworks中JNI调用hardware.c中定义的hw_get_module函数来获取硬件模块,然后调用硬件模块中的方法,硬件模块中的方法直接调用内核接口完成相关功能
在Android下访问HAL大致有以下两种方式:
(1)Android的app可以直接通过service调用.so格式的jni
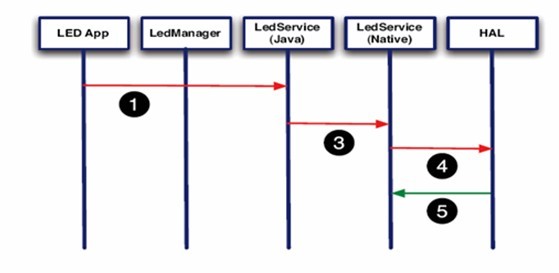
(2)经过Manager调用service
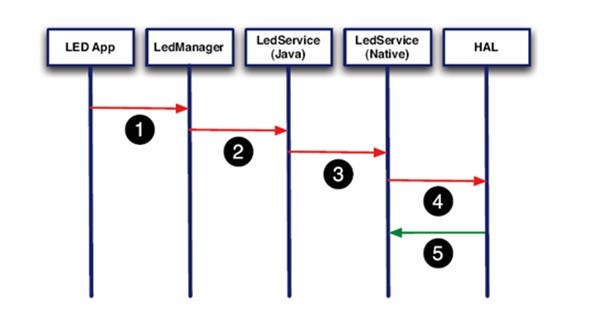
上面两种方法应该说是各有优缺点,第一种方法简单高效,但不正规。第二种方法实现起来比较复杂,但更符合目前的Android框架。第二种方法中,LegManager和LedService(java)在两个进程中,需要通过进程通讯的方式来通讯。
在现在的android框架中,这两种方式都存在,比如对于lights,是直接透过LightsService调用JNI,而对于sensor,中间则是通过SensorsManager
来调用JNI的。
1、通用硬件模块(libhardware.so)
一般来说HAL moudle需要涉及的是三个关键结构体:
struct hw_module_t;
struct hw_module_methods_t;
struct hw_device_t;
这三个结构体定义在hardware.h中。
(1)头文件为:/hardware/libhardware/include/hardware/hardware.h
头文件中主要定义了通用硬件模块结构体hw_module_t,声明了JNI调用的接口函数hw_get_module、hw_module_t定义如下:
/**
* Every hardware module must have a data structure named HAL_MODULE_INFO_SYM
* and the fields of this data structure must begin with hw_module_t
* followed by module specific information.
*/
typedef struct hw_module_t {
/** tag must be initialized to HARDWARE_MODULE_TAG */
uint32_t tag;
/** major version number for the module */
uint16_t version_major;
/** minor version number of the module */
uint16_t version_minor;
/** Identifier of module */
const char *id;
/** Name of this module */
const char *name;
/** Author/owner/implementor of the module */
const char *author;
/** Modules methods */
struct hw_module_methods_t* methods; //硬件模块的方法
/** module's dso */
void* dso;
/** padding to 128 bytes, reserved for future use */
uint32_t reserved[32-7];
} hw_module_t;
如注释所说,所有的hal模块都要有一个以HAL_MODULE_INFO_SYM命名的结构,而且这个结构要以hw_module_t开始,即要继承hw_module_t这个结构,比如lights,sensor:
struct sensors_module_t {
struct hw_module_t common;
int (*get_sensors_list)(struct sensors_module_t* module,
struct sensor_t const** list);
};
/*
* The lights Module
*/
struct light_module_t HAL_MODULE_INFO_SYM = {
common: {
tag: HARDWARE_MODULE_TAG,
version_major: 1,
version_minor: 0,
id: LIGHTS_HARDWARE_MODULE_ID,
name: "Lights module",
author: "Rockchip",
methods: &light_module_methods,
}
};
const struct sensors_module_t HAL_MODULE_INFO_SYM = {
.common = {
.tag = HARDWARE_MODULE_TAG,
.version_major = 1,
.version_minor = 0,
.id = SENSORS_HARDWARE_MODULE_ID,
.name = "Stingray SENSORS Module",
.author = "Motorola",
.methods = &sensors_module_methods,
},
.get_sensors_list = sensors__get_sensors_list
};
hw_module_t中比较重要的是硬件模块方法结构体hw_module_methods_t定义如下:
typedef struct hw_module_methods_t {
/** Open a specific device */
int (*open)(const struct hw_module_t* module, const char* id,
struct hw_device_t** device);
} hw_module_methods_t;
该方法在定义HAL_MODULE_INFO_SYM的时候被初始化。目前该结构中只定义了一个open方法,其中调用的设备结构体参数hw_device_t定义如下:
/**
* Every device data structure must begin with hw_device_t
* followed by module specific public methods and attributes.
*/
typedef struct hw_device_t {
/** tag must be initialized to HARDWARE_DEVICE_TAG */
uint32_t tag;
/** version number for hw_device_t */
uint32_t version;
/** reference to the module this device belongs to */
struct hw_module_t* module;
/** padding reserved for future use */
uint32_t reserved[12];
/** Close this device */
int (*close)(struct hw_device_t* device);
} hw_device_t;
struct light_device_t {
struct hw_device_t common;
int (*set_light)(struct light_device_t* dev,
struct light_state_t const* state);
};
/**
* Every device data structure must begin with hw_device_t
* followed by module specific public methods and attributes.
*/
struct sensors_poll_device_t {
struct hw_device_t common;
int (*activate)(struct sensors_poll_device_t *dev,
int handle, int enabled);
int (*setDelay)(struct sensors_poll_device_t *dev,
int handle, int64_t ns);
int (*poll)(struct sensors_poll_device_t *dev,
sensors_event_t* data, int count);
};
亦如注释所说,每一个设备的数据结构都必须也以hw_device_t开始。hw_get_module函数声明如下:
int hw_get_module(const char *id, const struct hw_module_t **module);
参数id为模块标识,定义在/hardware/libhardware/include/hardware录下的硬件模块头文件中,参数module是硬件模块地址,定义在/hardware/libhardware/include/hardware/hardware.h中
下面以lights模块为例进行分析:
在lights.h中定义有lights模块的ID
#define LIGHTS_HARDWARE_MODULE_ID "lights"
在JNI层会通过hw_ge_module()方法获得对应的模块,对于lights,在
frameworks/base/services/jni/com_android_server_LightsService.cpp的init_native方法中,代码如下:
static jint init_native(JNIEnv *env, jobject clazz)
{
int err;
hw_module_t* module;
Devices* devices;
devices = (Devices*)malloc(sizeof(Devices));
err = hw_get_module(LIGHTS_HARDWARE_MODULE_ID, (hw_module_t const**)&module);
if (err == 0) {
devices->lights[LIGHT_INDEX_BACKLIGHT]
= get_device(module, LIGHT_ID_BACKLIGHT);
………………………………………….
}
hw_get_module函数在hardware.c中实现:
int hw_get_module(const char *id, const struct hw_module_t **module)
{
return hw_get_module_by_class(id, NULL, module);
}
再看hw_get_module_by_class时如何实现的:
首先在hardware.c的开始有如下定义和注释:
/** Base path of the hal modules */
#define HAL_LIBRARY_PATH1 "/system/lib/hw"
#define HAL_LIBRARY_PATH2 "/vendor/lib/hw"
/**
* There are a set of variant filename for modules. The form of the filename
* is "<MODULE_ID>.variant.so" so for the led module the Dream variants
* of base "ro.product.board", "ro.board.platform" and "ro.arch" would be:
*
* led.trout.so
* led.msm7k.so
* led.ARMV6.so
* led.default.so
*/
static const char *variant_keys[] = {
"ro.hardware", /* This goes first so that it can pick up a different
file on the emulator. */
"ro.product.board",
"ro.board.platform",
"ro.arch"
};
static const int HAL_VARIANT_KEYS_COUNT =
(sizeof(variant_keys)/sizeof(variant_keys[0]));
int hw_get_module_by_class(const char *class_id, const char *inst,
const struct hw_module_t **module)
{
int status;
int i;
const struct hw_module_t *hmi = NULL;
char prop[PATH_MAX];
char path[PATH_MAX];
char name[PATH_MAX];
if (inst)
snprintf(name, PATH_MAX, "%s.%s", class_id, inst);
else
strlcpy(name, class_id, PATH_MAX);
/*
* Here we rely on the fact that calling dlopen multiple times on
* the same .so will simply increment a refcount (and not load
* a new copy of the library).
* We also assume that dlopen() is thread-safe.
*/
/* Loop through the configuration variants looking for a module */
for (i=0 ; i<HAL_VARIANT_KEYS_COUNT+1 ; i++) {
if (i < HAL_VARIANT_KEYS_COUNT) {
if (property_get(variant_keys[i], prop, NULL) == 0) {
continue;
}
snprintf(path, sizeof(path), "%s/%s.%s.so",
HAL_LIBRARY_PATH2, name, prop);
if (access(path, R_OK) == 0) break;
snprintf(path, sizeof(path), "%s/%s.%s.so",
HAL_LIBRARY_PATH1, name, prop);
if (access(path, R_OK) == 0) break;
} else {
snprintf(path, sizeof(path), "%s/%s.default.so",
HAL_LIBRARY_PATH1, name);
if (access(path, R_OK) == 0) break;
}
}
status = -ENOENT;
if (i < HAL_VARIANT_KEYS_COUNT+1) {
/* load the module, if this fails, we're doomed, and we should not try
* to load a different variant. */
status = load(class_id, path, module);
}
return status;
}
可以看到,在hw_get_module_by_class函数中,先通过property_get获得varient_key中定义的系统属性,如果系统中有定义该属性,就会获得一个模块名.属性名组成的一个so的名称,然后去定义两个patch(/system/lib/hw、/vendor/lib/hw)下查看,该so是否存在,如果存在,几回调用load函数,打开.so.例如在rockchip的rk29平台上,有定义ro.product.board = rk29sdk,在这里会得到lights.rk29sdk.so。
再看load函数的实现:
/**
* Load the file defined by the variant and if successful
* return the dlopen handle and the hmi.
* @return 0 = success, !0 = failure.
*/
static int load(const char *id,const char *path,
const struct hw_module_t **pHmi)
{
int status;
void *handle;
struct hw_module_t *hmi;
/*
* load the symbols resolving undefined symbols before
* dlopen returns. Since RTLD_GLOBAL is not or'd in with
* RTLD_NOW the external symbols will not be global
*/
handle = dlopen(path, RTLD_NOW);
if (handle == NULL) {
char const *err_str = dlerror();
LOGE("load: module=%s\n%s", path, err_str?err_str:"unknown");
status = -EINVAL;
goto done;
}
/* Get the address of the struct hal_module_info. */
const char *sym = HAL_MODULE_INFO_SYM_AS_STR;
hmi = (struct hw_module_t *)dlsym(handle, sym);
if (hmi == NULL) {
LOGE("load: couldn't find symbol %s", sym);
status = -EINVAL;
goto done;
}
/* Check that the id matches */
if (strcmp(id, hmi->id) != 0) {
LOGE("load: id=%s != hmi->id=%s", id, hmi->id);
status = -EINVAL;
goto done;
}
hmi->dso = handle;
/* success */
status = 0;
done:
if (status != 0) {
hmi = NULL;
if (handle != NULL) {
dlclose(handle);
handle = NULL;
}
} else {
LOGV("loaded HAL id=%s path=%s hmi=%p handle=%p",
id, path, *pHmi, handle);
}
*pHmi = hmi;
return status;
}
在这里会打开对应了so,比如lights.rk29sdk.so,然后获得这个模块中定义的hw_module_t的地址。后面JNI就能通过这个接口和hal层进行沟通了。
Android Hal 分析的更多相关文章
- android HAL 教程(含实例)
http://www.cnblogs.com/armlinux/archive/2012/01/14/2396768.html Android Hal 分析 ...
- Android架构分析之使用自定义硬件抽象层(HAL)模块
作者:刘昊昱 博客:http://blog.csdn.net/liuhaoyutz Android版本:2.3.7_r1 Linux内核版本:android-goldfish-2.6.29 在上一篇博 ...
- Android Hal层简要分析
Android Hal层简要分析 Android Hal层(即 Hardware Abstraction Layer)是Google开发的Android系统里上层应用对底层硬件操作屏蔽的一个软件层次, ...
- 【转】【Android】HAL分析
原文网址:http://www.cnblogs.com/lcw/p/3335505.html HAL概述 以下是基于android4.0.3,对应其他低版本的代码,可能有所差异,但基本大同小异. An ...
- 【Android】HAL分析
HAL概述 以下是基于android4.0.3,对应其他低版本的代码,可能有所差异,但基本大同小异. Android的HAL是为了保护一些硬件提供商的知识产权而提出的,是为了避开linux的GPL束缚 ...
- 【转】Android HAL实例解析
原文网址:http://www.embedu.org/Column/Column339.htm 作者:刘老师,华清远见嵌入式学院讲师. 一.概述 本文希望通过分析台湾的Jollen的mokoid 工程 ...
- Android HAL实例解析
一.概述 本文希望通过分析台湾的Jollen的mokoid 工程代码,和在s5pc100平台上实现过程种遇到的问题,解析Andorid HAL的开发方法. 二.HAL介绍 现有HAL架构由Patric ...
- Android多线程分析之五:使用AsyncTask异步下载图像
Android多线程分析之五:使用AsyncTask异步下载图像 罗朝辉 (http://www.cnblogs.com/kesalin) CC 许可,转载请注明出处 在本系列文章的第一篇<An ...
- Android多线程分析之四:MessageQueue的实现
Android多线程分析之四:MessageQueue的实现 罗朝辉 (http://www.cnblogs.com/kesalin/) CC 许可,转载请注明出处 在前面两篇文章<Androi ...
随机推荐
- post插件
分享牛系列,分享牛专栏,分享牛.在项目开发中,http请求方式是最常见的了.怎么模拟http请求呢?方法有很多种,可以使用httpclient直接模拟请求,也可以使用火狐post插件方式,这个章节主要 ...
- SSH网上商城---商品详情页的制作
在前面的博文中,小编分别简单的介绍了邮件的发送以及邮件的激活,逛淘宝的小伙伴都有这样的体会,比如在搜索框中输入连衣裙这个商品的时候,会出现多种多样各种款式的连衣裙,连衣裙的信息包括价格,多少人购买,商 ...
- FFmpeg源代码简单分析:libavdevice的avdevice_register_all()
===================================================== FFmpeg的库函数源代码分析文章列表: [架构图] FFmpeg源代码结构图 - 解码 F ...
- Android中Socket通信之TCP与UDP传输原理
一.Socket通信简介 Android与服务器的通信方式主要有两种,一是Http通信,一是Socket通信.两者的最大差异在于,http连接使用的是"请求-响应方式",即在请求时 ...
- Linux系统编程-----进程fork()
在开始之前,我们先来了解一些基本的概念: 1. 程序, 没有在运行的可执行文件 进程, 运行中的程序 2. 进程调度的方法: 按时间片轮转 先来先服务 短时间优先 按优先级别 3. 进程的状态: 就绪 ...
- android文件混淆详解
-injars androidtest.jar[jar包所在地址] -outjars out[输出地址] -libraryjars 'D:\android-sdk-windows\plat ...
- 修改android应用包名
由于项目需要,要修改已经开发好的应用包名,这本身很简单,但是如果你没找到门道,可能会白白浪费许多时间. 修改包名有三个地方要改,这三个地方的修改一定要按顺序来,否则你可能会遇到许多不必要的麻烦. 1. ...
- 【VSTS 日志】TFS 2015 Update 1 发布 – Git和TFVC代码库可以混合使用了
Visual Studio Team Foundation Server 2015 Update 1已经发布了. 这是 Team Foundation Server (TFS) 的最新版本,是 Mic ...
- iOS开发之四:常用控件--UIButton的使用
在介绍UIButton的用法前,要先了解一下它的父类UIControl,UIControl是所有具有事件处理功能控件的父类. 而该类控件一般响应事件又有三种形式:基于触摸.基础值.基础编辑.控件的层次 ...
- 【嵌入式开发】 Bootloader 详解 ( 代码环境 | ARM 启动流程 | uboot 工作流程 | 架构设计)
作者 : 韩曙亮 博客地址 : http://blog.csdn.net/shulianghan/article/details/42462795 转载请著名出处 相关资源下载 : -- u-boo ...