vue学习记录④(路由传参)
通过上篇文章对路由的工作原理有了基本的了解,现在我们一起来学习路由是如何传递参数的,也就是带参数的跳转。
带参数的跳转,一般是两种方式:
①.a标签直接跳转。
②点击按钮,触发函数跳转。
在上篇文章中我们已经有两个页面(Helloworld.vue&Hello.vue),现在我准备往Hello.vue里面添加3个链接,分别对应两种情况的跳转。
第一步:在原来的Hello.vue里添加路由链接跳转的代码(见第38-44行代码),添加后的Hello.vue代码如下:
 <template>

   <div class="hello">

     <h1>{{ msg }}</h1>

     <h2>Essential Links</h2>

     <ul>

       <li>

         <a href="https://vuejs.org" target="_blank">Core Docs</a>

       </li>

       <li>

         <a href="https://forum.vuejs.org" target="_blank">Forum</a>

       </li>

       <li>

         <a href="https://chat.vuejs.org" target="_blank">Community Chat</a>

       </li>

       <li>

         <a href="https://twitter.com/vuejs" target="_blank">Twitter</a>

       </li>

       <br>

       <li>

         <a href="http://vuejs-templates.github.io/webpack/" target="_blank">Docs for This Template</a>

       </li>

     </ul>

     <h2>Ecosystem</h2>

     <ul>

       <li>

         <a href="http://router.vuejs.org/" target="_blank">vue-router</a>

       </li>

       <li>

         <a href="http://vuex.vuejs.org/" target="_blank">vuex</a>

       </li>

       <li>

         <a href="http://vue-loader.vuejs.org/" target="_blank">vue-loader</a>

       </li>

       <li>

         <a href="https://github.com/vuejs/awesome-vue" target="_blank">awesome-vue</a>

       </li>

     </ul>

     <div>

       <router-link :to="{path:'/helloworld/123'}">参数传递1</router-link>

       <br>

       <router-link :to="{path:'/helloworld/789',query:{userid:9527,name:'Tom_Lo'}}">参数传递2</router-link>

       <br>

       <button @click="toNewpage">点击跳转</button>

     </div>

   </div>

 </template>

 <script>

 export default {

   name: 'hello',

   data() {

     return {

       msg: 'Welcome to Your Vue.js App'

     }

   },

    methods: {

     toNewpage: function() {

       this.$router.push({ path: '/helloworld/999', query: { userid: 128, name: 'Tom' } });

     }

   }

 }

 </script>

 <!-- Add "scoped" attribute to limit CSS to this component only -->

 <style scoped>

 h1,

 h2 {

   font-weight: normal;

 }

 ul {

   list-style-type: none;

   padding: 0;

 }

 li {

   display: inline-block;

   margin: 0 10px;

 }

 a {

   color: #42b983;

 }

 </style>
第38-44行代码的路由链接跳转写法是固定的,记住会用就好了。<router-link>默认会被渲染成一个 `<a>` 标签 ,to指令跳转到指定路径 。
第二步:Hello.vue传递了参数,那么我们就用Helloworld.vue接收参数。见更新后的Helloworld.vue代码:
 <!--模板部分-->

 <template>

   <div class="container">

     <h1>hello,world!</h1>

     <p>{{test}}</p>

     <p>接收的参数id:

       <span class="hint">{{id}}</span>

     </p>

     <p>接收的参数userid:

       <span class="hint">{{userid}}</span>

     </p>

     <p>接收的参数name:

       <span class="hint">{{username}}</span>

     </p>

   </div>

 </template>

 <!--js部分-->

 <script>

 export default {

   name: 'helloworld',

   data() {

     return {

       test: 'this is a test',

       id: this.$route.params.id,//接收参数

       userid: this.$route.query.userid,

       username: this.$route.query.name

     }

   }

 }

 </script>

 <!--样式部分-->

 <style>

 .container {

   background: #aaa;

   color: blue;

 }

 </style>
上面的第6-14行就是接收参数的容器。
注意:Hello.vue中的$router是用来传递参数的,而Helloworld.vue中的$route是用来接收参数的。
第三步:路由变化了,当然还得在index.js里面体现(见第16行),见更新后的index.js代码:
 import Vue from 'vue'

 import Router from 'vue-router'

 import Hello from '@/components/Hello'

 import HelloWorld from '@/components/Helloworld'//我们新定义的组件

 Vue.use(Router)

 export default new Router({

   routes: [

     {

       path: '/',

       name: 'Hello',

       component: Hello

     },

     {//新路由

       path: '/helloworld/:id',

       name: 'HelloWorld',

       component: HelloWorld

     }

   ]

 })
第四步:入口文件App.vue不用动。路由定义、发送参数、接收参数都具备了,下面咱们就跑一下试试吧~~
运行跳转成功后如下图:
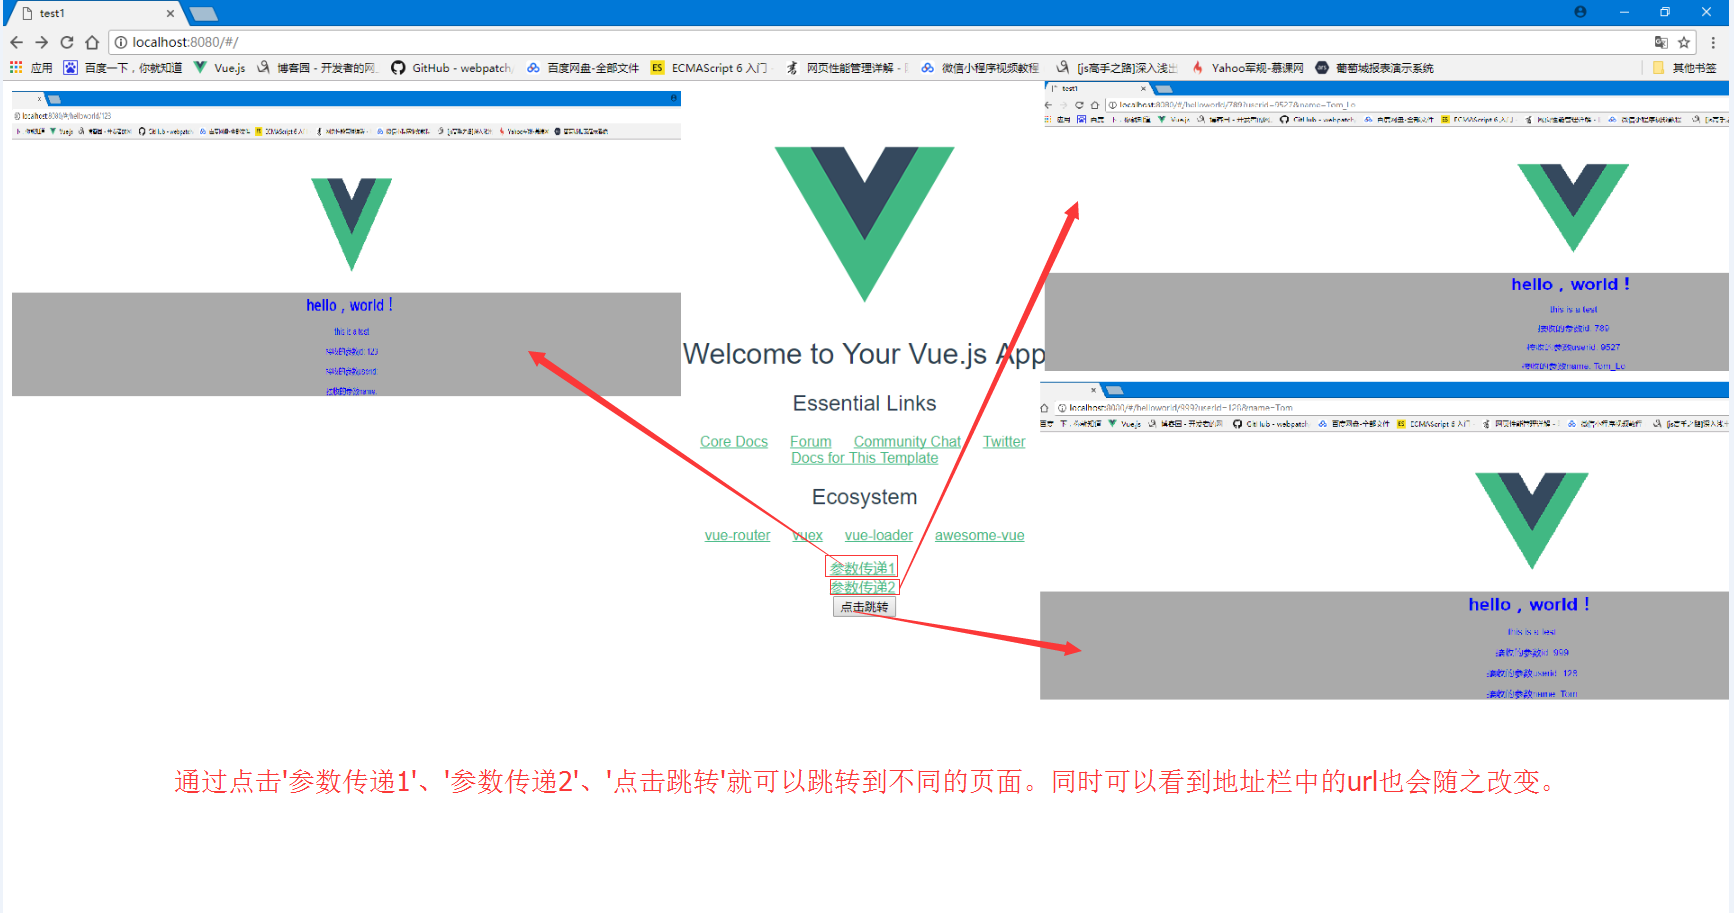
通过图示我们看到,参数都可以正常拿到了。
同时注意url的变化。首先url是有个#号,这个就代表是单页面的路由(hash模式);然后我们的参数实际都是放在url上传输的,要注意别超出url的长度范围。
下面我们再来看下子路由。
子路由也就是在父页面下,单独划出一个div容器,里面再塞进一个路由。
我们把Helloworld设定为父路由,再设定两个两个子路由。分别是info和content。
更新后的Helloworld.vue代码如下:
 <!--模板部分-->

 <template>

   <div class="container">

     <h1>hello,world!</h1>

     <p>{{test}}</p>

     <p>接收的参数id:

       <span class="hint">{{id}}</span>

     </p>

     <p>接收的参数userid:

       <span class="hint">{{userid}}</span>

     </p>

     <p>接收的参数name:

       <span class="hint">{{username}}</span>

     </p>

     <div class="subrouter">

       <h2 class="hint">子路由:</h2>

       <router-view></router-view>

     </div>

   </div>

 </template>

 <!--js部分-->

 <script>

 export default {

   name: 'helloworld',

   data() {

     console.log(this.$route);

     return {

       test: '这是一个测试',

       id: this.$route.params.id,//接收参数

       userid: this.$route.query.userid,

       username: this.$route.query.name

     };

   }

 }

 </script>

 <!--样式部分-->

 <style>

 .container {

   background: #ccc;

   color: greenyellow;

   height: 500px;

 }

 .hint {

   color: darkred;

   font-weight: bold;

 }

 .subrouter {

   background: #aaa;

   width: 500px;

   height: 100px;

   margin: 0 auto;

 }

 </style>
第15-18行创建了子路由的容器。然后在components下,创建新目录subpage,并在subpage下新建两个子组件info.vue和content.vue。
info.vue代码如下:
<template>

 <div class="info">info page--id:{{id}}</div>

</template>

<script>

export default {

 name: 'info',

 data () {

  return {

   id: this.$route.params.id

  }

 }

}

</script>

<style>

.info{

color:blue;

}

</style>
content.vue代码如下:
<template>

 <div class="content">

  content page

  <div>ID:{{id}}</div>

 </div>

</template>

<!--js部分-->

<script>

export default {

 name:'content',

 data() {

  return {

   id:this.$route.params.id

  };

 }

}

</script>

<style>

.content{

color:blueviolet;

}

</style>
子路由建好了,那怎么把他们串起来呢?这里就要更新index.js了。index.js代码如下:
import Vue from 'vue'

import Router from 'vue-router'

import Hello from '@/components/Hello'

import HelloWorld from '@/components/Helloworld' //我们新定义的组件

// 引入子页面

import Info from '@/components/subpage/info.vue'

import Content from '@/components/subpage/content.vue'

Vue.use(Router)

export default new Router({

  routes: [{

      path: '/',

      name: 'Hello',

      component: Hello

    },

    { //新路由

      path: '/helloworld/:id',

      name: 'HelloWorld',

      component: HelloWorld,

      children: [{

          path: 'info/:id',

          component: Info

        },

        {

          path: 'content/:id',

          component: Content

        }

      ]

    }

  ]

})
首先要引入子页面,然后在父路由下配置一下即可。
到了这里就算是配置好了,运行看看吧~~~~


vue学习记录④(路由传参)的更多相关文章
- react router @4 和 vue路由 详解(六)vue怎么通过路由传参?
完整版:https://www.cnblogs.com/yangyangxxb/p/10066650.html 8.vue怎么通过路由传参? a.通配符传参数 //在定义路由的时候 { path: ' ...
- vue中的路由传参及跨组件传参
路由跳转 this.$router.push('/course'); this.$router.push({name: course}); this.$router.go(-1); this.$r ...
- vue父子组件路由传参的方式
一.get方式(url传参): 1.动态路由传参: 父组件: selectItem (item) { this.$router.push({ path: `/recommend/${item.id}` ...
- Vue的Router路由传参
一.文件结构 二.vue.js 打开此链接 https://cdn.bootcss.com/vue/2.6.10/vue.js 复制粘贴页面的所有内容 三.vue-router.js 打开此链接 h ...
- vue路由传参刷新丢失
没有系统学习过vue,以前使用路由传参都是直接this.$router.push({name:'main',params:{'id': 123}})的,没有在路由定义中配置参数,如下: router: ...
- [Vue 牛刀小试]:第十三章 - Vue Router 基础使用再探(命名路由、命名视图、路由传参)
一.前言 在上一章的学习中,我们简单介绍了前端路由的概念,以及如何在 Vue 中通过使用 Vue Router 来实现我们的前端路由.但是在实际使用中,我们经常会遇到路由传参.或者一个页面是由多个组件 ...
- vue链接传参与路由传参
1.链接传参: 例如:链接是:http://localhost:3333/#/index?id=001 我们要获取参数:console.log(this.$route.query.id):即可 2.路 ...
- vue路由传参的三种方式区别(params,query)
最近在做一个项目涉及到列表到详情页的参数的传递,网上搜索一下路由传参,结合自己的写法找到一种适合自己的,不过也对三种写法都有了了解,在此记录一下 <ul class="table_in ...
- vue路由传参的三种方式以及解决vue路由传参页面刷新参数丢失问题
最近项目中涉及到跨页面传参数和后台进行数据交互,看到需求之后第一反应就是用路由传参来解决:Vue中给我们提供了三种路由传参方式,下面我们一个一个的来看一下: 方法一:params传参: this.$r ...
- Vue框架(四)——路由跳转、路由传参、cookies、axios、跨域问题、element-ui模块
路由跳转 三种方式: $router.push / $router.go / router-link to this.$router.push('/course'); this.$router.pus ...
随机推荐
- C语言可变参数va_list
一.什么是可变参数 在C语言编程中有时会遇到一些参数个数可变的函数,例如printf(),scanf()函数,其函数原型为: int printf(const char* format,-) int ...
- PAT1115:Counting Nodes in a BST
1115. Counting Nodes in a BST (30) 时间限制 400 ms 内存限制 65536 kB 代码长度限制 16000 B 判题程序 Standard 作者 CHEN, Y ...
- PAT1004:Counting Leaves
1004. Counting Leaves (30) 时间限制 400 ms 内存限制 65536 kB 代码长度限制 16000 B 判题程序 Standard 作者 CHEN, Yue A fam ...
- JXP
JSX 初识:它是JavaScript的语法扩展,建议在React中使用它来描述UI的外观. 考虑这个变量声明: 在JSX中嵌入表达式 可以通过将其包含在大括号中来嵌入JSX中的任何JavaScr ...
- 【手记】解决启动SQL Server Management Studio 17时报Cannot find one of more components...的问题
刚装好SSMS 17.1准备体验,弹出: 一番搜索,普遍办法都是安装VS2015独立shell.删除某个注册表项什么的,没用,首先这个shell我是装了的,然后也没有那个注册表项.我自己尝试过重装sh ...
- node npm --save,不同JS解析器的内置全局变量,PROMISE,CONST---ES6
npm --save 当你为你的模块安装一个依赖模块时,正常情况下你得先安装他们(在模块根目录下npm install module-name),然后连同版本号手动将他们添加到模块配置文件packa ...
- Python Web 框架:Tornado
1.Tornado Tornado:python编写的web服务器兼web应用框架 1.1.Tornado的优势 轻量级web框架 异步非阻塞IO处理方式 出色的抗负载能力 优异的处理性能,不依赖多进 ...
- Windows 下python 环境安装
1.先在官网上下载安装包,官网地址: https://www.python.org 2. 选择自己需要的版本进行安装,最好选择新版本下载, 3. 下载完成后,双击运行安装,一直next,直至 ...
- I/O------字节输出流
package io.day03; import java.io.FileOutputStream; import java.io.OutputStream; public class day03ou ...
- BZOJ_3011_[Usaco2012 Dec]Running Away From the Barn _可并堆
BZOJ_3011_[Usaco2012 Dec]Running Away From the Barn _可并堆 Description 给出以1号点为根的一棵有根树,问每个点的子树中与它距离小于l的 ...