Creating a NuGet Package in 7 easy steps - Plus using NuGet to integrate ASP.NET MVC 3 into existing Web Forms applications
UPDATE: Check out my follow up post where I remove the need for editing the Global.asax.cs and show up to Update and Publish a NuGet package.
Last month I wrote a post called Integrating ASP.NET MVC 3 into existing upgraded ASP.NET 4 Web Forms applications where I showed a very manual and very painful way to add ASP.NET MVC support to an existing ASP.NET WebForms application. You'd then have a lovely hybrid that is both MVC and WebForms.
One of my readers, Yannick said:
This screeaaams NuGet
Indeed it did, er, does. He's saying that this is just the kind of awful boring work that NuGet should make easier. So I did it. Thanks Yannick for just the sassy comment I needed to jump into action.

First, what I built, then how I built it. I'd like you, Dear Reader, to take a moment and create your own NuGet packages.
ADDING ASP.NET MVC TO AN ASP.NET WEBFORMS PROJECT WITH NUGET
Step 0 - Get NuGet 1.1 by going here. It's like 300k, just take a second.
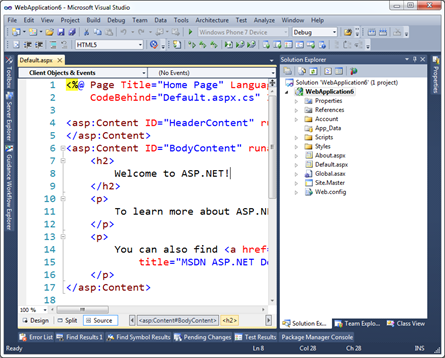
Step 1 - Open Visual Studio 2010 and make a default ASP.NET (WebForms) Application.
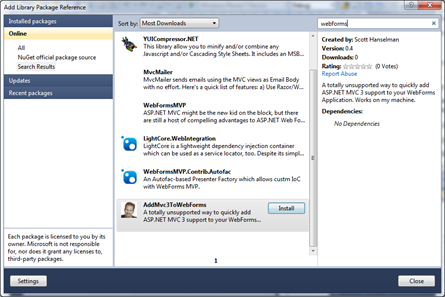
Step 2 - Right click on References and click Add Library Package Reference. Click Online on the left side, and in the Search box at upper right type in "WebForms" and look for my face. Oh yes. My face. Click Install.
(Alternatively, open the Package Manager Console and type "install-package AddMvc3ToWebForms" and watch the magic. The package is hosted on NuGet.org. You can too!)
Step 2a - Check out the stuff that's been added to your project.
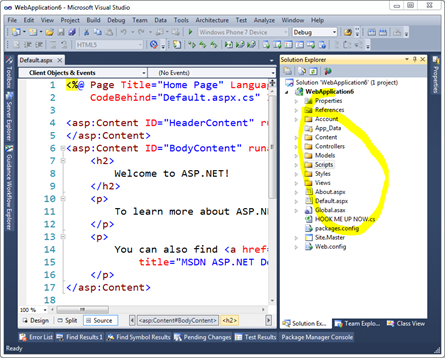
What's that HookMeUpNow.cs? That's all the routing stuff that I would have needed to edit your Global.asax.cs for. You'll need to add one line of code to Global.asax yourself to make this work now.
Step 3 - Hook up Routes and Everything
Add Mvc3Utilities.RegisterEverything() to your Application_Start. Feel free to rename whatever you like.
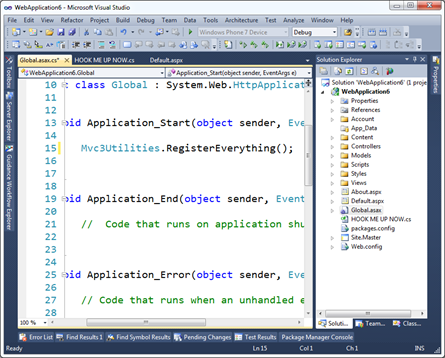
Now run it. You can hit both Default.aspx and /Home/About.
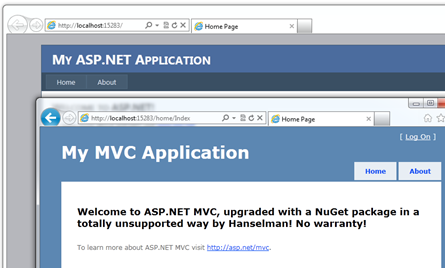
Step 4 - Profit!
Sweet.
HOW I MADE MY OWN NUGET PACKAGE AND YOU SHOULD TOO
Step 0 - Go get the NuGet.exe command line here. Put it in the Path or somewhere.
Step 1 - Make a folder for your new package, go there via the commmand line and run "nuget spec"
C:\Users\Scott\Desktop\AddMvc3ToWebForms>nuget spec
Created 'Package.nuspec' successfully.
C:\Users\Scott\Desktop\AddMvc3ToWebForms>dir Package.nuspec
Directory of C:\Users\Scott\Desktop\AddMvc3ToWebForms
02/15/2011 02:23 AM 813 Package.nuspec
1 File(s) 813 bytes
Now, I changed this file's name and edited it thusly.
<?xml version="1.0"?>
<package xmlns:xsd="http://www.w3.org/2001/XMLSchema" xmlns:xsi="http://www.w3.org/2001/XMLSchema-instance">
  <metadata xmlns="http://schemas.microsoft.com/packaging/2010/07/nuspec.xsd">
    <id>AddMvc3ToWebForms</id>
    <version>0.4</version>
    <authors>Scott Hanselman</authors>
    <owners>Scott Hanselman</owners>
    <iconUrl>http://www.hanselman.com/images/nugeticon.png</iconUrl>
    <requireLicenseAcceptance>false</requireLicenseAcceptance>
    <description>A totally unsupported way to quickly add ASP.NET MVC 3 support to your WebForms Application. Works on my machine.</description>
    <tags>MVC MVC3 ASP.NET WebForms</tags>
  </metadata>
</package>
Step 2 - Add stuff to your Content Folder
Since I want my NuGet package to add stuff to folders in my target Web Application, I put whatever I want in a folder called Content. Anything in that will show up in the root of my target project. This can be CSS, JS, CS or VB files, whatever. These files will all get dropped onto the project your package is applied to.
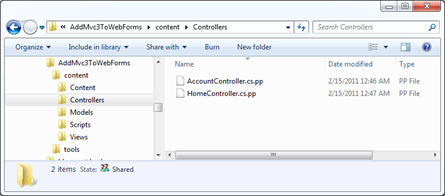
In my project I took the folders from an MVC application and put them in my NuGet folder structure. So, Content, Controllers, Models, Scripts, Views. Copied them right over from an existing blank ASP.NET MVC project.

Step 3 - Decide what needs to be Pre-Processed
However, when my HomeController shows up in your project, Dear Reader, I don't want it to be in the namespace ScottMvcApplication! You want it in MvcApplication54 or whatever your project name is. I need pre-process the source a little to use your project's context, names, namespaces, etc.
For the files I want pre-processed automatically by NuGet, I add a .pp extension. In my example, HomeController.cs.pp.
Then I add a few tokens I want replaced at install-time for that package. For example $rootnamespace$ or $assemblyname$. You can use any Visual Studio Project Property per the NuGet docs.
namespace $rootnamespace$.Controllers
{
    public class HomeController : Controller
    {
        //snip
    }
}
Step 4 - Decide what XML elements need to be merged (usually into web.config)
The next preprocessing that is common is adding elements to web.config. This is a nice little feature of NuGet because you just need to make a web.config.transform with the new elements and it will automatically and non-destructively add (and remove) them as needed. Here's my web.config.transform, for reference. Note this is not a full web.config. This is the one I added to my package in the control folder.
<configuration>
  <appSettings>
    <add key="ClientValidationEnabled" value="true"/>
    <add key="UnobtrusiveJavaScriptEnabled" value="true"/>
  </appSettings>

  <system.web>
    <compilation debug="true" targetFramework="4.0">
     <assemblies>
     <add assembly="System.Web.Abstractions, Version=4.0.0.0, Culture=neutral, PublicKeyToken=31BF3856AD364E35" />
     <add assembly="System.Web.Helpers, Version=1.0.0.0, Culture=neutral, PublicKeyToken=31BF3856AD364E35" />
     <add assembly="System.Web.Routing, Version=4.0.0.0, Culture=neutral, PublicKeyToken=31BF3856AD364E35" />
     <add assembly="System.Web.Mvc, Version=3.0.0.0, Culture=neutral, PublicKeyToken=31BF3856AD364E35" />
     <add assembly="System.Web.WebPages, Version=1.0.0.0, Culture=neutral, PublicKeyToken=31BF3856AD364E35" />
     </assemblies>
   </compilation>
    <pages>
       <namespaces>
         <add namespace="System.Web.Helpers" />
         <add namespace="System.Web.Mvc" />
         <add namespace="System.Web.Mvc.Ajax" />
         <add namespace="System.Web.Mvc.Html" />
         <add namespace="System.Web.Routing" />
         <add namespace="System.Web.WebPages"/>
       </namespaces>
     </pages>
  </system.web>
  <system.webServer>
    <validation validateIntegratedModeConfiguration="false"/>
    <modules runAllManagedModulesForAllRequests="true"/>
  </system.webServer>

     <runtime>
      <assemblyBinding xmlns="urn:schemas-microsoft-com:asm.v1">
        <dependentAssembly>
          <assemblyIdentity name="System.Web.Mvc" publicKeyToken="31bf3856ad364e35" />
          <bindingRedirect oldVersion="1.0.0.0-2.0.0.0" newVersion="3.0.0.0" />
        </dependentAssembly>
      </assemblyBinding>
    </runtime>
</configuration>
Step 5 - Add any PowerShell script you might need, especially for adding references
Almost done. Most package won't need much PowerShell, but some do. You can have an install.ps1 and an uninstall.ps1 and do lots of things. These go in a folder called Tools that's next to Content (not inside.)
Here's my install.ps1.
NOTE: Currently today there's no way to STOP the installation of a package while it's happening, so if you try to install mine on NuGet 1.0 I'll just warn you and ask you to uninstall. In the future there will likely be a pre-install or a dependency check. Hence the version check there.
param($installPath, $toolsPath, $package, $project)

if ($host.Version.Major -eq 1 -and $host.Version.Minor -lt 1)
{
    "NOTICE: This package only works with NuGet 1.1 or above. Please update your NuGet install at http://nuget.codeplex.com. Sorry, but you're now in a weird state. Please 'uninstall-package AddMvc3ToWebForms' now."
}
else
{
    $project.Object.References.Add("Microsoft.CSharp");
    $project.Object.References.Add("System.Web.Mvc");
    $project.Object.References.Add("Microsoft.Web.Infrastructure");
    $project.Object.References.Add("System.Web.WebPages");
    $project.Object.References.Add("System.Web.Razor");
    $project.Object.References.Add("System.ComponentModel.DataAnnotations");
}
Note that in (the future) NuGet 1.2 I won't need this code, I'll just add the references in my NuSpec file directly.
Step 6 - Pack it up
Go back to the command line and run nuget pack
C:\Users\Scott\Desktop\AddMvc3ToWebForms>nuget pack
Attempting to build package from 'AddMvc3ToWebForms.nuspec'.
Successfully created package 'C:\Users\Scott\Desktop\AddMvc3ToWebForms\AddMvc3ToWebForms.0.4.nupkg'.
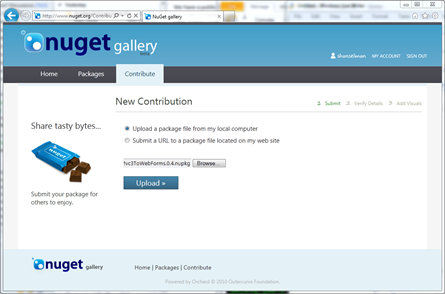
Step 7 - Submit your package
Next, login to the NuGet Gallery (beta) and Contribute Your Package. Just walk through the wizard and upload the nupkg. You can also get an API Key and use the command line tool to do this automatically, perhaps as part of a build process.
That's it. If you've got an open source library or something interesting or useful, get it up on NuGet before your blog commenters shame you into it!
P.S. Yes I didn't count Step 0.
Creating a NuGet Package in 7 easy steps - Plus using NuGet to integrate ASP.NET MVC 3 into existing Web Forms applications的更多相关文章
- Creating Custom Helper Methods 创建自定义辅助器方法----辅助器方法 ------ 精通ASP.NET MVC 5
创建内联的辅助器方法 和 拓展方法 好像类似的功能. 不过写在前台更直观
- Updating and Publishing a NuGet Package - Plus making NuGet packages smarter and avoiding source edits with WebActivator
I wrote a post a few days ago called "Creating a NuGet Package in 7 easy steps - Plus using NuG ...
- How to Publish a NuGet Package
How to Publish a NuGet Package Command line To push packages to nuget.org you must use nuget.exe v4. ...
- Visual Studio 2010 更新NuGet Package Manager出错解决办法
在Visual Studio 2010的扩展管理器中发现NuGet Package Manger有最新版本更新提示,选择更新安装提示以下错误信息: 2013/4/25 1:11:48 - Micros ...
- vs2017中生成.Net Standard Libarary的Nuget Package
场景: Project A 对Project B存在 project to project reference.这种场景下必须为两者都生成nuget package.这样在load Project A ...
- 使用 dotnet CLI 来打包和发布 .NET Core nuget package
原文链接:使用 dotnet CLI 来打包和发布 .NET Core nuget package 如何使用 visual studio 2015/2017 打包和发布 Nuget package, ...
- [转]Creating an Entity Framework Data Model for an ASP.NET MVC Application (1 of 10)
本文转自:http://www.asp.net/mvc/overview/older-versions/getting-started-with-ef-5-using-mvc-4/creating-a ...
- 【ASP.NET MVC系列】浅谈NuGet在VS中的运用
一 概述 在我们讲解NuGet前,我们先来看看一个例子. 1.例子: 假设现在开发一套系统,其中前端框架我们选择Bootstrap,由于选择Bootstrap作为前端框架,因此,在项目中,我们 ...
- [转]Bootstrap 3.0.0 with ASP.NET Web Forms – Step by Step – Without NuGet Package
本文转自:http://www.mytecbits.com/microsoft/dot-net/bootstrap-3-0-0-with-asp-net-web-forms In my earlier ...
随机推荐
- awk常见用法
awk作为linux字符搜索,结果统计的实用工具,其在linux日常运维中有着很多的巧妙运用.下面就来技术一下刚刚学到的技巧 #awk命令统计文件夹下所有文件大小 ls -l |awk 'BEGIN ...
- mysql-5.7.10-winx64 绿色版安装办法
mysql-5.7.10-winx64 绿色版安装办法 为了防止安装程序造成电脑系统冗余,经过测试,终于将绿色版的mysql for windows安装成功.当然很多是从事百度搜索到的,但作为一种积累 ...
- H.265:网络视频的高清时代
去年八月,爱立信公司推出了首款H.265编解码器,而在仅仅六个月之后,国际电联(ITU)就正式批准通过了HEVC/H.265标准,标准全称为高效视频编码(High Efficiency Video C ...
- ftp弱密码案例
- linux查看文件的后几行
aaarticlea/png;base64,iVBORw0KGgoAAAANSUhEUgAAAu4AAABiCAIAAACAksEXAAAZuUlEQVR4nO2dzdmzuq6G0wRV0ARNMM
- Bean Shell常用内置变量总结
JMeter在它的BeanShell中内置了变量,用户可以通过这些变量与JMeter进行交互,其中主要的变量及其使用方法如下: log:写入信息到jmeber.log文件,使用方法:log.info( ...
- 网页安全政策"(Content Security Policy,缩写 CSP)
作者:阿里聚安全链接:https://www.zhihu.com/question/21979782/answer/122682029来源:知乎著作权归作者所有.商业转载请联系作者获得授权,非商业转载 ...
- BZOJ2480 Spoj3105 Mod 数论 扩展BSGS
原文链接https://www.cnblogs.com/zhouzhendong/p/BZOJ2480.html 题目传送门 - BZOJ2480 题意 已知数 $a,p,b$ ,求满足 $a^x≡b ...
- 使用aws中国的s3时,制订bucket poicy时注意注意……
{ "Version": "2012-10-17", "Statement": [ { "Sid": "Pub ...
- 050 Kafka的引入介绍
高吞吐量的分布式订阅消息系统 1.官网 http://kafka.apache.org/ 2.官网的介绍 3.结构 这个是版本1.0之后的版本. In Kafka the communication ...