框架源码系列十一:事务管理(Spring事务管理的特点、事务概念学习、Spring事务使用学习、Spring事务管理API学习、Spring事务源码学习)
一、Spring事务管理的特点
Spring框架为事务管理提供一套统一的抽象,带来的好处有:
1. 跨不同事务API的统一的编程模型,无论你使用的是jdbc、jta、jpa、hibernate。
2. 支持声明式事务
3. 简单的事务管理API
4. 能与Spring的数据访问抽象层完美集成
说明:Spring的事物管理是用AOP实现的
二、事务概念学习
1. Isolation隔离级别
此事务与其他事务的工作隔离的程度。例如,该事务能否看到来自其他事务的未提交的写操作
READ_UNCOMMITTED读未提交
READ_COMMITTED读提交
REPEATABLE_READ可重复读
SERIALIZABLE序列化(串行)
2. Read/Write读写
该事务操作是读、还是写、还是有读有写
3. Timeout超时
对事务执行的时长设置一个阀值,如果超过阀值还未完成则回滚。
4. Propagation传播行为
当一个方法开启事务后,在方法中调用了其他的方法,其他方法可能也需要事务管理,此时就涉及事务该如何传播了。
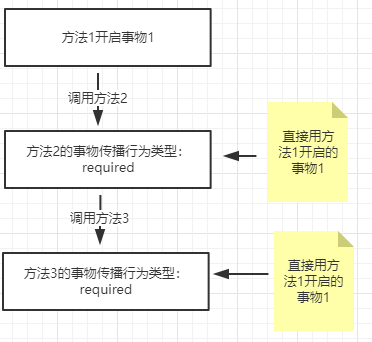
4.1. TransactionDefinition.PROPAGATION_REQUIRED:如果当前存在事务,则加入该事务;如果当前没有事务,则创建一个新的事务。
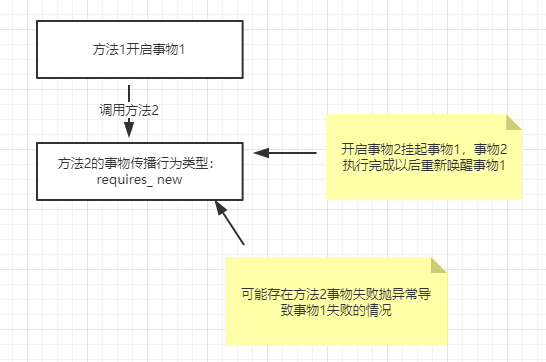
4.2. TransactionDefinition.PROPAGATION_REQUIRES_NEW:创建一个新的事务,如果当前存在事务,则把当前事务挂起。
4.3. TransactionDefinition.PROPAGATION_SUPPORTS:如果当前存在事务,则加入该事务;如果当前没有事务,则以非事务的方式继续运行。
4.4. TransactionDefinition.PROPAGATION_NOT_SUPPORTED:以非事务方式运行,如果当前存在事务,则把当前事务挂起。
4.5. TransactionDefinition.PROPAGATION_NEVER:以非事务方式运行,如果当前存在事务,则抛出异常。
4.6. TransactionDefinition.PROPAGATION_MANDATORY:如果当前存在事务,则加入该事务;如果当前没有事务,则抛出异常。
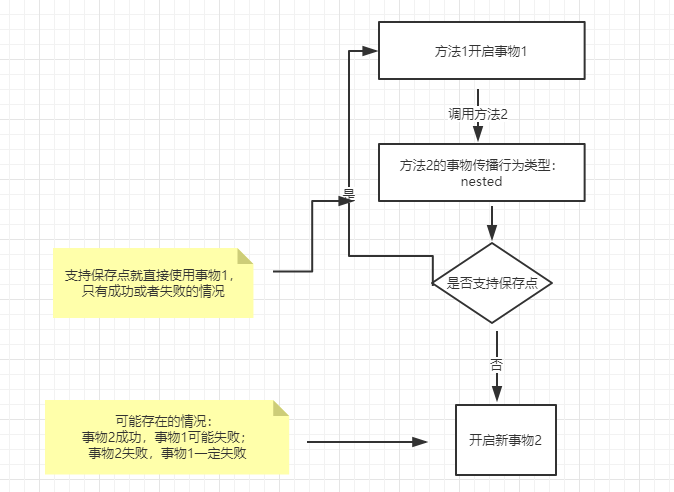
4.7. TransactionDefinition.PROPAGATION_NESTED:如果当前存在事务,则创建一个事务作为当前事务的嵌套事务来运行;如果当前没有事务,则该取值等价于TransactionDefinition.PROPAGATION_REQUIRED。
几种事物传播行为的情况:
5. SavePoint保存点
事务中可以设置一些保存点(阶段标识),回滚时可以指定回滚到前面的哪个保存点。
6. Commit/Rollback提交/回滚
提交、回滚事务
三、Spring事务使用学习
1. 配置事务管理器
    <!-- 配置事务管理器 -->

    <bean id="txManager" class="org.springframework.jdbc.datasource.DataSourceTransactionManager">

        <property name="dataSource" ref="dataSource"/>

    </bean>
2. 注解方式
2.1 开启注解支持
在xml中开启注解方式支持
<!-- 开启注解方式的事务配置支持-->

 <tx:annotation-driven transaction-manager="txManager"/>
或在java代码中以注解的方式(@EnableTransactionManagement)开启注解方式支持
package com.study.leesmall.spring.sample.tx;

import org.springframework.context.annotation.AnnotationConfigApplicationContext;

import org.springframework.context.annotation.ComponentScan;

import org.springframework.context.annotation.Configuration;

import org.springframework.context.annotation.ImportResource;

import org.springframework.transaction.annotation.EnableTransactionManagement;

import com.study.leesmall.spring.sample.tx.entity.User;

import com.study.leesmall.spring.sample.tx.service.UserService;

@Configuration

@ComponentScan("com.study.leesmall.spring.sample.tx")

@ImportResource("classpath:com/study/leesmall/spring/sample/tx/application.xml")

@EnableTransactionManagement

public class TxMain {

    public static void main(String[] args) {

        try (AnnotationConfigApplicationContext context = new AnnotationConfigApplicationContext(TxMain.class);) {

            User user = new User();

            user.setId("1234564");

            user.setUserName("leesmall-666666666");

            UserService userService = context.getBean(UserService.class);

            userService.insertUser(user);

        }

    }

}
2.2 在要加事务管理的类或方法上加@Transactional注解
package com.study.leesmall.spring.sample.jta.service;

import org.springframework.beans.factory.annotation.Autowired;

import org.springframework.stereotype.Service;

import org.springframework.transaction.annotation.Transactional;

import com.study.leesmall.spring.sample.jta.dao.LogDao;

import com.study.leesmall.spring.sample.jta.entity.Log;

@Service

public class LogService {

    @Autowired

    private LogDao logDao;

    @Transactional

    public void insertLog(Log log) {

        this.logDao.insert(log);

    }

}
2.3 掌握@Transactional的属性配置
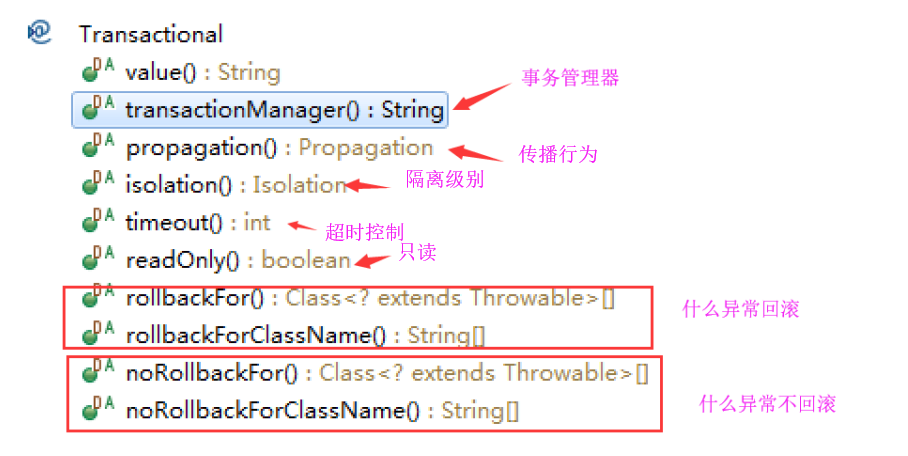
说明:rollbackFor默认情况下是对RuntimeException进行回滚。
3. 声明式事务配置
Spring提供基于AOP的声明式事务管理,让我们的事务管理变得简单、易用!
    <!-- 数据源 -->

    <bean id="dataSource" class="com.alibaba.druid.pool.DruidDataSource"

        init-method="init" destroy-method="close">

        <property name="driverClassName" value="${jdbc.driverClassName}" />

        <property name="url" value="${jdbc.url}" />

        <property name="username" value="${jdbc.username}" />

        <property name="password" value="${jdbc.password}" />

        <!-- 配置初始化大小、最小、最大连接数 -->

        <property name="initialSize" value="1" />

        <property name="minIdle" value="1" />

        <property name="maxActive" value="10" />

     </bean>

    <!-- 配置事务管理器 -->

    <bean id="txManager" class="org.springframework.jdbc.datasource.DataSourceTransactionManager">

        <property name="dataSource" ref="dataSource"/>

    </bean>

    <!-- ********************** 声明式事务配置 begin   ************** -->

    <!-- 配置事务增强的advice -->

    <tx:advice id="txAdvice" transaction-manager="txManager">

        <tx:attributes>

            <!-- all methods starting with 'get' are read-only -->

            <tx:method name="get*" read-only="true" />

            <!-- other methods use the default transaction settings (see below) -->

            <tx:method name="*" />

        </tx:attributes>

    </tx:advice>

    <!-- 配置事务的AOP切面 -->

    <aop:config>

        <aop:pointcut id="allService" expression="execution(* com.study.leesmall.spring.sample.tx.service.*Service.*(..)))"/>

        <aop:advisor advice-ref="txAdvice" pointcut-ref="allService"/>

    </aop:config>
<!-- ********************** 声明式事务配置 end ************** -->
3.1 掌握<tx:method>的各项属性的配置

4. 编程式事务管理
@Autowired
private PlatformTransactionManager txManager;
public User insertUser(User u) {

        // 1、创建事务定义

        TransactionDefinition definition = new DefaultTransactionDefinition();

        // 2、根据定义开启事务

        TransactionStatus status = txManager.getTransaction(definition);

        try {

            this.userDao.insert(u);

            // 3、提交事务

            txManager.commit(status);

            return this.userDao.find(u.getId());

        } catch (Exception e) {

            // 4、异常了,回滚事务

            txManager.rollback(status);

            throw e;

        }

    }
4.1 TransactionTemplate中的代码示例:
@Override

@Nullable

public <T> T execute(TransactionCallback<T> action) throws TransactionException {

    Assert.state(this.transactionManager != null, "No PlatformTransactionManager set");

    if (this.transactionManager instanceof CallbackPreferringPlatformTransactionManager)

    {

        return ((CallbackPreferringPlatformTransactionManager)

        this.transactionManager).execute(this, action);

    }

    else

    {

        TransactionStatus status = this.transactionManager.getTransaction(this);

        T result;

        try {

            result = action.doInTransaction(status);

        }

        catch (RuntimeException | Error ex) {

            // Transactional code threw application exception -> rollback

            rollbackOnException(status, ex);

            throw ex;

        }

        catch (Throwable ex) {

            // Transactional code threw unexpected exception -> rollback

            rollbackOnException(status, ex);

            throw new UndeclaredThrowableException(ex, "TransactionCallback threw

            undeclared checked exception");

        }

        this.transactionManager.commit(status);

        return result;

    }

}
四、Spring事务管理API学习
Spring为事务管理提供了统一的抽象建模,这样我们使用Spring来进行事务管理时,就只需要学会这套API即可,无论底下使用的是何种事务管理方式,jdbc也好,jpa也好,hibernate也好,jta也好。我们的业务代码中都是面向Spring的事务API。大大降低了我们的学习、使用成本
1.TransactionDefinition
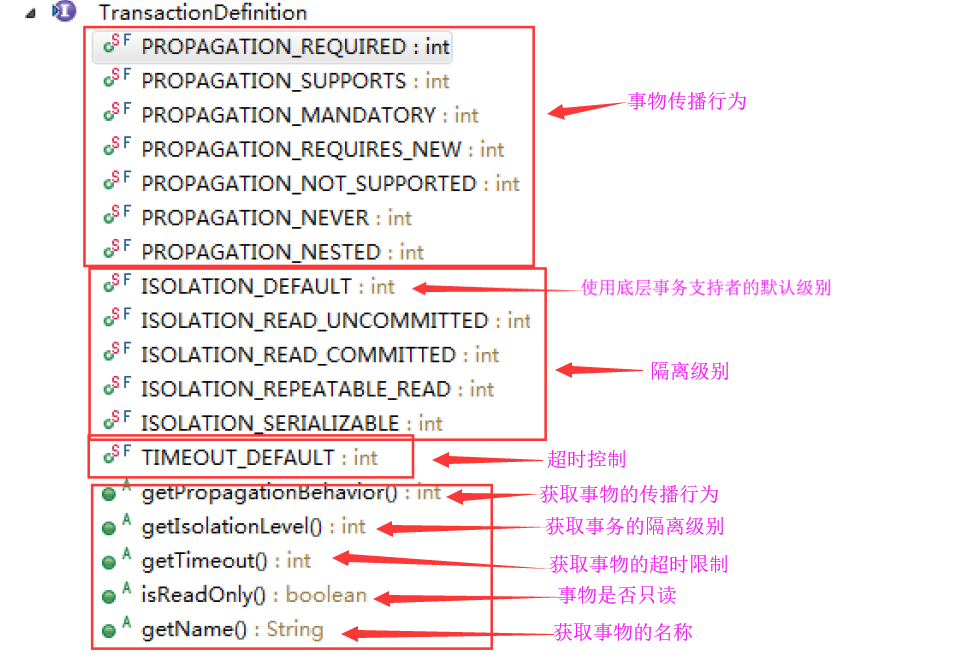
TransactionDefinition:事务定义。Spring事务管理框架将为我们管理事务,但不清楚该如何替我们管理,我们就通过事务定义来定义我们需要的事务管理信息,把这些信给事务管理器,它就知道我们的意图了。
1.1 来看看它都定义了哪些信息项:
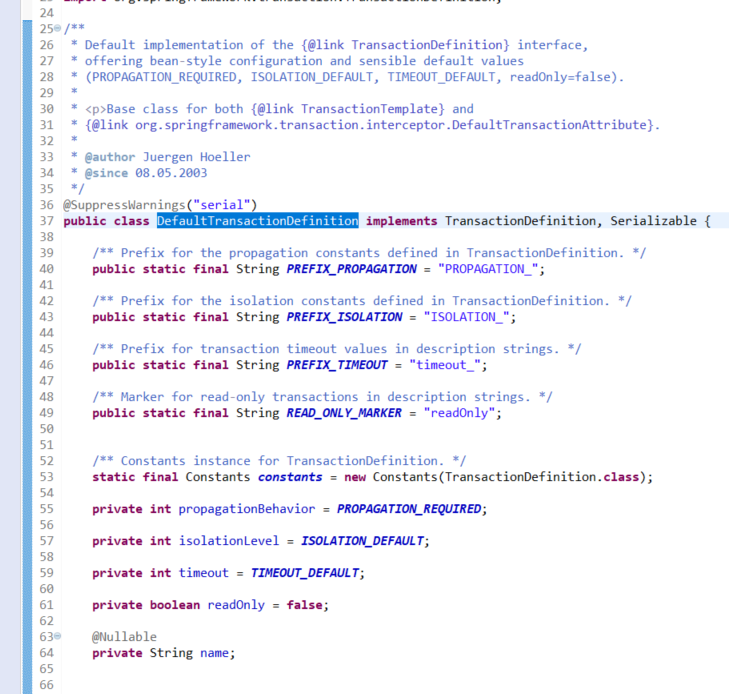
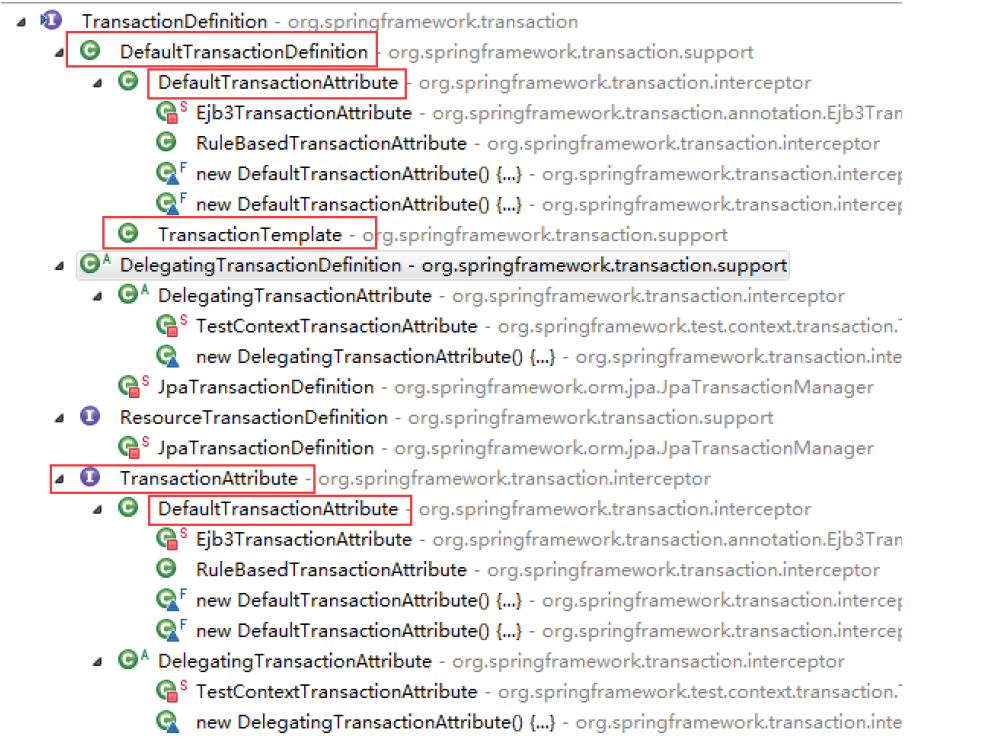
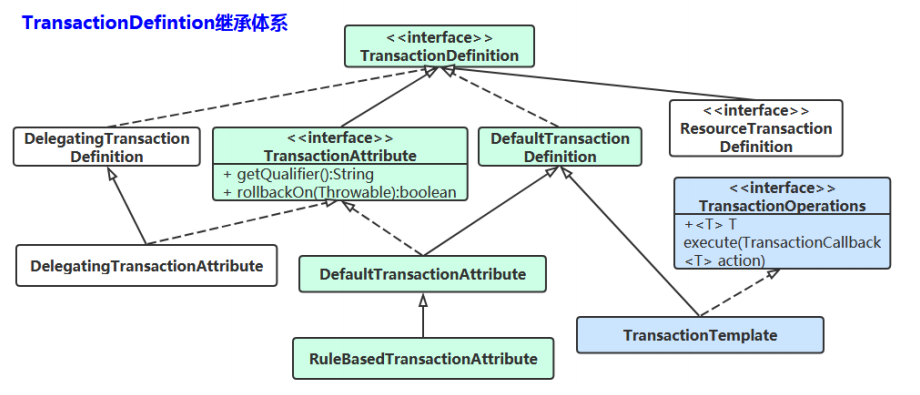
1.2 来看看它有什么实现类可用
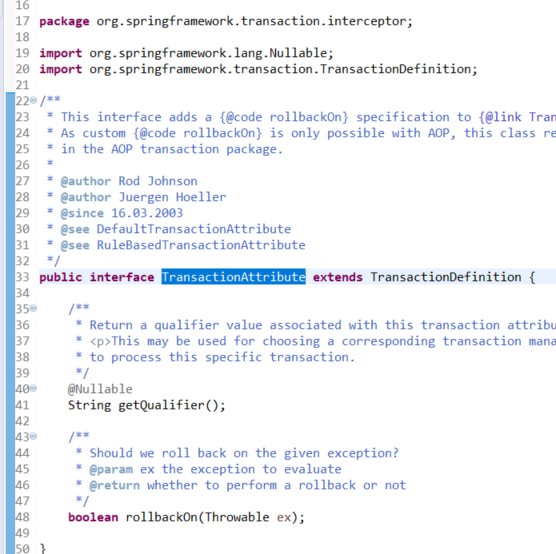
1.3 看下TransactionAttribute
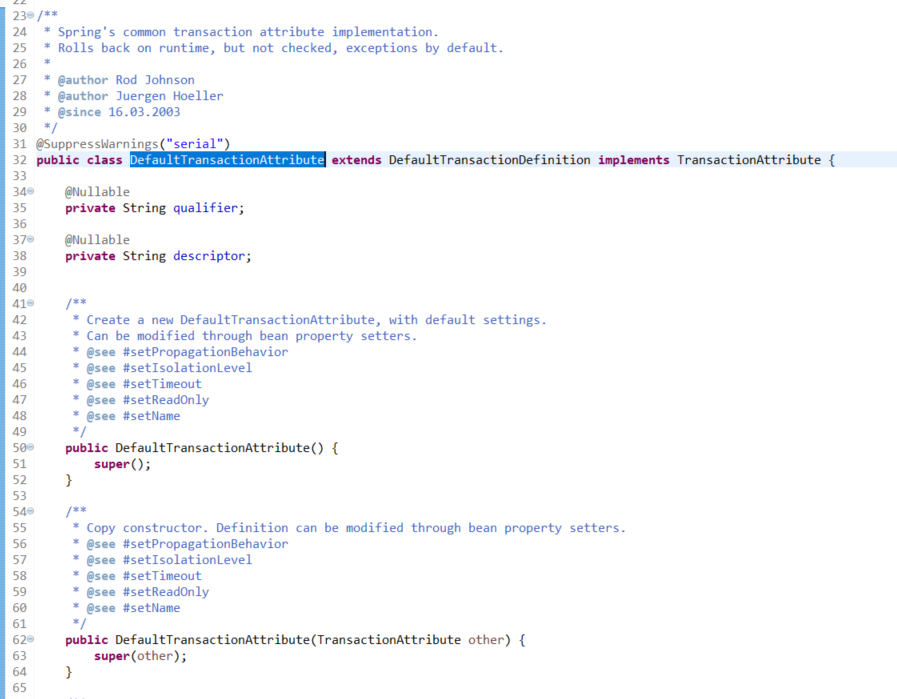
1.4 请看下DefaultTransactionDefinition、TransactinoTemplate、DefaultTransactionAttribute的源码
1.5 请把这个继承体系的类图画出来
2. PlatformTransactionManager
PlatformTransactionManager平台级的事务管理器,它抽象定义了事务管理行为,不同的事务管理实现实现该接口。我们编程面向该接口。
2.1 看下PlatformTransactionManager中定义的事务管理行为:

请仔细看源码中每个方法的的注释。
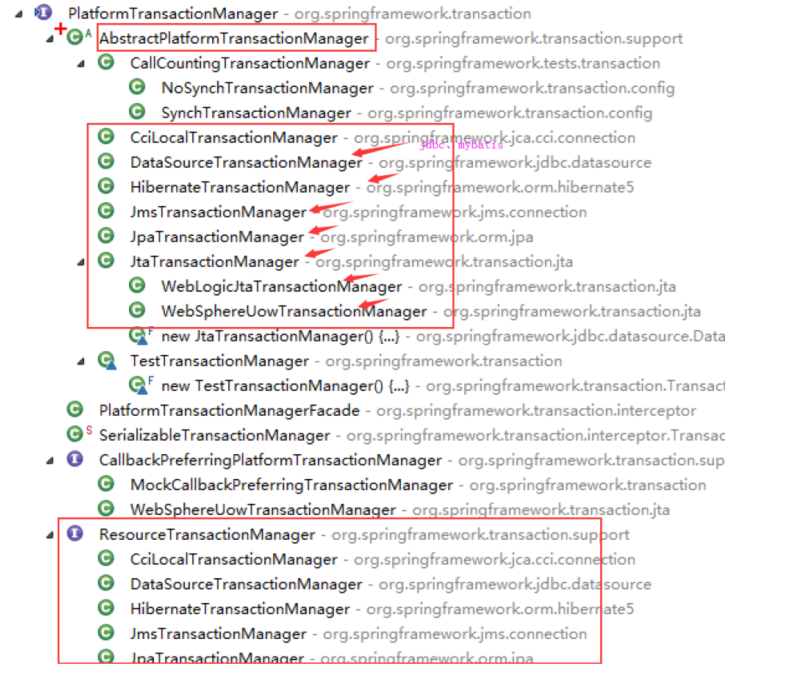
2.2 看下PlatformTransactionManager的子类有哪些:
3. TransactionStatus
TransactionStatus 事务状态,持有事务的状态信息。事务管理代码可通过它获取事务状态、以及显式地设置回滚(代替异常的方式)。它继承了SavePoint接口。在它的实现中会持有事务的很多对象:如事务对象、被挂起的事务资源等等。
从TransactionManager中获取事务得到它,提交/回滚事务时要给入它:

看 TransactionTemplate 中的使用示例:
3.1 看下它定义的方法
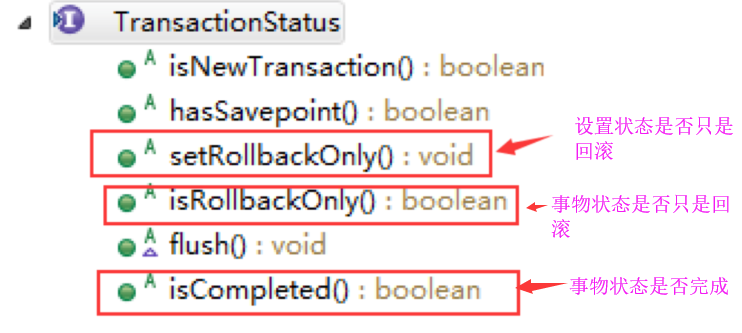
3.2 看它有哪些实现类

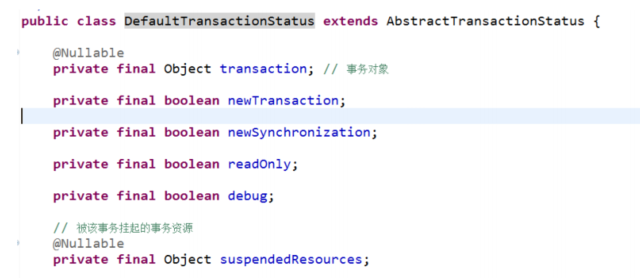
3.3 看下AbstractTransactionStatus、DefaultTransactionStatus中定义了哪些属性

五、Spring事务源码学习
1. AbstractPlatformTransactionManager
AbstractPlatformTransactionManager是PlatformTransactionManager的实现类
PlatformTransactionManager对应的源代码:

PlatformTransactionManager的子类:

下面来看一下AbstractPlatformTransactionManager中的三个方法的实现逻辑
getTransaction()
commit()
rollback()
1.1 看一下获取事物的方法org.springframework.transaction.support.AbstractPlatformTransactionManager.getTransaction(TransactionDefinition)
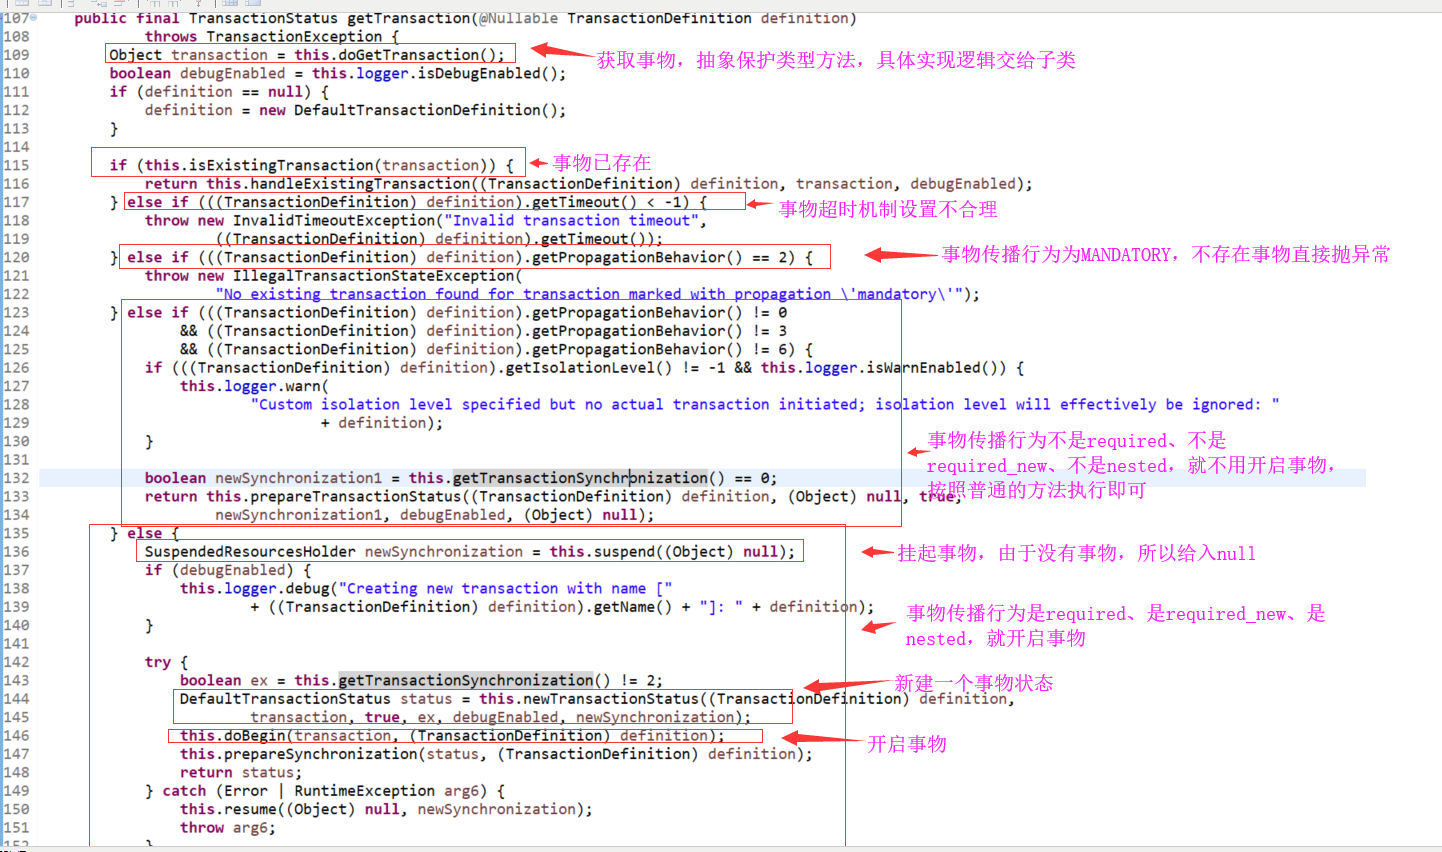
1.1.1 看一下事物已存在时的处理逻辑


1.1.2 看一下事物挂起时的处理逻辑


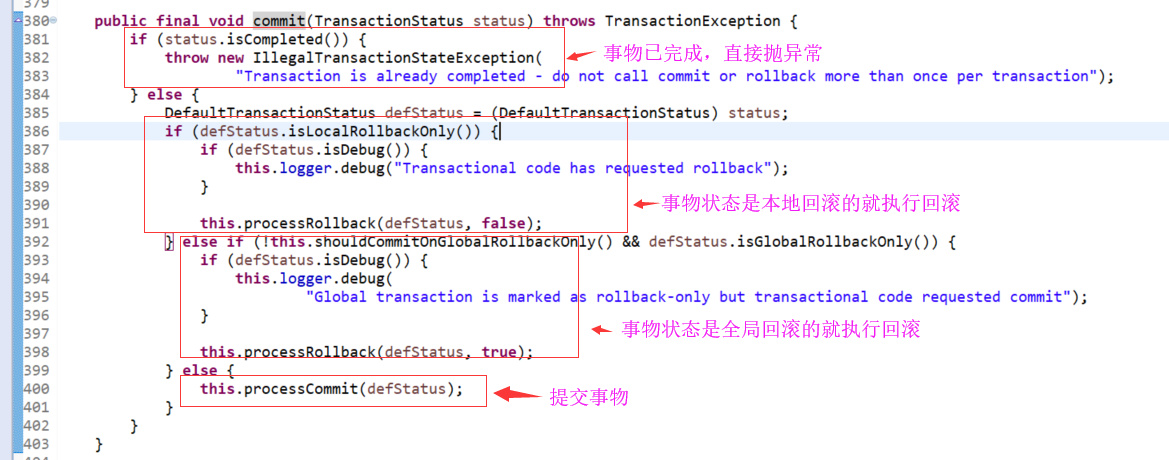
1.2 看一下提交事物的方法org.springframework.transaction.support.AbstractPlatformTransactionManager.commit(TransactionStatus)
1.3 看一下事物回滚的方法
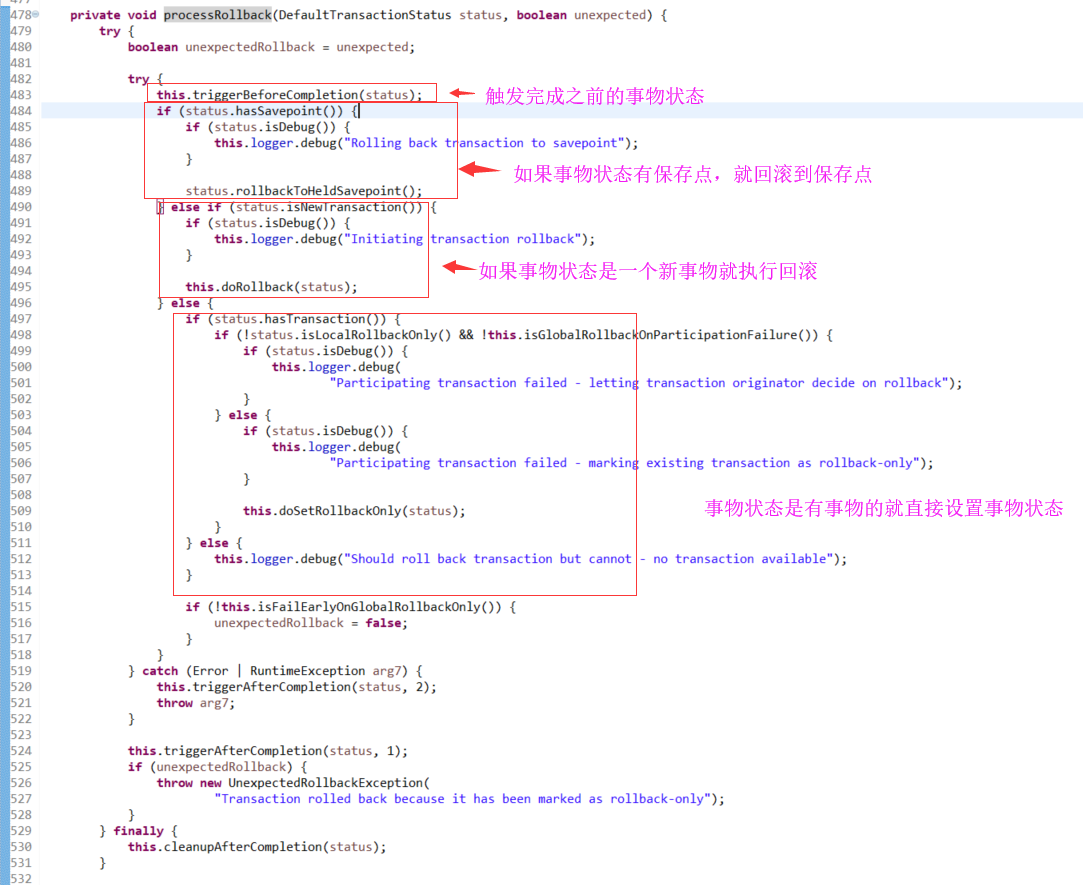
org.springframework.transaction.support.AbstractPlatformTransactionManager.rollback(TransactionStatus)

org.springframework.transaction.support.AbstractPlatformTransactionManager.processRollback(DefaultTransactionStatus, boolean)
总结这里的设计模式、设计原则:
面向接口编程
抽象类:固定不变的实现,提供模板方法,具体子类实现模板方法
一句话:接口、抽象类、模板方法、具体子类。Spring中很多地方用了。
2. DataSourceTransactionManager
DataSourceTransactionManager是基于jdbc connection的本地事务管理实现。多个方法调用参与到同一个事务,是通过共用connection来完成的
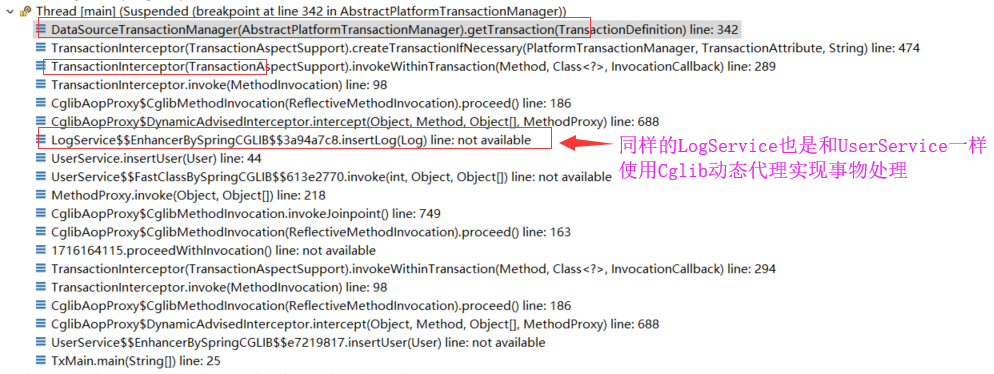
方法一:UserService.insertUser调用了方法二:logService.insertLog(log),两个都加事务定义,验证以下几种传播:
方法一required---方法二required
方法一required---方法二requires_new
方法一required---方法二nested
2.1 准备
Xml配置
<?xml version="1.0" encoding="UTF-8"?>

<beans xmlns="http://www.springframework.org/schema/beans"

    xmlns:xsi="http://www.w3.org/2001/XMLSchema-instance"

    xmlns:context="http://www.springframework.org/schema/context"

    xmlns:aop="http://www.springframework.org/schema/aop"

    xmlns:tx="http://www.springframework.org/schema/tx"

    xsi:schemaLocation="http://www.springframework.org/schema/beans

        http://www.springframework.org/schema/beans/spring-beans.xsd

        http://www.springframework.org/schema/context

        http://www.springframework.org/schema/context/spring-context.xsd

        http://www.springframework.org/schema/aop

        http://www.springframework.org/schema/aop/spring-aop.xsd

        http://www.springframework.org/schema/tx

        http://www.springframework.org/schema/tx/spring-tx.xsd">

    <!-- 加载配置参数 -->

    <context:property-placeholder location="classpath:com/study/leesmall/spring/sample/tx/application.properties"/>

    <!-- 数据源 -->

    <bean id="dataSource" class="com.alibaba.druid.pool.DruidDataSource"

        init-method="init" destroy-method="close">

        <property name="driverClassName" value="${jdbc.driverClassName}" />

        <property name="url" value="${jdbc.url}" />

        <property name="username" value="${jdbc.username}" />

        <property name="password" value="${jdbc.password}" />

        <!-- 配置初始化大小、最小、最大连接数 -->

        <property name="initialSize" value="1" />

        <property name="minIdle" value="1" />

        <property name="maxActive" value="10" />

     </bean>

     <bean id="jdbcTemplate" class="org.springframework.jdbc.core.JdbcTemplate" scope="prototype">

         <property name="dataSource" ref="dataSource" />

     </bean>

    <!-- *******************  事务管理配置    begin  ********************************** -->

    <!-- 配置事务管理器 -->

    <bean id="txManager" class="org.springframework.jdbc.datasource.DataSourceTransactionManager">

        <property name="dataSource" ref="dataSource"/>

    </bean>

    <!-- *******************  事务管理配置    end  ********************************** -->

</beans>
UserService:
@Service

public class UserService {

    @Autowired

    private UserDao userDao;

    @Autowired

    private LogService logService;

    @Transactional

    public User insertUser(User u) {

        this.userDao.insert(u);

        Log log = new Log(System.currentTimeMillis() + "", System.currentTimeMillis() + "-" +

        u.getUserName());

        this.logService.insertLog(log);

        return this.userDao.find(u.getId());

    }

}
LogService:
@Service

public class LogService {

    @Autowired

    private LogDao logDao;

    @Transactional

    // @Transactional(propagation = Propagation.REQUIRES_NEW)

    // @Transactional(propagation = Propagation.NESTED)

    public void insertLog(Log log) {

        this.logDao.insert(log);

    }

}
TxMain:
package com.study.leesmall.spring.sample.tx;

import org.springframework.context.annotation.AnnotationConfigApplicationContext;

import org.springframework.context.annotation.ComponentScan;

import org.springframework.context.annotation.Configuration;

import org.springframework.context.annotation.ImportResource;

import org.springframework.transaction.annotation.EnableTransactionManagement;

import com.study.leesmall.spring.sample.tx.entity.User;

import com.study.leesmall.spring.sample.tx.service.UserService;

@Configuration

@ComponentScan("com.study.leesmall.spring.sample.tx")

@ImportResource("classpath:com/study/leesmall/spring/sample/tx/application.xml")

@EnableTransactionManagement

public class TxMain {

    public static void main(String[] args) {

        try (AnnotationConfigApplicationContext context = new AnnotationConfigApplicationContext(TxMain.class);) {

            User user = new User();

            user.setId("1234564");

            user.setUserName("leesmall-666666666");

            UserService userService = context.getBean(UserService.class);

            userService.insertUser(user);

        }

    }

}
在AbstractPlatformTransactionManager.getTransaction方法里面打断点拿到调用栈去分析

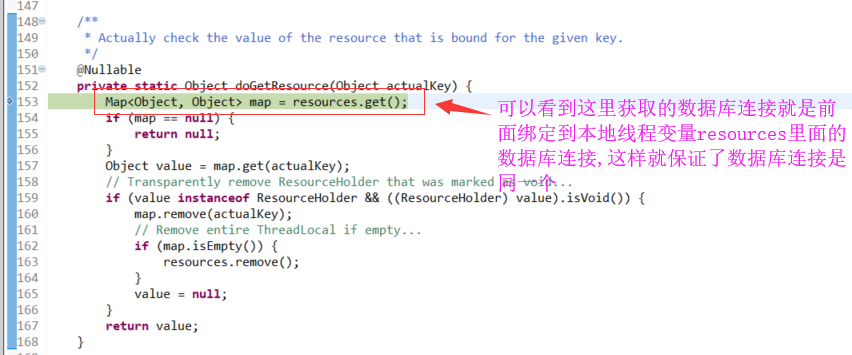
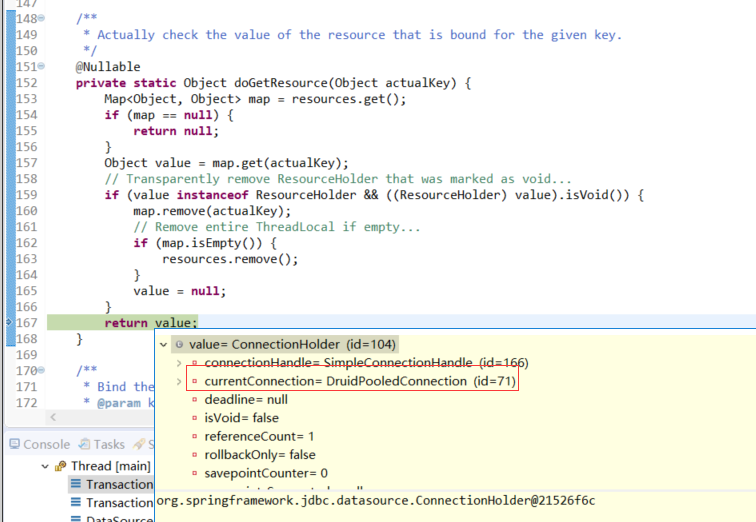
接下来跟代码,重点是要找到 Connection 绑定到线程,绑定到了哪里
调用栈如下:

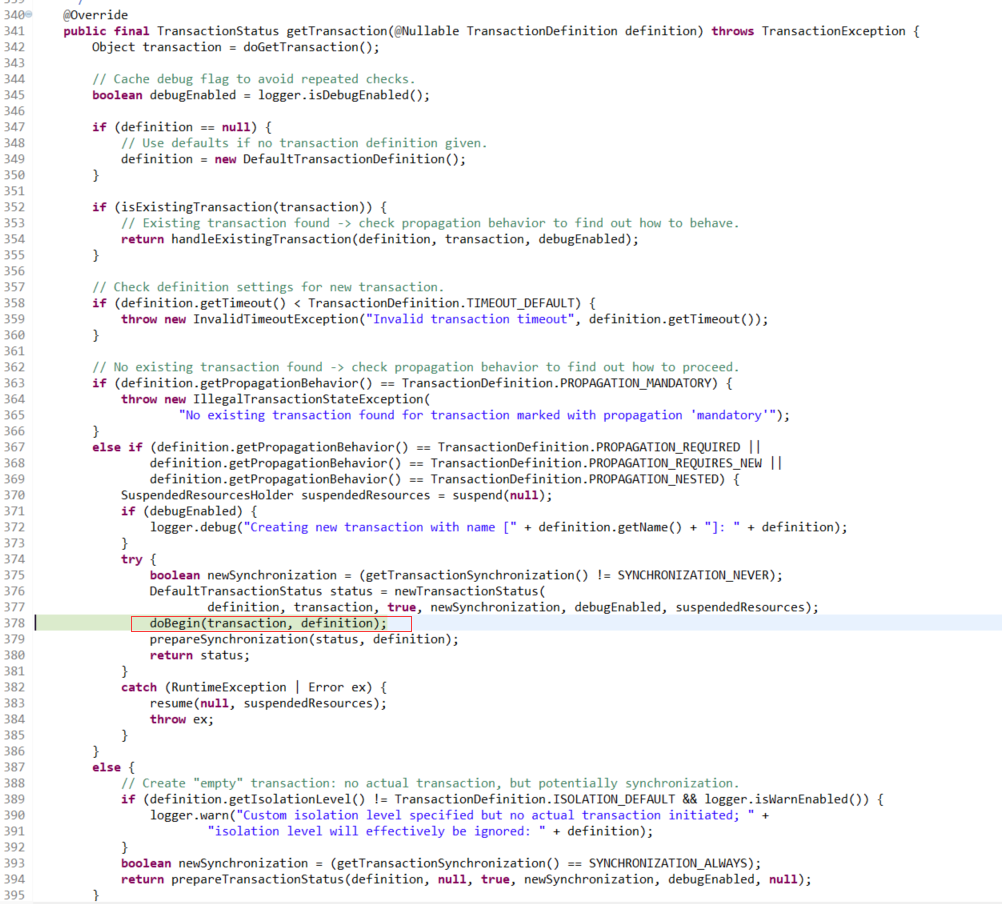
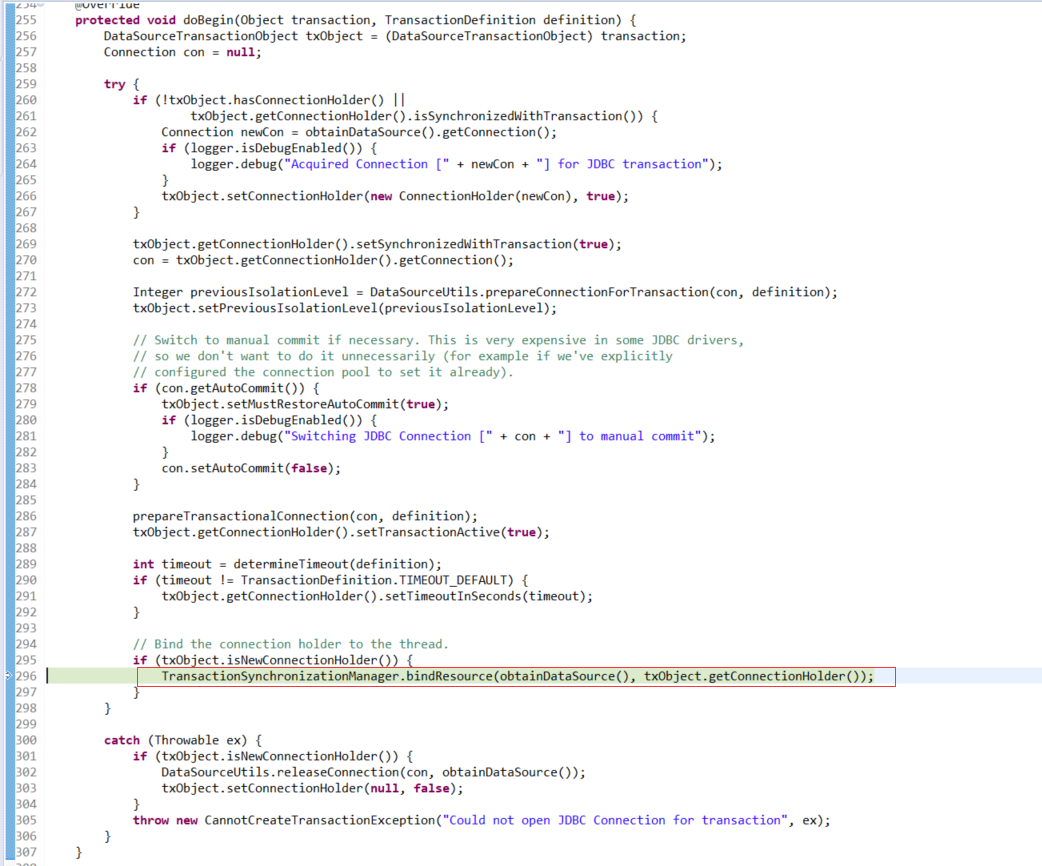
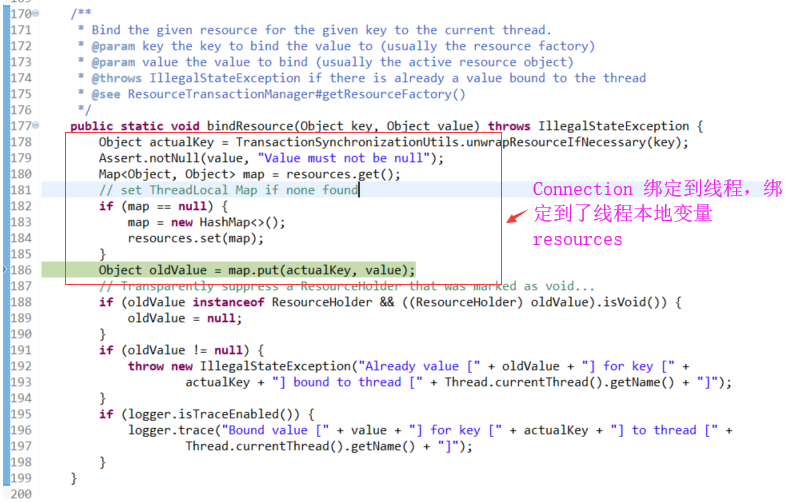
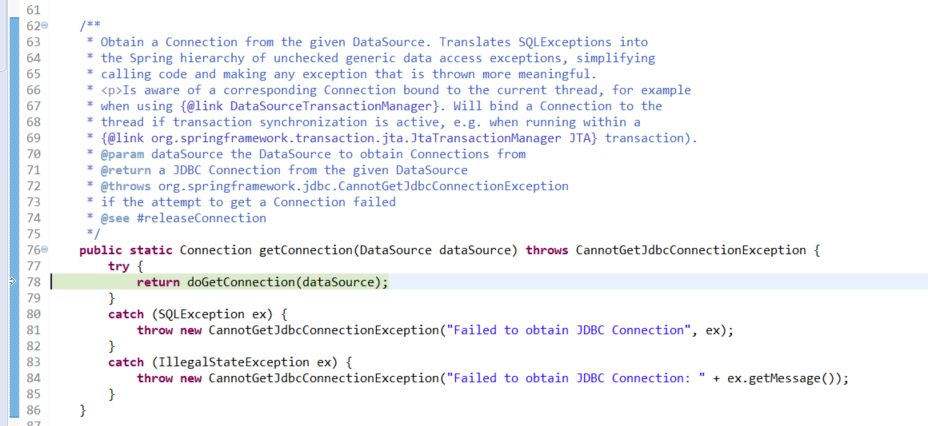
看完getTransaction即可。现在已有connection了,接下来业务代码中使用connection地方
找到JdbcTemplate的update操作的获取connection的代码,加断点,然后F8,让程序执行到这里,看下调用栈。

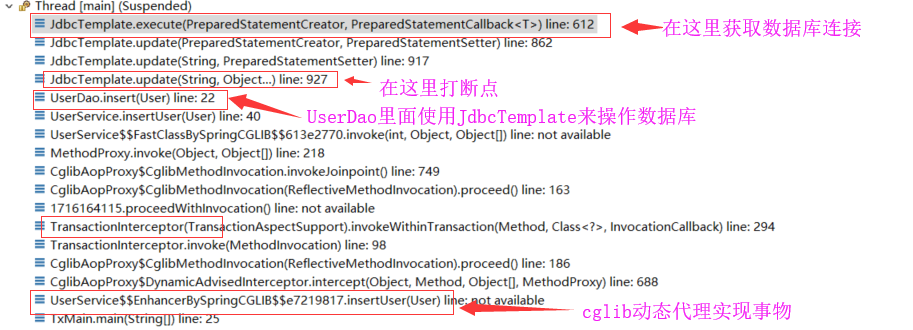
F5进入DataSourceUtils.getConnection(obtainDataSource()),看它如何获取Connection
调用栈如下:



第二次进到 getTransaction()
3. 声明式事务过程源码学习
先看一下声明式事务配置的示例:
    <!-- ********************** 声明式事务配置   ************** -->

    <!-- 配置事务增强的advice -->

    <tx:advice id="txAdvice" transaction-manager="txManager">

        <tx:attributes>

            <!-- all methods starting with 'get' are read-only -->

            <tx:method name="get*" read-only="true" />

           <!--  other methods use the default transaction settings (see below) -->

            <tx:method name="*" />

        </tx:attributes>

    </tx:advice>

    <!-- 配置事务的AOP切面 -->

    <aop:config>

        <aop:pointcut id="allService" expression="execution(* com.study.leesmall.spring.sample.tx.service.*Service.*(..)))"/>

        <aop:advisor advice-ref="txAdvice" pointcut-ref="allService"/>

    </aop:config>
3.1 标签解析
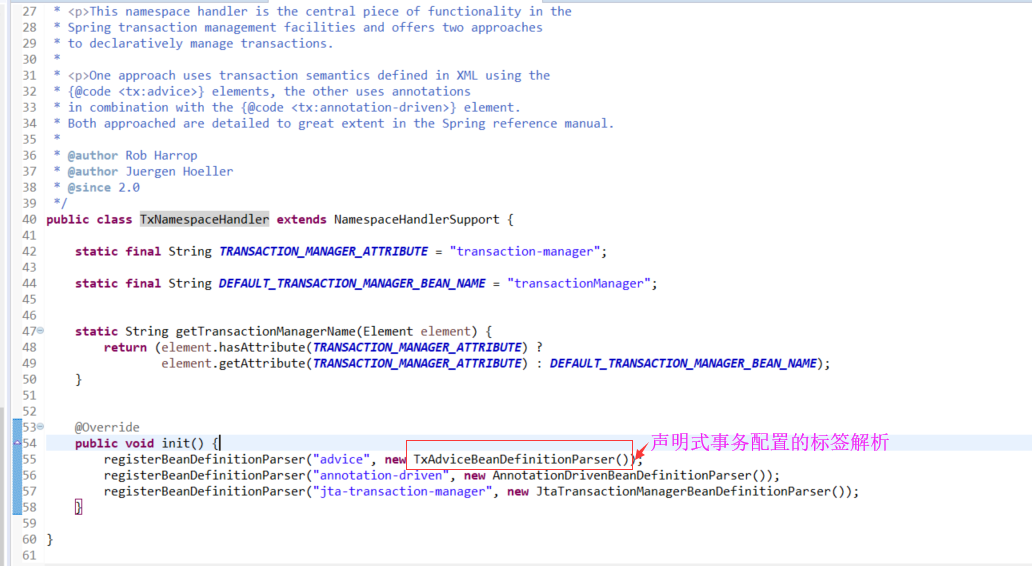
1)入口
E:\lib\spring-tx-5.1.3.RELEASE.jar
/META-INF/spring.handlers
http\://www.springframework.org/schema/tx=org.springframework.transaction.config.TxNamespaceHandler
3.2、<tx:advice>标签的解析器TxAdviceBeanDefinitionParser
a)思考:<tx:advice>advice注册的会是个什么advice?
b)浏览TxAdviceBeanDefinitionParser的代码,了解<tx:advice><tx:attributes>
<tx:method>的解析过程,产出了什么。
c)浏览TransactionInterceptor的代码,重点:invoke(MethodInvocationinvocation)方法
invokeWithinTransaction方法
d)浏览TransactionInterceptor的继承体系,事务处理的逻辑都在TransactionAspectSupport中
e)浏览TransactionAspectSupport
它里面有如下属性:
它的重点方法是invokeWithinTransaction
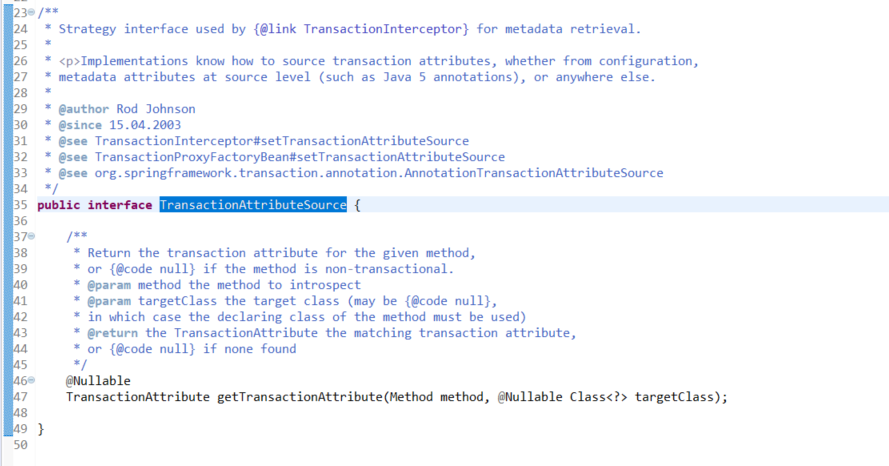
f)浏览TransactionAttributeSource接口定义
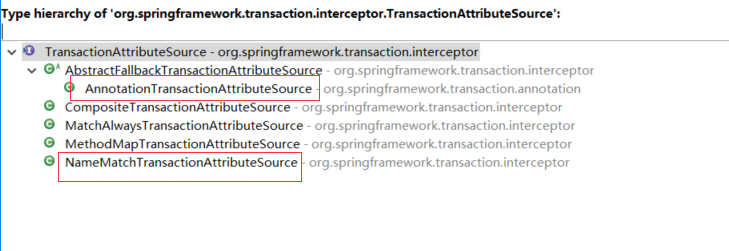
g)浏览TransactionAttributeSource的继承体系
h)再来看下TransactionAttribute,可能已不记得它是什么了
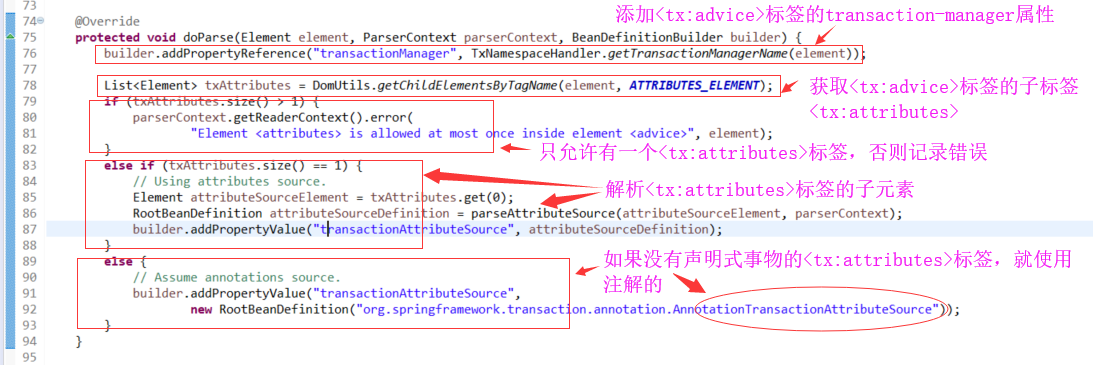
1)解析<tx:advice>标签
org.springframework.transaction.config.TxAdviceBeanDefinitionParser.doParse(Element, ParserContext, BeanDefinitionBuilder)
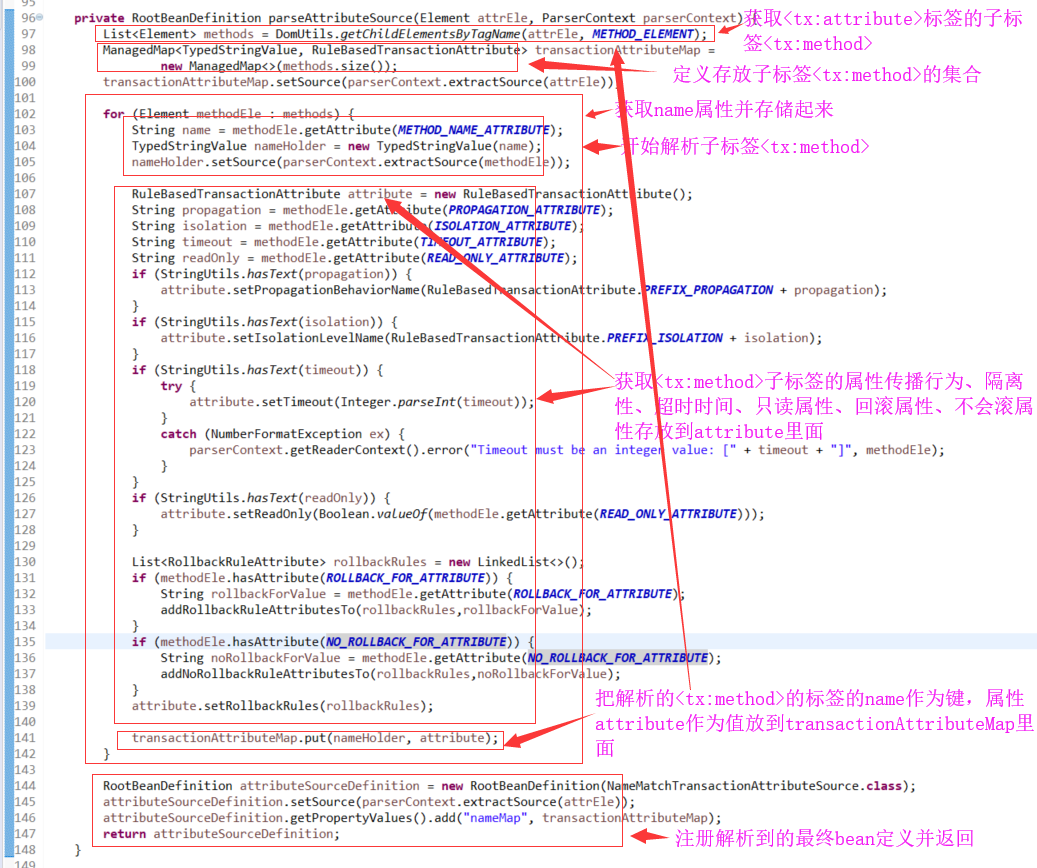
org.springframework.transaction.config.TxAdviceBeanDefinitionParser.parseAttributeSource(Element, ParserContext)
解析<tx:advice id="txAdvice" />标签的子标签<tx:attributes>
2)分析TransactionInterceptor
TransactionInterceptor的继承体系:
父类:
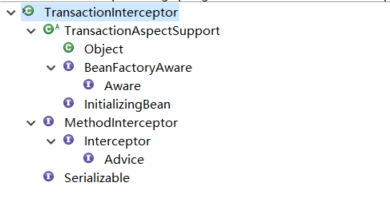
子类没有:

org.springframework.transaction.interceptor.TransactionInterceptor.invoke(MethodInvocation)

事务处理的逻辑都在TransactionAspectSupport中
浏览TransactionAspectSupport
它里面有如下属性:
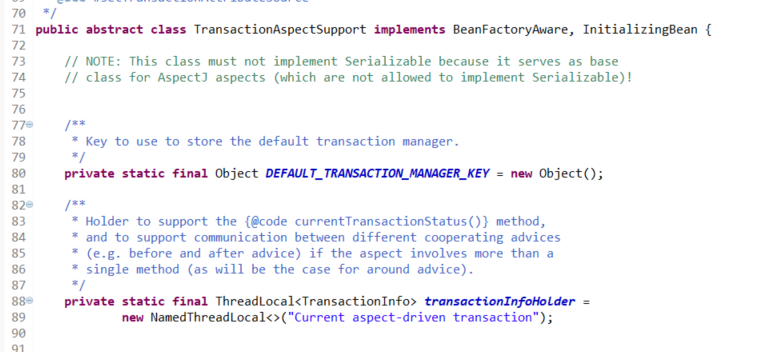
它的重点方法是invokeWithinTransaction
org.springframework.transaction.interceptor.TransactionAspectSupport.invokeWithinTransaction(Method, Class<?>, InvocationCallback)
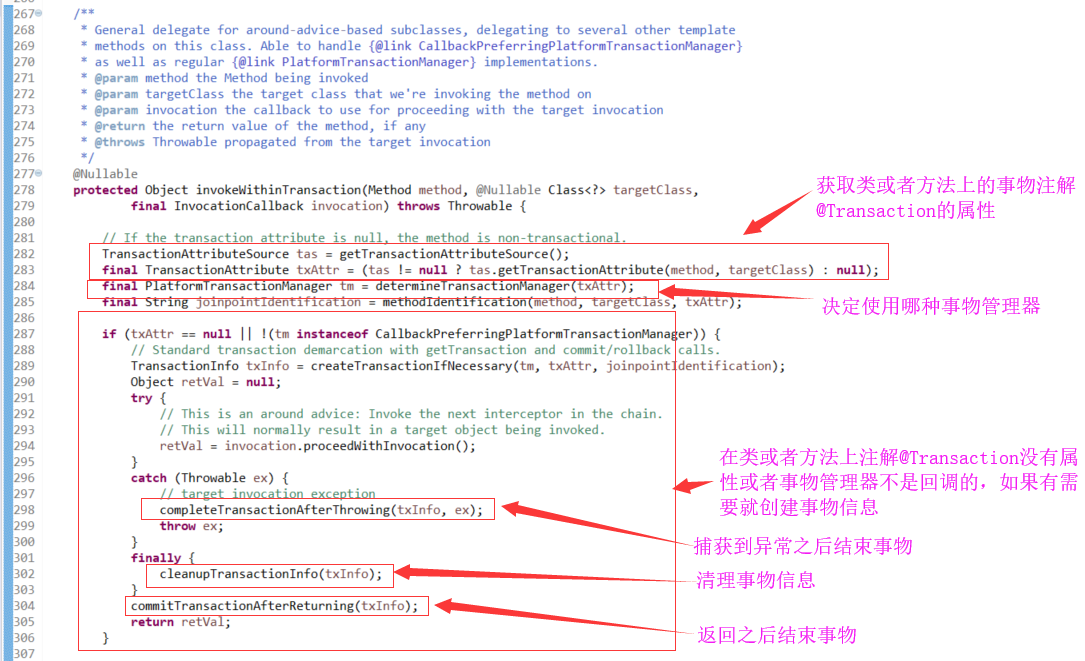
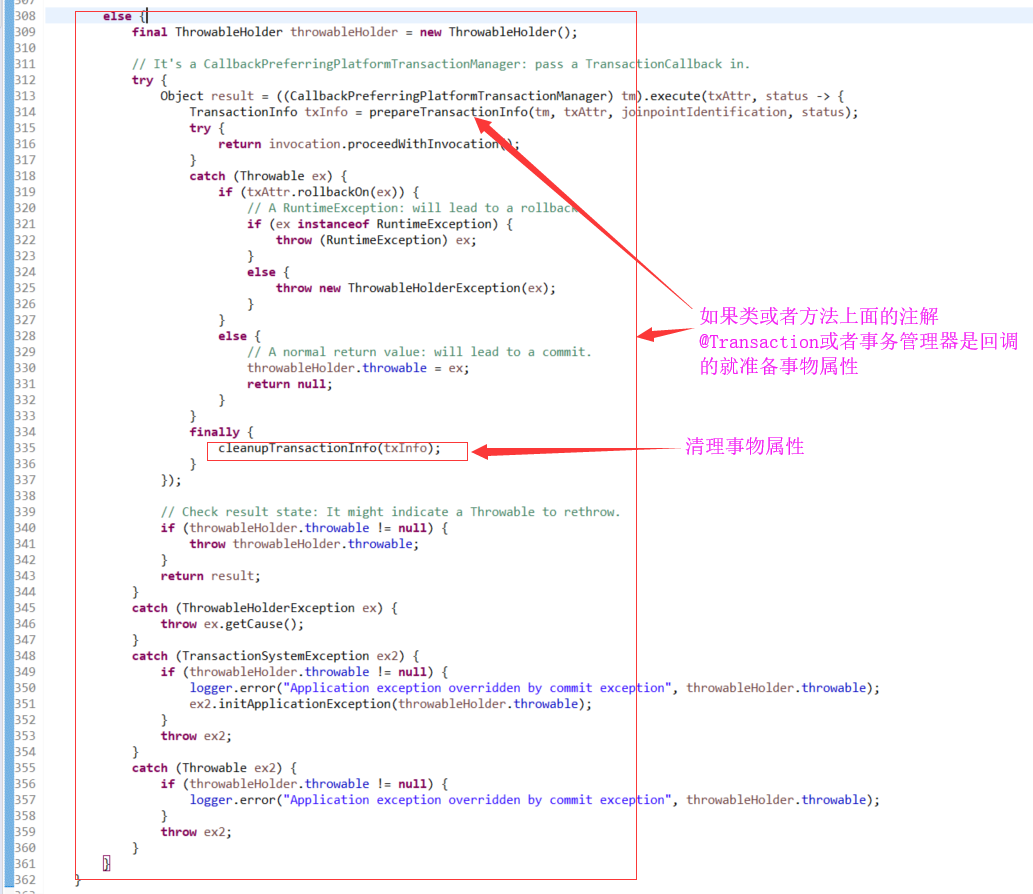
org.springframework.transaction.interceptor.TransactionAspectSupport.getTransactionAttributeSource()

org.springframework.transaction.interceptor.TransactionAspectSupport.createTransactionIfNecessary(PlatformTransactionManager, TransactionAttribute, String)
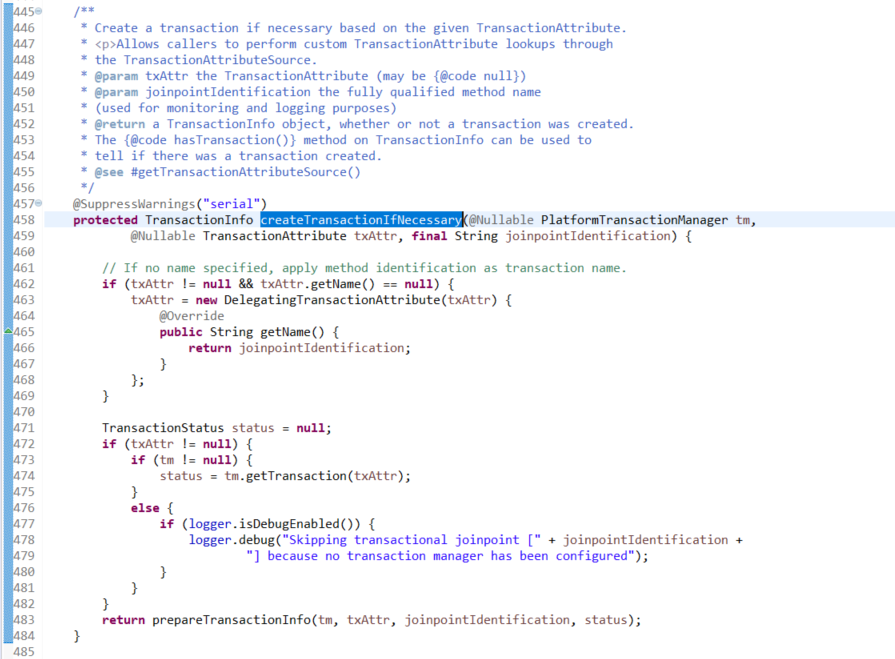
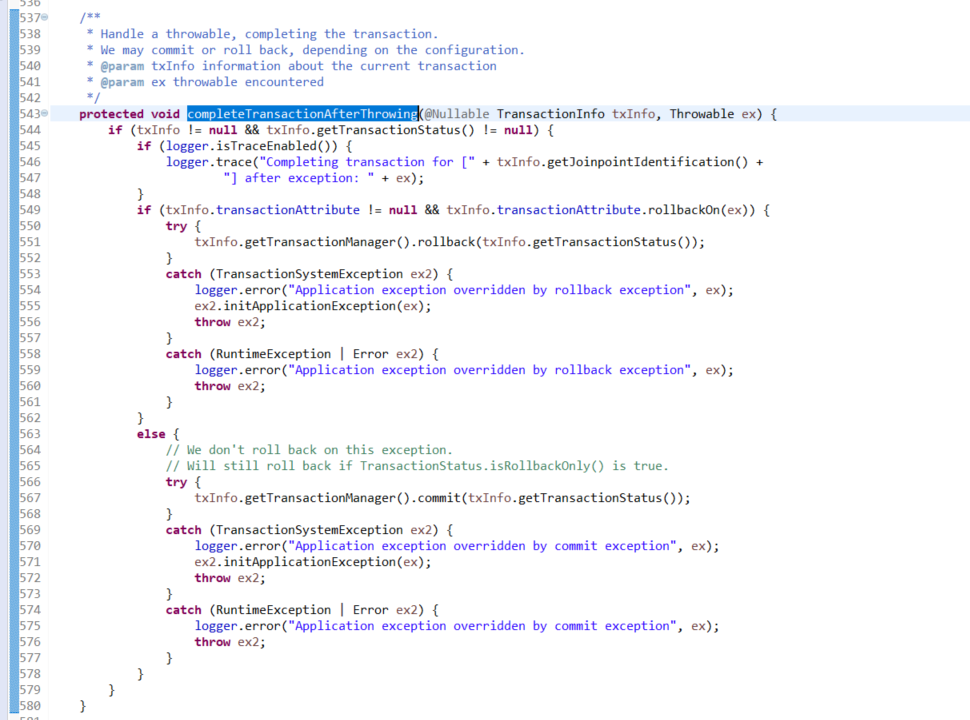
org.springframework.transaction.interceptor.TransactionAspectSupport.completeTransactionAfterThrowing(TransactionInfo, Throwable)
3)浏览TransactionAttributeSource接口定义
TransactionAttributeSource的继承体系:
3. 事务处理的监听
事务处理结果的监听:Spring里面可以对事物处理的结果进行监听
https://docs.spring.io/spring/docs/5.1.3.RELEASE/spring-framework-reference/data-access.html#transaction-event
4. 注解方式事务过程学习
开启注解支持:
<tx:annotation-driven transaction-manager="txManager"/>
1)入口
E:\lib\spring-tx-5.1.3.RELEASE.jar
/META-INF/spring.handlers
http\://www.springframework.org/schema/tx=org.springframework.transaction.config.TxNamespaceHandler
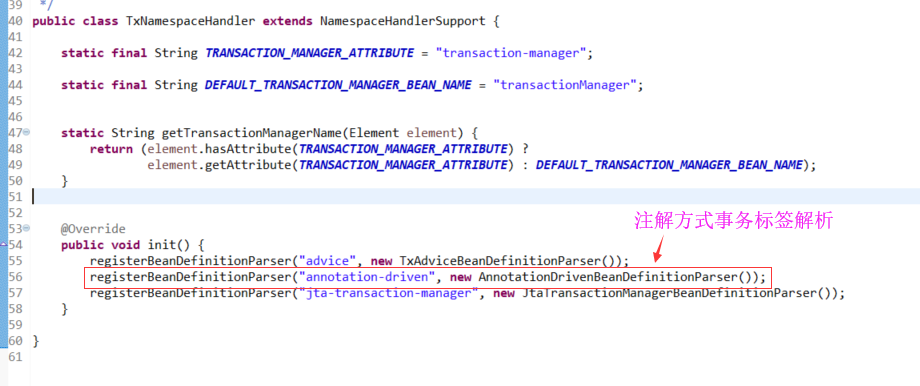
org.springframework.transaction.config.AnnotationDrivenBeanDefinitionParser
org.springframework.transaction.config.AnnotationDrivenBeanDefinitionParser.parse(Element, ParserContext)
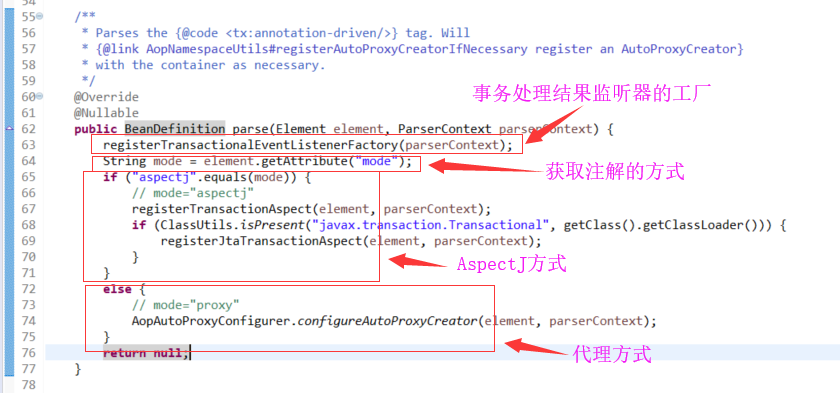
org.springframework.transaction.config.AnnotationDrivenBeanDefinitionParser.AopAutoProxyConfigurer.configureAutoProxyCreator(Element, ParserContext)
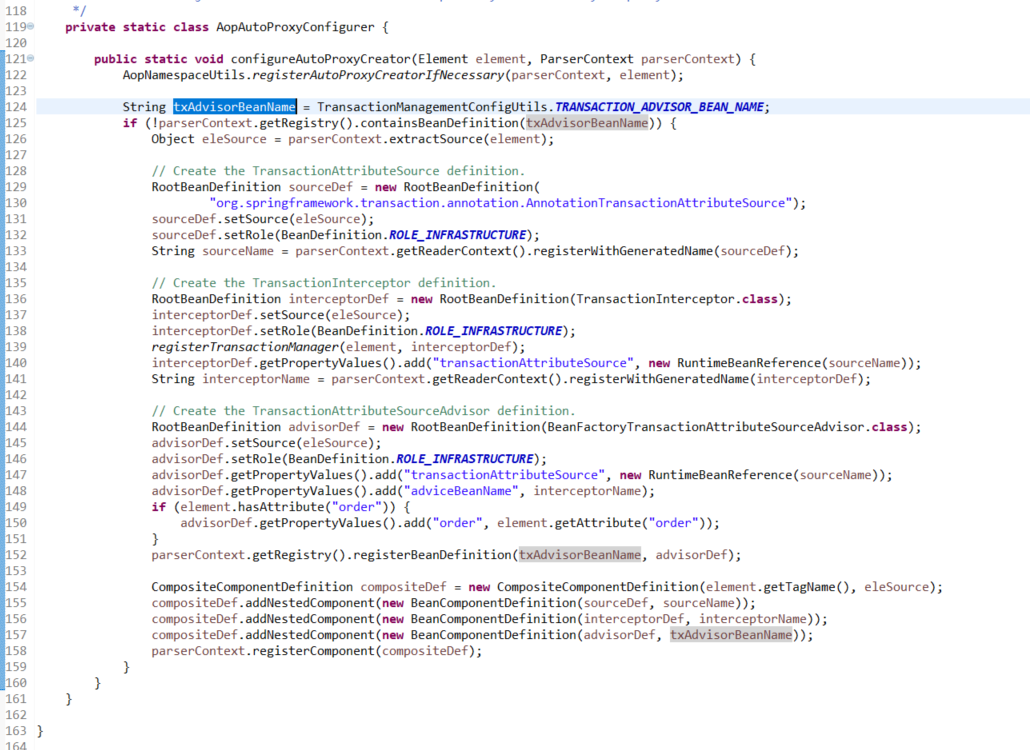
org.springframework.transaction.interceptor.BeanFactoryTransactionAttributeSourceAdvisor

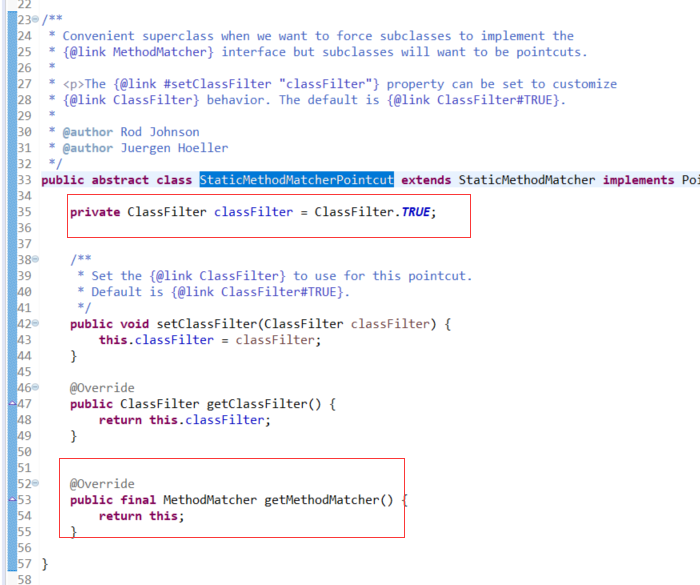
org.springframework.transaction.interceptor.TransactionAttributeSourcePointcut

org.springframework.aop.support.StaticMethodMatcherPointcut
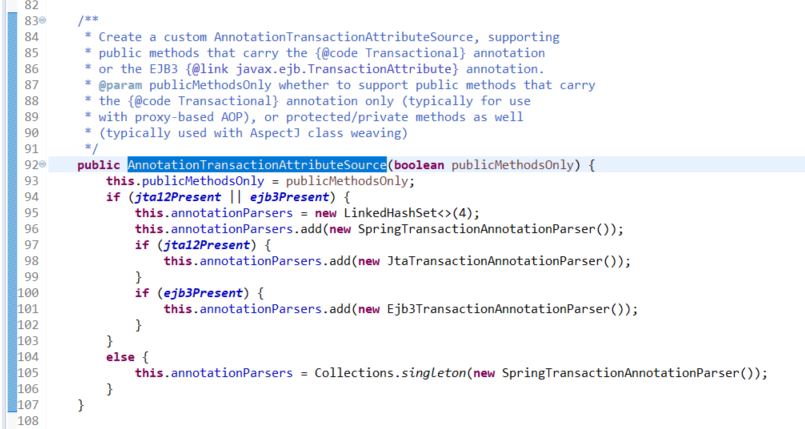
org.springframework.transaction.annotation.AnnotationTransactionAttributeSource

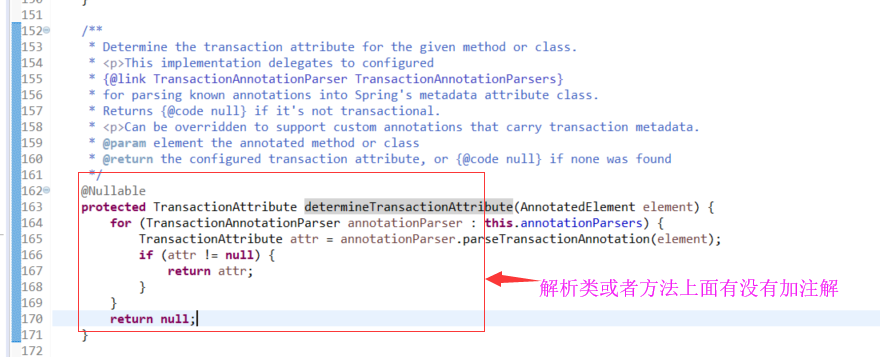
什么时候创建代理?
创建代理:getBean()创建Bean实例的时候
判断是否要创建代理?
怎么判断?Advisor的Pointcut是否匹配。事务是不是一个advisor
怎么使用调用它的方法?
切面增强、事务
2)开启注解支持的另外一种方式:
@EnableTransactionManagement
2.1)来看@EnableTransactionManagement这个注解的定义
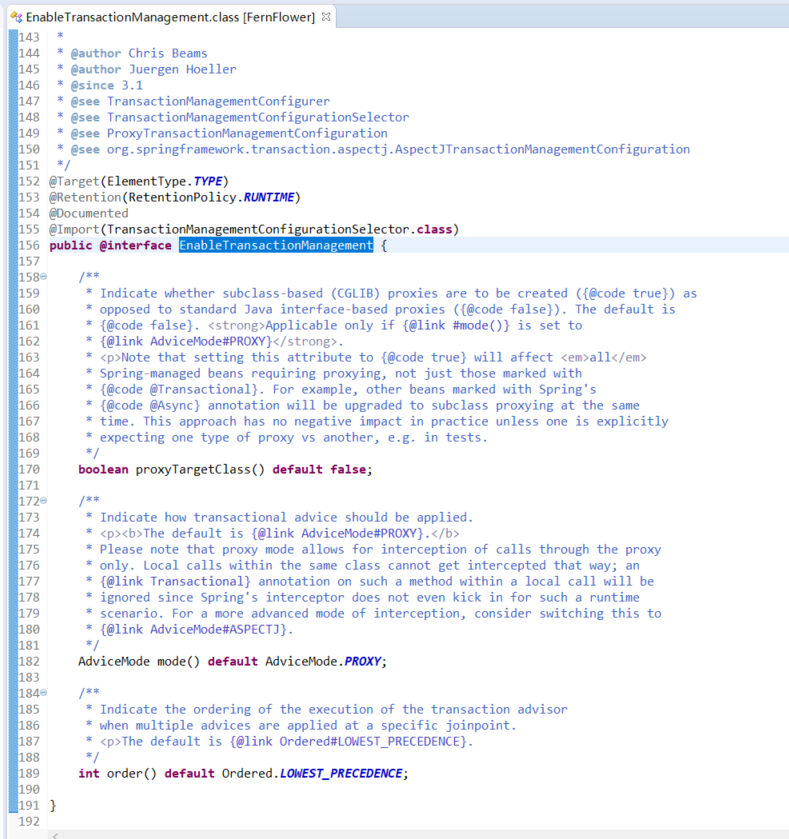
@EnableTransactionManagement起作用靠:
@Import(TransactionManagementConfigurationSelector.class)
public @interface EnableTransactionManagement {
@Import等价于在TxMain上面导入了一个包
2.2)看TransactionManagementConfigurationSelector
和<tx:annotation-driven transaction-manager="txManager"/>的实现是一样的
    /**

     * Returns {@link ProxyTransactionManagementConfiguration} or

     * {@code AspectJ(Jta)TransactionManagementConfiguration} for {@code PROXY}

     * and {@code ASPECTJ} values of {@link EnableTransactionManagement#mode()},

     * respectively.

     */

    @Override

    protected String[] selectImports(AdviceMode adviceMode) {

        switch (adviceMode) {

            case PROXY:

                return new String[] {AutoProxyRegistrar.class.getName(),

                        ProxyTransactionManagementConfiguration.class.getName()};

            case ASPECTJ:

                return new String[] {determineTransactionAspectClass()};

            default:

                return null;

        }

    }
2.3)看org.springframework.context.annotation.AutoProxyRegistrar实现的接口方法:
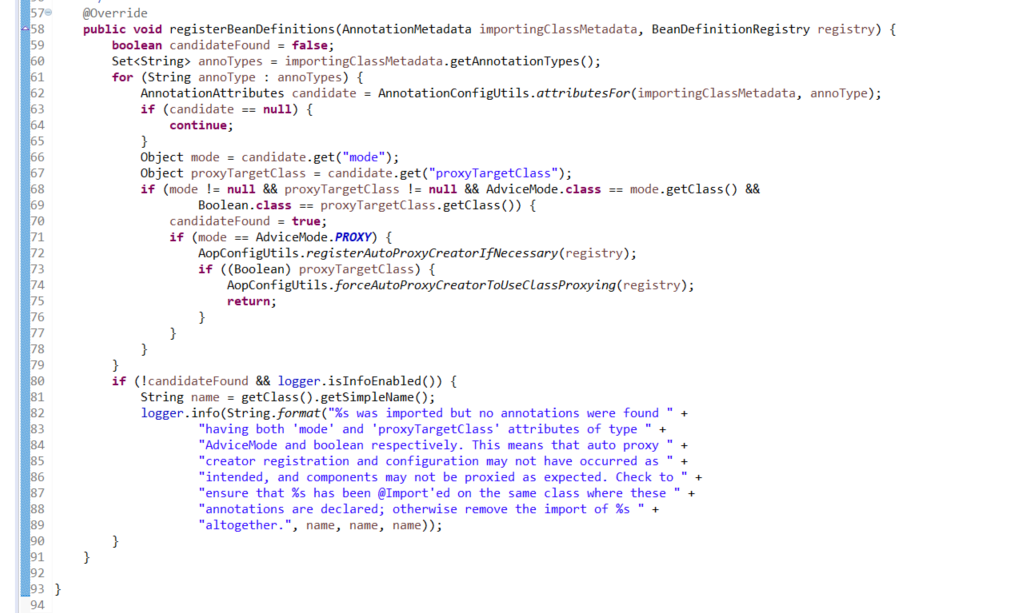
2.4)看org.springframework.transaction.annotation.ProxyTransactionManagementConfiguration类
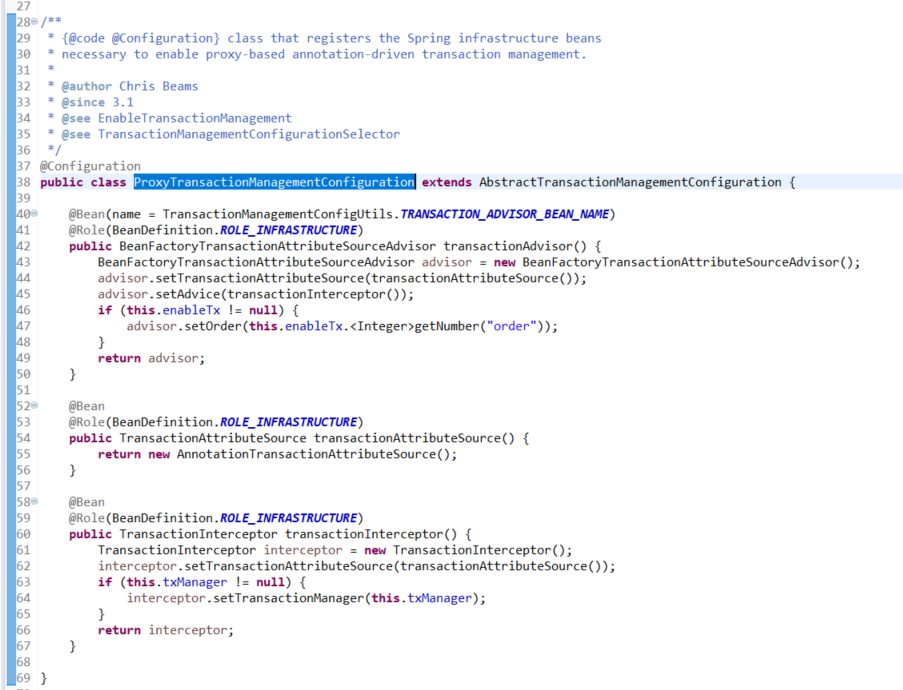
2.5)@import在哪里被解析的
ContextNamespaceHandler
AnnotationConfigBeanDefinitionParser

ConfigurationClassPostProcessor
ConfigurationClassParser
org.springframework.context.annotation.ConfigurationClassParser.doProcessConfigurationClass()
org.springframework.context.annotation.ConfigurationClassParser
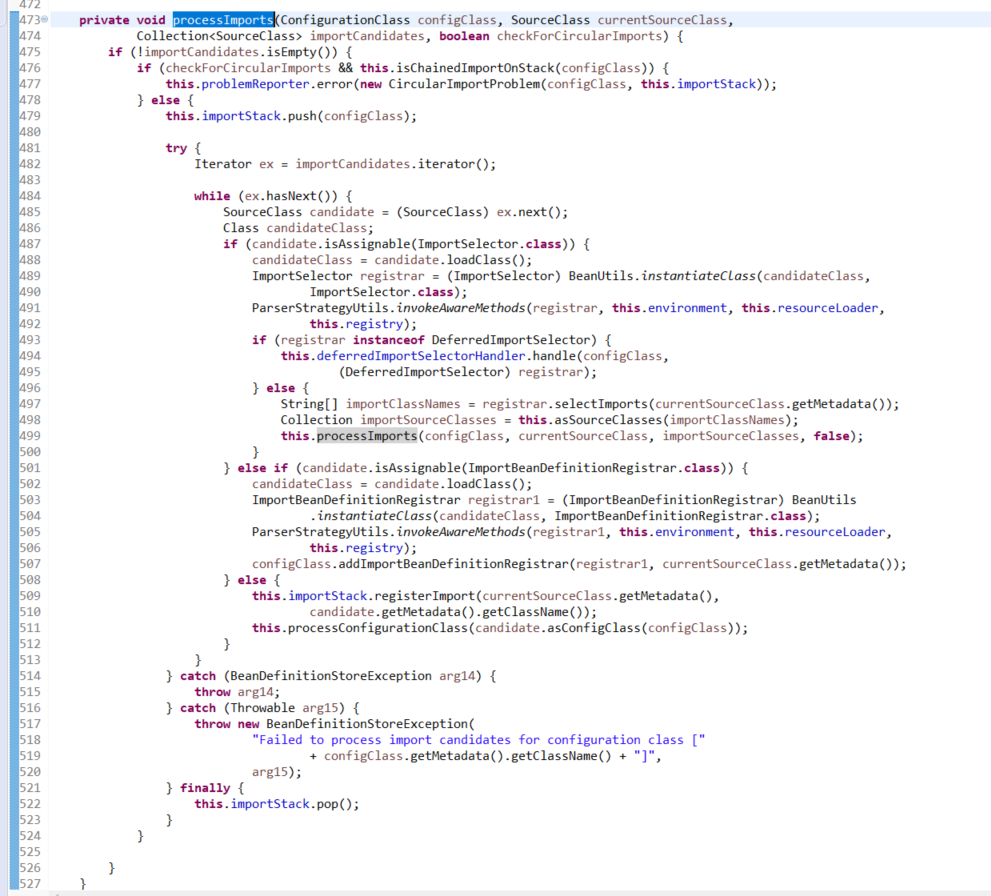
启动的时候,解析@EnableTransactionManagement,完成事务管理相关的AOP bean注册
剩下的事情都交给AOP
Xml:
启动的时候,完成事务管理相关的AOP bean注册
完整代码获取地址:https://github.com/leeSmall/FrameSourceCodeStudy/tree/master/spring-source-study
官网学习链接:
https://docs.spring.io/spring/docs/5.1.3.RELEASE/spring-framework-reference/data-access.html#transaction
框架源码系列十一:事务管理(Spring事务管理的特点、事务概念学习、Spring事务使用学习、Spring事务管理API学习、Spring事务源码学习)的更多相关文章
- SpringCloud 源码系列(6)—— 声明式服务调用 Feign
SpringCloud 源码系列(1)-- 注册中心 Eureka(上) SpringCloud 源码系列(2)-- 注册中心 Eureka(中) SpringCloud 源码系列(3)-- 注册中心 ...
- Spring 4 官方文档学习(七)核心技术之Spring AOP APIs
请忽略本篇内容!!! 1.介绍 2.Spring中的pointcut API 2.1.概念 2.2.对pointcut的操作 2.3. AspectJ expression pointcut 2.4. ...
- 框架源码系列六:Spring源码学习之Spring IOC源码学习
Spring 源码学习过程: 一.搞明白IOC能做什么,是怎么做的 1. 搞明白IOC能做什么? IOC是用为用户创建.管理实例对象的.用户需要实例对象时只需要向IOC容器获取就行了,不用自己去创建 ...
- Java源码详解系列(十一)--Spring的使用和源码
Spring 是一个一站式的 Java 框架,致力于提高我们项目开发的效率.通过 Spring,我们可以避免编写大量额外代码,更专注于我们的核心逻辑.目前,Spring 已经成为最受欢迎的 Java ...
- 框架源码系列十:Spring AOP(AOP的核心概念回顾、Spring中AOP的用法、Spring AOP 源码学习)
一.AOP的核心概念回顾 https://docs.spring.io/spring/docs/5.1.3.RELEASE/spring-framework-reference/core.html#a ...
- 框架源码系列七:Spring源码学习之BeanDefinition源码学习(BeanDefinition、Annotation 方式配置的BeanDefinition的解析)
一.BeanDefinition 1. bean定义都定义了什么? 2.BeanDefinition的继承体系 父类: AttributeAccessor: 可以在xml的bean定义里面加上DTD ...
- 事件机制-Spring 源码系列(4)
事件机制-Spring 源码系列(4) 目录: Ioc容器beanDefinition-Spring 源码(1) Ioc容器依赖注入-Spring 源码(2) Ioc容器BeanPostProcess ...
- Spring源码系列 — Bean生命周期
前言 上篇文章中介绍了Spring容器的扩展点,这个是在Bean的创建过程之前执行的逻辑.承接扩展点之后,就是Spring容器的另一个核心:Bean的生命周期过程.这个生命周期过程大致经历了一下的几个 ...
- Spring源码系列 — BeanDefinition
一.前言 回顾 在Spring源码系列第二篇中介绍了Environment组件,后续又介绍Spring中Resource的抽象,但是对于上下文的启动过程详解并未继续.经过一个星期的准备,梳理了Spri ...
随机推荐
- STM32(HY-SRF05)超声波测距项目
参考资料: https://www.cnblogs.com/qsyll0916/p/6964638.html http://blog.csdn.net/zhangdaxia2/article/deta ...
- 沃尔夫勒姆自动机时空图输出 C语言实现
#include <stdio.h> #include <stdlib.h> #include <time.h> #include <conio.h> ...
- python系统编程(六)
threading注意点 1. 线程执行代码的封装 通过上一小节,能够看出,通过使用threading模块能完成多任务的程序开发,为了让每个线程的封装性更完美,所以使用threading模块时,往往会 ...
- Java 避免创建不必要的对象
最好能重用对象而不是在每次需要的时候就创建一个相同功能的新对象.如果对象是不可变的,它就始终可以被重用. String s = new String("stringette"); ...
- pygame-KidsCanCode系列jumpy-part17-mask-collide碰撞检测
这节我们研究下pygame的几种碰撞检测模式: 如上图,左侧是默认的检测模式:基于矩形的检测(这也是性能最好的模式), 右侧是基于圆形的检测(性能略差于矩形检测). 矩形检测法虽然性能好,但是缺点也很 ...
- spring中的多线程aop方法拦截
日常开发中,常用spring的aop机制来拦截方法,记点日志.执行结果.方法执行时间啥的,很是方便,比如下面这样:(以spring-boot项目为例) 一.先定义一个Aspect import org ...
- android面试题总结加强再加强版(一)
在加强版的基础上又再加强的android应用面试题集 有些补充略显臃肿,只为学习 1.activity的生命周期. 方法 描述 可被杀死 下一个 onCreate() 在activity第一次被创建的 ...
- VBA 判断一个TXT编码方式,再创建一个新的文件,复制数据进去
如题,先读取一个文本文件判断编码(Unicode ANSI),就这两种编码然后将txt导入到excel表中,最后处理完成,再创建一个相同编码,不同文件名的txt文件,把新数据放进去 Sub test ...
- centos cron 自动执行脚本异常 命令不生效的解决办法
办法: 1.sh脚本加入 source /etc/profile 2.非系统命令,要写绝对路径
- BIM轻量化助力建筑业迈向BIM+时代
多年以来,BIM一直是曲高和寡,仅仅在建筑圈内孤芳自赏.我们花那么多心思建了那么多BIM模型,如果仅仅在建筑圈内使用,未免暴殄天物.如何充分发掘BIM的价值,让更多的受众从BIM中受益,这是我们亟待解 ...

