数据持久化-存取方式总结&应用沙盒&文件管理NSFileManager
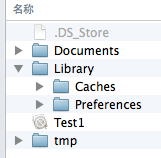
Documents:保存应用运行时生成的需要持久化的数据。例如,游戏应用可将游戏存档保存在该目录。iTunes同步设备时会备份该目录
Library/Preference:保存应用的所有偏好设置,iOS的Settings(设置)应用会在该目录中查找应用的设置信息。iTunes同步设备时会备份该目录
Library/Caches:保存应用运行时生成的需要持久化的数据,一般存储体积大、不需要备份的非重要数据,iTunes同步设备时不会备份该目录。
tmp:保存应用运行时所需的临时数据,使用完毕后再将相应的文件从该目录删除。应用没有运行时,系统也可能会清除该目录下的文件。iTunes同步设备时不会备份该目录
4.获取目录路径代码:
    //获取沙盒路径

    NSString *home = NSHomeDirectory();

    //1.获取Document路径

    //1.1通过文件名获取,因为ios以后的新版本可能修改目录名,不建议使用

    NSString *documentPath1 = [home stringByAppendingPathComponent:@"Documents"];

    //1.2通过系统方法获取,建议使用

    NSArray *array = NSSearchPathForDirectoriesInDomains(NSDocumentDirectory, NSUserDomainMask, YES);

    NSString *documentPath2 = [array objectAtIndex:];

    //2.获取Library/Cache目录,获取方式同Document,下面是系统方法

    NSArray *cache = NSSearchPathForDirectoriesInDomains(NSCachesDirectory, NSUserDomainMask, YES);

    NSString *cachePath = [cache objectAtIndex:];

    //3.获取Library/Preferences也可食用1.1的方式获取,但因为是保存setting设置,一般通过NSUserDefaults直接存储

    NSUserDefaults *defaults = [NSUserDefaults standardUserDefaults];

    [defaults setObject:@"myname" forKey:@"username"];

    //4.获取tmp目录

    NSString *tmpPath = NSTemporaryDirectory();
如何在沙盒中操作文件夹和文件,系统提供了
二.文件存储
1.XML属性列表(plist归档)
dataWithContentsOfFile方法读取plist文件中的信息并实例化对象
    NSString *tmpPath = NSTemporaryDirectory();

    NSString *path = [tmpPath stringByAppendingPathComponent:@"test.plist"];

    // 将数据封装成字典

    NSMutableDictionary *dict = [NSMutableDictionary dictionary];

    [dict setObject:@"jason" forKey:@"name"];

    [dict writeToFile:path atomically:YES];

    // 读取plist的内容,实例化NSDictionary

    NSDictionary *dictPlist = [NSDictionary dictionaryWithContentsOfFile:path];

    NSLog(@"name:%@", [dictPlist objectForKey:@"name"]);
2.NSUserDefaults(偏好设置)
使用set方法保存不同类型的对象,使用xxxForKey方法获取值
    //偏好设置

    NSUserDefaults *dft = [NSUserDefaults standardUserDefaults];

    [dft setObject:@"jason" forKey:@"username"];

    [dft setFloat:1.77f forKey:@"high"];

    [dft setBool:YES forKey:@"auto_logon"];

    //读取偏好设置

    NSUserDefaults *dft2 = [NSUserDefaults standardUserDefaults];

    NSString *name = [dft2 objectForKey:@"username"];

    float h = [dft2 floatForKey:@"high"];

    BOOL al = [dft2 boolForKey:@"auto_logon"];

    NSLog(@"%@--%f--%hhd",name,h,al);
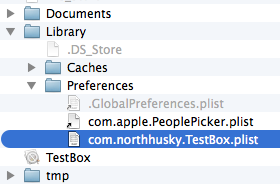
自动在Library/Preferences/生成项目名开头的plist文件
3.NSKeyedArchiver 归档(加密形式)
机制类似于java的对象序列化,归档是指将对象保存到文件,反归档(读档)是指将文件内容解析成对象
3.1 NSString、NSDictionary、NSArray、NSData、NSNumber等类型,可以直接用NSKeyedArchiver进行归档和反归档
3.2 任何遵守了NSCoding协议的对象,都可以进行归档和反归档
3.3 NSCoding协议需要实现两个方法:
- (void)encodeWithCoder:(NSCoder *)encoder //将对象归档的时候会调用(将对象写入文件之前会调用),用来说明哪些属性需要归档,怎样归档
-(id)initWithCoder:(NSCoder *)decoder //当从文件中反归档对象时调用,用来说明哪些属性需要反归档,怎样反归档
注:如果父类中也有属性需要归档或者反归档,必须调用super的encodeWithCoder:和initWithCoder:方法
3.4代码实例:
3.4.1 对象类:Person和子类Man
//  Person.h

#import <Foundation/Foundation.h>

@interface Person : NSObject<NSCoding>

@property (nonatomic, copy) NSString *name;

@property (nonatomic, assign) int age;

@property (nonatomic, assign) double height;

@end

//  Person.m

#import "Person.h"

@implementation Person

//归档时调用

- (void)encodeWithCoder:(NSCoder *)coder

{

    [coder encodeObject:_name forKey:@"name"];

    [coder encodeInt:_age forKey:@"age"];

    [coder encodeDouble:_height forKey:@"height"];

}

//反归档时调用调用的初始化方法

-(id)initWithCoder:(NSCoder *)deCode

{

    if (self = [super init]) {

        _name   = [deCode decodeObjectForKey:@"name"];

        _age    = [deCode decodeIntForKey:@"age"];

        _height = [deCode decodeDoubleForKey:@"height"];

    }

    return self;

}

@end

//  Man.h继承自Person

#import "Person.h"

@interface Man : Person

@property (nonatomic, copy) NSString *sex;

@end

//  Man.m

#import "Man.h"

@implementation Man

//归档时调用

-(void)encodeWithCoder:(NSCoder *)coder

{

    //首先调用父类的归档方法

    [super encodeWithCoder:coder];

    [coder encodeObject:_sex forKey:@"sex"];

}

//反归档时调用的初始化方法

-(id)initWithCoder:(NSCoder *)deCode

{

    if (self = [super initWithCoder:deCode]) {

        _sex = [deCode decodeObjectForKey:@"sex"];

    }

    return  self;

}

@end
3.4.1 归档和反归档的实现方法
NSString *tmpPath = NSTemporaryDirectory();

    NSString *path1 = [tmpPath stringByAppendingPathComponent:@"person.data"];

    NSString *path2 = [tmpPath stringByAppendingPathComponent:@"man.data"];

    Person *p = [[Person alloc]init];

    p.name = @"a";

    p.age = ;

    p.height = 1.70f;

    Man *m = [[Man alloc]init];

    m.name = @"b";

    m.age = ;

    m.height = 1.77f;

    m.sex = @"male";

    //归档

    [NSKeyedArchiver archiveRootObject:p toFile:path1];

    [NSKeyedArchiver archiveRootObject:m toFile:path2];

    //反归档

    Person *p2 = [NSKeyedUnarchiver unarchiveObjectWithFile:path1];

    Man *m2 = [NSKeyedUnarchiver unarchiveObjectWithFile:path2];

    NSLog(@"%@--%d--%f",p2.name,p2.age,p2.height);

    NSLog(@"%@--%d--%f---%@",m2.name,m2.age,m2.height,m2.sex);
4.SQLite3 & Core Data
都是对数据做操作,CoreData只是在SQLite3的基础上做了一层面向对象的封装,类似于Hibernate,暂不总结,后续会新写文章总结
三.NSFileManager
参考文章:http://www.cnblogs.com/xyzlmn/p/3196930.html
创建文件夹:
//创建文件夹

-(void *)createDir{

    NSString *documentsPath =[self dirDoc];

    NSFileManager *fileManager = [NSFileManager defaultManager];

    NSString *testDirectory = [documentsPath stringByAppendingPathComponent:@"test"];

    // 创建目录

    BOOL res=[fileManager createDirectoryAtPath:testDirectory withIntermediateDirectories:YES attributes:nil error:nil];

    if (res) {

        NSLog(@"文件夹创建成功");

    }else

        NSLog(@"文件夹创建失败");

 }
创建文件
//创建文件

-(void *)createFile{

    NSString *documentsPath =[self dirDoc];

    NSString *testDirectory = [documentsPath stringByAppendingPathComponent:@"test"];

    NSFileManager *fileManager = [NSFileManager defaultManager];

    NSString *testPath = [testDirectory stringByAppendingPathComponent:@"test.txt"];

    BOOL res=[fileManager createFileAtPath:testPath contents:nil attributes:nil];

    if (res) {

        NSLog(@"文件创建成功: %@" ,testPath);

    }else

        NSLog(@"文件创建失败");

}
写数据到文件:
//写文件

-(void)writeFile{

    NSString *documentsPath =[self dirDoc];

    NSString *testDirectory = [documentsPath stringByAppendingPathComponent:@"test"];

    NSString *testPath = [testDirectory stringByAppendingPathComponent:@"test.txt"];

    NSString *content=@"测试写入内容!";

    BOOL res=[content writeToFile:testPath atomically:YES encoding:NSUTF8StringEncoding error:nil];

    if (res) {

        NSLog(@"文件写入成功");

    }else

        NSLog(@"文件写入失败");

}
读文件数据:
//读文件

-(void)readFile{

    NSString *documentsPath =[self dirDoc];

    NSString *testDirectory = [documentsPath stringByAppendingPathComponent:@"test"];

    NSString *testPath = [testDirectory stringByAppendingPathComponent:@"test.txt"];

//    NSData *data = [NSData dataWithContentsOfFile:testPath];

//    NSLog(@"文件读取成功: %@",[[NSString alloc] initWithData:data encoding:NSUTF8StringEncoding]);

    NSString *content=[NSString stringWithContentsOfFile:testPath encoding:NSUTF8StringEncoding error:nil];

    NSLog(@"文件读取成功: %@",content);

}
文件属性:
//文件属性

-(void)fileAttriutes{

    NSString *documentsPath =[self dirDoc];

    NSString *testDirectory = [documentsPath stringByAppendingPathComponent:@"test"];

    NSFileManager *fileManager = [NSFileManager defaultManager];

    NSString *testPath = [testDirectory stringByAppendingPathComponent:@"test.txt"];

    NSDictionary *fileAttributes = [fileManager attributesOfItemAtPath:testPath error:nil];

    NSArray *keys;

    id key, value;

    keys = [fileAttributes allKeys];

    int count = [keys count];

    for (int i = 0; i < count; i++)

    {

        key = [keys objectAtIndex: i];

        value = [fileAttributes objectForKey: key];

        NSLog (@"Key: %@ for value: %@", key, value);

    }

}
删除文件:
//删除文件

-(void)deleteFile{

    NSString *documentsPath =[self dirDoc];

    NSString *testDirectory = [documentsPath stringByAppendingPathComponent:@"test"];

    NSFileManager *fileManager = [NSFileManager defaultManager];

    NSString *testPath = [testDirectory stringByAppendingPathComponent:@"test.txt"];

    BOOL res=[fileManager removeItemAtPath:testPath error:nil];

    if (res) {

        NSLog(@"文件删除成功");

    }else

        NSLog(@"文件删除失败");

    NSLog(@"文件是否存在: %@",[fileManager isExecutableFileAtPath:testPath]?@"YES":@"NO");

}
遍历子文件夹:
NSString *home = NSHomeDirectory();
NSFileManager *fileManage = [NSFileManagerdefaultManager];
NSArray *file = [fileManage subpathsOfDirectoryAtPath: home error:nil];
NSLog(@"%@",file);
NSArray *files = [fileManage subpathsAtPath: home ];
NSLog(@"%@",files);
数据持久化-存取方式总结&应用沙盒&文件管理NSFileManager的更多相关文章
- iOS路径沙盒文件管理(转载)
iOS路径沙盒文件管理,看到博主总结的很好,转载过来,原文:http://www.aichengxu.com/view/35264 一.iOS中的沙盒机制 iOS应用程序只能对自己创建的文件系统读取文 ...
- NSFileManager(沙盒文件管理)数据持久化 <序列化与反序列化>
iOS应用程序只能在为该改程序创建的文件中读取文件,不可以去其它地方访问,此区域被成为沙盒,所以所有的非代码文件都要保存在此,例如图像,图标,声音,映像,属性列表,文本文件等. 默认情况下 ...
- NSFileManager 沙盒文件管理
文件夹创建,复制,移动,删除,检查是否存在,代码如下: 1.获取沙盒 document 路径,作为文件夹路径的基路径. NSString *document = NSSearchPathForDire ...
- 1211笔记关于//modal//更改窗口的根控制器//数据存取//Plist属性列表//-“沙盒机制”//plis属性列表//偏好设置//归档普通对象//联系人数据存储//协议与回调函数
一.利用Modal形式展示控制器 1.如何展示// vc就是要展示的新控制器[self presentViewController:vc animated:YES completion:^{ N ...
- iOS数据持久化-OC
沙盒详解 1.IOS沙盒机制 IOS应用程序只能在为该改程序创建的文件系统中读取文件,不可以去其它地方访问,此区域被成为沙盒,所以所有的非代码文件都要保存在此,例如图像,图标,声音,映像,属性列表,文 ...
- iOS 阶段学习第25天笔记(iOS沙盒机制介绍)
iOS学习(OC语言)知识点整理 一.iOS沙盒机制介绍 1)概念: 每个ios应用都有自己的应用沙盒,应用沙盒就是文件系统目录,与其他应用放入文件 系统隔离,ios系统不允许访问 其他应用的应用沙盒 ...
- 沙盒SandBox
每个App都有自己的沙盒,也就是一个存储空间.App之间没有权限访问对方的沙盒资源.沙盒的目录下有三个文件夹:Documents.Library.temp 目录结构 Documents:用于存储用户数 ...
- iOS8沙盒路径的变化
iOS8中的的沙盒路径发生了变化 之前是这样的路径,通过NSHomedictionary()获取的家路径 /Users/wupeng/Library/Application Support/iPhon ...
- iOS开发——数据持久化Swift篇&(二)沙盒文件
沙盒文件 //******************** 5.2 文件操作 func use_FileOperations() { //1.获取程序的Home目录 let homeDirectory = ...
随机推荐
- Linux怎样改动root用户的password
Linux系统的root账号是很重要的一个账号.也是权限最大的一个账号,可是有时候忘了rootpassword怎么办?总不能重装系统吧,这个是下下策.事实上Linux系统中,假设忘记了root账号pa ...
- 【BZOJ 1660】 [Usaco2006 Nov]Bad Hair Day 乱发节
1660: [Usaco2006 Nov]Bad Hair Day 乱发节 Time Limit: 2 Sec Memory Limit: 64 MB Submit: 678 Solved: 32 ...
- poj_2828线段树,逆序插入
#include<iostream> #include<cstdio> #include<cstring> #include<algorithm> #d ...
- C++学习第一天--编译命令
前一个月的时间主要是在捯饬自己的ubuntu vim环境,昨天终于都搞好了,从今天开始,学习C++.至于为什么学习C++,其实很大一部分原因还是因为自己喜欢vim,又听说vim对C++的支持还不错,所 ...
- MinGW - 安装和配置 / MinGW - Howto Install And Configure
MinGW在线安装程序下载地址:http://sourceforge.net/projects/mingw/files/Automated%20MinGW%20Installer/mingw-get- ...
- [poj 3904] sky code 解题报告(组合计算+容斥原理)
题目链接:http://poj.org/problem?id=3904 题目大意: 给出一个数列,询问从中取4个元素满足最大公约数为1的方案数 题解: 很显然,ans=总的方案数-最大公约数大于1的4 ...
- [Codeforces Round #194 (Div. 2)] Secret 解题报告 (数学)
题目链接:http://codeforces.com/problemset/problem/334/C 题目: 题目大意: 给定数字n,要求构建一个数列使得数列的每一个元素的值都是3的次方,数列之和S ...
- docker 命令合集
目录 image镜像操作 container 容器操作 访问仓库 Repository 数据管理 使用网络 容器互联: image镜像操作 列出已经下载下来的镜像: docker image ls 查 ...
- 使用Visual Studio2012调试Redis源码
Redis是一款C语言编写Key-Value存储系统,基于BSD协议开放源码,其源码托管在github上,大概有三万行. 源码地址:https://github.com/antirez/redis 源 ...
- EasyUI 之 DataGrid的两种赋值方法
方法一:使用ViewData赋值 首先,我们创建一个User的实体类 public class User { public string UserID; public string UserName; ...