抛砖引玉 【镜像控件】 WPF实现毛玻璃控件不要太简单
原文:抛砖引玉 【镜像控件】 WPF实现毛玻璃控件不要太简单
源码已封装成 MirrorGrid类 可以直接在XAML里添加
根据需要可以把Grid 改为 button border等控件
注意 Target必须为当前控件下层的控件对象
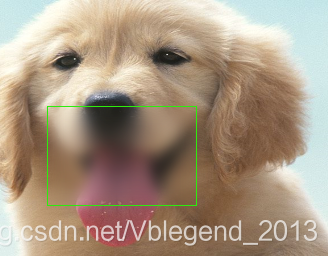
加个BlurEffect就是毛玻璃效果
<!--玻璃层控件-->

        <local:MirrorGrid

            Background="Red"

            Target="{Binding ElementName=box}"

            Width="150"

            Height="100"

            x:Name="thumb" Margin="0,0,0,0" HorizontalAlignment="Left" VerticalAlignment="Top" MouseDown="thumb_MouseDown" MouseMove="thumb_MouseMove" MouseUp="thumb_MouseUp">

            <local:MirrorGrid.Effect>

                <BlurEffect  Radius="20" RenderingBias="Performance"/>

            </local:MirrorGrid.Effect>

        </local:MirrorGrid>
using System.Windows;

using System.Windows.Controls;

using System.Windows.Media;

namespace WpfApp2

{

    /// <summary>

    /// 镜像格子

    /// </summary>

    public class MirrorGrid : Grid

    {

        /// <summary>

        /// 目标对象

        /// </summary>

        public FrameworkElement Target

        {

            get { return (FrameworkElement)GetValue(TargetProperty); }

            set { SetValue(TargetProperty, value); }

        }

        /// <summary>

        /// 目标对象属性

        /// </summary>

        public static readonly DependencyProperty TargetProperty =

        DependencyProperty.Register("Target", typeof(FrameworkElement), typeof(MirrorGrid),

        new FrameworkPropertyMetadata(null));

        /// <summary>

        /// 重写基类 Margin

        /// </summary>

        public new Thickness Margin

        {

            get { return (Thickness)GetValue(MarginProperty); }

            set { SetValue(MarginProperty, value); }

        }

        public new static readonly DependencyProperty MarginProperty = DependencyProperty.Register("Margin", typeof(Thickness), typeof(MirrorGrid), new FrameworkPropertyMetadata(new Thickness(0), new PropertyChangedCallback(OnMarginChanged)));

        private static void OnMarginChanged(DependencyObject target, DependencyPropertyChangedEventArgs e)

        {

            ((FrameworkElement)target).Margin = (Thickness)e.NewValue;

            //强制渲染

            ((FrameworkElement)target).InvalidateVisual();

        }

        protected override void OnRender(DrawingContext dc)

        {

            var Rect = new Rect(0, 0, RenderSize.Width, RenderSize.Height);

            if (Target == null)

            {

                dc.DrawRectangle(this.Background, null, Rect);

            }

            else

            {

                this.DrawImage(dc, Rect);

            }

        }

        private void DrawImage(DrawingContext dc, Rect rect)

        {

            VisualBrush brush = new VisualBrush(Target)

            {

                Stretch = Stretch.Fill,

            };

            var tl = this.GetElementLocation(Target);

            var sl = this.GetElementLocation(this);

            var lx = (sl.X - tl.X) / Target.ActualWidth;

            var ly = (sl.Y - tl.Y) / Target.ActualHeight;

            var pw = this.ActualWidth / Target.ActualWidth;

            var ph = this.ActualHeight / Target.ActualHeight;

            brush.Viewbox = new Rect(lx, ly, pw, ph);

            dc.DrawRectangle(brush, null, rect);

        }

        /// <summary>

        /// 获取控件元素在窗口的实际位置

        /// </summary>

        /// <param name="Control"></param>

        /// <returns></returns>

        public Point GetElementLocation(FrameworkElement Control)

        {

            Point location = new Point(0, 0);

            FrameworkElement element = Control;

            while (element != null)

            {

                var Offset = VisualTreeHelper.GetOffset(element);

                location = location + Offset;

                element = (FrameworkElement)VisualTreeHelper.GetParent(element);

            }

            return location;

        }

    }

}
测试源码
<Window x:Class="WpfApp2.Window1"

        xmlns="http://schemas.microsoft.com/winfx/2006/xaml/presentation"

        xmlns:x="http://schemas.microsoft.com/winfx/2006/xaml"

        xmlns:d="http://schemas.microsoft.com/expression/blend/2008"

        xmlns:mc="http://schemas.openxmlformats.org/markup-compatibility/2006"

        xmlns:local="clr-namespace:WpfApp2"

        mc:Ignorable="d"

        Title="Window1" Height="450" Width="800">

    <Grid ClipToBounds="True">

        <!--下层被模糊层-->

        <Grid x:Name="box"

              Background="AntiqueWhite"

              HorizontalAlignment="Left" Height="332" VerticalAlignment="Top" Width="551">

            <Grid HorizontalAlignment="Left" Height="260" Margin="0,0,0,0" VerticalAlignment="Top" Width="345">

                <Grid.Background>

                    <ImageBrush ImageSource="123.png"/>

                </Grid.Background>

            </Grid>

            <Ellipse Fill="#FFF4F4F5" HorizontalAlignment="Left" Height="114" Margin="345,218,0,0" Stroke="Black" VerticalAlignment="Top" Width="206"/>

        </Grid>

        <!--玻璃层控件-->

        <local:MirrorGrid

            Background="Red"

            Target="{Binding ElementName=box}"

            Width="150"

            Height="100"

            x:Name="thumb" Margin="0,0,0,0" HorizontalAlignment="Left" VerticalAlignment="Top" MouseDown="thumb_MouseDown" MouseMove="thumb_MouseMove" MouseUp="thumb_MouseUp">

            <local:MirrorGrid.Effect>

                <BlurEffect  Radius="20" RenderingBias="Performance"/>

            </local:MirrorGrid.Effect>

        </local:MirrorGrid>

        <!--测试边框线-->

        <Rectangle Stroke="#FF2DEC0E"

                   IsHitTestVisible="False"

                   Width="{Binding ElementName=thumb, Path=Width}"

                   Height="{Binding ElementName=thumb, Path=Height}"

                   Margin="{Binding ElementName=thumb, Path=Margin}"

                   HorizontalAlignment="Left" VerticalAlignment="Top"/>

    </Grid>

</Window>
后台
using System.Windows;

using System.Windows.Input;

namespace WpfApp2

{

    /// <summary>

    /// Window1.xaml 的交互逻辑

    /// </summary>

    public partial class Window1 : Window

    {

        public Window1()

        {

            InitializeComponent();

        }

        private bool isDragging;

        private Point clickPosition;

        private void thumb_MouseDown(object sender, MouseButtonEventArgs e)

        {

            isDragging = true;

            var draggableElement = sender as UIElement;

            clickPosition = e.GetPosition(this);

            draggableElement.CaptureMouse();

        }

        private void thumb_MouseUp(object sender, MouseButtonEventArgs e)

        {

            isDragging = false;

            var draggableElement = sender as UIElement;

            draggableElement.ReleaseMouseCapture();

        }

        private void thumb_MouseMove(object sender, MouseEventArgs e)

        {

            var draggableElement = sender as UIElement;

            if (isDragging && draggableElement != null)

            {

                Point currentPosition = e.GetPosition(this.Parent as UIElement);

                Thickness s = new Thickness(thumb.Margin.Left + currentPosition.X - clickPosition.X, thumb.Margin.Top + currentPosition.Y - clickPosition.Y,0,0);

                thumb.Margin = s;

                clickPosition = currentPosition;

            }

        }

    }

}
抛砖引玉 【镜像控件】 WPF实现毛玻璃控件不要太简单的更多相关文章
- 实现控件WPF(4)----Grid控件实现六方格
PS:今天上午,非常郁闷,有很多简单基础的问题搞得我有些迷茫,哎,代码几天不写就忘.目前又不当COO,还是得用心记代码哦! 利用Grid控件能很轻松帮助我们实现各种布局.上面就是一个通过Grid单元格 ...
- WPF中Ribbon控件的使用
这篇博客将分享如何在WPF程序中使用Ribbon控件.Ribbon可以很大的提高软件的便捷性. 上面截图使Outlook 2010的界面,在Home标签页中,将所属的Menu都平铺的布局,非常容易的可 ...
- WPF 调用WinForm控件
WPF可以使用WindowsFormsHost控件做为容器去显示WinForm控件,类似的用法网上到处都是,就是拖一个WindowsFormsHost控件winHost1到WPF页面上,让后设置win ...
- InteropBitmap指定内存,绑定WPF的Imag控件时刷新问题。
1.InteropBitmap指定内存,绑定WPF的Imag控件的Source属性 创建InteropBitmap的时候,像素的格式必须为PixelFormats.Bgr32, 如果不是的话在绑定到I ...
- 在WPF程序中将控件所呈现的内容保存成图像(转载)
在WPF程序中将控件所呈现的内容保存成图像 转自:http://www.cnblogs.com/TianFang/archive/2012/10/07/2714140.html 有的时候,我们需要将控 ...
- WPF 分页控件 WPF 多线程 BackgroundWorker
WPF 分页控件 WPF 多线程 BackgroundWorker 大家好,好久没有发表一篇像样的博客了,最近的开发实在头疼,很多东西无从下口,需求没完没了,更要命的是公司的开发从来不走正规流程啊, ...
- 【WPF】监听WPF的WebBrowser控件弹出新窗口的事件
原文:[WPF]监听WPF的WebBrowser控件弹出新窗口的事件 WPF中自带一个WebBrowser控件,当我们使用它打开一个网页,例如百度,然后点击它其中的链接时,如果这个链接是会弹出一个新窗 ...
- 在WPF的WebBrowser控件中抑制脚本错误
原文:在WPF的WebBrowser控件中抑制脚本错误 今天用WPF的WebBrowser控件的时候,发现其竟然没有ScriptErrorsSuppressed属性,导致其到处乱弹脚本错误的对话框,在 ...
- 浅尝辄止WPF自定义用户控件(实现颜色调制器)
主要利用用户控件实现一个自定义的颜色调制控件,实现一个小小的功能,具体实现界面如下. 首先自己新建一个wpf的用户控件类,我就放在我的wpf项目的一个文件夹下面,因为是一个很小的东西,所以就没有用mv ...
随机推荐
- jquery-validate使用.md
html <form id="s_form" class="form-horizontal" action="http://www.baidu. ...
- [AngularFire 2] Object Observables - How to Read Objects from a Firebase Database?
In this lesson we are going to learn how to use AngularFire 2 to query objects, and read them from t ...
- 11、V4L2摄像头获取单幅图片测试程序
#根据网上常见的一个测试程序修改而来 by rockie cheng#include <stdio.h>#include <stdlib.h>#include <stri ...
- 【微信小程序】自定义模态框实例
原文链接:https://mp.weixin.qq.com/s/23wPVFUGY-lsTiQBtUdhXA 1 概述 由于官方API提供的显示模态弹窗,只能简单地显示文字内容,不能对对话框内容进行自 ...
- windows关闭进程 批处理端口占用
cmd 关闭进程java taskkill /F /IM java.exe taskkill /f /im java.exe 如何用dat批处理文件关闭某端口对应程序-Windows自动化命令 如何用 ...
- ios_webView
iOS开发中WebView的使用 在AppDelegate.m文件里 view sourceprint" class="item about" style="c ...
- CSS文本阴影实例
原文 简书原文:https://www.jianshu.com/p/5abf2fa2f1b9 前言 以下的实例是我从<CSS实战>中看到的实例,当我看到这些实例的时候,发现平时不是很在意的 ...
- ios开发网络学习AFN框架的使用一:get和post请求
#import "ViewController.h" #import "AFNetworking.h" @interface ViewController () ...
- php实现 坐标移动
php实现 坐标移动 一.总结 一句话总结:伪代码,带函数逻辑,函数这样的方式写算法程序会节约超多的时间. 1.为什么算法题数据输入最好用多组数据输入的方式? 因为都是多组数据测试,而且多组数据输入 ...
- jquery 点击其他地方
<script type="text/javascript"> function stopPropagation(e) { if (e.stopPropagation) ...