Robot Operating System (ROS)学习笔记3---键盘控制
搭建环境:XMWare Ubuntu14.04 ROS(indigo)
转载自古月居 转载连接:http://www.guyuehome.com/253
一、创建控制包
 catkin_create-pkg smartcar_teleop rospy geometry_msgs std_msgs roscpp

 catkin_make
建包,参考:http://www.ros.org/wiki/ROS/Tutorials/CreatingPackage
二、简单的消息发布
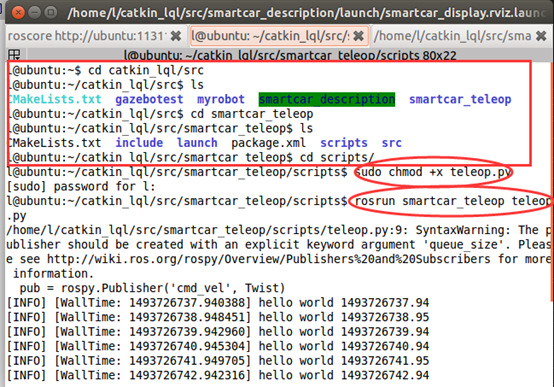
在smartcar_teleop下 创建scripts文件夹,在其文件夹下创建teleop.py文件
 #!/usr/bin/env python

 import roslib;

 roslib.load_manifest('smartcar_teleop')

 import rospy

 from geometry_msgs.msg import Twist

 from std_msgs.msg import String

 class Teleop:

     """docstring fos Teleop"""

     def __init__(self):

         pub = rospy.Publisher('cmd_vel',Twist)

         rospy.init_node('smartcar_teleop')

         rate = rospy.Rate(rospy.get_param('~hz',1))

         self.cmd = None

         cmd =Twist()

         cmd.linear.x = 0.2

         cmd.linear.y = 0

         cmd.linear.z = 0

         cmd.angular.x = 0

         cmd.angular.y = 0

         cmd.angular.z = 0.5

         self.cmd = cmd

         while not rospy.is_shutdown():

             str = "Hello world %s" %rospy.get_time()

             rospy.loginfo(str)

             pub.publish(self.cmd)

             rate.sleep()

 if __name__ == "__main__":Teleop()

 sudo chmod +x teleop.py

 rosrun smartcar_teleop teleop.py

可以建立一个launch文件(teleop.launch)运行
 <launch>

   <arg name="cmd_topic" default="cmd_vel" />

   <node pkg="smartcar_teleop" type="teleop.py" name="smartcar_teleop">

     <remap from="cmd_vel" to="$(arg cmd_topic)" />

   </node>

 </launch>
三、加入键盘控制
1、移植
首先,我们将其中src文件夹下的keyboard.cpp代码文件直接拷贝到我们smartcar_teleop包的src文件夹下,然后修改CMakeLists.txt文件,将下列代码加入文件底部:
 add_executable(smartcar_keyboard_teleop src/keyboard.cpp)

 target_link_libraries(smartcar_keyboard_teleop boost_thread ${catkin_LIBRARIES})
keyboard.cpp代码如下:
 #include <termios.h>

 #include <signal.h>

 #include <math.h>

 #include <stdio.h>

 #include <stdlib.h>

 #include <sys/poll.h>

 #include <boost/thread/thread.hpp>

 #include <ros/ros.h>

 #include <geometry_msgs/Twist.h>

 #define KEYCODE_W 0x77

 #define KEYCODE_A 0x61

 #define KEYCODE_S 0x73

 #define KEYCODE_D 0x64

 #define KEYCODE_A_CAP 0x41

 #define KEYCODE_D_CAP 0x44

 #define KEYCODE_S_CAP 0x53

 #define KEYCODE_W_CAP 0x57

 class SmartCarKeyboardTeleopNode

 {

     private:

         double walk_vel_;

         double run_vel_;

         double yaw_rate_;

         double yaw_rate_run_;

         geometry_msgs::Twist cmdvel_;

         ros::NodeHandle n_;

         ros::Publisher pub_;

     public:

         SmartCarKeyboardTeleopNode()

         {

             pub_ = n_.advertise<geometry_msgs::Twist>("cmd_vel", 1);

             ros::NodeHandle n_private("~");

             n_private.param("walk_vel", walk_vel_, 0.5);

             n_private.param("run_vel", run_vel_, 1.0);

             n_private.param("yaw_rate", yaw_rate_, 1.0);

             n_private.param("yaw_rate_run", yaw_rate_run_, 1.5);

         }

         ~SmartCarKeyboardTeleopNode() { }

         void keyboardLoop();

         void stopRobot()

         {

             cmdvel_.linear.x = 0.0;

             cmdvel_.angular.z = 0.0;

             pub_.publish(cmdvel_);

         }

 };

 SmartCarKeyboardTeleopNode* tbk;

 int kfd = 0;

 struct termios cooked, raw;

 bool done;

 int main(int argc, char** argv)

 {

     ros::init(argc,argv,"tbk", ros::init_options::AnonymousName | ros::init_options::NoSigintHandler);

     SmartCarKeyboardTeleopNode tbk;

     boost::thread t = boost::thread(boost::bind(&SmartCarKeyboardTeleopNode::keyboardLoop, &tbk));

     ros::spin();

     t.interrupt();

     t.join();

     tbk.stopRobot();

     tcsetattr(kfd, TCSANOW, &cooked);

     return(0);

 }

 void SmartCarKeyboardTeleopNode::keyboardLoop()

 {

     char c;

     double max_tv = walk_vel_;

     double max_rv = yaw_rate_;

     bool dirty = false;

     int speed = 0;

     int turn = 0;

     // get the console in raw mode

     tcgetattr(kfd, &cooked);

     memcpy(&raw, &cooked, sizeof(struct termios));

     raw.c_lflag &=~ (ICANON | ECHO);

     raw.c_cc[VEOL] = 1;

     raw.c_cc[VEOF] = 2;

     tcsetattr(kfd, TCSANOW, &raw);

     puts("Reading from keyboard");

     puts("Use WASD keys to control the robot");

     puts("Press Shift to move faster");

     struct pollfd ufd;

     ufd.fd = kfd;

     ufd.events = POLLIN;

     for(;;)

     {

         boost::this_thread::interruption_point();

         // get the next event from the keyboard

         int num;

         if ((num = poll(&ufd, 1, 250)) <)

         {

             perror("poll():");

             return;

         }

         else if(num > 0)

         {

             if(read(kfd, &c, 1) <)

             {

                 perror("read():");

                 return;

             }

         }

         else

         {

             if (dirty == true)

             {

                 stopRobot();

                 dirty = false;

             }

             continue;

         }

         switch(c)

         {

             case KEYCODE_W:

                 max_tv = walk_vel_;

                 speed = 1;

                 turn = 0;

                 dirty = true;

                 break;

             case KEYCODE_S:

                 max_tv = walk_vel_;

                 speed = -1;

                 turn = 0;

                 dirty = true;

                 break;

             case KEYCODE_A:

                 max_rv = yaw_rate_;

                 speed = 0;

                 turn = 1;

                 dirty = true;

                 break;

             case KEYCODE_D:

                 max_rv = yaw_rate_;

                 speed = 0;

                 turn = -1;

                 dirty = true;

                 break;

             case KEYCODE_W_CAP:

                 max_tv = run_vel_;

                 speed = 1;

                 turn = 0;

                 dirty = true;

                 break;

             case KEYCODE_S_CAP:

                 max_tv = run_vel_;

                 speed = -1;

                 turn = 0;

                 dirty = true;

                 break;

             case KEYCODE_A_CAP:

                 max_rv = yaw_rate_run_;

                 speed = 0;

                 turn = 1;

                 dirty = true;

                 break;

             case KEYCODE_D_CAP:

                 max_rv = yaw_rate_run_;

                 speed = 0;

                 turn = -1;

                 dirty = true;

                 break;

             default:

                 max_tv = walk_vel_;

                 max_rv = yaw_rate_;

                 speed = 0;

                 turn = 0;

                 dirty = false;

         }

         cmdvel_.linear.x = speed * max_tv;

         cmdvel_.angular.z = turn * max_rv;

         pub_.publish(cmdvel_);

     }

 }
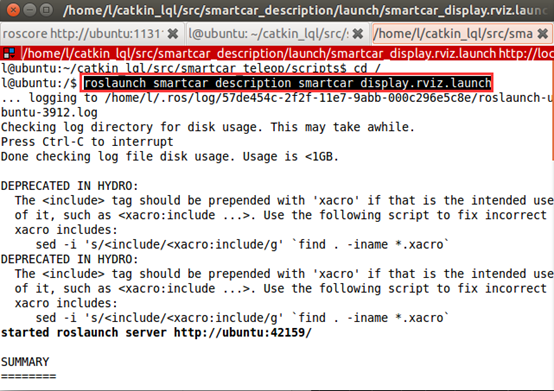
编译完成后,运行smartcar模型。重新打开一个终端,打开键盘控制节点:
rosrun smartcar_teleop smartcar_keyboard_teleop
在终端中按下键盘里的“W”、“S”、“D”、“A”以及“Shift”键进行机器人的控制。
Robot Operating System (ROS)学习笔记3---键盘控制的更多相关文章
- Robot Operating System (ROS)学习笔记4---语音控制
搭建环境:XMWare Ubuntu14.04 ROS(indigo) 转载自古月居 转载连接:http://www.guyuehome.com/260 一.语音识别包 1.安装 ...
- Robot Operating System (ROS)学习笔记2---使用smartcar进行仿真
搭建环境:XMWare Ubuntu14.04 ROS(indigo) 转载自古月居 转载连接:http://www.guyuehome.com/248 一.模型完善 文件夹urdf下,创建ga ...
- Robot Operating System (ROS)学习笔记---创建简单的机器人模型smartcar
搭建环境:XMWare Ubuntu14.04 ROS(indigo) 转载自古月居 转载连接:http://www.guyuehome.com/243 一.创建硬件描述包 已创建catkin_ ...
- ROS是Robot Operating System
ROS是Robot Operating System 机器人操作系统ROS | 简介篇 同样,从个人微信公众号Nao(ID:qRobotics)搬运. 前言 先放一个ROS Industrial一 ...
- 快速了解 Robot Operating System(ROS) 机器人操作系统
http://www.ros.org/ 关于ROS About ROS http://www.ros.org/about-ros/ 机器人操作系统(ROS)是用于编写机器人软件的灵活框架.目的在简化 ...
- ROS学习笔记1-引言
该学习笔记参考ROS官方wiki的内容,见:http://wiki.ros.org/ROS/Introduction 什么是ROSROS的全称是Robot Operating System,即机器人操 ...
- Learning Roadmap of Robotic Operating System (ROS)
ROS Wiki: http://wiki.ros.org/ Robots Using ROS Textbooks: A Gentle Introduction to ROS Learning ROS ...
- System类学习笔记
最近在学习源码的过程中发现:很多深层次的代码都用到了一个类System类,所以决定对System类一探究竟 本文先对System类进行了剖析,然后对System类做了总结 一.首先对该类的中的所有字段 ...
- system generator学习笔记【02】
作者:桂. 时间:2018-05-20 23:28:04 链接:https://www.cnblogs.com/xingshansi/p/9059668.html 前言 继续学习sysgen.接触s ...
随机推荐
- 修改postfix smtp端口,防止公网扫描浪费你的服务器流量
邮件服务器的默认发送邮件端口是25,一些ISP会封锁25端口防止垃圾邮件的发送,这样就导致不能使用Foxmail.outlook等邮件客户端发送邮件.修改默认smtp端口就可以解决这个问题.下面的方法 ...
- 阅读<All Digital VCXO Replacement for Gigabit Transceiver Applications>笔记---XAPP589
阅读<All Digital VCXO Replacement for Gigabit Transceiver Applications>笔记---XAPP589 1. 2. 外部设备能为 ...
- 使用vivado将bit文件转化为mcs文件
使用vivado将bit文件转化为mcs文件 1.在Tcl Console中运行脚本: write_cfgmem -force -format MCS -size 64 -interface spix ...
- SDI core端口说明
SDI core端口说明 本文基于赛灵思的官方文档以及自己的理解: 1.生成SDI core 2.得到SDI core的顶层文件,并对每个端口做出解释 smpte_sdi smpte_sdi ( .r ...
- 无法连接到 OPC服务器[无此类接口支持(异常来自HRESULT:0x80004002(E_NOINTERFACE))]
来源:https://stackoverrun.com/cn/q/10400663 无法连接到ABB Freelance OPC服务器[无此类接口支持(异常来自HRESULT:0x80004002(E ...
- JDBC相关概念介绍
一.JDBC相关概念介绍 1.1.数据库驱动 这里的驱动的概念和平时听到的那种驱动的概念是一样的,比如平时购买的声卡,网卡直接插到计算机上面是不能用的,必须要安装相应的驱动程序之后才能够使用声卡和网卡 ...
- switch case语句重点概况
witch-case语句格式如下: switch(变量){ case 变量值1: //; break; case 变量值2: //...; break; ... case default: //... ...
- CentOS7切换到root用户和退回普通用户
切换成root用户: sudo su - 退出root用户并切换回普通用户: exit
- vue请求拦截
写了很多的vue项目,经常碰到需要做请求拦截的情况,从发请求前的token判断到对返回信息的响应,我自己在不同的阶段是用不同的方式处理的. 入门阶段 记得当时做的第一个项目,是需要在请求头部加入登录是 ...
- Feign api调用方式
Feign使用简介 基本用法 基本的使用如下所示,一个对于canonical Retrofit sample的适配. interface GitHub { // RequestLine注解声明请求方法 ...
