QtDesigner与程序设计模式
在我的上一篇博文中提到我认识到UI设计的重要性。在这里将解析一下使用QtDesigner设计UI进行程序GUI的设计,QtDesigner的.ui文件可以转化为许多的程序代码,比如我知道的就有:c++,python;以下将是以c++为程序设计语言解析一下UI和Code混合编程。
class Ui_QWialog

{

public:

    //此处省略关于类里面的一些控件的申明
  ........
  ........

//个人解析:从下面的程序中可以看出一些如何使用QtDesigner和代码混合设计的模式。
//在下面的程序中有一个参数QDialog,这是从程序中传过来的关于主界面的地址,通过这个地址就可以操作整个的界面了
//这个.ui就是一个c++中的类,在使用时其实也是通过直接的申明该类来创建对象的,如果要操作其中的某一个控件可以如下使用:
//  ui->widget

    void setupUi(QDialog *QWialog)

    {

        if (QWialog->objectName().isEmpty())

            QWialog->setObjectName(QStringLiteral("QWialog"));

        QWialog->resize(, );

        horizontalLayoutWidget = new QWidget(QWialog); //指定父窗口

        horizontalLayoutWidget->setObjectName(QStringLiteral("horizontalLayoutWidget"));

        horizontalLayoutWidget->setGeometry(QRect(, , , ));

        horizontalLayout = new QHBoxLayout(horizontalLayoutWidget);

        horizontalLayout->setSpacing();

        horizontalLayout->setContentsMargins(, , , );

        horizontalLayout->setObjectName(QStringLiteral("horizontalLayout"));

        horizontalLayout->setContentsMargins(, , , );

        groupBox = new QGroupBox(horizontalLayoutWidget);

        groupBox->setObjectName(QStringLiteral("groupBox"));

        checkBox_2 = new QCheckBox(groupBox);

        checkBox_2->setObjectName(QStringLiteral("checkBox_2"));

        checkBox_2->setGeometry(QRect(, , , ));

        checkBox_3 = new QCheckBox(groupBox);

        checkBox_3->setObjectName(QStringLiteral("checkBox_3"));

        checkBox_3->setGeometry(QRect(, , , ));

        checkBox = new QCheckBox(groupBox);

        checkBox->setObjectName(QStringLiteral("checkBox"));

        checkBox->setGeometry(QRect(, , , ));

        horizontalLayout->addWidget(groupBox);

        horizontalLayoutWidget_2 = new QWidget(QWialog);

        horizontalLayoutWidget_2->setObjectName(QStringLiteral("horizontalLayoutWidget_2"));

        horizontalLayoutWidget_2->setGeometry(QRect(, , , ));

        horizontalLayout_2 = new QHBoxLayout(horizontalLayoutWidget_2);

        horizontalLayout_2->setSpacing();

        horizontalLayout_2->setContentsMargins(, , , );

        horizontalLayout_2->setObjectName(QStringLiteral("horizontalLayout_2"));

        horizontalLayout_2->setContentsMargins(, , , );

        groupBox_2 = new QGroupBox(horizontalLayoutWidget_2);

        groupBox_2->setObjectName(QStringLiteral("groupBox_2"));

        radioButton = new QRadioButton(groupBox_2);

        radioButton->setObjectName(QStringLiteral("radioButton"));

        radioButton->setGeometry(QRect(, , , ));

        radioButton_2 = new QRadioButton(groupBox_2);

        radioButton_2->setObjectName(QStringLiteral("radioButton_2"));

        radioButton_2->setGeometry(QRect(, , , ));

        radioButton_3 = new QRadioButton(groupBox_2);

        radioButton_3->setObjectName(QStringLiteral("radioButton_3"));

        radioButton_3->setGeometry(QRect(, , , ));

        horizontalLayout_2->addWidget(groupBox_2);

        plainTextEdit = new QPlainTextEdit(QWialog);

        plainTextEdit->setObjectName(QStringLiteral("plainTextEdit"));

        plainTextEdit->setGeometry(QRect(, , , ));

        horizontalLayoutWidget_3 = new QWidget(QWialog);

        horizontalLayoutWidget_3->setObjectName(QStringLiteral("horizontalLayoutWidget_3"));

        horizontalLayoutWidget_3->setGeometry(QRect(, , , ));

        horizontalLayout_3 = new QHBoxLayout(horizontalLayoutWidget_3);

        horizontalLayout_3->setSpacing();

        horizontalLayout_3->setContentsMargins(, , , );

        horizontalLayout_3->setObjectName(QStringLiteral("horizontalLayout_3"));

        horizontalLayout_3->setContentsMargins(, , , );

        groupBox_3 = new QGroupBox(horizontalLayoutWidget_3);

        groupBox_3->setObjectName(QStringLiteral("groupBox_3"));

        pushButton = new QPushButton(groupBox_3);

        pushButton->setObjectName(QStringLiteral("pushButton"));

        pushButton->setGeometry(QRect(, , , ));

        pushButton_2 = new QPushButton(groupBox_3);

        pushButton_2->setObjectName(QStringLiteral("pushButton_2"));

        pushButton_2->setGeometry(QRect(, , , ));

        pushButton_3 = new QPushButton(groupBox_3);

        pushButton_3->setObjectName(QStringLiteral("pushButton_3"));

        pushButton_3->setGeometry(QRect(, , , ));

        horizontalLayout_3->addWidget(groupBox_3);

        retranslateUi(QWialog);      //这是一些属性的设置函数

        QMetaObject::connectSlotsByName(QWialog);

    } // setupUi
在上面的代码中解释了其中的一些关键的点。使用混合编程的模式,在引入.ui文件后就可以开始界面的重新布局和设置了。
看下面的引用.ui的文件。
#include "qwialog.h"

#include "ui_qwialog.h"

QWialog::QWialog(QWidget *parent) :

    QDialog(parent),

    ui(new Ui::QWialog)

{

    ui->setupUi(this); //在这里就是初始化.ui代码。并且通过传入this指针来使得在主界面上进行界面布置。

}

QWialog::~QWialog()

{

    delete ui;

}
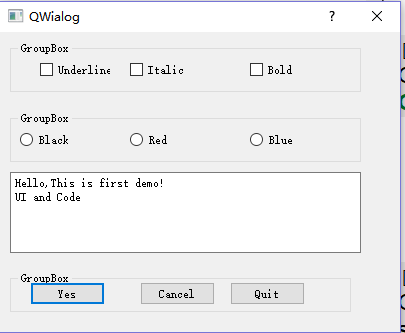
这是运行的结果图

接下来对该界面进行code的设计,这里只是在PainTextEdit中添加一行的文字:
以下是一个简单的代码:
#include "qwialog.h"

#include "ui_qwialog.h"

QWialog::QWialog(QWidget *parent) :

    QDialog(parent),

    ui(new Ui::QWialog)

{

    ui->setupUi(this);

    ui->plainTextEdit->appendPlainText("UI and Code");

}

QWialog::~QWialog()

{

    delete ui;

}
这里只是简单的添加一行的代码(也就是在Text中添加最后的字符)。其中更多的运用还需要自己慢慢的摸索
QtDesigner与程序设计模式的更多相关文章
- 程序设计模式 —— State 状态模式
我应该如何阅读? 本文将使用优雅的文字风格来告诉你什么是状态模式. 注意: 1.在阅读本文之前请保证你已经掌控了 面对对象的思想与 多态的基本概念,否则将难以理解. 2.本文实现将用C++实现,你不一 ...
- 【MPI学习6】MPI并行程序设计模式:具有不连续数据发送的MPI程序设计
基于都志辉老师<MPI并行程序设计模式>第14章内容. 前面接触到的MPI发送的数据类型都是连续型的数据.非连续类型的数据,MPI也可以发送,但是需要预先处理,大概有两类方法: (1)用户 ...
- 探究osg中的程序设计模式【目录】
前序 探究osg中的程序设计模式---开篇 探究osg中的程序设计模式---创造性模式 探究osg中的程序设计模式---创造型模式---Factory(工厂)模式 探究osg中的程序设计模式---创造 ...
- Java进阶7 并发优化2 并行程序设计模式
Java进阶7 并发优化2 并行程序设计模式20131114 1.Master-worker模式 前面讲解了Future模式,并且使用了简单的FutureTask来实现并发中的Future模式.下面介 ...
- [转][osg]探究osg中的程序设计模式【目录】
作者:3wwang 原文接连:http://www.3wwang.cn/html/article_104.html 前序 探究osg中的程序设计模式---开篇 探究osg中的程序设计模式---创造性模 ...
- 程序设计模式浅析(plain framework商业版设计模式)
程序设计其实对程序开发者来说十分重要,但是在工作中往往我们却忽略了这一块,因为我们所用的都是现有的模式.一个设计模式的好坏,往往能够体现出程序的专业性,还有整个项目的可持续性.这就是为什么有些公司,在 ...
- CRM/ERP 企业管理软件中常见的七种程序设计模式
管理软件中的常见代码设计模式,来自于业务上的需要,有不恰当的地方欢迎批评指正. 1 RE-TRY 重试模式 场景:在连接数据库服务器时,如果SQL Server数据库没有启动或正在启动,我们需要有一 ...
- 【MPI学习2】MPI并行程序设计模式:对等模式 & 主从模式
这里的内容主要是都志辉老师<高性能计算之并行编程技术——MPI并行程序设计> 书上有一些代码是FORTAN的,我在学习的过程中,将其都转换成C的代码,便于统一记录. 这章内容分为两个部分: ...
- Java程序设计模式系列之适配器模式
理解适配器设计模式需要从生活中的场景进行联系,在生活当中有那些东西能够称为适配器呢?从字面上理解,"适配"的意思就是让一个东西和另一个东西配对,能够让他们一起工作,比如大家用的笔记 ...
随机推荐
- 前端通信:ajax设计方案(八)--- 设计请求池,复用请求,让前端通信快、更快、再快一点
直接进入主题,本篇文章有点长,包括从设计阶段,到摸索阶段,再到实现阶段,最后全面覆盖测试阶段(包括数据搜集清洗),还有与主流前端通信框架进行对比PK阶段. 首先介绍一下一些概念: 1. 浏览器的并发能 ...
- springboot-32-使用mvc测试
Spring Boot可以和大部分流行的测试框架协同工作:通过Spring JUnit创建单元测试:生成测试数据初始化数据库用于测试:Spring Boot可以跟BDD(Behavier Driven ...
- postgresql逻辑结构--触发器(三)
触发器(tigger)是一种由事物自动触发执行的特殊存储过程,这些事件可以是对一个表进行INSERT.UPDATE.DELETE等操作. 一.创建触发器 create [ constraint ] ...
- Java队列——线程池创建的例子
线程池为线程生命周期开销问题和资源不足问题提供了解决方案.通过对多个任务重用线程,线程创建的开销被分摊到了多个任务上.其好处是,因为在请求到达时线程已经存在,所以无意中也消除了线程创建所带来的延迟.这 ...
- java开发细节问题,spring的单例模式,多线程同步问题
1.对象的赋值,new一个对象,然后在传递给函数赋值,往往这对对象赋值就可以使用了 2.对于 spring开发的细节问题 Spring框架里的bean,或者说组件,获取实例的时候都是默认的单例模式,这 ...
- C#读取注册表中二进制类型的值(REG_BINARY)
如需要读取注册表中某个键的值, 例如读取DriverDesc对应的值,一般情况下为String类型,读取代码如下: RegistryKey driverKey = Registry.LocalMach ...
- Linux的僵尸进程及其解决方法
1. 产生原因: 在UNIX 系统中,一个进程结束了,但是他的父进程没有等待(调用wait / waitpid)他,那么他将变成一个僵尸进程.通过ps命令查看其带有defunct的标志.僵尸进程是一个 ...
- es6学习笔记9--函数的扩展
函数参数的默认值 基本用法 在ES6之前,不能直接为函数的参数指定默认值,为了避免这个问题,通常需要先判断一下参数y是否被赋值,如果没有,再等于默认值. ES6允许为函数的参数设置默认值,即直接写在参 ...
- ASP.NET MVC呼叫WCF Service的方法
本演示,Insus.NET操练asp.net mvc的应用程序,虽然以前有写过:<MVC应用程序使用Wcf Service>http://www.cnblogs.com/insus/p/3 ...
- C#获取gif帧数
C#获取gif帧数 /// <summary> /// 获取gif帧数 /// </summary> /// <param name="gifBytes&quo ...