吴裕雄 python 人工智能——基于Mask_RCNN目标检测(3)
import os

import sys

import random

import math

import re

import time

import numpy as np

import cv2

import matplotlib

import matplotlib.pyplot as plt

from config import Config

import utils

import model as modellib

import visualize

from model import log

%matplotlib inline

# Root directory of the project

ROOT_DIR = os.getcwd()

# Directory to save logs and trained model

MODEL_DIR = os.path.join(ROOT_DIR, "logs")

# Local path to trained weights file

COCO_MODEL_PATH = os.path.join(ROOT_DIR, "mask_rcnn_coco.h5")

# Download COCO trained weights from Releases if needed

if not os.path.exists(COCO_MODEL_PATH):

    utils.download_trained_weights(COCO_MODEL_PATH)
class ShapesConfig(Config):
"""Configuration for training on the toy shapes dataset.
Derives from the base Config class and overrides values specific
to the toy shapes dataset.
"""
# Give the configuration a recognizable name
NAME = "shapes" # Train on 1 GPU and 8 images per GPU. We can put multiple images on each
# GPU because the images are small. Batch size is 8 (GPUs * images/GPU).
GPU_COUNT = 1
IMAGES_PER_GPU = 8 # Number of classes (including background)
NUM_CLASSES = 1 + 3 # background + 3 shapes # Use small images for faster training. Set the limits of the small side
# the large side, and that determines the image shape.
IMAGE_MIN_DIM = 128
IMAGE_MAX_DIM = 128 # Use smaller anchors because our image and objects are small
RPN_ANCHOR_SCALES = (8, 16, 32, 64, 128) # anchor side in pixels # Reduce training ROIs per image because the images are small and have
# few objects. Aim to allow ROI sampling to pick 33% positive ROIs.
TRAIN_ROIS_PER_IMAGE = 32 # Use a small epoch since the data is simple
STEPS_PER_EPOCH = 100 # use small validation steps since the epoch is small
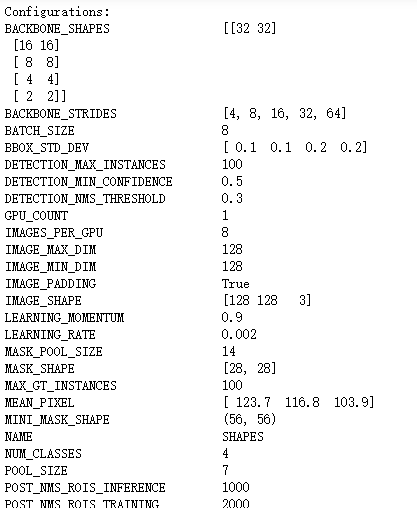
VALIDATION_STEPS = 5 config = ShapesConfig()
config.display()
def get_ax(rows=1, cols=1, size=8):

    """Return a Matplotlib Axes array to be used in

    all visualizations in the notebook. Provide a

    central point to control graph sizes.

    Change the default size attribute to control the size

    of rendered images

    """

    _, ax = plt.subplots(rows, cols, figsize=(size*cols, size*rows))

    return ax
class ShapesDataset(utils.Dataset):

    """Generates the shapes synthetic dataset. The dataset consists of simple

    shapes (triangles, squares, circles) placed randomly on a blank surface.

    The images are generated on the fly. No file access required.

    """

    def load_shapes(self, count, height, width):

        """Generate the requested number of synthetic images.

        count: number of images to generate.

        height, width: the size of the generated images.

        """

        # Add classes

        self.add_class("shapes", 1, "square")

        self.add_class("shapes", 2, "circle")

        self.add_class("shapes", 3, "triangle")

        # Add images

        # Generate random specifications of images (i.e. color and

        # list of shapes sizes and locations). This is more compact than

        # actual images. Images are generated on the fly in load_image().

        for i in range(count):

            bg_color, shapes = self.random_image(height, width)

            self.add_image("shapes", image_id=i, path=None,

                           width=width, height=height,

                           bg_color=bg_color, shapes=shapes)

    def load_image(self, image_id):

        """Generate an image from the specs of the given image ID.

        Typically this function loads the image from a file, but

        in this case it generates the image on the fly from the

        specs in image_info.

        """

        info = self.image_info[image_id]

        bg_color = np.array(info['bg_color']).reshape([1, 1, 3])

        image = np.ones([info['height'], info['width'], 3], dtype=np.uint8)

        image = image * bg_color.astype(np.uint8)

        for shape, color, dims in info['shapes']:

            image = self.draw_shape(image, shape, dims, color)

        return image

    def image_reference(self, image_id):

        """Return the shapes data of the image."""

        info = self.image_info[image_id]

        if info["source"] == "shapes":

            return info["shapes"]

        else:

            super(self.__class__).image_reference(self, image_id)

    def load_mask(self, image_id):

        """Generate instance masks for shapes of the given image ID.

        """

        info = self.image_info[image_id]

        shapes = info['shapes']

        count = len(shapes)

        mask = np.zeros([info['height'], info['width'], count], dtype=np.uint8)

        for i, (shape, _, dims) in enumerate(info['shapes']):

            mask[:, :, i:i+1] = self.draw_shape(mask[:, :, i:i+1].copy(),

                                                shape, dims, 1)

        # Handle occlusions

        occlusion = np.logical_not(mask[:, :, -1]).astype(np.uint8)

        for i in range(count-2, -1, -1):

            mask[:, :, i] = mask[:, :, i] * occlusion

            occlusion = np.logical_and(occlusion, np.logical_not(mask[:, :, i]))

        # Map class names to class IDs.

        class_ids = np.array([self.class_names.index(s[0]) for s in shapes])

        return mask, class_ids.astype(np.int32)

    def draw_shape(self, image, shape, dims, color):

        """Draws a shape from the given specs."""

        # Get the center x, y and the size s

        x, y, s = dims

        if shape == 'square':

            cv2.rectangle(image, (x-s, y-s), (x+s, y+s), color, -1)

        elif shape == "circle":

            cv2.circle(image, (x, y), s, color, -1)

        elif shape == "triangle":

            points = np.array([[(x, y-s),

                                (x-s/math.sin(math.radians(60)), y+s),

                                (x+s/math.sin(math.radians(60)), y+s),

                                ]], dtype=np.int32)

            cv2.fillPoly(image, points, color)

        return image

    def random_shape(self, height, width):

        """Generates specifications of a random shape that lies within

        the given height and width boundaries.

        Returns a tuple of three valus:

        * The shape name (square, circle, ...)

        * Shape color: a tuple of 3 values, RGB.

        * Shape dimensions: A tuple of values that define the shape size

                            and location. Differs per shape type.

        """

        # Shape

        shape = random.choice(["square", "circle", "triangle"])

        # Color

        color = tuple([random.randint(0, 255) for _ in range(3)])

        # Center x, y

        buffer = 20

        y = random.randint(buffer, height - buffer - 1)

        x = random.randint(buffer, width - buffer - 1)

        # Size

        s = random.randint(buffer, height//4)

        return shape, color, (x, y, s)

    def random_image(self, height, width):

        """Creates random specifications of an image with multiple shapes.

        Returns the background color of the image and a list of shape

        specifications that can be used to draw the image.

        """

        # Pick random background color

        bg_color = np.array([random.randint(0, 255) for _ in range(3)])

        # Generate a few random shapes and record their

        # bounding boxes

        shapes = []

        boxes = []

        N = random.randint(1, 4)

        for _ in range(N):

            shape, color, dims = self.random_shape(height, width)

            shapes.append((shape, color, dims))

            x, y, s = dims

            boxes.append([y-s, x-s, y+s, x+s])

        # Apply non-max suppression wit 0.3 threshold to avoid

        # shapes covering each other

        keep_ixs = utils.non_max_suppression(np.array(boxes), np.arange(N), 0.3)

        shapes = [s for i, s in enumerate(shapes) if i in keep_ixs]

        return bg_color, shapes
# Training dataset

dataset_train = ShapesDataset()

dataset_train.load_shapes(500, config.IMAGE_SHAPE[0], config.IMAGE_SHAPE[1])

dataset_train.prepare()

# Validation dataset

dataset_val = ShapesDataset()

dataset_val.load_shapes(50, config.IMAGE_SHAPE[0], config.IMAGE_SHAPE[1])

dataset_val.prepare()
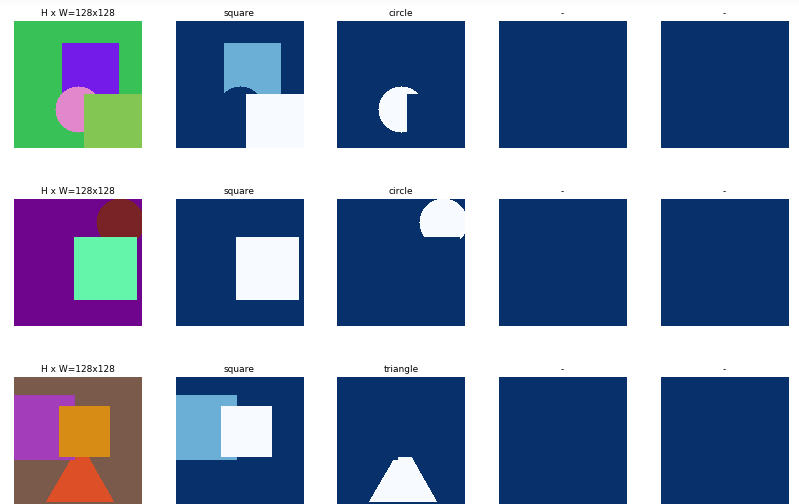
# Load and display random samples

image_ids = np.random.choice(dataset_train.image_ids, 4)

for image_id in image_ids:

    image = dataset_train.load_image(image_id)

    mask, class_ids = dataset_train.load_mask(image_id)

    visualize.display_top_masks(image, mask, class_ids, dataset_train.class_names)
# Create model in training mode

model = modellib.MaskRCNN(mode="training", config=config,

                          model_dir=MODEL_DIR)
# Which weights to start with?

init_with = "coco"  # imagenet, coco, or last

if init_with == "imagenet":

    model.load_weights(model.get_imagenet_weights(), by_name=True)

elif init_with == "coco":

    # Load weights trained on MS COCO, but skip layers that

    # are different due to the different number of classes

    # See README for instructions to download the COCO weights

    model.load_weights(COCO_MODEL_PATH, by_name=True,

                       exclude=["mrcnn_class_logits", "mrcnn_bbox_fc",

                                "mrcnn_bbox", "mrcnn_mask"])

elif init_with == "last":

    # Load the last model you trained and continue training

    model.load_weights(model.find_last()[1], by_name=True)
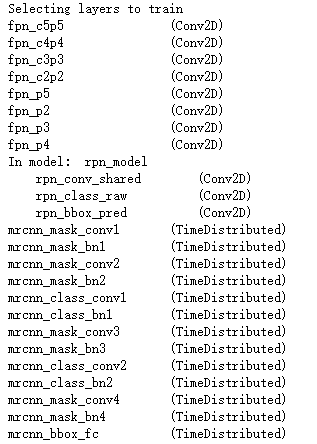
# Train the head branches

# Passing layers="heads" freezes all layers except the head

# layers. You can also pass a regular expression to select

# which layers to train by name pattern.

model.train(dataset_train, dataset_val,

            learning_rate=config.LEARNING_RATE,

            epochs=1,

            layers='heads')
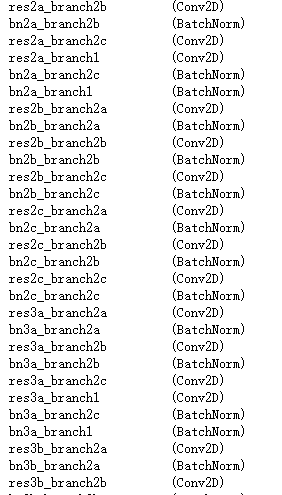
# Fine tune all layers

# Passing layers="all" trains all layers. You can also

# pass a regular expression to select which layers to

# train by name pattern.

model.train(dataset_train, dataset_val,

            learning_rate=config.LEARNING_RATE / 10,

            epochs=2,

            layers="all")
# Save weights

# Typically not needed because callbacks save after every epoch

# Uncomment to save manually

# model_path = os.path.join(MODEL_DIR, "mask_rcnn_shapes.h5")

# model.keras_model.save_weights(model_path)
class InferenceConfig(ShapesConfig):

    GPU_COUNT = 1

    IMAGES_PER_GPU = 1

inference_config = InferenceConfig()

# Recreate the model in inference mode

model = modellib.MaskRCNN(mode="inference",

                          config=inference_config,

                          model_dir=MODEL_DIR)

# Get path to saved weights

# Either set a specific path or find last trained weights

# model_path = os.path.join(ROOT_DIR, ".h5 file name here")

model_path = model.find_last()[1]

# Load trained weights (fill in path to trained weights here)

assert model_path != "", "Provide path to trained weights"

print("Loading weights from ", model_path)

model.load_weights(model_path, by_name=True)
# Test on a random image
image_id = random.choice(dataset_val.image_ids)
original_image, image_meta, gt_class_id, gt_bbox, gt_mask =\
modellib.load_image_gt(dataset_val, inference_config,
image_id, use_mini_mask=False) log("original_image", original_image)
log("image_meta", image_meta)
log("gt_class_id", gt_class_id)
log("gt_bbox", gt_bbox)
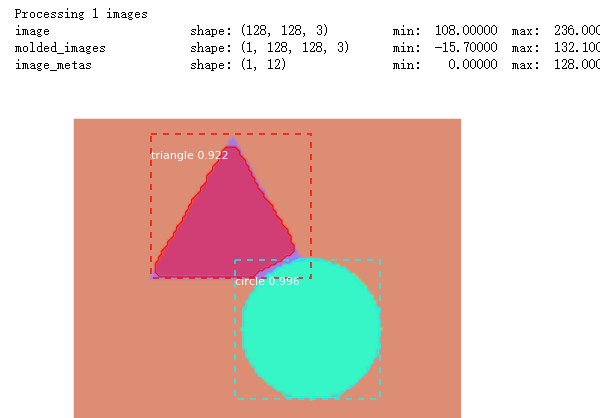
log("gt_mask", gt_mask) visualize.display_instances(original_image, gt_bbox, gt_mask, gt_class_id,
dataset_train.class_names, figsize=(8, 8))

results = model.detect([original_image], verbose=1)

r = results[0]

visualize.display_instances(original_image, r['rois'], r['masks'], r['class_ids'],

                            dataset_val.class_names, r['scores'], ax=get_ax())
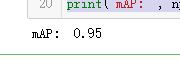
# Compute VOC-Style mAP @ IoU=0.5

# Running on 10 images. Increase for better accuracy.

image_ids = np.random.choice(dataset_val.image_ids, 10)

APs = []

for image_id in image_ids:

    # Load image and ground truth data

    image, image_meta, gt_class_id, gt_bbox, gt_mask =\

        modellib.load_image_gt(dataset_val, inference_config,

                               image_id, use_mini_mask=False)

    molded_images = np.expand_dims(modellib.mold_image(image, inference_config), 0)

    # Run object detection

    results = model.detect([image], verbose=0)

    r = results[0]

    # Compute AP

    AP, precisions, recalls, overlaps =\

        utils.compute_ap(gt_bbox, gt_class_id, gt_mask,

                         r["rois"], r["class_ids"], r["scores"], r['masks'])

    APs.append(AP)

print("mAP: ", np.mean(APs))
吴裕雄 python 人工智能——基于Mask_RCNN目标检测(3)的更多相关文章
- 吴裕雄 PYTHON 人工智能——基于MASK_RCNN目标检测(5)
import os import sys import numpy as np import tensorflow as tf import matplotlib import matplotlib. ...
- 吴裕雄 PYTHON 人工智能——基于MASK_RCNN目标检测(4)
import os import sys import random import math import re import time import numpy as np import tenso ...
- 吴裕雄 python 人工智能——基于Mask_RCNN目标检测(2)
import os import sys import itertools import math import logging import json import re import random ...
- 吴裕雄 python 人工智能——基于Mask_RCNN目标检测(1)
import os import sys import random import math import numpy as np import skimage.io import matplotli ...
- 吴裕雄 python 人工智能——基于神经网络算法在智能医疗诊断中的应用探索代码简要展示
#K-NN分类 import os import sys import time import operator import cx_Oracle import numpy as np import ...
- 吴裕雄 PYTHON 人工智能——智能医疗系统后台智能分诊模块及系统健康养生公告简约版代码展示
#coding:utf-8 import sys import cx_Oracle import numpy as np import pandas as pd import tensorflow a ...
- 吴裕雄 python 人工智能——智能医疗系统后台用户复诊模块简约版代码展示
#复诊 import sys import os import time import operator import cx_Oracle import numpy as np import pand ...
- 吴裕雄 python 人工智能——智能医疗系统后台用户注册、登录和初诊简约版代码展示
#用户注册.登录模块 #数据库脚本 CREATE TABLE usertable( userid number(8) primary key not null , username varchar(5 ...
- TF项目实战(基于SSD目标检测)——人脸检测1
SSD实战——人脸检测 Tensorflow 一 .人脸检测的困难: 1. 姿态问题 2.不同种族人, 3.光照 遮挡 带眼睛 4.视角不同 5. 不同尺度 二. 数据集介绍以及转化VOC: 1. F ...
随机推荐
- x = cos x 的解析形式
x = cos x 的解析形式 玩计算器的发现 大家都玩过计算器吧, 不知注意到没有. 输入任意数, 然后不断按最后总会输出. 什么, 你说明明记得是:? 哦, 因为你用了角度制. 这一系列操作等价于 ...
- iOS13禁用深色模式
全局禁用深色模式(暗黑模式)在Info.plist中增加UIUserInterfaceStyle,值为Light,如下 <key>UIUserInterfaceStyle</key& ...
- java-日期取特定值
import java.text.SimpleDateFormat; import java.util.Calendar; import java.util.Date; /** * @author G ...
- 0121 spring-boot-redis的使用
redis是什么呢?redis,属于NoSQL的一种,在互联网时代,起到加速系统的作用. redis是一种内存数据库,支持7种数据类型的存储,性能1S 10w次读写: redis提供的简单的事务保证了 ...
- spring(三):ApplicationContext
- mac VirtualBox虚拟机装CentOS,并配置网络,使其发布的静态网站能访问
1.下载VirtualBox(macOS版本) 下载地址:https://download.virtualbox.org/virtualbox/6.0.8/VirtualBox-6.0.8-13052 ...
- jumpserver 常见错误解决
官方链接:https://jumpserver.readthedocs.io/zh/master/faq_install.html 重启jumpserver后台 #cd /opt#python3.6 ...
- 安装Docker:解决container-selinux >= 2.9问题
1.安装Docker要求Centos内核版本高于3.10:通过uname -r查看当前系统的内核版本 uname -r 2.使用root登陆系统,确保yum包保持更新到最新: sudo yum ...
- 一文复习JSP内容
概念: JSP 全名为 Java Server Pages, 中文名叫 java 服务器页面, 其根 本是一个简化的 Servlet 设计, 它是由 Sun Microsystems 公司 倡导. 许 ...
- 微信小程序 (组件的使用)
创建组件 在根目录创建components目录,然后创建列表组件 组件中内容 <view class="prolist"> //循环prolist列表 <view ...