springboot整合@Scheduled定时任务的使用
1.启动类里面添加注解@EnableScheduling ,例如:
@SpringBootApplication
@EnableScheduling
@MapperScan("com.example.liuyi.mapper")
public class LiuyiApplication {

   public static void main(String[] args) {
      SpringApplication.run(LiuyiApplication.class, args);
   }

}
2.方法添加注解@Scheduled ,并且实现类上要有组件的注解@Component,
例如cron的使用场景:
@Component
public class TaskTest {

    /**
     * 定义一个按时间执行的定时任务,每隔5秒执行1次,
    cron表达式配置了在哪一刻执行任务,会在配置的任务开始时间判断任务是否可以执行,如果能则执行,不能则会跳过本次执行;
     */
    @Scheduled(cron = "0/5 * * * * ?")
    public void doEat() throws InterruptedException {
        System.out.println("开始吃饭啦"+new Date());
        Thread.sleep(7*1000);
        System.out.println("结束吃饭啦" +new Date());
    }

fixedDelay的使用场景
/**
 * fixedDelay是设定上一个任务结束后多久执行下一个任务,也就是fixedDelay只关心上一任务的结束时间和下一任务的开始时间。
 */
@Scheduled(fixedDelay = 5*1000)
public void doPlay() throws InterruptedException {
    System.out.println("开始玩啦"+new Date());
    Thread.sleep(7*1000);
    System.out.println("结束玩啦"+new Date());
}

fixedRate的使用场景
/**
 * 定义一个按频率执行的任务
 * 两个任务的开始时间间隔是5s,当到达任务的开始执行时间,但上一个任务却没有完成时,
 * spring会等待上一个任务执行完,并立即开始执行本次任务。
 */
@Scheduled(fixedRate = 1000 * 5)
public void doJob() throws InterruptedException {
    System.out.println("开始工作啦"+new Date());
    Thread.sleep(7*1000);
    System.out.println("结束工作啦" + new Date());
}

注意点:
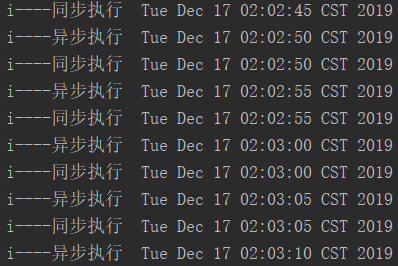
1.SpringBoot 默认就是定时任务同步执行的,只要将@Scheduled添加到需要配置的任务方法上,下次任务执行开始将在本次任务执行完毕后才开始
同一任务的异步执行需要在方法体上加@Async注解
/**
 * 同步执行
 * @throws InterruptedException
 */
@Scheduled(cron = "*/20 * * * * ?")
public void ipWriter() throws InterruptedException {
    for(int i=;i<;i++){
        System.out.println("i----同步执行  "+new Date());
Thread.sleep();
}
}

/**
 * 异步执行
 * @throws InterruptedException
 */
@Async
@Scheduled(cron = "*/20 * * * * ?")
public void ipWriterSync() throws InterruptedException {
    for(int i=;i<;i++){
        System.out.println("i----异步执行  "+new Date());
Thread.sleep();
}
}
2.多任务并发执行,在使用SpringBoot配置定时任务的过程中,使用@Scheduled配置了多个定时任务,但是在项目启动的时候每次只会启动一个定时任务,
因为 ThreadPoolTaskScheduler的源码默认开启的线程数是 1 ,所以每次只能执行一个定时任务,以下是部分源码
public class ThreadPoolTaskScheduler extends ExecutorConfigurationSupport implements AsyncListenableTaskExecutor, SchedulingTaskExecutor, TaskScheduler {
    private volatile int poolSize = ;

    public void setPoolSize(int poolSize) {
        Assert.isTrue(poolSize > , "'poolSize' must be 1 or higher");
        this.poolSize = poolSize;
        if (this.scheduledExecutor instanceof ScheduledThreadPoolExecutor) {
            ((ScheduledThreadPoolExecutor)this.scheduledExecutor).setCorePoolSize(poolSize);
}

    }
}
在启动的时候重新配置,创建BeanConfig类,注意,需要在类上添加@Component注解,项目启动的时候类中的@Bean注解才会被扫描到,使配置生效
@Component
public class ThreadPoolTaskSchedulerConfig {
    @Bean
    public TaskScheduler taskScheduler() {
        ThreadPoolTaskScheduler taskScheduler = new ThreadPoolTaskScheduler();
        taskScheduler.setPoolSize(2);//这里设置的线程数是2,可以根据需求调整
        return taskScheduler;
    }

}
springboot整合@Scheduled定时任务的使用的更多相关文章
- SpringBoot整合Quartz定时任务 系统job Spring Boot教程 调度任务
原文地址:https://www.cnblogs.com/allalongx/p/8477368.html 构建工程 创建一个Springboot工程,在它的程序入口加上@EnableScheduli ...
- SpringBoot整合Quartz定时任务
记录一个SpringBoot 整合 Quartz 的Demo实例 POM.XML文件 <!-- 定时器任务 quartz需要导入的坐标 --> <dependency> < ...
- SpringBoot学习18:springboot使用Scheduled 定时任务器
Scheduled 定时任务器:是 Spring3.0 以后自带的一个定时任务器. 1.在pom.xml文件中添加Scheduled依赖 <!-- 添加spring定时任务 Scheduled ...
- SpringBoot整合Quartz定时任务(持久化到数据库)
背景 最近在做项目,项目中有个需求:需要使用定时任务,这个定时任务需要即时生效.查看Quartz官网之后发现:Quartz提供两种基本作业存储类型: RAMJobStore :RAM也就是内存,默认情 ...
- SpringBoot整合Quartz定时任务 的简单实例
POM.XML文件 <!-- 定时器任务 quartz需要导入的坐标 --> <dependency> <groupId>org.quartz-scheduler& ...
- Spring Boot笔记(四) springboot 集成 @Scheduled 定时任务
个人博客网:https://wushaopei.github.io/ (你想要这里多有) 1.在SpringBoot 项目中使用@Scheduled注解执行定时任务: 配置pom.xml 依赖: ...
- springboot 整合task定时任务
一步:在启动类中加入 加入就会调用定时了. //开启定时任务 开启后就可以被扫描到 @EnableScheduling 二步:建一个tasks工具包 都会被扫描到的了 有三个类 Async ...
- SpringBoot整合Quartz定时任务 的简单实例 2
(1)什么是Quartz?(2)Quartz的特点:(3)Quartz专用词汇说明:(4)Quartz任务调度基本实现原理: 接下来看下具体的内容: (1)什么是Quartz? Quartz是一个完全 ...
- springboot之scheduled任务调度
springboot整合Scheduled可以方便的进行任务调度,话不多说,直接上代码 package com.rookie.bigdata; import org.springframework.b ...
随机推荐
- JavaScript数据类型总结
1. 六种简单数据类型:Undefined.Null.Boolean.Number.String.Symbol(新增): 一种复杂数据类型:Object: (1)基本数据类型保存在栈内存中,是按值传 ...
- 深度学习——CNN
整理自: https://blog.csdn.net/woaidapaopao/article/details/77806273?locationnum=9&fps=1 思想 filter尺寸 ...
- 2018-10-17-Sublime-Text-好用的插件
title author date CreateTime categories Sublime Text 好用的插件 lindexi 2018-10-17 10:14:40 +0800 2018-2- ...
- git常用常用操作指令
GIT操作 1:git init 初始化空的仓库,会在当前文件夹生成一个隐藏.git的文件夹,相当于一个仓库. 2:提交代码的流程:工作代码区-->暂存区 -->主仓库 -->服务器 ...
- QString 转换为 char *
一.QString 转换为 char * 将 QString 转 char *,需要用到 QByteArray 类,QByteArray 类的说明详见 Qt 帮助文档. 因为 char * 最后都有一 ...
- SSI(服务器端嵌入)
简介 SSI(服务器端嵌入)是一组放在 HTML 页面中的指令,当服务器向客户端访问提供这些页面时,会解释执行这些指令.它们能为已有的 HTML 页面添加动态生成内容,不需要通过 CGI 程序来或其他 ...
- Linux 创建网络会话
Linux 创建网络会话 RHEL7系统支持网络会话功能,允许用户在多个配置文件中快速切换(非常类似于firewalld防火墙服务中的区域技术).如果我们在公司网络中使用笔记本电脑时需要手动指定网络的 ...
- 怎么彻底删除用友通T3财务软件?
[问题现象]怎么彻底删除用友通T3财务软件? [原因分析]通过"添加或删除程序"无法正常卸载用友通T3,也尝试了360安全卫士强力卸载,都无法完全卸载,有没有办法可以彻底删除用友通 ...
- $bzoj4152\ The\ Captain$ 最短路
正解:最短路+优化连边 解题报告: 传送门$w$ 这种优化连边啥的真的好妙噢$QwQ$ 首先显然离散化下不说$QwQ$.然后对所有横坐标纵坐标分别建点,相邻两横坐标点相连,边权为离散前的坐标差.纵坐标 ...
- 洛谷$P4585\ [FJOI2015]$火星商店问题 线段树+$trie$树
正解:线段树+$trie$树 解题报告: 传送门$QwQ$ $umm$题目有点儿长我先写下题目大意趴$QwQ$,就说有$n$个初始均为空的集合和$m$次操作,每次操作为向某个集合内加入一个数$x$,或 ...