使用tensorflow的lstm网络进行时间序列预测
这篇文章将讲解如何使用lstm进行时间序列方面的预测,重点讲lstm的应用,原理部分可参考以下两篇文章:
Understanding LSTM Networks LSTM学习笔记
编程环境:python3.5,tensorflow 1.0
本文所用的数据集来自于kesci平台,由云脑机器学习实战训练营提供:真实业界数据的时间序列预测挑战
数据集采用来自业界多组相关时间序列(约40组)与外部特征时间序列(约5组)。本文只使用其中一组数据进行建模。
加载常用的库:
- #加载数据分析常用库
- import pandas as pd
- import numpy as np
- import tensorflow as tf
- from sklearn.metrics import mean_absolute_error,mean_squared_error
- from sklearn.preprocessing import MinMaxScaler
- import matplotlib.pyplot as plt
- % matplotlib inline
- import warnings
- warnings.filterwarnings('ignore')
- path = '../input/industry/industry_timeseries/timeseries_train_data/11.csv'
- data11 = pd.read_csv(path,names=['年','月','日','当日最高气温','当日最低气温','当日平均气温','当日平均湿度','输出'])
- data11.head()
| 年 | 月 | 日 | 当日最高气温 | 当日最低气温 | 当日平均气温 | 当日平均湿度 | 输出 | |
|---|---|---|---|---|---|---|---|---|
| 0 | 2015 | 2 | 1 | 1.9 | -0.4 | 0.7875 | 75.000 | 814.155800 |
| 1 | 2015 | 2 | 2 | 6.2 | -3.9 | 1.7625 | 77.250 | 704.251112 |
| 2 | 2015 | 2 | 3 | 7.8 | 2.0 | 4.2375 | 72.750 | 756.958978 |
| 3 | 2015 | 2 | 4 | 8.5 | -1.2 | 3.0375 | 65.875 | 640.645401 |
| 4 | 2015 | 2 | 5 | 7.9 | -3.6 | 1.8625 | 55.375 | 631.725130 |
- ##load data(本文以第一个表为例,其他表类似,不再赘述)
- f=open('../input/industry/industry_timeseries/timeseries_train_data/11.csv')
- df=pd.read_csv(f) #读入数据
- data=df.iloc[:,3:8].values #取第3-7列
- #定义常量
- rnn_unit=10 #hidden layer units
- input_size=4
- output_size=1
- lr=0.0006 #学习率
- tf.reset_default_graph()
- #输入层、输出层权重、偏置
- weights={
- 'in':tf.Variable(tf.random_normal([input_size,rnn_unit])),
- 'out':tf.Variable(tf.random_normal([rnn_unit,1]))
- }
- biases={
- 'in':tf.Variable(tf.constant(0.1,shape=[rnn_unit,])),
- 'out':tf.Variable(tf.constant(0.1,shape=[1,]))
- }
- def get_data(batch_size=60,time_step=20,train_begin=0,train_end=487):
- batch_index=[]
- scaler_for_x=MinMaxScaler(feature_range=(0,1)) #按列做minmax缩放
- scaler_for_y=MinMaxScaler(feature_range=(0,1))
- scaled_x_data=scaler_for_x.fit_transform(data[:,:-1])
- scaled_y_data=scaler_for_y.fit_transform(data[:,-1])
- label_train = scaled_y_data[train_begin:train_end]
- label_test = scaled_y_data[train_end:]
- normalized_train_data = scaled_x_data[train_begin:train_end]
- normalized_test_data = scaled_x_data[train_end:]
- train_x,train_y=[],[] #训练集x和y初定义
- for i in range(len(normalized_train_data)-time_step):
- if i % batch_size==0:
- batch_index.append(i)
- x=normalized_train_data[i:i+time_step,:4]
- y=label_train[i:i+time_step,np.newaxis]
- train_x.append(x.tolist())
- train_y.append(y.tolist())
- batch_index.append((len(normalized_train_data)-time_step))
- size=(len(normalized_test_data)+time_step-1)//time_step #有size个sample
- test_x,test_y=[],[]
- for i in range(size-1):
- x=normalized_test_data[i*time_step:(i+1)*time_step,:4]
- y=label_test[i*time_step:(i+1)*time_step]
- test_x.append(x.tolist())
- test_y.extend(y)
- test_x.append((normalized_test_data[(i+1)*time_step:,:4]).tolist())
- test_y.extend((label_test[(i+1)*time_step:]).tolist())
- return batch_index,train_x,train_y,test_x,test_y,scaler_for_y
- #——————————————————定义神经网络变量——————————————————
- def lstm(X):
- batch_size=tf.shape(X)[0]
- time_step=tf.shape(X)[1]
- w_in=weights['in']
- b_in=biases['in']
- input=tf.reshape(X,[-1,input_size]) #需要将tensor转成2维进行计算,计算后的结果作为隐藏层的输入
- input_rnn=tf.matmul(input,w_in)+b_in
- input_rnn=tf.reshape(input_rnn,[-1,time_step,rnn_unit]) #将tensor转成3维,作为lstm cell的输入
- cell=tf.contrib.rnn.BasicLSTMCell(rnn_unit)
- #cell=tf.contrib.rnn.core_rnn_cell.BasicLSTMCell(rnn_unit)
- init_state=cell.zero_state(batch_size,dtype=tf.float32)
- output_rnn,final_states=tf.nn.dynamic_rnn(cell, input_rnn,initial_state=init_state, dtype=tf.float32) #output_rnn是记录lstm每个输出节点的结果,final_states是最后一个cell的结果
- output=tf.reshape(output_rnn,[-1,rnn_unit]) #作为输出层的输入
- w_out=weights['out']
- b_out=biases['out']
- pred=tf.matmul(output,w_out)+b_out
- return pred,final_states
- #——————————————————训练模型——————————————————
- def train_lstm(batch_size=80,time_step=15,train_begin=0,train_end=487):
- X=tf.placeholder(tf.float32, shape=[None,time_step,input_size])
- Y=tf.placeholder(tf.float32, shape=[None,time_step,output_size])
- batch_index,train_x,train_y,test_x,test_y,scaler_for_y = get_data(batch_size,time_step,train_begin,train_end)
- pred,_=lstm(X)
- #损失函数
- loss=tf.reduce_mean(tf.square(tf.reshape(pred,[-1])-tf.reshape(Y, [-1])))
- train_op=tf.train.AdamOptimizer(lr).minimize(loss)
- with tf.Session() as sess:
- sess.run(tf.global_variables_initializer())
- #重复训练5000次
- iter_time = 5000
- for i in range(iter_time):
- for step in range(len(batch_index)-1):
- _,loss_=sess.run([train_op,loss],feed_dict={X:train_x[batch_index[step]:batch_index[step+1]],Y:train_y[batch_index[step]:batch_index[step+1]]})
- if i % 100 == 0:
- print('iter:',i,'loss:',loss_)
- ####predict####
- test_predict=[]
- for step in range(len(test_x)):
- prob=sess.run(pred,feed_dict={X:[test_x[step]]})
- predict=prob.reshape((-1))
- test_predict.extend(predict)
- test_predict = scaler_for_y.inverse_transform(test_predict)
- test_y = scaler_for_y.inverse_transform(test_y)
- rmse=np.sqrt(mean_squared_error(test_predict,test_y))
- mae = mean_absolute_error(y_pred=test_predict,y_true=test_y)
- print ('mae:',mae,' rmse:',rmse)
- return test_predict
test_predict = train_lstm(batch_size=80,time_step=15,train_begin=0,train_end=487)- iter: 3900 loss: 0.000505382
- iter: 4000 loss: 0.000502154
- iter: 4100 loss: 0.000503413
- iter: 4200 loss: 0.00140424
- iter: 4300 loss: 0.000500015
- iter: 4400 loss: 0.00050004
- iter: 4500 loss: 0.000498159
- iter: 4600 loss: 0.000500861
- iter: 4700 loss: 0.000519379
- iter: 4800 loss: 0.000499999
- iter: 4900 loss: 0.000501265
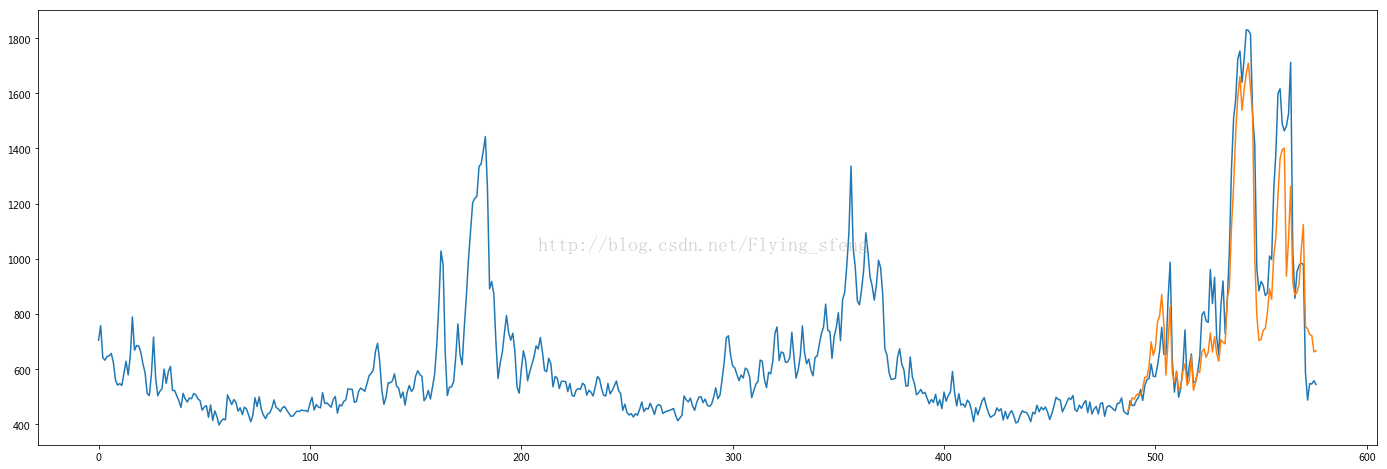
- mae: 121.183626208 rmse: 162.049017904
- plt.figure(figsize=(24,8))
- plt.plot(data[:, -1])
- plt.plot([None for _ in range(487)] + [x for x in test_predict])
- plt.show()
--------------------- 本文来自 Flying_sfeng 的CSDN 博客 ,全文地址请点击:https://blog.csdn.net/flying_sfeng/article/details/78852816?utm_source=copy
使用tensorflow的lstm网络进行时间序列预测的更多相关文章
- 基于 Keras 用 LSTM 网络做时间序列预测
目录 基于 Keras 用 LSTM 网络做时间序列预测 问题描述 长短记忆网络 LSTM 网络回归 LSTM 网络回归结合窗口法 基于时间步的 LSTM 网络回归 在批量训练之间保持 LSTM 的记 ...
- Python中利用LSTM模型进行时间序列预测分析
时间序列模型 时间序列预测分析就是利用过去一段时间内某事件时间的特征来预测未来一段时间内该事件的特征.这是一类相对比较复杂的预测建模问题,和回归分析模型的预测不同,时间序列模型是依赖于事件发生的先后顺 ...
- Tensorflow 循环神经网络 基本 RNN 和 LSTM 网络 拟合、预测sin曲线
时序预测一直是比较重要的研究问题,在统计学中我们有各种的模型来解决时间序列问题,但是最近几年比较火的深度学习中也有能解决时序预测问题的方法,另外在深度学习领域中时序预测算法可以解决自然语言问题等. 在 ...
- (数据科学学习手札40)tensorflow实现LSTM时间序列预测
一.简介 上一篇中我们较为详细地铺垫了关于RNN及其变种LSTM的一些基本知识,也提到了LSTM在时间序列预测上优越的性能,本篇就将对如何利用tensorflow,在实际时间序列预测任务中搭建模型来完 ...
- 第二十一节,使用TensorFlow实现LSTM和GRU网络
本节主要介绍在TensorFlow中实现LSTM以及GRU网络. 一 LSTM网络 Long Short Term 网络—— 一般就叫做 LSTM ——是一种 RNN 特殊的类型,可以学习长期依赖信息 ...
- 吴裕雄--天生自然神经网络与深度学习实战Python+Keras+TensorFlow:使用TensorFlow和Keras开发高级自然语言处理系统——LSTM网络原理以及使用LSTM实现人机问答系统
!mkdir '/content/gdrive/My Drive/conversation' ''' 将文本句子分解成单词,并构建词库 ''' path = '/content/gdrive/My D ...
- TensorFlow实现时间序列预测
常常会碰到各种各样时间序列预测问题,如商场人流量的预测.商品价格的预测.股价的预测,等等.TensorFlow新引入了一个TensorFlow Time Series库(以下简称为TFTS),它可以帮 ...
- 使用TensorFlow的递归神经网络(LSTM)进行序列预测
本篇文章介绍使用TensorFlow的递归神经网络(LSTM)进行序列预测.作者在网上找到的使用LSTM模型的案例都是解决自然语言处理的问题,而没有一个是来预测连续值的. 所以呢,这里是基于历史观察数 ...
- Kesci: Keras 实现 LSTM——时间序列预测
博主之前参与的一个科研项目是用 LSTM 结合 Attention 机制依据作物生长期内气象环境因素预测作物产量.本篇博客将介绍如何用 keras 深度学习的框架搭建 LSTM 模型对时间序列做预测. ...
随机推荐
- LightOJ 1074 - Extended Traffic (SPFA)
http://lightoj.com/volume_showproblem.php?problem=1074 1074 - Extended Traffic PDF (English) Stati ...
- 在ASP.NET MVC下有关上传图片脏数据的解决方案
在"在ASP.NET MVC下实现单个图片上传, 客户端服务端双重限制图片大小和格式, 服务端裁剪图片"中,已经实现了在客户端和服务端限制图片大小和格式,以及在服务端裁剪图片.但还 ...
- CentOS 安装 nexus (maven 私服)
原文:https://www.sunjianhua.cn/archives/centos-nexus.html 1.下载 wget http://download.sonatype.com/nexus ...
- uifont 字体详解
时间2013-06-04 11:26:33 CSDN博客原文 http://blog.csdn.net/u010013695/article/details/9020611 我们在开发中很多时候要设 ...
- C#编程(四十三)----------Lambda表达式
Lambda表达式 案例: using System; using System.Collections.Generic; using System.Linq; using System.Text; ...
- C#+arcengine获得栅格数据的像素值(高程)
此文问获得栅格数据的像元值(即高程),有可能部分见解不到位,望大神看到了不惜指教! /// <summary> /// 得到高程(通过像素值) /// </summ ...
- 数据访问:Implementing Efficient Transactions
An OLTP scenario is characterized by a large number of concurrent operations that create, update, an ...
- java 反射原理写了一个赋值和取值通用类
首先了解一下反射的原理,什么是反射?所谓的反射就是指java 语言在运行时拥有一项自观的能力,反射能使你得到装载到 jvm 中的类的内部信息,它不需要你在编码的时候就知道所需类的内部信息,允许程序执行 ...
- 关于websocket集群中不同服务器的用户间通讯问题
最近将应用部署到集群时遇到一个问题,即用户命中不同的服务器导致的用户间无法进行websocket通讯,在网上搜索到类似问题但都没有具体解决方案. 于是用redis的订阅发布功能解决了该问题,具体流程如 ...
- 用Eclipse给安卓应用进行签名
Eclipse功能强大,用它来给应用进行签名也十分简单.下面是进行签名的步骤