runoob-android
https://www.runoob.com/android/android-tutorial.html
https://www.runoob.com/w3cnote/android-tutorial-intro.html
https://developer.android.google.cn/studio
Android 的特性
Android 是一款与 Apple 4GS 竞争的功能强大的操作系统,并支持一些伟大的特性。以下列举出部分功能:
| 特性 | 描述 |
|---|---|
| 漂亮的 UI | Android 操作系统的基本屏幕提供了漂亮又直观的用户界面。 |
| 连接性 | GSM/EDGE, IDEN, CDMA, EV-DO, UMTS, Bluetooth, Wi-Fi, LTE, NFC 和 WiMAX. |
| 存储 | 用于数据存储的轻量级关系型数据库SQLite |
| 媒体支持 | H.263, H.264, MPEG-4 SP, AMR, AMR-WB, AAC, HE-AAC, AAC 5.1, MP3, MIDI, Ogg Vorbis, WAV, JPEG, PNG, GIF, 和 BMP |
| 消息 | SMS 和 MMS |
| Web 浏览器 | 基于开源的 WebKit 布局引擎,再加上支持 HTML5 和 CSS3 Chrome 的 V8 JavaScript 引擎。 |
| 多点触控 | Android原生支持多点触控,从最初的手持设备开始便有,如 HTC Hero。 |
| 多任务 | 用户可以跳从一个任务到另一个任务,并且相同时间可以同时运行各种应用。 |
| 可调整的 widgets | Widgets是可调整大小,这样用户就可以扩大更多的内容或缩小以节省空间。 |
| 多语言 | 支持单向和多向文本。 |
| GCM | 谷歌云消息(GCM)是一种服务,让开发人员对 Android 设备的用户发送短消息数据,而无需专有的同步解决方案。 |
| Wi-Fi Direct | 一种通过高带宽的对等网络连接来直接发现和配对应用的技术。 |
| Android Beam | 一个流行的基于 NFC 的技术,使用户能够即时共享,只需通过触摸 NFC 功能将两个手机连在一起。 |
Android 应用程序
Android 应用程序一般使用 Android 软件开发工具包,采用 Java 语言来开发。
一旦开发完成,Android 应用程序可以容易的打包,并在诸如 Google Play 和亚马逊应用商店上出售。
Android 在世界各地190多个国家有数以百万计的移动设备。这是任何移动平台和快速增长的最大的安装基础。全球每天有超过100万个新的 Android 设备被激活。
本教程的写作目的是教会你如何开发并打包 Android 应用程序。我们将从 Android 应用程序编程环境设置开始,然后深入 Android 应用程序开发的各个方面。
Android 开发环境搭建
第二,开发 Android 应用程序所需的所有工具都是免费的,可以从网上下载。以下是开始开发 Android 应用程序需要用到的软件列表。
- Java JDK5 或 以后版本
- Android SDK
- Java运行时环境(JRE)
- Android Studio
- (可选的)Java开发者使用的Eclipse IDE
- (可选的)Android开发工具(ADT)Eclipse插件
最后两个组件是可选的,如果是在 Windows 机器上工作,这些组件将方便于开发基于 Java 的应用程序。因此,让我们来看看如何来设置所需的环境。
安装 Java 开发工具包(JDK)
你可以从 Oracle 的 Java 网站:JDKJava SE下载下载最新版本的 Java 。在下载的文件中找到安装JDK的说明文档,按照给定的说明来安装和配置设置。最后设置 PATH 和 JAVA_HOME 环境变量来引用包含 javac 和 java的目录,通常分别为 java_install_dir/bin 和 java_install_dir。
如果运行的是 Windows,把 JDK 安装在 C:\jdk1.6.0_15,在 C:\autoexec.bat 文件添加以下内容:
- set PATH=C:\jdk1.6.0_15\bin;%PATH%
- set JAVA_HOME=C:\jdk1.6.0_15
你也可以右键单击"我的电脑",选择"属性"=》"高级"=》"环境变量",然后通过按下"确定"按钮来更新 PATH 值。
在 Linux 上,如果 SDK 安装在 /usr/local/jdk1.6.0_15 下,并且使用的是 C shell,把下面的代码到写入 .cshrc 文件。
- setenv PATH /usr/local/jdk1.6.0_15/bin:$PATH
- setenv JAVA_HOME /usr/local/jdk1.6.0_15
下载安装Android Studio
1. 下载安装Android Studio(https://developer.android.google.cn/studio)—— DOWNLOAD —— DOWNLOAD ANDROID STUDIO(来进行下载,下载的是最新版本)
2. 安装Android Studio,标准模式安装,sdk会都包含,自动安装。
3. 安装完成,目录在/Users/meiyan/Library/Android/sdk
配置环境变量
(1)进入当前用户的home目录
打开mac的terminal终端,输入 cd ~/
(2)输入 touch .bash_profile
如果没有.bash_profile这个文件,则需要我们创建一个这个文件。
(3)输入 open .bash_profile
打开我们创建的这个文件,此时应该弹出一个文本编辑框,如果是第一次配置环境,那么文本编辑框为空白。
在文本编辑器中添加如下环境配置:
AVA_HOME=/Library/Java/JavaVirtualMachines/jdk1.8.0_191.jdk/Contents/Home
PATH=$JAVA_HOME/bin:$PATH:.
CLASSPATH=$JAVA_HOME/lib/tools.jar:$JAVA_HOME/lib/dt.jar:.
export JAVA_HOME
export PATH
export CLASSPATH
export ANDROID_HOME=/Users/meiyan/Library/Android/sdk
export PATH=${PATH}:${ANDROID_HOME}/tools
export PATH=${PATH}:${ANDROID_HOME}/platform-tools
注意:ANDROID_HOME应该根据自己的sdk路径来填写,其余可以直接复制。
(4)在终端中输入 source .bash_profile,使我们创建的变量文件生效。注意:每次重新打开terminal,都需要输入source .bash_profile
输入 adb ,验证是否完成配置,如果不显示 adb: command not found,说明配置完成 。
或者 terminal输入 adb version
meiyan@songruiwudeMacBook-Air ~ % adb version
Android Debug Bridge version 1.0.41
Version 31.0.2-7242960
Installed as /Users/meiyan/Library/Android/sdk/platform-tools/adb
注意:mac air安装最后可能提示如下,不用管,不影响adb的使用。
Unable to install Intel HAXM
Your CPU does not support VT-x.
Unfortunately, your computer does not support hardware accelerated virtualization.
Here are some of your options:
1) Use a physical device for testing
2) Develop on a Windows/OSX computer with an Intel processor that supports VT-x and NX
3) Develop on a Linux computer that supports VT-x or SVM
4) Use an Android Virtual Device based on an ARM system image
(This is 10x slower than hardware accelerated virtualization)
Creating Android virtual device
Android virtual device Pixel_3a_API_30_x86 was successfully created
Android 架构
Linux内核
在所有层的最底下是 Linux - 包括大约115个补丁的 Linux 3.6。它提供了基本的系统功能,比如进程管理,内存管理,设备管理(如摄像头,键盘,显示器)。同时,内核处理所有 Linux 所擅长的工作,如网络和大量的设备驱动,从而避免兼容大量外围硬件接口带来的不便。
程序库
在 Linux 内核层的上面是一系列程序库的集合,包括开源的 Web 浏览器引擎 Webkit ,知名的 libc 库,用于仓库存储和应用数据共享的 SQLite 数据库,用于播放、录制音视频的库,用于网络安全的 SSL 库等。
Android程序库
这个类别包括了专门为 Android 开发的基于 Java 的程序库。这个类别程序库的示例包括应用程序框架库,如用户界面构建,图形绘制和数据库访问。一些 Android 开发者可用的 Android 核心程序库总结如下:
- android.app - 提供应用程序模型的访问,是所有 Android 应用程序的基石。
- android.content - 方便应用程序之间,应用程序组件之间的内容访问,发布,消息传递。
- android.database - 用于访问内容提供者发布的数据,包含 SQLite 数据库管理类。
- android.opengl - OpenGL ES 3D 图片渲染 API 的 Java 接口。
- android.os - 提供应用程序访问标注操作系统服务的能力,包括消息,系统服务和进程间通信。
- android.text - 在设备显示上渲染和操作文本。
- android.view - 应用程序用户界面的基础构建块。
- android.widget - 丰富的预置用户界面组件集合,包括按钮,标签,列表,布局管理,单选按钮等。
- android.webkit - 一系列类的集合,允许为应用程序提供内建的 Web 浏览能力。
看过了 Android 运行层内的基于 Java 的核心程序库,是时候关注一下 Android 软件栈中的基于 C/C++ 的程序库。
Android运行时
这是架构中的第三部分,自下而上的第二层。这个部分提供名为 Dalvik 虚拟机的关键组件,类似于 Java 虚拟机,但专门为 Android 设计和优化。
Dalvik 虚拟机使得可以在 Java 中使用 Linux 核心功能,如内存管理和多线程。Dalvik 虚拟机使得每一个 Android 应用程序运行在自己独立的虚拟机进程。
Android 运行时同时提供一系列核心的库来为 Android 应用程序开发者使用标准的 Java 语言来编写 Android 应用程序。
应用框架
应用框架层以 Java 类的形式为应用程序提供许多高级的服务。应用程序开发者被允许在应用中使用这些服务。
- 活动管理者 - 控制应用程序生命周期和活动栈的所有方面。
- 内容提供者 - 允许应用程序之间发布和分享数据。
- 资源管理器 - 提供对非代码嵌入资源的访问,如字符串,颜色设置和用户界面布局。
- 通知管理器 - 允许应用程序显示对话框或者通知给用户。
- 视图系统 - 一个可扩展的视图集合,用于创建应用程序用户界面。
应用程序
顶层中有所有的 Android 应用程序。你写的应用程序也将被安装在这层。这些应用程序包括通讯录,浏览器,游戏等。
Android 应用程序组件
应用程序组件是一个Android应用程序的基本构建块。这些组件由应用清单文件松耦合的组织。AndroidManifest.xml描述了应用程序的每个组件,以及他们如何交互。
以下是可以在Android应用程序中使用的四个主要组件。
| 组件 | 描述 |
|---|---|
| Activities | 描述UI,并且处理用户与机器屏幕的交互。 |
| Services | 处理与应用程序关联的后台操作。 |
| Broadcast Receivers | 处理Android操作系统和应用程序之间的通信。 |
| Content Providers | 处理数据和数据库管理方面的问题。 |
Activities
一个活动标识一个具有用户界面的单一屏幕。举个例子,一个邮件应用程序可以包含一个活动用于显示新邮件列表,另一个活动用来编写邮件,再一个活动来阅读邮件。当应用程序拥有多于一个活动,其中的一个会被标记为当应用程序启动的时候显示。
一个活动是Activity类的一个子类,如下所示:
- public class MainActivity extends Activity {
- }
Services
服务是运行在后台,执行长时间操作的组件。举个例子,服务可以是用户在使用不同的程序时在后台播放音乐,或者在活动中通过网络获取数据但不阻塞用户交互。
一个服务是Service类的子类,如下所示:
- public class MyService extends Service {
- }
Broadcast Receivers
广播接收器简单地响应从其他应用程序或者系统发来的广播消息。举个例子,应用程序可以发起广播来让其他应用程序知道一些数据已经被下载到设备,并且可以供他们使用。因此广播接收器会拦截这些通信并采取适当的行动。
广播接收器是BroadcastReceiver类的一个子类,每个消息以Intent对象的形式来广播。
- public class MyReceiver extends BroadcastReceiver {
- }
Content Providers
内容提供者组件通过请求从一个应用程序到另一个应用程序提供数据。这些请求由ContentResolver类的方法来处理。这些数据可以是存储在文件系统、数据库或者其他其他地方。
内容提供者是ContentProvider类的子类,并实现一套标准的API,以便其他应用程序来执行事务。
- public class MyContentProvider extends ContentProvider {
- }
我们将在独立的章节中通过这些标签的细节来涵盖应用程序组件。
附件组件
有一些附件的组件用于以上提到的实体、他们之间逻辑、及他们之间连线的构造。这些组件如下:
| 组件 | 描述 |
|---|---|
| Fragments | 代表活动中的一个行为或者一部分用户界面。 |
| Views | 绘制在屏幕上的UI元素,包括按钮,列表等。 |
| Layouts | 控制屏幕格式,展示视图外观的View的继承。 |
| Intents | 组件间的消息连线。 |
| Resources | 外部元素,例如字符串资源、常量资源及图片资源等。 |
| Manifest | 应用程序的配置文件。 |
Android应用程序剖析
在运行应用之前,你需要知道Android项目中的一些文件目录和文件 -
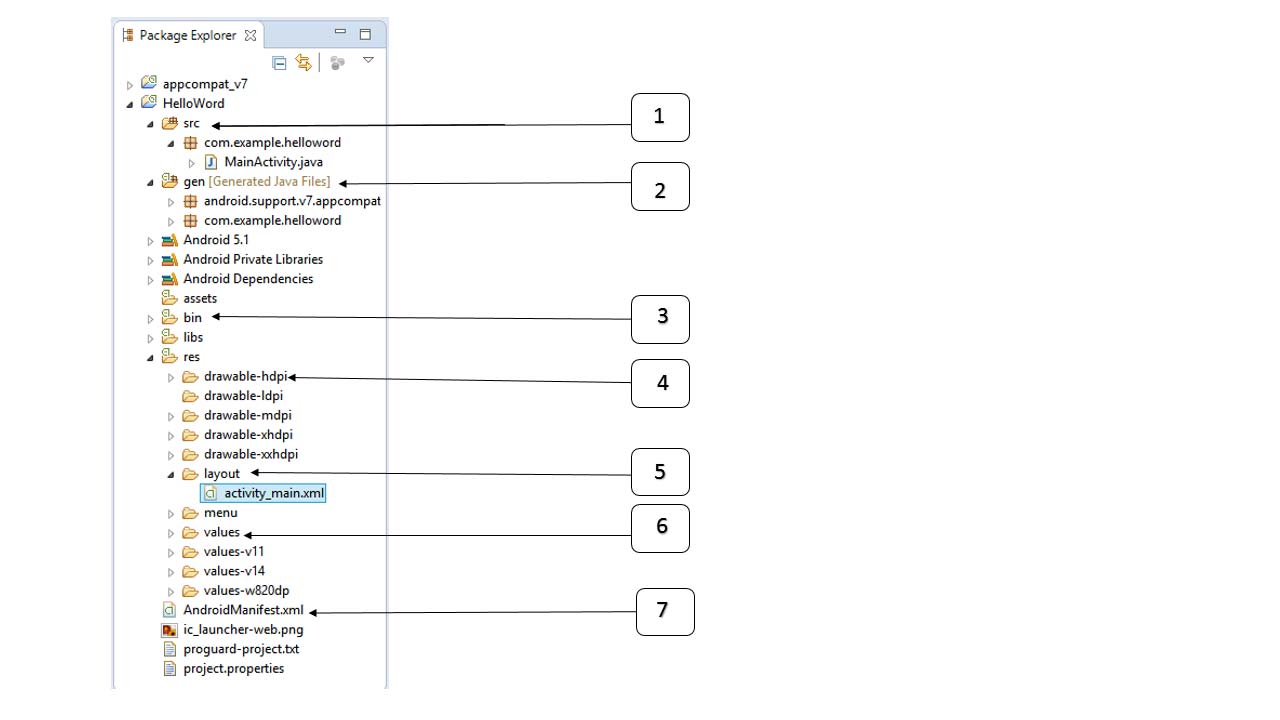
| 序号 | 文件夹、文件和说明 |
|---|---|
| 1 | src:包含项目中所有的.java源文件,默认情况下,它包括一个 MainActivity.java源文件对应的活动类,当应用程序通过应用图标启动时,将运行它。 |
| 2 | gen:这包含由编译器生成的.R文件,引用了所有项目中的资源。该文件不能被修改。 |
| 3 | bin:这个文件夹包含Android由APT构建的.apk包文件,以及运行Android应用程序所需要的其他所有东西。 |
| 4 | res/drawable-hdpi:这个目录下包括所有的为高密度屏幕设计所需的drawable对象。 |
| 5 | res/layout:这个目录存放用于定义用户界面的文件。 |
| 6 | res/values:这个目录存放各种各样的包含一系列资源的XML文件,比如字符串和颜色的定义。 |
| 7 | AndroidManifest.xml:这个是应用程序的清单文件,描述了应用程序的基础特性,定义它的各种组件。 |
下面的章节将给出一些重要的应用程序文件的概览。
主要活动文件
主要活动代码在MainActivity.java的Java文件中。这是实际的应用程序文件,将被转化为Dalvik可执行文件并运行。下面是由应用向导为Hello World应用生成的默认代码 -
- package com.example.helloworld;
- import android.os.Bundle;
- import android.app.Activity;
- import android.view.Menu;
- import android.view.MenuItem;
- import android.support.v4.app.NavUtils;
- public class MainActivity extends Activity {
- @Override
- public void onCreate(Bundle savedInstanceState) {
- super.onCreate(savedInstanceState);
- setContentView(R.layout.activity_main);
- }
- @Override
- public boolean onCreateOptionsMenu(Menu menu) {
- getMenuInflater().inflate(R.menu.activity_main, menu);
- return true;
- }
- }
这里,R.layout.activity_main引用自res/layout目录下的activity_main.xml文件。onCreate()是活动被加载之后众多被调用的方法之一。
Manifest文件
无论你开发什么组件用作应用程序中的一部分,都需要在应用程序项目根目录下的manifest.xml文件中声明所有的组件。这个文件是Android操作系统与你的应用程序之间的接口,因此,如果没有在这个文件中声明你的组件,将无法被操作系统所识别。举个例子,一个默认的清单文件看起来如下:
- <manifest xmlns:android="http://schemas.android.com/apk/res/android"
- package="com.example.helloworld"
- android:versionCode="1"
- android:versionName="1.0" >
- <uses-sdk
- android:minSdkVersion="8"
- android:targetSdkVersion="22" />
- <application
- android:icon="@drawable/ic_launcher"
- android:label="@string/app_name"
- android:theme="@style/AppTheme" >
- <activity
- android:name=".MainActivity"
- android:label="@string/title_activity_main" >
- <intent-filter>
- <action android:name="android.intent.action.MAIN" />
- <category android:name="android.intent.category.LAUNCHER"/>
- </intent-filter>
- </activity>
- </application>
- </manifest>
这里,...标签之间是应用程序相关的组件。andnroid:icon属性指出位于res/drawable-hdpi下面的应用程序图标。这个应用使用drawable文件夹下名为ic_launcher.png的图片。
标签用于指定一个活动,android:name属性指定一个Activity类子类的全名。android:label属性指定用于活动名称的字符串。可以使用标签来指定多个活动。
意图过滤器的action被命名为android.intent.action.MAIN,表明这个活动被用做应用程序的入口。意图过滤器的category被命名为android.intent.category.LAUNCHER,表明应用程序可以通过设备启动器的图标来启动。
@string指的是strings.xml(将在后面介绍)。因此,@string/app_name指的是定义在strings.xml中的app_name,实际为"Hello World"。类似的,应用中的其他字符串也很流行。
下面是你的清单文件中将用到的标签,用于指定不同的Android应用程序组件:
- 活动元素
- 服务元素
- 广播接收器元素
- 内容提供者元素
Strings 文件
strings.xml文件在res/value文件夹下,它包含应用程序使用到的所有文本。例如,按钮、标签的名称,默认文本,以及其他相似的strings。这个文件为他们的文本内容负责。一个默认的strings文件看起来如下:
- <resources>
- <string name="app_name">HelloWorld</string>
- <string name="hello_world">Hello world!</string>
- <string name="menu_settings">Settings</string>
- <string name="title_activity_main">MainActivity</string>
- </resources>
R 文件
gen/com.example.helloworld/R.java文件是活动的Java文件,如MainActivity.java的和资源如strings.xml之间的胶水。这是一个自动生成的文件,不要修改R.java文件的内容。下面是一个R.java文件的示例:
- /* AUTO-GENERATED FILE. DO NOT MODIFY.
- *
- * This class was automatically generated by the
- * aapt tool from the resource data it found. It
- * should not be modified by hand.
- */
- package com.example.helloworld;
- public final class R {
- public static final class attr {
- }
- public static final class dimen {
- public static final int padding_large=0x7f040002;
- public static final int padding_medium=0x7f040001;
- public static final int padding_small=0x7f040000;
- }
- public static final class drawable {
- public static final int ic_action_search=0x7f020000;
- public static final int ic_launcher=0x7f020001;
- }
- public static final class id {
- public static final int menu_settings=0x7f080000;
- }
- public static final class layout {
- public static final int activity_main=0x7f030000;
- }
- public static final class menu {
- public static final int activity_main=0x7f070000;
- }
- public static final class string {
- public static final int app_name=0x7f050000;
- public static final int hello_world=0x7f050001;
- public static final int menu_settings=0x7f050002;
- public static final int title_activity_main=0x7f050003;
- }
- public static final class style {
- public static final int AppTheme=0x7f060000;
- }
- }
Layout 文件
activity_main.xml是一个在res/layout目录下的layout文件。当应用程序构建它的界面时被引用。你将非常频繁的修改这个文件来改变应用程序的布局。在"Hello World"应用程序中,这个文件具有默认的布局,内容如下:
- <RelativeLayout xmlns:android="http://schemas.android.com/apk/res/android"
- xmlns:tools="http://schemas.android.com/tools"
- android:layout_width="match_parent"
- android:layout_height="match_parent" >
- <TextView
- android:layout_width="wrap_content"
- android:layout_height="wrap_content"
- android:layout_centerHorizontal="true"
- android:layout_centerVertical="true"
- android:padding="@dimen/padding_medium"
- android:text="@string/hello_world"
- tools:context=".MainActivity" />
- </RelativeLayout>
这是一个简单的RelativeLayout的示例,更多内容会在独立的章节中讲解。TextView是一个Android的控件用于构建用户图形界面。它包含有许多不同的属性,诸如android:layout_width, android:layout_height等用来设置它的宽度和高度等。@string指的是res/values文件夹下的strings.xml文件。因此,@string/hello_world指的是定义在strings.xml中的名为hello的字符串:"Hello World!"。
运行应用程序
让我们尝试运行刚刚建立的Hello World!应用程序。假设在搭建环境时你已经创建好了AVD。从Eclipse运行应用,打开你项目中的一个活动文件,并且点击工具栏上的 图标。Eclipse在AVD上安装应用,并启动它。如果一切顺利,将显示如下的模拟器窗口 -
Android 资源(Resources)访问
有许多东西用来构建一个优秀的 Android 应用程序。除了应用程序的编码,你需要关注各种各样的资源,诸如你用到的各种静态内容,如位图,颜色,布局定义,用户界面字符串,动画等等。这些资源一般放置在项目的 res/ 下独立子目录中。
这节教程将学习如何来组织应用程序资源,指定替代资源,并在应用程序中访问它们。
在eclipse中组织资源
你需要将每种资源放置在项目中 res/ 目录的特定子目录下。例如,这是一个简单项目的文件层级:
- MyProject/
- src/
- MyActivity.java
- res/
- drawable/
- icon.png
- layout/
- activity_main.xml
- info.xml
- values/
- strings.xml
res/ 目录在各种子目录中包含了所有的资源。这里有一个图片资源,两个布局资源和一个字符串资源文件。下表详细的给出了在项目中 res/ 目录里面支持的资源。
| 目录 | 资源类型 |
|---|---|
| anim/ | 定义动画属性的XML文件。它们被保存在res/anim/文件夹下,通过R.anim类访问 |
| color/ | 定义颜色状态列表的XML文件。它们被保存在res/color/文件夹下,通过R.color类访问 |
| drawable/ | 图片文件,如.png,.jpg,.gif或者XML文件,被编译为位图、状态列表、形状、动画图片。它们被保存在res/drawable/文件夹下,通过R.drawable类访问 |
| layout/ | 定义用户界面布局的XML文件。它们被保存在res/layout/文件夹下,通过R.layout类访问 |
| menu/ | 定义应用程序菜单的XML文件,如选项菜单,上下文菜单,子菜单等。它们被保存在res/menu/文件夹下,通过R.menu类访问 |
| raw/ | 任意的文件以它们的原始形式保存。需要根据名为R.raw.filename的资源ID,通过调用Resource.openRawResource()来打开raw文件 |
| values/ | 包含简单值(如字符串,整数,颜色等)的XML文件。这里有一些文件夹下的资源命名规范。arrays.xml代表数组资源,通过R.array类访问;integers.xml代表整数资源,通过R.integer类访问;bools.xml代表布尔值资源,通过R.bool类访问;colors.xml代表颜色资源,通过R.color类访问;dimens.xml代表维度值,通过R.dimen类访问;strings.xml代表字符串资源,通过R.string类访问;styles.xml代表样式资源,通过R.style类访问 |
| xml/ | 可以通过调用Resources.getXML()来在运行时读取任意的XML文件。可以在这里保存运行时使用的各种配置文件 |
替代资源
你的应用程序需要为特定的设备配置提供替代的资源支持。比如说,你需要为不同的屏幕分辨率提供替代的图片资源,为不同的语言提供替代的字符串资源。在运行时,Android 检测当前设备配置,并为应用程序加载合适的资源。
要为特定的配置的确定一系列替代资源,遵循如下的步骤:
- 在res/ 下创建一个新的目录,以 <resource_name>_<config_qualifier> 的方式命名。这里的 resources_name 是上表中提到的任意资源,如布局、图片等。 qualifier 将确定个性的配置使用哪些资源。你可以查看官方文档来了解不同类型资源的一个完整 qualifier 列表。
- 在这个目录中保存响应的替代资源。这些资源文件必须与下面例子中展示的默认资源文件名一致,然而这些文件将确定的内容进行替代。例如:虽然图片的文件名一样,但是高分辨率的屏幕,图片的分辨率也会高。
下面是一个例子,指定默认屏幕的图片和高分辨率的替代图片。
- MyProject/
- src/
- main/
- java/
- MyActivity.java
- res/
- drawable/
- icon.png
- background.png
- drawable-hdpi/
- icon.png
- background.png
- layout/
- activity_main.xml
- info.xml
- values/
- strings.xml
下面是另外一个例子,指定默认语言的布局和阿拉伯语言的替代布局。
- MyProject/
- src/
- main/
- java/
- MyActivity.java
- res/
- drawable/
- icon.png
- background.png
- drawable-hdpi/
- icon.png
- background.png
- layout/
- activity_main.xml
- info.xml
- layout-ar/
- main.xml
- values/
- strings.xml
访问资源
在应用程序开发中,需要访问定义好的资源,不论是通过代码还是通过 XML 文件。下面的章节介绍如何分别在这两种场景中访问资源。
在代码访问资源
当 Android 应用程序被编译,生成一个 R 类,其中包含了所有 res/ 目录下资源的 ID。你可以使用 R 类,通过子类+资源名或者直接使用资源 ID 来访问资源。
实例
访问 res/drawable/myimage.png,并将其设置到 ImageView 上,你将使用以下代码:
- ImageView imageView = (ImageView) findViewById(R.id.myimageview);
- imageView.setImageResource(R.drawable.myimage);
这里第一行代码用 R.id.myimageview 来在布局文件中获取定义为 myimageview 的 ImageView。第二行用 R.drawable.myimage 来获取在 res/ 的 drawable 子目录下名为 myimage 的图片。
实例
考虑下一个例子,其中 res/values/strings.xml 有如下定义:
- <?xml version="1.0" encoding="utf-8"?>
- <resources>
- <string name="hello">Hello, World!</string>
- </resources>
现在你可以在 ID 为 msg 的 TextView 对象上使用资源 ID 来设置文本,具体如下:
- TextView msgTextView = (TextView) findViewById(R.id.msg);
- msgTextView.setText(R.string.hello);
实例
考虑如下定义的布局 res/layout/activity_main.xml
- <?xml version="1.0" encoding="utf-8"?>
- <LinearLayout xmlns:android="http://schemas.android.com/apk/res/android"
- android:layout_width="fill_parent"
- android:layout_height="fill_parent"
- android:orientation="vertical" >
- <TextView android:id="@+id/text"
- android:layout_width="wrap_content"
- android:layout_height="wrap_content"
- android:text="Hello, I am a TextView" />
- <Button android:id="@+id/button"
- android:layout_width="wrap_content"
- android:layout_height="wrap_content"
- android:text="Hello, I am a Button" />
- </LinearLayout>
这个应用程序代码将为 activity 加载这个布局,onCreate() 方法中如下:
- public void onCreate(Bundle savedInstanceState) {
- super.onCreate(savedInstanceState);
- setContentView(R.layout.main_activity);
- }
在XML中访问
考虑下面的 XML 资源文件 res/values/strings.xml,其中包含一个颜色资源和一个字符串资源 -
- <?xml version="1.0" encoding="utf-8"?>
- <resources>
- <color name="opaque_red">#f00</color>
- <string name="hello">Hello!</string>
- </resources>
现在,你可以在下面的布局文件中使用这些资源来设置文本颜色和文本内容:
- <?xml version="1.0" encoding="utf-8"?>
- <EditText xmlns:android="http://schemas.android.com/apk/res/android"
- android:layout_width="fill_parent"
- android:layout_height="fill_parent"
- android:textColor="@color/opaque_red"
- android:text="@string/hello" />
现在,你如果再次回到上一章节讲解的" Hello World! "实例,我可以确定,你对这节中所有的概念有了更好的理解。所以,我强烈建议回去看看之前的实例,并查看我使用不同资源的基本用法。
Android 活动(Activity)
活动代表了一个具有用户界面的单一屏幕,如 Java 的窗口或者帧。Android 的活动是 ContextThemeWrapper 类的子类。
如果你曾经用 C,C++ 或者 Java 语言编程,你应该知道这些程序从 main() 函数开始。很类似的,Android 系统初始化它的程序是通过活动中的 onCreate() 回调的调用开始的。存在有一序列的回调方法来启动一个活动,同时有一序列的方法来关闭活动,如下面的活动声明周期图所示:
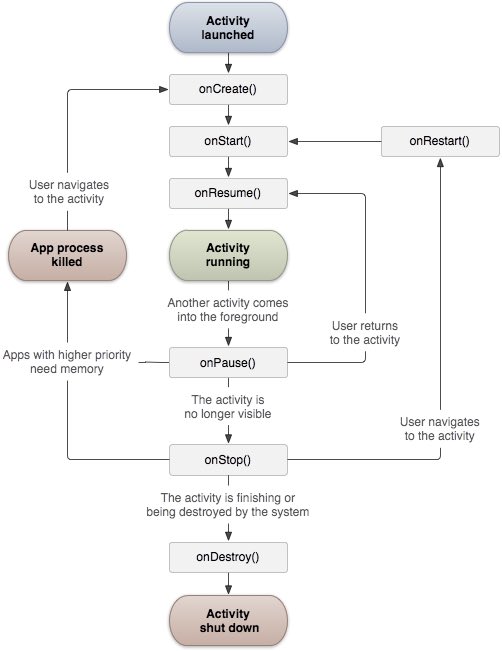
Activity 类定义了下面的回调。你可以不用实现所有的回调方法。但了解其中的每一个非常的重要,实现这些可以保证你的应用行为如用户所期望的那样。
| 回调 | 描述 |
|---|---|
| onCreate() | 这是第一个回调,在活动第一次创建时调用 |
| onStart() | 这个回调在活动为用户可见时被调用 |
| onResume() | 这个回调在应用程序与用户开始可交互的时候调用 |
| onPause() | 被暂停的活动无法接受用户输入,不能执行任何代码。当前活动将要被暂停,上一个活动将要被恢复时调用 |
| onStop() | 当活动不在可见时调用 |
| onDestroy() | 当活动被系统销毁之前调用 |
| onRestart() | 当活动被停止以后重新打开时调用 |
实例
这个实例通过简单地步骤展示 Android 应用程序活动的生命周期。按照下面的步骤来修改我们在 Hello World 实例章节中创建的 Android 应用程序。
| 步骤 | 描述 |
|---|---|
| 1 | 使用eclipse IDE来创建一个Android应用程序,并命名为HelloWorld放在com.example.helloworld包下。如之前Hello World Example章节中介绍。 |
| 2 | 按照下面修改主要活动文件MainActivity.java。保持其他部分不变。 |
| 3 | 运行应用程序来打开Android模拟器,并检查应用程序的修改结果。 |
下面是主要活动文件src/com.example.helloworld/MainActivity.java修改的内容。里面包含每一个基本的生命周期方法。Log.d()方法用来生成日志信息:
- package com.example.helloworld;
- import android.os.Bundle;
- import android.app.Activity;
- import android.util.Log;
- public class MainActivity extends Activity {
- String msg = "Android : ";
- /** 当活动第一次被创建时调用 */
- @Override
- public void onCreate(Bundle savedInstanceState) {
- super.onCreate(savedInstanceState);
- setContentView(R.layout.activity_main);
- Log.d(msg, "The onCreate() event");
- }
- /** 当活动即将可见时调用 */
- @Override
- protected void onStart() {
- super.onStart();
- Log.d(msg, "The onStart() event");
- }
- /** 当活动可见时调用 */
- @Override
- protected void onResume() {
- super.onResume();
- Log.d(msg, "The onResume() event");
- }
- /** 当其他活动获得焦点时调用 */
- @Override
- protected void onPause() {
- super.onPause();
- Log.d(msg, "The onPause() event");
- }
- /** 当活动不再可见时调用 */
- @Override
- protected void onStop() {
- super.onStop();
- Log.d(msg, "The onStop() event");
- }
- /** 当活动将被销毁时调用 */
- @Override
- public void onDestroy() {
- super.onDestroy();
- Log.d(msg, "The onDestroy() event");
- }
- }
活动类从项目的res/layout中的XML文件加载所有的UI组件。下面的语句从res/layout/activity_main.xml文件中加载UI组件:
- setContentView(R.layout.activity_main);
一个应用程序可以有1个或多个活动,而没有任何限制。每个为应用程序所定义的活动都需要在AndroidManifest.xml中声明。应用的主要活动需要在清单中声明,且意图过滤器标签中需要包含 MAIN 动作和 LAUNCHER 类别。如下:
- <manifest xmlns:android="http://schemas.android.com/apk/res/android"
- package="com.example.helloworld"
- android:versionCode="1"
- android:versionName="1.0" >
- <uses-sdk
- android:minSdkVersion="8"
- android:targetSdkVersion="22" />
- <application
- android:icon="@drawable/ic_launcher"
- android:label="@string/app_name"
- android:theme="@style/AppTheme" >
- <activity
- android:name=".MainActivity"
- android:label="@string/title_activity_main" >
- <intent-filter>
- <action android:name="android.intent.action.MAIN" />
- <category android:name="android.intent.category.LAUNCHER"/>
- </intent-filter>
- </activity>
- </application>
- </manifest>
不论是 MAIN 动作还是 LAUNCHER 类别没有在活动中声明,那么应用程序的图标将不会出现在主屏幕的应用列表中。
让我们运行起刚刚修改的 "Hellow World!" 应用程序。假设你在环境搭建的时候已经创建了 AVD 。从 Eclipse 运行应用,打开一个项目中的活动文件,并从工具栏点击运行图标。Eclipse在AVD上安装应用并启动它。如果一切顺利,将显示模拟器屏幕如下,同时你可以在Eclipse IDE的LogCat窗口中看到日志信息:
- 07-19 15:00:43.405: D/Android :(866): The onCreate() event
- 07-19 15:00:43.405: D/Android :(866): The onStart() event
- 07-19 15:00:43.415: D/Android :(866): The onResume() event
让我们点击 Android 模拟器上的红色按钮 ,它将在Eclipse IDE的LogCat窗口中产生如下的事件消息:
- <code>07-19 15:01:10.995: D/Android :(866): The onPause() event
- 07-19 15:01:12.705: D/Android :(866): The onStop() event
- </code>
让我们再次点击 Android 模拟器上的菜单按钮 ,它将在 Eclipse IDE 的 LogCat 窗口中产生如下的事件消息:
- <code>07-19 15:01:13.995: D/Android :(866): The onStart() event
- 07-19 15:01:14.705: D/Android :(866): The onResume() event
- </code>
接下来,让我们点击Android模拟器上的返回按钮 ,它将在Eclipse IDE的LogCat窗口中产生如下的事件消息,Android 应用程序上活动的整个生命周期完成。
- 07-19 15:33:15.687: D/Android :(992): The onPause() event
- 07-19 15:33:15.525: D/Android :(992): The onStop() event
- 07-19 15:33:15.525: D/Android :(992): The onDestroy() event
Android 服务(Service)
服务是一个后台运行的组件,执行长时间运行且不需要用户交互的任务。即使应用被销毁也依然可以工作。服务基本上包含两种状态 -
| 状态 | 描述 |
|---|---|
| Started | Android的应用程序组件,如活动,通过startService()启动了服务,则服务是Started状态。一旦启动,服务可以在后台无限期运行,即使启动它的组件已经被销毁。 |
| Bound | 当Android的应用程序组件通过bindService()绑定了服务,则服务是Bound状态。Bound状态的服务提供了一个客户服务器接口来允许组件与服务进行交互,如发送请求,获取结果,甚至通过IPC来进行跨进程通信。 |
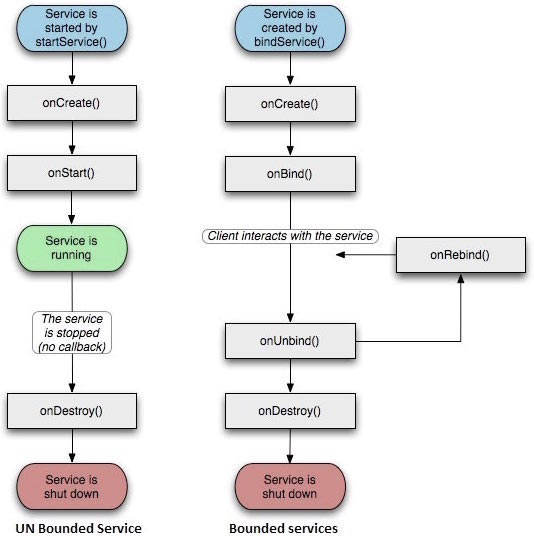
服务拥有生命周期方法,可以实现监控服务状态的变化,可以在合适的阶段执行工作。下面的左图展示了当服务通过startService()被创建时的生命周期,右图则显示了当服务通过bindService()被创建时的生命周期:
要创建服务,你需要创建一个继承自Service基类或者它的已知子类的Java类。Service基类定义了不同的回调方法和多数重要方法。你不需要实现所有的回调方法。虽然如此,理解所有的方法还是非常重要的。实现这些回调能确保你的应用以用户期望的方式实现。
| 回调 | 描述 |
|---|---|
| onStartCommand() | 其他组件(如活动)通过调用startService()来请求启动服务时,系统调用该方法。如果你实现该方法,你有责任在工作完成时通过stopSelf()或者stopService()方法来停止服务。 |
| onBind | 当其他组件想要通过bindService()来绑定服务时,系统调用该方法。如果你实现该方法,你需要返回IBinder对象来提供一个接口,以便客户来与服务通信。你必须实现该方法,如果你不允许绑定,则直接返回null。 |
| onUnbind() | 当客户中断所有服务发布的特殊接口时,系统调用该方法。 |
| onRebind() | 当新的客户端与服务连接,且此前它已经通过onUnbind(Intent)通知断开连接时,系统调用该方法。 |
| onCreate() | 当服务通过onStartCommand()和onBind()被第一次创建的时候,系统调用该方法。该调用要求执行一次性安装。 |
| onDestroy() | 当服务不再有用或者被销毁时,系统调用该方法。你的服务需要实现该方法来清理任何资源,如线程,已注册的监听器,接收器等。 |
下面的主服务演示了每个方法的生命周期 -
- package com.runoob.androidservices;
- import android.app.Service;
- import android.os.IBinder;
- import android.content.Intent;
- import android.os.Bundle;
- public class HelloService extends Service {
- /** 标识服务如果被杀死之后的行为 */
- int mStartMode;
- /** 绑定的客户端接口 */
- IBinder mBinder;
- /** 标识是否可以使用onRebind */
- boolean mAllowRebind;
- /** 当服务被创建时调用. */
- @Override
- public void onCreate() {
- }
- /** 调用startService()启动服务时回调 */
- @Override
- public int onStartCommand(Intent intent, int flags, int startId) {
- return mStartMode;
- }
- /** 通过bindService()绑定到服务的客户端 */
- @Override
- public IBinder onBind(Intent intent) {
- return mBinder;
- }
- /** 通过unbindService()解除所有客户端绑定时调用 */
- @Override
- public boolean onUnbind(Intent intent) {
- return mAllowRebind;
- }
- /** 通过bindService()将客户端绑定到服务时调用*/
- @Override
- public void onRebind(Intent intent) {
- }
- /** 服务不再有用且将要被销毁时调用 */
- @Override
- public void onDestroy() {
- }
- }
实例
这个例子将通过简单地步骤为你展示如何创建自己的Android服务。按照下面的步骤来修改之前在Hello World实例章节中创建的Android应用程序:
| 步骤 | 描述 |
|---|---|
| 1 | 使用Android Studio IDE来创建Android应用程序并在com.runoob.androidservices包下命名为androidservices。类似Hello World实例章节。 |
| 2 | 修改主活动文件MainActivity.java来添加startService()和stopService()方法。 |
| 3 | 在包com.runoob.androidservices下创建新的Java文件MyService.java。这个文件将实现Android服务相关的方法。 |
| 4 | 在AndroidManifest.xml文件中使用<service.../>标签来定义服务。应用程序可以有一个或多个服务,没有任何限制。 |
| 5 | 修改res/layout/activity_main.xml文件中的默认布局,在线性布局中包含两个按钮。 |
| 6 | 不要对res/values/strings.xml文件中的任何常量进行修改。Android Studio会注意字符串值。 |
| 7 | 启动Android模拟器来运行应用程序,并验证应用程序所做改变的结果。 |
下面是主活动文件src/com.runoob.androidservices/MainActivity.java文件所修改的内容。这个文件包含所有基本的生命周期方法。我们添加了startService()和stopService()方法来启动和停止服务。
- package com.runoob.androidservices;
- import android.app.Activity;
- import android.os.Bundle;
- import android.view.Menu;
- import android.content.Intent;
- import android.view.View;
- public class MainActivity extends Activity {
- @Override
- public void onCreate(Bundle savedInstanceState) {
- super.onCreate(savedInstanceState);
- setContentView(R.layout.activity_main);
- }
- @Override
- public boolean onCreateOptionsMenu(Menu menu) {
- getMenuInflater().inflate(R.menu.menu_main, menu);
- return true;
- }
- // Method to start the service
- public void startService(View view) {
- startService(new Intent(getBaseContext(), MyService.class));
- }
- // Method to stop the service
- public void stopService(View view) {
- stopService(new Intent(getBaseContext(), MyService.class));
- }
- }
以下是src/com.runoob.androidservices/MyService.java的内容。这个文件可以基于需求实现一个或多个服务关联的方法。对于新人,我们只实现onStartCommand()和onDestroy() -
- package com.runoob.androidservices;
- import android.app.Service;
- import android.content.Intent;
- import android.os.IBinder;
- import android.widget.Toast;
- public class MyService extends Service {
- @Override
- public IBinder onBind(Intent arg0) {
- return null;
- }
- @Override
- public int onStartCommand(Intent intent, int flags, int startId) {
- // Let it continue running until it is stopped.
- Toast.makeText(this, "服务已经启动", Toast.LENGTH_LONG).show();
- return START_STICKY;
- }
- @Override
- public void onDestroy() {
- super.onDestroy();
- Toast.makeText(this, "服务已经停止", Toast.LENGTH_LONG).show();
- }
- }
下面将修改AndroidManifest.xml文件。这里添加<service.../>标签来包含我们的服务:
- <?xml version="1.0" encoding="utf-8"?>
- <manifest xmlns:android="http://schemas.android.com/apk/res/android"
- package="com.runoob.androidservices"
- android:versionCode="1"
- android:versionName="1.0">
- <uses-sdk
- android:minSdkVersion="13"
- android:targetSdkVersion="22" />
- <application
- android:icon="@drawable/ic_launcher"
- android:label="@string/app_name"
- android:theme="@style/AppTheme" >
- <activity
- android:name=".MainActivity"
- android:label="@string/title_activity_main" >
- <intent-filter>
- <action android:name="android.intent.action.MAIN" />
- <category android:name="android.intent.category.LAUNCHER"/>
- </intent-filter>
- </activity>
- <service android:name=".MyService" />
- </application>
- </manifest>
以下是res/layout/activity_main.xml文件的内容,包含两个按钮:
- <RelativeLayout xmlns:android="http://schemas.android.com/apk/res/android"
- xmlns:tools="http://schemas.android.com/tools" android:layout_width="match_parent"
- android:layout_height="match_parent" android:paddingLeft="@dimen/activity_horizontal_margin"
- android:paddingRight="@dimen/activity_horizontal_margin"
- android:paddingTop="@dimen/activity_vertical_margin"
- android:paddingBottom="@dimen/activity_vertical_margin" tools:context=".MainActivity">
- <TextView
- android:id="@+id/textView1"
- android:layout_width="wrap_content"
- android:layout_height="wrap_content"
- android:text="Android 服务实例"
- android:layout_alignParentTop="true"
- android:layout_centerHorizontal="true"
- android:textSize="30dp" />
- <TextView
- android:id="@+id/textView2"
- android:layout_width="wrap_content"
- android:layout_height="wrap_content"
- android:text="www.runoob.com"
- android:textColor="#ff87ff09"
- android:textSize="30dp"
- android:layout_above="@+id/imageButton"
- android:layout_centerHorizontal="true"
- android:layout_marginBottom="40dp" />
- <ImageButton
- android:layout_width="wrap_content"
- android:layout_height="wrap_content"
- android:id="@+id/imageButton"
- android:src="@drawable/ic_launcher"
- android:layout_centerVertical="true"
- android:layout_centerHorizontal="true" />
- <Button
- android:layout_width="wrap_content"
- android:layout_height="wrap_content"
- android:id="@+id/button2"
- android:text="启动服务"
- android:onClick="startService"
- android:layout_below="@+id/imageButton"
- android:layout_centerHorizontal="true" />
- <Button
- android:layout_width="wrap_content"
- android:layout_height="wrap_content"
- android:text="停止服务"
- android:id="@+id/button"
- android:onClick="stopService"
- android:layout_below="@+id/button2"
- android:layout_alignLeft="@+id/button2"
- android:layout_alignStart="@+id/button2"
- android:layout_alignRight="@+id/button2"
- android:layout_alignEnd="@+id/button2" />
- </RelativeLayout>
下面是res/values/strings.xml的内容,来定义两个新的常量:
- <?xml version="1.0" encoding="utf-8"?>
- <resources>
- <string name="app_name">Android Services</string>
- <string name="title_activity_main">MainActivity</string>
- <string name="menu_settings">Settings</string>
- <string name="action_settings">Settings</string>
- </resources>
让我们运行刚刚修改的My Application应用程序。我假设你已经在安装环境时创建了AVD。打开你的项目中的活动文件,点击工具栏中的图标来在Android Studio中运行应用程序。Android Studio在AVD上安装应用程序并启动它。如果一切顺利,将在模拟器窗口上显示如下:
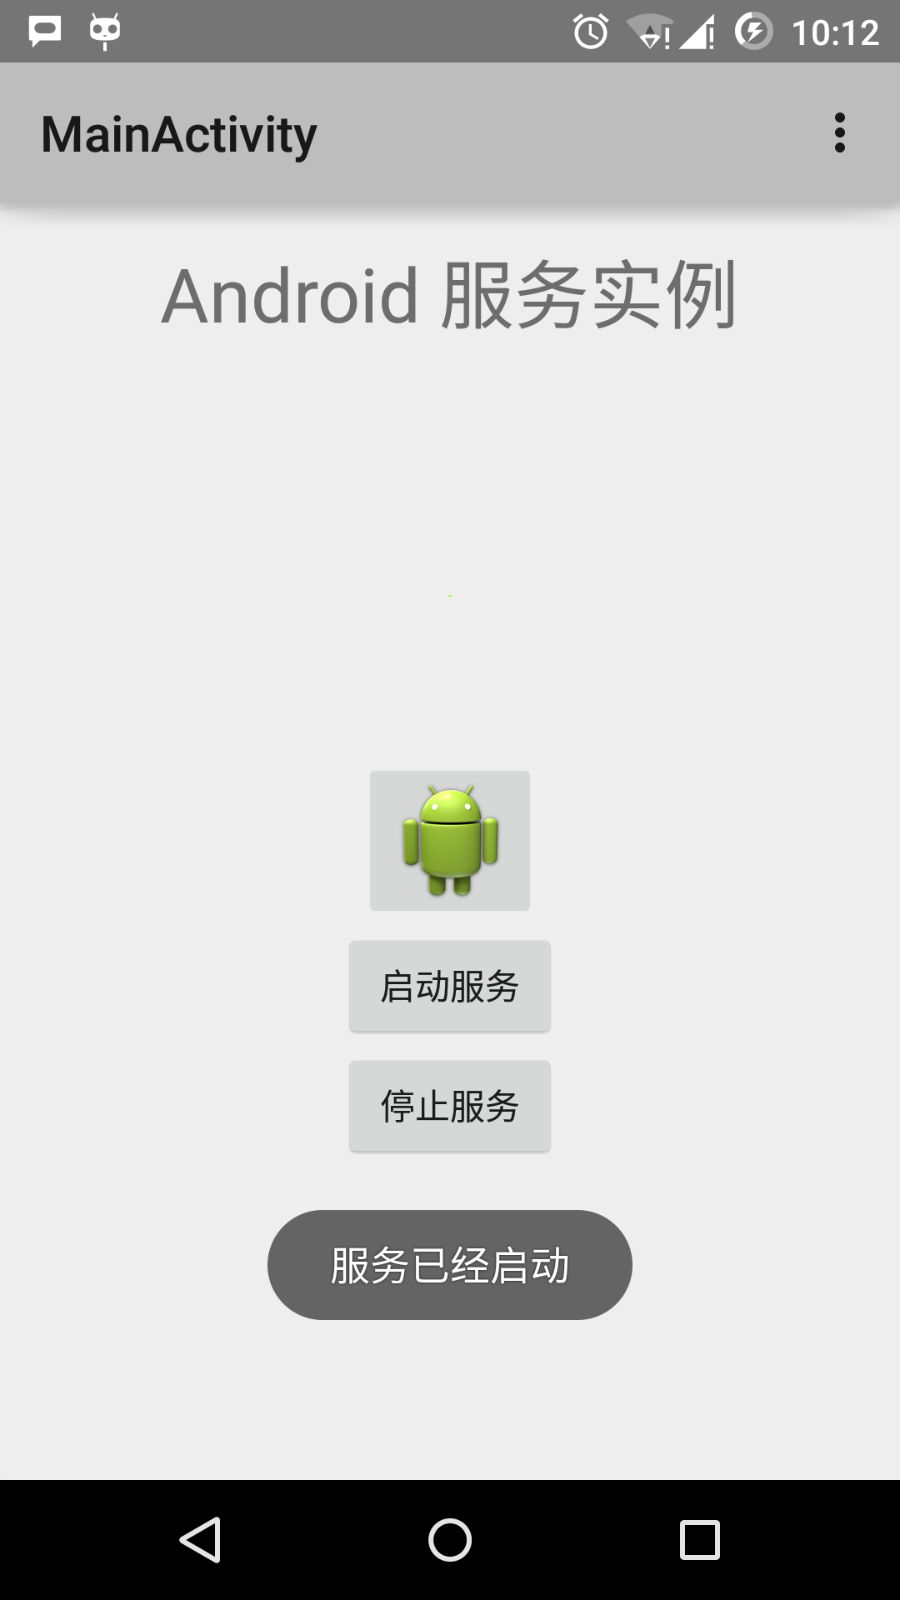
现在点击"启动服务"按钮来启动服务,这将执行我们编写的onStartCommand()方法,一条"服务已经启动"的消息在模拟器的底部出现,如下:

点击底部的"停止服务"按钮,可以停止服务。
Android 广播接收器(Broadcast Receivers)
广播接收器用于响应来自其他应用程序或者系统的广播消息。这些消息有时被称为事件或者意图。例如,应用程序可以初始化广播来让其他的应用程序知道一些数据已经被下载到设备,并可以为他们所用。这样广播接收器可以定义适当的动作来拦截这些通信。
有以下两个重要的步骤来使系统的广播意图配合广播接收器工作。
- 创建广播接收器
- 注册广播接收器
还有一个附加的步骤,要实现自定义的意图,你必须创建并广播这些意图。
创建广播接收器
广播接收器需要实现为BroadcastReceiver类的子类,并重写onReceive()方法来接收以Intent对象为参数的消息。
- public class MyReceiver extends BroadcastReceiver {
- @Override
- public void onReceive(Context context, Intent intent) {
- Toast.makeText(context, "Intent Detected.", Toast.LENGTH_LONG).show();
- }
- }
注册广播接收器
应用程序通过在AndroidManifest.xml中注册广播接收器来监听制定的广播意图。假设我们将要注册MyReceiver来监听系统产生的ACTION_BOOT_COMPLETED事件。该事件由Android系统的启动进程完成时发出。

- <application
- android:icon="@drawable/ic_launcher"
- android:label="@string/app_name"
- android:theme="@style/AppTheme" >
- <receiver android:name="MyReceiver">
- <intent-filter>
- <action android:name="android.intent.action.BOOT_COMPLETED">
- </action>
- </intent-filter>
- </receiver>
- </application>
现在,无论什么时候Android设备被启动,都将被广播接收器MyReceiver所拦截,并且在onReceive()中实现的逻辑将被执行。
有许多系统产生的事件被定义为类Intent中的静态常量值。下面的表格列举了重要的系统事件。
| 事件常量 | 描述 |
|---|---|
| android.intent.action.BATTERY_CHANGED | 持久的广播,包含电池的充电状态,级别和其他信息。 |
| android.intent.action.BATTERY_LOW | 标识设备的低电量条件。 |
| android.intent.action.BATTERY_OKAY | 标识电池在电量低之后,现在已经好了。 |
| android.intent.action.BOOT_COMPLETED | 在系统完成启动后广播一次。 |
| android.intent.action.BUG_REPORT | 显示报告bug的活动。 |
| android.intent.action.CALL | 执行呼叫数据指定的某人。 |
| android.intent.action.CALL_BUTTON | 用户点击"呼叫"按钮打开拨号器或者其他拨号的合适界面。 |
| android.intent.action.DATE_CHANGED | 日期发生改变。 |
| android.intent.action.REBOOT | 设备重启。 |
广播自定义意图
如果你想要应用程序中生成并发送自定义意图,你需要在活动类中通过sendBroadcast()来创建并发送这些意图。如果你使用sendStickyBroadcast(Intent)方法,则意图是持久的(sticky),这意味着你发出的意图在广播完成后一直保持着。
- public void broadcastIntent(View view)
- {
- Intent intent = new Intent();
- intent.setAction("com.runoob.CUSTOM_INTENT");
- sendBroadcast(intent);
- }
com.runoob.CUSTOM_INTENT的意图可以像之前我们注册系统产生的意图一样被注册。
- <application
- android:icon="@drawable/ic_launcher"
- android:label="@string/app_name"
- android:theme="@style/AppTheme" >
- <receiver android:name="MyReceiver">
- <intent-filter>
- <action android:name="com.runoob.CUSTOM_INTENT">
- </action>
- </intent-filter>
- </receiver>
- </application>
实例
这个实例将解释如何创建广播接收器来拦截自定义意图。一旦你熟悉自定义意图,你可以为应用程序编程来拦截系统产生的意图。让我们按照下面的步骤来修改Hello World实例章节中我们创建的Android应用程序。
| 步骤 | 描述 |
|---|---|
| 1 | 使用Android Studio来创建Android应用程序并命名为broadcastreceiver,并放在Hello World实例章节中的com.runoob.broadcastreceiver包下。 |
| 2 | 修改主要活动文件MainActivity.java来添加broadcastIntent()方法。 |
| 3 | 在com.runoob.broadcastreceiver包下创建名为MyReceiver.java的新的Java文件来定义广播接收器。 |
| 4 | 应用程序可以处理一个或多个自定义或者系统的意图,没有任何限制。每个你想拦截的意图都需要使用<receiver.../>标签在AndroidManifest.xml中注册。 |
| 5 | 修改res/layout/activity_main.xml文件中的默认内容来包含一个广播意图的按钮。 |
| 6 | 不需要修改字符串文件,Android Studio会注意string.xml文件。 |
| 7 | 启动Android模拟器来运行应用程序,并验证应用程序所做改变的结果。 |
下面是修改的主要活动文件src/com.runoob.broadcastreceiver/MainActivity.java的内容。这个文件包含了每个基础的生命周期方法。我们添加了broadcastIntent()方法来广播自定义事件。
- package com.runoob.broadcastreceiver;
- import android.os.Bundle;
- import android.app.Activity;
- import android.view.Menu;
- import android.content.Intent;
- import android.view.View;
- public class MainActivity extends Activity {
- @Override
- public void onCreate(Bundle savedInstanceState) {
- super.onCreate(savedInstanceState);
- setContentView(R.layout.activity_main);
- }
- @Override
- public boolean onCreateOptionsMenu(Menu menu) {
- getMenuInflater().inflate(R.menu.menu_main, menu);
- return true;
- }
- // 广播自定义意图
- public void broadcastIntent(View view){
- Intent intent = new Intent();
- intent.setAction("cn.programmer.CUSTOM_INTENT");
- sendBroadcast(intent);
- }
- }
下面是src/com.runoob.broadcastreceiver/MyReceiver.java的内容:
- package com.runoob.broadcastreceiver;
- import android.content.BroadcastReceiver;
- import android.content.Context;
- import android.content.Intent;
- import android.widget.Toast;
- public class MyReceiver extends BroadcastReceiver {
- @Override
- public void onReceive(Context context, Intent intent) {
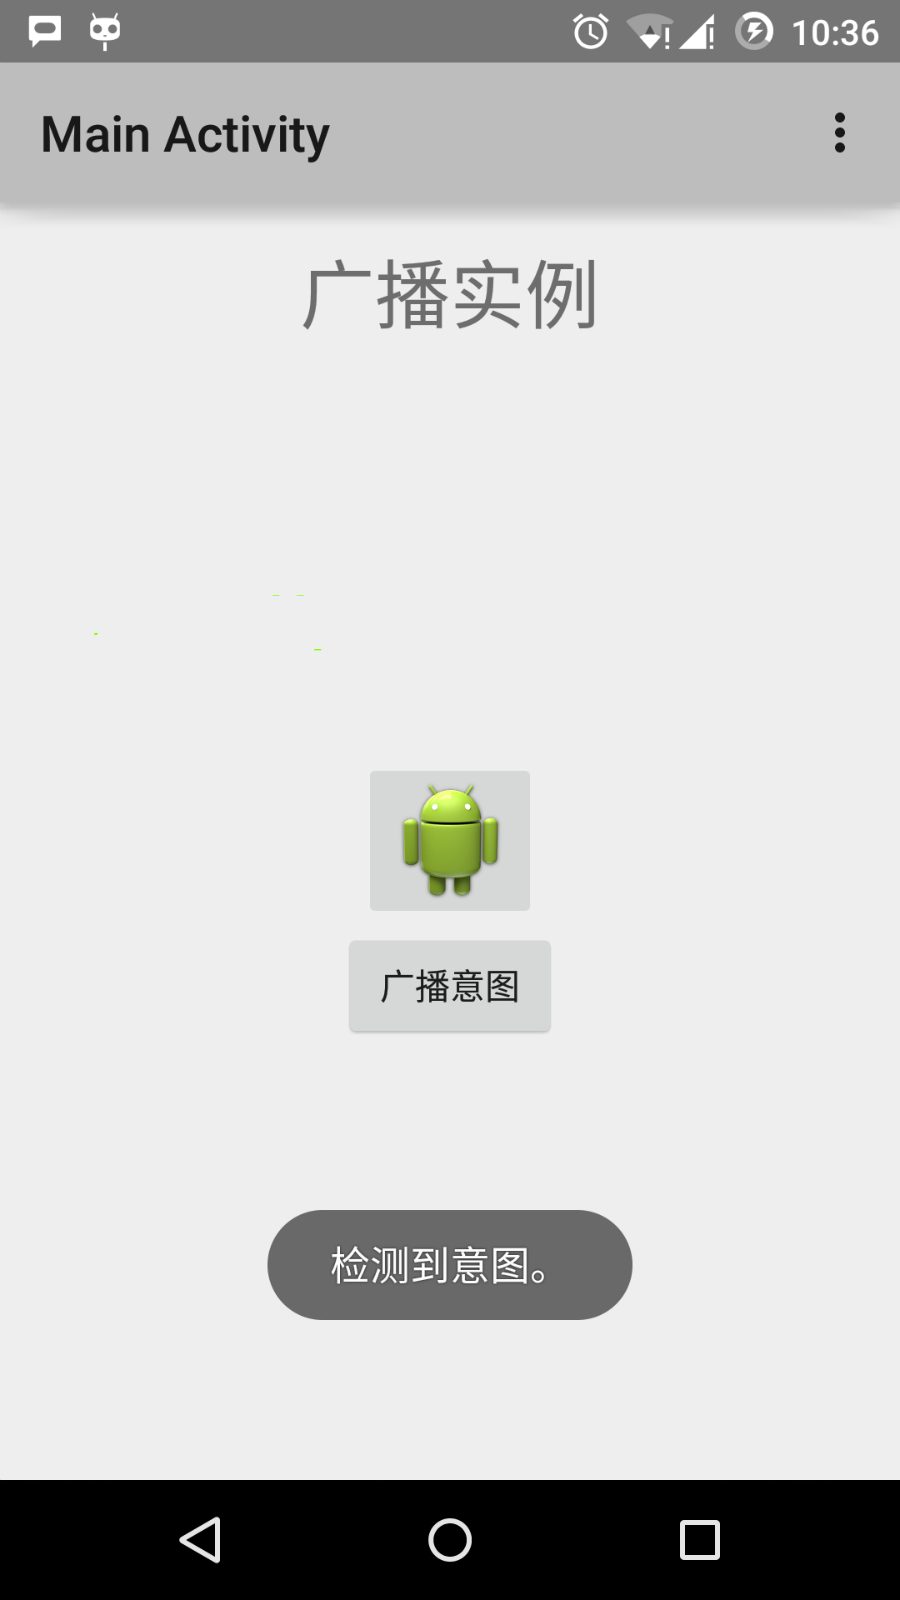
- Toast.makeText(context, "检测到意图。", Toast.LENGTH_LONG).show();
- }
- }
接下来修改AndroidManifest.xml文件。这里通过添加<receiver.../>标签来包含我们的广播接收器:
- <?xml version="1.0" encoding="utf-8"?>
- <manifest xmlns:android="http://schemas.android.com/apk/res/android"
- package="com.runoob.broadcastreceiver"
- android:versionCode="1"
- android:versionName="1.0" >
- <uses-sdk
- android:minSdkVersion="8"
- android:targetSdkVersion="22" />
- <application
- android:icon="@drawable/ic_launcher"
- android:label="@string/app_name"
- android:theme="@style/AppTheme" >
- <activity
- android:name=".MainActivity"
- android:label="@string/title_activity_main" >
- <intent-filter>
- <action android:name="android.intent.action.MAIN" />
- <category android:name="android.intent.category.LAUNCHER"/>
- </intent-filter>
- </activity>
- <receiver android:name="MyReceiver">
- <intent-filter>
- <action android:name="cn.programmer.CUSTOM_INTENT">
- </action>
- </intent-filter>
- </receiver>
- </application>
- </manifest>
下面是res/layout/activity_main.xml文件的内容,包含广播自定义意图的按钮。
- <RelativeLayout xmlns:android="http://schemas.android.com/apk/res/android"
- xmlns:tools="http://schemas.android.com/tools" android:layout_width="match_parent"
- android:layout_height="match_parent" android:paddingLeft="@dimen/activity_horizontal_margin"
- android:paddingRight="@dimen/activity_horizontal_margin"
- android:paddingTop="@dimen/activity_vertical_margin"
- android:paddingBottom="@dimen/activity_vertical_margin" tools:context=".MainActivity">
- <TextView
- android:id="@+id/textView1"
- android:layout_width="wrap_content"
- android:layout_height="wrap_content"
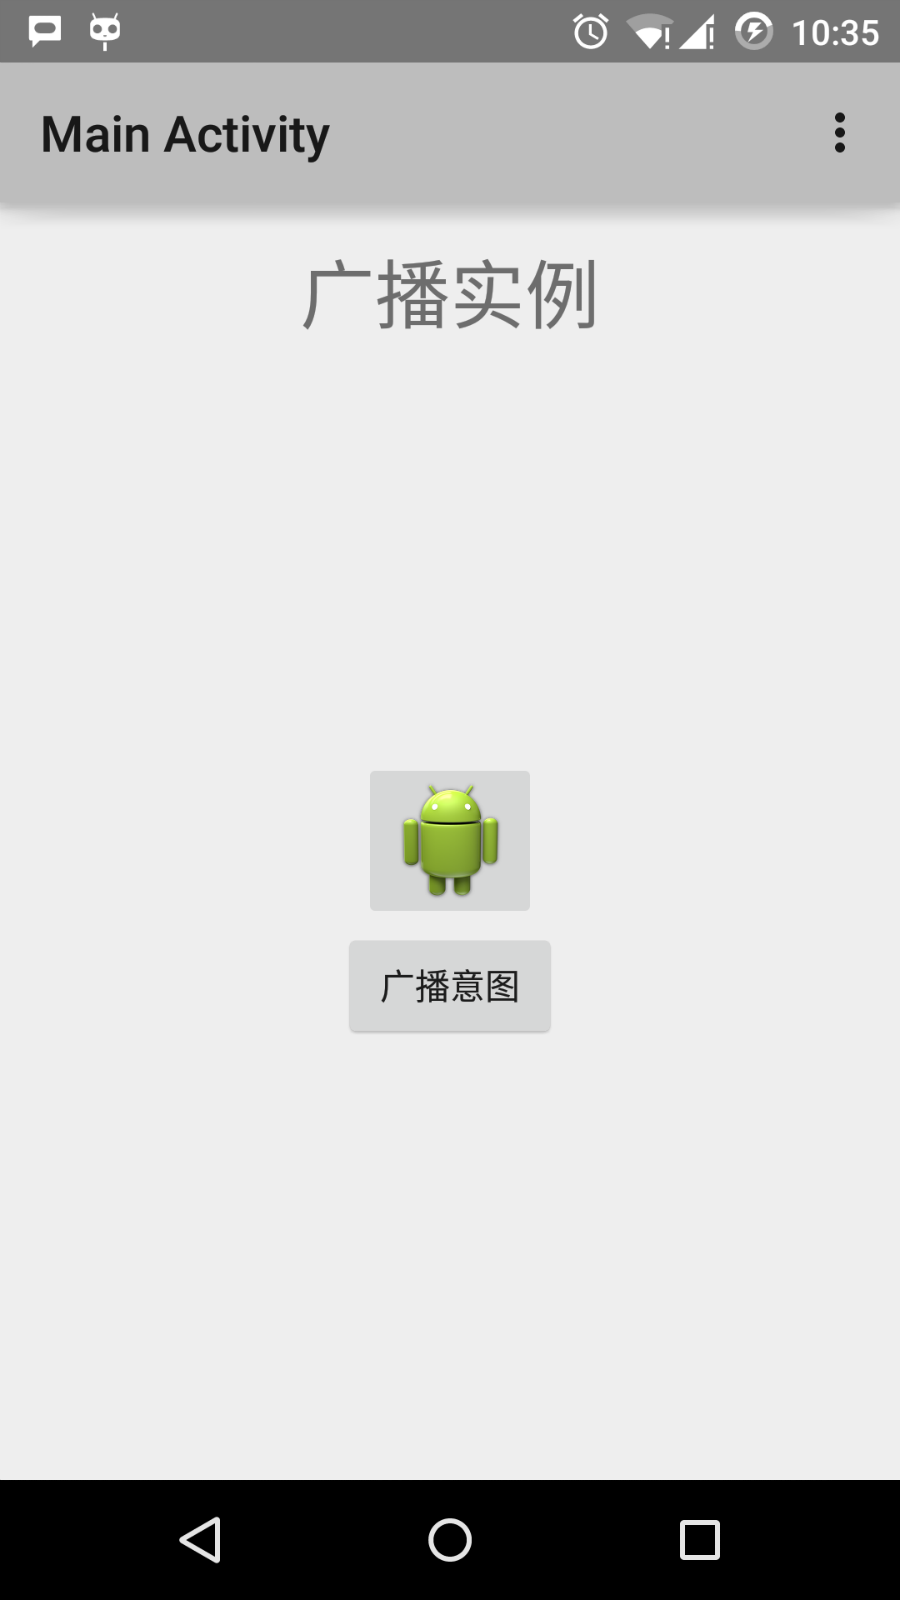
- android:text="广播实例"
- android:layout_alignParentTop="true"
- android:layout_centerHorizontal="true"
- android:textSize="30dp" />
- <TextView
- android:id="@+id/textView2"
- android:layout_width="wrap_content"
- android:layout_height="wrap_content"
- android:text="www.runoob.com"
- android:textColor="#ff87ff09"
- android:textSize="30dp"
- android:layout_above="@+id/imageButton"
- android:layout_centerHorizontal="true"
- android:layout_marginBottom="40dp" />
- <ImageButton
- android:layout_width="wrap_content"
- android:layout_height="wrap_content"
- android:id="@+id/imageButton"
- android:src="@drawable/ic_launcher"
- android:layout_centerVertical="true"
- android:layout_centerHorizontal="true" />
- <Button
- android:layout_width="wrap_content"
- android:layout_height="wrap_content"
- android:id="@+id/button2"
- android:text="广播意图"
- android:onClick="broadcastIntent"
- android:layout_below="@+id/imageButton"
- android:layout_centerHorizontal="true" />
- </RelativeLayout>
下面是res/values/strings.xml文件的内容,定义了两个新的常量。
- <?xml version="1.0" encoding="utf-8"?>
- <resources>
- <string name="app_name">Android Broadcast Receiver</string>
- <string name="action_settings">Settings</string>
- <string name="menu_settings">Settings</string>
- <string name="title_activity_main">Main Activity</string>
- </resources>
让我们运行刚刚修改的Hello World!应用程序。我假设你已经在安装环境时创建了AVD。打开你的项目中的活动文件,点击工具栏中的图标来在Android Studio中运行应用程序。Android Studio在AVD上安装应用程序并启动它。如果一切顺利,将在模拟器窗口上显示如下:
现在点击"广播意图"按钮来广播我们的自定义意图。这将广播我们的自定义意图"cn.programmer.CUSTOM_INTENT",在我们注册的广播接收器MyReceiver中拦截并执行我们实现的逻辑。模拟器的底部将出现toast。如下:
你可以尝试实现其他的广播接收器来拦截系统产生的意图,如系统启动,日期改变和低电量等。
Android - 内容提供者(Content Provider)
内容提供者组件通过请求从一个应用程序向其他的应用程序提供数据。这些请求由类 ContentResolver 的方法来处理。内容提供者可以使用不同的方式来存储数据。数据可以被存放在数据库,文件,甚至是网络。
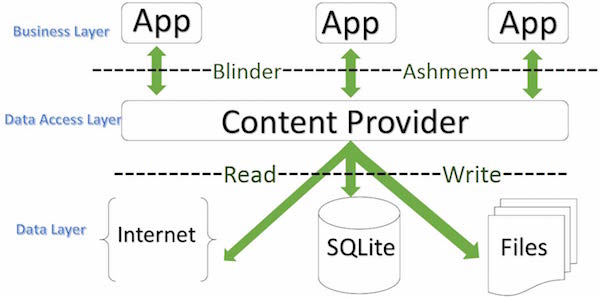
有时候需要在应用程序之间共享数据。这时内容提供者变得非常有用。
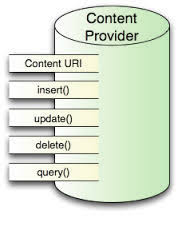
内容提供者可以让内容集中,必要时可以有多个不同的应用程序来访问。内容提供者的行为和数据库很像。你可以查询,编辑它的内容,使用 insert(), update(), delete() 和 query() 来添加或者删除内容。多数情况下数据被存储在 SQLite 数据库。
内容提供者被实现为类 ContentProvider 类的子类。需要实现一系列标准的 API,以便其他的应用程序来执行事务。
- public class MyApplication extends ContentProvider {
- }
内容URI
要查询内容提供者,你需要以如下格式的URI的形式来指定查询字符串:
- <prefix>://<authority>/<data_type>/<id>
以下是URI中各部分的具体说明:
| 部分 | 说明 |
|---|---|
| prefix | 前缀:一直被设置为content:// |
| authority | 授权:指定内容提供者的名称,例如联系人,浏览器等。第三方的内容提供者可以是全名,如:cn.programmer.statusprovider |
| data_type | 数据类型:这个表明这个特殊的内容提供者中的数据的类型。例如:你要通过内容提供者Contacts来获取所有的通讯录,数据路径是people,那么URI将是下面这样:content://contacts/people |
| id | 这个指定特定的请求记录。例如:你在内容提供者Contacts中查找联系人的ID号为5,那么URI看起来是这样:content://contacts/people/5 |
创建内容提供者
这里描述创建自己的内容提供者的简单步骤。
- 首先,你需要继承类 ContentProviderbase 来创建一个内容提供者类。
- 其次,你需要定义用于访问内容的你的内容提供者URI地址。
- 接下来,你需要创建数据库来保存内容。通常,Android 使用 SQLite 数据库,并在框架中重写 onCreate() 方法来使用 SQLiteOpenHelper 的方法创建或者打开提供者的数据库。当你的应用程序被启动,它的每个内容提供者的 onCreate() 方法将在应用程序主线程中被调用。
- 最后,使用<provider.../>标签在 AndroidManifest.xml 中注册内容提供者。
以下是让你的内容提供者正常工作,你需要在类 ContentProvider 中重写的一些方法:
- onCreate():当提供者被启动时调用。
- query():该方法从客户端接受请求。结果是返回指针(Cursor)对象。
- insert():该方法向内容提供者插入新的记录。
- delete():该方法从内容提供者中删除已存在的记录。
- update():该方法更新内容提供者中已存在的记录。
- getType():该方法为给定的URI返回元数据类型。
实例
该实例解释如何创建自己的内容提供者。让我们按照下面的步骤:
| 步骤 | 描述 |
|---|---|
| 1 | 使用 Android Studio 创建 Android 应用程序并命名为 Content Provider,在包com.runoob.contentprovider 下,并建立空活动。 |
| 2 | 修改主要活动文件 MainActivity.java 来添加两个新的方法 onClickAddName() 和 onClickRetrieveStudents()。 |
| 3 | 在包 com.runoob.contentprovider 下创建新的 Java 文件 StudentsProvider.java 来定义实际的提供者,并关联方法。 |
| 4 | 使用<provider.../>标签在 AndroidManifest.xml 中注册内容提供者。 |
| 5 | 修改 res/layout/activity_main.xml 文件的默认内容来包含添加学生记录的简单界面。 |
| 6 | 无需修改 strings.xml,Android Studio 会注意 strings.xml 文件。 |
| 7 | 启动 Android 模拟器来运行应用程序,并验证应用程序所做改变的结果。 |
下面是修改的主要活动文件 src/com.runoob.contentprovider/MainActivity.java 的内容。该文件包含每个基础的生命周期方法。我们添加了两个新的方法,onClickAddName() 和 onClickRetrieveStudents() 来让应用程序处理用户交互。
- package com.runoob.contentprovider;
- import android.net.Uri;
- import android.os.Bundle;
- import android.app.Activity;
- import android.content.ContentValues;
- import android.content.CursorLoader;
- import android.database.Cursor;
- import android.view.Menu;
- import android.view.View;
- import android.widget.EditText;
- import android.widget.Toast;
- import com.runoob.contentprovider.R;
- public class MainActivity extends Activity {
- @Override
- protected void onCreate(Bundle savedInstanceState) {
- super.onCreate(savedInstanceState);
- setContentView(R.layout.activity_main);
- }
- @Override
- public boolean onCreateOptionsMenu(Menu menu) {
- getMenuInflater().inflate(R.menu.menu_main, menu);
- return true;
- }
- public void onClickAddName(View view) {
- // Add a new student record
- ContentValues values = new ContentValues();
- values.put(StudentsProvider.NAME,
- ((EditText)findViewById(R.id.editText2)).getText().toString());
- values.put(StudentsProvider.GRADE,
- ((EditText)findViewById(R.id.editText3)).getText().toString());
- Uri uri = getContentResolver().insert(
- StudentsProvider.CONTENT_URI, values);
- Toast.makeText(getBaseContext(),
- uri.toString(), Toast.LENGTH_LONG).show();
- }
- public void onClickRetrieveStudents(View view) {
- // Retrieve student records
- String URL = "content://com.example.provider.College/students";
- Uri students = Uri.parse(URL);
- Cursor c = managedQuery(students, null, null, null, "name");
- if (c.moveToFirst()) {
- do{
- Toast.makeText(this,
- c.getString(c.getColumnIndex(StudentsProvider._ID)) +
- ", " + c.getString(c.getColumnIndex( StudentsProvider.NAME)) +
- ", " + c.getString(c.getColumnIndex( StudentsProvider.GRADE)),
- Toast.LENGTH_SHORT).show();
- } while (c.moveToNext());
- }
- }
- }
在包com.runoob.contentprovider下创建新的文件StudentsProvider.java。以下是src/com.runoob.contentprovider/StudentsProvider.java的内容。
- package com.runoob.contentprovider;
- import java.util.HashMap;
- import android.content.ContentProvider;
- import android.content.ContentUris;
- import android.content.ContentValues;
- import android.content.Context;
- import android.content.UriMatcher;
- import android.database.Cursor;
- import android.database.SQLException;
- import android.database.sqlite.SQLiteDatabase;
- import android.database.sqlite.SQLiteOpenHelper;
- import android.database.sqlite.SQLiteQueryBuilder;
- import android.net.Uri;
- import android.text.TextUtils;
- public class StudentsProvider extends ContentProvider {
- static final String PROVIDER_NAME = "com.example.provider.College";
- static final String URL = "content://" + PROVIDER_NAME + "/students";
- static final Uri CONTENT_URI = Uri.parse(URL);
- static final String _ID = "_id";
- static final String NAME = "name";
- static final String GRADE = "grade";
- private static HashMap<String, String> STUDENTS_PROJECTION_MAP;
- static final int STUDENTS = 1;
- static final int STUDENT_ID = 2;
- static final UriMatcher uriMatcher;
- static{
- uriMatcher = new UriMatcher(UriMatcher.NO_MATCH);
- uriMatcher.addURI(PROVIDER_NAME, "students", STUDENTS);
- uriMatcher.addURI(PROVIDER_NAME, "students/#", STUDENT_ID);
- }
- /**
- * 数据库特定常量声明
- */
- private SQLiteDatabase db;
- static final String DATABASE_NAME = "College";
- static final String STUDENTS_TABLE_NAME = "students";
- static final int DATABASE_VERSION = 1;
- static final String CREATE_DB_TABLE =
- " CREATE TABLE " + STUDENTS_TABLE_NAME +
- " (_id INTEGER PRIMARY KEY AUTOINCREMENT, " +
- " name TEXT NOT NULL, " +
- " grade TEXT NOT NULL);";
- /**
- * 创建和管理提供者内部数据源的帮助类.
- */
- private static class DatabaseHelper extends SQLiteOpenHelper {
- DatabaseHelper(Context context){
- super(context, DATABASE_NAME, null, DATABASE_VERSION);
- }
- @Override
- public void onCreate(SQLiteDatabase db)
- {
- db.execSQL(CREATE_DB_TABLE);
- }
- @Override
- public void onUpgrade(SQLiteDatabase db, int oldVersion, int newVersion) {
- db.execSQL("DROP TABLE IF EXISTS " + STUDENTS_TABLE_NAME);
- onCreate(db);
- }
- }
- @Override
- public boolean onCreate() {
- Context context = getContext();
- DatabaseHelper dbHelper = new DatabaseHelper(context);
- /**
- * 如果不存在,则创建一个可写的数据库。
- */
- db = dbHelper.getWritableDatabase();
- return (db == null)? false:true;
- }
- @Override
- public Uri insert(Uri uri,ContentValues values){/**
- * 添加新学生记录
- */long rowID = db.insert( STUDENTS_TABLE_NAME,"", values);/**
- * 如果记录添加成功
- */if(rowID >0){Uri _uri =ContentUris.withAppendedId(CONTENT_URI, rowID);
- getContext().getContentResolver().notifyChange(_uri,null);return _uri;}thrownewSQLException("Failed to add a record into "+ uri);}@OverridepublicCursor query(Uri uri,String[] projection,String selection,String[] selectionArgs,String sortOrder){SQLiteQueryBuilder qb =newSQLiteQueryBuilder();
- qb.setTables(STUDENTS_TABLE_NAME);switch(uriMatcher.match(uri)){case STUDENTS:
- qb.setProjectionMap(STUDENTS_PROJECTION_MAP);break;case STUDENT_ID:
- qb.appendWhere( _ID +"="+ uri.getPathSegments().get(1));break;default:thrownewIllegalArgumentException("Unknown URI "+ uri);}if(sortOrder ==null|| sortOrder ==""){/**
- * 默认按照学生姓名排序
- */
- sortOrder = NAME;}Cursor c = qb.query(db, projection, selection, selectionArgs,null,null, sortOrder);/**
- * 注册内容URI变化的监听器
- */
- c.setNotificationUri(getContext().getContentResolver(), uri);return c;}@Overridepublicintdelete(Uri uri,String selection,String[] selectionArgs){int count =0;switch(uriMatcher.match(uri)){case STUDENTS:
- count = db.delete(STUDENTS_TABLE_NAME, selection, selectionArgs);break;case STUDENT_ID:String id = uri.getPathSegments().get(1);
- count = db.delete( STUDENTS_TABLE_NAME, _ID +" = "+ id +(!TextUtils.isEmpty(selection)?" AND ("+ selection +')':""), selectionArgs);break;default:thrownewIllegalArgumentException("Unknown URI "+ uri);}
- getContext().getContentResolver().notifyChange(uri,null);return count;}@Overridepublicint update(Uri uri,ContentValues values,String selection,String[] selectionArgs){int count =0;switch(uriMatcher.match(uri)){case STUDENTS:
- count = db.update(STUDENTS_TABLE_NAME, values, selection, selectionArgs);break;case STUDENT_ID:
- count = db.update(STUDENTS_TABLE_NAME, values, _ID +" = "+ uri.getPathSegments().get(1)+(!TextUtils.isEmpty(selection)?" AND ("+selection +')':""), selectionArgs);break;default:thrownewIllegalArgumentException("Unknown URI "+ uri );}
- getContext().getContentResolver().notifyChange(uri,null);return count;}@OverridepublicString getType(Uri uri){switch(uriMatcher.match(uri)){/**
- * 获取所有学生记录
- */case STUDENTS:return"vnd.android.cursor.dir/vnd.example.students";/**
- * 获取一个特定的学生
- */case STUDENT_ID:return"vnd.android.cursor.item/vnd.example.students";default:thrownewIllegalArgumentException("Unsupported URI: "+ uri);}}}
以下是修改后的AndroidManifest.xml文件。这里添加了<provider.../>标签来包含我们的内容提供者:
- <?xml version="1.0" encoding="utf-8"?>
- <manifest xmlns:android="http://schemas.android.com/apk/res/android"
- package="com.runoob.contentprovider"
- android:versionCode="1"
- android:versionName="1.0" >
- <uses-sdk
- android:minSdkVersion="8"
- android:targetSdkVersion="22" />
- <application
- android:allowBackup="true"
- android:icon="@drawable/ic_launcher"
- android:label="@string/app_name"
- android:theme="@style/AppTheme" >
- <activity
- android:name="com.runoob.contentprovider.MainActivity"
- android:label="@string/app_name" >
- <intent-filter>
- <action android:name="android.intent.action.MAIN" />
- <category android:name="android.intent.category.LAUNCHER" />
- </intent-filter>
- </activity>
- <provider android:name="StudentsProvider"
- android:authorities="com.example.provider.College" >
- </provider>
- </application>
- </manifest>
下面是res/layout/activity_main.xml文件的内容:
- <RelativeLayout xmlns:android="http://schemas.android.com/apk/res/android"
- xmlns:tools="http://schemas.android.com/tools" android:layout_width="match_parent"
- android:layout_height="match_parent" android:paddingLeft="@dimen/activity_horizontal_margin"
- android:paddingRight="@dimen/activity_horizontal_margin"
- android:paddingTop="@dimen/activity_vertical_margin"
- android:paddingBottom="@dimen/activity_vertical_margin" tools:context=".MainActivity">
- <TextView
- android:id="@+id/textView1"
- android:layout_width="wrap_content"
- android:layout_height="wrap_content"
- android:text="内容提供者实例"
- android:layout_alignParentTop="true"
- android:layout_centerHorizontal="true"
- android:textSize="30dp" />
- <TextView
- android:id="@+id/textView2"
- android:layout_width="wrap_content"
- android:layout_height="wrap_content"
- android:text="www.runoob.com"
- android:textColor="#ff87ff09"
- android:textSize="30dp"
- android:layout_below="@+id/textView1"
- android:layout_centerHorizontal="true" />
- <ImageButton
- android:layout_width="wrap_content"
- android:layout_height="wrap_content"
- android:id="@+id/imageButton"
- android:src="@drawable/ic_launcher"
- android:layout_below="@+id/textView2"
- android:layout_centerHorizontal="true" />
- <Button
- android:layout_width="wrap_content"
- android:layout_height="wrap_content"
- android:id="@+id/button2"
- android:text="添加"
- android:layout_below="@+id/editText3"
- android:layout_alignRight="@+id/textView2"
- android:layout_alignEnd="@+id/textView2"
- android:layout_alignLeft="@+id/textView2"
- android:layout_alignStart="@+id/textView2"
- android:onClick="onClickAddName"/>
- <EditText
- android:layout_width="wrap_content"
- android:layout_height="wrap_content"
- android:id="@+id/editText"
- android:layout_below="@+id/imageButton"
- android:layout_alignRight="@+id/imageButton"
- android:layout_alignEnd="@+id/imageButton" />
- <EditText
- android:layout_width="wrap_content"
- android:layout_height="wrap_content"
- android:id="@+id/editText2"
- android:layout_alignTop="@+id/editText"
- android:layout_alignLeft="@+id/textView1"
- android:layout_alignStart="@+id/textView1"
- android:layout_alignRight="@+id/textView1"
- android:layout_alignEnd="@+id/textView1"
- android:hint="姓名"
- android:textColorHint="@android:color/holo_blue_light" />
- <EditText
- android:layout_width="wrap_content"
- android:layout_height="wrap_content"
- android:id="@+id/editText3"
- android:layout_below="@+id/editText"
- android:layout_alignLeft="@+id/editText2"
- android:layout_alignStart="@+id/editText2"
- android:layout_alignRight="@+id/editText2"
- android:layout_alignEnd="@+id/editText2"
- android:hint="年级"
- android:textColorHint="@android:color/holo_blue_bright" />
- <Button
- android:layout_width="wrap_content"
- android:layout_height="wrap_content"
- android:text="查询"
- android:id="@+id/button"
- android:layout_below="@+id/button2"
- android:layout_alignRight="@+id/editText3"
- android:layout_alignEnd="@+id/editText3"
- android:layout_alignLeft="@+id/button2"
- android:layout_alignStart="@+id/button2"
- android:onClick="onClickRetrieveStudents"/>
- </RelativeLayout>
确保res/values/strings.xml文件中有以下内容:
- <?xml version="1.0" encoding="utf-8"?>
- <resources>
- <string name="app_name">Content Provider</string>
- <string name="action_settings">Settings</string>
- </resources>
让我们运行刚刚修改的 Content Provider 应用程序。我假设你已经在安装环境时创建了 AVD。打开你的项目中的活动文件,点击工具栏中的图标来在 Android Studio 中运行应用程序。Android Studio 在 AVD 上安装应用程序并启动它。如果一切顺利,将在模拟器窗口上显示如下:
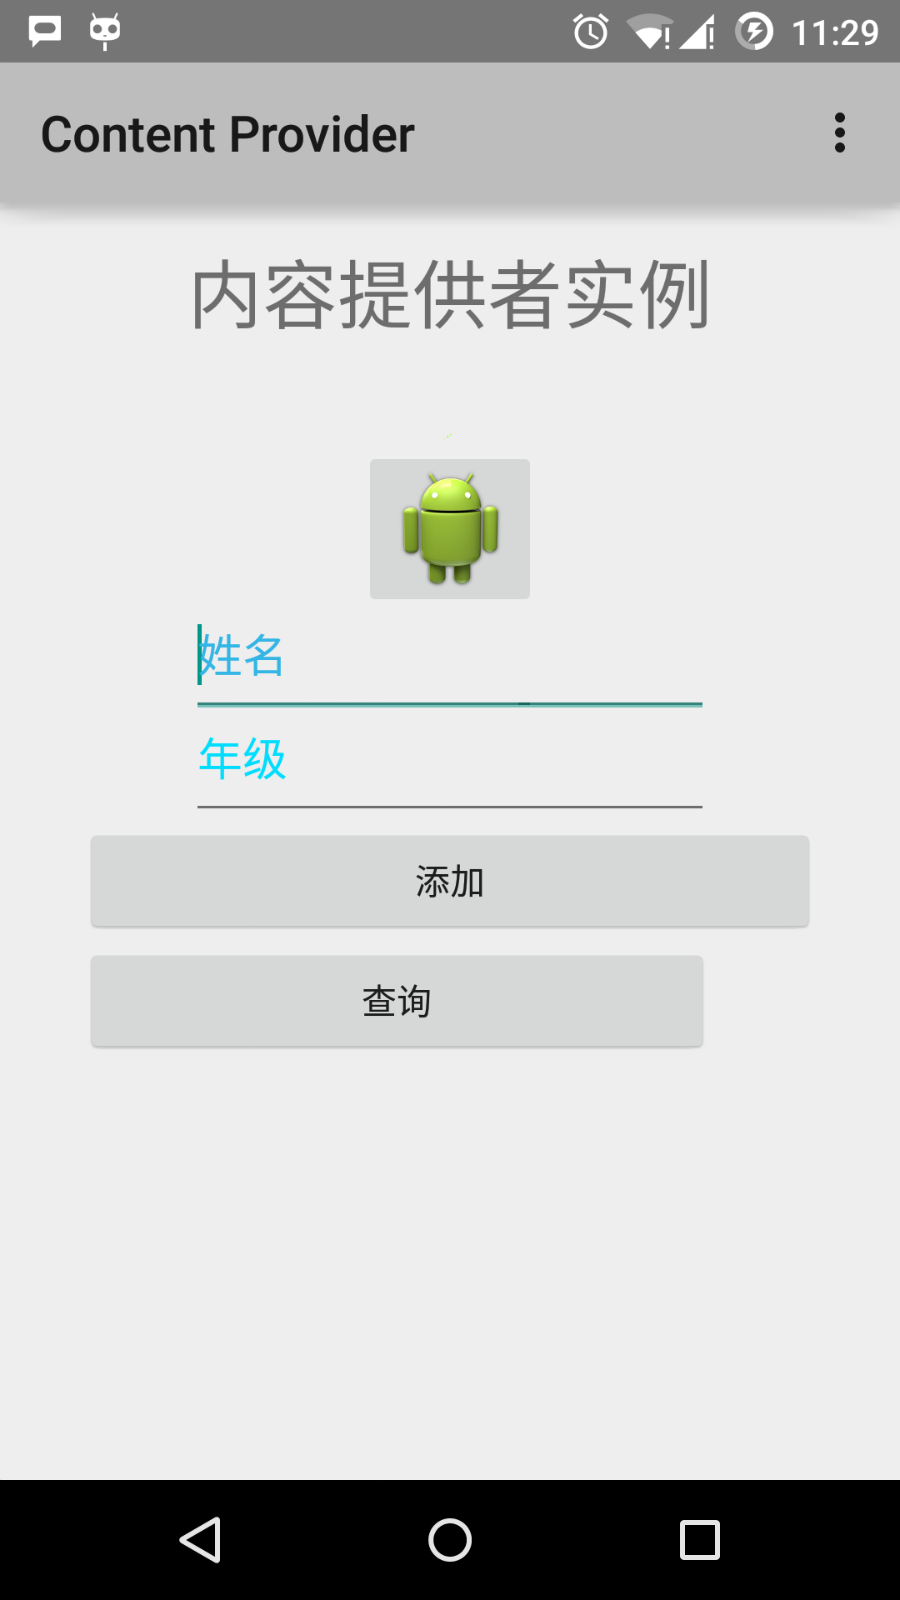
输入姓名和年级,并点击"添加"按钮,这将在数据中添加一条学生记录,并在底部删除一条信息。信息内容显示包含添加进数据库的记录数的内容提供者URI。这个操作使用了insert()方法。重复这个过程在我们的内容提供者的数据库中添加更多的学生。
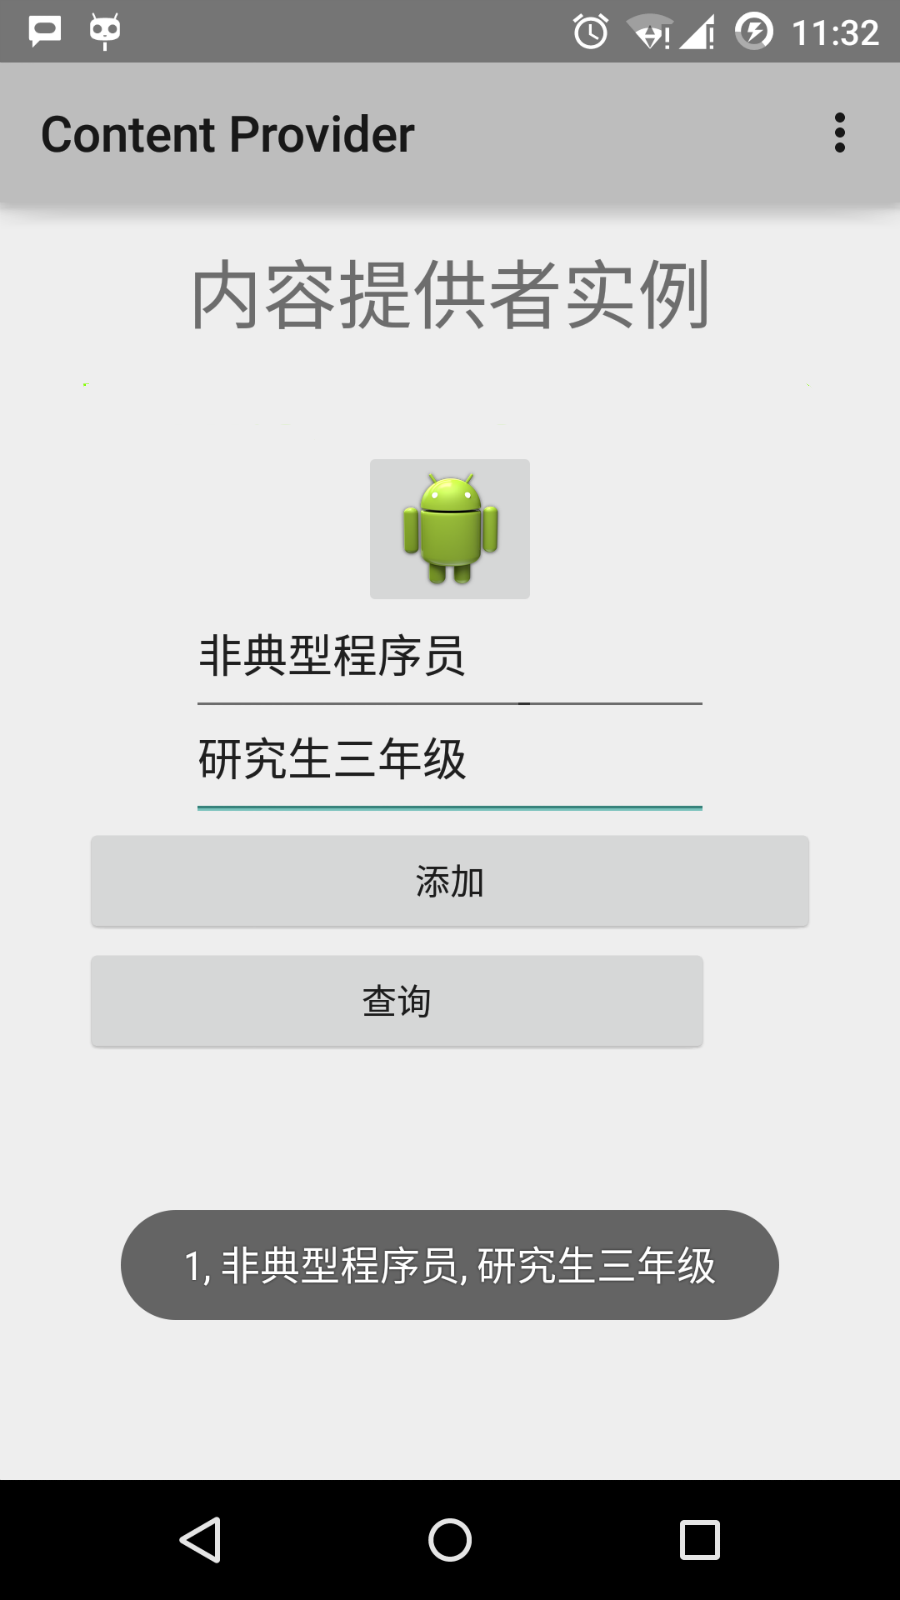
一旦你完成数据库记录的添加,是时候向内容提供者要求给回这些记录。点击"查询"按钮,这将通过实现的 query() 方法来获取并显示所有的数据记录。
你可以在 MainActivity.java 中提供回调方法,来编写更新和删除的操作,并修改用户界面来添加更新和删除操作。
你可以通过这种方式使用已有的内容提供者,如通讯录。你也可以通过这种方式来开发一个优秀的面向数据库的应用,你可以像上面介绍的实例那样来执行素有的数据库操作,如读、写、更新和删除。
Android 碎片(Fragment)
碎片是活动的一部分,使得活动更加的模块化设计。我们可以认为碎片是一种子活动。
下面是关于碎片的重要知识点 -
- 碎片拥有自己的布局,自己的行为及自己的生命周期回调。
- 当活动在运行的时候,你可以在活动中添加或者移除碎片。
- 你可以合并多个碎片在一个单一的活动中来构建多栏的UI。
- 碎片可以被用在多个活动中。
- 碎片的生命周期和它的宿主活动紧密关联。这意味着活动被暂停,所有活动中的碎片被停止。
- 碎片可以实现行为而没有用户界面组件。
- 碎片是 Android API 版本11中被加入到 Android API。
通过继承 Fragment 类来创建碎片。可以通过使用 元素在活动的布局文件中声明碎片来在你的活动中插入碎片。
在引入碎片之前,由于每次给定的一个时间点在屏幕上只能显示单一的活动,因此我们有一个局限。我们无法分割设备屏幕并且独立的控制不同的部分。伴随着碎片的引入,我们获得了更大的灵活性,并使得一个时间点只能在屏幕上有一个单一活动的限制被移除。现在我们可以有单一的活动,但每个活动由多个碎片组装,每个碎片有自己的布局,事件和完整的生命周期。
下面是一个典型的示例演示如何让两个由碎片定义的UI模块,在为平板设计的活动中组合,在为手持设备设计的活动中分离。
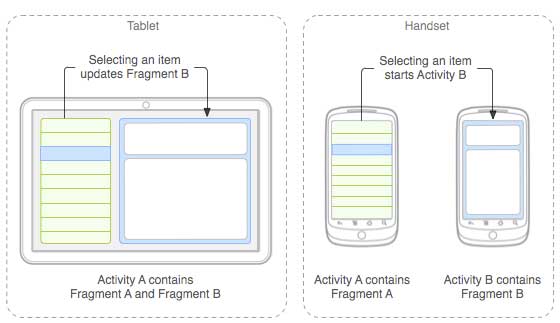
当运行在在平板尺寸的设备上,这个应用程序可以在活动A中嵌入两个碎片。在手机设备屏幕上,由于没有足够的空间,活动A仅包含有文章列表的碎片,当用户点击文章时,启动包含第二个碎片的活动B来阅读文章。
碎片的生命周期
Android 的碎片拥有自己的生命周期,与 Android 的活动很相似。下面简单介绍它生命周期的不同阶段。
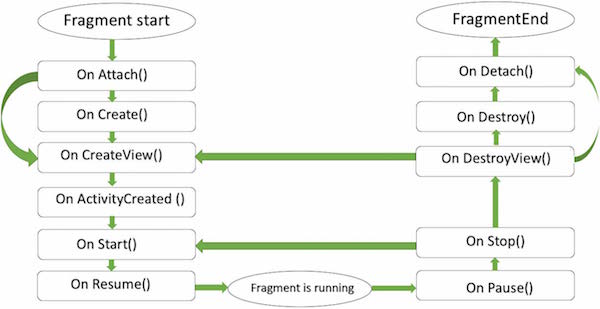
这是在类fragment中你可以重写的方法列表:
- onAttach(): 碎片实例被关联到活动实例。碎片和活动还没有完全初始化。通常,你在该方法中获取到活动的引用,在碎片将来的初始化工作中被使用。
- onCreate(): 当创建碎片时,系统调用该方法。你需要初始化一些碎片的必要组件。这些组件是当碎片被暂停、停止时需要保留的,以便被恢复。
- onCreateView(): 当碎片将要第一次绘制它的用户界面时系统调用该方法。为了绘制碎片的UI,你需要从该方法中返回一个代表碎片根布局的View组件。如果该碎片不提供用户界面,直接返回null。
- onActivityCreated: 当宿主活动被创建,在onCreateView()方法之后调用该方法。活动和碎片实例与活动的视图层级被创建。这时,视图可以通过findViewById()方法来访问。在这个方法中,你可以实例化需要Context对象的对象。
- onStart(): 碎片可见时调用该方法。
- onResume(): 碎片可交互时调用该方法。
- onPause(): 当首次表明用户将要离开碎片时系统调用该方法。通常,这里你需要提交任何的会超出用户会话的持久化的变化。
- onStop(): 碎片将要被停止时调用。
- onDestroyView(): 调用该方法后,碎片将要被销毁。
- onDestroy(): 该方法被用来清理碎片的状态。但在Android平台并不保证一定被调用。
如何使用碎片?
这里介绍创建碎片的简单步骤。
- 首先决定在活动中需要使用多少个碎片。例如,我们需要使用两个碎片来处理设备的横屏和竖屏两种模式。
- 下一步,基于碎片数量,创建继承自类Fragment的类。类Fragment包含上面提到的回调函数。根据你的需求重写任意的方法。
- 对应每个片段,你需要在XML文件中创建布局。这些文件中包含已定义的碎片的布局。
- 最后,基于需求修改活动文件来定义实际的碎片替换逻辑。
碎片类型
基本的碎片可以分为如下所示的三种:
- 单帧碎片 - 单帧碎片被如移动电话之类的手持设备使用。一个碎片如同一个视频一样显示。
- 列表碎片 - 包含有特殊列表视图的碎片被叫做列表碎片。
- 碎片过渡 - 与碎片事务一起使用。可以从一个碎片移动到另外一个碎片。
Android 单帧碎片
单帧碎片:单帧碎片是为小屏幕设备所设计的,如手持设备(移动电话),Android 3.0 以上版本支持。
实例
该实例解释如何创建自己的碎片。这里我们创建两个碎片,其中一个被使用在设备是横屏的时候,另一个被使用在设备是竖屏的时候。下面让我们按照步骤开始吧。
| 步骤 | 描述 |
|---|---|
| 1 | 使用 Android Studio IDE 来创建一个 Android 应用程序,命名为 Single Fragments,包名 cn.uprogrammer.singlefragments。 |
| 2 | 修改如下所示的主活动文件 MainActivity.java。这里我们将要检查设备的方向,并基于此切换不同的碎片。 |
| 3 | 在 cn.uprogrammer.singlefragments 包下创建 PortraitFragment.java 和 LandscapeFragment.java 两个文件,并关联方法。 |
| 4 | 创建布局文件 res/layout/landscape_fragment.xml 和 res/layout/portrait_fragment.xml 来定义两个碎片的布局。 |
| 5 | 修改 res/layout/activity_main.xml 来包含两个碎片。 |
| 6 | 在 res/values/strings.xml 中定义需要的常量。 |
| 7 | 启动Android模拟器来运行应用程序,并验证应用程序所做改变的结果。 |
下面是主要活动文件 src/cn.uprogrammer.singlefragments/MainActivity.java 的内容:
- package cn.uprogrammer.singlefragment;
- import android.os.Bundle;
- import android.app.Activity;
- import android.app.FragmentManager;
- import android.app.FragmentTransaction;
- import android.content.res.Configuration;
- public class MainActivity extends Activity {
- @Override
- protected void onCreate(Bundle savedInstanceState) {
- super.onCreate(savedInstanceState);
- Configuration config = getResources().getConfiguration();
- FragmentManager fragmentManager = getFragmentManager();
- FragmentTransaction fragmentTransaction =
- fragmentManager.beginTransaction();
- /**
- * 检测设备方向,并做相应地操作。
- */
- if (config.orientation == Configuration.ORIENTATION_LANDSCAPE) {
- /**
- * 设备的横屏模式。
- */
- LandscapeFragment ls_fragment = new LandscapeFragment();
- fragmentTransaction.replace(android.R.id.content, ls_fragment);
- }else{
- /**
- * 设备的竖屏模式。
- */
- PortraitFragment pm_fragment = new PortraitFragment();
- fragmentTransaction.replace(android.R.id.content, pm_fragment);
- }
- fragmentTransaction.commit();
- }
- }
在包 cn.uprogrammer.singlefragments 下创建两个碎片文件 LandscapeFragment.java 和 PortraitFragment.java。
以下是 LandscapeFragment.java 文件的内容:
- package cn.uprogrammer.singlefragment;
- import android.app.Fragment;
- import android.os.Bundle;
- import android.view.LayoutInflater;
- import android.view.View;
- import android.view.ViewGroup;
- public class LandscapeFragment extends Fragment {
- @Override
- public View onCreateView(LayoutInflater inflater,
- ViewGroup container, Bundle savedInstanceState) {
- /**
- * Inflate the layout for this fragment
- */
- return inflater.inflate(
- R.layout.landscape_fragment, container, false);
- }
- }
以下是 PortraitFragment.java 文件的内容:
- package cn.uprogrammer.singlefragment;
- import android.app.Fragment;
- import android.os.Bundle;
- import android.view.LayoutInflater;
- import android.view.View;
- import android.view.ViewGroup;
- public class PortraitFragment extends Fragment {
- @Override
- public View onCreateView(LayoutInflater inflater,
- ViewGroup container, Bundle savedInstanceState) {
- /**
- * Inflate the layout for this fragment
- */
- return inflater.inflate(
- R.layout.portrait_fragment, container, false);
- }
- }
在目录 res/layout 目录下创建2个布局文件 landscape_fragment.xml 和 portrait_fragment.xml。
以下是 landscape_fragment.xml 文件的内容:
- <?xml version="1.0" encoding="utf-8"?>
- <LinearLayout
- xmlns:android="http://schemas.android.com/apk/res/android"
- android:orientation="vertical"
- android:layout_width="fill_parent"
- android:layout_height="fill_parent"
- android:background="#7bae16">
- <TextView
- android:layout_width="fill_parent"
- android:layout_height="wrap_content"
- android:text="@string/landscape_message"
- android:textColor="#000000"
- android:textSize="28sp" />
- <!-- More GUI components go here -->
- </LinearLayout>
以下是 portrait_fragment.xml 文件的内容:
- <?xml version="1.0" encoding="utf-8"?>
- <LinearLayout
- xmlns:android="http://schemas.android.com/apk/res/android"
- android:orientation="horizontal"
- android:layout_width="fill_parent"
- android:layout_height="fill_parent"
- android:background="#666666">
- <TextView
- android:layout_width="fill_parent"
- android:layout_height="wrap_content"
- android:text="@string/portrait_message"
- android:textColor="#000000"
- android:textSize="28sp" />
- <!-- More GUI components go here -->
- </LinearLayout>
以下是 res/layout/activity_main.xml 文件的内容,其中包含两个碎片:
- <?xml version="1.0" encoding="utf-8"?>
- <LinearLayout xmlns:android="http://schemas.android.com/apk/res/android"
- xmlns:tools="http://schemas.android.com/tools"
- android:layout_width="fill_parent"
- android:layout_height="fill_parent"
- android:orientation="horizontal">
- <fragment
- android:id="@+id/landscape_fragment"
- android:layout_weight="1"
- android:layout_width="0dp"
- android:layout_height="match_parent" />
- <fragment
- android:id="@+id/portrait_fragment"
- android:layout_weight="2"
- android:layout_width="0dp"
- android:layout_height="match_parent" />
- </LinearLayout>
确保 res/values/strings.xml 文件包含如下内容:
- <?xml version="1.0" encoding="utf-8"?>
- <resources>
- <string name="app_name">Single Fragment</string>
- <string name="hello_world">Hello world!</string>
- <string name="action_settings">Settings</string>
- <string name="landscape_message">这是横屏模式碎片</string>
- <string name="portrait_message">这是竖屏模式碎片</string>
- </resources>
让我们运行刚刚修改的 Single Fragments 应用程序。我假设你已经在安装环境时创建了 AVD。打开你的项目中的活动文件,点击工具栏中的图标来在 Android Studio 中运行应用程序。Android Studio 在 AVD 上安装应用程序并启动它。如果一切顺利,将在模拟器窗口上显示如下:
Android 列表碎片
列表碎片的基本实现是用来在碎片中创建项目列表
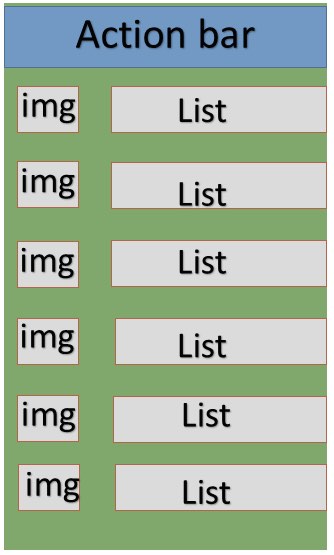
实例
这个实例解释如何基于 ArrayAdapter 来创建列表碎片。让我们按照下面的步骤开始:
| 步骤 | 描述 |
|---|---|
| 1 | 使用 Android Studio 创建 Android 应用程序,命名为 List Fragment,包名为 cn.uprogrammer.listfragment |
| 2 | 修改字符串文件,在 res/values/string.xml 中添加新的字符串常量 |
| 3 | 在 res/layout 下创建名为 list_fragment.xml 的布局文件来定义列表碎片,并在 activity_main.xml 中添加 标签 |
| 4 | 创建 MyListFragment.java 文件,其中包含 onCreateView(), onActivityCreated() 和 OnItemClickListener()。 |
| 5 | 启动Android模拟器来运行应用程序,并验证应用程序所做改变的结果。 |
在开始编码前,在 res/values 目录下的 string.xml 中初始化字符串常量。
- <?xml version="1.0" encoding="utf-8"?>
- <resources>
- <string name="app_name">listfragment</string>
- <string name="action_settings">Settings</string>
- <string name="hello_world">Hello world!</string>
- <string name="title_activity_main">List Fragment Demo</string>
- <string name="imgdesc">imgdesc</string>
- <string-array name="Planets">
- <item>Sun</item>
- <item>Mercury</item>
- <item>Venus</item>
- <item>Earth</item>
- <item>Mars</item>
- <item>Jupiter</item>
- <item>Saturn</item>
- <item>Uranus</item>
- <item>Neptune</item>
- </string-array>
- </resources>
以下是 res/layout/activity_main.xml 文件的内容,其中包含线性布局和碎片标签。
- <?xml version="1.0" encoding="utf-8"?>
- <LinearLayout
- xmlns:android="http://schemas.android.com/apk/res/android"
- android:layout_width="match_parent"
- android:layout_height="match_parent"
- android:orientation="vertical" >
- <fragment
- android:id="@+id/fragment1"
- android:name="cn.uprogrammer.listfragment.MyListFragment"
- android:layout_width="match_parent"
- android:layout_height="match_parent" />
- </LinearLayout>
以下是 res/layout/list_fragment.xml 文件的内容,其中包含线性布局,列表视图 和 TextView。
- <?xml version="1.0" encoding="utf-8"?>
- <LinearLayout
- xmlns:android="http://schemas.android.com/apk/res/android"
- android:layout_width="match_parent"
- android:layout_height="match_parent"
- android:orientation="vertical" >
- <ListView
- android:id="@android:id/list"
- android:layout_width="match_parent"
- android:layout_height="wrap_content" >
- </ListView>
- <TextView
- android:id="@android:id/empty"
- android:layout_width="match_parent"
- android:layout_height="wrap_content" >
- </TextView>
- </LinearLayout>
以下是 src/cn.uprogrammer.listfragment/MyListFragment.java 文件的内容。在开始编码之前,需要按照如下的几个步骤:
- 创建 MyListFragment 类,继承自 ListFragment。
- 在 onCreateView() 方法内,使用上面定义的 list_fragment xml 布局来填充视图。
- 在 onActivityCreated() 方法内, 使用 在 string.xml 中定义的字符串数组 R.array.planet 资源来创建一个 ArrayAdapter,并将适配器设置到列表视图,并设置列表项的点击监听器
- 在 OnItemClickListener() 方法内,以土司消息的方式来显示被点击项的位置
- package cn.uprogrammer.listfragment;
- import android.app.ListFragment;
- import android.annotation.SuppressLint;
- import android.app.ListFragment;
- import android.os.Bundle;
- import android.view.LayoutInflater;
- import android.view.View;
- import android.view.ViewGroup;
- import android.widget.AdapterView;
- import android.widget.AdapterView.OnItemClickListener;
- import android.widget.ArrayAdapter;
- import android.widget.Toast;
- public class MyListFragment extends ListFragment implements OnItemClickListener {
- @Override
- public View onCreateView(LayoutInflater inflater, ViewGroup container, Bundle savedInstanceState) {
- View view = inflater.inflate(R.layout.list_fragment, container, false);
- return view;
- }
- @Override
- public void onActivityCreated(Bundle savedInstanceState) {
- super.onActivityCreated(savedInstanceState);
- ArrayAdapter adapter = ArrayAdapter.createFromResource(getActivity(), R.array.Planets, android.R.layout.simple_list_item_1);
- setListAdapter(adapter);
- getListView().setOnItemClickListener(this);
- }
- @Override
- public void onItemClick(AdapterView<?> parent, View view, int position,long id) {
- Toast.makeText(getActivity(), "Item: " + position, Toast.LENGTH_SHORT).show();
- }
- }
以下代码是 MainActivity.java 的内容:
- package cn.uprogrammer.listfragment;
- import android.app.Activity;
- import android.os.Bundle;
- public class MainActivity extends Activity {
- @Override
- protected void onCreate(Bundle savedInstanceState) {
- super.onCreate(savedInstanceState);
- setContentView(R.layout.activity_main);
- }
- }
以下是 AndroidManifest.xml 文件的内容:
- <?xml version="1.0" encoding="utf-8"?>
- <manifest xmlns:android="http://schemas.android.com/apk/res/android"
- package="cn.uprogrammer.listfragment">
- <application
- android:icon="@drawable/ic_launcher"
- android:label="@string/app_name"
- android:theme="@style/AppTheme" >
- <activity
- android:name=".MainActivity"
- android:label="@string/title_activity_main" >
- <intent-filter>
- <action android:name="android.intent.action.MAIN" />
- <category android:name="android.intent.category.LAUNCHER"/>
- </intent-filter>
- </activity>
- </application>
- </manifest>
让我们运行刚刚修改的 List Fragment 应用程序。我假设你已经在安装环境时创建了AVD。打开你的项目中的活动文件,点击工具栏中的图标来在Android Studio中运行应用程序。Android Studio在AVD上安装应用程序并启动它。如果一切顺利,将在模拟器窗口上显示如下:
Android 碎片过渡
Lollipop (Android 5.0) 中的活动和碎片过渡建立在一些相对新的 Android 特性上,叫做 过渡。在 KitKat 中引入,过渡框架提供了一系列方便的 API 来在应用程序的不同的 UI 状态间 提供动画。这个框架围绕两个关键概念构建:场景和过渡。场景定义了应用程序 UI 给定的状态,过渡则定义了两个场景间的动画变化。
当一个场景变化,过渡有两个主要职责:
- 捕获开始和结束场景中每个视图的状态
- 创建一个动画绘制者 (Animator),基于从一个场景到另一个场景需要动画的视图的不同。
实例
这个实例解释如何使用碎片过渡来创建自定义的动画。让我们按照下面的步骤开始:
| 步骤 | 描述 |
|---|---|
| 1 | 使用 Android Studio 来创建 Android 应用程序,命名为 Fragment Custom Animation,包名为 cn.uprogrammer.fragmentcustomanimation. |
| 2 | 修改 res/layout/activity_main.xml 文件,添加一个 TextView |
| 3 | 在 res/layout/ 下创建 fragment_stack.xml 的布局文件,定义碎片标签和按钮标签 |
| 4 | 在 res/ 下建立子目录 anim,并添加 fragment_slide_left.xml, fragment_slide_left_exit.xml, fragment_slide_right_exit.xml 和 fragment_slide_left_enter.xml |
| 5 | 在 MainActivity.java 中需要添加碎片栈,碎片管理器和 onCreateView() |
| 6 | 启动Android模拟器来运行应用程序,并验证应用程序所做改变的结果。 |
以下是 res/layout/activity_main.xml 文件的内容,其包含帧布局和按钮。
- <?xml version="1.0" encoding="utf-8"?>
- <LinearLayout
- xmlns:android="http://schemas.android.com/apk/res/android"
- android:layout_width="match_parent"
- android:layout_height="match_parent"
- android:orientation="vertical" >
- <FrameLayout
- android:id="@+id/fragment1"
- android:layout_width="match_parent"
- android:layout_height="0dp"
- android:layout_weight="1" />
- <Button
- android:id="@+id/new_fragment"
- android:layout_width="wrap_content"
- android:layout_height="wrap_content"
- android:text="添加新碎片" />
- </LinearLayout>
以下是 res/anim/fragment_stack.xml 文件:
- <?xml version="1.0" encoding="utf-8"?>
- <LinearLayout xmlns:android="http://schemas.android.com/apk/res/android"
- android:orientation="vertical" android:layout_width="match_parent"
- android:layout_height="match_parent">
- <TextView
- android:id="@+id/text"
- android:layout_width="match_parent"
- android:layout_height="match_parent"
- android:gravity="center"/>
- </LinearLayout>
以下是 res/animator/fragment_slide_left_enter.xml 文件的内容,其包含设置方法和动画绘制者对象标签。
- <?xml version="1.0" encoding="utf-8"?>
- <set xmlns:android="http://schemas.android.com/apk/res/android">
- <objectAnimator
- android:interpolator="@android:interpolator/decelerate_quint"
- android:valueFrom="100dp" android:valueTo="0dp"
- android:valueType="floatType"
- android:propertyName="translationX"
- android:duration="@android:integer/config_mediumAnimTime" />
- <objectAnimator
- android:interpolator="@android:interpolator/decelerate_quint"
- android:valueFrom="0.0" android:valueTo="1.0"
- android:valueType="floatType"
- android:propertyName="alpha"
- android:duration="@android:integer/config_mediumAnimTime" />
- </set>
以下是 res/animator/fragment_slide_left_exit.xml 文件的内容,其包含设置方法和动画绘制者对象标签。
- <?xml version="1.0" encoding="utf-8"?>
- <set xmlns:android="http://schemas.android.com/apk/res/android">
- <objectAnimator
- android:interpolator="@android:interpolator/decelerate_quint"
- android:valueFrom="0dp" android:valueTo="-100dp"
- android:valueType="floatType"
- android:propertyName="translationX"
- android:duration="@android:integer/config_mediumAnimTime" />
- <objectAnimator
- android:interpolator="@android:interpolator/decelerate_quint"
- android:valueFrom="1.0" android:valueTo="0.0"
- android:valueType="floatType"
- android:propertyName="alpha"
- android:duration="@android:integer/config_mediumAnimTime" />
- </set>
以下是 res/animator/fragment_slide_right_enter.xml 文件的内容,其包含设置方法和动画绘制者对象标签。
- <?xml version="1.0" encoding="utf-8"?>
- <set xmlns:android="http://schemas.android.com/apk/res/android">
- <objectAnimator
- android:interpolator="@android:interpolator/decelerate_quint"
- android:valueFrom="-100dp" android:valueTo="0dp"
- android:valueType="floatType"
- android:propertyName="translationX"
- android:duration="@android:integer/config_mediumAnimTime" />
- <objectAnimator
- android:interpolator="@android:interpolator/decelerate_quint"
- android:valueFrom="0.0" android:valueTo="1.0"
- android:valueType="floatType"
- android:propertyName="alpha"
- android:duration="@android:integer/config_mediumAnimTime" />
- </set>
以下是 res/animator/fragment_slide_right_exit.xml 文件的内容,其包含设置方法和动画绘制者对象标签。
- <?xml version="1.0" encoding="utf-8"?>
- <set xmlns:android="http://schemas.android.com/apk/res/android">
- <objectAnimator
- android:interpolator="@android:interpolator/decelerate_quint"
- android:valueFrom="0dp" android:valueTo="100dp"
- android:valueType="floatType"
- android:propertyName="translationX"
- android:duration="@android:integer/config_mediumAnimTime" />
- <objectAnimator
- android:interpolator="@android:interpolator/decelerate_quint"
- android:valueFrom="1.0" android:valueTo="0.0"
- android:valueType="floatType"
- android:propertyName="alpha"
- android:duration="@android:integer/config_mediumAnimTime" />
- </set>
以下是 src/cn.uprogrammer.fragmentcustomanimation/MainActivity.java 文件的内容,包含按钮监听器,CountingFragment 和 onCreateView():
- package cn.uprogrammer.fragmentcustomanimation;
- import android.app.Activity;
- import android.app.Fragment;
- import android.app.FragmentTransaction;
- import android.os.Bundle;
- import android.view.LayoutInflater;
- import android.view.View;
- import android.view.View.OnClickListener;
- import android.view.ViewGroup;
- import android.widget.Button;
- import android.widget.TextView;
- /**
- * 演示在碎片事务中使用自定义动画.
- */
- public class MainActivity extends Activity {
- int mStackLevel = 1;
- @Override
- protected void onCreate(Bundle savedInstanceState) {
- super.onCreate(savedInstanceState);
- setContentView(R.layout.activity_main);
- Button button = (Button)findViewById(R.id.new_fragment);
- button.setOnClickListener(new OnClickListener() {
- public void onClick(View v) {
- addFragmentToStack();
- }
- });
- if (savedInstanceState == null) {
- // 添加初始碎片
- Fragment newFragment = CountingFragment.newInstance(mStackLevel);
- FragmentTransaction ft = getFragmentManager().beginTransaction();
- ft.add(R.id.fragment1, newFragment).commit();
- }
- else
- {
- mStackLevel = savedInstanceState.getInt("level");
- }
- }
- @Override
- public void onSaveInstanceState(Bundle outState) {
- super.onSaveInstanceState(outState);
- outState.putInt("level", mStackLevel);
- }
- void addFragmentToStack() {
- mStackLevel++;
- // 实例化新的碎片
- Fragment newFragment = CountingFragment.newInstance(mStackLevel);
- // 添加碎片到活动,并将其放入后退栈中
- FragmentTransaction ft = getFragmentManager().beginTransaction();
- ft.setCustomAnimations(R.animator.fragment_slide_left_enter,
- R.animator.fragment_slide_left_exit,
- R.animator.fragment_slide_right_enter,
- R.animator.fragment_slide_right_exit);
- ft.replace(R.id.fragment1, newFragment);
- ft.addToBackStack(null);
- ft.commit();
- }
- public static class CountingFragment extends Fragment {
- int mNum;
- /**
- * 创建CountingFragment的实例,提供"num"作为参数
- */
- static CountingFragment newInstance(int num) {
- CountingFragment f = new CountingFragment();
- Bundle args = new Bundle();
- args.putInt("num", num);
- f.setArguments(args);
- return f;
- }
- /**
- * 在创建时,获取实例的number参数.
- */
- @Override
- public void onCreate(Bundle savedInstanceState) {
- super.onCreate(savedInstanceState);
- mNum = getArguments() != null ? getArguments().getInt("num") : 1;
- }
- /**
- * 碎片的界面仅包含一个TextView,用于显示number
- */
- @Override
- public View onCreateView(LayoutInflater inflater, ViewGroup container,Bundle savedInstanceState) {
- View v = inflater.inflate(R.layout.fragment_stack, container,false);View tv = v.findViewById(R.id.text);((TextView)tv).setText("Fragment #"+ mNum);
- tv.setBackgroundDrawable(getResources().getDrawable(android.R.drawable.gallery_thumb));return v;}}}
以下是 AndroidManifest.xml 文件的内容:
- <?xml version="1.0" encoding="utf-8"?>
- <manifest xmlns:android="http://schemas.android.com/apk/res/android"
- package="cn.uprogrammer.fragmentcustomanimation"
- android:versionCode="1"
- android:versionName="1.0" >
- <application
- android:allowBackup="true"
- android:icon="@drawable/ic_launcher"
- android:label="@string/app_name"
- android:theme="@style/AppTheme" >
- <activity
- android:name=".MainActivity"
- android:label="@string/app_name" >
- <intent-filter>
- <action android:name="android.intent.action.MAIN" />
- <category android:name="android.intent.category.LAUNCHER" />
- </intent-filter>
- </activity>
- </application>
- </manifest>
让我们运行刚刚修改的 Fragment Custom Animation 应用程序。我假设你已经在安装环境时创建了 AVD。打开你的项目中的活动文件,点击工具栏中的图标来在 Android Studio 中运行应用程序。Android Studio 在 AVD 上安装应用程序并启动它。如果一切顺利,将在模拟器窗口上显示如下:
Android 意图(Intent)和过滤器(Filter)
Android意图是一个要执行的操作的抽象描述。它可以通过 startActivity 来启动一个活动,broadcastIntent 来发送广播到任何对它感兴趣的广播接受器组件,startService(Intent) 或者bindService(Intent, ServiceConnection, int) 来与后台服务通讯。
意图本身(一个 Intent 对象)是一个被动的数据结构,保存着要执行操作的抽象描述。
例如,你有一个活动,需要打开邮件客户端并通过 Android 设备来发送邮件。为了这个目的,你的活动需要发送一个带有合适选择器的 ACTION_SEND 到 Android 意图处理者。指定的选择器给定合适的界面来让用户决定如何发送他的邮件数据。
- Intent email = new Intent(Intent.ACTION_SEND, Uri.parse("mailto:"));
- email.putExtra(Intent.EXTRA_EMAIL, recipients);
- email.putExtra(Intent.EXTRA_SUBJECT, subject.getText().toString());
- email.putExtra(Intent.EXTRA_TEXT, body.getText().toString());
- startActivity(Intent.createChooser(email, "Choose an email client from..."));
上面的语法调用 startActivity 方法来开启邮件活动,代码运行结果看起来像这样:

例如,你有一个活动,需要在 Android 设备上通过浏览器打开一个URL。为了这个目的,你的活动发送 ACTION_WEB_SEARCH 意图到 Android 意图处理器来在浏览器中打开给定的 URL 。意图处理器通过解析一系列活动,并选择最适合你的意图的一个活动,在这个例子中,是 Web 浏览器活动。意图处理器传递你的网页地址到 Web 浏览器,并打开 Web 浏览器活动。
- String q = "https://www.runoob.com";
- Intent intent = new Intent(Intent.ACTION_WEB_SEARCH );
- intent.putExtra(SearchManager.QUERY, q);
- startActivity(intent);
上面的例子将在Android搜索引擎上查找"www.runoob.com",并在一个活动上给出关键词的结果。
对于每一个组件-活动,服务,广播接收器都有独立的机制来传递意图。
| 序号 | 方法和描述 |
|---|---|
| 1 | Context.startActivity():意图传递给该方法,用于启动一个新的活动或者让已存在的活动做一些新的事情。 |
| 2 | Context.startService():意图传递给该方法,将初始化一个服务,或者新的信息到一个持续存在的服务。 |
| 3 | Context.sendBroadcast():意图传递给该方法,信息将传递到所有对此感兴趣的广播接收器。 |
意图对象
意图对象是一包的信息,用于组件接收到的意图就像 Android 系统接受到的信息。
意图对象包括如下的组件,具体取决于要通信或者执行什么。
动作(Action)
这是意图对象中必须的部分,被表现为一个字符串。在广播的意图中,动作一旦发生,将会被报告。动作将很大程度上决定意图的其他部分如何被组织。Intent 类定义了一系列动作常量对应不同的意图。这里是一份Android意图标准动作列表。
意图对象中的动作可以通过 setAction() 方法来设置,通过 getAction() 方法来读取。
数据(Data)
添加数据规格到意图过滤器。这个规格可以只是一个数据类型(如元类型属性),一条 URI ,或者同时包括数据类型和 URI 。 URI 则由不同部分的属性来指定。
这些指定 URL 格式的属性是可选的,但是也相互独立 -
- 如果意图过滤器没有指定模式,所有其他的 URI 属性将被忽略。
- 如果没有为过滤器指定主机,端口属性和所有路径属性将被忽略。
setData() 方法只能以 URI 来指定数据,setType() 只能以元类型指定数据,setDataAndType() 可以同时指定 URI 和元类型。URI 通过 getData() 读取,类型通过 getType() 读取。
以下是动作/数据组的一些实例 -
| 序号 | 动作/数据组和描述 |
|---|---|
| 1 | ACTION_VIEW content://contacts/people/1:显示ID为1的用户的信息。 |
| 2 | ACTION_DIAL content://contacts/people/1:显示电话拨号器,并填充用户1的数据。 |
| 3 | ACTION_VIEW tel:123:显示电话拨号器,并填充给定的号码。 |
| 4 | ACTION_DIAL tel:123:显示电话拨号器,并填充给定的号码。 |
| 5 | ACTION_EDIT content://contacts/people/1:编辑ID为1的用户信息。 |
| 6 | ACTION_VIEW content://contacts/people/:显示用户列表,以便查看。 |
| 7 | ACTION_SET_WALLPAPER:显示选择壁纸设置。 |
| 8 | ACTION_SYNC:同步数据,默认的值为:android.intent.action.SYNC |
| 9 | ACTION_SYSTEM_TUTORIAL:开启平台定义的教程(默认教程或者启动教程) |
| 10 | ACTION_TIMEZONE_CHANGED:当时区被改变时通知 |
| 11 | ACTION_UNINSTALL_PACKAGE:运行默认的卸载器 |
类别
类别是意图中可选的部分,是一个字符串,包含该类型组件需要处理的意图的附加信息。addCategory() 方法为意图对象添加类别,removeCategory() 方法删除之前添加的类别,getCategories() 获取所有被设置到意图对象中的类别。这里是Android意图标准类别列表。
可以查看下面章节中的意图过滤器来了解我们如何使用类别来通过对应的意图选择合适的活动。
附加数据
这是传递给需要处理意图的组件的以键值对描述的附加信息。通过 putExtras() 方法设置,getExtras() 方法读取。这里是Android意图标准附加数据列表。
标记
这些标记是意图的可选部分,说明Android系统如何来启动活动,启动后如何处理等。
| 序号 | 标记和说明 |
|---|---|
| 1 | FLAG_ACTIVITY_CLEAR_TASK :如果在意图中设置,并通过 Context.startActivity 传递,这个标记将导致与该活动相关联的所有已存在的任务在活动启动前被清空。活动将成为一个空任务的根,所有旧的活动被结束。该标记可以与 FLAG_ACTIVITY_NEW_TASK 结合使用。 |
| 2 | FLAG_ACTIVITY_CLEAR_TOP :如果设置该标记,活动将在当前运行的任务中被启动。这并不会启动一个新的活动实例,所有的在它之上的活动被关闭,这个意图作为一个新的意图被传递到已有的(目前在顶部的)活动。 |
| 3 | FLAG_ACTIVITY_NEW_TASK :这个标记一般用于使得活动用于"启动器"风格的行为:为用户提供一个可以独立完成运行的数据,并启动完整儿独立的活动。 |
组件名称
组件名称对象是一个可选的域,代表活动、服务或者广播接收器类。如果设置,则意图对象被传递到实现设计好的类的实例,否则,Android 使用其他意图中的其他信息来定位一个合适的目标。组件名称通过 setComponent(),setClass()或者 setClassName() 来设置,通过 getComponent() 获取。
意图的类型
Android 支持两种类型的意图。
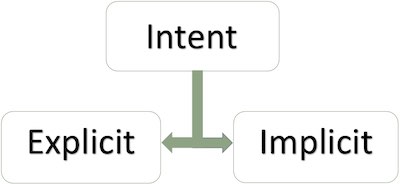
显式意图
显式意图用于连接应用程序的内部世界,假设你需要连接一个活动到另外一个活动,我们可以通过显示意图,下图显示通过点击按钮连接第一个活动到第二个活动。
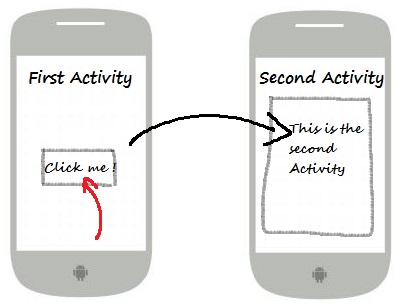
这些意图通过名称指定目标组件,一般用于应用程序内部信息 - 比如一个活动启动一个下属活动或者启动一个兄弟活动。举个例子:
- // 通过指定类名的显式意图
- Intent i = new Intent(FirstActivity.this, SecondAcitivity.class);
- // 启动目标活动
- startActivity(i);
隐式意图
这些意图没有为目标命名,组件名称的域为空。隐式意图经常用于激活其他应用程序的组件。举个例子:
- Intent read1=new Intent();
- read1.setAction(android.content.Intent.ACTION_VIEW);
- read1.setData(ContactsContract.Contacts.CONTENT_URI);
- startActivity(read1);
上面的代码将给出如下结果:

目标组件接收到意图,可以使用getExtras()方法来获取由源组件发送的附加数据。例如:
- // 在代码中的合适位置获取包对象
- Bundle extras = getIntent().getExtras();
- // 通过键解压数据
- String value1 = extras.getString("Key1");
- String value2 = extras.getString("Key2");
实例
下面的实例演示使用 Android 意图来启动各种 Android 内置应用程序的功能。
| 步骤 | 描述 |
|---|---|
| 1 | 使用 Android Studio IDE 创建 Android 应用程序,并命名为Intent filter,包名为 com.runoob.intentfilter。当创建项目时,确保目标 SDK 和用最新版本的 Android SDK 进行编译使用高级的API。 |
| 2 | 修改src/com.runoob.intentfilter/MainActivity.java文件,并添加代码定义两个监听器来对应两个按钮"启动浏览器"和"启动电话" |
| 3 | 修改res/layout/activity_main.xml布局文件,在线性布局中添加3个按钮。 |
| 4 | 启动Android模拟器来运行应用程序,并验证应用程序所做改变的结果。 |
以下是src/com.runoob.intentfilter/MainActivity.java文件的内容:
- package com.runoob.intentfilter;
- import android.content.Intent;
- import android.net.Uri;
- import android.support.v7.app.ActionBarActivity;
- import android.os.Bundle;
- import android.view.Menu;
- import android.view.MenuItem;
- import android.view.View;
- import android.widget.Button;
- public class MainActivity extends ActionBarActivity {
- Button b1,b2;
- @Override
- protected void onCreate(Bundle savedInstanceState) {
- super.onCreate(savedInstanceState);
- setContentView(R.layout.activity_main);
- b1=(Button)findViewById(R.id.button);
- b1.setOnClickListener(new View.OnClickListener() {
- @Override
- public void onClick(View v) {
- Intent i = new Intent(android.content.Intent.ACTION_VIEW, Uri.parse("https://www.runoob.com"));
- startActivity(i);
- }
- });
- b2=(Button)findViewById(R.id.button2);
- b2.setOnClickListener(new View.OnClickListener() {
- @Override
- public void onClick(View v) {
- Intent i = new Intent(android.content.Intent.ACTION_VIEW,Uri.parse("tel:9510300000"));
- startActivity(i);
- }
- });
- }
- @Override
- public boolean onCreateOptionsMenu(Menu menu) {
- getMenuInflater().inflate(R.menu.menu_main, menu);
- return true;
- }
- @Override
- public boolean onOptionsItemSelected(MenuItem item) {
- // Handle action bar item clicks here. The action bar will
- // automatically handle clicks on the Home/Up button, so long
- // as you specify a parent activity in AndroidManifest.xml.
- int id = item.getItemId();
- //noinspection SimplifiableIfStatement
- if (id == R.id.action_settings) {
- return true;
- }
- return super.onOptionsItemSelected(item);
- }
- }
下面是res/layout/activity_main.xml文件的内容:
- <RelativeLayout xmlns:android="http://schemas.android.com/apk/res/android"
- xmlns:tools="http://schemas.android.com/tools"
- android:layout_width="match_parent"
- android:layout_height="match_parent"
- android:paddingLeft="@dimen/activity_horizontal_margin"
- android:paddingRight="@dimen/activity_horizontal_margin"
- android:paddingTop="@dimen/activity_vertical_margin"
- android:paddingBottom="@dimen/activity_vertical_margin"
- tools:context=".MainActivity">
- <TextView
- android:id="@+id/textView1"
- android:layout_width="wrap_content"
- android:layout_height="wrap_content"
- android:text="意图实例"
- android:layout_alignParentTop="true"
- android:layout_centerHorizontal="true"
- android:textSize="30dp" />
- <TextView
- android:id="@+id/textView2"
- android:layout_width="wrap_content"
- android:layout_height="wrap_content"
- android:text="www.runoob.com"
- android:textColor="#ff87ff09"
- android:textSize="30dp"
- android:layout_below="@+id/textView1"
- android:layout_centerHorizontal="true" />
- <ImageButton
- android:layout_width="wrap_content"
- android:layout_height="wrap_content"
- android:id="@+id/imageButton"
- android:src="@drawable/ic_launcher"
- android:layout_below="@+id/textView2"
- android:layout_centerHorizontal="true" />
- <EditText
- android:layout_width="wrap_content"
- android:layout_height="wrap_content"
- android:id="@+id/editText"
- android:layout_below="@+id/imageButton"
- android:layout_alignRight="@+id/imageButton"
- android:layout_alignEnd="@+id/imageButton" />
- <Button
- android:layout_width="wrap_content"
- android:layout_height="wrap_content"
- android:text="启动浏览器"
- android:id="@+id/button"
- android:layout_alignTop="@+id/editText"
- android:layout_alignRight="@+id/textView1"
- android:layout_alignEnd="@+id/textView1"
- android:layout_alignLeft="@+id/imageButton"
- android:layout_alignStart="@+id/imageButton" />
- <Button
- android:layout_width="wrap_content"
- android:layout_height="wrap_content"
- android:text="启动电话"
- android:id="@+id/button2"
- android:layout_below="@+id/button"
- android:layout_alignLeft="@+id/button"
- android:layout_alignStart="@+id/button"
- android:layout_alignRight="@+id/textView2"
- android:layout_alignEnd="@+id/textView2" />
- </RelativeLayout>
下面是res/values/strings/xml的内容,定义了两个新的常量。
- <?xml version="1.0" encoding="utf-8"?>
- <resources>
- <string name="app_name">Intent filter</string>
- <string name="action_settings">Settings</string>
- </resources>
下面是默认的AndroidManifest.xml的内容:
- <?xml version="1.0" encoding="utf-8"?>
- <manifest xmlns:android="http://schemas.android.com/apk/res/android"
- package="com.runoob.intentfilter"
- android:versionCode="1"
- android:versionName="1.0" >
- <uses-sdk
- android:minSdkVersion="8"
- android:targetSdkVersion="22" />
- <application
- android:allowBackup="true"
- android:icon="@drawable/ic_launcher"
- android:label="@string/app_name"
- android:theme="@style/Base.Theme.AppCompat" >
- <activity
- android:name="com.runoob.intentfilter.MainActivity"
- android:label="@string/app_name" >
- <intent-filter>
- <action android:name="android.intent.action.MAIN" />
- <category android:name="android.intent.category.LAUNCHER" />
- </intent-filter>
- </activity>
- </application>
- </manifest>
让我们运行刚刚修改的 Intent filter 应用程序。我假设你已经在安装环境时创建了 AVD。打开你的项目中的活动文件,点击工具栏中的图标来在 Android Studio 中运行应用程序。Android Studio 在 AVD 上安装应用程序并启动它。如果一切顺利,将在模拟器窗口上显示如下:
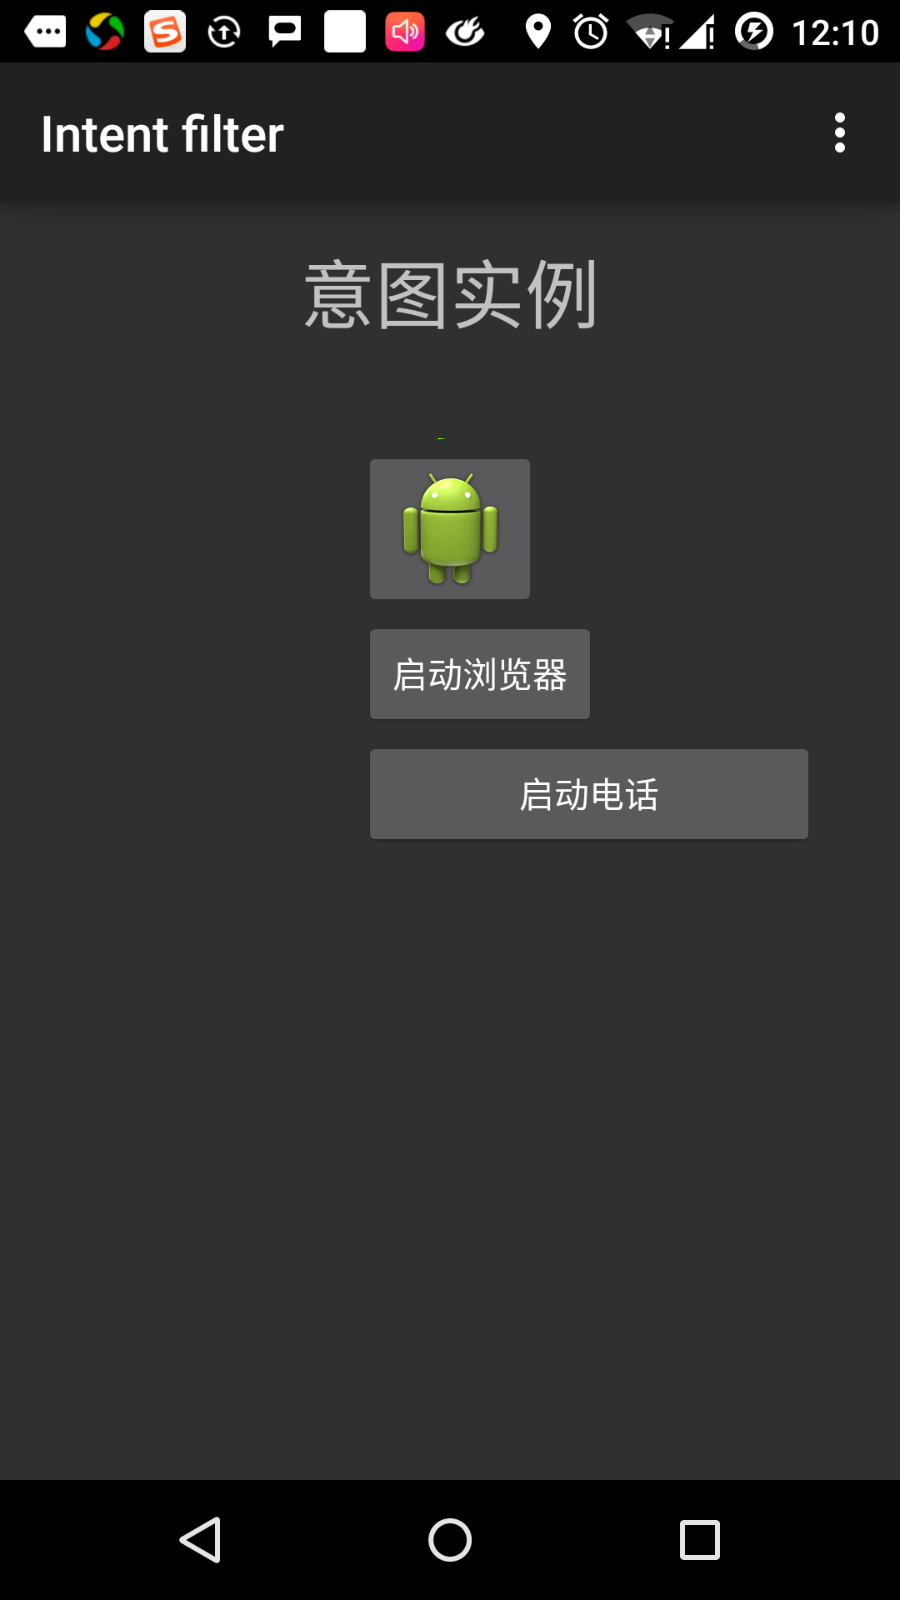
现在点击"启动浏览器"按钮,这将根据配置启动一个浏览器,并且显示https://www.runoob.com如下:
类似的方式,你可以点击"启动电话"按钮来打开电话界面,这将允许你拨打已经给定的电话号码。
意图过滤器
你已经看到如何使用意图来调用另外的活动。 Android 操作系统使用过滤器来指定一系列活动、服务和广播接收器处理意图,需要借助于意图所指定的动作、类别、数据模式。在 manifest 文件中使用 <intent-filter> 元素在活动,服务和广播接收器中列出对应的动作,类别和数据类型。
下面的实例展示AndroidManifest.xml文件的一部分,指定一个活动com.runoob.intentfilter.CustomActivity可以通过设置的动作,类别及数据来调用:
- <activity android:name=".CustomActivity"
- android:label="@string/app_name">
- <intent-filter>
- <action android:name="android.intent.action.VIEW" />
- <action android:name="com.example.MyApplication.LAUNCH" />
- <category android:name="android.intent.category.DEFAULT" />
- <data android:scheme="http" />
- </intent-filter>
- </activity>
当活动被上面的过滤器所定义,其他活动就可以通过下面的方式来调用这个活动。使用 android.intent.action.VIEW,使用 com.runoob.intentfilter.LAUNCH 动作,并提供android.intent.category.DEFAULT类别。
元素指定要被调用的活动所期望的数据类型。上面的实例中,自定义活动期望的数据由"http://"开头。
有这样的情况,通过过滤器,意图将被传递到多个的活动或者服务,用户将被询问启动哪个组件。如果没有找到目标组件,将发生一个异常。
在调用活动之前,有一系列的 Android 检查测试:
- 过滤器 <intent-filter> 需要列出一个或者多个的动作,不能为空;过滤器至少包含一个 元素,否则将阻塞所有的意图。如果多个动作被提到,Android 在调用活动前尝试匹配其中提到的一个动作。
- 过滤器 <intent-filter> 可能列出0个,1个或者多个类别。如果没有类别被提到,Android 通过这个测试,如果有多个类别被提及,意图通过类型测试,每个意图对象的分类必须匹配过滤器中的一个分类。
- 每个 元素可以指定一个 URI 和一个数据类型(元媒体类型)。这里有独立的属性,如 URI 中的每个部分:模式,主机,端口和路径。意图包含有 URI 和类型,只有它的类型匹配了过滤器中列出的某个类型,则通过数据类型部分的测试。
实例
下面的实例是上面实例的一些修改。这里我们将看到如果一个意图调用定义的两个活动,Android 如何来解决冲突;如何使用过滤器来调用自定义活动;如果没有为意图定义合适的活动,则会出现异常。
| 步骤 | 说明 |
|---|---|
| 1 | 使用Android Studio IDE创建Android应用程序,并命名为Intent filter,包名为com.runoob.intentfilter。当创建项目时,确保目标 SDK 和用最新版本的 Android SDK 进行编译使用高级的API。 |
| 2 | 修改 src/com.runoob.intentfilter/MainActivity.java 文件,添加代码来定义三个监听器来对应布局文件中定义的三个按钮。 |
| 3 | 添加 src/com.runoob.intentfilter/CustomActivity.java 文件来包含一个活动,可以被不同的意图调用。 |
| 4 | 修改 res/layout/activity_main.xml 文件在线性布局中添加三个按钮。 |
| 5 | 添加 res/lauout/custom_view.xml 布局文件,添加简单地 来显示通过 intent 传递的数据。 |
| 6 | 修改 AndroidManifest.xml 文件,添加 <intent-filter> 定义意图的规则来调用自定义活动。 |
| 7 | 启动 Android 模拟器来运行应用程序,并验证应用程序所做改变的结果。 |
以下是src/com.runoob.intentfilter/MainActivity.java的内容:
- package com.runoob.intentfilter;
- import android.content.Intent;
- import android.net.Uri;
- import android.support.v7.app.ActionBarActivity;
- import android.os.Bundle;
- import android.view.Menu;
- import android.view.MenuItem;
- import android.view.View;
- import android.widget.Button;
- public class MainActivity extends ActionBarActivity {
- Button b1,b2,b3;
- @Override
- protected void onCreate(Bundle savedInstanceState) {
- super.onCreate(savedInstanceState);
- setContentView(R.layout.activity_main);
- b1=(Button)findViewById(R.id.button);
- b1.setOnClickListener(new View.OnClickListener() {
- @Override
- public void onClick(View v) {
- Intent i = new Intent(android.content.Intent.ACTION_VIEW,Uri.parse("https://www.runoob.com"));
- startActivity(i);
- }
- });
- b2=(Button)findViewById(R.id.button2);
- b2.setOnClickListener(new View.OnClickListener() {
- @Override
- public void onClick(View v) {
- Intent i = new Intent("com.runoob.intentfilter.LAUNCH",Uri.parse("https://www.runoob.com"));
- startActivity(i);
- }
- });
- b3=(Button)findViewById(R.id.button3);
- b3.setOnClickListener(new View.OnClickListener() {
- @Override
- public void onClick(View v) {
- Intent i = new Intent("com.runoob.intentfilter.LAUNCH",Uri.parse("https://www.runoob.com"));
- startActivity(i);
- }
- });
- }
- @Override
- public boolean onCreateOptionsMenu(Menu menu) {
- // Inflate the menu; this adds items to the action bar if it is present.
- getMenuInflater().inflate(R.menu.menu_main, menu);
- return true;
- }
- @Override
- public boolean onOptionsItemSelected(MenuItem item) {
- // Handle action bar item clicks here. The action bar will
- // automatically handle clicks on the Home/Up button, so long
- // as you specify a parent activity in AndroidManifest.xml.
- int id = item.getItemId();
- //noinspection SimplifiableIfStatement
- if (id == R.id.action_settings) {
- return true;
- }
- return super.onOptionsItemSelected(item);
- }
- }
下面是src/com.runoob.intentfilter/CustomActivity.java的内容:
- package com.runoob.intentfilter;
- import android.app.Activity;
- import android.net.Uri;
- import android.os.Bundle;
- import android.widget.TextView;
- public class CustomActivity extends Activity {
- @Override
- public void onCreate(Bundle savedInstanceState) {
- super.onCreate(savedInstanceState);
- setContentView(R.layout.custom_view);
- TextView label = (TextView) findViewById(R.id.show_data);
- Uri url = getIntent().getData();
- label.setText(url.toString());
- }
- }
下面是res/layout/activity_main.xml 的内容:
- <RelativeLayout xmlns:android="http://schemas.android.com/apk/res/android"
- xmlns:tools="http://schemas.android.com/tools"
- android:layout_width="match_parent"
- android:layout_height="match_parent"
- android:paddingLeft="@dimen/activity_horizontal_margin"
- android:paddingRight="@dimen/activity_horizontal_margin"
- android:paddingTop="@dimen/activity_vertical_margin"
- android:paddingBottom="@dimen/activity_vertical_margin"
- tools:context=".MainActivity">
- <TextView
- android:id="@+id/textView1"
- android:layout_width="wrap_content"
- android:layout_height="wrap_content"
- android:text="意图实例"
- android:layout_alignParentTop="true"
- android:layout_centerHorizontal="true"
- android:textSize="30dp" />
- <TextView
- android:id="@+id/textView2"
- android:layout_width="wrap_content"
- android:layout_height="wrap_content"
- android:text="www.runoob.com"
- android:textColor="#ff87ff09"
- android:textSize="30dp"
- android:layout_below="@+id/textView1"
- android:layout_centerHorizontal="true" />
- <ImageButton
- android:layout_width="wrap_content"
- android:layout_height="wrap_content"
- android:id="@+id/imageButton"
- android:src="@drawable/ic_launcher"
- android:layout_below="@+id/textView2"
- android:layout_centerHorizontal="true" />
- <EditText
- android:layout_width="wrap_content"
- android:layout_height="wrap_content"
- android:id="@+id/editText"
- android:layout_below="@+id/imageButton"
- android:layout_alignRight="@+id/imageButton"
- android:layout_alignEnd="@+id/imageButton" />
- <Button
- android:layout_width="wrap_content"
- android:layout_height="wrap_content"
- android:text="通过View动作启动浏览器"
- android:id="@+id/button"
- android:layout_alignTop="@+id/editText"
- android:layout_alignRight="@+id/textView1"
- android:layout_alignEnd="@+id/textView1"
- android:layout_alignLeft="@+id/imageButton"
- android:layout_alignStart="@+id/imageButton" />
- <Button
- android:layout_width="wrap_content"
- android:layout_height="wrap_content"
- android:text="通过Launch动作启动浏览器"
- android:id="@+id/button2"
- android:layout_below="@+id/button"
- android:layout_alignLeft="@+id/button"
- android:layout_alignStart="@+id/button"
- android:layout_alignRight="@+id/textView2"
- android:layout_alignEnd="@+id/textView2" />
- <Button
- android:layout_width="wrap_content"
- android:layout_height="wrap_content"
- android:text="异常情况"
- android:id="@+id/button3"
- android:layout_below="@+id/button2"
- android:layout_alignLeft="@+id/button2"
- android:layout_alignStart="@+id/button2"
- android:layout_alignRight="@+id/textView2"
- android:layout_alignEnd="@+id/textView2" />
- </RelativeLayout>
下面是res/layout/custom_view.xml文件的内容:
- <?xml version="1.0" encoding="utf-8"?>
- <LinearLayout xmlns:android="http://schemas.android.com/apk/res/android"
- android:orientation="vertical"
- android:layout_width="fill_parent"
- android:layout_height="fill_parent">
- <TextView android:id="@+id/show_data"
- android:layout_width="fill_parent"
- android:layout_height="400dp"/>
- </LinearLayout>
下面是res/values/strings.xml文件的内容:
- <?xml version="1.0" encoding="utf-8"?>
- <resources>
- <string name="app_name">My Application</string>
- <string name="action_settings">Settings</string>
- </resources>
下面是AndroidManifest.xml文件的内容:
- <?xml version="1.0" encoding="utf-8"?>
- <manifest xmlns:android="http://schemas.android.com/apk/res/android"
- package="com.runoob.intentfilter"
- android:versionCode="1"
- android:versionName="1.0" >
- <uses-sdk
- android:minSdkVersion="8"
- android:targetSdkVersion="22" />
- <application
- android:allowBackup="true"
- android:icon="@drawable/ic_launcher"
- android:label="@string/app_name"
- android:theme="@style/Base.Theme.AppCompat" >
- <activity
- android:name="com.runoob.intentfilter.MainActivity"
- android:label="@string/app_name" >
- <intent-filter>
- <action android:name="android.intent.action.MAIN" />
- <category android:name="android.intent.category.LAUNCHER" />
- </intent-filter>
- </activity>
- <activity android:name="com.runoob.intentfilter.CustomActivity"
- android:label="@string/app_name">
- <intent-filter>
- <action android:name="android.intent.action.VIEW" />
- <action android:name="com.runoob.intentfilter.LAUNCH" />
- <category android:name="android.intent.category.DEFAULT" />
- <data android:scheme="http" />
- </intent-filter>
- </activity>
- </application>
- </manifest>
让我们运行刚刚修改的 Intent filter 应用程序。我假设你已经在安装环境时创建了 AVD 。打开你的项目中的活动文件,点击工具栏中的图标来在 Android Studio 中运行应用程序。 Android Studio 在 AVD 上安装应用程序并启动它。如果一切顺利,将在模拟器窗口上显示如下:
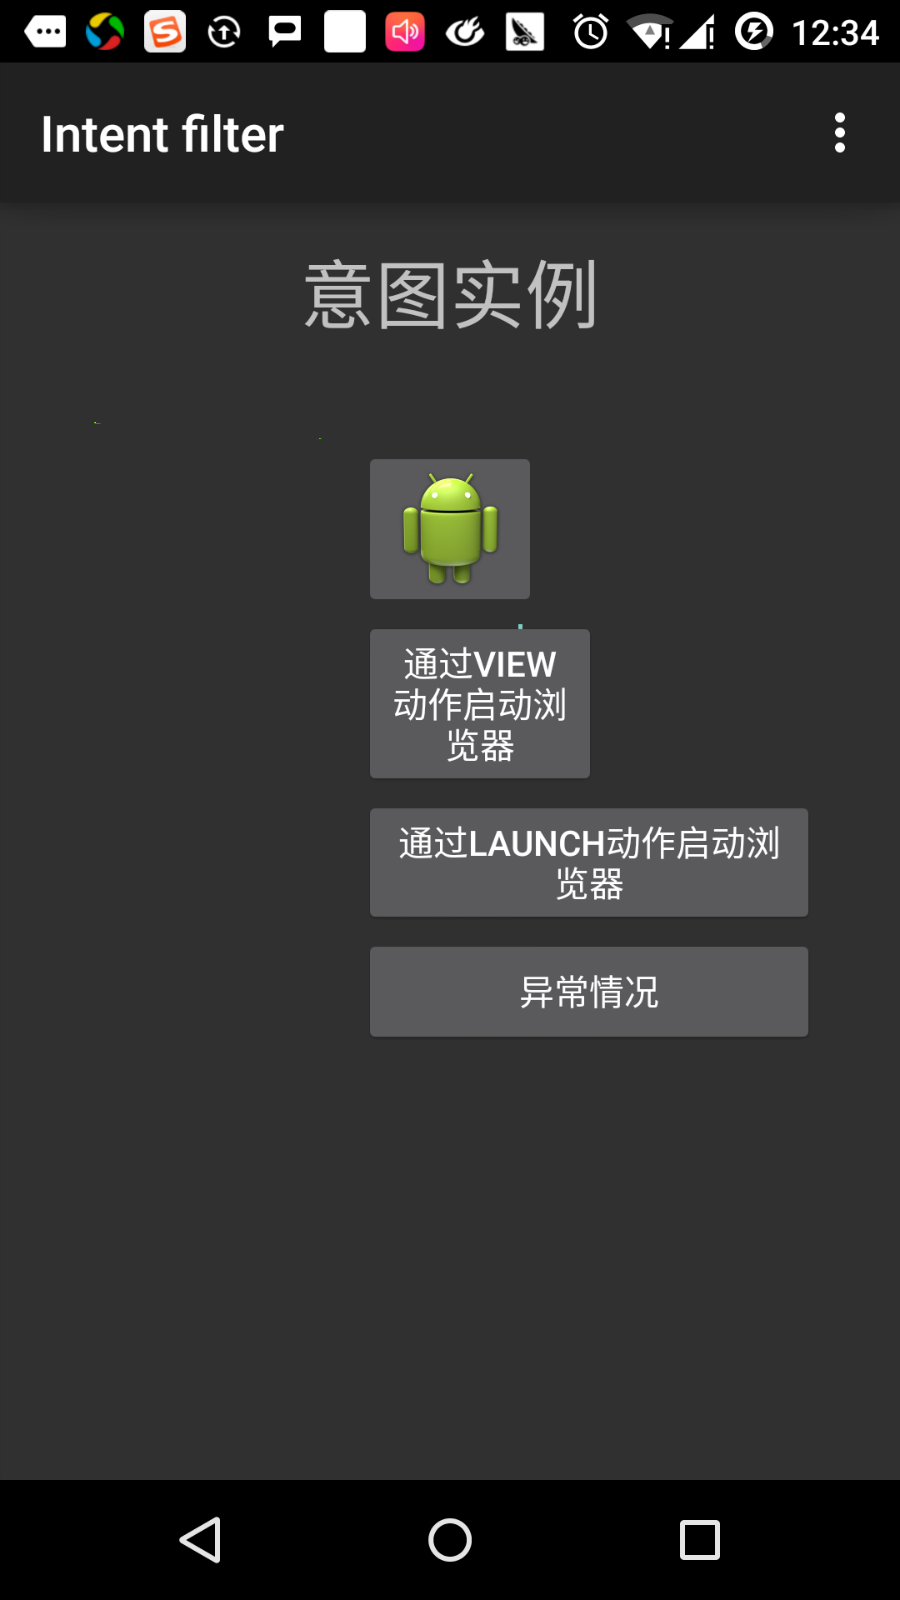
点击第一个按钮"使用View动作启动浏览器"。这里我们定义我们自定义的活动包含"android.intent.action.VIEW",并且 Android 系统已经定义了默认的活动来对应VIEW动作来启动Web浏览器,因此 Android 显示下面的选项来选择你想要启动的活动:
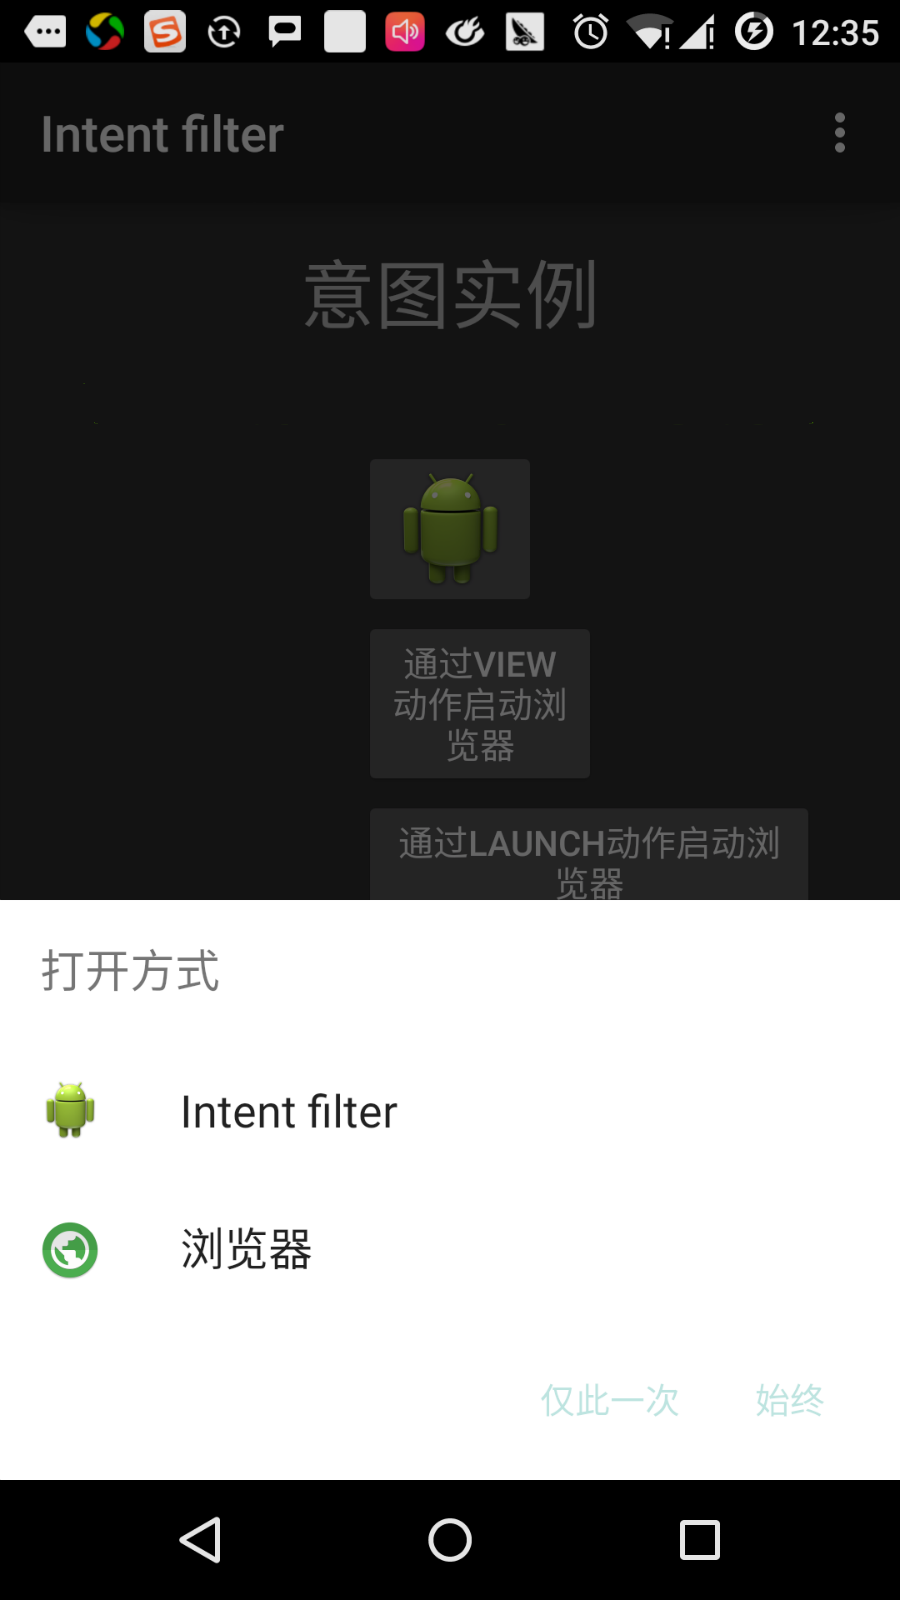
如果你选择浏览器, Android 将启动 Web 浏览器,并打开 www.runoob.com 网站。如果你选择 IntentDemo选项,Android 将启动 CustomActivity,该活动什么都没有做,仅仅是捕获并在TextView中显示传递的数据。
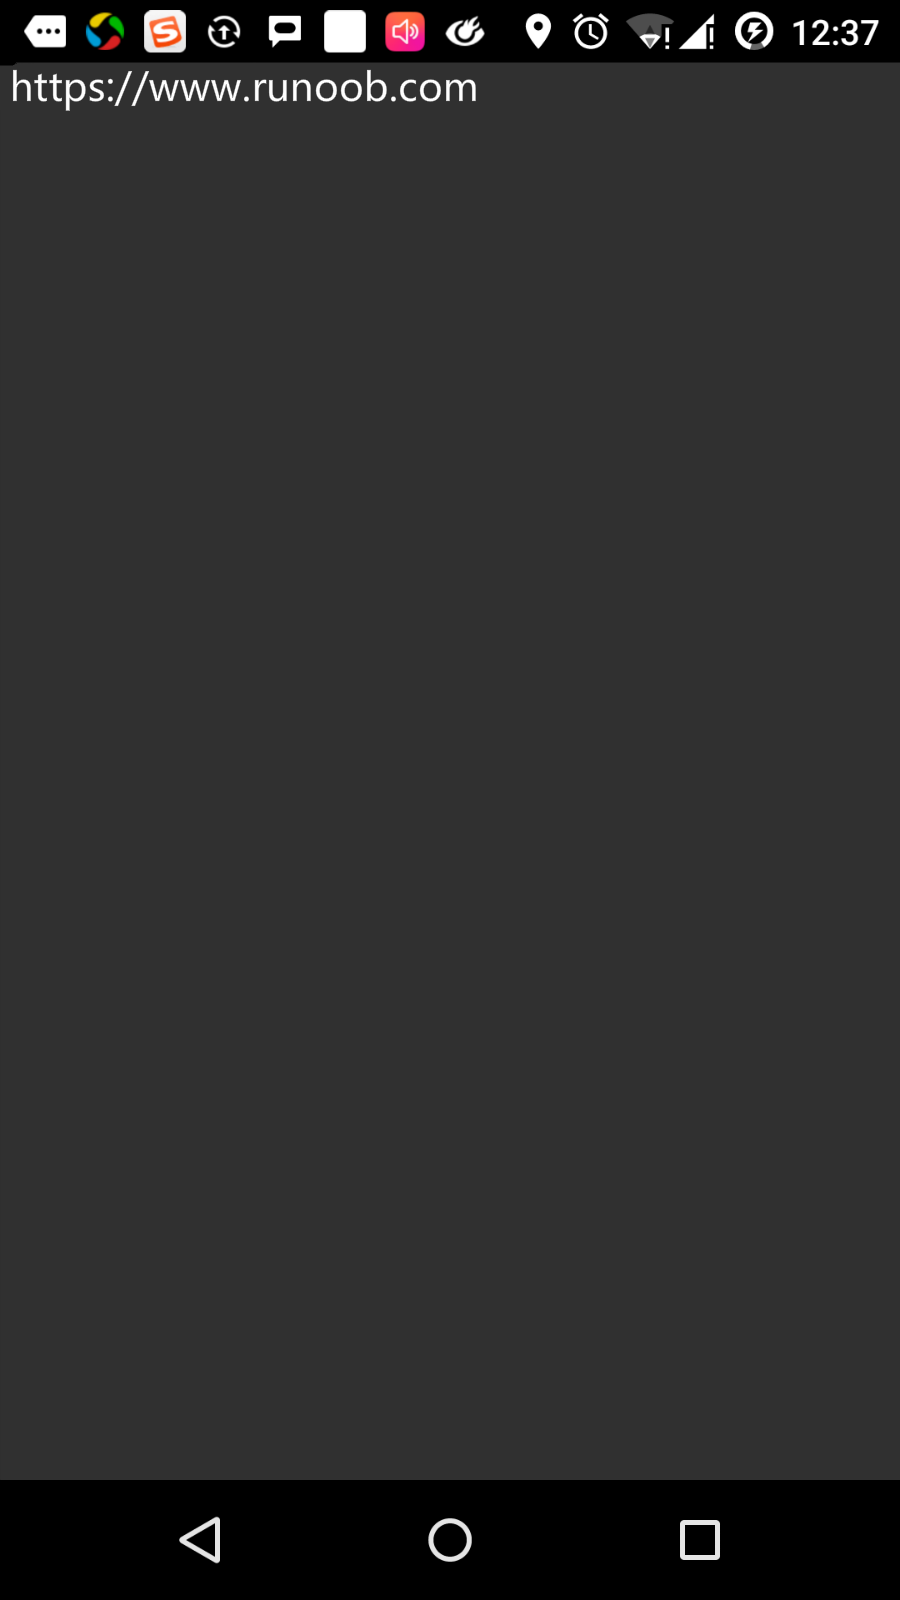
现在,通过返回按钮返回并点击"通过Launch动作启动浏览器"按钮,这里 Android 应用过滤器来选择定义的活动,并简单启动自定义活动。
再次使用返回按钮返回,并点击"异常条件"按钮,这里Android尝试找到一个由意图给定的有效的过滤器,但没有找到一个定义的有效的活动。因为我们使用 https 代替 http 的数据,并给定了正确的动作,一次 Android 产生了一个异常。
runoob-android的更多相关文章
- Android 学习资源
下面这些资源对Android开发来说是很有帮助的! 最常用的: Android开发官方网站:http://developer.android.com/index.html 这个网站应该是Android ...
- Android学习资源整理
官方文档:https://developer.android.com/guide/index.html (万万没想到居然有中文) 网友整理的学习笔记,挺不错的 http://www.runoob.co ...
- 我的Android第四章
本章需掌握 1.连接真机的过程. 2.dx指令的作用 3.adb是什么? 4.adb有什么用(有什么好处)? 5.adb的一些常用命令 1.连接真机的过程. 需要:一部Android机.usb连接线, ...
- 我的Android第四章:Android的adb命令使用以及SQlite数据库运用
adb是什么?:adb的全称为Android Debug Bridge,就是起到调试桥的作用. adb有什么用?:借助adb工具,我们可以管理设备或手机模拟器的状态.还可以进行很多手机操作, ...
- Android消息处理机制(Handler 与Message)---01
一.handler的使用场景为么会有handler?(部分内容图片摘自http://www.runoob.com/w3cnote/android-tutorial-handler-message.ht ...
- Android学习参考教程和工具及常见问题解决
参考教程: 1.菜鸟教程:http://www.runoob.com/w3cnote/android-tutorial-intro.html 2.Android初學特訓班(第五版) 使用工具: 1.A ...
- Android 开机启动通知
效果图: 学习: 1.静态注册实现开机启动 <uses-permission android:name="android.permission.RECEIVE_BOOT_COMPLET ...
- Android 开发转型前端准备知识
最近React Native甚是流行,再加上微信推动微应用的背景下,Android和IOS向前端转型势在必行. 技能点: 1.lambda表达式 http://blog.csdn.net/ioriog ...
- Android学习总结(一)——Activity的基本概念与Activity的生命周期
一.Activity的基本概念 Activity是Android的四大组件之一,它是一种可以包含用户界面的组件,主要用于和用户进行交互,比如打电话,照相,发送邮件,或者显示一个地图!Activity用 ...
- Android学习笔记-构建一个可复用的自定义BaseAdapter
转载自http://www.runoob.com/w3cnote/android-tutorial-customer-baseadapter.html 作者:coder-pig 本节引言: 如题, ...
随机推荐
- MMCA:多模态动态权重更新,视觉定位新SOTA | ACM MM'24 Oral
来源:晓飞的算法工程笔记 公众号,转载请注明出处 论文: Visual Grounding with Multi-modal Conditional Adaptation 论文地址:https://a ...
- JBOSS漏洞复现
Jboss漏洞复现 统一靶场:/vulhub/jboss JMX Console 未授权访问漏洞 # 介绍 JBoss的webUI界面 http://ip:port/jmx-console未授权访问( ...
- 哪些网站可以申请免费的纯IP地址https证书
申请免费纯IP地址HTTPS证书,您可以按照以下步骤进行: 一.选择证书颁发机构(CA) 目前,虽然一些大型云服务提供商(如阿里云.华为云.腾讯云等)已经取消了免费一年期SSL证书的供应,但仍有一些C ...
- 【一步步开发AI运动小程序】七、进行运动计时、计数
随着人工智能技术的不断发展,阿里体育等IT大厂,推出的"乐动力"."天天跳绳"AI运动APP,让云上运动会.线上运动会.健身打卡.AI体育指导等概念空前火热.那 ...
- [python] Python异步编程库asyncio使用指北
Python的asyncio模块提供了基于协程(coroutines)的异步编程(asynchronous programming)模型.作为一种高效的编程范式,异步编程允许多个轻量级任务并发执行,且 ...
- golang读取文件
golang 按行读取文件 file, err := os.Open("app-2019-06-01.log") if err != nil { log.Fatal(err) } ...
- 21stUESTC
数矩形 平面上有 \(n\) 个点,这 \(n\) 个点两两不重合.问这 \(n\) 个点可以组成多少个矩形 请注意:矩形的边不必平行于坐标轴. \(4 ≤ n ≤ 1000\) 保证这些点两两不重合 ...
- 新型大语言模型的预训练与后训练范式,Meta的Llama 3.1语言模型
前言:大型语言模型(LLMs)的发展历程可以说是非常长,从早期的GPT模型一路走到了今天这些复杂的.公开权重的大型语言模型.最初,LLM的训练过程只关注预训练,但后来逐步扩展到了包括预训练和后训练在内 ...
- 18号CSS学习
一.CSS简介 1.HTML局限性 只关注内容的语义. "丑" 2.CSS-网页的美容师 CSS是层叠样式表的简称,也称为CSS样式表或级联样式表. 主要用于设置HTML页面中的 ...
- MySQL 迁移到 PG 怎么做
千万不要用 pgloader,就是个垃圾 etlalchemy 是值得信赖的选择. https://github.com/seanharr11/etlalchemy 还有其它基于 sqlalchemy ...