FragmentTabHost用法
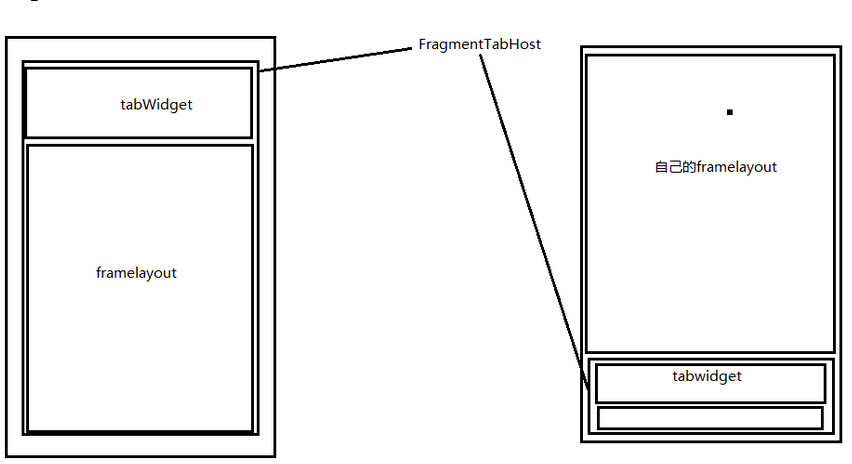
FragmentTabHost组成
- Tabhost,TabWidget,切换的内容容器FrameLayout
层级关系
----FragmentTabHost

    |-----TabWidget

    |-----FrameLayout
布局实现
- 实现tabhost采用android.support.v4.app.FragmentTabHost
注意 id:@android:id/tabhost
- 实现tabWidget
注意 id:@android:id/tabs
实现FrameLayout
注意
1. id: @android:id/tabcontent
2. 此容器已经被废除,但在布局中必须有
实现自定义的内容容器区域(FrameLayout)
注意 :
1. 整体需采用线性布局
2. 将自定义展示的区域放到TabHost之上
3. 自定义的内容需要给权重
代码实现
- 初始化TabHost
调用setup(Context,FragmentManager,int);
最后一个参数 指的是 Fragment的容器id 用来切换fragment的
- 新建TabSpec
调用setIndicator(View view)//实现自定义的tab
- 添加TabSpec
调用addTab(TabSpec,Class,Bundle)的方法添加TabSpec
Class 指的是 tab对应的 Fragment
Bundle 指的是 Fragment 初始化的参数
组合式控件的实现(下面的Tab一般都自定义)
- 新建布局
- 将布局和代码进行关联
新建的View 必须继承 和 布局容器一样的容器类
通过View.inflate(context,LayoutId, this)将View和xml进行绑定
- 功能进行封装
根据当前View需要的功能进行封装
<LinearLayout xmlns:android="http://schemas.android.com/apk/res/android"

    xmlns:tools="http://schemas.android.com/tools"

    android:layout_width="match_parent"

    android:layout_height="match_parent"

    android:orientation="vertical" >

    <FrameLayout

        android:id="@+id/activity_home_container"

        android:layout_width="fill_parent"

        android:layout_height="0dp"

        android:layout_weight="1" >

    </FrameLayout>

    <android.support.v4.app.FragmentTabHost

        android:id="@android:id/tabhost"

        android:layout_width="match_parent"

        android:layout_height="wrap_content" >

        <TabWidget

            android:id="@android:id/tabs"

            android:layout_width="match_parent"

            android:layout_height="wrap_content"

            android:layout_alignParentBottom="true"

            android:background="#FFF1F1F1" >

        </TabWidget>

        <FrameLayout

            android:id="@android:id/tabcontent"

            android:layout_width="0dp"

            android:layout_height="0dp" >

        </FrameLayout>

    </android.support.v4.app.FragmentTabHost>

</LinearLayout>
代码:
public class HomeActivity extends BaseActivity implements OnTabChangeListener {
private static final String TAB_CHAT = "chat";
private static final String TAB_CONTACT = "contact";
private static final String TAB_DISCOVER = "discover";
private static final String TAB_ME = "me";
private FragmentTabHost tabhost;
private TabIndicatorView chatIndicator;
private TabIndicatorView contactIndicator;
private TabIndicatorView discoverIndicator;
private TabIndicatorView meIndicator;
@Override
protected void onCreate(Bundle savedInstanceState) {
super.onCreate(savedInstanceState);
setContentView(R.layout.act_home);
// 1. 初始化TabHost
tabhost = (FragmentTabHost) findViewById(android.R.id.tabhost);
tabhost.setup(this, getSupportFragmentManager(),
R.id.activity_home_container);//上面的fargment
// 2. 新建TabSpec
TabSpec spec = tabhost.newTabSpec(TAB_CHAT);//需要自定义常量
chatIndicator = new TabIndicatorView(this);
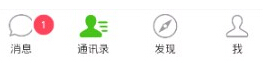
chatIndicator.setTabTitle("消息");
chatIndicator.setTabIcon(R.drawable.tab_icon_chat_normal,
R.drawable.tab_icon_chat_focus);//选中和默认的图标
spec.setIndicator(chatIndicator);
// 3. 添加TabSpec
tabhost.addTab(spec, ChatFra.class, null);//添加上面的fargment
// 2. 新建TabSpec
spec = tabhost.newTabSpec(TAB_CONTACT);
contactIndicator = new TabIndicatorView(this);
contactIndicator.setTabIcon(R.drawable.tab_icon_contact_normal,
R.drawable.tab_icon_contact_focus);
contactIndicator.setTabTitle("通讯录");
contactIndicator.setTabUnreadCount(10);
spec.setIndicator(contactIndicator);
// 3. 添加TabSpec
tabhost.addTab(spec, ContactFra.class, null);
// 2. 新建TabSpec
spec = tabhost.newTabSpec(TAB_DISCOVER);
discoverIndicator = new TabIndicatorView(this);
discoverIndicator.setTabIcon(R.drawable.tab_icon_discover_normal,
R.drawable.tab_icon_discover_focus);
discoverIndicator.setTabTitle("发现");
discoverIndicator.setTabUnreadCount(10);
spec.setIndicator(discoverIndicator);
// 3. 添加TabSpec
tabhost.addTab(spec, DiscoverFra.class, null);
// 2. 新建TabSpec
spec = tabhost.newTabSpec(TAB_ME);
meIndicator = new TabIndicatorView(this);
meIndicator.setTabIcon(R.drawable.tab_icon_me_normal,
R.drawable.tab_icon_me_focus);
meIndicator.setTabTitle("我");
meIndicator.setTabUnreadCount(10);
spec.setIndicator(meIndicator);
// 3. 添加TabSpec
tabhost.addTab(spec, MeFra.class, null);
// 去掉分割线
tabhost.getTabWidget().setDividerDrawable(android.R.color.white);
// 初始化 tab选中
tabhost.setCurrentTabByTag(TAB_CHAT);
chatIndicator.setTabSelected(true);
// 设置tab切换的监听
tabhost.setOnTabChangedListener(this);
}
@Override
public void onTabChanged(String tag) {
chatIndicator.setTabSelected(false);
contactIndicator.setTabSelected(false);
discoverIndicator.setTabSelected(false);
meIndicator.setTabSelected(false);
if (TAB_CHAT.equals(tag)) {
chatIndicator.setTabSelected(true);
} else if (TAB_CONTACT.equals(tag)) {
contactIndicator.setTabSelected(true);
} else if (TAB_DISCOVER.equals(tag)) {
discoverIndicator.setTabSelected(true);
} else if (TAB_ME.equals(tag)) {
meIndicator.setTabSelected(true);
}
}
}

下面的自定义,动态的去添加信息
public class TabIndicatorView extends RelativeLayout {

	private ImageView ivTabIcon;

	private TextView tvTabHint;

	private TextView tvTabUnRead;

	private int normalIconId;

	private int focusIconId;

	public TabIndicatorView(Context context) {

		this(context, null);//这个实现这个构造函数就可以了

	}

	public TabIndicatorView(Context context, AttributeSet attrs) {

		super(context, attrs);

		// 将布局文件和 代码进行绑定

		View.inflate(context, R.layout.tab_indicator, this);

		ivTabIcon = (ImageView) findViewById(R.id.tab_indicator_icon);

		tvTabHint = (TextView) findViewById(R.id.tab_indicator_hint);

		tvTabUnRead = (TextView) findViewById(R.id.tab_indicator_unread);

		setTabUnreadCount(0);

	}

	// 设置tab的title

	public void setTabTitle(String title) {

		tvTabHint.setText(title);

	}

	public void setTabTitle(int titleId) {

		tvTabHint.setText(titleId);

	}

	// 初始化图标

	public void setTabIcon(int normalIconId, int focusIconId) {

		this.normalIconId = normalIconId;

		this.focusIconId = focusIconId;

		ivTabIcon.setImageResource(normalIconId);

	}

	// 设置未读数

	public void setTabUnreadCount(int unreadCount) {

		if (unreadCount <= 0) {

			tvTabUnRead.setVisibility(View.GONE);

		} else {

			if (unreadCount <= 99) {

				tvTabUnRead.setText(unreadCount + "");

			} else {

				tvTabUnRead.setText("99+");

			}

			tvTabUnRead.setVisibility(View.VISIBLE);

		}

	}

	// 设置选中

	public void setTabSelected(boolean selected) {

		if (selected) {

			ivTabIcon.setImageResource(focusIconId);

		} else {

			ivTabIcon.setImageResource(normalIconId);

		}

	}

}
FragmentTabHost用法的更多相关文章
- FragmentTabHost的基本用法
开通博客以来已经约莫1个月了.几次想提笔写写东西,但总是由于各种各样的原因并没有开始.现在,年假刚结束,项目也还没有开始,但最终促使我写这篇博客的是,看了一篇博友写的新年计划,说是要在新的一年中写50 ...
- 【Android Widget】FragmentTabHost
android.support.v4包里面提供了FragmentTabHost用来替代TabHost,FragmentTabHost内容页面支持Fragment,下面我们就通过示例来看他的用法 效果图 ...
- FragmentTabHost的应用
原创)FragmentTabHost的应用(fragment学习系列文章之二) 时间 2014-04-14 00:11:46 CSDN博客 原文 http://blog.csdn.net/flyi ...
- EditText 基本用法
title: EditText 基本用法 tags: EditText,编辑框,输入框 --- EditText介绍: EditText 在开发中也是经常用到的控件,也是一个比较必要的组件,可以说它是 ...
- jquery插件的用法之cookie 插件
一.使用cookie 插件 插件官方网站下载地址:http://plugins.jquery.com/cookie/ cookie 插件的用法比较简单,直接粘贴下面代码示例: //生成一个cookie ...
- Java中的Socket的用法
Java中的Socket的用法 Java中的Socket分为普通的Socket和NioSocket. 普通Socket的用法 Java中的 ...
- [转载]C#中MessageBox.Show用法以及VB.NET中MsgBox用法
一.C#中MessageBox.Show用法 MessageBox.Show (String) 显示具有指定文本的消息框. 由 .NET Compact Framework 支持. MessageBo ...
- python enumerate 用法
A new built-in function, enumerate() , will make certain loops a bit clearer. enumerate(thing) , whe ...
- [转载]Jquery中$.get(),$.post(),$.ajax(),$.getJSON()的用法总结
本文对Jquery中$.get(),$.post(),$.ajax(),$.getJSON()的用法进行了详细的总结,需要的朋友可以参考下,希望对大家有所帮助. 详细解读Jquery各Ajax函数: ...
随机推荐
- redis缓存雪崩,缓存穿透,缓存击穿的解决方法
一.缓存雪崩 缓存雪崩表示在某一时间段,缓存集中失效,导致请求全部走数据库,有可能搞垮数据库,使整个服务瘫痪. 使缓存集中失效的原因: 1.redis服务器挂掉了. 2.对缓存数据设置了相同的过期时间 ...
- dskinlite(uieasy mfc界面库)使用记录3:绘制动态元素(按钮控件通过隐藏方式修改图片显示)
效果图: 分别是:正常,正常鼠标悬停,按下,按下鼠标悬停 XML代码: 75,76行定义了一个image,注意id和index属性 初始化代码: click代码: 147,148,153,154:通过 ...
- 关于PHP架构师进阶的一些思考
相信大家都有感觉,就是当程序员写业务写了几年后,就会有想进阶的想法,技术方面当然就是架构师了,然后具体从哪些方面丰富自己才能个达到目的呢?大部分人可能会很迷茫,当然也包括我, 最近和很多大牛交流了一些 ...
- win10无法访问服务器上的共享文件夹怎么设置,提示:你不能访问此共享文件夹,因为你组织的安全策略阻止未经身份验证的来宾访问
此问题需要修改Win10 网络策略 按window+R键输入gpedit.msc 来启动本地组策略编辑器. 依次找到“计算机配置-管理模板-网络-Lanman工作站”这个节点,在右侧内容区可以看到“启 ...
- 计蒜客 2019 蓝桥杯省赛 B 组模拟赛(一)
D题:马的管辖 二进制枚举方案.判断该方案是否全部能被覆盖,将最优方案存下来并进行剪枝. #include<iostream> #include<cstring> #inclu ...
- Failed to mount component: template or render function not defined.
Failed to mount component: template or render function not defined. vue-loader13.0有一个变更就是默认启用了esModu ...
- JAVA 8 主要新特性 ----------------(五)Lambda方法引用与构造器引用
一.Lambda方法引用 当要传递给Lambda体的操作,已经有实现的方法了,可以使用方法引用!(实现抽象方法的参数列表,必须与方法引用方法的参数列表保持一致!) 方法引用: 使用操作符 “::” 将 ...
- Stanford CS20学习笔记
Lecture Note 2 Tensorboard P3 Data Structures P4 Math Operations P6 Data Types P7 tf native &&am ...
- 再探haproxy
一 设置haproxy输出log 1.1 调整配置文件 默认haproxy是不会输出log到文件的,这样很大程度在查询问题时会很不方便,haproxy是可以输出日志到文件的,配置文档类似于如下: ]# ...
- 基于面向方面和UML的实时系统建模研究
一.基本信息 标题:基于面向方面和UML的实时系统建模研究 时间:2010 出版源:计算机技术与发展 领域分类:面向方向:实时系统:横切关注点:统一建模语言: 二.研究背景 问题定义:实时系统建模研究 ...