Android中Context样式分析
本文基于SDK 28, android studio 4.1.1
1、样式定义以及使用
1.1、默认样式
创建一个简单的项目, 其AndroidManifest.xml配置如下:
<?xml version="1.0" encoding="utf-8"?>

<manifest xmlns:android="http://schemas.android.com/apk/res/android"

    package="com.example.myapplication">

    <application

        android:allowBackup="true"

        android:icon="@mipmap/ic_launcher"

        android:label="@string/app_name"

        android:roundIcon="@mipmap/ic_launcher_round"

        android:supportsRtl="true"

        android:theme="@style/Theme.MyApplication"

        >

        <activity

            android:name=".MainActivity"

            android:label="@string/app_name">

            <intent-filter>

                <action android:name="android.intent.action.MAIN" />

                <category android:name="android.intent.category.LAUNCHER" />

            </intent-filter>

        </activity>

    </application>

</manifest>
其中android:theme指定应用的样式Theme.MyApplication, 在values和values-night文件夹的themes.xml中定义,分别表示白色模式和暗黑模式。
values文件夹下themes.xml定义如下:
<resources xmlns:tools="http://schemas.android.com/tools">

    <!-- Base application theme. -->

    <style name="Theme.MyApplication"                parent="Theme.MaterialComponents.DayNight.DarkActionBar">

        <!-- Primary brand color. -->

        <item name="colorPrimary">@color/purple_500</item>

        <item name="colorPrimaryVariant">@color/purple_700</item>

        <item name="colorOnPrimary">@color/white1</item>

        <!-- Secondary brand color. -->

        <item name="colorSecondary">@color/teal_200</item>

        <item name="colorSecondaryVariant">@color/teal_700</item>

        <item name="colorOnSecondary">@color/black1</item>

        <!-- Status bar color. -->

        <item name="android:statusBarColor" tools:targetApi="l">?attr/colorPrimaryVariant</item>

        <!-- Customize your theme here. -->

    </style>

</resources>
Theme.MyApplication样式继承自Theme.materialComponents.DayNight.DarkActionBar, 定义了白色风格下状态栏颜色、背景色等;同样地,values-night文件夹下themes.xml中Theme.MyApplication定义了黑色风格下状态栏颜色、背景色等。
转到colorPrimary定义(Ctrl + 鼠标左键),在appcompat-xxx下的values.xml中定义如下:
<?xml version="1.0" encoding="utf-8"?>

<resources xmlns:ns1="urn:oasis:names:tc:xliff:document:1.2">

    ...

            <!-- The primary branding color for the app. By default, this is the color applied to the

             action bar background. -->

        <attr format="color" name="colorPrimary"/>

    ...

</resources>
可以看出colorPrimary是一个attr属性,其在两个Theme.MyApplication样式中都设置了值。
1.2、样式定义及使用
在某些情况下针对具体的Activity,需要处理特殊样式,仿照着Theme.MyApplication创建Activity的样式。在values文件夹下创建attrs.xml。在attrs.xml中定义attr类型的背景颜色
<?xml version="1.0" encoding="utf-8"?>

<resources>

    <attr name="color_background" format="color" />

</resources>
分别在values和values-night文件夹下的theme.xml中定义activity的样式activity_theme, 并分别定义color_background为#FFAAAAAA、#FF333333
<?xml version="1.0" encoding="utf-8"?>

<resources>

   ...

   <style name="activity_theme" parent="Theme.MaterialComponents.DayNight.DarkActionBar">

        <item name="color_background">#FFAAAAAA</item>

   </style>

   ...

</resources>
在布局文件中引用该属性作为背景:
<?xml version="1.0" encoding="utf-8"?>

<androidx.constraintlayout.widget.ConstraintLayout

 xmlns:android="http://schemas.android.com/apk/res/android"

 xmlns:app="http://schemas.android.com/apk/res-auto"

 android:layout_width="match_parent"

 android:layout_height="match_parent"

 android:gravity="center"

 android:background="?attr/color_background">

 ...

</androidx.constraintlayout.widget.ConstraintLayout>
在Activity加载View之前设置MainActivity的样式:
@Override

protected void onCreate(Bundle savedInstanceState) {

    setTheme(R.style.activity_theme);

    super.onCreate(savedInstanceState);

    setContentView(R.layout.activity_main);

}
运行程序,就可以看到activity_theme中定义的color_background =#FFAAAAAA背景色效果。
1.3、当前样式下attr属性的获取
当前样式下color_background属性可以通过TypedValue来获取:
    TypedValue typedValue = new TypedValue();

    MainActivity.this.getTheme().resolveAttribute(R.attr.color_background, typedValue, true);

    Log.d("MainActivity", "R.attr.color_background属性:" + typedValue.coerceToString());
1.4、属性集合的定义与获取
在values.xml中定义属性集合custom:
<resources>

    ...

    <declare-styleable name="custom">

        <attr name="string1" format="string" />

        <attr name="color1" format="color" />

    </declare-styleable>

    ...

</resources>
在activity_theme样式中添加对应属性
<style name="activity_theme" parent="Theme.MaterialComponents.DayNight.DarkActionBar">

    <item name="color_background">#FFAAAAAA</item>

    <item name="string1">Activity</item>

    <item name="color1">#0000ff</item>

</style>
可通过如下代码获取对应属性:
int[] attrs = R.styleable.custom;

TypedArray array = MainActivity.this.getTheme().obtainStyledAttributes(attrs);

for (int i = 0; i < array.getIndexCount(); i++) {

    int attr = array.getIndex(i);

    if (attr == R.styleable.custom_string1) {

        String string1 = array.getString(attr);

        Log.d("MainActivity", "R.styleable.custom_string1属性: " + string1);

    } else if (attr == R.styleable.custom_color1) {

        int color1 = array.getColor(attr, Color.BLACK);

        Log.d("MainActivity", "R.styleable.custom_color1属性: #" +          Integer.toHexString(color1));

    }

}
2、Activity中Theme的初始化流程
Activity中主题设置方法为setTheme,获取主题方法为getTheme,下面分别分析setTheme和getTheme()
2.1、系统调用setTheme以及setTheme逻辑
在MainActivity中重写setTheme, 并增加断点, 启动调试,则可获得如下调用堆栈:
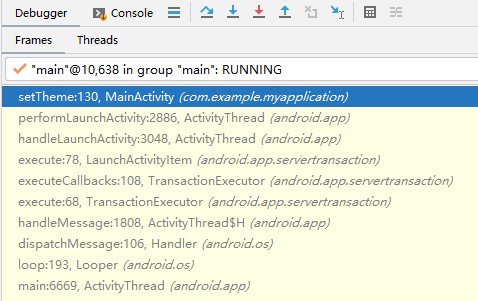
点到上一步performLaunchActivity:
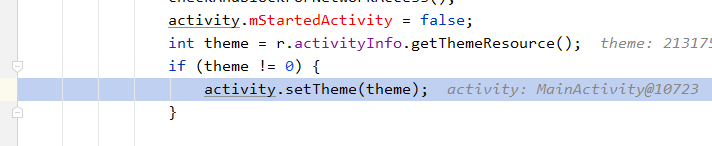
ActivityInfo类型的变量r.activityInfo的getThemeResource()方法如下:
public final int getThemeResource() {

    return theme != 0 ? theme : applicationInfo.theme;

}
表示:如果当前activity有对应的theme,就设置,否则就使用application的theme,这两个theme分别设置在activity标签和application标签下。
setTheme代码如下:
@Override

public void setTheme(int resid) {

    if (mThemeResource != resid) {

        mThemeResource = resid;

        initializeTheme();

    }

}

private void initializeTheme() {

    final boolean first = mTheme == null;

    if (first) {

        mTheme = getResources().newTheme();

        final Resources.Theme theme = getBaseContext().getTheme();

        if (theme != null) {

            mTheme.setTo(theme);

        }

    }

    onApplyThemeResource(mTheme, mThemeResource, first);

}

protected void onApplyThemeResource(Resources.Theme theme, int resId, boolean first) {

    theme.applyStyle(resId, true);

}
首先判断设置的resId和mThemeResource是不是一样,如果不一样就对mThemeResource赋值,检查并初始化mTheme,然后调用Resources.Theme#applyStyle方法 --> ResourceImpl.ThemeImpl#applyStyle
void applyStyle(int resId, boolean force) {

    synchronized (mKey) {

        mAssets.applyStyleToTheme(mTheme, resId, force);

        mThemeResId = resId;

        mKey.append(resId, force);

    }

}
mAssets类型为AssetManager,applyStyleToTheme方法调用native方法nativeThemeApplyStyle,这个方法将样式中的属性键值对复制到mTheme中,这一过程类似于Map的put方法,存在就更新,不存在就存入。再创建一个样式activity_theme1, color_background属性定义为#ffffff, 可通过如下代码验证:
setTheme(R.style.activity_theme);

context.getTheme().resolveAttribute(R.attr.color_background, typedValue, true);

Log.d("MainActivity", "R.attr.color_background属性:" + typedValue.coerceToString());

setTheme(R.style.activity_theme1);

context.getTheme().resolveAttribute(R.attr.color_background, typedValue, true);

Log.d("MainActivity", "R.attr.color_background属性:" + typedValue.coerceToString());

int[] attrs = R.styleable.custom;

//string1和color1还是activity_theme样式中定义的值

TypedArray array = context.getTheme().obtainStyledAttributes(attrs);

for (int i = 0; i < array.getIndexCount(); i++) {

    int attr = array.getIndex(i);

    if (attr == R.styleable.custom_string1) {

        String string1 = array.getString(attr);

        Log.d("MainActivity", "R.styleable.custom_string1属性: " + string1);

    } else if (attr == R.styleable.custom_color1) {

        int color1 = array.getColor(attr, Color.BLACK);

        Log.d("MainActivity", "R.styleable.custom_color1属性: #" + Integer.toHexString(color1));

     }

}
如果将application标签下的android:theme="@style/Theme.MyApplication"移除,程序依旧可以运行,再将activity_theme中的 parent="Theme.MaterialComponents.DayNight.DarkActionBar"去掉,运行程序,程序就会报异常:
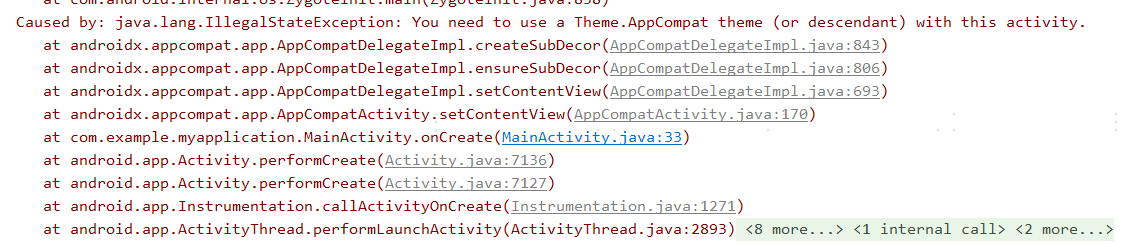
AppCompatDelegateImpl类中异常抛出的代码如下:
private ViewGroup createSubDecor() {

    TypedArray a = mContext.obtainStyledAttributes(R.styleable.AppCompatTheme);

    if (!a.hasValue(R.styleable.AppCompatTheme_windowActionBar)) {

        a.recycle();

        throw new IllegalStateException(

                "You need to use a Theme.AppCompat theme (or descendant) with this activity.");

    }

    ...

    return subDecor;

}
这就是样式继承的意义所在:提供一些默认的属性。
    <style name="activity_theme"parent="Theme.MaterialComponents.DayNight.DarkActionBar">

       ...

    </style>
以上样式继承在效果上等价于activity_theme去掉parent,然后代码中先后调用
       ```

setTheme(R.style.Theme_MaterialComponents_DayNight_DarkActionBar);

setTheme(R.style.activity_theme);

       ```
如果想要改变一些属性,如状态栏颜色,可以在对应样式中进行修改:
<style name="activity_theme">

    ...

    <item name="android:statusBarColor" tools:targetApi="l">#ff0000</item>

</style>
2.2、getTheme()逻辑
Activity的getTheme方法来自于android.view.ContextThemeWrapper类,代码如下:
@Override

public Resources.Theme getTheme() {

    if (mTheme != null) {

        return mTheme;

    }

    mThemeResource = Resources.selectDefaultTheme(mThemeResource,

            getApplicationInfo().targetSdkVersion);

    initializeTheme();

    return mTheme;

}
主要逻辑是:如果mTheme已经初始化过,就返回mTheme,如果没有,就调用Resources.selectDefaultTheme,根据mThemeResource和sdk版本号选择对应的样式id(mThemeResource不为0就返回mThemeResource),通过initializeTheme初始化mTheme。
3、定义特殊需求的样式
定义一个Toast的样式:
<style name="toast_theme">

    <item name="color_background">#ff0000</item>

</style>
如果需要获取该样式下的属性值,可以通过构建Context来完成。一般地,可以通过如下代码来获取该样式下的属性值:
ContextThemeWrapper contextThemeWrapper = new ContextThemeWrapper(getApplication(), R.style.activity_theme);

TypedValue typedValue = new TypedValue();

contextThemeWrapper.getTheme().resolveAttribute(R.attr.color_background, typedValue, true);

Log.d("Test", typedValue.coerceToString().toString());
以上构建的contextThemeWrapper可以用来加载View、显示Toast等(Activity实际上就是一个ContextThemeWrapper)。Toast也可以保存下来复用,改变文字、字体颜色、背景等等,它实际引用的是Application,不会造成内存泄露。
Toast toast = new Toast(contextThemeWrapper);

View contentView = LayoutInflater.from(contextThemeWrapper).inflate(R.layout.toast_text, null);

TextView textView = (TextView) contentView;

textView.setText("Hello, World!");

toast.setView(contentView);

toast.show();
其中R.layout.toast_text如下:
<?xml version="1.0" encoding="utf-8"?>

<TextView xmlns:android="http://schemas.android.com/apk/res/android"

    android:layout_width="wrap_content"

    android:layout_height="wrap_content"

    android:id="@+id/textView"

    android:textColor="#ffffff"

    android:textSize="16sp"

    android:background="?attr/color_background">

</TextView>
Application也可以通过调用setTheme来赋予其一些属性值,它继承自ContextWrapper, 内部的mBase是android.app.ContextImpl的实例, android.app.ContextImpl#setTheme实现了和android.view.ContextThemeWrapper#setTheme同样的逻辑,可以用于加载View、显示Toast等等。
Application application = getApplication();

application.setTheme(R.style.toast_theme);

Toast toast = new Toast(application);

View contentView = LayoutInflater.from(application).inflate(R.layout.toast_text, null);

TextView textView = (TextView) contentView;

textView.setText("Hello, World!");

toast.setView(contentView);

toast.show();
总结
(1) AndroidManifest.xml中activity标签下android:theme优先级更高,application标签下的android:theme次之,直接在代码中设置setTheme优先级最高。对Activity,系统默认设置AndroidManifest.xml中配置的theme;对Application, 系统没有设置过主题。
(2) 样式类似于Map,key是attr的id值,value是对应的属性值,可以进行继承、覆盖等。
Android中Context样式分析的更多相关文章
- android中的样式和主题
有的时候我们一个页面要用很多个textview,而且这些textview的样式非常相像,这种情况下我们可以把这些样式抽取出来,然后在每个textview中引用即可,这样修改起来也方便. 我们来看一个简 ...
- Android中AppWidget的分析与应用:AppWidgetProvider .
from: http://blog.csdn.net/thl789/article/details/7887968 本文从开发AppWidgetProvider角度出发,看一个AppWidgetPrv ...
- Android中Context的总结及其用法
在android中我们经常遇到这样的情况,在创建一个对象的时候往往需要传递一个this参数,比如:语句 MyView mView = new MyView(this),要求传递一个this参数,这个t ...
- Android中Context详解 ---- 你所不知道的Context(转)
Android中Context详解 ---- 你所不知道的Context(转) 本文出处 :http://b ...
- Android 中图片压缩分析(上)
作者: shawnzhao,QQ音乐技术团队一员 一.前言 在 Android 中进行图片压缩是非常常见的开发场景,主要的压缩方法有两种:其一是质量压缩,其二是下采样压缩. 前者是在不改变图片尺寸的情 ...
- android中的样式主题和国际化
一.Android中的样式和主题 1.1样式 样式是作用在控件上的,它是一个包含一个或者多个view控件属性的集合.android style类似网页设计中的css设计思路,可以让设计 ...
- Android中Context详解
大家好, 今天给大家介绍下我们在应用开发中最熟悉而陌生的朋友-----Context类 ,说它熟悉,是应为我们在开发中时刻的在与它打交道,例如:Service.BroadcastReceiver.A ...
- Android中Context详解 ---- 你所不知道的Context
转自:http://blog.csdn.net/qinjuning/article/details/7310620Android中Context详解 ---- 你所不知道的Context 大家好, ...
- 转:Android中Context详解 ---- 你所不知道的Context
转:http://blog.csdn.net/qinjuning/article/details/7310620 转:http://blog.csdn.net/lmj623565791/article ...
随机推荐
- 【uva 12219】Common Subexpression Elimination(图论--树+自定义比较器+映射+递归)
题意:如题,用表达式树来表示一个表达式,且消除公共的部分,即用编号表示.编号 K 定义为表达式第 K 个出现的字符串. 解法:先构造表达式树,给每棵子树用(string,left_son,right_ ...
- Codeforces Round #651 (Div. 2) A. Maximum GCD (思维)
题意:在\(1\)~\(n\)中找两个不相等的数使得他们的\(gcd\)最大. 题解:水题,如果\(n\)是偶数,那么一定取\(n\)和\(n/2\),\(n\)是奇数的话,取\(n-1\)和\((n ...
- Linux系统编程【1】——编写more命令
背景介绍 笔者知识背景 笔者接触Linux快一年了.理论知识方面:学习了操作系统基础知识,了解进程调度.内存分配.文件管理.磁盘I/O这些基本的概念. 实操方面:会使用Linux简单命令,在嵌入式系统 ...
- EFCore学习记录--数据访问技术人门
1.安装Microsoft.EntityFrameworkCore.Sqlite.Microsoft.EntityFrameworkCore.Tools包2.创建模型 数据库上下文模型:Bloggin ...
- PPT 倒计时时钟,用 GIF 动画实现,可直接使用 -- 附 Python 实现代码
在上课时,有时需要显示一个倒计时时钟,让学生做题. PPT 没有简单有效的方法实现倒计时时钟,参考了多个方案,最终决定采用 GIF 动画来实现. 这样使用起来很简单,只要把事先做好的各个时长的倒计时动 ...
- SSM框架整合(Spring + SpringMVC + MyBatis)
搭建环境 使用Spring(业务层)整合其他的框架SpringMVC(表现层)和MyBatis(持久层) Spring框架 创建数据库表 CREATE DATABASE ssm; USE ssm; C ...
- Cortex-M系列内核 启动文件分析
最近终于闲了下来了准备好好学习下Cortex-M3/M4系列处理器的架构,经过各种资料的折磨也没法对它的整个工作过程能有个完整的认知,最后看到一片博客打算从程序的运行过程开始探究,所以首先就找到了启动 ...
- Vue2.0 多种组件传值方法-不过如此的 Vuex
码文不易啊,转载请带上本文链接呀,感谢感谢 https://www.cnblogs.com/echoyya/p/14404397.html 在vue项目中了解组件间通讯很重要,也是最基础的面试题,可以 ...
- uni-app 实战-打包 📦 App
uni-app 实战-打包 App Android & iOS 证书 广告 refs xgqfrms 2012-2020 www.cnblogs.com 发布文章使用:只允许注册用户才可以访问 ...
- javascript questions & code review
javascript questions & code review refs https://github.com/learning-js-by-reading-source-codes/j ...