Spring Boot 快速入门(IDEA)
从字面理解,Boot是引导的意思,因此SpringBoot帮助开发者快速搭建Spring框架;SpringBoot帮助开发者快速启动一个Web容器;SpringBoot继承了原有Spring框架的优秀基因;SpringBoot简化了使用Spring的过程。
一、Spring Boot概述
Build Anything with Spring Boot:Spring Boot is the starting point for building all Spring-based applications. Spring Boot is designed to get you up and running as quickly as possible, with minimal upfront configuration of Spring.
上面是引自官网的一段话,大概是说: Spring Boot 是所有基于 Spring 开发的项目的起点。Spring Boot 的设计是为了让你尽可能快的跑起来 Spring 应用程序并且尽可能减少你的配置文件。
二、Spring Boot 快速搭建
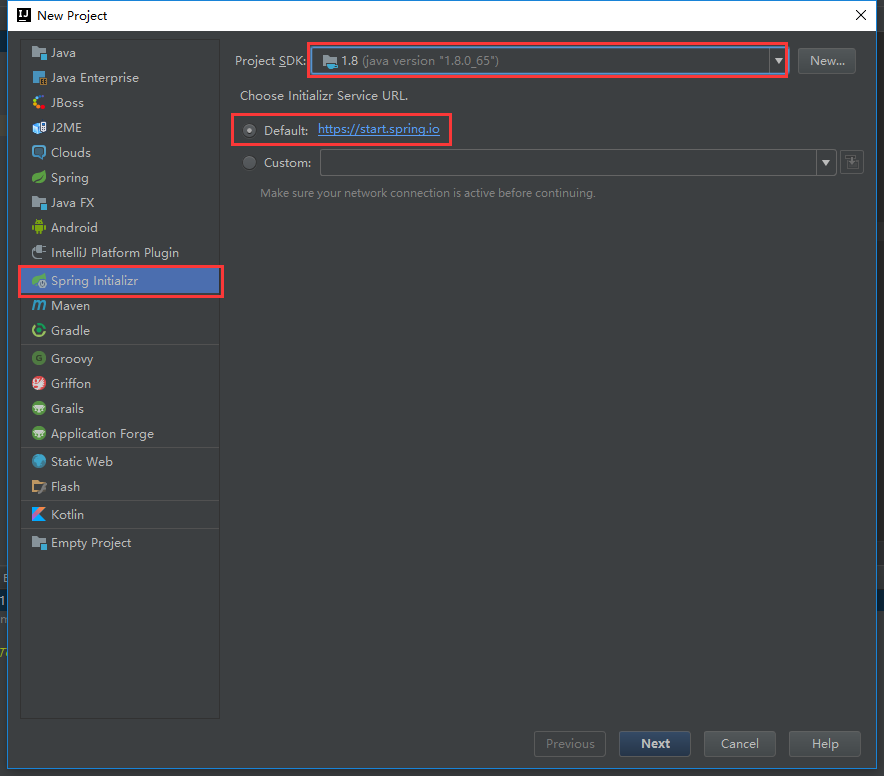
第一步:新建项目(使用IDEA可以自动生产配置)
File-->New-->Project-->Spring Initializr:
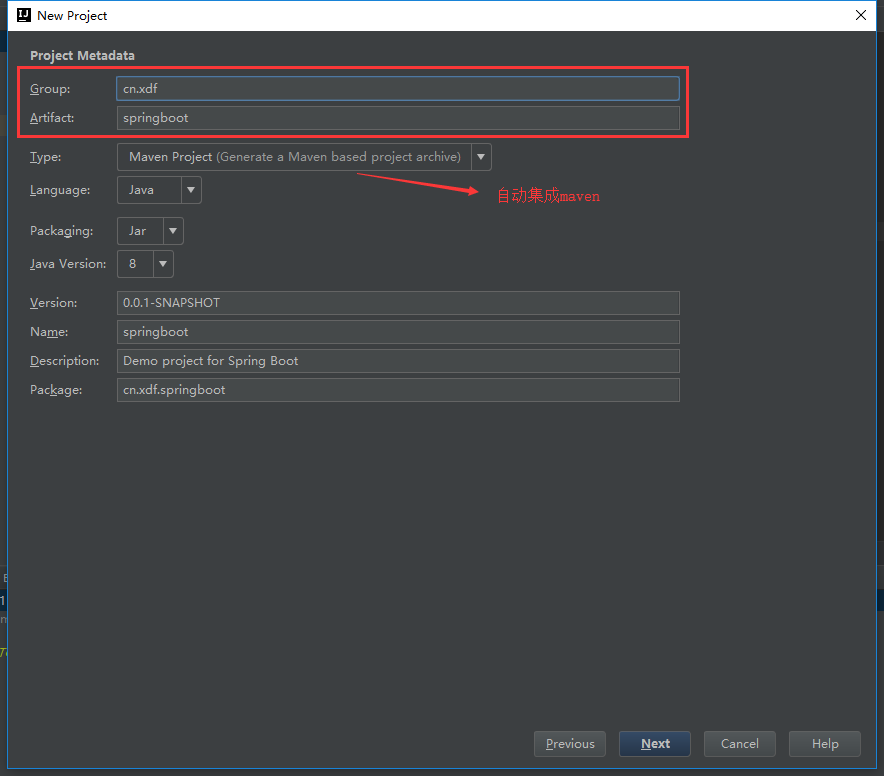
然后修改一下项目的信息:
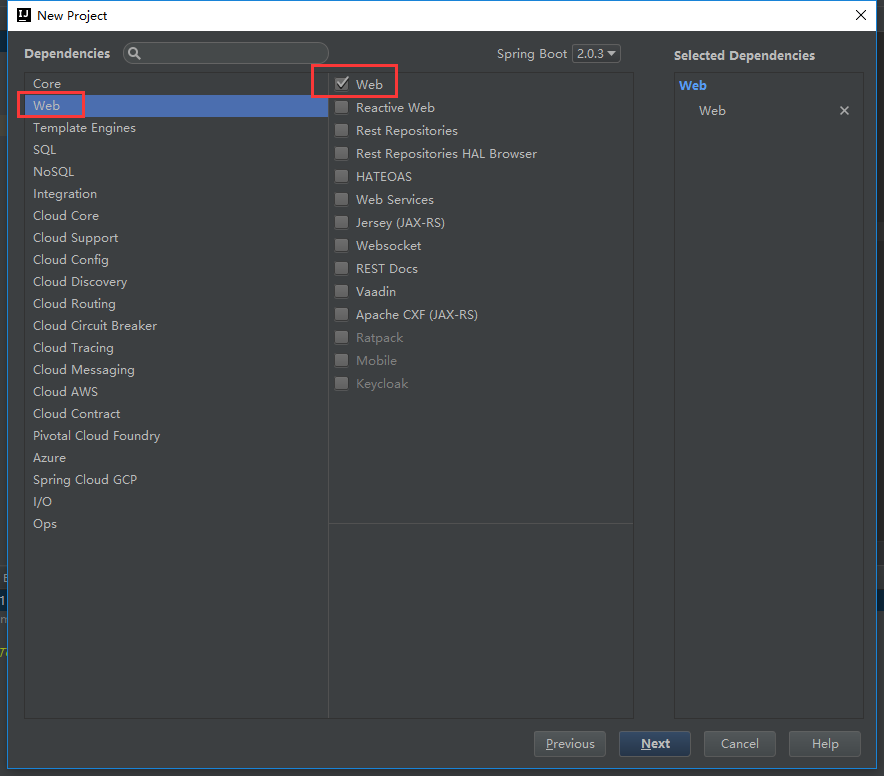
勾选上Web模板:
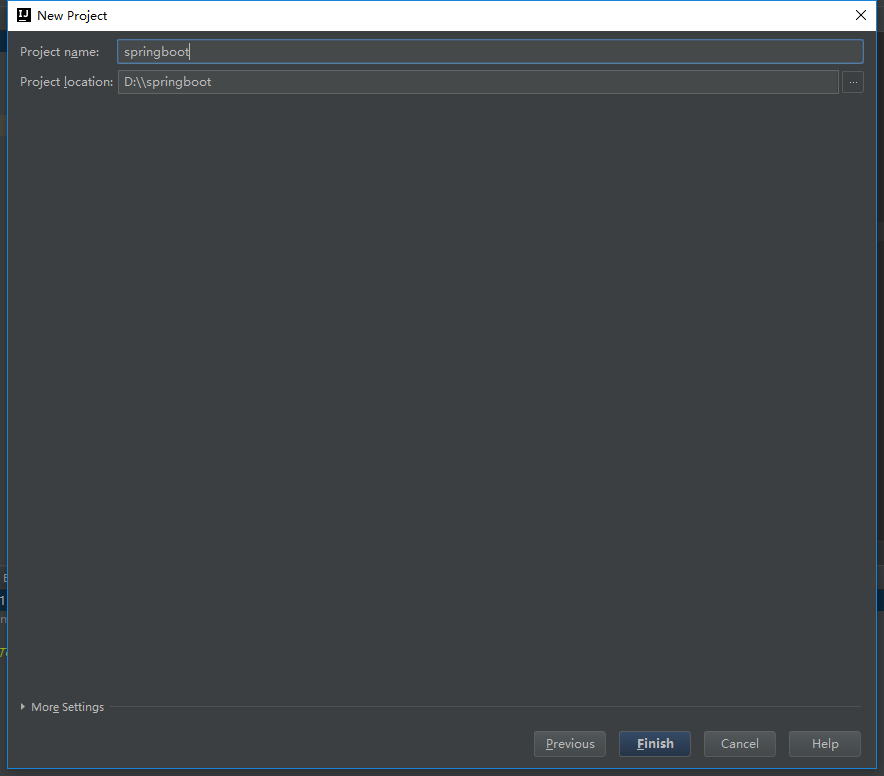
选择好项目的位置,点击【Finish】:
如果是第一次配置Spring Boot的话,可能需要等待一会IDEA下载相应的依赖包(右下角可看到下载的进度),默认创建好的 项目结构如下:
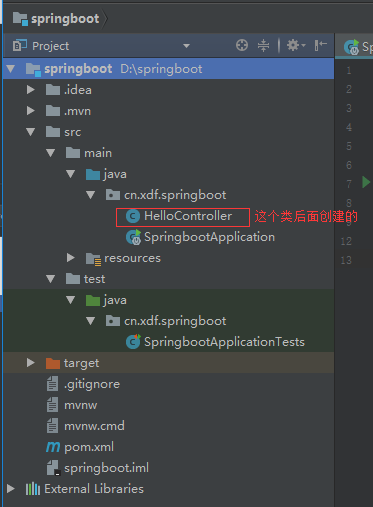
项目结构还是比较简练的,少了很多配置文件, 我们来了解一下默认生产的有什么:
1)SpringBootApplication:一个带有main()方法的类,用于启动应用程序;
2)SpringBootApplicationTests:一个空的Junit测试类,它加载了一个使用Spring Boot字典配配置功能的Spring应用程序上下文;
3)application.properties:一个空的properties配置文件,可以根据需要添加配置属性;
4)pom.xml:Maven 构建说明文件。
第二步:创建Controller类
在cn.xdf.springboot包下创建一个Controller类:
package cn.xdf.springboot; import org.springframework.web.bind.annotation.GetMapping;
import org.springframework.web.bind.annotation.RestController;
//测试控制器
@RestController //该注解 相当于 @Responsebody + @Controller
public class HelloController {
@GetMapping("/hello") //该注解 相当于 @RequestMapping(value="/hello", method = RequestMethod.GET)
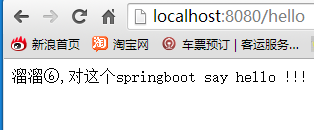
public String demo(){ return "溜溜⑥,对这个springboot say hello !!!";
}
}
第三步:利用IDEA启动Spring Boot
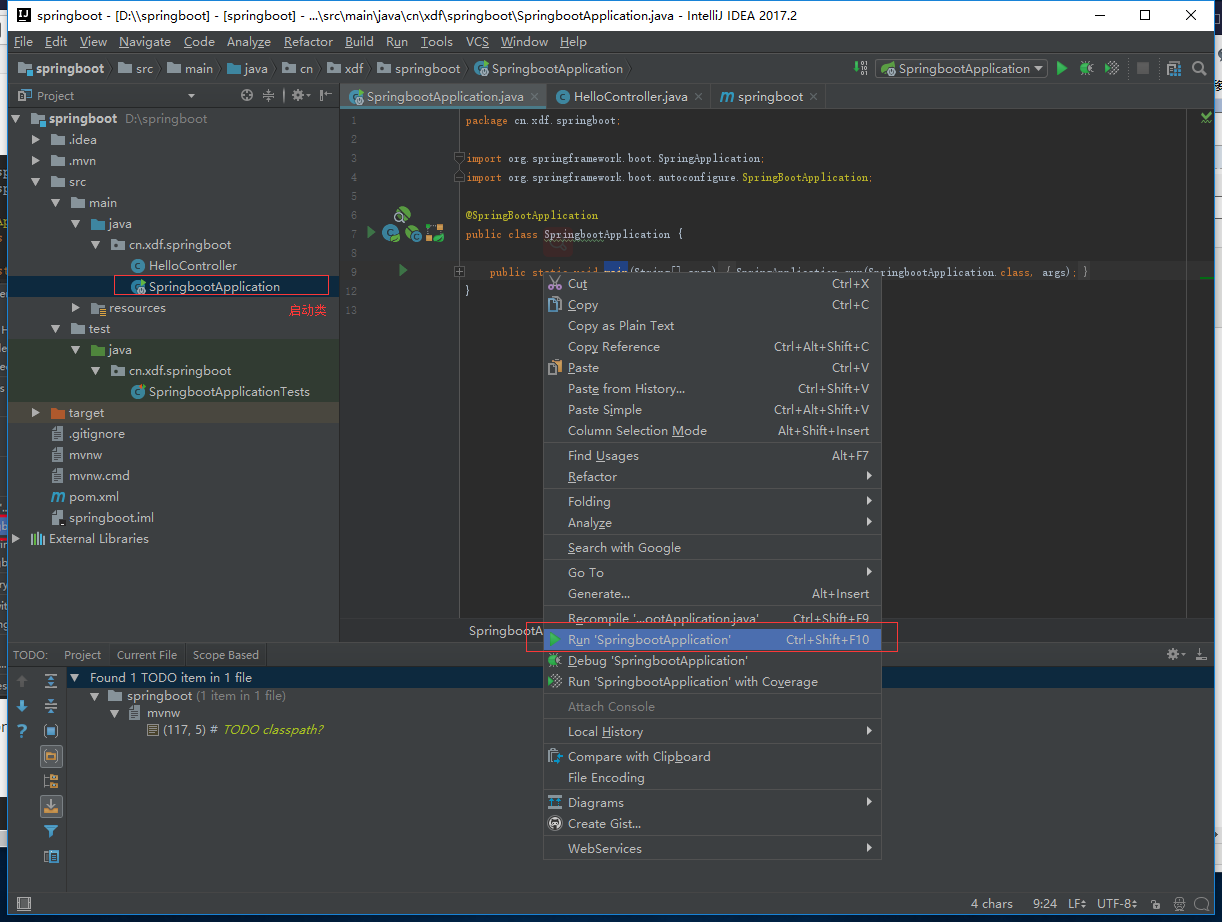
注意:我们之所以在上面的项目中没有手动的去配置Tomcat服务器,是因为Spring Boot内置了Tomcat,等待一会就会看到下面启动成功的信息:
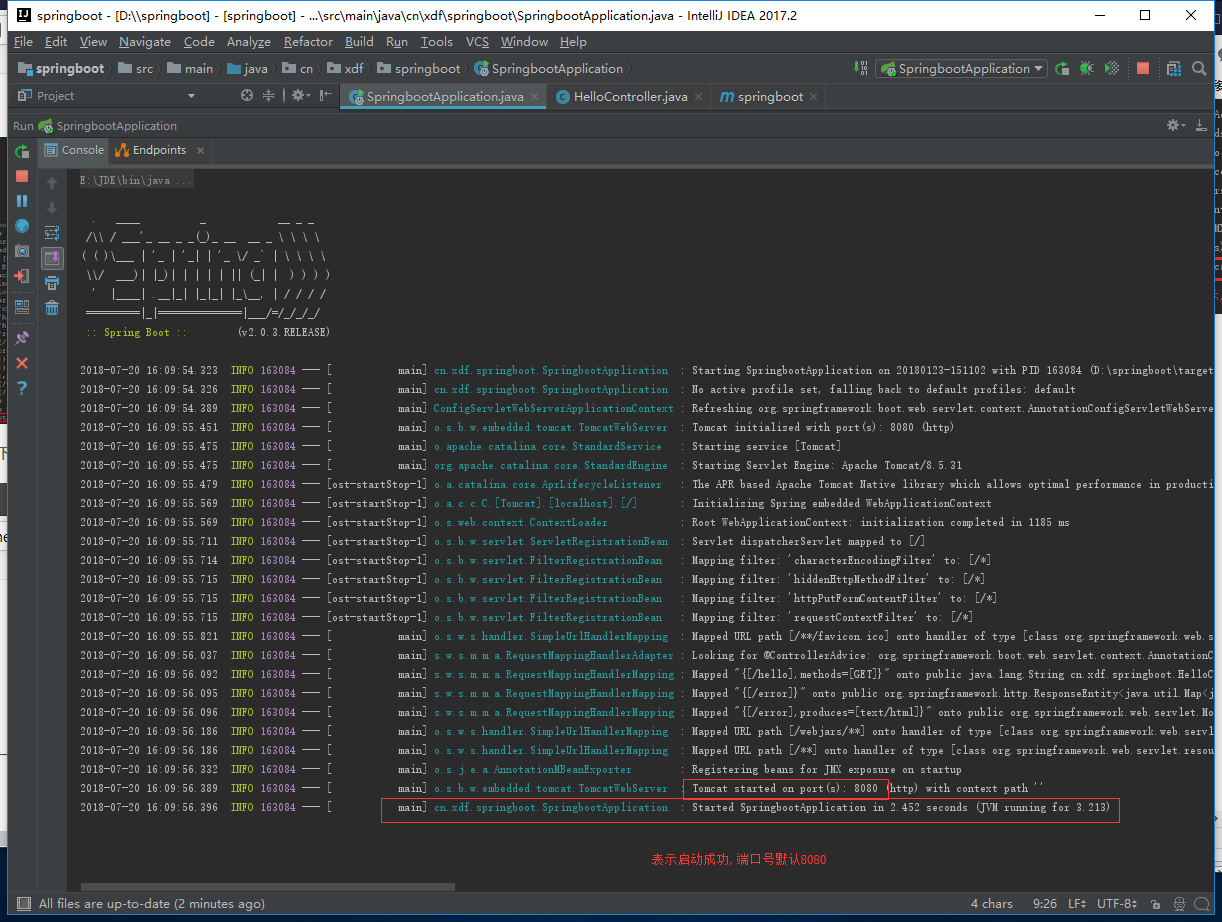
然后,可以在页面访问 http://localhost:8080/hello ,效果如下:
注意:如何启动错误如下,由以下标红的错误信息可以看出是8080端口连接失败,为什么呢,很可能是被占用!这个时候我尝试在访问http://localhost:8080,结果真的可以访问,so确实被占用了,那么接下来杀掉原来占用他的进程或应用就可以了
2018-07-20 16:06:03.175  INFO 161672 --- [           main] o.s.j.e.a.AnnotationMBeanExporter        : Registering beans for JMX exposure on startup

2018-07-20 16:06:03.192 ERROR 161672 --- [           main] o.apache.catalina.core.StandardService   : Failed to start connector [Connector[HTTP/1.1-8080]]

org.apache.catalina.LifecycleException: Failed to start component [Connector[HTTP/1.1-8080]]

    at org.apache.catalina.util.LifecycleBase.start(LifecycleBase.java:167) ~[tomcat-embed-core-8.5.31.jar:8.5.31]

    at org.apache.catalina.core.StandardService.addConnector(StandardService.java:225) ~[tomcat-embed-core-8.5.31.jar:8.5.31]

    at org.springframework.boot.web.embedded.tomcat.TomcatWebServer.addPreviouslyRemovedConnectors(TomcatWebServer.java:256) [spring-boot-2.0.3.RELEASE.jar:2.0.3.RELEASE]

    at org.springframework.boot.web.embedded.tomcat.TomcatWebServer.start(TomcatWebServer.java:198) [spring-boot-2.0.3.RELEASE.jar:2.0.3.RELEASE]

    at org.springframework.boot.web.servlet.context.ServletWebServerApplicationContext.startWebServer(ServletWebServerApplicationContext.java:300) [spring-boot-2.0.3.RELEASE.jar:2.0.3.RELEASE]

    at org.springframework.boot.web.servlet.context.ServletWebServerApplicationContext.finishRefresh(ServletWebServerApplicationContext.java:162) [spring-boot-2.0.3.RELEASE.jar:2.0.3.RELEASE]

    at org.springframework.context.support.AbstractApplicationContext.refresh(AbstractApplicationContext.java:553) [spring-context-5.0.7.RELEASE.jar:5.0.7.RELEASE]

    at org.springframework.boot.web.servlet.context.ServletWebServerApplicationContext.refresh(ServletWebServerApplicationContext.java:140) [spring-boot-2.0.3.RELEASE.jar:2.0.3.RELEASE]

    at org.springframework.boot.SpringApplication.refresh(SpringApplication.java:759) [spring-boot-2.0.3.RELEASE.jar:2.0.3.RELEASE]

    at org.springframework.boot.SpringApplication.refreshContext(SpringApplication.java:395) [spring-boot-2.0.3.RELEASE.jar:2.0.3.RELEASE]

    at org.springframework.boot.SpringApplication.run(SpringApplication.java:327) [spring-boot-2.0.3.RELEASE.jar:2.0.3.RELEASE]

    at org.springframework.boot.SpringApplication.run(SpringApplication.java:1255) [spring-boot-2.0.3.RELEASE.jar:2.0.3.RELEASE]

    at org.springframework.boot.SpringApplication.run(SpringApplication.java:1243) [spring-boot-2.0.3.RELEASE.jar:2.0.3.RELEASE]

    at cn.xdf.springboot.SpringbootApplication.main(SpringbootApplication.java:10) [classes/:na]

Caused by: org.apache.catalina.LifecycleException: Protocol handler start failed

    at org.apache.catalina.connector.Connector.startInternal(Connector.java:1020) ~[tomcat-embed-core-8.5.31.jar:8.5.31]

    at org.apache.catalina.util.LifecycleBase.start(LifecycleBase.java:150) ~[tomcat-embed-core-8.5.31.jar:8.5.31]

    ... 13 common frames omitted

Caused by: java.net.BindException: Address already in use: bind

    at sun.nio.ch.Net.bind0(Native Method) ~[na:1.8.0_65]

    at sun.nio.ch.Net.bind(Net.java:433) ~[na:1.8.0_65]

    at sun.nio.ch.Net.bind(Net.java:425) ~[na:1.8.0_65]

    at sun.nio.ch.ServerSocketChannelImpl.bind(ServerSocketChannelImpl.java:223) ~[na:1.8.0_65]

    at sun.nio.ch.ServerSocketAdaptor.bind(ServerSocketAdaptor.java:74) ~[na:1.8.0_65]

    at org.apache.tomcat.util.net.NioEndpoint.bind(NioEndpoint.java:210) ~[tomcat-embed-core-8.5.31.jar:8.5.31]

    at org.apache.tomcat.util.net.AbstractEndpoint.start(AbstractEndpoint.java:1150) ~[tomcat-embed-core-8.5.31.jar:8.5.31]

    at org.apache.coyote.AbstractProtocol.start(AbstractProtocol.java:591) ~[tomcat-embed-core-8.5.31.jar:8.5.31]

    at org.apache.catalina.connector.Connector.startInternal(Connector.java:1018) ~[tomcat-embed-core-8.5.31.jar:8.5.31]

    ... 14 common frames omitted
第四步:springboot关闭
进入cmd:
netstat -ano | find “端口号”
taskkill /F /PID 进程号
C:\Users\Administrator>netstat -ano | find "8080"

  TCP    0.0.0.0:8080           0.0.0.0:0              LISTENING       151048

  TCP    10.149.0.104:53425     220.194.95.147:8080    CLOSE_WAIT      7980

  TCP    10.149.0.104:64273     223.167.104.150:8080   ESTABLISHED     133884

  TCP    [::]:8080              [::]:0                 LISTENING       151048

C:\Users\Administrator>taskkill /f /pid 151048

成功: 已终止 PID 为 151048 的进程。

C:\Users\Administrator>
三、解析Spring Boot
1.解析pom.xml
<?xml version="1.0" encoding="UTF-8"?>

<project xmlns="http://maven.apache.org/POM/4.0.0" xmlns:xsi="http://www.w3.org/2001/XMLSchema-instance"

    xsi:schemaLocation="http://maven.apache.org/POM/4.0.0 http://maven.apache.org/xsd/maven-4.0.0.xsd">

    <modelVersion>4.0.0</modelVersion>

    <groupId>cn.xdf</groupId>

    <artifactId>springboot</artifactId>

    <version>0.0.1-SNAPSHOT</version>

    <packaging>jar</packaging>

    <name>springboot</name>

    <description>Demo project for Spring Boot</description>

    <parent>

        <groupId>org.springframework.boot</groupId>

        <artifactId>spring-boot-starter-parent</artifactId>

        <version>2.0.3.RELEASE</version>

        <relativePath/> <!-- lookup parent from repository -->

    </parent>

    <properties>

        <project.build.sourceEncoding>UTF-8</project.build.sourceEncoding>

        <project.reporting.outputEncoding>UTF-8</project.reporting.outputEncoding>

        <java.version>1.8</java.version>

    </properties>

    <dependencies>

        <dependency>

            <groupId>org.springframework.boot</groupId>

            <artifactId>spring-boot-starter-web</artifactId>

        </dependency>

        <dependency>

            <groupId>org.springframework.boot</groupId>

            <artifactId>spring-boot-starter-test</artifactId>

            <scope>test</scope>

        </dependency>

    </dependencies>

    <build>

        <plugins>

            <plugin>

                <groupId>org.springframework.boot</groupId>

                <artifactId>spring-boot-maven-plugin</artifactId>

            </plugin>

        </plugins>

    </build>

</project>
我们可以看到一些比较陌生的标签<parent>,这个标签是在SpringBoot的父级依赖:
    <parent>

        <groupId>org.springframework.boot</groupId>

        <artifactId>spring-boot-starter-parent</artifactId>

        <version>2.0.3.RELEASE</version>

        <relativePath/> <!-- lookup parent from repository -->

    </parent>
有了这个,当前的项目才是 Spring Boot 项目,spring-boot-starter-parent 是一个特殊的 starter ,它用来提供相关的 Maven 默认依赖,使用它之后,常用的包依赖就可以省去 version 标签。
关于具体 Spring Boot 提供了哪些 jar 包的依赖,我们可以查看本地 Maven 仓库下:\repository\org\springframework\boot\spring-boot-dependencies\2.0.1.RELEASE\spring-boot-dependencies-2.0.1.RELEASE.pom 文件来查看
2.解析应用入口类
Spring Boot 项目通常有一个名为 *Application 的入口类,入口类里有一个 main 方法, 这个 main 方法其实就是一个标准的 Javay 应用的入口方法。
@SpringBootApplication 是 Spring Boot 的核心注解,它是一个组合注解,该注解组合了:@Configuration、@EnableAutoConfiguration、@ComponentScan; 若不是用 @SpringBootApplication 注解也可以使用这三个注解代替。
- 其中,@EnableAutoConfiguration 让 Spring Boot 根据类路径中的 jar 包依赖为当前项目进行自动配置,例如,添加了 spring-boot-starter-web 依赖,会自动添加 Tomcat 和 Spring MVC 的依赖,那么 Spring Boot 会对 Tomcat 和 Spring MVC 进行自动配置。
- Spring Boot 还会自动扫描 @SpringBootApplication 所在类的同级包以及下级包里的 Bean ,所以入口类建议就配置在 grounpID + arctifactID 组合的包名下(这里为 cn.xdf.springboot 包)
3.解析Spring Boot的配置文件
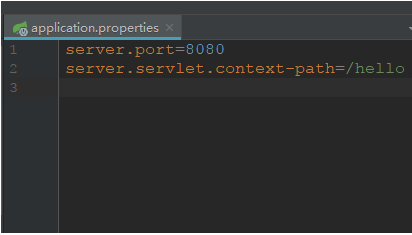
Spring Boot 使用一个全局的配置文件 application.properties 或 application.yml,放置在【src/main/resources】目录或者类路径的 /config 下。
Spring Boot 不仅支持常规的 properties 配置文件,还支持 yaml 语言的配置文件。yaml 是以数据为中心的语言,在配置数据的时候具有面向对象的特征。
Spring Boot 的全局配置文件的作用是对一些默认配置的配置值进行修改。
4.Spring Boot 热部署
在目前的 Spring Boot 项目中,当发生了任何修改之后我们都需要重新启动才能够正确的得到效果,这样会略显麻烦,Spring Boot 提供了热部署的方式,当发现任何类发生了改变,就会通过 JVM 类加载的方式,加载最新的类到虚拟机中,这样就不需要重新启动也能看到修改后的效果了。
我们往 pom.xml 中添加一个依赖就可以了:
<dependency>

    <groupId>org.springframework.boot</groupId>

    <artifactId>spring-boot-devtools</artifactId>

    <optional>true</optional> <!-- 这个需要为 true 热部署才有效 -->

</dependency>
重新启动 Spring Boot ,然后修改任意代码,就能观察到控制台的自动重启现象
Spring Boot 快速入门(IDEA)的更多相关文章
- Spring Boot 快速入门
Spring Boot 快速入门 http://blog.csdn.net/xiaoyu411502/article/details/47864969 今天给大家介绍一下Spring Boot MVC ...
- Spring Boot快速入门(二):http请求
原文地址:https://lierabbit.cn/articles/4 一.准备 postman:一个接口测试工具 创建一个新工程 选择web 不会的请看Spring Boot快速入门(一):Hel ...
- spring boot入门教程——Spring Boot快速入门指南
Spring Boot已成为当今最流行的微服务开发框架,本文是如何使用Spring Boot快速开始Web微服务开发的指南,我们将使创建一个可运行的包含内嵌Web容器(默认使用的是Tomcat)的可运 ...
- Spring Boot 快速入门 史上最简单
1.Spring Boot 概述 Spring Boot 是所有基于 Spring 开发的项目的起点.Spring Boot 的设计是为了让你尽可能快的跑起来 Spring 应用程序并且尽可能减少你的 ...
- 笔记61 Spring Boot快速入门(一)
IDEA+Spring Boot快速搭建 一.IDEA创建项目 略 项目创建成功后在resources包下,属性文件application.properties中,把数据库连接属性加上,同时可以设置服 ...
- Spring Boot 快速入门笔记
Spirng boot笔记 简介 Spring Boot是由Pivotal团队提供的全新框架,其设计目的是用来简化新Spring应用的初始搭建以及开发过程.该框架使用了特定的方式来进行配置,从而使开发 ...
- Spring Boot快速入门(最新)
本章通过完成Spring Boot基础项目的构建并实现一个简单的Http请求处理,让大家对Spring Boot有一个初步的了解,并体验其结构简单.开发快速的特性.预计阅读及演练过程将花费约5分钟. ...
- Spring Boot 快速入门(一)
简介 相信很多人都接触spring框架很长时间了,每次搭建spring框架的时候都需要配置好多的jar.xml,做很多繁琐重复的配置,稍微不留神就会出现各种各样的问题,每次调试真的是香菇.蓝瘦啊. ...
- Spring Boot快速入门
安装 安装依赖 maven是一个依赖管理工具,我们利用maven进行构建.创建一个maven项目,在pom.xml里面添加依赖项 <?xml version="1.0" en ...
随机推荐
- 浅述python中range()函数的用法
函数用法说明: 用法一:range(m) 输出: [0,1,...,m-1](从0到m-1的一个list,不包括m) 示例: 用法二:range(m,n),m<n 输出:[m,m+1,..,n- ...
- 云计算和SDN中的开源交换机介绍以及使用
之前关于SDN的开发工作都是在控制器层面上(以ryu为主),现在开始了新的工程项目,需要同时修改控制器和交换机的源码,如果后续项目需要,还可能需要加中间层——网络虚拟层,这部分的知识已经在前面读过了相 ...
- 巨蟒python全栈开发数据库攻略3:行记录的操作&单表查询3
1.数据行的增删改 2.单表查询 select&where条件 3.group by&having&order by&limit
- 微信公众号非善意访问的限制 php curl 伪造UA
w <?php if (strpos($_SERVER['HTTP_USER_AGENT'], 'MicroMessenger') === false) { echo 'www123'; } d ...
- In-Stream Big Data Processing
http://highlyscalable.wordpress.com/2013/08/20/in-stream-big-data-processing/ Overview In recent y ...
- java 字符串解析为json 使用org.json包的JSONObject+JSONArray
参考: https://blog.csdn.net/xingfei_work/article/details/76572550 java中四种json解析方式 JSONObject+JSONArray ...
- Yii2.0的乐观锁与悲观锁(转)
原文:Yii2.0的乐观锁与悲观锁 Web应用往往面临多用户环境,这种情况下的并发写入控制, 几乎成为每个开发人员都必须掌握的一项技能. 在并发环境下,有可能会出现脏读(Dirty Read).不可重 ...
- 我的Android进阶之旅------>Android Activity的singleTask加载模式和onActivityResult方法之间的冲突
今天调试一个bug的时候,情景如下: 一个Activity A,需要用startActivityForResult方法开启Activity B.Activity B的launch mode被设置为si ...
- subprocess 模块 与终端相互交互
import subprocess ''' sh-3.2# ls /Users/egon/Desktop |grep txt$ mysql.txt tt.txt 事物.txt ''' #1 Linux ...
- JavaScript-4.2函数,变量作用域---ShinePans
<html> <head> <meta http-equiv="content-type" content="text/html;chars ...