springMVC注解的参数传递
1、web.xml
- <?xml version="1.0" encoding="UTF-8"?>
- <web-app xmlns:xsi="http://www.w3.org/2001/XMLSchema-instance" xmlns="http://java.sun.com/xml/ns/javaee" xsi:schemaLocation="http://java.sun.com/xml/ns/javaee http://java.sun.com/xml/ns/javaee/web-app_2_5.xsd" id="WebApp_ID" version="2.5">
- <display-name>springmvc1</display-name>
- <filter>
- <filter-name>characterEncoding</filter-name>
- <filter-class>org.springframework.web.filter.CharacterEncodingFilter</filter-class>
- <init-param>
- <param-name>encoding</param-name>
- <param-value>UTF-8</param-value>
- </init-param>
- </filter>
- <filter-mapping>
- <filter-name>characterEncoding</filter-name>
- <url-pattern>/*</url-pattern>
- </filter-mapping>
- <servlet>
- <servlet-name>springmvc</servlet-name>
- <servlet-class>org.springframework.web.servlet.DispatcherServlet</servlet-class>
- <init-param>
- <param-name>contextConfigLocation</param-name>
- <param-value>classpath:springmvc.xml</param-value>
- </init-param>
- </servlet>
- <servlet-mapping>
- <servlet-name>springmvc</servlet-name>
- <url-pattern>*.do</url-pattern>
- </servlet-mapping>
- <welcome-file-list>
- <welcome-file>index.html</welcome-file>
- <welcome-file>index.htm</welcome-file>
- <welcome-file>index.jsp</welcome-file>
- <welcome-file>default.html</welcome-file>
- <welcome-file>default.htm</welcome-file>
- <welcome-file>default.jsp</welcome-file>
- </welcome-file-list>
- </web-app>
2、springmvc.xml
- <?xml version="1.0" encoding="UTF-8"?>
- <beans xmlns="http://www.springframework.org/schema/beans"
- xmlns:mvc="http://www.springframework.org/schema/mvc"
- xmlns:aop="http://www.springframework.org/schema/aop"
- xmlns:tx="http://www.springframework.org/schema/tx"
- xmlns:context="http://www.springframework.org/schema/context"
- xmlns:xsi="http://www.w3.org/2001/XMLSchema-instance"
- xsi:schemaLocation="http://www.springframework.org/schema/beans
- http://www.springframework.org/schema/beans/spring-beans-3.2.xsd
- http://www.springframework.org/schema/mvc
- http://www.springframework.org/schema/mvc/spring-mvc-3.2.xsd
- http://www.springframework.org/schema/context
- http://www.springframework.org/schema/context/spring-context-3.2.xsd
- http://www.springframework.org/schema/aop
- http://www.springframework.org/schema/aop/spring-aop-3.2.xsd
- http://www.springframework.org/schema/tx
- http://www.springframework.org/schema/tx/spring-tx-3.2.xsd">
- <!-- 把Controller交给spring管理 -->
- <context:component-scan base-package="com.xiaostudy"/>
- <!-- 配置注解处理器映射器 功能:寻找执行类Controller -->
- <bean class="org.springframework.web.servlet.mvc.method.annotation.RequestMappingHandlerMapping"/>
- <!-- 配置注解处理器适配器 功能:调用controller方法,执行controller -->
- <bean class="org.springframework.web.servlet.mvc.method.annotation.RequestMappingHandlerAdapter"/>
- <!-- 配置sprigmvc视图解析器:解析逻辑试图
- 后台返回逻辑试图:index
- 视图解析器解析出真正物理视图:前缀+逻辑试图+后缀====/WEB-INF/index.jsp -->
- <bean class="org.springframework.web.servlet.view.InternalResourceViewResolver">
- <property name="prefix" value="/WEB-INF/"/>
- <property name="suffix" value=".jsp"/>
- </bean>
- </beans>
3、domain类
- package com.xiaostudy.domain;
- public class User {
- private int id;
- private String username;
- private String password;
- private int age;
- public int getId() {
- return id;
- }
- public void setId(int id) {
- this.id = id;
- }
- public String getUsername() {
- return username;
- }
- public void setUsername(String username) {
- this.username = username;
- }
- public String getPassword() {
- return password;
- }
- public void setPassword(String password) {
- this.password = password;
- }
- public int getAge() {
- return age;
- }
- public void setAge(int age) {
- this.age = age;
- }
- @Override
- public String toString() {
- return "User [id=" + id + ", username=" + username + ", password=" + password + ", age=" + age + "]";
- }
- }
4、封装domain类
- package com.xiaostudy.controller;
- import com.xiaostudy.domain.User;
- public class CustomUser {
- private User user;
- public User getUser() {
- return user;
- }
- public void setUser(User user) {
- this.user = user;
- }
- @Override
- public String toString() {
- return "CustomUser [user=" + user + "]";
- }
- }
5、注解类
- package com.xiaostudy.controller;
- import org.springframework.stereotype.Controller;
- import org.springframework.web.bind.annotation.RequestMapping;
- import org.springframework.web.bind.annotation.RequestMethod;
- import com.xiaostudy.domain.User;
- @Controller//<bean class="com.xiaostudy.controller.MyController"/>
- @RequestMapping(value="/myController")//访问该类的方法时,前面多这样一个路径
- public class MyController {
- // @RequestMapping("hello")//http://localhost:8080/demo2/hello.do
- // @RequestMapping("/hello")//http://localhost:8080/demo2/hello.do
- // @RequestMapping(value="/hello.do")//http://localhost:8080/demo2/hello.do
- // @RequestMapping(value="/hello.do",method=RequestMethod.GET)//http://localhost:8080/demo2/hello.do
- // @RequestMapping(value="/hello.do",method= {RequestMethod.GET,RequestMethod.POST})//http://localhost:8080/demo2/hello.do
- public String print() {
- return "index";
- }
- @RequestMapping("hi")//http://localhost:8080/demo2/myController/hi.do
- public String hello() {
- return "index";
- }
- @RequestMapping("requestint")//http://localhost:8080/demo2/myController/requestint.do
- public String requestint(int id) {
- System.out.println(id);
- return "index";
- }
- @RequestMapping("requestint2")//http://localhost:8080/demo2/myController/requestint2.do
- public String requestint2(int id, int i) {
- System.out.println(id + " " + i);
- return "index";
- }
- @RequestMapping("requestint3")//http://localhost:8080/demo2/myController/requestint3.do
- public String requestint3(User user) {
- System.out.println(user);
- return "index";
- }
- @RequestMapping("requestint4")//http://localhost:8080/demo2/myController/requestint4.do
- public String requestint4(CustomUser customUser) {
- System.out.println(customUser);
- return "index";
- }
- @RequestMapping("xiaostudy")//http://localhost:8080/demo2/myController/hi.do
- public String add() {
- return "xiaostudy";
- }
- }
6、填写表单数据的xiaostudy.jsp
- <%@ page language="java" contentType="text/html; charset=UTF-8" pageEncoding="UTF-8"%>
- <!DOCTYPE html PUBLIC "-//W3C//DTD HTML 4.01 Transitional//EN"
- "http://www.w3.org/TR/html4/loose.dtd">
- <html>
- <head>
- <meta http-equiv="Content-Type" content="text/html; charset=UTF-8">
- <title>springMVC_demo</title>
- </head>
- <body>
- <form action="${pageContext.request.contextPath }/myController/requestint.do">
- <fieldset>
- <legend>单独一个参数</legend>
- <input type="text" name="id" id="id"/>
- <input type="submit" value="提交">
- </fieldset>
- </form>
- <form action="${pageContext.request.contextPath }/myController/requestint2.do">
- <fieldset>
- <legend>两个参数</legend>
- <input type="text" name="i" id="i"/>
- <input type="text" name="id" id="id"/>
- <input type="submit" value="提交">
- </fieldset>
- </form>
- <form action="${pageContext.request.contextPath }/myController/requestint3.do">
- <fieldset>
- <legend>参数为一个对象</legend>
- <input type="text" name="id" id="id"/>
- <input type="text" name="username" id="username"/>
- <input type="password" name="password" id="password"/>
- <input type="text" name="age" id="age"/>
- <input type="submit" value="提交">
- </fieldset>
- </form>
- <form action="${pageContext.request.contextPath }/myController/requestint4.do">
- <fieldset>
- <legend>参数为一个封装对象</legend>
- <input type="text" name="user.id" id="id"/>
- <input type="text" name="user.username" id="username"/>
- <input type="password" name="user.password" id="password"/>
- <input type="text" name="user.age" id="age"/>
- <input type="submit" value="提交">
- </fieldset>
- </form>
- </body>
- </html>
7、跳转的index.jsp
- <%@ page language="java" contentType="text/html; charset=UTF-8" pageEncoding="UTF-8"%>
- <!DOCTYPE html PUBLIC "-//W3C//DTD HTML 4.01 Transitional//EN"
- "http://www.w3.org/TR/html4/loose.dtd">
- <html>
- <head>
- <meta http-equiv="Content-Type" content="text/html; charset=UTF-8">
- <title>springMVC_demo</title>
- </head>
- <body>
- xiaostudy
- </body>
- </html>
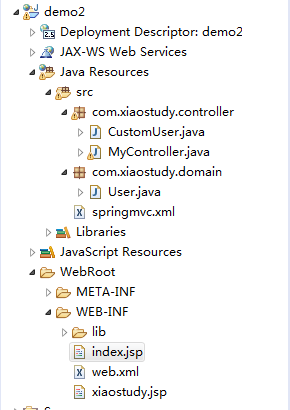
项目文件结构
springMVC注解的参数传递的更多相关文章
- springmvc注解和参数传递
一.SpringMVC注解入门 1. 创建web项目2. 在springmvc的配置文件中指定注解驱动,配置扫描器 <!-- mvc的注解驱动 --> <mvc:annotation ...
- springmvc入门基础之注解和参数传递
一.SpringMVC注解入门 1. 创建web项目2. 在springmvc的配置文件中指定注解驱动,配置扫描器 <!-- mvc的注解驱动 --> <mvc:annotation ...
- springMVC 注解版
http://blog.csdn.net/liuxiit/article/details/5756115 http://blog.csdn.net/hantiannan/article/categor ...
- springMVC注解初步
一.(补充)视图解析器---XmlViewResolver 作用:分离配置信息. 在视图解析器---BeanNameViewResolver的基础之上进行扩充,新建一个myView.xml分离信息 在 ...
- SpringMVC注解开发初步
一.(补充)视图解析器---XmlViewResolver 作用:分离配置信息. 在视图解析器---BeanNameViewResolver的基础之上进行扩充,新建一个myView.xml分离信息 在 ...
- SpringMVC注解汇总(二)-请求映射规则
接上一节SpringMVC注解汇总-定义 讲到Httpy请求信息 URL路径映射 1)普通URL路径映射 @RequestMapping(value={"/test1", &quo ...
- springMVC注解启用及优化
使用注解的原因 最方便的还是启用注解 注解方便,而且项目中很流行. 配置文件尽量减少,主要使用注解方式. Springmvc的注解是在2.5版本后有了注解,如何开启注解配置文件 Web.xml文件中不 ...
- 6.SpringMVC注解启用
SpringMVC注解可以帮助我们快速地注入 属性和参数 提高开发效率. 由于 有相当一部分人讨厌xml配置方式 注解可以覆盖 xml则不能 使用注解比xml规范化,因为很多注解都是java的规范的范 ...
- springMVC(注解版笔记)
springMVC(注解版) 较之于非注解版本,发生一下变化: 1.配置文件需要配置的标签有: <!-- 包的扫描,此包下面的所有包都启用注解 --> <context:compon ...
随机推荐
- 华为交换机忘记console的密码,怎么恢复出厂设置
第一步:一般情况下由于密码忘记我们会被阻挡在交换机telnet远程管理界面之外. 第二步:虽然可以尝试console线连接交换机的控制接口,但是很多时候这个密码也被网络管理员进行了设置,不巧的是如果这 ...
- vue下给title配置图标.ico
在根目录下放入要作为浏览网站时看到的网页title里的图标.如 32*32 后缀为.ico的图 然后再项目中build文件夹中的,webpack.dev.conf.js文件加入一句代码,加入完重启即可 ...
- Gunner II--hdu5233(map&vector/二分)
题目链接:http://acm.hdu.edu.cn/showproblem.php?pid=5233 题意:有n颗树,第 i 棵树的高度为 h[i],树上有鸟,现在这个人要打m次枪,每次打的高度是 ...
- Apache的访问控制
目录配置段 注释不能写在指令后面,下面这样是不行的,应当换行,但为了阅读方便我就这么写了 Alias /dir/ "/var/www/html/admin" #路径 ...
- Centos7编译4.7.2内核
由于想要编译kvm-kmod,编译的时候提示内核版本太低,所以就不得不升级下linux内核,目前最新版内核是4.7.2,编译内核并不是一件很难的事,但是这么久没编译过,还是有必要记录下这一过程. 首先 ...
- 源码包安装(Python mysql redis)
一 源码包安装 (1)python3.6源码包安装 ./configure ------> 定制功能 make make install mysql 源码包 cmake make make i ...
- karma安装
Last login: Sat Jun :: on ttys000 ➜ ~ cd /Users/wangyizhe/Projects/work/smartcmp/services/new-yacmp/ ...
- 《FTL之垃圾回收、写放大和OP 》总结
来自 http://www.ssdfans.com/?p=1840: 写放大WA: 对空盘来说(未触发GC),写放大一般为1,即Host写入多少数据,SSD写入闪存也是多少数据量(这里忽略SSD内部数 ...
- vim高亮显示文本
行列高亮设置 • 行高亮 " 设置高亮行的颜色,ctermbg设定背景色,ctermfg设定前景色 set cursorline hi CursorLine cterm=NONE cterm ...
- CCF 权限查询(模拟)
试题编号: 201612-3 试题名称: 权限查询 时间限制: 1.0s 内存限制: 256.0MB 问题描述: 问题描述 授权 (authorization) 是各类业务系统不可缺少的组成部分,系统 ...