Gitlab仓库搭建和免密使用gitlab
Gitlab简介
GitLab 是一个用于仓库管理系统的开源项目,使用Git作为代码管理工具,并在此基础上搭建起来的web服务。
可通过Web界面进行访问公开的或者私人项目。它拥有与Github类似的功能,能够浏览源代码,管理缺陷和注释。可以管理团队对仓库的访问,它非常易于浏览提交过的版本并提供一个文件历史库。团队成员可以利用内置的简单聊天程序(Wall)进行交流。它还提供一个代码片段收集功能可以轻松实现代码复用。
管理的命令
gitlab-ctl stop
gitlab-ctl start
gitlab-ctl restart
Gitlab的仓库搭建
1)上传安装包
- [root@localhost ~]# rz
[root@ken ~]# ls | grep git
gitlab-ce-8.9.5-ce.0.el7.x86_64.rpm
2)使用yum安装
- [root@localhost ~]# yum localinstall gitlab-ce-8.9.5-ce.0.el7.x86_64.rpm -y
3)修改配置文件
- [root@localhost ~]# vim /etc/gitlab/gitlab.rb
- ...
- ## Url on which GitLab will be reachable.
- ## For more details on configuring external_url see:
- ## https://gitlab.com/gitlab-org/omnibus-gitlab/blob/master/doc/settings/configuration.md#c onfiguring-the-external-url-for-gitlab
- external_url 'http://192.168.253.147' #改成本机的ip地址
- ## Note: configuration settings below are optional.
- ## Uncomment and change the value.
- ############################
- # gitlab.yml configuration #
- ############################
4)使配置生效
- [root@localhost ~]# gitlab-ctl reconfigure
5)通过配置文件里更改的ip直接访问浏览器。
Gitlab在linux中的使用
一、密码使用
用到的命令
1.git add
2. git commit
3. git push origin 字分支名字
第一步:创建目录
[root@localhost ~]# mkdir haha
[root@localhost ~]# cd haha
[root@localhost haha]# ls -a
. .. #不包含.git的目录
第二步:从web仓库中下载项目
[root@localhost haha]# git clone http://192.168.253.147/root/mama.git正克隆到 'mama'... #仓库中的链接
warning: 您似乎克隆了一个空版本库。
[root@localhost haha]# ls
mama
第三步:创建新的分支
[root@localhost haha]# cd mama
[root@localhost mama]# ls -a
. .. .git #下载的版本库中的目录包含.git文件
第四步:创建测试文件并上传
- [root@localhost mama]# vim test1
- [root@localhost mama]# cat test1
- root:x:::root:/root:/bin/bash
- bin:x:::bin:/bin:/sbin/nologin
- daemon:x:::daemon:/sbin:/sbin/nologin
- adm:x:::adm:/var/adm:/sbin/nologin
- lp:x:::lp:/var/spool/lpd:/sbin/nologin
- sync:x:::sync:/sbin:/bin/sync
- shutdown:x:::shutdown:/sbin:/sbin/shutdown
- halt:x:::halt:/sbin:/sbin/halt
- mail:x:::mail:/var/spool/mail:/sbin/nologin
- ...
- [root@localhost mama]# git add .
- [root@localhost mama]# git commit -m 'v1' #将测试文件提交到仓库中(中间省略一千字)
- 。。。
- [root@localhost mama]# git push -u origin master #将子分支的测试文件推送到主分支,这里master既是子分支又是主分支,因为没有创建子分支
- Username for 'http://192.168.253.147': root
- Password for 'http://root@192.168.253.147':
- Counting objects: , done.
- Compressing objects: % (/), done.
- Writing objects: % (/), bytes | bytes/s, done.
- Total (delta ), reused (delta )
- To http://192.168.253.147/root/mama.git
- * [new branch] master -> master
- 分支 master 设置为跟踪来自 origin 的远程分支 master。
第五步:在网页查看gitlab
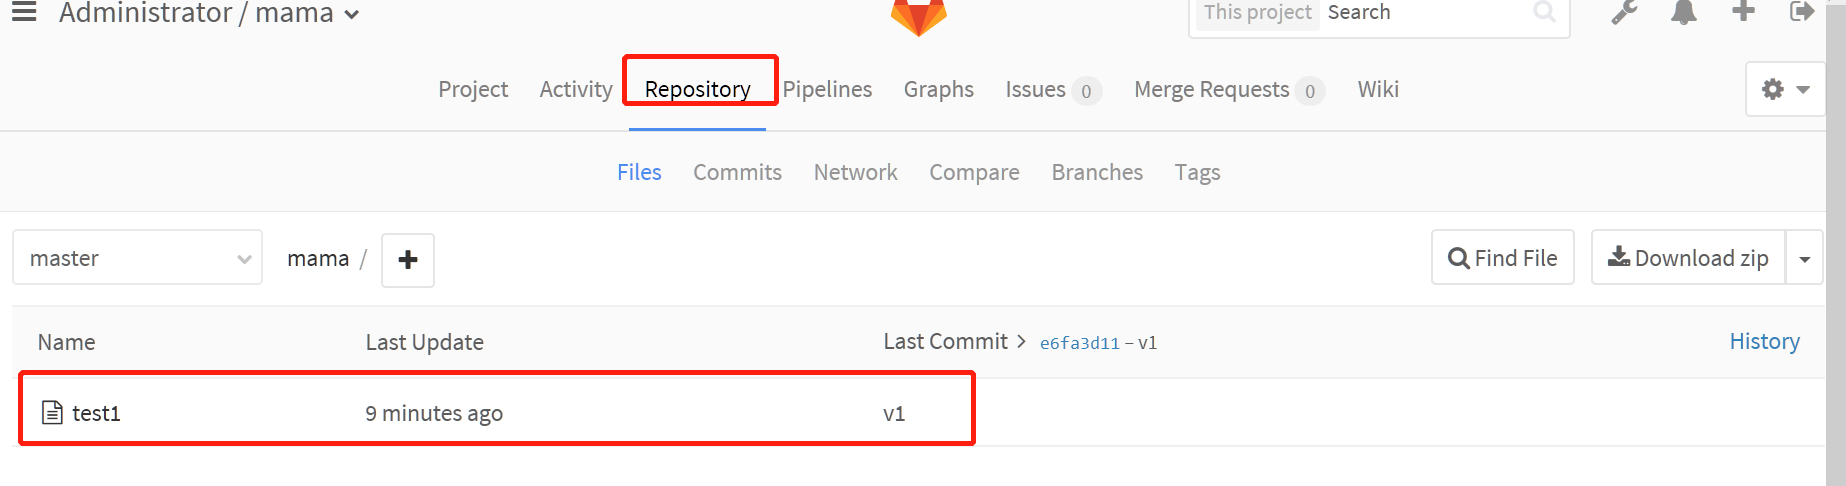
能看到刚才创建的测试文件即成功。
二、免密使用
用途:为了解决每次登陆gitlab都要输入用户密码
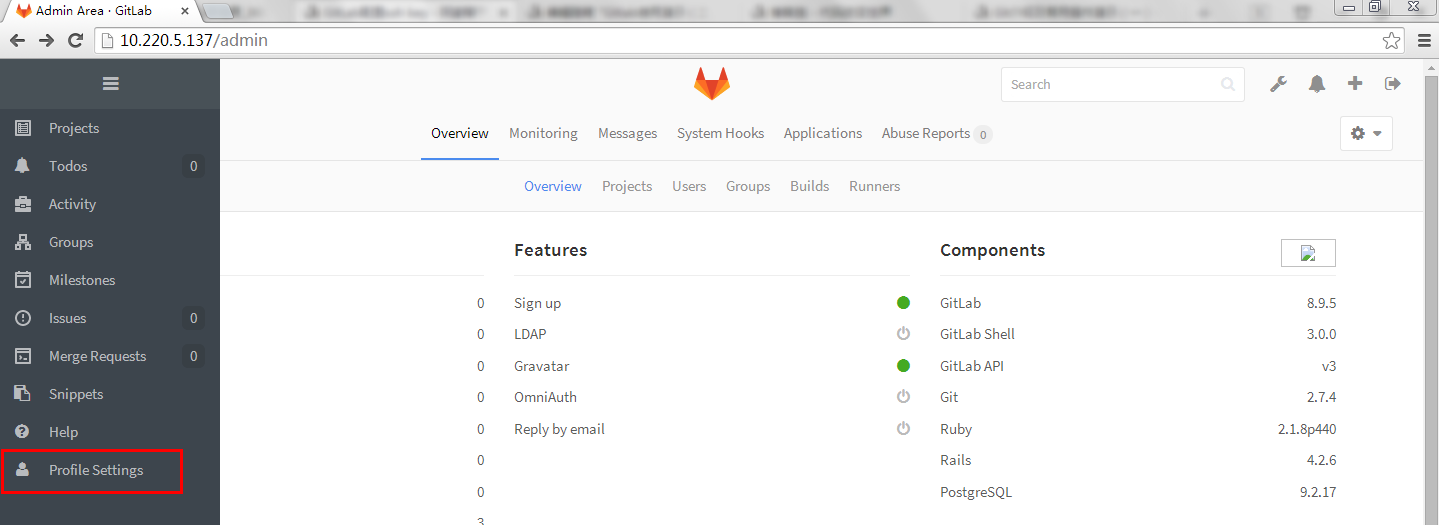
第一步:查看web端gitlab的秘钥地址

第二步:在本机生成秘钥文件并查看公钥
- [root@localhost ~]# cat .ssh/id_rsa.pub
- ssh-rsa AAAAB3NzaC1yc2EAAAADAQABAAABAQCzKsjckORW+jl9lnxEXPo+Fym7DsGRM0dR3F3py2+zFlDhVNSAoYN+EeflBlfkoQLorb7viaE
Nnzx26QxCx9dJ2Gdz1lWkjHoKwxExVU1bBM7DaTYlHD+t4hPM/moXWi4+T+uIeBnTWHcqlVYh6OIC817P7smBk+WKQUhA1L/2QUIutYDWd9FxVy
IiYwbgtoiLqmhLlOadEfjjCz7hS1x0tsXRliN1lawAQ+RGdzdwSXS984H38nxIVmvwBDXRB+TJrtJyNb8Fn9YKXbETZDUXQPbd48NPmQPHfNdUTd
ULvAZfX0AM3cphbdMoA2jchDaEjYZlp138lXwQzkXiDTX root@localhost.localdomain
第三步:复制秘钥信息填写进web服务端
第四步:粘贴公钥
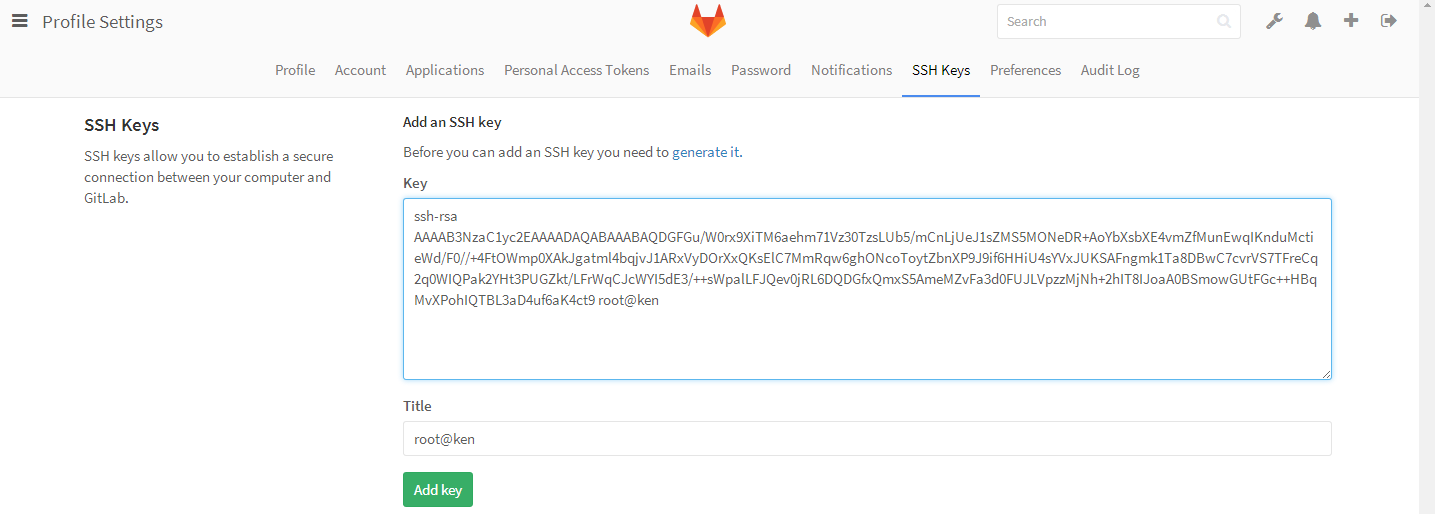
第五步:点击提交之后再次下载仓库信息
注意这里git clone之后写的是ssh的信息,不是http的连接信息了
回车之后可以看到没有输入任何东西就直接下载完成
- [root@localhost ~]# mkdir user1
- [root@localhost ~]# cd user1
- [root@localhost user1]# git clone git@192.168.253.147:root/mama.git
- 正克隆到 'mama'... #可以看到不需要验证了
- The authenticity of host '192.168.253.147 (192.168.253.147)' can't be established.
- ECDSA key fingerprint is SHA256:7rl4vvR/lMeNEQyYw4zTD+RUS4ForCBbU8+7jItYy/.
- ECDSA key fingerprint is MD5:4a:f8:5c:::da:fe:6b:b8:7f:d0:8a::fc:f4:.
- Are you sure you want to continue connecting (yes/no)? yes
- Warning: Permanently added '192.168.253.147' (ECDSA) to the list of known hosts.
- remote: Counting objects: , done.
- remote: Compressing objects: % (/), done.
- remote: Total (delta ), reused (delta )
- 接收对象中: % (/), done.
第六步:重新创建一个测试文件,推送到主机仓库中
- [root@localhost mama]# echo '' >>test2
- [root@localhost mama]# git add .
- [root@localhost mama]# git commit -m 'v2'
- [master 15373f7] v2
- Committer: root <root@localhost.localdomain>
- 您的姓名和邮件地址基于登录名和主机名进行了自动设置。请检查它们正确
- 与否。您可以通过下面的命令对其进行明确地设置以免再出现本提示信息:
- git config --global user.name "Your Name"
- git config --global user.email you@example.com
- 设置完毕后,您可以用下面的命令来修正本次提交所使用的用户身份:
- git commit --amend --reset-author
- file changed, insertion(+)
- create mode test2
- [root@localhost mama]# git push -u origin master #将本地仓库推送到远程主机
Counting objects: 4, done.
Compressing objects: 100% (2/2), done.
Writing objects: 100% (3/3), 261 bytes | 0 bytes/s, done.
Total 3 (delta 0), reused 0 (delta 0)
To git@192.168.253.147:root/mama.git
5e1b2e6..15373f7 master -> master
分支 master 设置为跟踪来自 origin 的远程分支 master。
第七步:网页中查看是否有推送的内容
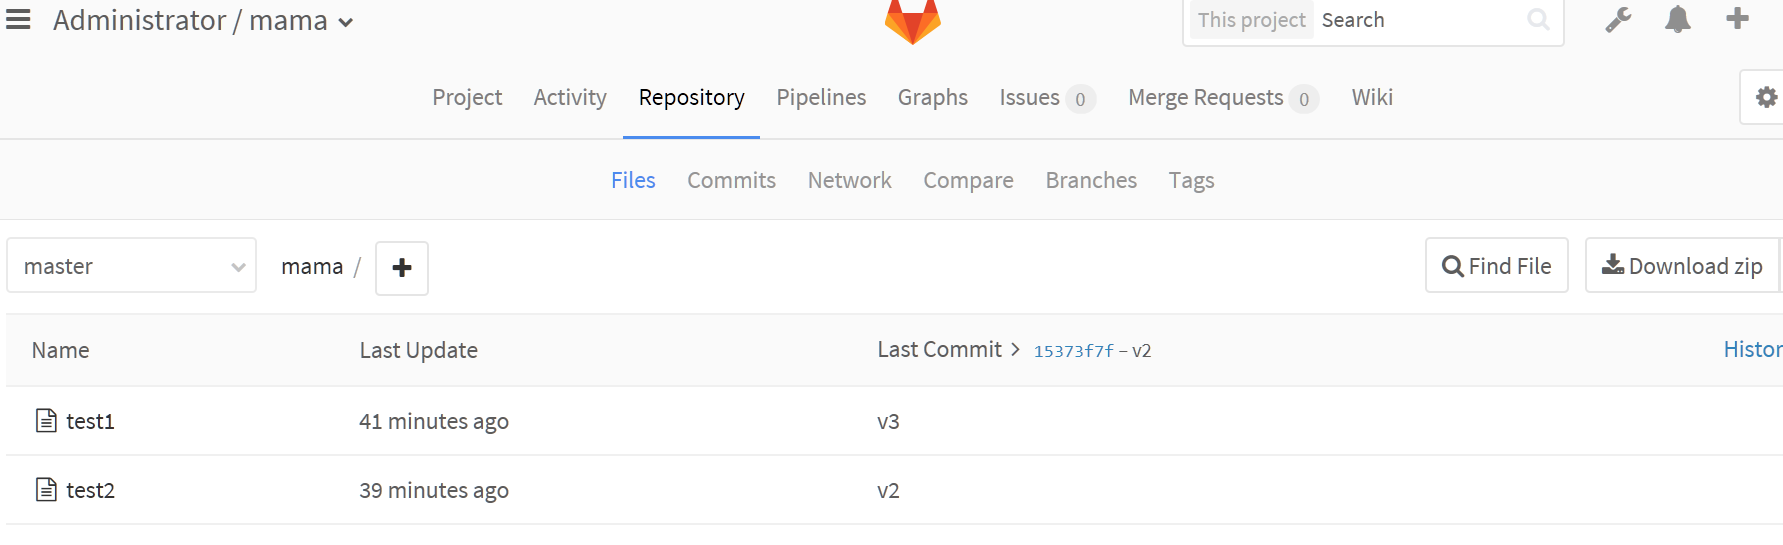
可以看到test2文件被上传上来了,证明免密操作成功。
Gitlab在web中的免密使用
第一步:下载并安装git
第二步:创建空文件夹
第三步:
创建一个文件zz.txt作为工作目录并进入目录之后
右击鼠标有两个选项,一个是bash一个是GUI,选择bash
第四步:初始化并提交文件至仓库
- zzz@LAPTOP-H0DJGG0F MINGW32 ~/Desktop/新建文件夹
- $ git init
- Initialized empty Git repository in C:/Users/zzz/Desktop/新建文件夹/.git/
- zzz@LAPTOP-H0DJGG0F MINGW32 ~/Desktop/新建文件夹 (master)
- $ git add .
- zzz@LAPTOP-H0DJGG0F MINGW32 ~/Desktop/新建文件夹 (master)
- $ git status
- On branch master
- Initial commit
- Changes to be committed:
- (use "git rm --cached <file>..." to unstage)
- new file: zz.txt #新文件已被添加到缓存区
- zzz@LAPTOP-H0DJGG0F MINGW32 ~/Desktop/新建文件夹 (master)
- $ git config --global user.email "you@example.com" #身份验证
- zzz@LAPTOP-H0DJGG0F MINGW32 ~/Desktop/新建文件夹 (master)
- $ git config --global user.name "Your Name"
- zzz@LAPTOP-H0DJGG0F MINGW32 ~/Desktop/新建文件夹 (master)
- $ git commit -m 'v1' #提交至版本仓库v1
- [master (root-commit) a268755] v1
- file changed, insertions(+), deletions(-)
- create mode zz.txt
第五步:生成密钥并把公钥信息添加到web端
然后添加主机,将仓库内容推送至主机中
如果不需要身份验证则证明成功
- zzz@LAPTOP-H0DJGG0F MINGW32 ~/Desktop/新建文件夹 (master)
- $ ssh-keygen
- Generating public/private rsa key pair.
- Enter file in which to save the key (/c/Users/zzz/.ssh/id_rsa):
- Created directory '/c/Users/zzz/.ssh'. #此目录下保存着公钥信息,复制添加到web端,如同linux的添加密钥操作一样
- Enter passphrase (empty for no passphrase):
- Enter same passphrase again:
- Your identification has been saved in /c/Users/zzz/.ssh/id_rsa.
- Your public key has been saved in /c/Users/zzz/.ssh/id_rsa.pub.
- The key fingerprint is:
- SHA256:ISrkWjSgsW4l2IPMPkEbZWdjcmV7BCWRRYaCSJSkBNQ zzz@LAPTOP-H0DJGG0F
- The key's randomart image is:
- +---[RSA ]----+
- |XO=+.*.*O* |
- |OO+E*.oo= |
- |***. o... |
- |o++o . ... |
- | =+ . S |
- |.o.. |
- |. |
- | |
- | |
- +----[SHA256]-----+
zzz@LAPTOP-H0DJGG0F MINGW32 ~/Desktop/新建文件夹 (master)
$ git push -u origin master #直接推送会报错,因为没添加主机
fatal: 'origin' does not appear to be a git repository
fatal: Could not read from remote repository.
Please make sure you have the correct access rights
and the repository exists.
zzz@LAPTOP-H0DJGG0F MINGW32 ~/Desktop/新建文件夹 (master)
$ git remote add origin git@192.168.253.147:root/mama.git #添加主机
zzz@LAPTOP-H0DJGG0F MINGW32 ~/Desktop/新建文件夹 (master)
$ git push -u origin master
The authenticity of host '192.168.253.147 (192.168.253.147)' can't be establisd.
ECDSA key fingerprint is SHA256:7rl4vvR/lMeNEQyYw4zTD+RUS4ForCBbU8+7jItYy/0.
Are you sure you want to continue connecting (yes/no)? yes
Warning: Permanently added '192.168.253.147' (ECDSA) to the list of known host
To git@192.168.253.147:root/mama.git
第六步:重新创建文件夹,下载添加的主机仓库内容
然后在此仓库中新建文件new.txt写入测试内容,提交v5版本库推送至主机。
- zzz@LAPTOP-H0DJGG0F MINGW32 ~/Desktop/新建文件夹 ()/mama (master)
- $ git add .
- zzz@LAPTOP-H0DJGG0F MINGW32 ~/Desktop/新建文件夹 ()/mama (master)
- $ git commit -m 'v5' #提交测试文件
- [master 5eee116] v5
- file changed, insertions(+), deletions(-)
- create mode new.txt
- zzz@LAPTOP-H0DJGG0F MINGW32 ~/Desktop/新建文件夹 ()/mama (master)
- $ git push -u origin master #推送
- Counting objects: , done.
- Delta compression using up to threads.
- Compressing objects: % (/), done.
- Writing objects: % (/), bytes | bytes/s, done.
- Total (delta ), reused (delta )
- To git@192.168.253.147:root/mama.git
- 15373f7..5eee116 master -> master
- Branch master set up to track remote branch master from origin.
可以看到推送过程中并不需要密码
第七步:查看是否推送成功
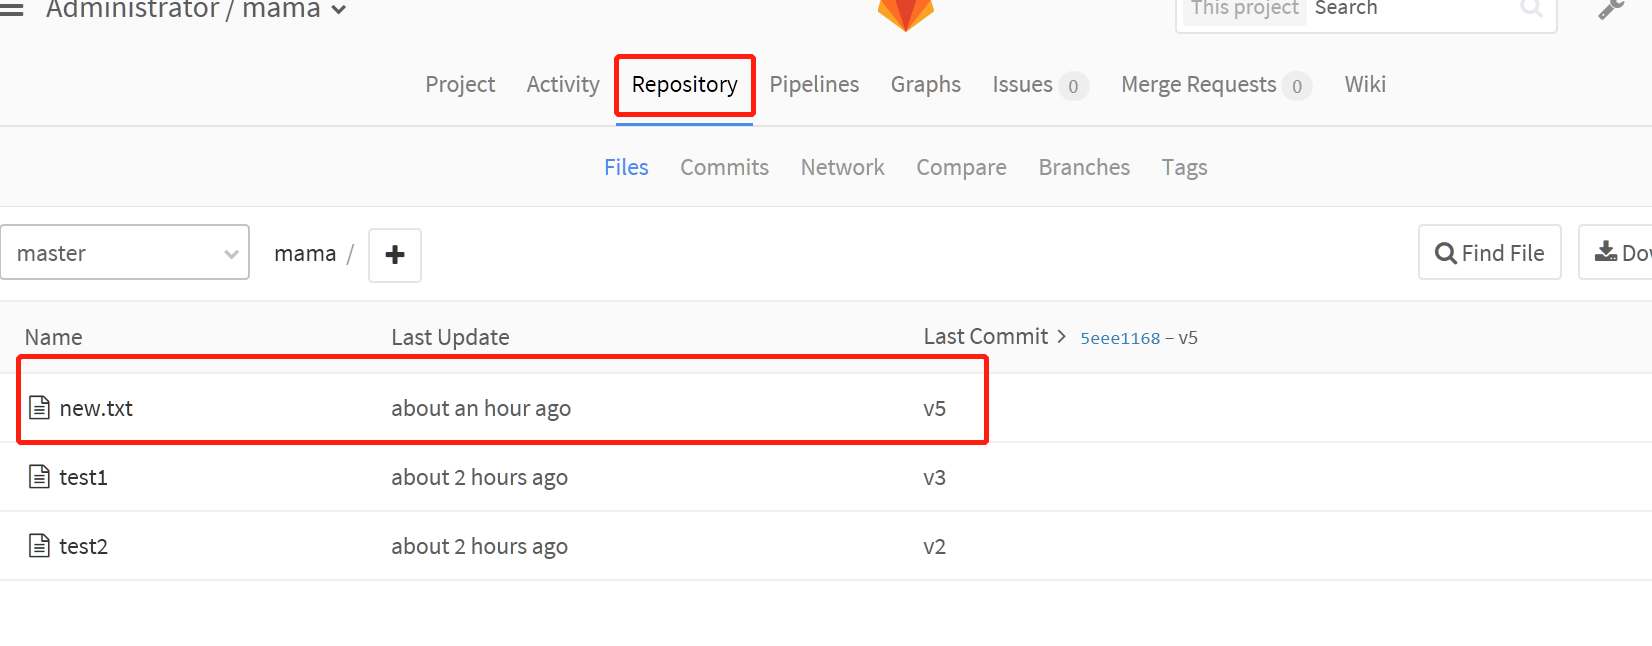
推送成功,也证明免密操作成功。
Gitlab仓库搭建和免密使用gitlab的更多相关文章
- linux进阶之gitlab仓库搭建及免密使用
一.Gitlab简介 GitLab 是一个用于仓库管理系统的开源项目,使用Git作为代码管理工具,并在此基础上搭建起来的web服务. 可通过Web界面进行访问公开的或者私人项目.它拥有与Github类 ...
- Gitlab仓库搭建及在Linux/windows中的免密使用
1. Gitlab简介 Gitlab:代码私有仓库,可以使用Git进行代码的管理. GitHub:公共仓库. GitLab 是一个用于仓库管理系统的开源项目,使用Git作为代码管理工具,并在此基础上搭 ...
- Gitlab仓库搭建及在linux/windows中免密使用gitlab(二)--技术流ken
Gitlab简介 GitLab 是一个用于仓库管理系统的开源项目,使用Git作为代码管理工具,并在此基础上搭建起来的web服务. 可通过Web界面进行访问公开的或者私人项目.它拥有与Github类似的 ...
- sftp免密登录
最近在linux服务器上搭建了一个sftp服务器,在做免密登录时,因为理解的问题,走了些弯路,在此记录一下. 先来说一下服务器端,在服务端的每一个用户的根目录下都有一个.ssh目录,在这个下面放的公私 ...
- Linux入门——SSH免密登录
SSH免密登录 1.简介 SSH是一种网络协议,用于计算机之间的加密登录. 本文针对的实现是OpenSSH,它是自由软件,应用非常广泛. 2.初始化公钥私钥 有rsa,dsa两种加密方式,生成的公钥私 ...
- 在linux下执行git clone、git pull 、git push等操作免密
1. 通过ssh密钥实现 ssh-keygen -t rsa -C "你的邮箱" -f "自己定义的目录" 打开: id_rsa.pub ,将文件内容复制到 g ...
- 非root用户的SSH免密登录
在网上找到的教程一般是这样说的 cd ~/.ssh/ # 若没有该目录,请先执行一次ssh localhost ssh-keygen -t rsa # 会有提示,都按回车就可以 cat id_rsa. ...
- 多节点ssh免密匙登录
1,在所有节点上,使用yourname用户名执行: ssh-keygen -t dsa -P '' -f /home/yourname/.ssh/id_dsa 2,在node1的/home/yourn ...
- Mac 使用 SSH 免密连接服务器
1.生成 SSH 秘钥 ssh-keygen -t rsa 生成的密钥对 id_rsa 和 id_rsa.pub,默认存储在 ~/.ssh 目录,其中没有后缀的是私有,有后缀 .pub 的为公钥.生 ...
随机推荐
- 触摸板PCB制作-TM12
1.布局: 使 PSoC 与Sensor之间的距离保持最小化是一个不错的做法. 通常将 PSoC 与其他组件一起贴装到底层,而将 CapSense Sensor置于顶层上. Sensor和栅格地层位 ...
- Ant-编译构建(1)-HelloWorld
1.项目目录构成,lib包暂时为空,本次例子未引入第三方包. 2.编写相关的build.xml <?xml version="1.0" encoding="utf- ...
- 厉害了,Apache架构师们遵循的 30 条设计原则
作者:Srinath 翻译:贺卓凡,来源:公众号ImportSource Srinath通过不懈的努力最终总结出了30条架构原则,他主张架构师的角色应该由开发团队本身去扮演,而不是专门有个架构师团队或 ...
- 推荐 33 个 IDEA 最牛配置,写代码太爽了!
作者:琦彦 blog.csdn.net/fly910905/article/details/77868300 1.设置maven 1.在File->settings->搜索maven 2. ...
- docker添加加速器
通过 Docker 官方镜像加速,中国区用户能够快速访问最流行的 Docker 镜像.该镜像托管于中国大陆,本地用户现在将会享受到更快的下载速度和更强的稳定性,从而能够更敏捷地开发和交付 Docker ...
- CF912E Prime Gift题解(搜索+二分答案)
CF912E Prime Gift题解(搜索+二分答案) 标签:题解 阅读体验:https://zybuluo.com/Junlier/note/1314956 洛谷题目链接 $ $ CF题目 ...
- HTML+CSS ,原型
此图是别人所作
- Gradle打包问题Deprecated Gradle features were used in this build, making it incompatible with Gradle 5.0
前言 使用gradle打包react native的时候,出现了如下报错,下面和大家说一下解决的具体办法 Deprecated Gradle features were used in this bu ...
- 反射、getattr
#coding=utf-8 class Dog(object): def __init__(self,name): self.name = name def eat(self): print '123 ...
- 【rabbitmq】解决SimpleAmqpClient创建连接时阻塞的问题
https://blog.csdn.net/panxianzhan/article/details/50755409 https://blog.csdn.net/csm201314/article/d ...