视觉里程计:2D-2D 对极几何、3D-2D PnP、3D-3D ICP

参考链接:https://mp.weixin.qq.com/s/89IHjqnw-JJ1Ak_YjWdHvA
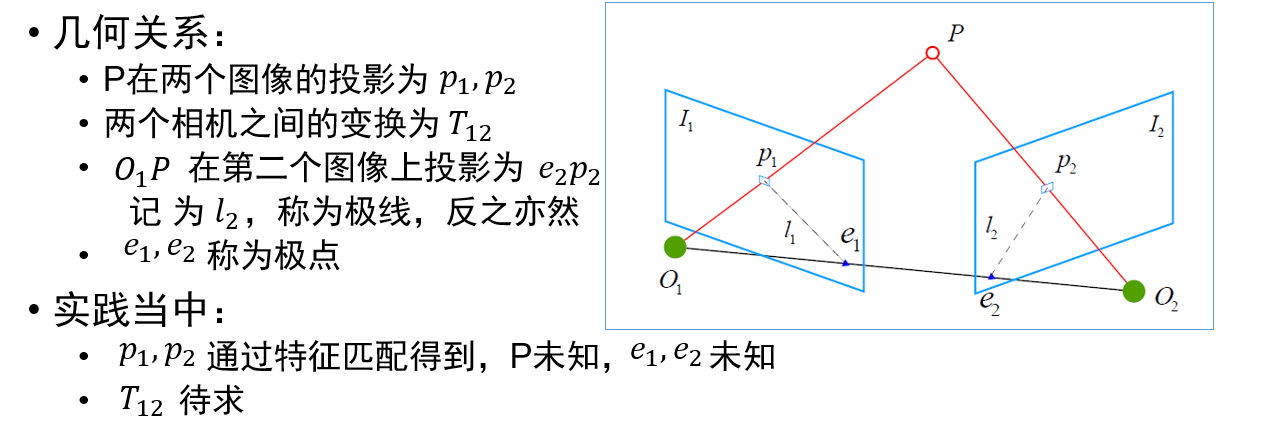
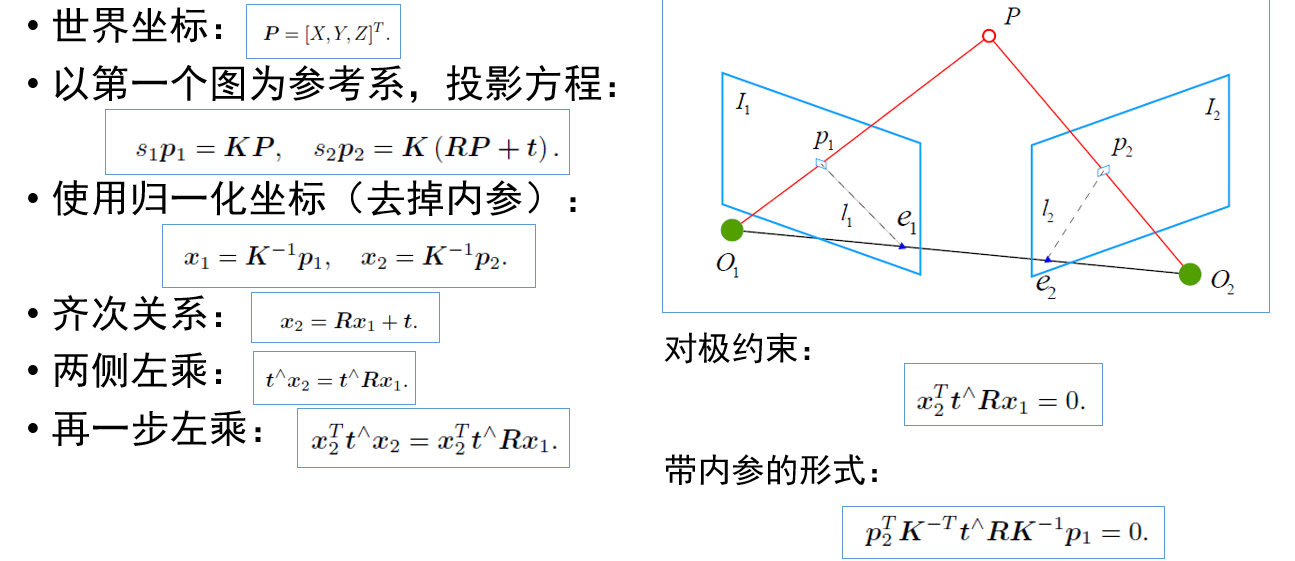
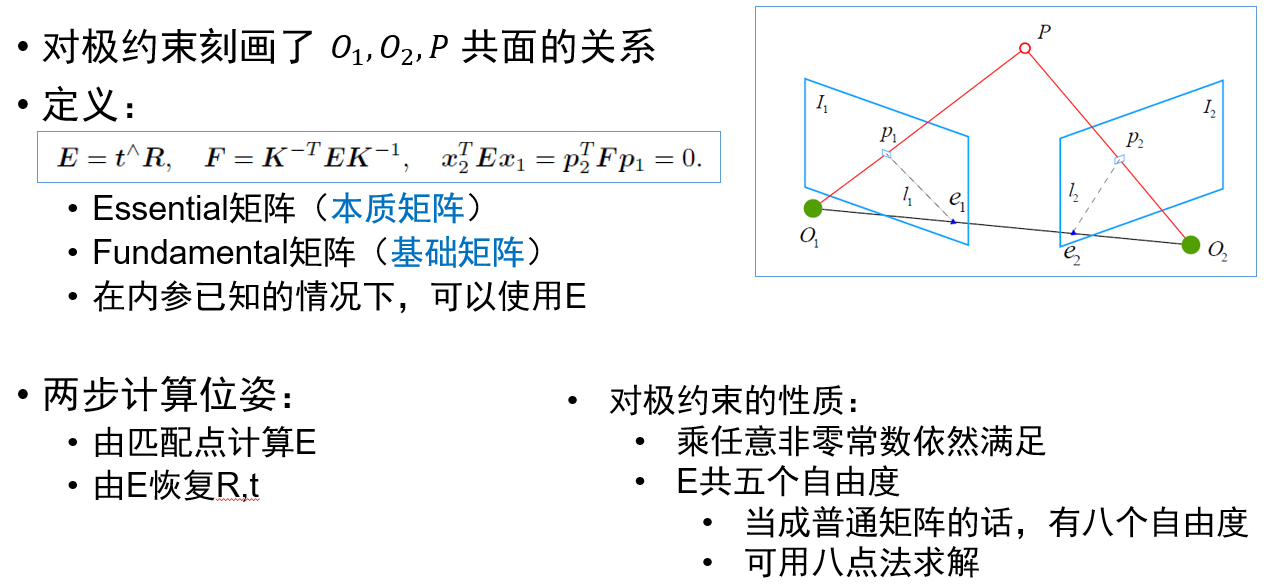

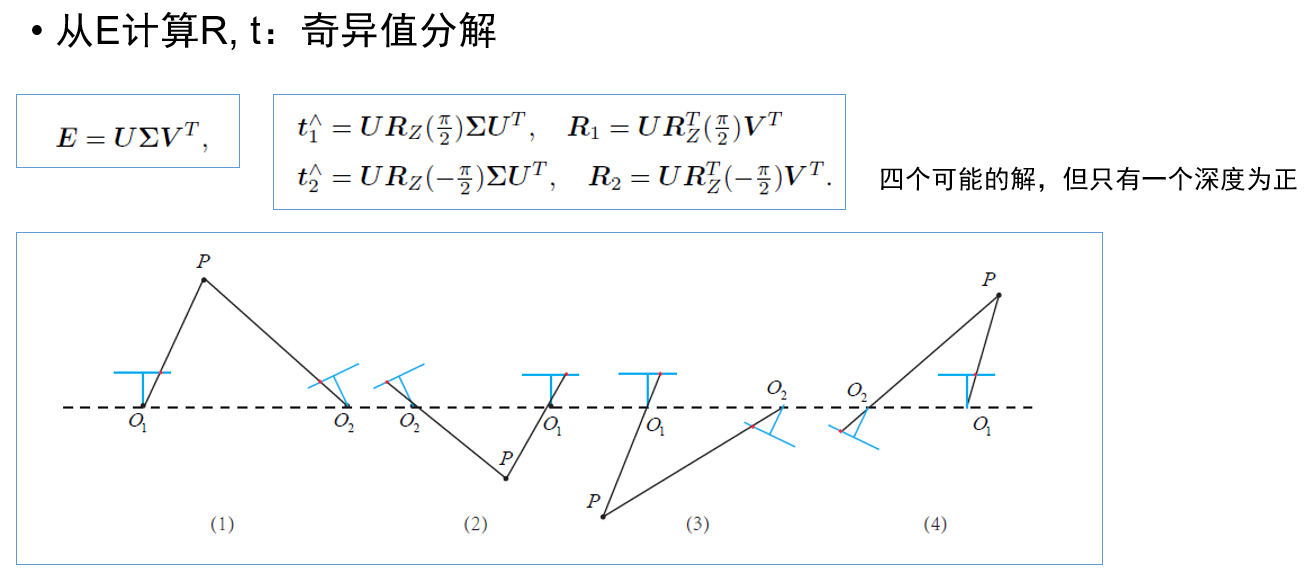


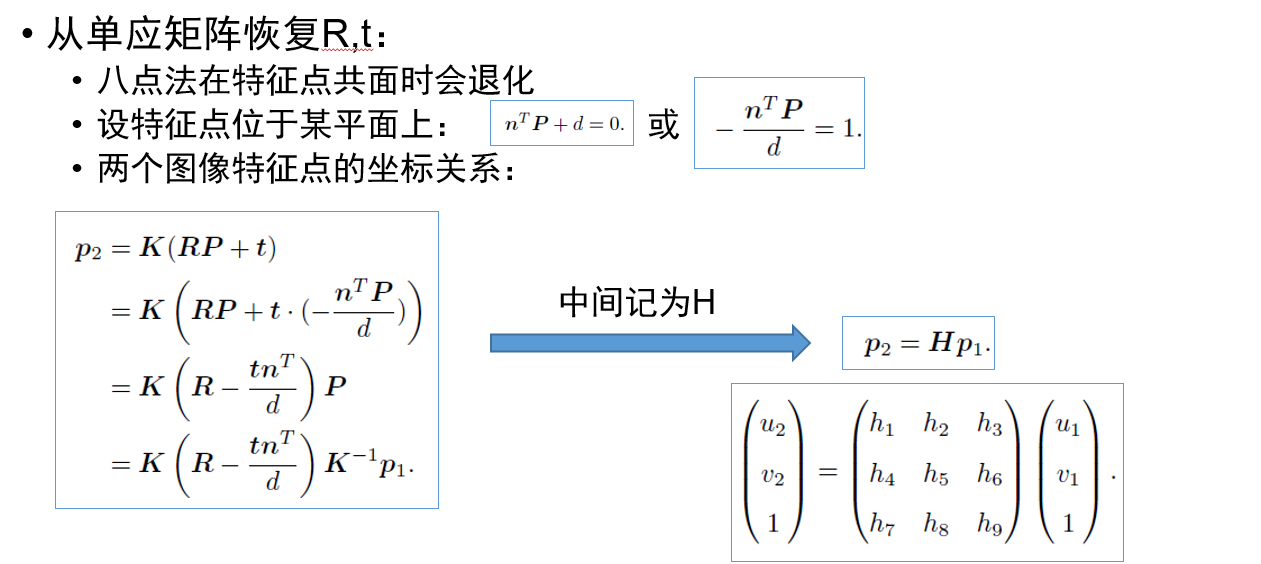
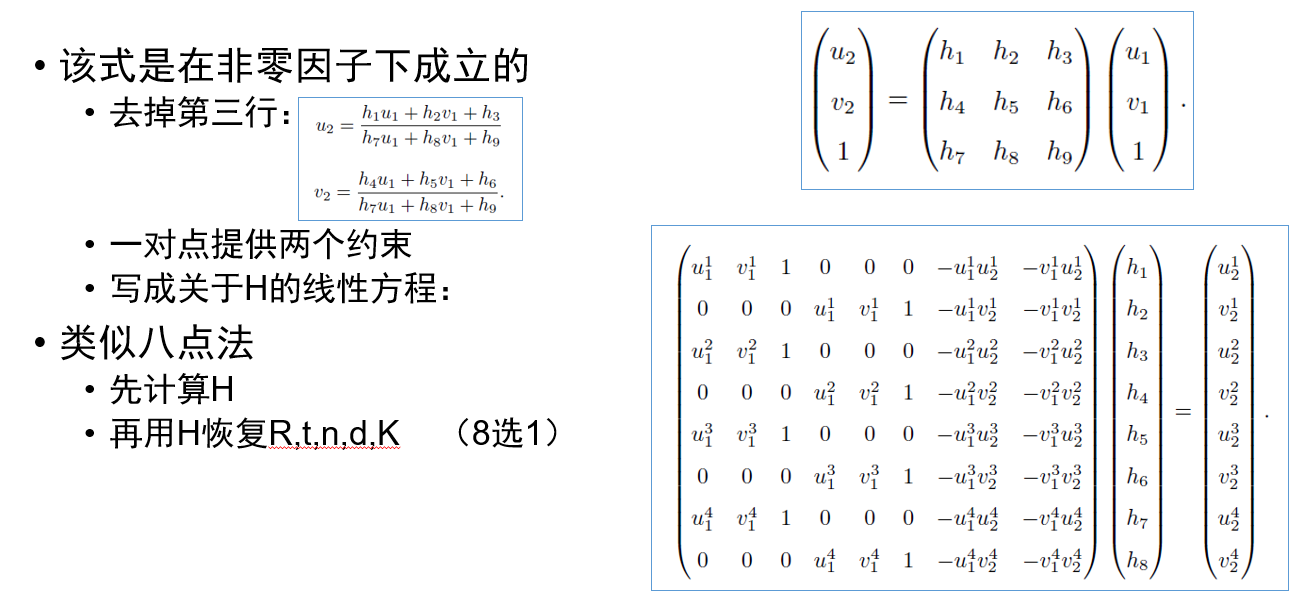
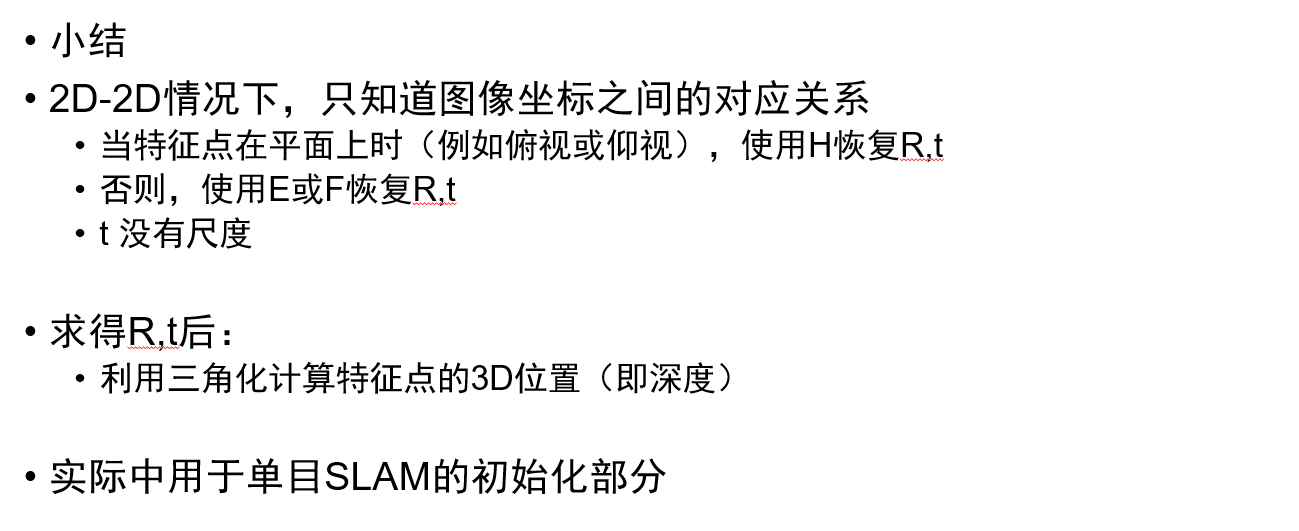
- #include <iostream>
- #include <opencv2/core/core.hpp>
- #include <opencv2/features2d/features2d.hpp>
- #include <opencv2/highgui/highgui.hpp>
- #include <opencv2/calib3d/calib3d.hpp>
- // #include "extra.h" // use this if in OpenCV2
- using namespace std;
- using namespace cv;
- /****************************************************
- * 本程序演示了如何使用2D-2D的特征匹配估计相机运动
- * **************************************************/
- void find_feature_matches(
- const Mat &img_1, const Mat &img_2,
- std::vector<KeyPoint> &keypoints_1,
- std::vector<KeyPoint> &keypoints_2,
- std::vector<DMatch> &matches);
- void pose_estimation_2d2d(
- std::vector<KeyPoint> keypoints_1,
- std::vector<KeyPoint> keypoints_2,
- std::vector<DMatch> matches,
- Mat &R, Mat &t);
- // 像素坐标转相机归一化坐标
- Point2d pixel2cam(const Point2d &p, const Mat &K);
- int main(int argc, char **argv) {
- if (argc != ) {
- cout << "usage: pose_estimation_2d2d img1 img2" << endl;
- return ;
- }
- //-- 读取图像
- Mat img_1 = imread(argv[], CV_LOAD_IMAGE_COLOR);
- Mat img_2 = imread(argv[], CV_LOAD_IMAGE_COLOR);
- assert(img_1.data && img_2.data && "Can not load images!");
- vector<KeyPoint> keypoints_1, keypoints_2;
- vector<DMatch> matches;
- find_feature_matches(img_1, img_2, keypoints_1, keypoints_2, matches);
- cout << "一共找到了" << matches.size() << "组匹配点" << endl;
- //-- 估计两张图像间运动
- Mat R, t;
- pose_estimation_2d2d(keypoints_1, keypoints_2, matches, R, t);
- //-- 验证E=t^R*scale
- Mat t_x =
- (Mat_<double>(, ) << , -t.at<double>(, ), t.at<double>(, ),
- t.at<double>(, ), , -t.at<double>(, ),
- -t.at<double>(, ), t.at<double>(, ), );
- cout << "t^R=" << endl << t_x * R << endl;
- //-- 验证对极约束
- Mat K = (Mat_<double>(, ) << 520.9, , 325.1, , 521.0, 249.7, , , );
- for (DMatch m: matches) {
- Point2d pt1 = pixel2cam(keypoints_1[m.queryIdx].pt, K);
- Mat y1 = (Mat_<double>(, ) << pt1.x, pt1.y, );
- Point2d pt2 = pixel2cam(keypoints_2[m.trainIdx].pt, K);
- Mat y2 = (Mat_<double>(, ) << pt2.x, pt2.y, );
- Mat d = y2.t() * t_x * R * y1;
- cout << "epipolar constraint = " << d << endl;
- }
- return ;
- }
- void find_feature_matches(const Mat &img_1, const Mat &img_2,
- std::vector<KeyPoint> &keypoints_1,
- std::vector<KeyPoint> &keypoints_2,
- std::vector<DMatch> &matches) {
- //-- 初始化
- Mat descriptors_1, descriptors_2;
- // used in OpenCV3
- Ptr<FeatureDetector> detector = ORB::create();
- Ptr<DescriptorExtractor> descriptor = ORB::create();
- // use this if you are in OpenCV2
- // Ptr<FeatureDetector> detector = FeatureDetector::create ( "ORB" );
- // Ptr<DescriptorExtractor> descriptor = DescriptorExtractor::create ( "ORB" );
- Ptr<DescriptorMatcher> matcher = DescriptorMatcher::create("BruteForce-Hamming");
- //-- 第一步:检测 Oriented FAST 角点位置
- detector->detect(img_1, keypoints_1);
- detector->detect(img_2, keypoints_2);
- //-- 第二步:根据角点位置计算 BRIEF 描述子
- descriptor->compute(img_1, keypoints_1, descriptors_1);
- descriptor->compute(img_2, keypoints_2, descriptors_2);
- //-- 第三步:对两幅图像中的BRIEF描述子进行匹配,使用 Hamming 距离
- vector<DMatch> match;
- //BFMatcher matcher ( NORM_HAMMING );
- matcher->match(descriptors_1, descriptors_2, match);
- //-- 第四步:匹配点对筛选
- double min_dist = , max_dist = ;
- //找出所有匹配之间的最小距离和最大距离, 即是最相似的和最不相似的两组点之间的距离
- for (int i = ; i < descriptors_1.rows; i++) {
- double dist = match[i].distance;
- if (dist < min_dist) min_dist = dist;
- if (dist > max_dist) max_dist = dist;
- }
- printf("-- Max dist : %f \n", max_dist);
- printf("-- Min dist : %f \n", min_dist);
- //当描述子之间的距离大于两倍的最小距离时,即认为匹配有误.但有时候最小距离会非常小,设置一个经验值30作为下限.
- for (int i = ; i < descriptors_1.rows; i++) {
- if (match[i].distance <= max( * min_dist, 30.0)) {
- matches.push_back(match[i]);
- }
- }
- }
- Point2d pixel2cam(const Point2d &p, const Mat &K) {
- return Point2d
- (
- (p.x - K.at<double>(, )) / K.at<double>(, ),
- (p.y - K.at<double>(, )) / K.at<double>(, )
- );
- }
- void pose_estimation_2d2d(std::vector<KeyPoint> keypoints_1,
- std::vector<KeyPoint> keypoints_2,
- std::vector<DMatch> matches,
- Mat &R, Mat &t) {
- // 相机内参,TUM Freiburg2
- Mat K = (Mat_<double>(, ) << 520.9, , 325.1, , 521.0, 249.7, , , );
- //-- 把匹配点转换为vector<Point2f>的形式
- vector<Point2f> points1;
- vector<Point2f> points2;
- for (int i = ; i < (int) matches.size(); i++) {
- points1.push_back(keypoints_1[matches[i].queryIdx].pt);
- points2.push_back(keypoints_2[matches[i].trainIdx].pt);
- }
- //-- 计算基础矩阵
- Mat fundamental_matrix;
- fundamental_matrix = findFundamentalMat(points1, points2, CV_FM_8POINT);
- cout << "fundamental_matrix is " << endl << fundamental_matrix << endl;
- //-- 计算本质矩阵
- Point2d principal_point(325.1, 249.7); //相机光心, TUM dataset标定值
- double focal_length = ; //相机焦距, TUM dataset标定值
- Mat essential_matrix;
- essential_matrix = findEssentialMat(points1, points2, focal_length, principal_point);
- cout << "essential_matrix is " << endl << essential_matrix << endl;
- //-- 计算单应矩阵
- //-- 但是本例中场景不是平面,单应矩阵意义不大
- Mat homography_matrix;
- homography_matrix = findHomography(points1, points2, RANSAC, );
- cout << "homography_matrix is " << endl << homography_matrix << endl;
- //-- 从本质矩阵中恢复旋转和平移信息.
- // 此函数仅在Opencv3中提供
- recoverPose(essential_matrix, points1, points2, R, t, focal_length, principal_point);
- cout << "R is " << endl << R << endl;
- cout << "t is " << endl << t << endl;
- }


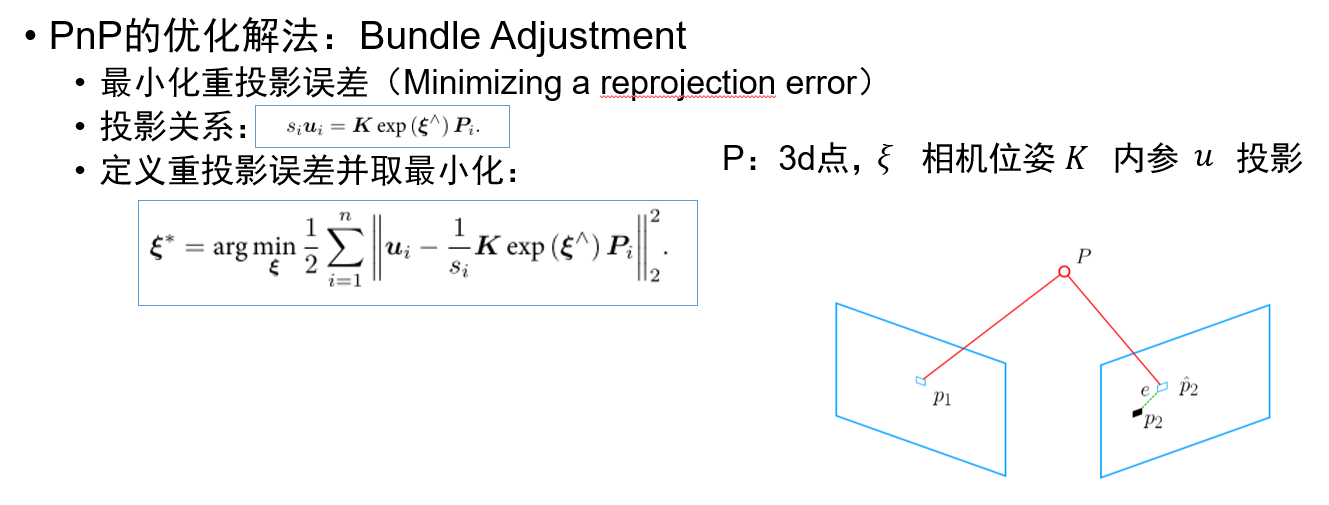
- #include <iostream>
- #include <opencv2/opencv.hpp>
- // #include "extra.h" // used in opencv2
- using namespace std;
- using namespace cv;
- void find_feature_matches(
- const Mat &img_1, const Mat &img_2,
- std::vector<KeyPoint> &keypoints_1,
- std::vector<KeyPoint> &keypoints_2,
- std::vector<DMatch> &matches);
- void pose_estimation_2d2d(
- const std::vector<KeyPoint> &keypoints_1,
- const std::vector<KeyPoint> &keypoints_2,
- const std::vector<DMatch> &matches,
- Mat &R, Mat &t);
- void triangulation(
- const vector<KeyPoint> &keypoint_1,
- const vector<KeyPoint> &keypoint_2,
- const std::vector<DMatch> &matches,
- const Mat &R, const Mat &t,
- vector<Point3d> &points
- );
- /// 作图用
- inline cv::Scalar get_color(float depth) {
- float up_th = , low_th = , th_range = up_th - low_th;
- if (depth > up_th) depth = up_th;
- if (depth < low_th) depth = low_th;
- return cv::Scalar( * depth / th_range, , * ( - depth / th_range));
- }
- // 像素坐标转相机归一化坐标
- Point2f pixel2cam(const Point2d &p, const Mat &K);
- int main(int argc, char **argv) {
- if (argc != ) {
- cout << "usage: triangulation img1 img2" << endl;
- return ;
- }
- //-- 读取图像
- Mat img_1 = imread(argv[], CV_LOAD_IMAGE_COLOR);
- Mat img_2 = imread(argv[], CV_LOAD_IMAGE_COLOR);
- vector<KeyPoint> keypoints_1, keypoints_2;
- vector<DMatch> matches;
- find_feature_matches(img_1, img_2, keypoints_1, keypoints_2, matches);
- cout << "一共找到了" << matches.size() << "组匹配点" << endl;
- //-- 估计两张图像间运动
- Mat R, t;
- pose_estimation_2d2d(keypoints_1, keypoints_2, matches, R, t);
- //-- 三角化
- vector<Point3d> points;
- triangulation(keypoints_1, keypoints_2, matches, R, t, points);
- //-- 验证三角化点与特征点的重投影关系
- Mat K = (Mat_<double>(, ) << 520.9, , 325.1, , 521.0, 249.7, , , );
- Mat img1_plot = img_1.clone();
- Mat img2_plot = img_2.clone();
- for (int i = ; i < matches.size(); i++) {
- // 第一个图
- float depth1 = points[i].z;
- cout << "depth: " << depth1 << endl;
- Point2d pt1_cam = pixel2cam(keypoints_1[matches[i].queryIdx].pt, K);//由匹配点的像素坐标得到相机坐标
- cv::circle(img1_plot, keypoints_1[matches[i].queryIdx].pt, , get_color(depth1), );//画出匹配点,颜色由深度决定
- // 第二个图
- Mat pt2_trans = R * (Mat_<double>(, ) << points[i].x, points[i].y, points[i].z) + t;
- float depth2 = pt2_trans.at<double>(, );
- cv::circle(img2_plot, keypoints_2[matches[i].trainIdx].pt, , get_color(depth2), );
- }
- cv::imshow("img 1", img1_plot);
- cv::imshow("img 2", img2_plot);
- cv::waitKey();
- return ;
- }
- void find_feature_matches(const Mat &img_1, const Mat &img_2,
- std::vector<KeyPoint> &keypoints_1,
- std::vector<KeyPoint> &keypoints_2,
- std::vector<DMatch> &matches) {
- //-- 初始化
- Mat descriptors_1, descriptors_2;
- // used in OpenCV3
- Ptr<FeatureDetector> detector = ORB::create();
- Ptr<DescriptorExtractor> descriptor = ORB::create();
- // use this if you are in OpenCV2
- // Ptr<FeatureDetector> detector = FeatureDetector::create ( "ORB" );
- // Ptr<DescriptorExtractor> descriptor = DescriptorExtractor::create ( "ORB" );
- Ptr<DescriptorMatcher> matcher = DescriptorMatcher::create("BruteForce-Hamming");
- //-- 第一步:检测 Oriented FAST 角点位置
- detector->detect(img_1, keypoints_1);
- detector->detect(img_2, keypoints_2);
- //-- 第二步:根据角点位置计算 BRIEF 描述子
- descriptor->compute(img_1, keypoints_1, descriptors_1);
- descriptor->compute(img_2, keypoints_2, descriptors_2);
- //-- 第三步:对两幅图像中的BRIEF描述子进行匹配,使用 Hamming 距离
- vector<DMatch> match;
- // BFMatcher matcher ( NORM_HAMMING );
- matcher->match(descriptors_1, descriptors_2, match);
- //-- 第四步:匹配点对筛选
- double min_dist = , max_dist = ;
- //找出所有匹配之间的最小距离和最大距离, 即是最相似的和最不相似的两组点之间的距离
- for (int i = ; i < descriptors_1.rows; i++) {
- double dist = match[i].distance;
- if (dist < min_dist) min_dist = dist;
- if (dist > max_dist) max_dist = dist;
- }
- printf("-- Max dist : %f \n", max_dist);
- printf("-- Min dist : %f \n", min_dist);
- //当描述子之间的距离大于两倍的最小距离时,即认为匹配有误.但有时候最小距离会非常小,设置一个经验值30作为下限.
- for (int i = ; i < descriptors_1.rows; i++) {
- if (match[i].distance <= max( * min_dist, 30.0)) {
- matches.push_back(match[i]);
- }
- }
- }
- void pose_estimation_2d2d(
- const std::vector<KeyPoint> &keypoints_1,
- const std::vector<KeyPoint> &keypoints_2,
- const std::vector<DMatch> &matches,
- Mat &R, Mat &t) {
- // 相机内参,TUM Freiburg2
- Mat K = (Mat_<double>(, ) << 520.9, , 325.1, , 521.0, 249.7, , , );
- //-- 把匹配点转换为vector<Point2f>的形式
- vector<Point2f> points1;
- vector<Point2f> points2;
- for (int i = ; i < (int) matches.size(); i++) {
- points1.push_back(keypoints_1[matches[i].queryIdx].pt);
- points2.push_back(keypoints_2[matches[i].trainIdx].pt);
- }
- //-- 计算本质矩阵
- Point2d principal_point(325.1, 249.7); //相机主点, TUM dataset标定值
- int focal_length = ; //相机焦距, TUM dataset标定值
- Mat essential_matrix;
- essential_matrix = findEssentialMat(points1, points2, focal_length, principal_point);
- //-- 从本质矩阵中恢复旋转和平移信息.
- recoverPose(essential_matrix, points1, points2, R, t, focal_length, principal_point);
- }
- void triangulation(
- const vector<KeyPoint> &keypoint_1,
- const vector<KeyPoint> &keypoint_2,
- const std::vector<DMatch> &matches,
- const Mat &R, const Mat &t,
- vector<Point3d> &points) {
- Mat T1 = (Mat_<float>(, ) <<
- , , , ,
- , , , ,
- , , , );
- Mat T2 = (Mat_<float>(, ) <<
- R.at<double>(, ), R.at<double>(, ), R.at<double>(, ), t.at<double>(, ),
- R.at<double>(, ), R.at<double>(, ), R.at<double>(, ), t.at<double>(, ),
- R.at<double>(, ), R.at<double>(, ), R.at<double>(, ), t.at<double>(, )
- );
- Mat K = (Mat_<double>(, ) << 520.9, , 325.1, , 521.0, 249.7, , , );
- vector<Point2f> pts_1, pts_2;
- for (DMatch m:matches) {
- // 将像素坐标转换至相机坐标
- pts_1.push_back(pixel2cam(keypoint_1[m.queryIdx].pt, K));
- pts_2.push_back(pixel2cam(keypoint_2[m.trainIdx].pt, K));
- }
- Mat pts_4d;
- cv::triangulatePoints(T1, T2, pts_1, pts_2, pts_4d);
- // 转换成非齐次坐标
- for (int i = ; i < pts_4d.cols; i++) {
- Mat x = pts_4d.col(i);
- x /= x.at<float>(, ); // 归一化
- Point3d p(
- x.at<float>(, ),
- x.at<float>(, ),
- x.at<float>(, )
- );
- points.push_back(p);
- }
- }
- Point2f pixel2cam(const Point2d &p, const Mat &K) {
- return Point2f
- (
- (p.x - K.at<double>(, )) / K.at<double>(, ),
- (p.y - K.at<double>(, )) / K.at<double>(, )
- );
- }



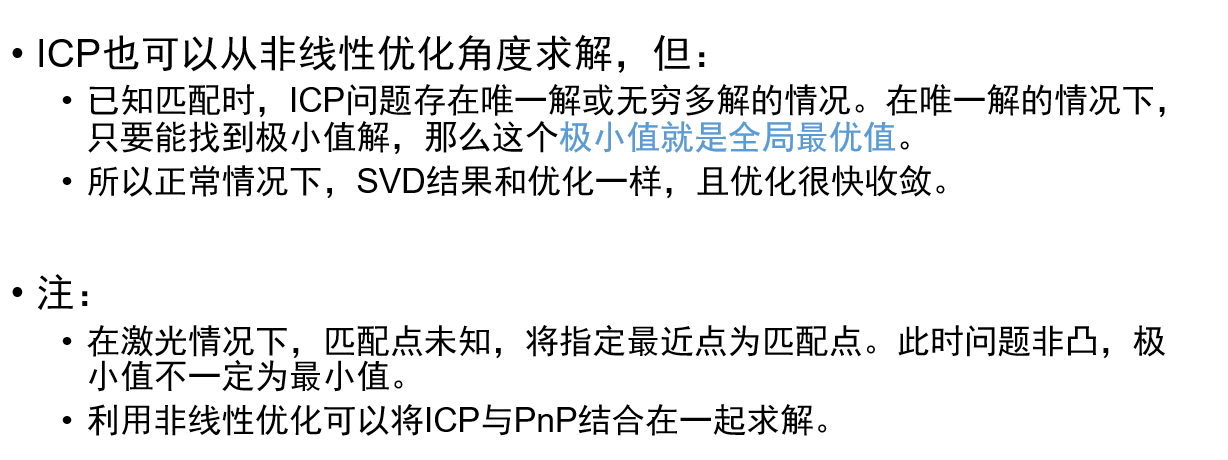

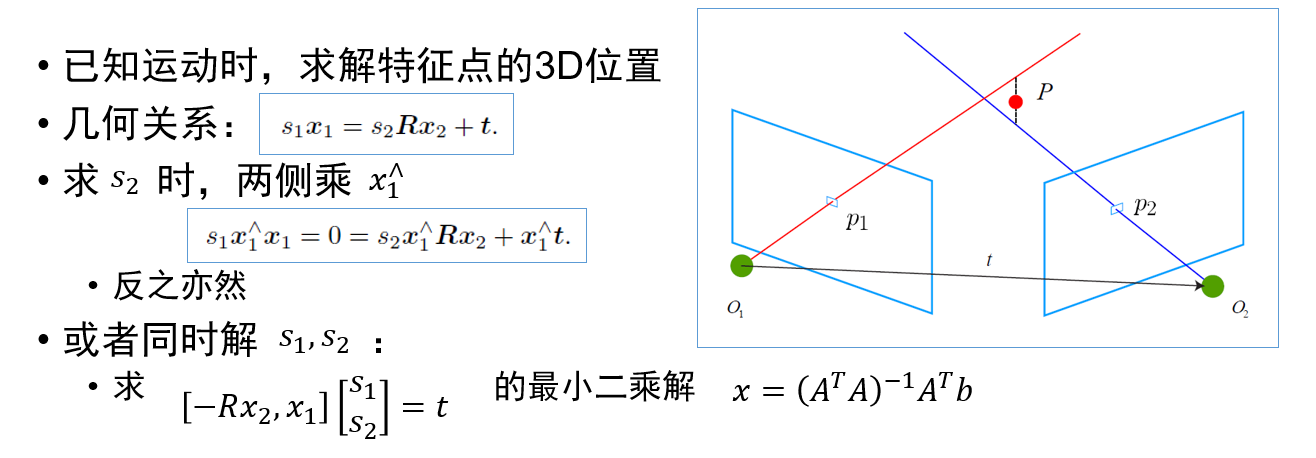
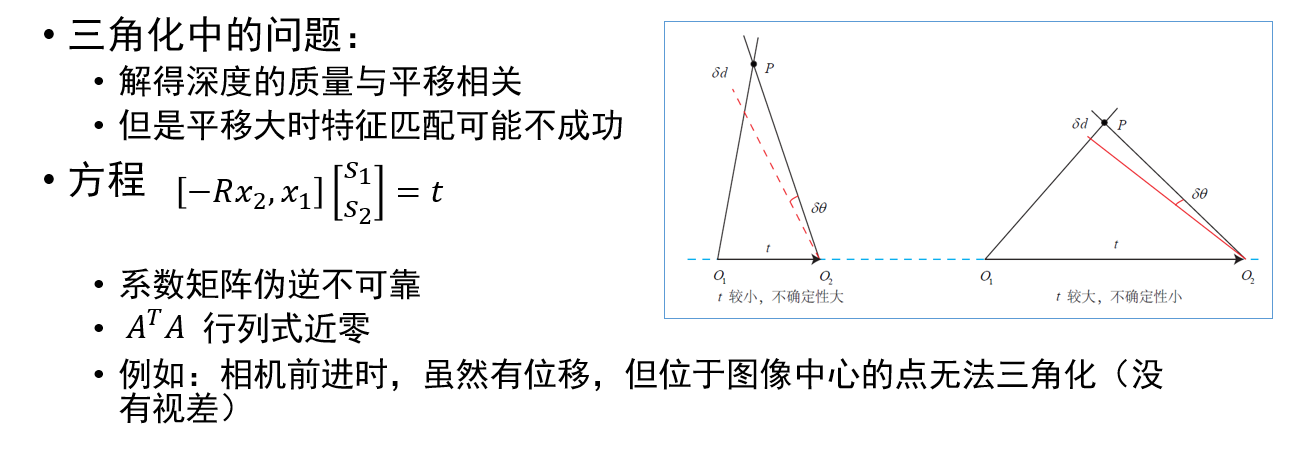
视觉里程计:2D-2D 对极几何、3D-2D PnP、3D-3D ICP的更多相关文章
- SLAM入门之视觉里程计(1):特征点的匹配
SLAM 主要分为两个部分:前端和后端,前端也就是视觉里程计(VO),它根据相邻图像的信息粗略的估计出相机的运动,给后端提供较好的初始值.VO的实现方法可以根据是否需要提取特征分为两类:基于特征点的方 ...
- 第三篇 视觉里程计(VO)的初始化过程以及openvslam中的相关实现详解
视觉里程计(Visual Odometry, VO),通过使用相机提供的连续帧图像信息(以及局部地图,先不考虑)来估计相邻帧的相机运动,将这些相对运行转换为以第一帧为参考的位姿信息,就得到了相机载体( ...
- 视觉slam十四讲个人理解(ch7视觉里程计1)
参考博文::https://blog.csdn.net/david_han008/article/details/53560736 https://blog.csdn.net/n66040927/ar ...
- SLAM入门之视觉里程计(2):相机模型(内参数,外参数)
相机成像的过程实际是将真实的三维空间中的三维点映射到成像平面(二维空间)过程,可以简单的使用小孔成像模型来描述该过程,以了解成像过程中三维空间到二位图像空间的变换过程. 本文包含两部分内容,首先介绍小 ...
- SLAM入门之视觉里程计(5):单应矩阵
在之前的博文OpenCV,计算两幅图像的单应矩阵,介绍调用OpenCV中的函数,通过4对对应的点的坐标计算两个图像之间单应矩阵\(H\),然后调用射影变换函数,将一幅图像变换到另一幅图像的视角中.当时 ...
- 关于视觉里程计以及VI融合的相关研究(长期更新)
1. svo 源码:https://github.com/uzh-rpg/rpg_svo 国内对齐文章源码的研究: (1)冯斌: 对其代码重写 https://github.com/yueying/O ...
- (3)视觉里程计 Visual Odometry
首先分析include头文件下的slamBase.h文件 # pragma once // 各种头文件 // C++标准库 #include <fstream> #include < ...
- SLAM——视觉里程计(一)feature
从现在开始下面两篇文章来介绍SLAM中的视觉里程计(Visual Odometry).这个是我们正式进入SLAM工程的第一步,而之前介绍的更多的是一些基础理论.视觉里程计完成的事情是视觉里程计VO的目 ...
- SLAM入门之视觉里程计(2):两视图对极约束 基础矩阵
在上篇相机模型中介绍了图像的成像过程,场景中的三维点通过"小孔"映射到二维的图像平面,可以使用下面公式描述: \[ x = MX \]其中,\(c\)是图像中的像点,\(M\)是一 ...
随机推荐
- 这样才能正确解锁MaxCompute客户端
大数据计算服务(MaxCompute,原名ODPS)是一种快速.完全托管的TB/PB级数据仓库解决方案.MaxCompute向用户提供了完善的数据导入方案以及多种经典的分布式计算模型,能够更快速的解决 ...
- 阿里云Linux服务器购买、配置
购买.配置阿里云Linux服务器配置ftp发布网站全教程 http://blog.csdn.net/Jolesen/article/details/77505840
- win10 解决telnet不是内部或外部命令的方案
1.Telnet用于远程操作互联网中的设备或终端计算机服务器,可以有效的减少现场操作的麻烦.因为设备或终端是遍布整个省或市,有的甚至是国外,如何高效的处理问题是当务之急,除了telnet还可以ssh使 ...
- 微信小程序学习笔记(三)--框架-逻辑层
逻辑层将数据进行处理后发送给视图层,同时接受视图层的事件反馈. 开发者写的所有代码最终将会打包成一份 JavaScript 文件,并在小程序启动的时候运行,直到小程序销毁.这一行为类似 Service ...
- Oracle中使用REGEXP_SUBSTR,regexp_replace,wm_concat函数
REGEXP_SUBSTR函数格式如下: function REGEXP_SUBSTR(String, pattern, position, occurrence, modifier)__srcstr ...
- 为什么对象被new 以后在执行dup操作?
为什么对象被new 以后在执行dup操作? 今天有个朋友问我,为什么一个new一个对象的指令在new后面紧跟的是dup操作?他说搜了可能找到的 搜索引擎都找不到答案,包括翻了<<深入JAV ...
- python作业/练习/实战:3、实现商品管理的一个程序
作业要求 实现一个商品管理的一个程序,运行程序有三个选项,输入1添加商品:输入2删除商品:输入3 查看商品信息1.添加商品: 商品名称:xx 商品如果已经存在,提示商品已存在 商品价格:xx数量只能为 ...
- 力扣算法题—148sort-list
Sort a linked list in O(n log n) time using constant space complexity. Example 1: Input: 4->2-> ...
- 数据持久化之嵌入式数据库 SQLite(三)
阿里P7Android高级架构进阶视频免费学习请点击:https://space.bilibili.com/474380680 SQLite 是 D. Richard Hipp 用 C 语言编写的开源 ...
- MVC5+EF6 完整教程
随笔分类 - MVC ASP.NET MVC MVC5+EF6 完整教程17--升级到EFCore2.0 摘要: EF Core 2.0上周已经发布了,我们也升级到core 文章内容基于vs2017, ...
