一篇文章带你掌握主流数据库框架——MyBatis
一篇文章带你掌握主流数据库框架——MyBatis
MyBatis 是一款优秀的持久层框架,它支持自定义 SQL、存储过程以及高级映射。
在之前的文章中我们学习了MYSQL和JDBC,但是这些东西远远不足以支持我们书写JavaWeb相关的内容
在学习MyBatis前,请先学习Java,Mysql,JDBC,Maven内容
MyBatis学前须知
首先我们先简单介绍一下MyBatis:
- Mybats是一款优秀的持久层框架,用于简化JDBC开发
- MyBatis本是Apache的一个开源项目iBatis,2010年由apache software foundation 迁移到了google code,并改名为MyBatis
- 官网:MyBatis中文网
我们再来介绍一下JavaEE概念:
- JavaEE三层架构:表现层,业务层,持久层
- 表现层:负责接收客户端请求,向客户端响应结果
- 业务层:它负责业务逻辑处理
- 持久层:负责将数据保存到数据库的那一层代码
最后我们了解一下框架:
- 框架是一个半成品软件,是一套可重用的,通用的软件基础代码模型
- 在框架的基础上构建软件编写更加有效,规范,通用,可扩展
MyBatis产生背景
我们在前面提到MyBatis的产生是为了简化JDBC开发
那么我们就先来介绍一下JDBC的缺点:
我们通过一段代码进行解析:
package com.itheima.jdbc;

import org.junit.Test;

import java.sql.*;

import java.util.Date;

    @Test

    public void testPreparedStatement2() throws  Exception {

        // 前置链接操作

        String url = "jdbc:mysql:///db1?useSSL=false&useServerPrepStmts=true";

        String username = "root";

        String password = "1234";

        Connection conn = DriverManager.getConnection(url, username, password);

        // 接收用户输入 用户名和密码

        String name = "zhangsan";

        String pwd = "' or '1' = '1";

        // 定义sql

        String sql = "select * from tb_user where username = ? and password = ?";

        // 获取pstmt对象

        PreparedStatement pstmt = conn.prepareStatement(sql);

        Thread.sleep(10000);

        // 设置?的值

        pstmt.setString(1,name);

        pstmt.setString(2,pwd);

        ResultSet rs = null;

                // 执行sql

        rs = pstmt.executeQuery();

        // 设置?的值

        pstmt.setString(1,"aaa");

        pstmt.setString(2,"bbb");

        // 执行sql

        rs = pstmt.executeQuery();

        // 判断登录是否成功

        if(rs.next()){

            System.out.println("登录成功~");

        }else{

            System.out.println("登录失败~");

        }

        //7. 释放资源

        rs.close();

        pstmt.close();

        conn.close();

    }

}
在上述代码中,我们可以注意到:
/*

硬编码概念: 代码展现形式固定,如果有所更改需要手动修改代码

硬编码动作:注册驱动,获得链接,SQL语句

*/

		// 前置链接操作

        String url = "jdbc:mysql:///db1?useSSL=false&useServerPrepStmts=true";

        String username = "root";

        String password = "1234";

        Connection conn = DriverManager.getConnection(url, username, password);

        // 接收用户输入 用户名和密码

        String name = "zhangsan";

        String pwd = "' or '1' = '1";

/*

操作繁琐:大量代码堆叠

操作繁琐动作:手动设置参数,手动封装结果

*/

		// 获取pstmt对象

        PreparedStatement pstmt = conn.prepareStatement(sql);

        Thread.sleep(10000);

        // 设置?的值

        pstmt.setString(1,name);

        pstmt.setString(2,pwd);

        ResultSet rs = null;

                // 执行sql

        rs = pstmt.executeQuery();

        // 设置?的值

        pstmt.setString(1,"aaa");

        pstmt.setString(2,"bbb");

        // 执行sql

        rs = pstmt.executeQuery();
因而为了解决JDBC的这些缺点,MyBatis应运而生!
MyBatis解决思想:
- 硬编码 -> 配置文件
- 注册驱动,获得连接:在mybatis-config.xml设置其连接池信息
- SQL语句:设置专门的Mapper接口和Mapper.xml设置其信息
- 操作繁琐 - > 自动完成
- 采用SqlSession对象的各类方法直接封装
MyBatis免除了几乎所有的JDBC代码以及设置参数和获得结果集的工作
MyBatis快速入门
我们将以一个案例进行MyBatis的快速入门(资源来自B站黑马程序员老陈的JavaWeb课程)
我们以步骤形式逐步进行:
- 准备数据库数据
- 创建模块,导入坐标(这里采用Maven创建项目,在项目自动生成的pom.xml中导入模块坐标即可)
<!--

我们使用mybatis,导入mybatis坐标

我们使用mysql,导入mysql坐标

我们需要进行单元测试,导入junit坐标

我们需要日志,查看错误信息,导入日志坐标(注意:需要导入logback.xml包,可在网络查询)

->

<dependencies>

        <!--mybatis 依赖-->

        <dependency>

            <groupId>org.mybatis</groupId>

            <artifactId>mybatis</artifactId>

            <version>3.5.5</version>

        </dependency>

        <!--mysql 驱动-->

        <dependency>

            <groupId>mysql</groupId>

            <artifactId>mysql-connector-java</artifactId>

            <version>5.1.46</version>

        </dependency>

        <!--junit 单元测试-->

        <dependency>

            <groupId>junit</groupId>

            <artifactId>junit</artifactId>

            <version>4.13</version>

            <scope>test</scope>

        </dependency>

        <!-- 添加slf4j日志api -->

        <dependency>

            <groupId>org.slf4j</groupId>

            <artifactId>slf4j-api</artifactId>

            <version>1.7.20</version>

        </dependency>

        <!-- 添加logback-classic依赖 -->

        <dependency>

            <groupId>ch.qos.logback</groupId>

            <artifactId>logback-classic</artifactId>

            <version>1.2.3</version>

        </dependency>

        <!-- 添加logback-core依赖 -->

        <dependency>

            <groupId>ch.qos.logback</groupId>

            <artifactId>logback-core</artifactId>

            <version>1.2.3</version>

        </dependency>

    </dependencies>
- 编写MyBatis核心配置文件(替换连接信息,解决硬编码问题)
<!--

创建mybatis-config.xml,

写入下列信息(MyBatis官网可查找)

<?xml version="1.0" encoding="UTF-8" ?>

<!DOCTYPE configuration

  PUBLIC "-//mybatis.org//DTD Config 3.0//EN"

  "http://mybatis.org/dtd/mybatis-3-config.dtd">

<configuration>

  <environments default="development">

    <environment id="development">

      <transactionManager type="JDBC"/>

      <dataSource type="POOLED">

        <property name="driver" value="${driver}"/>

        <property name="url" value="${url}"/>

        <property name="username" value="${username}"/>

        <property name="password" value="${password}"/>

      </dataSource>

    </environment>

  </environments>

  <mappers>

    <mapper resource="org/mybatis/example/BlogMapper.xml"/>

  </mappers>

</configuration>

然后我们需要对上述信息进行修改,使其完成连接数据库的问题

-->

<?xml version="1.0" encoding="UTF-8" ?>

<!DOCTYPE configuration

  PUBLIC "-//mybatis.org//DTD Config 3.0//EN"

  "http://mybatis.org/dtd/mybatis-3-config.dtd">

<configuration>

  <environments default="development">

    <environment id="development">

      <transactionManager type="JDBC"/>

        <!--注意:这里dataSource表示数据库连接--->

      <dataSource type="POOLED">

          <!--

			我们需要修改下述信息

			driver:固定com.mysql.jdbc.Driver

			url:jdbc:mysql:/// + 数据库名称 + ?useSSL=false

			username:数据库账号

			password:数据库密码

			-->

        <property name="driver" value="com.mysql.jdbc.Driver"/>

        <property name="url" value="jdbc:mysql:///mybatis?useSSL=false"/>

        <property name="username" value="root"/>

        <property name="password" value="123456"/>

      </dataSource>

    </environment>

  </environments>

    <!--这里mapper表示映射地址:我们所需要的Mapper.xml,在后续我们会在Mapper.xml中书写SQL语句-->

  <mappers>

    <mapper resource="com/itheima/mapper/UserMapper.xml"/>

  </mappers>

</configuration>
- 创建SQL映射文件(统一管理sql语句,解决硬编码问题)
<!--

同样自己创建Mapper.xml文档,这里注意在前面加上前缀,如果你是Usr用户的数据库操作,命名为UserMapper.xml便于区分

导入下述代码(同样,在Mybatis官网可以找到)

<?xml version="1.0" encoding="UTF-8" ?>

<!DOCTYPE mapper

  PUBLIC "-//mybatis.org//DTD Mapper 3.0//EN"

  "http://mybatis.org/dtd/mybatis-3-mapper.dtd">

<mapper namespace="org.mybatis.example.BlogMapper">

  <select id="selectBlog" resultType="Blog">

    select * from Blog where id = #{id}

  </select>

</mapper>

在创建完成后,不要忘记回到上一步,把mapper的resource地址改为该文档所在地址

-->

<?xml version="1.0" encoding="UTF-8" ?>

<!DOCTYPE mapper

  PUBLIC "-//mybatis.org//DTD Mapper 3.0//EN"

  "http://mybatis.org/dtd/mybatis-3-mapper.dtd">

<!--

namespace:名称空间,在后续需要与Mapper接口名称一致保证互联(这里暂时设置为test)

id:查找方法的唯一表示

resultType:返回类型

在<select></select>中间书写语句即可

后续会继续介绍

-->

<mapper namespace="test">

  <select id="selectAll" resultType="User">

    select * from Blog where id = #{id}

  </select>

</mapper>
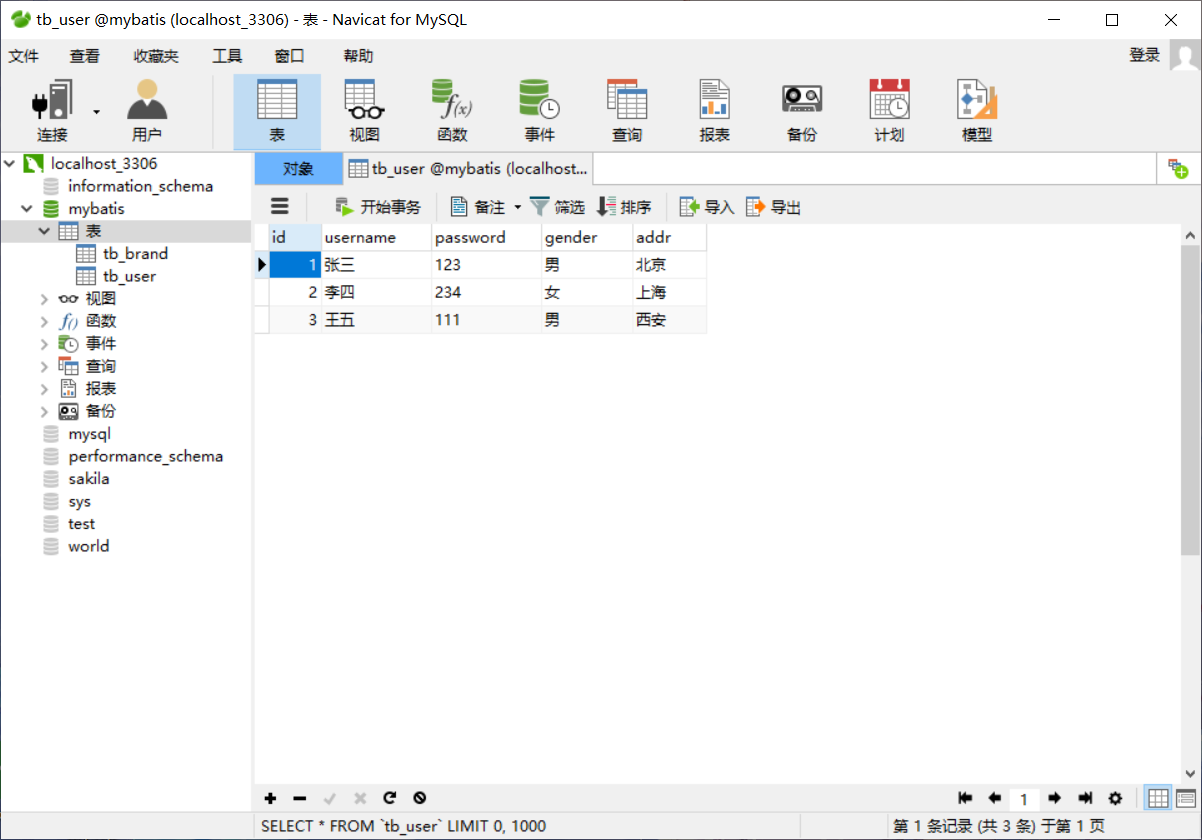
- 1 定义POJO类(与数据库信息完全相同的类)
// 注意:数据为private,书写get和set方法以及toString方法

package com.itheima.pojo;

// alt + 鼠标左键 整列编辑

public class User {

    private Integer id;

    private String username;

    private String password;

    private String gender;

    private String addr;

    public Integer getId() {

        return id;

    }

    public void setId(Integer id) {

        this.id = id;

    }

    public String getUsername() {

        return username;

    }

    public void setUsername(String username) {

        this.username = username;

    }

    public String getPassword() {

        return password;

    }

    public void setPassword(String password) {

        this.password = password;

    }

    public String getGender() {

        return gender;

    }

    public void setGender(String gender) {

        this.gender = gender;

    }

    public String getAddr() {

        return addr;

    }

    public void setAddr(String addr) {

        this.addr = addr;

    }

    @Override

    public String toString() {

        return "User{" +

                "id=" + id +

                ", username='" + username + '\'' +

                ", password='" + password + '\'' +

                ", gender='" + gender + '\'' +

                ", addr='" + addr + '\'' +

                '}';

    }

}
- 2 主代码展示
// 创建主代码

package com.itheima;

import com.itheima.pojo.User;

import org.apache.ibatis.io.Resources;

import org.apache.ibatis.session.SqlSession;

import org.apache.ibatis.session.SqlSessionFactory;

import org.apache.ibatis.session.SqlSessionFactoryBuilder;

import java.io.IOException;

import java.io.InputStream;

import java.util.List;

/**

 * Mybatis 快速入门代码

 */

public class MyBatisDemo {

    public static void main(String[] args) throws IOException {

        //1. 加载mybatis的核心配置文件,获取 SqlSessionFactory(官网下载)

        /*

        下述为官网下载,我们只需要修改第一行的mybatis-config.xml地址即可

        String resource = "org/mybatis/example/mybatis-config.xml";

		InputStream inputStream = Resources.getResourceAsStream(resource);

		SqlSessionFactory sqlSessionFactory = new SqlSessionFactoryBuilder().build(inputStream);

        */

        String resource = "mybatis-config.xml";

        InputStream inputStream = Resources.getResourceAsStream(resource);

        SqlSessionFactory sqlSessionFactory = new SqlSessionFactoryBuilder().build(inputStream);

        //2. 获取SqlSession对象,用它来执行sql(sqlSessionFactory方法)

        SqlSession sqlSession = sqlSessionFactory.openSession();

        //3. 执行sql(这里的test.selectList是我们的UserMapper.xml中所设置的名称空间.id)

        List<User> users = sqlSession.selectList("test.selectAll");

        System.out.println(users);

        //4. 释放资源

        sqlSession.close();

    }

}
至此,我们已经了解了MyBatis的整体创建流程
在下面我们会以上述入门为标准,进行各种流程上的简化开发
解决SQL语句警告问题(IDEA正式版)
我们在Mapper.xml中书写sql语句时,可能会出现sql表名显示红色(报错)现象
产生原因:IDEA和数据库没有建立连接,不识别表信息
解决方法:在IDEA中配置MYSQL数据库连接
解决优点:代码不再报错,显示所有SQL语句以及表列的补全信息
解决方法:
- 在Database中打开加号,逐步打开Data Source,MYSQL
- 打开页面后,填写USer,Password即可
Mapper代理开发
我们在入门代码中创建了Mapper.xml,并在其中书写代码
我们在主项目的代码中包含有以下这段:
List<User> users = sqlSession.selectList("test.selectAll");
但test.selectAll属于硬编码阶段,且书写方式麻烦
因而产生了Mapper代理开发,同样我们采用案例的形式逐步书写:
- 定义与SQL映射文件同名的Mapper接口,并将该接口与SQL映射文件放置在同一目录级别下(IDEA2022版已解决这个问题)
- 设置SQL映射文件的namespace属性为Mapper接口全限定名(接口与xml文件产生连接)
<?xml version="1.0" encoding="UTF-8" ?>

<!DOCTYPE mapper

        PUBLIC "-//mybatis.org//DTD Mapper 3.0//EN"

        "http://mybatis.org/dtd/mybatis-3-mapper.dtd">

<!--

    namespace:名称空间

-->

<mapper namespace="com.itheima.mapper.UserMapper">

    <!--statement-->

    <select id="selectAll" resultType="user">

        select *

        from tb_user;

    </select>

</mapper>
- 在Mapper接口中定义方法,方法名就是SQL映射文件中sql语句的id,并保持参数类型和返回值类型一致
package com.itheima.mapper;

import com.itheima.pojo.User;

import org.apache.ibatis.annotations.Param;

import org.apache.ibatis.annotations.Select;

import java.util.Collection;

import java.util.List;

import java.util.Map;

import java.util.Set;

public interface UserMapper {

    List<User> selectAll();

}
- 主代码展示:
package com.itheima;

import com.itheima.mapper.UserMapper;

import com.itheima.pojo.User;

import org.apache.ibatis.io.Resources;

import org.apache.ibatis.session.SqlSession;

import org.apache.ibatis.session.SqlSessionFactory;

import org.apache.ibatis.session.SqlSessionFactoryBuilder;

import java.io.IOException;

import java.io.InputStream;

import java.util.List;

/**

 * Mybatis 代理开发

 */

public class MyBatisDemo2 {

    public static void main(String[] args) throws IOException {

        //1. 加载mybatis的核心配置文件,获取 SqlSessionFactory

        String resource = "mybatis-config.xml";

        InputStream inputStream = Resources.getResourceAsStream(resource);

        SqlSessionFactory sqlSessionFactory = new SqlSessionFactoryBuilder().build(inputStream);

        //2. 获取SqlSession对象,用它来执行sql

        SqlSession sqlSession = sqlSessionFactory.openSession();

        //3.1 获取UserMapper接口的代理对象

        //(采用sqlSession方法获得接口类产生对象,调用对象的方法[这里方法来自xml],并根据Mapper接口设置的返回参数)

        UserMapper userMapper = sqlSession.getMapper(UserMapper.class);

        List<User> users = userMapper.selectAll();

        System.out.println(users);

        //4. 释放资源

        sqlSession.close();

    }

}
Mapper补充内容
在mybatis-config.xml文件中我们设置过mapper内容:
    <mappers>

        <!--加载sql映射文件-->

       <mapper resource="com/itheima/mapper/UserMapper.xml">

    </mappers>
但随着sql映射文件增多,单个书写过于麻烦,所以开发出了package方法
    <mappers>

        <!--加载sql映射文件-->

       <!-- <mapper resource="com/itheima/mapper/UserMapper.xml"/>-->

        <!--Mapper代理方式:通过包扫描的方法,将包中所对应的mapper.xml映射过来-->

        <package name="com.itheima.mapper"/>

    </mappers>
MyBatis核心配置文件
Mybatis核心配置文件就是我们之前写入的mybatis-config.xml文件
现在我们对MyBatis的相关内容进行分析:
- 标签:
- 类型别名可为 Java 类型设置一个缩写名字。
- 它仅用于 XML 配置,意在降低冗余的全限定类名书写。
- 我们可以在标签内书写package标签,并设置文件夹名称,则后续内容中不需要添加该文件夹名称
- 标签:
- MyBatis 可以配置成适应多种环境,这种机制有助于将 SQL 映射应用于多种数据库之中
- 通过default设置信息来更换数据库,default的值为下述environment的id值
- Mapper,dataSource以及内部信息均已介绍,这里不再介绍
下面给出代码展示:
<?xml version="1.0" encoding="UTF-8" ?>

<!DOCTYPE configuration

        PUBLIC "-//mybatis.org//DTD Config 3.0//EN"

        "http://mybatis.org/dtd/mybatis-3-config.dtd">

<configuration>

    <typeAliases>

        <package name="com.itheima.pojo"/>

    </typeAliases>

    <!--

    environments:配置数据库连接环境信息。可以配置多个environment,通过default属性切换不同的environment

    -->

    <environments default="development">

        <environment id="development">

            <transactionManager type="JDBC"/>

            <dataSource type="POOLED">

                <!--数据库连接信息-->

                <property name="driver" value="com.mysql.jdbc.Driver"/>

                <property name="url" value="jdbc:mysql:///mybatis?useSSL=false"/>

                <property name="username" value="root"/>

                <property name="password" value="123456"/>

            </dataSource>

        </environment>

        <environment id="test">

            <transactionManager type="JDBC"/>

            <dataSource type="POOLED">

                <!--数据库连接信息-->

                <property name="driver" value="com.mysql.jdbc.Driver"/>

                <property name="url" value="jdbc:mysql:///mybatis?useSSL=false"/>

                <property name="username" value="root"/>

                <property name="password" value="1234"/>

            </dataSource>

        </environment>

    </environments>

    <mappers>

        <!--加载sql映射文件-->

       <!-- <mapper resource="com/itheima/mapper/UserMapper.xml"/>-->

        <!--Mapper代理方式-->

        <package name="com.itheima.mapper"/>

    </mappers>

</configuration>
MyBatis进阶内容(增删改查)
在下述内容中,我们会通过一个案例进行MyBatis的增删改查并且补充相应知识点
在开始前,我们同样准备环境:
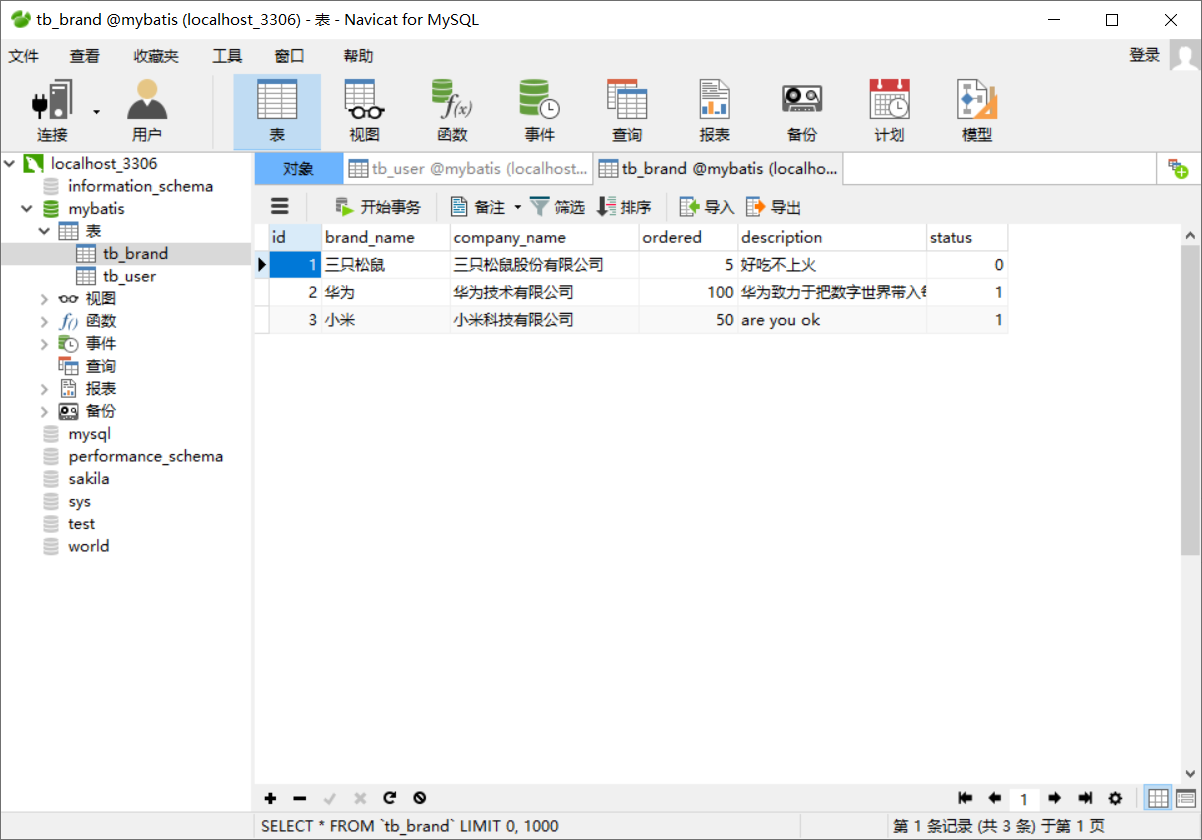
- 数据库表tb_brand
- 实体类Brand
package com.itheima.pojo;

/**

 * 品牌

 *

 * alt + 鼠标左键:整列编辑

 *

 * 在实体类中,基本数据类型建议使用其对应的包装类型

 */

public class Brand {

    // id 主键

    private Integer id;

    // 品牌名称

    private String brandName;

    // 企业名称

    private String companyName;

    // 排序字段

    private Integer ordered;

    // 描述信息

    private String description;

    // 状态:0:禁用  1:启用

    private Integer status;

    public Integer getId() {

        return id;

    }

    public void setId(Integer id) {

        this.id = id;

    }

    public String getBrandName() {

        return brandName;

    }

    public void setBrandName(String brandName) {

        this.brandName = brandName;

    }

    public String getCompanyName() {

        return companyName;

    }

    public void setCompanyName(String companyName) {

        this.companyName = companyName;

    }

    public Integer getOrdered() {

        return ordered;

    }

    public void setOrdered(Integer ordered) {

        this.ordered = ordered;

    }

    public String getDescription() {

        return description;

    }

    public void setDescription(String description) {

        this.description = description;

    }

    public Integer getStatus() {

        return status;

    }

    public void setStatus(Integer status) {

        this.status = status;

    }

    @Override

    public String toString() {

        return "Brand{" +

                "id=" + id +

                ", brandName='" + brandName + '\'' +

                ", companyName='" + companyName + '\'' +

                ", ordered=" + ordered +

                ", description='" + description + '\'' +

                ", status=" + status +

                '}';

    }

}
- 测试用例(在test文件夹下的java文件下创建test即可)

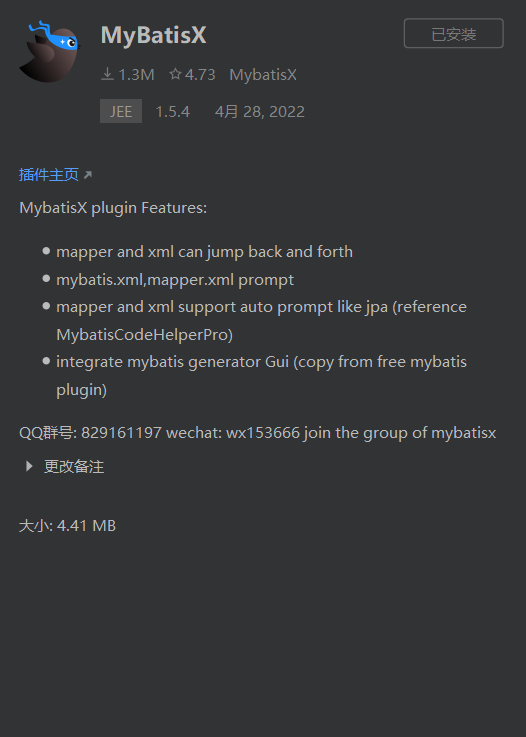
- 安装MyBatisX插件(方便对应Mapper.xml和Mapper接口)
查询数据
我们将会介绍三种数据查询方法:
- 查询所有数据
- 根据ID查询单个数据
- 根据条件查询数据
接下来我们逐一讲解:
查询所有数据
查询所有数据步骤:
- 编写接口方法:Mapper接口(参数:无 返回类型:List)
package com.itheima.mapper;

import com.itheima.pojo.Brand;

import org.apache.ibatis.annotations.Param;

import org.apache.ibatis.annotations.ResultMap;

import org.apache.ibatis.annotations.Select;

import java.util.List;

import java.util.Map;

public interface BrandMapper {

    /**

     * 查询所有

     */

    List<Brand> selectAll();

}
- 编写SQL语句(在xml中编写)
    <select id="selectAll" resultType="brand">

        select *

        from tb_brand;

    </select>
- 执行方式
    @Test

    public void testSelectAll() throws IOException {

        //1. 获取SqlSessionFactory

        String resource = "mybatis-config.xml";

        InputStream inputStream = Resources.getResourceAsStream(resource);

        SqlSessionFactory sqlSessionFactory = new SqlSessionFactoryBuilder().build(inputStream);

        //2. 获取SqlSession对象

        SqlSession sqlSession = sqlSessionFactory.openSession();

        //3. 获取Mapper接口的代理对象

        BrandMapper brandMapper = sqlSession.getMapper(BrandMapper.class);

        //4. 执行方法

        List<Brand> brands = brandMapper.selectAll();

        System.out.println(brands);

        //5. 释放资源

        sqlSession.close();

    }
但是这种方法中,我们会发现brandName和companyName并没有显示
主要原因:
- brandName在MYSQL中定义为brand_name;companyName在MYSQL中定义为company_name
解决方法有两种:
- 给所有名称不同的属性添加别名,使其与MYSQL属性同名
<mapper namespace="com.itheima.mapper.BrandMapper">

	<select id="selectAll" resultMap="brandResultMap">

        select id, brand_name as brandName, company_name as companyName, ordered, description, status

        from tb_brand;

    </select>

</mapper>
- 在xml中添加一段ResultMap属性(推荐!!!)
<mapper namespace="com.itheima.mapper.BrandMapper">

<!--

        数据库表的字段名称  和  实体类的属性名称 不一样,则不能自动封装数据

            * 起别名:对不一样的列名起别名,让别名和实体类的属性名一样

                * 缺点:每次查询都要定义一次别名

                    * sql片段

                        * 缺点:不灵活

            * resultMap:

                1. 定义<resultMap>标签

                2. 在<select>标签中,使用resultMap属性替换 resultType属性

    -->

    <!--

        id:唯一标识

        type:映射的类型,支持别名

    -->

    <resultMap id="brandResultMap" type="brand">

        <!--

            id:完成主键字段的映射

                column:表的列名

                property:实体类的属性名

            result:完成一般字段的映射

                column:表的列名

                property:实体类的属性名

        -->

        <result column="brand_name" property="brandName"/>

        <result column="company_name" property="companyName"/>

    </resultMap>

   <select id="selectAll" resultMap="brandResultMap">

        select *

        from tb_brand;

    </select>

   <select id="selectAll" resultMap="brand">

        select *

        from tb_brand;

    </select>

</mapper>
单个查询
单个查询步骤:
- 编写接口方法:Mapper接口(参数:id 返回类型:Brand)
Brand selectById(int id);
- 编写SQL语句
    <select id="selectById" resultMap="brandResultMap">

        select *

        from tb_brand

        where id = #{id};

    </select>
- 执行方法,测试
    @Test

    public void testSelectById() throws IOException {

        //接收参数

        int id = 1;

        //1. 获取SqlSessionFactory

        String resource = "mybatis-config.xml";

        InputStream inputStream = Resources.getResourceAsStream(resource);

        SqlSessionFactory sqlSessionFactory = new SqlSessionFactoryBuilder().build(inputStream);

        //2. 获取SqlSession对象

        SqlSession sqlSession = sqlSessionFactory.openSession();

        //3. 获取Mapper接口的代理对象

        BrandMapper brandMapper = sqlSession.getMapper(BrandMapper.class);

        //4. 执行方法

        Brand brand = brandMapper.selectById(id);

        System.out.println(brand);

        //5. 释放资源

        sqlSession.close();

    }
知识点讲解:
{}:会将其替换为 ? 放置SQL注入
- ${}:拼接sql,会存在SQL注入问题
- 使用时机:
- 参数传递:#{}
- 表名或列名不固定的情况下:${}
条件查询
这里我们介绍多条件查询:
- 编写接口方法:Mapper接口(参数:所有查询条件 返回结果:List)
    /**

     * 条件查询

     *  * 参数接收

     *      1. 散装参数:如果方法中有多个参数,需要使用@Param("SQL参数占位符名称")

     *      2. 对象参数:对象的属性名称要和参数占位符名称一致

     *      3. map集合参数

     *

     */

    List<Brand> selectByCondition(@Param("status") int status, @Param("companyName") String companyName, @Param("brandName") String brandName);

    List<Brand> selectByCondition(Brand brand);

    List<Brand> selectByCondition(Map map);
- 编写SQL语句:
    <!--

        条件查询:

		这里#{}中的元素和Param所书写的属性相同;

		如果是Brand,则与Brand的属性相同;

		如果是Map,则与Map集合的键相同即可

    -->

    <select id="selectByCondition" resultMap="brandResultMap">

         select *

         from tb_brand

         where status = #{status}

           and company_name like #{companyName}

           and brand_name like #{brandName}

     </select>
- 执行方法,测试:
    @Test

    public void testSelectByCondition() throws IOException {

        //接收参数

        int status = 1;

        String companyName = "华为";

        String brandName = "华为";

        // 处理参数

        companyName = "%" + companyName + "%";

        brandName = "%" + brandName + "%";

        //封装对象

       /* Brand brand = new Brand();

        brand.setStatus(status);

        brand.setCompanyName(companyName);

        brand.setBrandName(brandName);*/

        Map map = new HashMap();

        // map.put("status" , status);

        map.put("companyName", companyName);

        // map.put("brandName" , brandName);

        //1. 获取SqlSessionFactory

        String resource = "mybatis-config.xml";

        InputStream inputStream = Resources.getResourceAsStream(resource);

        SqlSessionFactory sqlSessionFactory = new SqlSessionFactoryBuilder().build(inputStream);

        //2. 获取SqlSession对象

        SqlSession sqlSession = sqlSessionFactory.openSession();

        //3. 获取Mapper接口的代理对象

        BrandMapper brandMapper = sqlSession.getMapper(BrandMapper.class);

        //4. 执行方法

        //List<Brand> brands = brandMapper.selectByCondition(status, companyName, brandName);

//        List<Brand> brands = brandMapper.selectByCondition(brand);

        List<Brand> brands = brandMapper.selectByCondition(map);

        System.out.println(brands);

        //5. 释放资源

        sqlSession.close();

    }
动态查询
动态查询概念:
- 在所有的查询条件中,用户可能并不会全部查询,可能只有挑选条件查询
- 这时如果以之前的代码,会导致导入值为null而导致查询错误
动态SQL语句:
- if语句
<!--

if标签:整体框架

test:判断条件

  <if test="title != null">

		sql语句内容

  </if>

-->

<select id="findActiveBlogWithTitleLike"

     resultType="Blog">

  SELECT * FROM BLOG

  WHERE state = ‘ACTIVE’

  <if test="title != null">

    AND title like #{title}

  </if>

</select>
- where语句
    <!--

        动态条件查询

            * if: 条件判断

                * test:逻辑表达式

            * 问题:

                * 恒等式

                * <where> 替换 where 关键字

    -->

<!--这里的where会根据实际情况,自行添加and或者删除and-->

	<select id="selectByCondition" resultMap="brandResultMap">

        select *

        from tb_brand

        /* where 1 = 1*/

        <where>

            <if test="status != null">

                and status = #{status}

            </if>

            <if test="companyName != null and companyName != '' ">

                and company_name like #{companyName}

            </if>

            <if test="brandName != null and brandName != '' ">

                and brand_name like #{brandName}

            </if>

        </where>
- choose语句
<!--

<choose> <!--相当于switch-->

<when test="status != null"> <!--相当于case-->

-->

<select id="findActiveBlogLike"

     resultType="Blog">

  SELECT * FROM BLOG WHERE state = ‘ACTIVE’

  <choose>

    <when test="title != null">

      AND title like #{title}

    </when>

    <when test="author != null and author.name != null">

      AND author_name like #{author.name}

    </when>

    <otherwise>

      AND featured = 1

    </otherwise>

  </choose>

</select>
我们根据两个案例来解释上述语法:
- 多条件查询语句:
- 编写接口方法:Mapper接口(参数:Brand 返回类型:List)
List<Brand> selectByCondition(Brand brand);
- 编写SQL语句:
    <!--

        动态条件查询

            * if: 条件判断

                * test:逻辑表达式

            * 问题:

                * 恒等式

                * <where> 替换 where 关键字

    -->

    <select id="selectByCondition" resultMap="brandResultMap">

        select *

        from tb_brand

        /* where 1 = 1*/

        <!--这里使用where,防止无条件或者and位置错误-->

        <where>

            <if test="status != null">

                and status = #{status}

            </if>

            <if test="companyName != null and companyName != '' ">

                and company_name like #{companyName}

            </if>

            <if test="brandName != null and brandName != '' ">

                and brand_name like #{brandName}

            </if>

        </where>

    </select>
- 执行方法,测试:
    @Test

    public void testSelectByCondition() throws IOException {

        //接收参数

        int status = 1;

        String companyName = "华为";

        String brandName = "华为";

        // 处理参数

        companyName = "%" + companyName + "%";

        brandName = "%" + brandName + "%";

        //封装对象

        Brand brand = new Brand();

        brand.setStatus(status);

        brand.setCompanyName(companyName);

        brand.setBrandName(brandName);

        //1. 获取SqlSessionFactory

        String resource = "mybatis-config.xml";

        InputStream inputStream = Resources.getResourceAsStream(resource);

        SqlSessionFactory sqlSessionFactory = new SqlSessionFactoryBuilder().build(inputStream);

        //2. 获取SqlSession对象

        SqlSession sqlSession = sqlSessionFactory.openSession();

        //3. 获取Mapper接口的代理对象

        BrandMapper brandMapper = sqlSession.getMapper(BrandMapper.class);

        //4. 执行方法

		List<Brand> brands = brandMapper.selectByCondition(brand);

        System.out.println(brands);

        //5. 释放资源

        sqlSession.close();

    }
- 单条件动态查询:
- 编写接口方法:Mapper接口(参数:Brand 返回类型:List)
List<Brand> selectByConditionSingle(Brand brand);
- 编写SQL语句:
    <select id="selectByConditionSingle" resultMap="brandResultMap">

        select *

        from tb_brand

        <!--这里使用where防止无条件出现导致错误-->

        <where>

            <choose><!--相当于switch-->

                <when test="status != null"><!--相当于case-->

                    status = #{status}

                </when>

                <when test="companyName != null and companyName != '' "><!--相当于case-->

                    company_name like #{companyName}

                </when>

                <when test="brandName != null and brandName != ''"><!--相当于case-->

                    brand_name like #{brandName}

                </when>

            </choose>

        </where>

    </select>
- 执行方法,测试:
    @Test

    public void testSelectByConditionSingle() throws IOException {

        //接收参数

        int status = 1;

        String companyName = "华为";

        String brandName = "华为";

        // 处理参数

        companyName = "%" + companyName + "%";

        brandName = "%" + brandName + "%";

        //封装对象

        Brand brand = new Brand();

        //brand.setStatus(status);

        brand.setCompanyName(companyName);

        //brand.setBrandName(brandName);

        //1. 获取SqlSessionFactory

        String resource = "mybatis-config.xml";

        InputStream inputStream = Resources.getResourceAsStream(resource);

        SqlSessionFactory sqlSessionFactory = new SqlSessionFactoryBuilder().build(inputStream);

        //2. 获取SqlSession对象

        SqlSession sqlSession = sqlSessionFactory.openSession();

        //3. 获取Mapper接口的代理对象

        BrandMapper brandMapper = sqlSession.getMapper(BrandMapper.class);

        //4. 执行方法

        List<Brand> brands = brandMapper.selectByConditionSingle(brand);

        System.out.println(brands);

        //5. 释放资源

        sqlSession.close();

    }
添加数据
在这小节我们会讲到添加功能并附带返回主键:
添加功能
添加功能步骤:
- 编写接口方法:Mapper接口(参数:Brand 返回类型:void )
void add(Brand brand);
- 编写MYSQL语句:
<!--

useGeneratedKeys:对于支持自动生成记录主键的数据库,如:MySQL,SQL Server,此时设置useGeneratedKeys参数值为true,在执行添加记录之后可以获取到数据库自动生成的主键ID。

keyProperty:后面跟数据库中自动增长的列名,这时该属性值就会反馈在Java代码中

-->

<insert id="add" useGeneratedKeys="true" keyProperty="id">

        insert into tb_brand (brand_name, company_name, ordered, description, status)

        values (#{brandName}, #{companyName}, #{ordered}, #{description}, #{status});

    </insert>
- 代码调试,测试:
    @Test

    public void testAdd() throws IOException {

        //接收参数

        int status = 1;

        String companyName = "波导手机";

        String brandName = "波导";

        String description = "手机中的战斗机";

        int ordered = 100;

        //封装对象

        Brand brand = new Brand();

        brand.setStatus(status);

        brand.setCompanyName(companyName);

        brand.setBrandName(brandName);

        brand.setDescription(description);

        brand.setOrdered(ordered);

        //1. 获取SqlSessionFactory

        String resource = "mybatis-config.xml";

        InputStream inputStream = Resources.getResourceAsStream(resource);

        SqlSessionFactory sqlSessionFactory = new SqlSessionFactoryBuilder().build(inputStream);

        //2. 获取SqlSession对象

        SqlSession sqlSession = sqlSessionFactory.openSession();

        // 这里openSession的参数未设置时为手动提交信息,设置true后为自动提交事务

        //SqlSession sqlSession = sqlSessionFactory.openSession(true);

        //3. 获取Mapper接口的代理对象

        BrandMapper brandMapper = sqlSession.getMapper(BrandMapper.class);

        //4. 执行方法(这里就可以对brand的id进行提取,并输出)

        brandMapper.add(brand);

        Integer id = brand.getId();

        System.out.println(id);

        // 执行add后并未立刻执行,我们需要提交事务才能反馈到数据库中

        sqlSession.commit();

        //5. 释放资源

        sqlSession.close();

    }
修改数据
该小节中我们会介绍两种修改方法:
- 全字段修改
- 单字段修改
我们会在下述内容中一一讲解:
全字段修改
- 编写接口方法:Mapper接口(参数:所有数据 返回类型:int(修改行)或void)
int update(Brand brand);
- 编写MYSQL语句:
    <update id="update">

        update tb_brand

        set	brand_name = #{brandName},

            company_name = #{companyName},

            ordered = #{ordered},

            description = #{description},

            status = #{status}

        where id = #{id};

    </update>
- 执行方法,测试:
    @Test

    public void testUpdate() throws IOException {

        //接收参数

        int status = 0;

        String companyName = "波导手机";

        String brandName = "波导";

        String description = "波导手机,手机中的战斗机";

        int ordered = 200;

        int id = 6;

        //封装对象

        Brand brand = new Brand();

        brand.setStatus(status);

        brand.setCompanyName(companyName);

        brand.setBrandName(brandName);

        brand.setDescription(description);

        brand.setOrdered(ordered);

        brand.setId(id);

        //1. 获取SqlSessionFactory

        String resource = "mybatis-config.xml";

        InputStream inputStream = Resources.getResourceAsStream(resource);

        SqlSessionFactory sqlSessionFactory = new SqlSessionFactoryBuilder().build(inputStream);

        //2. 获取SqlSession对象

        SqlSession sqlSession = sqlSessionFactory.openSession();

        //SqlSession sqlSession = sqlSessionFactory.openSession(true);

        //3. 获取Mapper接口的代理对象

        BrandMapper brandMapper = sqlSession.getMapper(BrandMapper.class);

        //4. 执行方法

        int count = brandMapper.update(brand);

        System.out.println(count);

        //提交事务

        sqlSession.commit();

        //5. 释放资源

        sqlSession.close();

    }
单字段修改
- 编写接口方法:Mapper接口(参数:所有数据 返回类型:int(修改行)或void)
int update(Brand brand);
- 编写MYSQL语句:
    <update id="update">

        update tb_brand

        <set>

            <if test="brandName != null and brandName != ''">

                brand_name = #{brandName},

            </if>

            <if test="companyName != null and companyName != ''">

                company_name = #{companyName},

            </if>

            <if test="ordered != null">

                ordered = #{ordered},

            </if>

            <if test="description != null and description != ''">

                description = #{description},

            </if>

            <if test="status != null">

                status = #{status}

            </if>

        </set>

        where id = #{id};

    </update>
- 执行方法,测试:
    @Test

    public void testUpdate() throws IOException {

        //接收参数

        int status = 0;

        String companyName = "波导手机";

        String brandName = "波导";

        String description = "波导手机,手机中的战斗机";

        int ordered = 200;

        int id = 6;

        //封装对象

        Brand brand = new Brand();

        brand.setStatus(status);

//        brand.setCompanyName(companyName);

//        brand.setBrandName(brandName);

//        brand.setDescription(description);

//        brand.setOrdered(ordered);

        brand.setId(id);

        //1. 获取SqlSessionFactory

        String resource = "mybatis-config.xml";

        InputStream inputStream = Resources.getResourceAsStream(resource);

        SqlSessionFactory sqlSessionFactory = new SqlSessionFactoryBuilder().build(inputStream);

        //2. 获取SqlSession对象

        SqlSession sqlSession = sqlSessionFactory.openSession();

        //SqlSession sqlSession = sqlSessionFactory.openSession(true);

        //3. 获取Mapper接口的代理对象

        BrandMapper brandMapper = sqlSession.getMapper(BrandMapper.class);

        //4. 执行方法

        int count = brandMapper.update(brand);

        System.out.println(count);

        //提交事务

        sqlSession.commit();

        //5. 释放资源

        sqlSession.close();

    }
删除功能
这节介绍删除功能的两种形式:
- 单个删除
- 多个删除
我们将会在下面一一讲解:
单个删除
- 编写接口方法:Mapper接口(参数:id 返回类型:void)
void deleteById(int id);
- 编写MYSQL:
    <delete id="deleteById">

        delete from tb_brand where id = #{id};

    </delete>
- 代码执行,测试:
    @Test

    public void testDeleteById() throws IOException {

        //接收参数

        int id = 6;

        //1. 获取SqlSessionFactory

        String resource = "mybatis-config.xml";

        InputStream inputStream = Resources.getResourceAsStream(resource);

        SqlSessionFactory sqlSessionFactory = new SqlSessionFactoryBuilder().build(inputStream);

        //2. 获取SqlSession对象

        SqlSession sqlSession = sqlSessionFactory.openSession();

        //SqlSession sqlSession = sqlSessionFactory.openSession(true);

        //3. 获取Mapper接口的代理对象

        BrandMapper brandMapper = sqlSession.getMapper(BrandMapper.class);

        //4. 执行方法

        brandMapper.deleteById(id);

        //提交事务

        sqlSession.commit();

        //5. 释放资源

        sqlSession.close();

    }
多个删除
- 编写接口方法:Mapper接口(参数:int[] id 返回类型:void)
void deleteByIds(int[] ids);
- 编写MYSQL代码:
    <!--

        mybatis会将数组参数,封装为一个Map集合。

            * 默认:array = 数组

            * 使用@Param注解改变map集合的默认key的名称

    -->

    <!--

    foreach:类似于for强化语句

    collection:集合/数组

    item:数组中的单个值

    separator:分割符

    open:开始处添加符号

    close:结尾处添加符合

    -->

    <delete id="deleteByIds">

        delete from tb_brand where id

        in

        <!--这部分整合出来类似于:(id1,id2,id3....)-->

            <foreach collection="array" item="id" separator="," open="(" close=")">

                #{id}

            </foreach>

             ;

    </delete>
- 代码运行,测试:
    @Test

    public void testDeleteByIds() throws IOException {

        //接收参数

        int[] ids = {5,7,8};

        //1. 获取SqlSessionFactory

        String resource = "mybatis-config.xml";

        InputStream inputStream = Resources.getResourceAsStream(resource);

        SqlSessionFactory sqlSessionFactory = new SqlSessionFactoryBuilder().build(inputStream);

        //2. 获取SqlSession对象

        SqlSession sqlSession = sqlSessionFactory.openSession();

        //SqlSession sqlSession = sqlSessionFactory.openSession(true);

        //3. 获取Mapper接口的代理对象

        BrandMapper brandMapper = sqlSession.getMapper(BrandMapper.class);

        //4. 执行方法

        brandMapper.deleteByIds(ids);

        //提交事务

        sqlSession.commit();

        //5. 释放资源

        sqlSession.close();

    }
参数传递
MyBatis接口方法中可以接收各种各样的参数,MyBatis底层对这些参数有着不同的封装处理方法
我们在下面一一介绍:
多参数传递
在接口多参数传递中会把所有参数转移为Map集合
会转化为两种Map集合:
arg集合,下标从0开始: arg[0]
Param集合,下标从1开始: Param[1]
我们在xml中也可以直接使用arg或param来直接表示(但不推荐,因为不能直观得到信息)
我们所推荐的做法是使用@Param注解:
在参数前加上注解@Param("")
注意:这里使用Param注解实际上是对Param集合的键进行修改,也就是说你的Param集合将不再能够使用
单参数传递
常见的单参数传递分为六种:
POJO类型: 直接使用, 属性名 和 参数占位符 名称一致即可
Map集合: 直接使用,键名 和 参数占位符 名称一致即可
Collection: 封装为Map集合
- map.put("arg0",collection集合);
- map.put("collection",collection集合);
List: 封装为Map集合
- map.put("arg0",List集合);
- map.put("collection",List集合);
- map.put("list",List集合);
Array:封装为Map
- map.put("arg0",数组);
- map.put("array",数组);
其他类型:直接使用
注解开发
我们先来介绍注解开发的格式:
- 注解开发写在Mapper接口的方法中
// 相当于节省了xml的一步,直接在接口中定义方法

@Select("select * from tb_user where id = #{id}")

List<Brand> selectAll();
当然,注解的方法也分为四种:
- @Select
- @Insert
- @Update
- @Delete
注解的优缺点:
- 优点 : 注解完成简单功能,方便快捷
- 缺点 : 注解会导致Java代码繁琐,在接口中书写大量Java和MYSQL代码导致可读性变差
使用注解来映射简单语句会使代码显得更加简洁,但对于稍微复杂一点的语句,Java 注解不仅力不从心,还会让你本就复杂的 SQL 语句更加混乱不堪。 因此,如果你需要做一些很复杂的操作,最好用 XML 来映射语句。
选择何种方式来配置映射,以及认为是否应该要统一映射语句定义的形式,完全取决于你和你的团队。 换句话说,永远不要拘泥于一种方式,你可以很轻松的在基于注解和 XML 的语句映射方式间自由移植和切换。
结束语
好的,关于MyBatis的内容就介绍到这里,希望能为你带来帮助!
附录
该文章属于学习内容,具体参考B站黑马程序员陈老师的JavaWeb课程
这里附上链接:01-MyBatis简介_哔哩哔哩_bilibili
一篇文章带你掌握主流数据库框架——MyBatis的更多相关文章
- 一篇文章带你掌握主流基础框架——Spring
一篇文章带你掌握主流基础框架--Spring 这篇文章中我们将会介绍Spring的框架以及本体内容,包括核心容器,注解开发,AOP以及事务等内容 那么简单说明一下Spring的必要性: Spring技 ...
- 一篇文章带你掌握主流办公框架——SpringBoot
一篇文章带你掌握主流办公框架--SpringBoot 在之前的文章中我们已经学习了SSM的全部内容以及相关整合 SSM是Spring的产品,主要用来简化开发,但我们现在所介绍的这款框架--Spring ...
- 一篇文章带你掌握主流服务层框架——SpringMVC
一篇文章带你掌握主流服务层框架--SpringMVC 在之前的文章中我们已经学习了Spring的基本内容,SpringMVC隶属于Spring的一部分内容 但由于SpringMVC完全针对于服务层使用 ...
- 一篇文章带你了解NoSql数据库——Redis简单入门
一篇文章带你了解NoSql数据库--Redis简单入门 Redis是一个基于内存的key-value结构数据库 我们会利用其内存存储速度快,读写性能高的特点去完成企业中的一些热门数据的储存信息 在本篇 ...
- 一篇文章带你掌握MyBatis简化框架——MyBatisPlus
一篇文章带你掌握MyBatis简化框架--MyBatisPlus 我们在前面的文章中已经学习了目前开发所需的主流框架 类似于我们所学习的SpringBoot框架用于简化Spring开发,我们的国人大大 ...
- 一篇文章带你了解网页框架——Vue简单入门
一篇文章带你了解网页框架--Vue简单入门 这篇文章将会介绍我们前端入门级别的框架--Vue的简单使用 如果你以后想从事后端程序员,又想要稍微了解前端框架知识,那么这篇文章或许可以给你带来帮助 温馨提 ...
- MYSQL(基本篇)——一篇文章带你走进MYSQL的奇妙世界
MYSQL(基本篇)--一篇文章带你走进MYSQL的奇妙世界 MYSQL算是我们程序员必不可少的一份求职工具了 无论在什么岗位,我们都可以看到应聘要求上所书写的"精通MYSQL等数据库及优化 ...
- 一篇文章带你了解服务器操作系统——Linux简单入门
一篇文章带你了解服务器操作系统--Linux简单入门 Linux作为服务器的常用操作系统,身为工作人员自然是要有所了解的 在本篇中我们会简单介绍Linux的特点,安装,相关指令使用以及内部程序的安装等 ...
- MYSQL(进阶篇)——一篇文章带你深入掌握MYSQL
MYSQL(进阶篇)--一篇文章带你深入掌握MYSQL 我们在上篇文章中已经学习了MYSQL的基本语法和概念 在这篇文章中我们将讲解底层结构和一些新的语法帮助你更好的运用MYSQL 温馨提醒:该文章大 ...
随机推荐
- map集合中对应key的value为null处理办法
问题: Map集合中对应key的value为null,但是现在需要将这个value转为Integer类型,这个value如果不是null,那么get到的是long类型或者是Bigdecimal类型 处 ...
- 微服务追踪SQL(支持Isto管控下的gorm查询追踪)
效果图 SQL的追踪正确插入到微服务的调用链之间 详细记录了SQL的执行内容和消耗时间 搜索SQL的类型 多线程(goroutine)下的追踪效果 在 Kubernetes 中部署微服务后,通过 Is ...
- ajax传递参数与controller接收参数映射关系
将ajax的参数传递至后台controller时,data 中的参数名要与controller中的形参保持一致. 前端ajax代码: 1 $.ajax({ 2 url:"/doLogin&q ...
- 有关golang信道的面试笔记
信道是一个goroutine之间很关键的通信媒介. 理解golang的信道很重要,这里记录平时易忘记的.易混淆的点. 1. 基本使用 刚声明的信道,零值为nil,无法直接使用,需配合make函数进行初 ...
- 在docker容器中如何自动生成配置文件(以nginx配置为例)
应用场景类似于多个域名要起多个容器,有些参数有些域名需要,有些域名不需要,或者参数的值不太一样,需要去对应的配置文件修改,不太灵活,如果通过变量的方式直接定义在Dockerfile文件中,需要哪些参数 ...
- 分享一些小tips
谷歌浏览器破解 google拓展商店中hackbar地址 https://chrome.google.com/webstore/detail/djmoeoifnlhjolebkehmpaocfnipk ...
- 常用的函数式接口_Prodicate接口_默认方法or&negate和常用的函数式接口_Predicate接口练习_集合信息筛选
常用的函数式接口_Prodicate接口_默认方法or&negate OR package com.yang.Test.PredicateStudy; import java.util.fun ...
- mysql 经典案例
MySQL多表联合查询是MySQL数据库的一种查询方式,下面就为您介绍MySQL多表联合查询的语法,供您参考学习之用. MySQL多表联合查询语法: SELECT * FROM 插入表 LEFT JO ...
- MySQL 常见索引类型介绍
GreatSQL社区原创内容未经授权不得随意使用,转载请联系小编并注明来源. MySQL 主要索引类型有如下几种: 1.主键索引 2.唯一索引 3.普通索引 4.空间索引 5.全文索引 假设有如下一张 ...
- [MRCTF2020]套娃-1
1.打开之后未发现有用的信息,右键检查源代码信息,发现部分代码信息,结果如下: 2.对代码进行分析:$_SERVER['QUERY_STRING']:指的是查询的字符串,即地址栏?之后的部分,%5f指 ...