android 之 Dialog
Android平台下对话框主要有普通对话框、选项对话框、单选多选对话框、进度对话框、日期对话框、时间对话框等。
在程序中通过开发回调方法onCreateDialog来完成对话框的创建,该方法需要传入代表对话框id参数。如果要显示对话框,则调用showDialog方法传入对话框的id来显示指定对话框。
当对话框第一次被显示时,会调用onCreateDialog方法来创建对话框实例,之后将不再重复创建该实例。每次对话框在被显示之前都会调用onPrepareDialog方法,如不重写该方法,每次显示的对话框都将是最初创建的那个。
关闭对话框可用dismiss方法实现。但如果需要让对话框在关闭之后彻底被清除,要调用removeDialog方法并传入dialog的id来彻底释放对话框。
onDismissListener方法可在关闭对话框时执行一些特定工作。
例子如下:
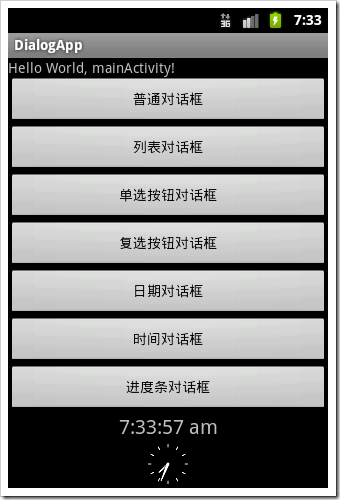
界面上放置四个按钮:
<?xml version="1.0" encoding="utf-8"?>
<LinearLayout xmlns:android="http://schemas.android.com/apk/res/android"
android:orientation="vertical" android:layout_width="fill_parent"
android:layout_height="fill_parent">
<TextView android:id="@+id/tv01" android:layout_width="fill_parent"
android:layout_height="wrap_content" android:text="@string/hello" />
<Button android:id="@+id/bt01" android:layout_width="fill_parent"
android:layout_height="wrap_content" android:text="普通对话框" />
<Button android:id="@+id/bt02" android:layout_width="fill_parent"
android:layout_height="wrap_content" android:text="列表对话框" />
<Button android:id="@+id/bt03" android:layout_width="fill_parent"
android:layout_height="wrap_content" android:text="单选按钮对话框" />
<Button android:id="@+id/bt04" android:layout_width="fill_parent"
android:layout_height="wrap_content" android:text="复选按钮对话框" />
<Button android:id="@+id/bt05" android:layout_width="fill_parent"
android:layout_height="wrap_content" android:text="日期对话框" />
<Button android:id="@+id/bt06" android:layout_width="fill_parent"
android:layout_height="wrap_content" android:text="时间对话框" />
<Button android:id="@+id/bt07" android:layout_width="fill_parent"
android:layout_height="wrap_content" android:text="进度条对话框" />
<DigitalClock android:text="DigitalClock"
android:textSize="20dip" android:gravity="center" android:id="@+id/dclock01"
android:layout_width="fill_parent" android:layout_height="wrap_content" />
<AnalogClock android:text="AnalogClock" android:textSize="20dip"
android:gravity="center" android:id="@+id/aclock01"
android:layout_width="fill_parent" android:layout_height="wrap_content" />
</LinearLayout>
为每个按钮绑定OnClikListener,其中用showDialog(id)方法显示对话框:
bt01.setOnClickListener(new Button.OnClickListener(){
@Override
public void onClick(View v) {
// TODO Auto-generated method stub
showDialog(COMMON_DIALOG);
}});
覆写onCreateDialog方法:
@Override
protected Dialog onCreateDialog(int id) {
// TODO Auto-generated method stub
Dialog dialog = null;
switch (id) {
case COMMON_DIALOG:
Builder b1 = new AlertDialog.Builder(this);
b1.setIcon(R.drawable.img01);
b1.setTitle("普通对话框标题");
b1.setMessage("普通对话框内容");
b1.setPositiveButton("确定", new OnClickListener() {@Override
public void onClick(DialogInterface dialog, int which) {
// TODO Auto-generated method stub
tv.setText("您选择了普通对话框");
}
});
dialog = b1.create();
break;
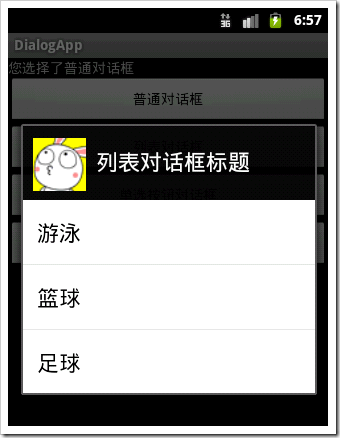
case LIST_DIALOG:
Builder b2 = new AlertDialog.Builder(this);
b2.setIcon(R.drawable.img01);
b2.setTitle("列表对话框标题");
b2.setItems(R.array.msa, new DialogInterface.OnClickListener() {
@Override
public void onClick(DialogInterface dialog, int which) {
// TODO Auto-generated method stub
tv.setText("您选择了:"+getResources().getStringArray(R.array.msa)[which]);
}
});
dialog = b2.create();
break;/*其中R.array.msa在res/values下array.xml中:
<?xml version="1.0" encoding="utf-8"?>
<resources>
<string-array name="msa">
<item>游泳</item>
<item>篮球</item>
<item>足球</item>
</string-array>
</resources>*/
case LIST_DIALOG_SINGLE:
Builder b3 = new AlertDialog.Builder(this);
b3.setIcon(R.drawable.img01);
b3.setTitle("单选按钮对话框标题");
b3.setSingleChoiceItems(R.array.msa, 0,new DialogInterface.OnClickListener() {
@Override
public void onClick(DialogInterface dialog, int which) {
// TODO Auto-generated method stub
tv.setText("您选择了:"+getResources().getStringArray(R.array.msa)[which]);
}
});
b3.setPositiveButton("确定", new DialogInterface.OnClickListener() {
@Override
public void onClick(DialogInterface dialog, int which) {
// TODO Auto-generated method stub
}
});
dialog = b3.create();
break;
case LIST_DIALOG_MULTIPLE:


Builder b4 = new AlertDialog.Builder(this);
b4.setIcon(R.drawable.img01);
b4.setTitle("复选按钮对话框标题");
b4.setMultiChoiceItems(R.array.msa, mulFlags,new DialogInterface.OnMultiChoiceClickListener() {
@Override
public void onClick(DialogInterface dialog, int which, boolean isChecked) {
// TODO Auto-generated method stub
mulFlags[which]=isChecked;
String result="您选择了:";
for(int i=0;i<mulFlags.length;i++){
if(mulFlags[i]){
result+=items[i]+"、";
}
}
tv.setText(result.substring(0, result.length()-1));
}
});
b4.setPositiveButton("确定", new DialogInterface.OnClickListener() {
@Override
public void onClick(DialogInterface dialog, int which) {
// TODO Auto-generated method stub
}
});
dialog = b4.create();
break;
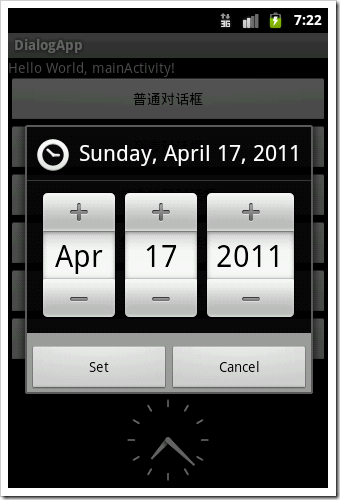
case DATE_DIALOG:
c=Calendar.getInstance();
dialog=new DatePickerDialog(this, new DatePickerDialog.OnDateSetListener() {
@Override
public void onDateSet(DatePicker view, int year, int monthOfYear,
int dayOfMonth) {
// TODO Auto-generated method stub
tv.setText("您选择了"+year+"年"+monthOfYear+"月"+dayOfMonth+"日");
}
}, c.get(Calendar.YEAR), c.get(Calendar.MONTH), c.get(Calendar.DAY_OF_MONTH));
case TIME_DIALOG:
c=Calendar.getInstance();
dialog=new TimePickerDialog(this, new TimePickerDialog.OnTimeSetListener() {@Override
public void onTimeSet(TimePicker view, int hourOfDay, int minute) {
// TODO Auto-generated method stub
tv.setText("您选择了"+hourOfDay+"时"+minute+"分");
}
}, c.get(Calendar.HOUR_OF_DAY), c.get(Calendar.MINUTE),false);
case PROGRESS_DIALOG:
pd = new ProgressDialog(this);
pd.setMax(100);
pd.setProgressStyle(ProgressDialog.STYLE_HORIZONTAL);
pd.setTitle("安装进度");
pd.setCancelable(false);
dialog=pd;
break;
default:
break;
}
return dialog;
}


显示进度进度条需要时刻更新进度条进度,因此需要覆写onPrepareDialpg方法:
@Override
protected void onPrepareDialog(int id, Dialog dialog) {
// TODO Auto-generated method stub
super.onPrepareDialog(id, dialog);
switch (id) {
case PROGRESS_DIALOG:
pd.incrementProgressBy(-pd.getProgress());
new Thread() {//该线程负责进度对话框的进度,并发送消息至主Activity的handler对象进行更新。
public void run() {
while (true) {
myHandler.sendEmptyMessage(INCREASE);
if (pd.getProgress() >= 100) {
break;
}
try {
Thread.sleep(40);
} catch (Exception e) {
e.printStackTrace();
}
}
}
}.start();
}
}
主函数中myhandler:
myHandler = new Handler() {
@Override
public void handleMessage(Message msg) {
// TODO Auto-generated method stubswitch (msg.what) {
case INCREASE:
pd.incrementProgressBy(1);
if (pd.getProgress() >= 100) {
pd.dismiss();
}
break;
}
super.handleMessage(msg);
}};
android 之 Dialog的更多相关文章
- Android PopupWindow Dialog 关于 is your activity running 崩溃详解
Android PopupWindow Dialog 关于 is your activity running 崩溃详解 [TOC] 起因 对于 PopupWindow Dialog 需要 Activi ...
- Android 自定义Dialog类,并在Activity中实现按钮监听。
实际开发中,经常会用到Dialog,比如退出时候会弹出是否退出,或者还有一些编辑框也会用Dialog实现,效果图如下: 开发中遇到的问题无非在于如果在Activity中监听这个Dialog中实现的 ...
- Android 对话框(Dialog)大全 建立你自己的对话框
Android 对话框(Dialog)大全 建立你自己的对话框 原文地址: http://www.cnblogs.com/salam/archive/2010/11/15/1877512.html A ...
- Android自定义Dialog
Android开发过程中,常常会遇到一些需求场景——在界面上弹出一个弹框,对用户进行提醒并让用户进行某些选择性的操作, 如退出登录时的弹窗,让用户选择“退出”还是“取消”等操作. Android系统提 ...
- Android中Dialog
在Android中,Dialog是一个非常重要的UI, 它可以方便的给用户提示,用最简洁的方式向用户展示信息, 以下的图片是Dialog的一个整体架构,通过它,可以总体对Dialog有一个很清晰的认识 ...
- android之dialog
先编写activity_main.xml文件 代码如下: <LinearLayout xmlns:android="http://schemas.android.com/apk/res ...
- Android之Dialog详解
Android中的对话框形式大致可分为五种:分别是一般对话框形式,列表对话框形式,单选按钮对话框,多选按钮对话框,自定义对话框. 在实际开发中,用系统的对话框会很少,因为太丑了,美工不愿意,多是使用自 ...
- Android 封装Dialog
package com.example.myandroid01; import android.support.v7.app.ActionBarActivity; import android.os. ...
- Android中Dialog对话框
布局文件xml: <LinearLayout xmlns:android="http://schemas.android.com/apk/res/android" xmlns ...
- Android中Dialog的使用
上一篇博文讲到对话框popWindow的使用,这篇博文主要解说Dialog的使用. 1.什么是Dialog? Dialog就是对话框的一种方式! 在Android开发中.我们常常会须要在Android ...
随机推荐
- js filter用法比较
讲解一个很实用的JS小语法 filter 就是从数组中找到适合条件的元素(比如说大于某一个元素的值) var arr=[1,23,5,78,34,55,13]; 如何才能找到大于23的所有元素呢, 1 ...
- Windows7获取、更换桌面背景,C#
使用的API原型是 BOOL SystemParametersinfo(UINT uiAction,UINT uiParam,PVOID pvParam,UINT fWinlni); 在C#中定义如下 ...
- Java GUI 事件监听
现在使用的仍是AWT的事件模型.涉及到3类对象: Event Source:事件源,即事件发生所在的组件 Event:事件,封装了此次事件的相关信息 Event Listener:事件监听器,监听事件 ...
- CentOS7下Oracle11gR2监听启动错误解决
oracle监听程序启动失败,错误如下: [oracle@localhost ~]$ lsnrctl start LSNRCTL - Production on -APR- :: Copyright ...
- Azure Linux 云主机使用Root超级用户登录
Azure的Linux虚拟机是可以灵活使用root超级用户的管理员权限的: 1:使用sudo passwd root指令设置超级用户root密码: 使用创建Linux时设置的用户名和密码登陆,使用su ...
- Android学习总结(十八) ———— SQLite数据库使用
一.基本概念 数据库最经典的四个操作 添加.删除.修改.查找,在处理大量数据的时候使用数据库可以帮我们迅速定位当前须要处理的数据,举个例子 好比现在要实现一个搜索功能 用数据库的话只须要其中一个搜索条 ...
- vue.js与react.js相比较的优势
vue.js的简介 vue.js是一个javascript mvvm库,它是以数据驱动和组件化的思想构建的.我们平时多用js去操作dom,vue.js则是使用了数据绑定驱动来操作dom的,也就是说创建 ...
- codevs 1606 台阶
时间限制: 1 s 空间限制: 128000 KB 题目等级 : 黄金 Gold 题目描述 Description 话说某牛家门外有一台阶,这台阶可能会很高(总层数<=1000000). 这 ...
- Codeforces Round #318 (Div. 2) D Bear and Blocks (数学)
不难发现在一次操作以后,hi=min(hi-1,hi-1,hi+1),迭代这个式子得到k次操作以后hi=min(hi-j-(k-j),hi-k,hi+j-(k-j)),j = 1,2,3... 当k ...
- WPF知识点全攻略07- 数据绑定(Binding)
数据绑定是WPF不得不提,不得不会系列之一 数据绑定简言之,就是把数据源的数据绑定到目标对象的属性上.目标对象可以是承自DependencyProperty的任何可访问的属性或控件,目标属性必须为依赖 ...