Android布局之相对布局——RelativeLayout
此博文主要是相对布局xml属性的解析及实例。
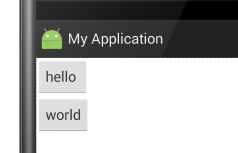
android:layout_above:此控件底部的边缘位于设定ID控件的上方
    <Button

        android:id="@+id/btn1"

        android:layout_width="wrap_content"

        android:layout_height="wrap_content"

        android:text="hello "

        android:layout_above="@+id/btn2" />    //<<<<------

    <Button

        android:id="@+id/btn2"

        android:layout_width="wrap_content"

        android:layout_height="wrap_content"

        android:text="world"

        android:layout_centerVertical="true"

        android:layout_alignParentLeft="true"

        android:layout_alignParentStart="true" />
显示结果:

android:layout_below:此控件顶部的边缘位于设定ID控件的下方
    <Button

        android:id="@+id/btn1"

        android:layout_width="wrap_content"

        android:layout_height="wrap_content"

        android:text="hello " />

    <Button

        android:id="@+id/btn2"

        android:layout_width="wrap_content"

        android:layout_height="wrap_content"

        android:text="world"

        android:layout_below="@+id/btn1"    //<<<<<<-------

        android:layout_alignParentLeft="true"

        android:layout_alignParentStart="true" />
显示结果:
android:layout_alignBaseline:将此控件内容的基线与给定ID控件内容的基线对齐。
    <Button

        android:id="@+id/btn1"

        android:layout_width="wrap_content"

        android:layout_height="wrap_content"

        android:text="hello "

        />

    <Button

        android:id="@+id/btn2"

        android:layout_width="wrap_content"

        android:layout_height="wrap_content"

        android:text="world"

        android:layout_alignBaseline="@+id/btn1"  //<<<<<------

        android:textSize="56sp"

        android:layout_toRightOf="@+id/btn1"
此属性没加时显示效果:
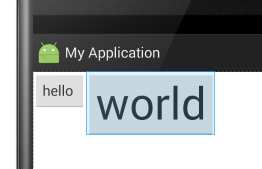
此属性加了之后的显示效果(此示例会超出布局,具体情况请自己多加练习):

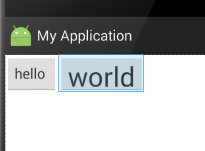
android:layout_alignBottom:将此控件的底部边缘与给定ID的控件底部边缘对齐。
    <Button

        android:id="@+id/btn1"

        android:layout_width="wrap_content"

        android:layout_height="wrap_content"

        android:text="hello "

        />

    <Button

        android:id="@+id/btn2"

        android:layout_width="wrap_content"

        android:layout_height="wrap_content"

        android:text="world"

        android:textSize="34sp"
     android:layout_alignBottom="@+id/btn1"    //<<<<----
     android:layout_toRightOf="@+id/btn1" />
此属性没加时显示效果:
添加后显示的效果:
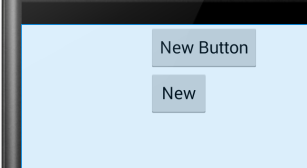
android:layout_alignEnd:将此控件与给定ID控件的末端对齐。以下的例子,很容易懂
    <Button

        android:layout_width="wrap_content"

        android:layout_height="wrap_content"

        android:text="New Button"

        android:id="@+id/button"

        android:layout_alignParentTop="true"

        android:layout_alignParentStart="true" />

    <Button

        android:layout_width="wrap_content"

        android:layout_height="wrap_content"

        android:text="New"

        android:id="@+id/button2"

        android:layout_alignEnd="@+id/button"    //<<<<<--------

        android:layout_below="@+id/button" />
此属性未添加时的显示结果:
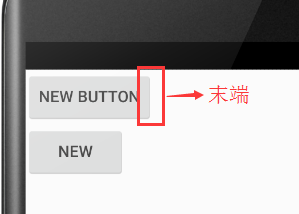
当添加此属性时的显示结果:

android:layout_alignLeft:将此控件的左边缘与给定ID控件的左边缘对齐
    <Button

        android:layout_width="wrap_content"

        android:layout_height="wrap_content"

        android:text="New Button"

        android:id="@+id/button"

        android:layout_alignParentTop="true"

        android:layout_centerHorizontal="true" />

    <Button

        android:layout_width="wrap_content"

        android:layout_height="wrap_content"

        android:text="New"

        android:id="@+id/button2"

        android:layout_alignLeft="@+id/button"    //<<<<<------

        android:layout_below="@+id/button" />
未添加此属性时显示效果:

添加此属性之后显示效果:
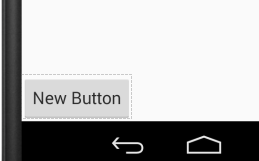
android:layout_alignParentBottom:如果设置为true,那么就将此控件的底部边缘与父容器的底部边缘匹配。
    <Button

        android:layout_width="wrap_content"

        android:layout_height="wrap_content"

        android:text="New Button"

        android:id="@+id/button"

        android:layout_alignParentBottom="true" />    //<<<<<------
未添加此属性显示效果:

添加后:
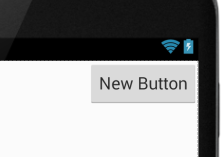
android:layout_alignParentEnd:如果设置为true,那么此控件的末边缘与父容器匹配
    <Button

        android:layout_width="wrap_content"

        android:layout_height="wrap_content"

        android:text="New Button"

        android:id="@+id/button"

        android:layout_alignParentEnd="true" />    //<<<<<<-------
未加此属性之前:
加了之后:
android:layout_alignParentLeft:如果设置为true,那么此控件的左边缘与父容器的左边缘匹配。这个属性可以用到的时候再用,这里可以参考layout_alignParentBottom属性,只是这个在左部而已。
android:layout_alignParentRight:如果设置为true,那么此控件的右边缘与父容器的右边缘匹配。此属性效果和 android:layout_alignParentEnd 属性效果差不多,显示效果参照 android:layout_alignParentEnd 的图
android:layout_alignParentStart:如果设置为true,那么此控件的开始边缘与父容器的开始边缘匹配。这个属性和android:layout_alignParentEnd 属性应该有别的用法,虽然在此例子中与left和right那两个属性显示效果差不多一样......
android:layout_alignParentTop:如果设置为true,那么此控件的顶部边缘与父容器的顶部边缘匹配。与layout_alignParentBottom相对。
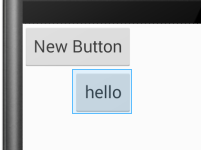
android:layout_alignRight:将此控件的右边缘与给定ID控件的右边缘对齐。
    <Button

        android:layout_width="wrap_content"

        android:layout_height="wrap_content"

        android:text="New Button"

        android:id="@+id/button"

        android:layout_alignParentStart="true" />

    <Button

        android:layout_width="wrap_content"

        android:layout_height="wrap_content"

        android:text="hello"

        android:layout_below="@+id/button"

        android:layout_alignRight="@+id/button"/>    //<<<<<------
未添加此属性时显示的效果:

添加后:
android:layout_alignStart:将此控件的开始边缘与给定ID控件的开始边缘对齐。和android:layout_alignLeft作用差不多感觉。
android:layout_alignTop:将此控件的顶部边缘与给定ID控件的顶部边缘对齐。
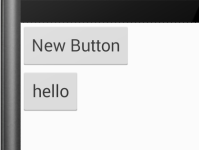
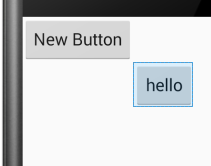
android:layout_toEndof:将此控件的开始边缘与给定ID控件的结束边缘对齐。
    <Button

        android:layout_width="wrap_content"

        android:layout_height="wrap_content"

        android:text="New Button"

        android:id="@+id/button"

        android:layout_alignParentStart="true" />

    <Button

        android:layout_width="wrap_content"

        android:layout_height="wrap_content"

        android:text="hello"

        android:layout_below="@+id/button"

        android:layout_toEndOf="@+id/button" />    //<<<<<<-----
未添加此属性时显示效果:
添加后显示效果:
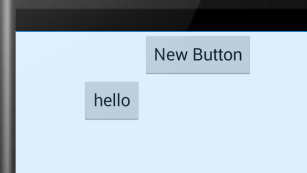
android:layout_toLeftof:将此控件的右边缘与给定ID控件的左边缘对齐。
    <Button

        android:layout_width="wrap_content"

        android:layout_height="wrap_content"

        android:text="New Button"

        android:id="@+id/button"

        android:layout_alignParentTop="true"

        android:layout_centerHorizontal="true" />

    <Button

        android:layout_width="wrap_content"

        android:layout_height="wrap_content"

        android:text="hello"

        android:layout_below="@+id/button"

        android:layout_toLeftOf="@+id/button"/>    //<<<<<<------
未添加此属性时显示结果:

添加后显示结果:
android:layout_toRightof:将此控件的左边缘与给定ID控件的右边缘对齐。
    <Button

        android:layout_width="wrap_content"

        android:layout_height="wrap_content"

        android:text="New Button"

        android:id="@+id/button"

        android:layout_alignParentTop="true"

        android:layout_centerHorizontal="true" />

    <Button

        android:layout_width="wrap_content"

        android:layout_height="wrap_content"

        android:text="hello"

        android:layout_below="@+id/button"

        android:layout_toRightOf="@+id/button" />    //<<<<<<<-------
未添加显示效果:
添加后显示效果:

android:layout_toStartof:将此控件的末边缘与给定ID控件的开始边缘对齐。和android:layout_toLeftof属性的显示效果一样。
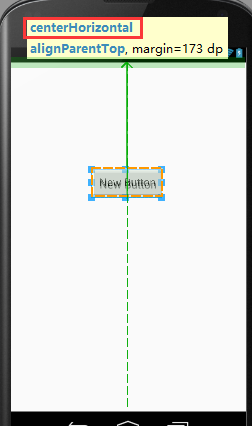
android:layout_centerHorizontal:如果设置为true,此控件将设置为水平居中
在这一条绿线上都是范围
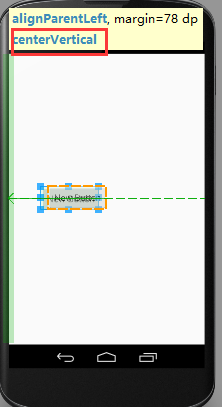
android:layout_centerVertical:如果设置为true,此控件将设置为垂直居中
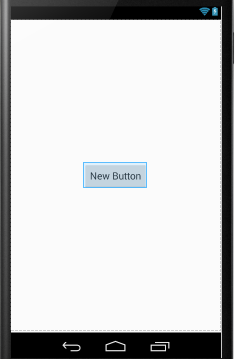
android:layout_centerInParent:如果设置为true,则此控件在他的父容器的中心位置。
android:layout_alignWithParentIfMissing:如果设置为true,当控件的 layout_toLeftOf、layout_toRightOf、等等 属性找不到时,就以父元素作为参考。
------------------------------------------------------------------------
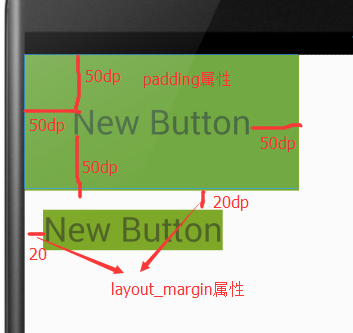
android:padding:指定控件中的内容与到此控件的四边缘的距离
android:layout_margin:设置此控件的四边缘与其他控件的距离
    <TextView

        android:layout_width="wrap_content"

        android:layout_height="wrap_content"

        android:text="New Button"

        android:textSize="36sp"

        android:id="@+id/button"

        android:background="@android:color/holo_green_dark"

        android:layout_alignParentTop="true"

        android:padding="50dp"                //<<<<<<-------

        android:layout_alignParentStart="true" />

    <TextView

        android:layout_width="wrap_content"

        android:layout_height="wrap_content"

        android:text="New Button"

        android:id="@+id/button2"

        android:textSize="36sp"

        android:background="@android:color/holo_green_dark"

        android:layout_margin="20dip"            //<<<<<<--------

        android:layout_below="@+id/button" />
显示效果:
android:paddingBottom:设置控件内容与控件下边缘的距离
android:paddingTop:设置控件内容与控件上边缘的距离
android:paddingLeft:设置控件内容与控件左边缘的距离
android:paddingRight:设置控件内容与控件右边缘的距离
android:layout_marginBottom:设置此控件的下边缘与其他控件的距离
android:layout_marginTop:设置此控件的上边缘与其他控件的距离
android:layout_marginLeft:设置此控件的左边缘与其他控件的距离
android:layout_marginRight:设置此控件的右边缘与其他控件的距离
Android布局之相对布局——RelativeLayout的更多相关文章
- Android UI -- 布局介绍(布局包括FrameLayout, LinearLayout, RelativeLayout, GridLayout)
首先介绍常用布局类 FrameLayout 最简单的布局管理器. 这个布局管理类有几个特性: 添加组件默认在左上角的. 如果添加多个组件会叠加到一起,并且都在左上角.(可以通过一gravity属性改变 ...
- Android 自学之相对布局 RelativeLayout
相对布局(RelativeLayout),相对布局容器内子组件的位置总是相对兄弟组件.父容器来决定的. RelativeLayout的XML属性及相关方法说明 XML属性 相关方法 说明 androi ...
- .Net程序猿玩转Android开发---(7)相对布局RelativeLayout
相对布局RelativeLayout是Android布局中一个比較经常使用的控件,使用该控件能够布局出适合各种屏幕分辨率的布局,RelativeLayout採用相对位置进行 ...
- Android精通:TableLayout布局,GridLayout网格布局,FrameLayout帧布局,AbsoluteLayout绝对布局,RelativeLayout相对布局
在Android中提供了几个常用布局: LinearLayout线性布局 RelativeLayout相对布局 FrameLayout帧布局 AbsoluteLayout绝对布局 TableLayou ...
- [转]浅谈Android五大布局(二)——RelativeLayout和TableLayout
在浅谈Android五大布局(一)中已经描述了LinearLayout(线性布局).FrameLayout(单帧布局)和AbsoulteLayout(绝对布局)三种布局结构,剩下的两种布局Relati ...
- 浅谈Android样式开发之布局优化
引言 今天我们来谈一下Android中布局优化常用的一些手段.官方给出了3种优化方案,分别是</include>.</viewstub>.</merge>标签,下面 ...
- Android开发-之五大布局
在html中大家都知道布局是什么意思了,简单来说就是将页面划分模块,比如html中的div.table等.那么Android中也是这样的.Android五大布局让界面更加美化,开发起来也更加方便.当然 ...
- Android开发自学笔记(Android Studio)—4.1布局组件
一.引言 Android的界面是有布局和组件协同完成的,布局好比是建筑里的框架,而组件则相当于建筑里的砖瓦.组件按照布局的要求依次排列,就组成了用户所看见的界面.在Android4.0之前,我们通常说 ...
- Android成长日记-五大布局
1. 五布局之线性布局LinearLayout 特点:它包含的子控件将以横向或竖向的方式排列 ps:android:gravity=”center|bottom”(gravity允许多级联用) Tip ...
- Android性能优化之布局优化
最新最准确内容建议直接访问原文:Android性能优化之布局优化 本文为Android性能优化的第二篇——布局优化,主要介绍使用抽象布局标签(include, viewstub, merge).去除不 ...
随机推荐
- 阿里云服务器及部署mysql
可通过百度获取内容不再赘述. 远程连接: 远程连接阿里云服务器需在服务器上开放443端口,方法自行百度 win10通过系统自带远程连接服务连接时需安装凭据: http://blog.csdn.ne ...
- 找不到javax.servlet.Filter的类文件
在这里我是用IDEA来开发的,Tomcat用的maven插件 原因:没有相应在jar包 解决:导入相应在jar的依赖,在pom文件中添加 <dependency> <groupId& ...
- 怎么让普通用户达到root用户也可以拥有权限修改文件(CentOS系统)
为什么会提出这个问题呢? 答:因为啊,比如我们在大数据集群搭建的时候,经常会需要配置环境变量,如/etc/profile.那么,问题来了,每次必须得都切换到root用户才能,但是呢,如何可以在普通用户 ...
- 浅谈Java中static作用--转
static表示“全局”或者“静态”的意思,用来修饰成员变量和成员方法,也可以形成静态static代码块,但是Java语言中没有全局变量的概念. 被static修饰的成员变量和成员方法独立于该类的任何 ...
- 481 Magical String 魔力字符串
详见:https://leetcode.com/problems/magical-string/description/ C++: 方法一: class Solution { public: int ...
- 解决spring boot websocket
在网上找的demo写了一个小例子,本地开发测试都很正常,但是部署在tomcat就各种坑 1.MyWebSocket不要用spring 注解标注 2.main方法对应的类继承SpringBootServ ...
- 命令模式和php实现
命令模式: 命令模式(Command Pattern):将一个请求封装为一个对象,从而使我们可用不同的请求对客户进行参数化:对请求排队或者记录请求日志,以及支持可撤销的操作.命令模式是一种对象行为型模 ...
- var、符号运算、条件语句、三元(目)运算、自加和自减
1.var a=“hello world” a 这个变量是字符串了,对于里面的每一个字母来说,他是字节,里面有11个字节,(包括空格),字节总数用length表示 2.符号运算 + 字符串拼接 . ...
- xcode6的项目中虚拟键盘无法弹出
这是因为Xcode6中的模拟器键盘设置跟之前的版本不一样了.之前版本是模拟器的键盘和电脑的键盘都可以使用,但是Xcode6的模拟器键盘只能使用一种,即要么是模拟器键盘,要么是电脑键盘.快捷键切换键盘类 ...
- linux环境iptables配置
Linux iptables常用规则 设置一个自己用的表, 允许ping 允许ssh 允许 web 允许mysql 允许 ftp 允许dns查询 其他的拒绝.脚本如下 # Firewall confi ...