Open Cascade创建自己的MFC文档程序
项目初始设置
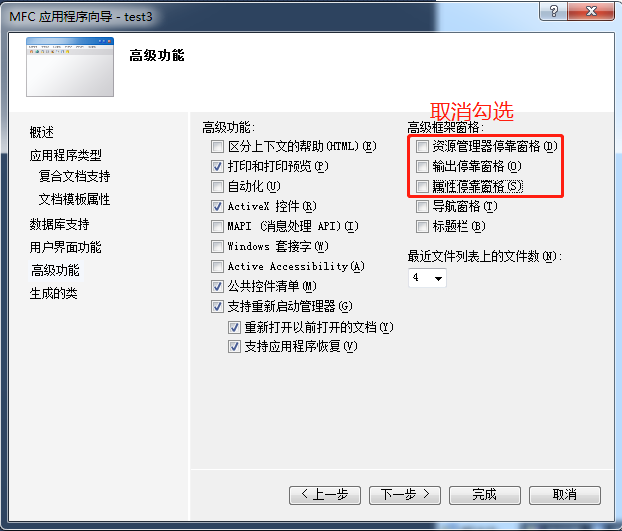
在Visual studio中创建一个单文档MFC项目(本例以MFCTest为名称):

在项目属性的VC++页面设置包含目录、库目录,在链接器的输入中添加OCC库目录下的所有.lib文件名称
添加头文件
在stdafx.h中添加:
#include <BRepTools.hxx>

#include <Standard_DefineHandle.hxx>

#include <DsgPrs_LengthPresentation.hxx>

#include <GCPnts_TangentialDeflection.hxx>

#include <Geom_Axis2Placement.hxx>

#include <Geom_CartesianPoint.hxx>

#include <Geom_Line.hxx>

#include <Geom_Surface.hxx>

#include <BRepAdaptor_Surface.hxx>

#include <GeomAbs_CurveType.hxx>

#include <GeomAdaptor_Curve.hxx>

#include <GeomTools_Curve2dSet.hxx>

#include <gp_Vec.hxx>

#include <Graphic3d_NameOfMaterial.hxx>

#include <MMgt_TShared.hxx>

#include <OSD_Environment.hxx>

#include <Precision.hxx>

#include <Prs3d_IsoAspect.hxx>

#include <Prs3d_LineAspect.hxx>

#include <Prs3d_Projector.hxx>

#include <Prs3d_Text.hxx>

#include <Quantity_Factor.hxx>

#include <Quantity_Length.hxx>

#include <Quantity_NameOfColor.hxx>

#include <Quantity_PhysicalQuantity.hxx>

#include <Quantity_PlaneAngle.hxx>

#include <Quantity_TypeOfColor.hxx>

#include <SelectMgr_EntityOwner.hxx>

#include <SelectMgr_SelectableObject.hxx>

#include <SelectMgr_Selection.hxx>

#include <SelectMgr_SelectionManager.hxx>

#include <SelectMgr_ListOfFilter.hxx>

#include <SelectMgr_Filter.hxx>

#include <StdSelect_EdgeFilter.hxx>

#include <StdSelect_ShapeTypeFilter.hxx>

#include <Standard_Boolean.hxx>

#include <Standard_CString.hxx>

#include <Standard_ErrorHandler.hxx>

#include <Standard_Integer.hxx>

#include <Standard_IStream.hxx>

#include <Standard_Macro.hxx>

#include <Standard_NotImplemented.hxx>

#include <Standard_OStream.hxx>

#include <Standard_Real.hxx>

#include <StdPrs_Curve.hxx>

#include <StdPrs_Point.hxx>

#include <StdPrs_PoleCurve.hxx>

#include <TCollection_AsciiString.hxx>

#include <TColgp_Array1OfPnt2d.hxx>

#include <TColgp_HArray1OfPnt2d.hxx>

#include <TCollection_AsciiString.hxx>

#include <TColStd_HSequenceOfTransient.hxx>

#include <TColStd_MapIteratorOfMapOfTransient.hxx>

#include <TColStd_MapOfTransient.hxx>

#include <TopExp_Explorer.hxx>

#include <TopoDS.hxx>

#include <TopoDS_Compound.hxx>

#include <TopoDS_Shape.hxx>

#include <TopoDS_Solid.hxx>

#include <TopoDS_Vertex.hxx>

#include <TopExp.hxx>

#include <TopTools_HSequenceOfShape.hxx>

#include <UnitsAPI.hxx>

#include <V3d_View.hxx>

#include <V3d_Viewer.hxx>

#include <WNT_Window.hxx>

#include <Prs3d_PointAspect.hxx>

#include <AIS_Point.hxx>

#include <AIS_InteractiveContext.hxx>

#include <AIS_Shape.hxx>

#include <BRep_Tool.hxx>

#include <BRepAlgoAPI_Fuse.hxx>

#include <BRepBuilderAPI_MakeEdge.hxx>

#include <BRepBuilderAPI_MakeFace.hxx>

#include <BRepBuilderAPI_MakeWire.hxx>

#include <BRepBuilderAPI_MakeVertex.hxx>

#include <BRepBuilderAPI_Transform.hxx>

#include <BRepPrimAPI_MakeCone.hxx>

#include <BRepPrimAPI_MakeRevol.hxx>

#include <BRepFilletAPI_MakeFillet.hxx>

#include <BRepBuilderAPI_Copy.hxx>

#include <BRepBuilderAPI_MakePolygon.hxx>

#include <BRepLib.hxx>

#include <BRepOffsetAPI_MakeThickSolid.hxx>

#include <BRepOffsetAPI_ThruSections.hxx>

#include <BRepPrimAPI_MakeCylinder.hxx>

#include <BRepPrimAPI_MakePrism.hxx>

#include <BRepPrimAPI_MakeTorus.hxx>

#include <BRepAlgoAPI_Section.hxx>

#include <BRepPrimAPI_MakeSphere.hxx>

#include <BRepFeat_SplitShape.hxx>

#include <TColgp_HArray1OfPnt.hxx>

#include <GeomAPI_Interpolate.hxx>

#include <GC_MakeArcOfCircle.hxx>

#include <GC_MakeSegment.hxx>

#include <GC_MakeCircle.hxx>

#include <GCE2d_MakeSegment.hxx>

#include <gp.hxx>

#include <gp_Ax1.hxx>

#include <gp_Ax2.hxx>

#include <gp_Ax2d.hxx>

#include <gp_Dir.hxx>

#include <gp_Dir2d.hxx>

#include <gp_Pnt.hxx>

#include <gp_Pnt2d.hxx>

#include <gp_Trsf.hxx>

#include <gp_Vec.hxx>

#include <Geom_CylindricalSurface.hxx>

#include <Geom_Plane.hxx>

#include <Geom_Surface.hxx>

#include <Geom_TrimmedCurve.hxx>

#include <Geom2d_Ellipse.hxx>

#include <Geom2d_TrimmedCurve.hxx>

#include <TopExp_Explorer.hxx>

#include <TopoDS.hxx>

#include <TopoDS_Edge.hxx>

#include <TopoDS_Face.hxx>

#include <TopoDS_Wire.hxx>

#include <TopoDS_Shape.hxx>

#include <TopoDS_Compound.hxx>

#include <GCPnts_AbscissaPoint.hxx>

#include <BRepAdaptor_Curve.hxx>

#include <GeomLib.hxx>

#include <GeomConvert_CompCurveToBSplineCurve.hxx>

#include <TopTools_ListOfShape.hxx>

#include <TopTools_ListIteratorOfListOfShape.hxx>

#include <TopTools_DataMapOfShapeInteger.hxx>

#include <TopTools_DataMapOfShapeReal.hxx>

#include <TopTools_IndexedDataMapOfShapeAddress.hxx>

#include <V3d_PositionalLight.hxx>

#include <V3d_DirectionalLight.hxx>

#include <V3d_AmbientLight.hxx>

#include <IGESControl_Controller.hxx>

#include <IGESControl_Writer.hxx>

#include <Interface_Static.hxx>

#include <OpenGl_GraphicDriver.hxx>

#include <Graphic3d_GraphicDriver.hxx>
添加代码
MFC文档分成三个结构:
Application: 项目名称.cpp     项目名称.h

     Doc:  项目名称View.cpp 项目名称View.h

    View: 项目名称Doc.cpp   项目名称Doc.h


在Application中 "项目名称.h" 文件中的类中加入代码:
protected:

    Handle(Graphic3d_GraphicDriver) m_GraphicDriver;

public:

    Handle(Graphic3d_GraphicDriver) GetGraphicDriver(){return m_GraphicDriver;}
在对应的类的实现文件 "项目名称.cpp" 的类的构造函数中添加:
try {

Handle(Aspect_DisplayConnection) aDisplayConnection;

m_GraphicDriver = new OpenGl_GraphicDriver(aDisplayConnection);

}

catch (Standard_Failure) {

AfxMessageBox(L"(Error Ocured in Initializing the Opencascade graphic variable.)");

}
接着处理Document Class在 "项目名称Doc.h" 中定义的类中添加:
public:

    Handle(V3d_Viewer) GetViewer(void) {return myViewer;}

protected:

    Handle(AIS_InteractiveContext) myAISContext;

    Handle(V3d_Viewer) myViewer;
接着去实现文档 "项目名称Doc.cpp" 中类的"项目名称Doc::项目名称Doc()"构造函数中添加:
Handle(Graphic3d_GraphicDriver) theGraphicDriver = ((CMFCTestApp*)AfxGetApp())->GetGraphicDriver();

myViewer = new V3d_Viewer(theGraphicDriver);

myViewer->SetDefaultLights();

myViewer->SetLightOn();

myAISContext = new AIS_InteractiveContext(myViewer);

myAISContext->SetDisplayMode(AIS_Shaded,true);

myAISContext->SetAutomaticHilight(Standard_False);
在 "项目名称View.h" 中添加:
public:

    virtual void OnInitialUpdate();

protected:

    Handle(V3d_View) myView;
在 "项目名称View.cpp" 中重写OnInitialUpdate()函数:
void CmOCCTView::OnInitialUpdate() {

myView = GetDocument()->GetViewer()->CreateView();

myView->SetShadingModel(V3d_GOURAUD);

Handle(Graphic3d_GraphicDriver) theGraphicDriver = ((CMFCTestApp*)AfxGetApp())->GetGraphicDriver();

Aspect_Handle aWindowHandle = (Aspect_Handle)GetSafeHwnd();

Handle(WNT_Window) aWntWindow = new WNT_Window(GetSafeHwnd());

myView->SetWindow(aWntWindow);

if (!aWntWindow->IsMapped()) {

aWntWindow->Map();

}

Standard_Integer w = ;

Standard_Integer h = ;

aWntWindow->Size(w, h);

::PostMessage(GetSafeHwnd(), WM_SIZE, SIZE_RESTORED, w + h * );

myView->FitAll();

myView->ZBufferTriedronSetup(Quantity_NOC_RED, Quantity_NOC_GREEN, Quantity_NOC_BLUE1, 0.8, 0.05, );

myView->TriedronDisplay(Aspect_TOTP_LEFT_LOWER, Quantity_NOC_WHITE, 0.2, V3d_ZBUFFER);

}
在下方的OnDraw中加入:
myView->MustBeResized();

myView->Update();
选择x64平台编译生成即可看到界面:
注意:
在添加代码时会在new关键字处报错
将当前文件下的
#ifdef _DEBUG

#define new DEBUG_NEW

#endif
删去即可
2. 如果编译提醒缺少dll,请将opencascade的win64/vc14/bin目录以及所有第三方库的bin目录添加到系统环境变量Path,如此可以搜索到相应dll文件。或者将dll文件复制到exe文件目录下。
绘图
在mOCCTDoc.cpp和mOCCTDoc.h中写入DrawSphere代码:(需要在mOCCTDoc.cpp中include 头文件 #include “MFCTestView.h”)
//mMFCTestDoc.cpp:

void CmOCCTDoc::DrawSphere(double Radius) {

  BRepPrimAPI_MakeSphere mkSphere(Radius);

  TopoDS_Shape Sphere = mkSphere.Shape();

  Handle(AIS_Shape) myAISSphere = new AIS_Shape(Sphere);

  myAISContext->Display(myAISSphere, Standard_False);

  CMDIFrameWnd *pFrame = (CMDIFrameWnd*)AfxGetApp()->m_pMainWnd;

  CMDIChildWnd *pChild = (CMDIChildWnd *)pFrame->GetActiveFrame();

  CmOCCTView *pView = (CmOCCTView *)pChild->GetActiveView();

  pView->FitAll();

}
//mMFCTestDoc.h:

void CmOCCTDoc::DrawSphere(double Radius);
在mOCCTView.h中加入一个类方法:
void FitAll() { if (!myView.IsNull()) myView->FitAll(); myView->ZFitAll(); };
接着在CMFCTestView::OnDraw中调用绘球函数:
pDoc->DrawSphere();
编译生成即可
鼠标拖拽
在 MFCTestView.cpp及MFCTestView.h中添加OnMouseMove函数:
//MFCTestView.h

protected:

afx_msg void OnMouseMove(UINT nFlags, CPoint point);
.cpp文件
// MFCTestView.cpp

BEGIN_MESSAGE_MAP(CmOCCTView, CView)

...

ON_WM_MOUSEMOVE()

...

END_MESSAGE_MAP()

...

void CmOCCTView::OnMouseMove(UINT nFlags, CPoint point)

{

    // TODO: Add your message handler code here and/or call default

    CView::OnMouseMove(nFlags, point);

    if(nFlags && MK_LBUTTON){

    //myView->Rotate(point.x,point.y);

    myView->Rotation(point.x,point.y);

    }

}
如此可实现鼠标左键的拖拽旋转
参考资料:
1.如何在自己的项目中使用OpenCascade7.3
2.How to Build an simple Opencascade Program using Visual C++
Open Cascade创建自己的MFC文档程序的更多相关文章
- 【VC编程技巧】窗口☞3.5对单文档或者多文档程序制作启动画面
(一)概要: 文章描写叙述了如何通过Visual C++ 2012或者Visual C++ .NET,为单文档或者多文档程序制作启动画面.在Microsoft Visual Studio 6.0中对于 ...
- 理解MFC 文档、视图、框架[转]
理解文档/视图框架 出处.雷神 了解文档和视图的相互作用关系是编写MFC程序的基本功.但是MFC的应用程序框架把文档和视图之间 ...
- MFC文档、视图和框架
文档.视图.框架 文档/视图结构是MFC提供的一种不错的设计,它将数据的处理和显示分开来,这样更便于我们对程序的维护和扩展. 文档 文档对象用于管理和维护数据,包括保存数据.取出数据以及 ...
- 深入分析MFC文档视图结构(项目实践)
k_eckel:http://www.mscenter.edu.cn/blog/k_eckel 文档视图结构(Document/View Architecture)是MFC的精髓,也是Observer ...
- MFC学习(七) 单文档程序
1 MFC单文档程序的主要类 (1)文档类(Document) 即应用程序处理的数据对象,文档一般从 MFC 中 CDocument 中派生.CDocument 类用于相应数据文件的读取以及存储 Cv ...
- VC-基础:MFC单文档程序架构解析
MFC单文档程序架构解析 这里我以科院杨老师的单文档程序来分析一下MFC单文档的程序架构,纯属个人见解,不当之处烦请指教! 首先我们了解到的是 图(一) theApp 是唯一一个在程序形成的时候就存在 ...
- MFC单文档程序架构解析
MFC单文档程序架构解析 MFC单文档程序架构解析 这里我以科院杨老师的单文档程序来分析一下MFC单文档的程序架构,纯属个人见解,不当之处烦请指教! 首先我们了解到的是 图(一) theApp 是唯一 ...
- MFC文档视图结构学习笔记
文档/视图概述 为了统一和简化数据处理方法,Microsoft公司在MFC中提出了文档/视图结构的概念,其产品Word就是典型的文档/视图结构应用程序 MFC通过其文档类和视图类提供了大量有关数据处理 ...
- MFC多文档程序启动无子窗口的实现
刚学MFC的我们,肯定会从一个基本MFC程序开始. 而VC++6.0的MFC基础类提供了三种创建方式:单文档.多文档.对话框. 当我们创建多文档应用程序的时候,会自动启动一个子窗口. 在我们平时使用软 ...
随机推荐
- CClientDC类 CWindowDC类
CClientDC类 CClientDC类也是CDC类的派生类.它只能在窗口的客户区(即窗口中除了边框.标题栏.菜单栏以及状态栏外的中间部分)中进行绘图,坐标点(0,0)通常指的是客户区的左上角.它的 ...
- (水题)洛谷 - P1996 - 约瑟夫问题 - 链表
https://www.luogu.org/problemnew/show/P1996 试了一下数组实现的双向链表,是挺难用的,估计是应该写个get_next()函数比直接用next数组好. #inc ...
- 51nod 1138 【数学-等差数列】
思路: 很显然每个连续的序列都是等差数列, 那么我们利用等差数列求和公式. S=(a1+a1+k-1)k/2=(2·a1+k-1)*k/2;a1是首项,k是个数. 枚举k,首项最小为1,k最大,具体不 ...
- Template Code 无法使用 this.Host 报错
问题显示: Error 6 Compiling transformation: 'Microsoft.VisualStudio.TextTemplatingBED07DAE3B6FD53FA94701 ...
- Linux 问题 卸载setup.py方式安装的python包
python ./setup.py install --record install.txt cat install.txt | xargs rm -rf
- bzoj4145 [AMPPZ2014]The Prices(状压dp)
Description 你要购买m种物品各一件,一共有n家商店,你到第i家商店的路费为d[i],在第i家商店购买第j种物品的费用为c[i][j], 求最小总费用. Input 第一行包含两个正整数n, ...
- 我人生中的第一场Java面试
1.说起我的第一次Java面试,我不禁回想起我大学时参加校园招聘的那段日子,那时候我还是本科生,由于不是科班出身,只学过一点点Java皮毛,所以那时候对于找Java工作并没有什么概念,只是以为上过Ja ...
- VS2008/2010 都不能使用Access2010数据库
VS2008/2010 都不能使用Access2010数据库,因为VS2008/2010都不能使用X64位的Access数据库引擎.
- mysql文件系统
1 磁盘划分 在一台mysql服务器上,一般是sda做系统,sdb做数据,sdc做日志. 2 磁盘调度策略 linux默认调度策略是cfq,mysql上一般改为deadline echo 'deadl ...
- 【数据结构(C语言版)系列三】 队列
队列的定义 队列是一种先进先出的线性表,它只允许在表的一端进行插入,而在另一端删除元素.这和我们日常生活中的排队是一致的,最早进入队列的元素最早离开.在队列中,允许插入的一端叫做队尾(rear),允许 ...
