js程序设计03——面向对象
ECMAScript中有2中属性:数据属性、访问器属性。
数据属性是为了指定某对象的指定key上的一些行为,比如value是否可删除、修改、key可循环遍历等特点。而访问器属性不包含数据值,包含一堆get、set方法(非必须),读取访问对象属性时,采用getter、setter分别实现。
数据属性包括:
- Configurable:表示能否通过delete删除该属性,或者修改重新定义属性,默认false
- Enumerable:表示for-in循环返回属性,默认false
- Writable:表示能否修改属性值,默认false
- Value:包含这个数据的值
一旦把属性定义为不可配置的,就不能再把它变回可配置了:
var person = {};

Object.defineProperty(person,"name",{

  configurable:false,

  value:"admin"

});

//直接报错:TypeError: Cannot redefine property: name

Object.defineProperty(person,"name",{

  configurable:true,

  value:"test"

})
因为这里的"name"属性已经定义为configurable:false,即不可重新修改属性,所以再次修改会报错。
var person = {

  name:"我是没修改前的值",

  _age:22

};

Object.defineProperty(person,"age",{

  get:function(){

    return this._age;

  },

  set:function(newValue){

    if(newValue > this.age){

      this._age = newValue;

      this.name += " 哈哈,我是修改后的name值";

    }

  }

});

person.age = 22;

console.log(person);

person.age = 23;

console.log(person);
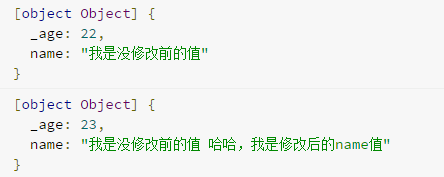
执行结果:

注意:这里的属性下划线是一种记号,表示只能通过对象方法访问的属性,这样一来,对该属性的读取会使用get、set来实现,如果只指定get表示不能写入,只指定set表示不能读取。
那么,如何一次性声明定义多个属性呢,可以使用Object的defineProperties方法,如下:
var person = {};

Objetc.defineProperties(person,{

  _name:{

    value:"chaozhou"

  },

  age:{

    value:23,

    set:function(newValue){

      this.age = newValue;

    },

    get:function(){

      return this.age;

    }

  },

  sex:{

    value:"男"

  }

});
关于对象创建(设计模式)
1、工厂模式
function createPerson(name,age){

  var o = new Object();

  o.name = name;

  o.age = age;

  o.sayName = function(){

    console.log(this.name);

  }

  return o;

}

var p = new createPerson("admin",23);

p.sayName();   //"admin"
2、构造器模式
function Person(name,age){

  this.name = name;

  this.age = age;

  this.sayName = function(){

    console.log(this.name);

  }

}

var p = new Person("admin",23);

p.sayName();   //"admin"

console.log(p instanceof Object);  //true

console.log(p instanceof Person);  //true

function Person2(name,age){

  this.name = name;

  this.age = age;

  this.sayName = sayname;

}

function sayname(){

  console.log(this.name);

}

var p2 = new Person2("admin2",22);

p2.sayName();   //"admin2"

console.log(p2 instanceof Object);  //true

console.log(p2 instanceof Person2);  //true
3、原型模式
function Person(){

  Person.prototype.name = "admin";

  Person.prototype.age = 12;

  Person.prototype.sayName = function(){

    console.log(Person.prototype.name);

  };

}

var p1 = new Person();

p1.sayName();    //"admin"

function Person2(){}

Person2.prototype.name = "admin1";

Person2.prototype.age = 14;

Person2.prototype.sayName = function(){

  console.log(Person2.prototype.name);

};

var p1 = new Person2();

p1.sayName();   //"admin1"
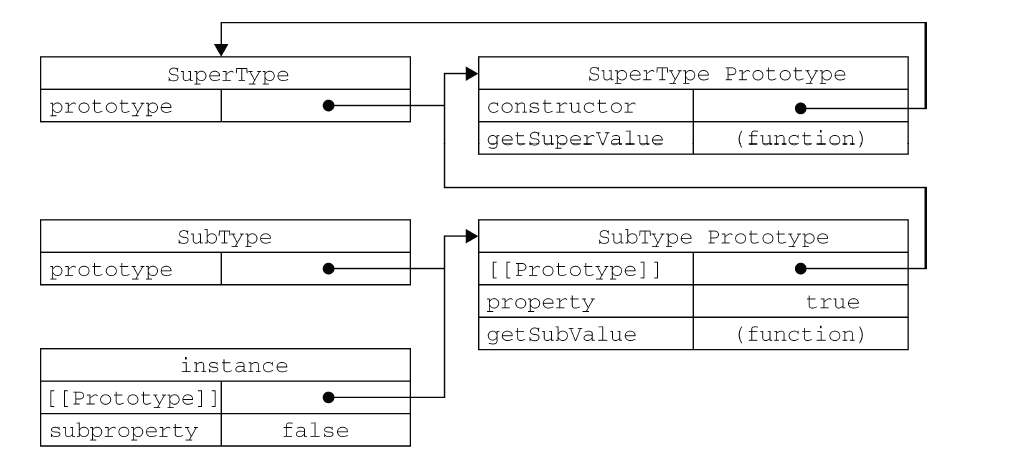
原型模式下,所有对象实例共享prototype定义的属性和方法,相当于直接将这些信息添加到原型中。原型设计中的关系如下图(摘自:“javascript高级程序设计”):

自我理解与解释:创建Person构造函数后,Person默认拥有prototype属性,指向的是Person的原型,而Person的原型默认拥有constructor属性,该属性指向一个包含了prototype属性的函数的指针,即Person构造函数,Person原型中的其它属性比如name,是在Person原型属性之上添加的其它属性。person1、person2实例的prototype属性同是一个指向Person.prototype的指针。
判断对象是否是某原型:
Person.prototype.isPrototypeOf(person1) //判断person1内部是否含所有指向Person.prototype的指针
获取某对象的原型:
alert(Object.getPrototypeOf(person1) == Person.prototype); //true
使用delete操作符只能删除实例对象上的属性,不能删除原型上的同名属性:
首先看不使用delete时:
function Person2(){}

Person2.prototype.name = "我是原型的name";

Person2.prototype.age = 14;

Person2.prototype.sayName = function(){

  console.log(Person2.prototype.name);    //"我是原型的name"

  console.log(this.name);   //"我是实例的name"

};

var p1 = new Person2();

p1.name = "我是实例的name"

p1.sayName();
使用delete后:
function Person2(){}

Person2.prototype.name = "我是原型的name";

Person2.prototype.age = 14;

Person2.prototype.sayName = function(){

  console.log(Person2.prototype.name);    //"我是原型的name"

  console.log(this.name);   //"我是原型的name"

};

var p1 = new Person2();

p1.name = "我是实例的name"

delete p1.name;

p1.sayName();
判断实例中是否包含某属性hasOwnProperty使用:
function Person2(){}

Person2.prototype.name = "我是原型的name";

Person2.prototype.age = 14;

Person2.prototype.sayName = function(){

  console.log(this.name);   //"我是实例的name"

};

var p1 = new Person2();

p1.name = "我是实例的name"

p1.sayName();

console.log(p1.hasOwnProperty("name"));   //true

delete p1.name;

console.log(p1.hasOwnProperty("name"));   //false
相比于hasOwnProperty,in操作符可以判断该实例是否包含该属性,不管该属性存在于实例还是原型中,in可以单独使用,也可以在for-in循环(只能遍历数据属性中Enumerable为true的属性)中使用:
function Person2(){}

Person2.prototype.name = "我是原型的name";

Person2.prototype.age = 14;

Person2.prototype.sayName = function(){

  console.log(this.name);   //"我是实例的name"

};

var p = new Person2();

var arr = [];

for(var attr in p){

  arr.push(attr);

}

console.log(arr);  //["name", "age", "sayName"]
使用Object.keys同样可以列出所有对象属性,不同的是对原型使用会返回原型中的所有属性数组,对实例使用仅仅返回实例属性数组:
function Person2(){}

Person2.prototype.name = "我是原型的name";

Person2.prototype.age = 14;

Person2.prototype.sayName = function(){

  console.log(this.name);   //"我是实例的name"

};

var p = new Person2();

p.test = "admin"

console.log(Object.keys(Person2.prototype));   //["name", "age", "sayName"]

console.log(Object.keys(p));   //["test"]

console.log(Object.getOwnPropertyNames(Person2.prototype));  //["constructor", "name", "age", "sayName"] 获取所有原型属性(不管是否可枚举)
关于原型简写:
可以直接使用如下字面量形式简写:
function Person(){

}

//constructor 属性不再指向Person 了,而是指向Object

Person.prototype = {

  name:"admin",

  age:23,

  sayName:function(){

    console.log(this.name);

  }

};

var p = new Person();

console.log(p instanceof Object);   //true

console.log(p instanceof Person);   //true

console.log(p.constructor == Object);   //true

console.log(p.constructor == Person);   //false
简写之后只有一个问题,就是constructor指向变了,可以人为指定constructor指向:
function Person(){

}

//constructor 属性不再指向Person 了,而是指向Object

Person.prototype = {

  constructor:Person,

  name:"admin",

  age:23,

  sayName:function(){

    console.log(this.name);

  }

};

var p = new Person();

console.log(p instanceof Object);   //true

console.log(p instanceof Person);   //true

console.log(p.constructor == Object);   //false

console.log(p.constructor == Person);   //true
原型的动态性
也就说,可以先声明一个实例,然后修改实例原型某属性(如果修改整个原型,则情况有变),则修改后的原型属性或者方法实例可立即调用:
function Person(){

}

var p = new Person();

Person.prototype.name = "admin";

console.log(p.name);  //"admin"
组合使用构造模式及原型模式
function Person(name,age){

  this.name = name;

  this.age = age;

  this.friends = ["jefy","lorry"];

}

Person.prototype = {

  constructor:Person,

  sayName:function(){

    console.log(this.name);

  }

}

var p1 = new Person("p1",11);

var p2 = new Person("p2",22);

p1.friends.push("gatu");

console.log(p1.friends);   //["jefy", "lorry", "gatu"]

console.log(p2.friends);   //["jefy", "lorry"]

console.log(p1.friends === p2.friends);   //false

console.log(p1.sayName === p2.sayName);   //true
关于对象继承
function SuperType(){

  this.property = true;

}

SuperType.prototype.getSuperValue = function(){

  return this.property;

};

function SubType(){

  this.subproperty = false;

}

//继承了SuperType

SubType.prototype = new SuperType();

SubType.prototype.getSubValue = function (){

 return this.subproperty;

};

var instance = new SubType();

alert(instance.getSuperValue()); //true

alert(instance.getSubValue()); //false
继承实现的本质是重写原型对象,换句话说,原来存在于SuperType 的实例中的所有属性和方法,现在也存在于SubType.prototype 中了。在确立了继承关系之后,我们给SubType.prototype 添加了一个方法,这样就在继承了SuperType 的属性和方法的基础上又添加了一个新方法,结构如下:

我们没有使用SubType 默认提供的原型,而是给它换了一个新原型;这个新原型就是SuperType 的实例。于是,新原型不仅具有作为一个SuperType 的实例所拥有的全部属性和方法,而且其内部还有一个指针,指向了SuperType 的原型。最终结果就是这样的:instance 指向SubType的原型, SubType 的原型又指向SuperType 的原型。getSuperValue() 方法仍然还在SuperType.prototype 中,但property 则位于SubType.prototype 中。这是因为property 是一个实例属性,而getSuperValue()则是一个原型方法。既然SubType.prototype 现在是SuperType的实例,那么property 当然就位于该实例中了。
关于应用类型值的原型问题
先看一个例子:
function SuperType(){

 this.colors = ["red", "blue", "green"];

}

function SubType(){

}

//继承了SuperType

SubType.prototype = new SuperType();

var instance1 = new SubType();

instance1.colors.push("black");

alert(instance1.colors); //"red,blue,green,black"

var instance2 = new SubType();

alert(instance2.colors); //"red,blue,green,black"
当SubType 通过原型链继承了SuperType 之后,SubType.prototype 就变成了SuperType 的一个实例,因此它也拥有了一个它自己的colors 属性——就跟专门创建了一个SubType.prototype.colors 属性一样。但结果是什么呢?结果是SubType 的所有实例都会共享这一个colors 属性。而我们对instance1.colors 的修改能够通过instance2.colors 反映出来,就已经充分证实了这一点。
如下方式可以解决这个问题:
function SuperType(){

  this.colors = ["red", "blue", "green"];

}

function SubType(){

//继承了SuperType

SuperType.call(this);

}

var instance1 = new SubType();

instance1.colors.push("black");

alert(instance1.colors); //"red,blue,green,black"

var instance2 = new SubType();

alert(instance2.colors); //"red,blue,green"
通过使用call()方法(或apply()方法也可以),我们实际上是在(未来将要)新创建的SubType 实例的环境下调用了SuperType 构造函数。这样一来,就会在新SubType 对象上执行SuperType()函数中定义的所有对象初始化代码。
借用构造函数向超类传递参数:
function SuperType(name){

  this.name = name;

}

function SubType(){

  //继承了SuperType,同时还传递了参数

  SuperType.call(this, "Nicholas");

  //实例属性

  this.age = ;

}

var instance = new SubType();

alert(instance.name); //"Nicholas";

alert(instance.age); //
组合继承
function SuperType(name){

this.name = name;

this.colors = ["red", "blue", "green"];

}

SuperType.prototype.sayName = function(){

alert(this.name);};

function SubType(name, age){

//继承属性

SuperType.call(this, name);

this.age = age;

}

//继承方法

SubType.prototype = new SuperType();

SubType.prototype.constructor = SubType;

SubType.prototype.sayAge = function(){

alert(this.age);

};

var instance1 = new SubType("Nicholas", );

instance1.colors.push("black");

alert(instance1.colors); //"red,blue,green,black"

instance1.sayName(); //"Nicholas";

instance1.sayAge(); //

var instance2 = new SubType("Greg", );

alert(instance2.colors); //"red,blue,green"

instance2.sayName(); //"Greg";

instance2.sayAge(); //
在这个例子中,SuperType 构造函数定义了两个属性:name 和colors。SuperType 的原型定义了一个方法sayName()。SubType 构造函数在调用SuperType 构造函数时传入了name 参数,紧接着又定义了它自己的属性age。然后,将SuperType 的实例赋值给SubType 的原型,然后又在该新原型上定义了方法sayAge()。这样一来,就可以让两个不同的SubType 实例既分别拥有自己属性——包括colors 属性,又可以使用相同的方法了。
js程序设计03——面向对象的更多相关文章
- Day046--JavaScript-- DOM操作, js中的面向对象, 定时
一. DOM的操作(创建,追加,删除) parentNode 获取父级标签 nextElementSibling 获取下一个兄弟节点 children 获取所有的子标签 <!DOCTYPEhtm ...
- 前端 ---JS中的面向对象
JS中的面向对象 创建对象的几种常用方式 1.使用Object或对象字面量创建对象 2.工厂模式创建对象 3.构造函数模式创建对象 4.原型模式创建对象 1.使用Object或对象字面量创建对象 ...
- python 全栈开发,Day52(关于DOM操作的相关案例,JS中的面向对象,定时器,BOM,client、offset、scroll系列)
昨日作业讲解: 京东购物车 京东购物车效果: 实现原理: 用2个盒子,就可以完整效果. 先让上面的小盒子向下移动1px,此时就出现了压盖效果.小盒子设置z-index压盖大盒子,将小盒子的下边框去掉, ...
- node.js 学习03
node.js学习03 解决浏览器接收服务端信息之后乱码的问题: 服务器通过设置http响应报文头,告诉浏览器使用相应的编码 来解析网页. res.setHeader('Content','text/ ...
- 前端JavaScript(3)-关于DOM操作的相关案例,JS中的面向对象、定时器、BOM、位置信息
小例子: 京东购物车 京东购物车效果: 实现原理: 用2个盒子,就可以完整效果. 先让上面的小盒子向下移动1px,此时就出现了压盖效果.小盒子设置z-index压盖大盒子,将小盒子的下边框去掉,就可以 ...
- 轻松理解JS中的面向对象,顺便搞懂prototype和__proto__
这篇文章主要讲一下JS中面向对象以及 __proto__,ptototype和construcator,这几个概念都是相关的,所以一起讲了. 在讲这个之前我们先来说说类,了解面向对象的朋友应该都知道, ...
- 086 01 Android 零基础入门 02 Java面向对象 01 Java面向对象基础 03 面向对象基础总结 01 面向对象基础(类和对象)总结
086 01 Android 零基础入门 02 Java面向对象 01 Java面向对象基础 03 面向对象基础总结 01 面向对象基础(类和对象)总结 本文知识点:面向对象基础(类和对象)总结 说明 ...
- 轻松理解JS中的面向对象,顺便搞懂prototype和__proto__的原理介绍
这篇文章主要讲一下JS中面向对象以及 __proto__,ptototype和construcator,这几个概念都是相关的,所以一起讲了. 在讲这个之前我们先来说说类,了解面向对象的朋友应该都知道, ...
- 重学js之JavaScript 面向对象的程序设计(创建对象)
注意: 本文章为 <重学js之JavaScript高级程序设计>系列第五章[JavaScript引用类型]. 关于<重学js之JavaScript高级程序设计>是重新回顾js基 ...
随机推荐
- smarty基本语法
smarty基本语法: 1.注释:<{* this is a comment *}>,注意左右分隔符的写法,要和自己定义的一致. <{* I am a Smarty comment, ...
- 关于Beam Search
Wiki定义:In computer science, beam search is a heuristic search algorithm that explores a graph by exp ...
- 在将 varchar 值 '1,2,3,4,5,6,7,8' 转换成数据类型 int 时失败。
alter PROCEDURE PrTradingDelete ) AS BEGIN WHERE id in(@id) END GO 执行上面这个存储过程会异常.提示 :在将 varchar 值 '1 ...
- Windows平台使用Gitblit搭建Git服务器图文教程
Git服务现在独树一帜,相比与SVN有更多的灵活性,最流行的开源项目托管网站Github上面,如果托管开源项目,那么就是免费使用的,但是闭源的项目就会收取昂贵的费用,如果你不缺米,那么不在本文讨论的范 ...
- WPF 获得鼠标相对于屏幕的位置,相对于控件的位置
相对于屏幕的位置 第一步: /// <summary> /// 用于获得鼠标相对于屏幕的位置 /// </summary> public class Win3 ...
- ubuntu14 下配置cgi
1.安装apache2 sudo apt-get install apache2 2.配置apache2 vim /etc/apache2/sites-enabled/ 000-default.con ...
- Adding AirDrop File Sharing Feature to Your iOS Apps
http://www.appcoda.com/ios7-airdrop-programming-tutorial/ Adding AirDrop File Sharing Feature to You ...
- oracle 中文乱码---查看和修改客户端字符集
客户端NLS_LANG的设置方法 Windows: # 常用中文字符集set NLS_LANG=SIMPLIFIED CHINESE_CHINA.ZHS16GBK # 常用unicode字符集 set ...
- HLSL之镜面反射光照
今天学习的是镜面的反射光照,其实一般在场景中基本环境光和漫反射光照已经可以表现出一个不错的照明了,今天的镜面反射光照其实仅仅适合于需要在表面添加抛光或者闪耀的物体上,例如金属.玻璃等等,同时也是基于之 ...
- WebService 调用
一.WebService调用 1.webservice支持四种调用方式:SOAP 1.1,SOAP 1.2,GET,POST. 2.如果要webservice支持GET,POST调 ...
