安卓开发_浅谈Service
一、Service(服务)
Service是Android程序中四大基础组件之一,它和Activity一样都是Context的子类,区别在于它没有UI界面,是在后台运行的组件。
public abstract class

Service

extends ContextWrapper

implements ComponentCallbacks

java.lang.Object

   ↳ android.content.Context

     ↳ android.content.ContextWrapper

       ↳ android.app.Service
二、Service启动方法+相应的生命周期
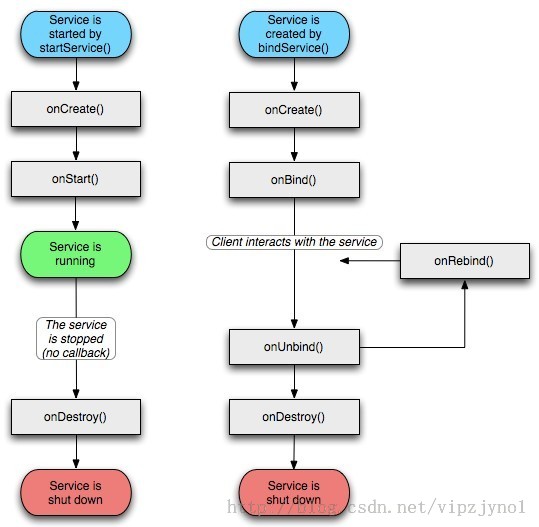
Service的生命周期并不是固定的,而是要看启动Service的方式。
而启动Service的方式又分为两种startService和bindService

1、 StartService(启动运行在后台的服务,所谓后台即没有界页;作为四大组件之一,其是运行在主线程中的)
启动时:
Context.startService(intent)-->onCreate()àonStartCommand ()
停止时:
Context_stopService(intent)-->onDestroy()
使用方法:
(1)、创建一个自定义服务类继承Service,实现抽象方法
(2)、清单文件中注册自定义的服务类
(3)、在activity中通过startService和 stopService()
看一个Demo
 package com.example.demo01;

 import android.app.Activity;

 import android.content.Intent;

 import android.os.Bundle;

 import android.util.Log;

 import android.view.View;

 public class MainActivity extends Activity {

     @Override

     protected void onCreate(Bundle savedInstanceState) {

         // TODO Auto-generated method stub

         super.onCreate(savedInstanceState);

         setContentView(R.layout.activity_main);

     }

     public void btn_startService(View view)

     {

         Intent intent = new Intent(this,MyService.class);

         intent.putExtra("info", "这里是传送的数据");

         startService(intent);

         Log.i("activity", "开启服务");

     }

     public void btn_closeService(View view)

     {

         Intent intent = new Intent(this,MyService.class);

         Log.i("activity", "关闭服务");

         stopService(intent);

     }

 }
MainActivity.class
 package com.example.demo01;

 import android.app.Service;

 import android.content.Intent;

 import android.os.IBinder;

 import android.util.Log;

 public class MyService extends Service{

     @Override

     public void onCreate() {

         // TODO Auto-generated method stub

         super.onCreate();

         Log.i("MyService", "--->onCreate");

     }

     @Override

     public IBinder onBind(Intent intent) {

         // TODO Auto-generated method stub

         Log.i("MyService", "--->onBind");

         return null;

     }

     @Override

     public int onStartCommand(Intent intent, int flags, int startId) {

         // TODO Auto-generated method stub

         Log.i("MyService", "--->onStartCommand");

         String str = intent.getStringExtra("info");

         Log.i("MyService", "自定义服务MyService被activity启动并收到了activity发送过来信息:"+str);

         return super.onStartCommand(intent, flags, startId);

     }

     @Override

     public void onDestroy() {

         // TODO Auto-generated method stub

         super.onDestroy();

         Log.i("MyService", "--->onDestroy");

     }

 }
MyService.class自定义服务类
 <LinearLayout xmlns:android="http://schemas.android.com/apk/res/android"

     xmlns:tools="http://schemas.android.com/tools"

     android:layout_width="match_parent"

     android:layout_height="match_parent"

     android:orientation="vertical"

      >

     <Button

         android:onClick="btn_startService"

         android:text="开启服务并发送消息"

         android:layout_width="wrap_content"

         android:layout_height="wrap_content">

     </Button>

     <Button

         android:onClick="btn_closeService"

         android:text="关闭服务"

         android:layout_width="wrap_content"

         android:layout_height="wrap_content">

     </Button>

 </LinearLayout>
activity_main.xml 布局文件
清单文件注册自定义的服务类
<service android:name="com.example.demo01.MyService"></service>
点击两次开启服务按钮,然后点击一次关闭服务按钮,
可见第一次开启服务的时候执行onCreate()服务, 再执行onStartCommand()方法,
当第二次开启服务的时候,则不再执行onCreate()方法,直接执行onStartCommand
当关闭服务的时候,执行onDestroy()方法

2、BindService(基于IBinder方式将两个组件进行绑定,然后相互传值,如果以绑定的方式启动的服务,在解除绑定时也会自动停止服务)
绑定时:
bindService-->onCreate()-->onBind()
解绑时:
unbindService-->onUnbind()-->onDestory()
使用方法:
(1)、创建一个自定义服务类继承Service,实现onBind()方法
(2)、创建Bindler的子类
(3)、在onBind()方法中返回自定义Bindler子类的对象
(4)、清单文件中组册自定义服务
(5)、创建ServiceConnection接口对象,实现 onServiceConnected()方法和 onServiceDisconnected方法
(6)、在activity中绑定bindService和解绑服务unbindService
Demo
 package com.example.demo02;

 import android.app.Service;

 import android.content.Intent;

 import android.os.Binder;

 import android.os.IBinder;

 import android.util.Log;

 public class MyService extends Service{

     private MyBinder binder ;

     @Override

     public IBinder onBind(Intent intent) {

         // TODO Auto-generated method stub

         Log.i("service", "-->onBind");

         return new MyBinder();

     }

     @Override

     public void onCreate() {

         // TODO Auto-generated method stub

         Log.i("service", "-->onCreate");

         super.onCreate();

     }

     @Override

     public int onStartCommand(Intent intent, int flags, int startId) {

         // TODO Auto-generated method stub

         Log.i("service", "-->onStartCommand");

         return super.onStartCommand(intent, flags, startId);

     }

     @Override

     public void onDestroy() {

         // TODO Auto-generated method stub

         Log.i("service", "-->onDestroy");

         super.onDestroy();

     }

     class MyBinder extends Binder{

         public void function(){

             Log.i("service", "Binder-->function");

         }

     }

 }
MyService.class
 <LinearLayout xmlns:android="http://schemas.android.com/apk/res/android"

     xmlns:tools="http://schemas.android.com/tools"

     android:layout_width="match_parent"

     android:layout_height="match_parent"

     android:orientation="vertical"

       >

     <Button

         android:layout_width="wrap_content"

         android:layout_height="wrap_content"

         android:text="绑定服务"

         android:onClick="btn_bindService"

         />

     <Button

         android:layout_width="wrap_content"

         android:layout_height="wrap_content"

         android:text="解绑服务"

         android:onClick="btn_unbindService"

         />

     <Button

         android:layout_width="wrap_content"

         android:layout_height="wrap_content"

         android:text="执行自定义Binder子类的function方法"

         android:onClick="btn_Binder"

         />

 </LinearLayout>
activity_main.xml 布局文件
清单文件注册:
<service android:name="com.example.demo02.MyService"></service>
一共三个按钮
当点击“绑定服务”按钮时 执行

当点击“执行自定义Binder子类的function方法”按钮时 执行

当点击“解绑服务”按钮时 执行

BIND_AUTO_CREATE标识表示:绑定的服务组件如果不存,则会自动创建,
由bindService方式启动的Service,其生命周期会受到绑定组件的影响,即当绑定组件Activity销毁时,Service也会停止
安卓开发_浅谈Service的更多相关文章
- 安卓开发_浅谈ListView(SimpleAdapter数组适配器)
安卓开发_浅谈ListView(ArrayAdapter数组适配器) 学习使用ListView组件和SimapleAdapter适配器实现一个带图标的ListView列表 总共3部分 一.MainAc ...
- 安卓开发_浅谈Android动画(四)
Property动画 概念:属性动画,即通过改变对象属性的动画. 特点:属性动画真正改变了一个UI控件,包括其事件触发焦点的位置 一.重要的动画类及属性值: 1. ValueAnimator 基本属 ...
- 安卓开发_浅谈ListView(自定义适配器)
ListView作为一个实际开发中使用率非常高的视图,一般的系统自带的适配器都无法满足开发中的需求,这时候就需要开发人员来自定义适配器使得ListView能够有一个不错的显示效果 有这样一个Demo ...
- 安卓开发_浅谈Fragment之ListFragment
ListFragment,即Fragment的一个子类,当我们用的一个Fragment只需要一个listview视图的时候使用 该类有几个特点: 1.ListFragment 本身具只有一个ListV ...
- 安卓开发_浅谈OptionsMenus(选项菜单)
Android平台下所提供的菜单大体上可分为三类:选项菜单.上下文菜单和子菜单. 当Activity在前台运行时,如果用户按下手机上的Menu键,此时就会在屏幕低端弹出相应的选项菜单.但这个功能需要开 ...
- 安卓开发_浅谈Notification(通知栏)
Notification通知栏是显示在手机状态的消息,代表一种全局效果的通知 快速创建一个Notification的步骤简单可以分为以下四步: 第一步:通过getSystemService()方法得到 ...
- 安卓开发_浅谈ListView之分页列表
前言: 在开发的过程中,有时候我们需要从网络解析一些数据,比如最近的一些新闻,我们需要把这些数据用ListView显示出来. 因为是解析一个网络数据源,这样将会一下子将所有的数据解析出来,当数据源数据 ...
- 安卓开发_浅谈AsyncTask
现在就来学习一下AsyncTask. 一.先介绍一下AsyncTask: 在开发Android移动客户端的时候往往要使用多线程来进行操作,我们通常会将耗时的操作放在单独的线程执行,避免其占用主线程而给 ...
- 安卓开发_浅谈主配置文件(AndroidManifest.xml)
AndroidManifest.xml本质:是整个应用的主配置清单文件包含:该应用的包名,版本号,组件,权限等信息作用:记录该应用的相关的配置信息 一.常用标签(1).全局篇(包名,版本信息)(2). ...
随机推荐
- BW对应后台表[转]
数据源对应后台表 (2012-01-04 20:08:57) 转载▼ 标签: 杂谈 分类: SAP MM Data Sources Tables Purchasing 2LIS_02_SCL EKKO ...
- 有了Hadoop MapReduce, 为什么还要Spark?
a. 由于MapReduce的shuffle过程需写磁盘,比较影响性能:而Spark利用RDD技术,计算在内存中进行. b. MapReduce计算框架(API)比较局限, 而Spark则是具备灵活性 ...
- netbeans php安装、调试
文件清单 jdk-8u45-windows-i586_8.0.450.14.1429092020.exe netbeans-8.0.2-php-windows.exe wampserver2.5-Ap ...
- Javascript this 关键字
Javascript 的 this 关键字总是指向当前被执行函数的所有者. 换句话说,如果当前函数可以视为某个对象的一个方法,那么 this 就指向该对象. 例如有这么一个函数 doSomething ...
- 简单学ES6 - class
前言 随着ES6标准的定稿,众多的特性也趋于稳定,各大浏览器也在逐步实现这些特性,那么对ES6有更多的了解就无可厚非了. 准备 在学习ES6之前,我们需要有一个环境来测试ES6代码.在这里我推荐使用n ...
- [python实用代码片段]python获取当前时间的前一天,前一周,前一个月
python获取当前时间的前一天,前一周,前一个月. 实用python的datetime.timedelta方法,避免了有的月份是30和31等不同的情况. 获取前一个月的时间,方法实现:首先datet ...
- .NET C# 使用S22.Imap.dll接收邮件 并且指定收取的文件夹的未读邮件,并且更改未读准态
string host = Conf.ConfigInfo.POP_Host; int port = Conf.ConfigInfo.POP_Port; string username =Conf.C ...
- .Net魔法堂:史上最全的ActiveX开发教程——部署篇
一.前言 接<.Net魔法堂:史上最全的ActiveX开发教程——发布篇>,后我们继续来部署吧! 二. 挽起衣袖来部署 ActiveX的部署其实就是客户端安装ActiveX组件,对未签 ...
- sprint演示Scrum 项目7.0
1.坚持所有的sprint都结束于演示. 团队的成果得到认可,会感觉很好. 其他人可以了解你的团队在做些什么,并得到重要反馈. 演示是一种社会活动,不同的团队可以在这里相互交流,讨论各自的工作.这很有 ...
- 在C#后端处理一些结果然传给前端Javascript或是jQuery
在C#后端处理一些结果然传给前端Javascript或是jQuery,以前Insus.NET有做过一个例子<把CS值传给JS使用 >http://www.cnblogs.com/insus ...
