Asp.net设计模式笔记之二:应用程序分离与关注点分离
本次笔记主要涉及的内容如下:
1.将智能UI(SmartUI)反模式重构成分层方式的示例代码
2.分层设计与传统的Asp.net WebForm模型(代码后植)相比具有的优势
3.逻辑分层概念以及分离应用程序关注点
4.企业级Asp.net应用程序中各个不同层的责任
一、智能UI反模式
asp.net WebForm模型使得我们能够随意将控件拖放到设计页面上,然后进行代码书写。而其本身则使用代码后植技术,使得后台代码和前台代码分离开。后台代码包含了应用程序的所有事件处理,数据访问以及业务逻辑等,这样就会造成一种混乱:所有的关注点混杂在一起,这会引发测试问题并导致业务逻辑重复,同时也会造成代码无法重用等问题。原因就是,我们很难重用内在绑定到特定视图(ASPX页面)的逻辑。
不过Asp.net WebForm模型也有他好的一面,那就是,它非常适合原型设计以及一次性或者短期的应用程序。但问题是,那些成功的临时应用程序都有可能被后续的开发和维护,这样慢慢的就会发展成难以维护的关键任务应用程序。
为了演示这种模式,构建一个使用网格来显示商品页面,该页面将列出出售的商品,显示他们的名称,推荐零售价格,零售价格,折扣以及节省百分比。接下来的我们有个扩展需求,就是,过节了,我们会在页面新增一个全体商品打95折的选项,藉以此来看看Asp.net WebForm的扩展性。
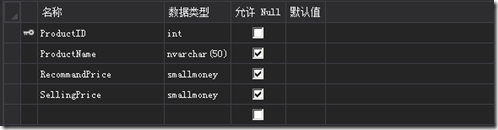
首先创建一个名称为0620.DaemonPattern.Web的项目,然后在项目上右击,添加一个Sql Server数据库文件,名称为 Shop.mdf。
然后添加如下字段,之后随便添加一些内容:
最后将这个数据库中的表拖放到Default.aspx页面中,VS会自动给你创建一个GridView并包含数据库连接的可用数据显示列表。
然后我们在后台添加如下内容,以便于展示需求一:
 protected void GridView1_RowDataBound(object sender, GridViewRowEventArgs e)

        {

            if(e.Row.RowType==DataControlRowType.DataRow)

            {

                decimal recommandPrice = decimal.Parse(((DataRowView)e.Row.DataItem)["RecommandPrice"].ToString());

                decimal sellingPrice = decimal.Parse(((DataRowView)e.Row.DataItem)["SellingPrice"].ToString());

                Label lblDiscount = (Label)e.Row.FindControl("lblDiscount");

                Label lblSavings = (Label)e.Row.FindControl("lblSavings");

                lblSavings.Text = DisplaySavings(recommandPrice,sellingPrice);

                lblDiscount.Text = DisplayDiscount(recommandPrice, sellingPrice);

            }

        }

        protected string DisplayDiscount(decimal recommandPrice, decimal sellingPrice)

        {

            string discountText = string.Empty;

            if (recommandPrice > sellingPrice)

                discountText = string.Format("{0:C}", (recommandPrice - sellingPrice));

            return discountText;

        }

        protected string DisplaySavings(decimal recommandPrice,decimal sellingPrice)

        {

            string savingText = string.Empty;

            if (recommandPrice > sellingPrice)

                savingText = (1 - (sellingPrice / recommandPrice)).ToString("#%");

            return savingText;

        }
得到的页面如下:
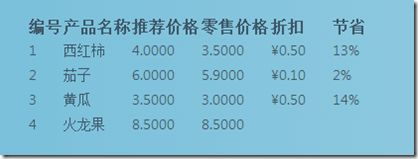
现在我们做好了我们的工作,我们的商品列表拥有了折扣和节省选项,貌似一切都完结了。
但是,十一国庆节来了,这段时间游客数量大增,我们得加一些促销手段让游客们多买我们的东西,于是决定将所有产品打95折销售,那么,我们就需要拿现在的代码开刀了:
 protected void GridView1_RowDataBound(object sender, GridViewRowEventArgs e)

        {

            if(e.Row.RowType==DataControlRowType.DataRow)

            {

                decimal recommandPrice = decimal.Parse(((DataRowView)e.Row.DataItem)["RecommandPrice"].ToString());

                decimal sellingPrice = decimal.Parse(((DataRowView)e.Row.DataItem)["SellingPrice"].ToString());

                Label lblSellingPrice = (Label)e.Row.FindControl("lblSellingPrice");

                Label lblDiscount = (Label)e.Row.FindControl("lblDiscount");

                Label lblSavings = (Label)e.Row.FindControl("lblSavings");

                lblSavings.Text = DisplaySavings(recommandPrice, ApplyExtraDiscountsTo(sellingPrice));

                lblDiscount.Text = DisplayDiscount(recommandPrice, ApplyExtraDiscountsTo(sellingPrice));

                lblSellingPrice.Text = string.Format("{0:C}", ApplyExtraDiscountsTo(sellingPrice));

            }

        }

        protected decimal ApplyExtraDiscountsTo(decimal originalSellingPrice)

        {

            decimal price = originalSellingPrice;

            int discountType = Int16.Parse(this.ddlDiscountType.SelectedValue);

            if (discountType == 1)

            {

                price = price * 0.95M;

            }

            return price;

        }

        protected string DisplayDiscount(decimal recommandPrice, decimal sellingPrice)

        {

            string discountText = string.Empty;

            if (recommandPrice > sellingPrice)

                discountText = string.Format("{0:C}", (recommandPrice - sellingPrice));

            return discountText;

        }

        protected string DisplaySavings(decimal recommandPrice,decimal sellingPrice)

        {

            string savingText = string.Empty;

            if (recommandPrice > sellingPrice)

                savingText = (1 - (sellingPrice / recommandPrice)).ToString("#%");

            return savingText;

        }

        protected void ddlDiscountType_SelectedIndexChanged(object sender, EventArgs e)

        {

            GridView1.DataBind();

        }
得到的结果如下图所示:
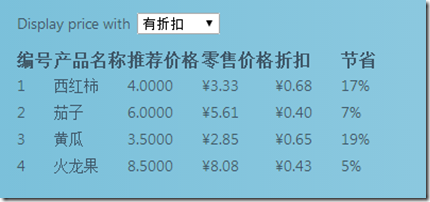
现在,你能看出来我们的问题所在了吗?当然,如果这个程序很小,我们不会遇到什么问题,但是当程序很大的时候,我们就不得不触动之前的业务逻辑部分,在修改过程中,我们不知道我们会引入什么样的Bug,这,理所当然的违反了封闭开放原则,并且不利于项目的后续开发和维护。
所以,如果想要应对这种智能UI的反模式,最好的办法就是对应用程序分层。应用程序分层属于分离关注点的一种形式。可以通过命名空间,文件夹或采用单独的项目来实现。下图给出了企业级分层设计的Asp.net应用程序的典型体系结构:
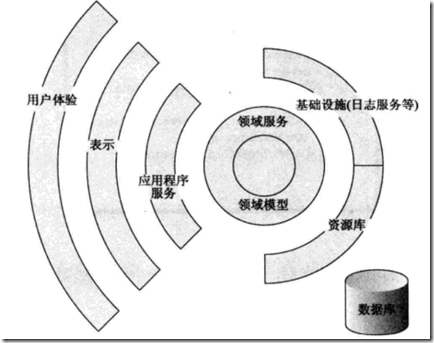
领域模型和领域服务(聚合根)是整个应用程序的中心点,其上是Application Service,再上则是Presentation层,最上面则是User Interface交互层。
为了演示分层设计的效果和好处,我们将对上面的项目进行重构。
首先,我们创建项目框架:
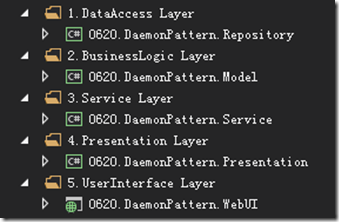
其引用关系为:
Repository引用Model
Service引用Repository和Model
Presentation引用Service和Model
WebUI引用Repository,Model,Service和Presentation
下面来讲解下各层的关注点:
1.业务层
在之前的智能UI反模式中,业务逻辑与表示逻辑混为一谈。但是本层的关注点则是业务逻辑,将不会映入任何的表示逻辑。简而言之,可以将其看做是一个包括了所有相关实体以及关系的系统概念模型(这里不得不提到Domain Model模式的概念,它主要是用来组织复杂的业务逻辑和关系)。
下面,我们将在0620.DaemonPattern.Model层中创建领域模型。向本层中添加名为 IDiscountStrategy的新接口,定义如下:
 public class IDiscountStrategy

    {

        decimal ApplyExtraDiscountTo(decimal originalSellingPrice);

    }
之所以将接口命名为IDiscountStrategy是因为它实际上会匹配Strategy设计模式(Stategy模式将算法封装到一个类中,并可以在运行时转换,从而改变对象的行为)。应用这个模式的原因在于,它能够支持可在运行时选择和改变的算法。
既然已经有了接口,就可以添加折扣策略的两种实现。
首先,创建一个TradeDiscountStategy的新类,定义如下:
public class TradeDiscountStategy:IDiscountStrategy

    {

        public decimal ApplyExtraDiscountTo(decimal originalSellingPrice)

        {

            decimal price = originalSellingPrice;

            price = price * 0.95M;

            return price;

        }

    }
之后再利用Null Object模式创建一个无操作行为的类NullDiscountStategy:
 public class NullDiscountStategy:IDiscountStrategy

    {

        public decimal ApplyExtraDiscountTo(decimal originalSellingPrice)

        {

            return originalSellingPrice;

        }

    }
在建立折扣策略之后,我们来创建Price对象。
 public class Price

    {

        public Price(decimal recommandPrice, decimal sellingPrice)

        {

            this.recommandPrice = recommandPrice;

            this.sellingPrice = sellingPrice;

        }

        private IDiscountStrategy discountStategy = new NullDiscountStategy();

        private decimal recommandPrice;

        private decimal sellingPrice;

        public void SetDiscountStategyTo(IDiscountStrategy aDiscountStrategy)

        {

            discountStategy = aDiscountStrategy;

        }

        public decimal SellingPrice

        {

            get

            {

                return discountStategy.ApplyExtraDiscountTo(sellingPrice);

            }

        }

        public decimal RecommandPrice

        {

            get

            {

                return recommandPrice;

            }

        }

        public decimal Discount

        {

            get

            {

                if (RecommandPrice > SellingPrice)

                    return RecommandPrice - SellingPrice;

                else

                    return 0;

            }

        }

        public decimal Savings

        {

            get

            {

                if (RecommandPrice > SellingPrice)

                    return 1 - (SellingPrice / RecommandPrice);

                else

                    return 0;

            }

        }

    }
之后,再创建一个简单的Product类:
 public class Product

    {

        public int ProductId { get; set; }

        public string ProductName { get; set; }

        public Price Price { get; set; }

    }
好了,现在业务实体都创建的差不多了。但是为了演示是否有折扣行为,我们还需要创建一个枚举类型:
 public enum CustomType

    {

        Standard = 0,

        Trade = 1

    }
为了确定哪一种折扣策略用哪种价格,我们还得创建一个工厂类,它唯一的职责就是为给定的CustomType返回一个匹配的折扣策略。
创建一个名为DiscountFactory的新类,定义如下:
public class DiscountFactory

    {

        public static IDiscountStrategy GetDiscountStategyFor(CustomType customType)

        {

            switch (customType)

            {

                case CustomType.Trade:

                    return new TradeDiscountStategy();

                default:

                    return new NullDiscountStategy();

            }

        }

    }
由于服务层将与数据存储交互,以检索商品。使用Repository模式来实现此功能,但只指定资源库接口,这是因为不希望model项目牵涉到诸如使用什么类型的数据存储或使用什么类型的技术来查询等细节。创建一个名为IProductRepository的接口,接口中只有一个方法:
 public interface IProductRepository

    {

        IList<Product> FindAll();

    }
服务类需要能够将给定的折扣策略应用到一组商品,可以创建一个自定义集合来实现该功能。这里我们使用扩展方法来进行。
创建一个名为ProductListExtensionMethods的新类,其定义如下:
 public class ProductListExtensionMethods

    {

        public static void Apply(this IList<Product> products,IDiscountStrategy discountStategy)

        {

            foreach(var product in products)

            {

                product.Price.SetDiscountStategyTo(discountStategy);

            }

        }

    }
现在可以创建客户端用来与领域交互的服务类。创建一个新的ProductService类,代码如下:
 public class ProductService

    {

        public ProductService(IProductRepository productRepository)

        {

            this.productRepository = productRepository;

        }

        private IProductRepository productRepository;

        public IList<Product> GetAllProductsFor(CustomType customType)

        {

            IDiscountStrategy discountStrategy = DiscountFactory.GetDiscountStategyFor(customType);

            IList<Product> products = productRepository.FindAll();

            products.Apply(discountStrategy);

            return products;

        }

    }
现在我们已经将所有的业务逻辑创建完毕。注意,业务逻辑并没有绑定到特定的数据存储,并使用接口对资源库进行访问来完成所有持久化需要。现在可以以完全与应用程序其他部分隔离的方式来测试业务层,而且业务层不会受到其他层变化的影响。要讨论的下一个层次是服务层,他将作为应用程序的入口。
2.服务层
服务层的作用就是充当应用程序的入口,有时候又被称为门面(Facade:为一系列复杂的接口和子系统提供了一个简单的接口并控制对其的访问)。服务层为表示层提供了强类型视图模型,有时候被称为视图模型。视图模型是为特定试图优化的强类型的类。将要创建的视图模型用来显示商品(视图模型是为特定视图优化的强类型的类,并包含用来辅助完成数据表示的逻辑)。
向0620.DaemonPattern.Service层添加一个名为ProductViewModel的新类,代码如下:
public class ProductViewModel

    {

        public int ProductId { get; set; }

        public string Name { get; set; }

        public string RecommandPrice { get; set; }

        public string SellingPrice { get; set; }

        public string Discount { get; set; }

        public string Savings { get; set; }

    }
为了让客户端与服务层交互,将使用Request/Response消息模式。Request部分由客户端提供,它将携带所有必要的参数。在这里,他将包含CustomType枚举变量(在领域模型中定义)。创建一个名为ProductListRequest的新类,代码如下:
  public class ProductListRequest

    {

        public CustomType CustomType { get; set; }

    }
对于Response对象,要定义更多属性,以便客户端能够检查请求是否完成。还会有一个Message属性,如果调用没有成功完成,该属性可以让服务为客户端提供信息。创建一个名为ProductListResponse的新类,代码如下:
 public class ProductListResponse

    {

        public bool Success { get; set; }

        public string Message { get; set; }

        public IList<ProductViewModel> Products { get; set; }

    }
为了将Product实体转换成ProductViewModel,需要两个方法:一个用来转换单个商品,另一个用来转换商品列表。可以将这些方法添加到领域模型的Product实体中,但他们并非真正属于业务逻辑,因此最好的做法就是将其作为扩展方法,这样在使用他们时,就像是Product实体的优先部分。
在Service项目中创建一个名为ProductMapperExtensionMethods的新类,并添加两个方法,代码如下:
 public static class ProductMapperExtensionMethods

    {

        public static IList<ProductViewModel> ConvertToProductListViewModel(this IList<Model.Product> products)

        {

            IList<ProductViewModel> productViewModels = new List<ProductViewModel>();

            foreach(var item in products)

            {

                productViewModels.Add(item.ConvertToProductViewModel());

            }

            return productViewModels;

        }

        public static ProductViewModel ConvertToProductViewModel(this Model.Product product)

        {

            ProductViewModel productViewModel = new ProductViewModel();

            productViewModel.ProductId = product.ProductId;

            productViewModel.Name = product.ProductName;

            productViewModel.RecommandPrice = string.Format("{0:C}",product.Price.RecommandPrice);

            productViewModel.SellingPrice = string.Format("{0:C}", product.Price.SellingPrice);

            if (product.Price.Discount > 0)

                productViewModel.Discount = string.Format("{0:C}", product.Price.Discount);

            if (product.Price.Savings < 1 && product.Price.Savings > 0)

                productViewModel.Savings = product.Price.Savings.ToString("#%");

            return productViewModel;

        }

    }
最后,添加ProductService类,它将于领域模型服务交互,以检索商品列表;然后将其转换成ProductViewModels列表。向Service项目中添加一个名为ProductService的新类,其定义如下:
 public class ProductService

    {

        public ProductService(Model.ProductService productService)

        {

            this.productService = productService;

        }

        private Model.ProductService productService;

        public ProductListResponse GetAllResponseFor(ProductListRequest productListRequest)

        {

            var productListResponse = new ProductListResponse();

            try

            {

                IList<Model.Product> products = productService.GetAllProductsFor(productListRequest.CustomType);

                productListResponse.Products = products.ConvertToProductListViewModel();

                productListResponse.Success = true;

            }

            catch(Exception ex)

            {

                productListResponse.Success = false;

                productListResponse.Message = "An Error Occurred";

            }

            return productListResponse;

        }

    }
该服务类捕获所有错误并向客户端返回一条友好的消息,此时是记录错误信息的理想时机。通过在这里处理所有错误并标清成功标记,使得服务层出现问题时,可以让客户端优雅地进行响应。这样就完成了应用程序的服务层,现在可以继续创建数据库访问层。
3.数据访问层
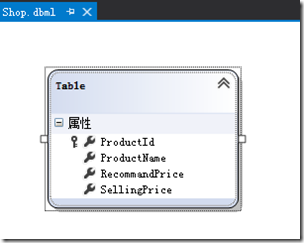
跟智能UI一样,需要使用数据库来存放商品。在WebUI项目中创建一个数据库,其模式,名称和数据与智能UI反模式联系中使用的相同。然后在Repository层添加一个linq to sql类,并将表拖放到其中:
现在创建一个IProductRepository接口(在Model项目中创建过)的具体实现。向该层添加一个名为ProductRepository的新类:
 public class ProductRepository:IProductRepository

    {

        public IList<Model.Product> FindAll()

        {

            var products = from p in new ShopDataContext().Table

                           select new Model.Product

                           {

                               ProductId = p.ProductId,

                               ProductName = p.ProductName,

                               Price = new Model.Price(p.RecommandPrice.Value, p.SellingPrice.Value)

                           };

            return products.ToList();

        }

    }
在FindAll方法中,查询Linq to SQL来获取所有的商品,然后根据该数据创建一个Product业务实体列表并将其返回。至此,数据访问层完毕。
4.表示层
为了将表示逻辑与用户体验(用户界面)分离,采用Model-View-Presenter(模式-视图-呈现器)模式。在0620.DaemonPattern.Presentation项目中创建一个名为IProductListView的新接口,包含如下契约:
 public interface IProductListView

    {

        void Display(IList<ProductViewModel> products);

        Model.CustomType CustomerType { get; }

        string ErrorMessage { set; }

    }
该接口将由ASPX Web表单实现。通过使用接口,可以再测试时将视图分离出来。创建一个名为ProductListPresenter的新类,代码如下:
 public class ProductListPresenter

    {

        public ProductListPresenter(IProductListView productListView,Service.ProductService productService)

        {

            this.productListView = productListView;

            this.productService = productService;

        }

        private IProductListView productListView;

        private Service.ProductService productService;

        public void Display()

        {

            ProductListRequest productListRequest = new ProductListRequest();

            productListRequest.CustomType = productListView.CustomerType;

            ProductListResponse productListResponse = productService.GetAllResponseFor(productListRequest);

            if (productListResponse.Success)

                productListView.Display(productListResponse.Products);

            else

                productListView.ErrorMessage = productListResponse.Message;

        }

    }
呈现器类负责获取数据,处理用户事件并通过视图的接口更新视图。
这样就完成了一个非常瘦但是很简单的表示层。拥有表示层的好处是,现在很容易测试数据库的表示以及用户和系统之间的交互,而不用担心难以测试的Web表单。还可以在应用程序之上添加任何形式的用户体验,比如WPF,Winform或者web表单引用程序。
5.用户体验层
最后,可以实现视图,以便在网页上显示商品。但在处理HTML标记之前,需要一种方式将松散耦合的应用程序粘合到一起,因此创建IProductRepository接口的一个具体实现。为此,使用StructureMap,这是一种IOC容器。利用VS2013中的程序包管理控制台,执行如下命令“install-package StructureMap -project 0620.DaemonPattern.WebUI”即可安装到WebUI项目中。
首先在项目中添加一个BootStrapper类,用于配置StructureMap相关:
 public class BootStrapper

    {

        public static void ConfigStructureMap()

        {

            ObjectFactory.Initialize(x =>

            {

                x.For<IProductRepository>().Use<ProductRepository>();

            });

        }

    }
然后在Global中的Application_Start方法中进行注册:
BootStrapper.ConfigStructureMap();
BootStrapper类的目的是向StructureMap注册所有的具体依赖类。当客户端代码使用StructureMap来解析某个类时,StructureMap检查该类的依赖类,并根据选中的具体实现(在ProductRegistry中指定)自动注入这些依赖类。
之后我们来组织前台HTML内容:
  <div class="content-wrapper">

              Display price with

            <asp:DropDownList id="ddlCustomType" runat="server" AutoPostBack="true" >

                <asp:ListItem Value="0">没有折扣</asp:ListItem>

                <asp:ListItem Value="1">有折扣</asp:ListItem>

            </asp:DropDownList>

            <asp:Label ID="lblErrorMessage" runat="server"></asp:Label>

            <asp:Repeater ID="rptProducts" runat="server">

                <HeaderTemplate>

                    <table>

                        <tr>

                            <td>名称</td>

                            <td>推荐价格</td>

                            <td>零售价格</td>

                            <td>折扣</td>

                            <td>节省</td>

                        </tr>

                </HeaderTemplate>

                <ItemTemplate>

                    <tr>

                        <td><%#Eval("Name") %></td>

                        <td><%#Eval("RecommandPrice") %></td>

                        <td><%#Eval("SellingPrice") %></td>

                        <td><%#Eval("Discount") %></td>

                        <td><%#Eval("Savings") %></td>

                    </tr>

                </ItemTemplate>

                <FooterTemplate>

                    </table>

                </FooterTemplate>

            </asp:Repeater>

        </div>
后台代码如下:
public partial class _Default : Page,IProductListView

    {

        protected void Page_Init(object sender,EventArgs e)

        {

            presenter = new ProductListPresenter(this, ObjectFactory.GetInstance<Service.ProductService>());

            ddlCustomType.SelectedIndexChanged+=(s,ee)=>

            {

                presenter.Display();

            };

        }

        protected void Page_Load(object sender, EventArgs e)

        {

            if (!Page.IsPostBack)

                presenter.Display();

        }

        private ProductListPresenter presenter;

        public void Display(IList<Service.ProductViewModel> products)

        {

            rptProducts.DataSource = products;

            rptProducts.DataBind();

        }

        public Model.CustomType CustomerType

        {

            get

            {

                return (CustomType)Enum.ToObject(typeof(CustomType), int.Parse(this.ddlCustomType.SelectedValue));

            }

        }

        public string ErrorMessage

        {

            set

            {

                lblErrorMessage.Text = string.Format("Error:{0}", value);

            }

        }

    }
该页面在页面初始化事件期间只创建ProductListPresenter的一个新实例,并通过StructureMap的ObjectFactory.GetInstance方法获取ProductService的实现。然后改页面的所有其他工作委托给Presenter,自己只负责处理用户事件并转发调用。
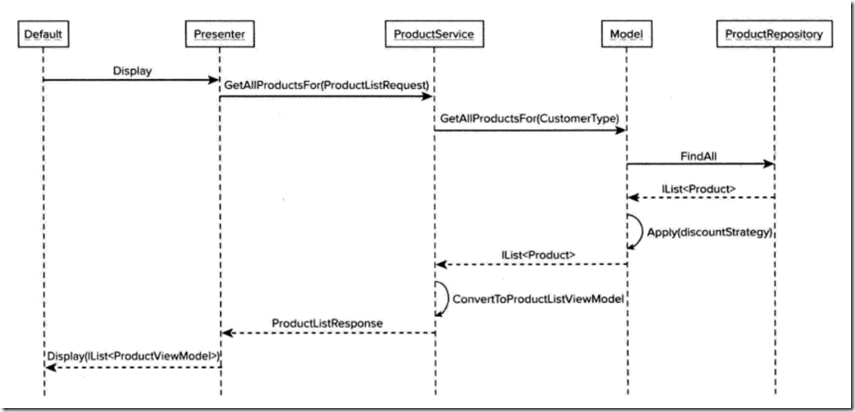
虽然说分层设计的应用程序还有其他的更多工作,但是现在我们已经有了一个松散耦合的应用程序,它可以测试,可以维护,并且充分实现了关注点分离,下图给出了各层之间的交互并清晰定义了每层的责任。
最后总结一下:
1.策略模式的使用
2.分层模式实现关注点分离
3.DomainModel是分层模式中的核心
Asp.net设计模式笔记之二:应用程序分离与关注点分离的更多相关文章
- ASP.NET 设计模式:应用程序分层与关注点分离(SoC)
应用程序分层设计 应用程序分层属于关注点分离的一种形式,可以通过命名空间.文件夹或采用单独的项目来实现. 下图为一个采用分层设计的项目结构 ASPPatterns.Chap3.Layered.Repo ...
- Asp.net设计模式笔记之一:理解设计模式
GOF设计模式著作中的23种设计模式可以分成三组:创建型(Creational),结构型(Structural),行为型(Behavioral).下面来做详细的剖析. 创建型 创建型模式处理对象构造和 ...
- 设计模式笔记之二:Android开发中的MVP架构(转)
写在前面,本博客来源于公众号文章:http://mp.weixin.qq.com/s?__biz=MzA3MDMyMjkzNg==&mid=402435540&idx=1&sn ...
- ASP.NET学习笔记(二)语法
基本的 ASP 语法规则 通常情况下,ASP 文件包含 HTML 标签,类似 HTML 文件.不过,ASP 文件也能够包含服务器端脚本,这些脚本被分隔符 <% 和 %> 包围起来. 在 A ...
- Asp.net设计模式笔记之三:业务逻辑层的组织
本章内容要点: 1.Transaction Script模式组织业务逻辑 2.Active Record模式和Castle Windsor来组织业务逻辑 3.Domain Model模式来组织业务逻辑 ...
- python学习笔记(二)——程序结构
1. 选择结构: if 语句:单分支.双分支.多分支 **单分支结构** if 条件表达式: 语句块 **双分支结构** if 条件表达式: 语句块 else: 语句块 **多分支结构** if 条件 ...
- [ASP.NET MVC]笔记(二) 数据注解和验证
验证注解的使用 1.Required:必须字段 [Required] public string FirstName() { get; set; } 2.StringLength:长度限制,或是可选项 ...
- .net学习笔记----Asp.net的生命周期之一应用程序生命周期
Http请求刚刚到达服务器的时候 当服务器接收到一个 Http请求的时候,IIS (Internet Information Services,互联网信息服务)首先需要决定如何去处理这个请求. 什么是 ...
- GEEK学习笔记— —程序猿面试宝典笔记(二)
所谓笔记,就是比較个人的东西,把个人认为有点意思的东西记录下来~~ 程序猿面试宝典笔记(一)基本概念 程序猿面试宝典笔记(二)预处理.const和sizeof 程序猿面试宝典笔记(三)auto_ptr ...
随机推荐
- 【原】结构体包含CString类型成员变量出错的原理
问题如下:我定义了如下的一个结构体: typedef struct{ CString csText;}MyStruct; 并有如下的程序段1:MyStruct * p=NULL;p=(MyStru ...
- 做一些Spring AOP做过的事,封装 jdk动态代理成为一个黑盒子
怎么使用eclise 抽取方法,请看 利用eclipse 抽取代码片段为方法 抽取完成之后,还需要 ① 将Collection.class换成 target.getClass(),targ ...
- java中使用split分割字符串一个有趣的现象
最近在项目中,发现了一个bug,充分了展示了自己对java底层的认知有很多的不足和欠缺. 下面有段代码: String str="1#2#3"; String[] strs=str ...
- Android Design Support Library——Snackbar
Snackbar是一个轻量级控件,它可以很方便的提供消息的提示和动作反馈,类似于Toast.Snackbar包括一段文字信息与一个可选的操作按钮,超时自动隐藏,也可以通过滑动来删除.效果如下所示: S ...
- Struts2-tomcat报错:There is no Action mapped for namespace / and action
HTTP Status 404 - There is no Action mapped for namespace / and action name first. type Status repor ...
- Hadoop Eclipse开发环境搭建
This document is from my evernote, when I was still at baidu, I have a complete hadoop developme ...
- 使用Java正则表达式提取字符串中的数字一例
直接上代码: String reg = "\\D+(\\d+)$"; //提取字符串末尾的数字:封妖塔守卫71 == >> 71 String s = monster. ...
- How to use python remove the '^M' when copy words from Windows to Linux
今天帮同事用Python写了一个小工具,实现了在linux下批量文件名和去掉windows 文件到linux过程中产生^M的脚本,代码如下: !/opt/exptools/bin/python imp ...
- selenium读取txt文件的几种方式
1.用java读取txt文件 public static String readFJ(String path) { path = "D:/workspace/hetong.txt" ...
- 2014 Super Training #6 H Edward's Cola Plan --排序+二分
原题: ZOJ 3676 http://acm.zju.edu.cn/onlinejudge/showProblem.do?problemCode=3676 题意:给每个朋友一瓶可乐,可乐有普通和高 ...