使用spring 4.0 + maven 构建超简单的web项目
一.需求
使用spring去管理web项目,是目前非常流行的一种思路,本文将介绍使用maven+spring 4.0.2 来构建一个简单的web项目.
二.实现
1.新建一个maven项目,如下图所示:

这里因为是构建web项目,所以,选择的是webapp.
项目的架构图:
2.在pom.xml中添加所依赖的jar包,如下所示:
<project xmlns="http://maven.apache.org/POM/4.0.0" xmlns:xsi="http://www.w3.org/2001/XMLSchema-instance"

    xsi:schemaLocation="http://maven.apache.org/POM/4.0.0 http://maven.apache.org/maven-v4_0_0.xsd">

    <modelVersion>4.0.0</modelVersion>

    <groupId>com.amos</groupId>

    <artifactId>ssh_integrated</artifactId>

    <packaging>war</packaging>

    <version>0.0.1-SNAPSHOT</version>

    <name>ssh_integrated Maven Webapp</name>

    <url>http://maven.apache.org</url>

    <dependencies>

        <dependency>

            <groupId>org.springframework</groupId>

            <artifactId>spring-web</artifactId>

            <version>4.0.2.RELEASE</version>

        </dependency>

        <dependency>

            <groupId>junit</groupId>

            <artifactId>junit</artifactId>

            <version>3.8.1</version>

            <scope>test</scope>

        </dependency>

        <dependency>

            <groupId>org.springframework</groupId>

            <artifactId>spring-context</artifactId>

            <version>4.0.2.RELEASE</version>

        </dependency>

    </dependencies>

    <build>

        <finalName>ssh_integrated_spring</finalName>

    </build>

</project>
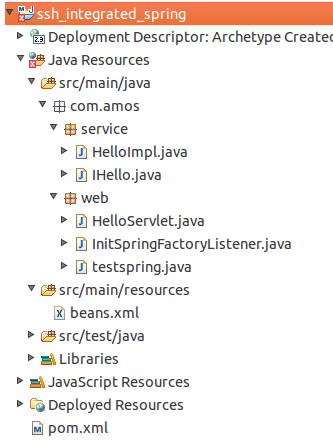
3.新建一个接口com.amos.service.IHello.java,并实现接口.
package com.amos.service;

public interface IHello {

    public String sayHi();

}
com.amos.service.HelloImpl.java
package com.amos.service;

import java.util.Date;

public class HelloImpl implements IHello{

    private String msg;

    public void setMsg(String msg) {

        this.msg = msg;

    }

    public String sayHi() {

        return "当前时间:"+new Date()+" msg:"+msg;

    }

}
4.新建一个Servlet,并实现此Servlet
com.amos.web.HelloServlet
package com.amos.web;

import java.io.IOException;

import javax.servlet.ServletException;

import javax.servlet.annotation.WebServlet;

import javax.servlet.http.HttpServlet;

import javax.servlet.http.HttpServletRequest;

import javax.servlet.http.HttpServletResponse;

import org.springframework.context.ApplicationContext;

import org.springframework.web.context.support.WebApplicationContextUtils;

import com.amos.service.IHello;

@WebServlet(name="HelloServlet",urlPatterns={"/hello"})

public class HelloServlet extends HttpServlet {

    private static final long serialVersionUID = 2801654413247618244L;

    private IHello hello;

    protected void doGet(HttpServletRequest req, HttpServletResponse resp) throws ServletException, IOException {

        //方法1,使用传统方式去加载beans.xml,每次请求时加载

        //ApplicationContext applicationContext = new ClassPathXmlApplicationContext("beans.xml");

        //方法2,使用监听器的方式加载beans.xml,在一启动的时候就加载监听器,避免多次加载,提高效率

        //ApplicationContext applicationContext  = (ApplicationContext) this.getServletContext().getAttribute("SpringApplicationContext");

        //方法3,使用spring自带的监听器去加载beans.xml

        //ApplicationContext applicationContext  = (ApplicationContext) this.getServletContext().getAttribute(WebApplicationContext.ROOT_WEB_APPLICATION_CONTEXT_ATTRIBUTE);

        //使用webapplicationcontextutils这个工具类可以很方便的获取ApplicationContext,只需要传入servletContext

        ApplicationContext applicationContext = WebApplicationContextUtils.getRequiredWebApplicationContext(this.getServletContext());

        hello = applicationContext.getBean(IHello.class);

        String sayHi = hello.sayHi();

        System.err.println("sayHi:" + sayHi);

        resp.setContentType("text/html;charset=utf-8");

        resp.getWriter().write("<h2>" + sayHi + "</h2>");

    }

}
注:这里要注意的是实现spring管理Bean的三种方式.
第一种:最传统的方式,同时也是效率最低的一种,因为,每次发一个请求都要重新加载一次,而且对于不同的Servlet的要每个都去加载,会大大降低效率.
第二种:使用监听器来实现加载beans.xml,每次项目启动的时候加载一次就可以了.这样大提高了效率.
com.amos.web.InitSpringFactoryListener.java
package com.amos.web;

import javax.servlet.ServletContextEvent;

import javax.servlet.ServletContextListener;

import org.springframework.context.ApplicationContext;

import org.springframework.context.support.ClassPathXmlApplicationContext;

public class InitSpringFactoryListener implements ServletContextListener {

    public InitSpringFactoryListener() {

    }

    public void contextInitialized(ServletContextEvent arg0) {

        //这里将加载beans.xml加载到内存中,放到servletcontext中,名称可以随便取,这里取为SpringApplicationContext,

        ApplicationContext applicationContext = new ClassPathXmlApplicationContext("beans.xml");

        arg0.getServletContext().setAttribute("SpringApplicationContext", applicationContext);

    }

    public void contextDestroyed(ServletContextEvent arg0) {

    }

}
同时,web.xml中要定义一个listener属性.
<!-- 自己去写一个监听器来实现加载beans.xml,进而启动spring容器 -->

    <!--

    <listener>

        <listener-class>com.amos.web.InitSpringFactoryListener</listener-class>

    </listener> -->
第三种:针对第二种方法,其实spring中已经封装好了一种监听器,人工去配置即可,原理和第二种方法一致.
只需要在web.xml中加入如下代码即可.
<!-- 使用spring自带的监听器,其默认加载的是WEB-INF下的applicationContext.xml -->

    <listener>

        <listener-class>org.springframework.web.context.ContextLoaderListener</listener-class>

    </listener>
但运行进会报如下错误:
org.springframework.beans.factory.BeanDefinitionStoreException: IOException parsing XML document from ServletContext resource [/WEB-INF/applicationContext.xml]; nested exception is java.io.FileNotFoundException: Could not open ServletContext resource [/WEB-INF/applicationContext.xml]

    at org.springframework.beans.factory.xml.XmlBeanDefinitionReader.loadBeanDefinitions(XmlBeanDefinitionReader.java:343)

    at org.springframework.beans.factory.xml.XmlBeanDefinitionReader.loadBeanDefinitions(XmlBeanDefinitionReader.java:303)

    at org.springframework.beans.factory.support.AbstractBeanDefinitionReader.loadBeanDefinitions(AbstractBeanDefinitionReader.java:180)

    at org.springframework.beans.factory.support.AbstractBeanDefinitionReader.loadBeanDefinitions(AbstractBeanDefinitionReader.java:216)

    at org.springframework.beans.factory.support.AbstractBeanDefinitionReader.loadBeanDefinitions(AbstractBeanDefinitionReader.java:187)

    at org.springframework.web.context.support.XmlWebApplicationContext.loadBeanDefinitions(XmlWebApplicationContext.java:125)

    at org.springframework.web.context.support.XmlWebApplicationContext.loadBeanDefinitions(XmlWebApplicationContext.java:94)

    at org.springframework.context.support.AbstractRefreshableApplicationContext.refreshBeanFactory(AbstractRefreshableApplicationContext.java:129)

    at org.springframework.context.support.AbstractApplicationContext.obtainFreshBeanFactory(AbstractApplicationContext.java:540)

    ........

    Caused by: java.io.FileNotFoundException: Could not open ServletContext resource [/WEB-INF/applicationContext.xml]

    at org.springframework.web.context.support.ServletContextResource.getInputStream(ServletContextResource.java:141)

    at org.springframework.beans.factory.xml.XmlBeanDefinitionReader.loadBeanDefinitions(XmlBeanDefinitionReader.java:329)

    ... 22 more
说找不到applicationContext.xml文件,那么如何解决这个问题呢?
他说找不到,那就在WIB-INF目录下建一个即可.
然后引入自定义的beans.xml即可.
<?xml version="1.0" encoding="UTF-8"?>

<beans xmlns="http://www.springframework.org/schema/beans"

    xmlns:xsi="http://www.w3.org/2001/XMLSchema-instance" xmlns:context="http://www.springframework.org/schema/context"

    xmlns:tx="http://www.springframework.org/schema/tx" xmlns:aop="http://www.springframework.org/schema/aop"

    xsi:schemaLocation="http://www.springframework.org/schema/beans

               http://www.springframework.org/schema/beans/spring-beans-4.0.xsd

               http://www.springframework.org/schema/context

               http://www.springframework.org/schema/context/spring-context-4.0.xsd

               http://www.springframework.org/schema/tx

               http://www.springframework.org/schema/tx/spring-tx-4.0.xsd

               http://www.springframework.org/schema/aop

               http://www.springframework.org/schema/aop/spring-aop-4.0.xsd

               ">

    <import resource="classpath:beans.xml"/>

</beans>
这个时候问题解决.
这里HelloSerlvet中如何获取对应的ApplicationContext呢?
//方法3,使用spring自带的监听器去加载beans.xml

        //ApplicationContext applicationContext  = (ApplicationContext) this.getServletContext().getAttribute(WebApplicationContext.ROOT_WEB_APPLICATION_CONTEXT_ATTRIBUTE);
这个是需要查看源码才能发现其属性名称,所以比较麻烦.这里还有一种较简便的方法,如下所示:
//使用webapplicationcontextutils这个工具类可以很方便的获取ApplicationContext,只需要传入servletContext

        ApplicationContext applicationContext = WebApplicationContextUtils.getRequiredWebApplicationContext(this.getServletContext());
第三种方法,基本上配置完毕,但还会感觉很不爽,因为还要新建一个applicationContext.xml去专门import bean.xml,是相当讨厌的.
其实还可以在web.xml中配置自定义的xml文件名称,如下所示:
    <!-- 配置spring的加载文件路径及文件名称 -->

    <context-param>

        <param-name>contextConfigLocation</param-name>

        <param-value>classpath:beans.xml</param-value>

    </context-param>
org.springframework.web.context.ContextLoaderListener中有这样一段说明:
<p>Processes a {@link #CONFIG_LOCATION_PARAM "contextConfigLocation"}

* context-param and passes its value to the context instance, parsing it into

* potentially multiple file paths which can be separated by any number of

* commas and spaces, e.g. "WEB-INF/applicationContext1.xml,

* WEB-INF/applicationContext2.xml". Ant-style path patterns are supported as well,

* e.g. "WEB-INF/*Context.xml,WEB-INF/spring*.xml" or "WEB-INF/**/*Context.xml".

* If not explicitly specified, the context implementation is supposed to use a

* default location (with XmlWebApplicationContext: "/WEB-INF/applicationContext.xml").

*
可以自定义spring默认加载的xml文件的名称,可以以逗号和空格进行分隔,也可以使用Ant类型的去标记.xml如,WEB-INF/spring*.xml
否则默认的加载的就是applicationContext.xml.
可以在web.xml中进行配置其参数.
所以,最终的web.xml如下:
<!DOCTYPE web-app PUBLIC

 "-//Sun Microsystems, Inc.//DTD Web Application 2.3//EN"

 "http://java.sun.com/dtd/web-app_2_3.dtd" >

<web-app>

    <display-name>Archetype Created Web Application</display-name>

    <!-- 配置spring的加载文件路径及文件名称 -->

    <context-param>

        <param-name>contextConfigLocation</param-name>

        <param-value>classpath:beans.xml</param-value>

    </context-param>

    <!-- 使用spring自带的监听器,其默认加载的是WEB-INF下的applicationContext.xml -->

    <listener>

        <listener-class>org.springframework.web.context.ContextLoaderListener</listener-class>

    </listener>

    <!-- 自己去写一个监听器来实现加载beans.xml,进而启动spring容器 -->

    <!--

    <listener>

        <listener-class>com.amos.web.InitSpringFactoryListener</listener-class>

    </listener> -->

</web-app>
5.运行效果

6.本文源码
https://github.com/amosli/ssh_integrated_spring
使用spring 4.0 + maven 构建超简单的web项目的更多相关文章
- idea+Spring+Mybatis+jersey+jetty构建一个简单的web项目
一.先使用idea创建一个maven项目. 二.引入jar包,修改pom.xml <dependencies> <dependency> <groupId>org. ...
- DOS命令行中用MAVEN构建 Java 和 Java Web 项目
一.Maven的安装 : 1.将 maven3.0解压到任一目录下,如D:\Program Files 2.配置环境变量:变量名: MAVEN_HOME 变量值:D:\Program Files\ ...
- maven创建一个简单的web项目
1.确认maven插件和配置在eclipse中已经完成 如果没完成,可参考这篇博客:http://www.cnblogs.com/mmzs/p/8191979.html 2.在eclipse中用mav ...
- maven-bundle-plugin插件, 用maven构建基于osgi的web应用
maven-bundle-plugin 2.4.0以下版本导出META-INF中的内容到MANIFEST.MF中 今天终于把maven-bundle-plugin不能导出META-INF中的内容到Ex ...
- python超简单的web服务器
今天无意google时看见,心里突然想说,python做web服务器,用不用这么简单啊,看来是我大惊小怪了. web1.py 1 2 3 #!/usr/bin/python import Simp ...
- Django入门第一步:构建一个简单的Django项目
Django入门第一步:构建一个简单的Django项目 1.简介 Django是一个功能完备的Python Web框架,可用于构建复杂的Web应用程序.在本文中,将通过示例跳入并学习Django.您将 ...
- 基于Maven + SSM (Spring、SpringMVC、Mybatis)构建一个简单的测试项目
最近在公司实习期间的培训交流中有机会接触到SSM,然后自己花费1周的时间投入学习.谈不上深刻理解其中原理,所以没有涉及理论知识,只是浅层次的学习如何使用,在此将学习过程记录整理出来,一方面自己备用:另 ...
- Spring Boot(IDEA,Gradle)超详细用户管理项目(一)——Hello World
1.构建工具的配置(Gradle):自定义-所有设置:构建.执行.部署-构建工具-Gradle: 设置Gradle用户主目录:(该目录相当于仓库,gradle将下载所需依赖到此目录下),此目录下可新建 ...
- 基于Maven构建开发第一个Storm项目
前面说过了Storm的测试项目,那么此时我们更想自己写一个小项目来练练手,首先我们自己的Windows系统上首先应该安装好maven,然后启动Eclipse for JavaEE版本,接下来开始建立项 ...
随机推荐
- oracle返回多个参数
CREATE OR REPLACE PACKAGE BODY get_form_no_pub IS /*================================================ ...
- 如何创建 CSS
如何插入样式表 当读到一个样式表时,浏览器会根据它来格式化 HTML 文档.插入样式表的方法有三种: 外部样式表 当样式需要应用于很多页面时,外部样式表将是理想的选择.在使用外部样式表的情况下,你可以 ...
- [JBoss] - JBAS015874: JBoss AS 7.1.1.Final "Brontes" started - Eclipse中不能正常启动的解决方法
在使用Eclipse + Jboss插件时,如果有时写配置文件写错,在重新启动发布JBoss时,会出现: 14:43:49,317 INFO [org.jboss.as] (Controller B ...
- [转]Windows系统中监控文件复制操作的几种方式
1. ICopyHook 作用: 监视文件夹和打印机移动,删除, 重命名, 复制操作. 可以得到源和目标文件名. 可以控制拒绝操作. 缺点: 不能对文件进行控制. 只对Shell文件操作有效, 对原生 ...
- Apache Shiro 使用手册(一)Shiro架构介绍
一.什么是Shiro Apache Shiro是一个强大易用的Java安全框架,提供了认证.授权.加密和会话管理等功能: 认证 - 用户身份识别,常被称为用户"登录": 授权 - ...
- python学习-day20、装饰器【图片缺失可看】印象笔记博客备份
前言: 装饰器用于装饰某些函数或者方法,或者类.可以在函数执行之前或者执行之后,执行一些自定义的操作. 1.定义:装饰器就是一个函数,为新定义的函数.把原函数嵌套到新函数里面.以后就可以在执行新函数的 ...
- linux 下 ntfs移动硬盘挂载
fdisk -l Disk /dev/sdb: 500.0 GB, 500074283008 bytes255 heads, 63 sectors/track, 60797 cylindersUnit ...
- Bugtags 2016-06-16 更新内容
增加版本管理功能 随着版本的增多,有些历史的版本不再使用,可将这些版本隐藏起来.操作步骤如下:点击设置 - 版本管理(管理员可见)- 取消勾选需要隐藏的版本即可.隐藏版本后,版本筛选中将不会显示,但不 ...
- 炉石复盘 宇宙法vs复活牧 [20161130]
选宇宙法完成使用50个法师职业牌的任务,遇到一个复活牧泰兰德. 前中期下怪,解场.虽然宇宙法偏娱乐,但牧师节奏也比较慢,因此血线一度降到10血以下,但仍然不惧怕牧师斩杀. 9费牧师拍下伊瑟拉,解不掉, ...
- UINavigationItem UINavigationBar 关系分析[转]
http://blog.csdn.net/luoyeffcs/article/details/16106707 目录 1.关系分析 2.关系综述 3.概念点 4.疑问 1.关系分析 UIBarItem ...