阿里云上的Centos 7.6的一次Nginx+Mysql+PHP7.3 部署
阿里云申请了一台服务器 Centos 7.6,每次安装都要上网找一大堆教程,因为不熟悉,因为总是忘记。
所以,有时间的时候,还是记录下自己的学习过程,有助于下次的问题解决。
我先总结下:
1)安装VSFTP太麻烦,主要是端口麻烦,必须要开21端口和其他的数据端口,最好使用rz 替代
2)ningx php配置中遇到一些小问题,主要是文件夹权限问题、php-fpm没有启动问题
一、登录如何登录Centos 7.6
阿里云服务器是别人申请的,给的时候就是阿里云的网站登录用户名和密码和阿里云web页面的远程登录的密码。那么如何登录远程服务器呢,不能像Windows那样使用“远程桌面连接”很是烦恼。
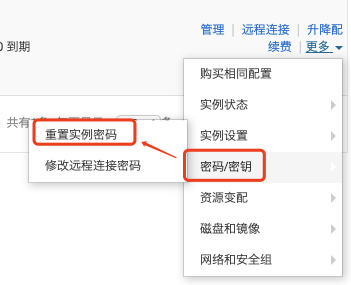
1.登录到阿里云后台,找到实例列表,再最后有个功能菜单,点击更多>密码/秘钥>重置实例密码,弹出密码重置页面,重置密码即可。
2.重置后,重启实例
3.使用SSH工具,我使用的是SecureCRT7.3.0 (mac 系统),新建一个session,填写好IP、用户名即可。
4.双击SecureCRT中的session,表示可以通过SecureCRT登录。
Last login: Wed Apr  3 18:19:55 2019

Welcome to Alibaba Cloud Elastic Compute Service !

[root@iZbp1edef2k4kmoqb9ypfvZ ~]#
注意:一定要在阿里云重置密码后才能在此SecureCRT登录成功。否则会报错。
二、配置生成环境软件
这台服务器主要运行PHP,但我希望使用Ningx来配合完成PHP的配置,这样后期扩展会好点。Apache现在使用的人少,而且配置繁琐。那么这台服务器需要安装
1.Ningx

2.Ftp 为了方便后期文件传输

3.PHP 7最新稳定版本

4.Mysql 5.6稳定版本

5.配置站点
1.Ngnix安装与配置
1.1 安装nginx
使用命令yum install -y nginx 进行安装,注意我的阿里云centos里面已经安装了yum,没有安装的yum请自行搜索安装方法。
yum install -y nginx

... ... 中间省略

Installed:

  nginx.x86_64 1:1.12.2-2.el7

... ....

Complete!
1.2 查询nginx
[root@iZbp1edef2k4kmoqb9ypfvZ ~]# which nginx

/usr/sbin/nginx

[root@iZbp1edef2k4kmoqb9ypfvZ local]# whereis nginx

nginx: /usr/sbin/nginx /usr/lib64/nginx /etc/nginx /usr/share/nginx /usr/share/man/man8/nginx.8.gz /usr/share/man/man3/nginx.3pm.gz
nginx路径 /usr/sbin/nginx
nginx配置路径 /etc/nginx
1.3 启动nginx
#启动

cd /usr/local/nginx #一般是这个目录 可以使用上面的查询命令来查询

./nginx

#重启

nginx -t #判断配置是否正确

nginx -s reload #重新加载配置,重启nginx,这个设置有延迟

#关闭

ps -ef|grep nginx #查找nginx进程号

kill -QUIT #从容停止   主进程号

 kill -TERM #快速停止  主进程号

kill -9 nginx #强制停止
实际上在命令窗口输入
nginx
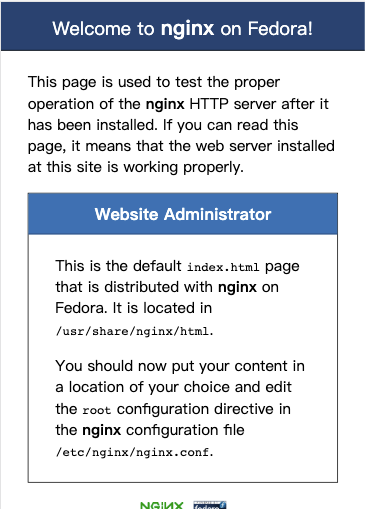
在浏览器访问公网IP,如下图,说明nginx部署好了
2.安装FTP服务器
网上看了下,大多是vsftpd教程,具体操作如下
2.1 FTP安装
yum install -y vsftpd

Loaded plugins: fastestmirror

... ... 省略

Complete!
2.2 查看ftp安装位置信息
[root@iZbp1edef2k4kmoqb9ypfvZ home]# whereis vsftpd

vsftpd: /usr/sbin/vsftpd /etc/vsftpd /usr/share/man/man8/vsftpd.8.gz
2.2 FTP启动
#设置开机启动

systemctl enable vsftpd.service

#启动

systemctl start vsftpd.service

#停止

systemctl stop vsftpd.service

#查看状态

systemctl status vsftpd.service
2.3 配置FTP
/etc/vsftpd/vsftpd.conf 此为配置文件
直接在命令中执行
vim /etc/vsftpd/vsftpd.conf
具体配置如下
#显示行号

:set number

#修改配置 12 行 设置为NO 禁止匿名用户

anonymous_enable=NO

#修改配置 33 行 开启读写权限

anon_mkdir_write_enable=YES

#修改配置48行 设定是否允许 改变 上传文件的属主 , 与下面一个设定项配合使用

chown_uploads=YES

#修改配置73行 如果 FTP client 会下达“async ABOR”这个指令时,这个设定才需要启用,而一般此设定并不安全,所以通常将其取消

async_abor_enable=YES

#修改配置83行 大多数 FTP 服务器都选择用 ASCII 方式传输数据 , 将 # 去掉就能实现用 ASCII 方式上传和下载文件

ascii_upload_enable=YES

#修改配置84行 将 # 去掉就能实现用 ASCII 方式下载文件

ascii_download_enable=YES

#修改配置87行 将#去掉可设置登录FTP服务器时显示的欢迎信息

ftpd_banner=Welcome to blah FTP service.

#修改配置101行

chroot_local_user=YES

#添加下列内容到vsftpd.conf末尾

use_localtime=YES

#端口号  可以修改

listen_port=21

idle_session_timeout=300

guest_enable=YES

guest_username=vsftpd

user_config_dir=/etc/vsftpd/vconf

data_connection_timeout=1

#启动被动模式

virtual_use_local_privs=YES

pasv_min_port=40000

pasv_max_port=40010

accept_timeout=5

connect_timeout=1

allow_writeable_chroot=YES
2.4 建立用户文件(用户名密码)
在命令中输入
#创建编辑用户文件

vim /etc/vsftpd/virtusers

#第一行为用户名,第二行为密码。不能使用root作为用户名

abcname

abc123sFJH
2.5 生成用户数据文件
db_load -T -t hash -f /etc/vsftpd/virtusers /etc/vsftpd/virtusers.db

#设定PAM验证文件,并指定对虚拟用户数据库文件进行读取

chmod 600 /etc/vsftpd/virtusers.db
2.6 修改/etc/pam.d/vsftpd PAM认证文件
# 修改前先备份

cp /etc/pam.d/vsftpd /etc/pam.d/vsftpd.bak

#编辑vsftpd文件

vi /etc/pam.d/vsftpd

#先将配置文件中原有的 auth 及 account 的所有配置行均注释掉,添加下面两行

auth sufficient /lib64/security/pam_userdb.so db=/etc/vsftpd/virtusers

account sufficient /lib64/security/pam_userdb.so db=/etc/vsftpd/virtusers

# 如果系统为32位,上面改为lib
2.7 新建系统用户vsftpd,用户目录为/home/vsftpd
#用户登录终端设为/bin/false(即:使之不能登录系统,只能登陆ftp)

useradd vsftpd -d /home/vsftpd -s /bin/false

chown -R vsftpd:vsftpd /home/vsftpd
2.8 建立虚拟用户个人配置文件
#建立vconf文件夹

mkdir /etc/vsftpd/vconf

cd /etc/vsftpd/vconf

#这里建立虚拟用户abcname配置文件

touch abcname

#编辑abcname用户配置文件,内容如下,其他用户类似

vi abcname

local_root=/home/vsftpd/abcname/

write_enable=YES

anon_world_readable_only=NO

anon_upload_enable=YES

anon_mkdir_write_enable=YES

anon_other_write_enable=YES

#建立abcname用户根目录

mkdir -p /home/vsftpd/abcname/
2.9 设置防火墙
IPtables 的设置方式:

vi /etc/sysconfig/iptables

#编辑iptables文件,添加如下内容,开启21端口

-A INPUT -m state --state NEW -m tcp -p tcp --dport 21 -j ACCEPT

-A INPUT -m state --state NEW -m tcp -p tcp --dport 40000:40010 -j ACCEPT

firewall 的设置方式:

firewall-cmd --zone=public --add-service=ftp --permanent

firewall-cmd --zone=public --add-port=21/tcp --permanent

firewall-cmd --zone=public --add-port=40000-40010/tcp --permanent
2.10 重启vsftpd
systemctl restart vsftpd.service
问题:
总是提示
425 Failed to establish connection.
服务器发回了不可路由的地址。使用服务器地址代替。
网上的解决方案有几种
1.对ftp目录设置权限
chmod -R 775 /home/vsftpd/abcname
2.禁用selinux
#打开SELINUX配置文件

vim /etc/selinux/config

#修改配置参数

#注释

SELINUX=enforcing

#增加

SELINUX=disabled

#修改完成后,需要重启!
3.设置selinux不对vsftpd做限制
setsebool -P ftpd_connect_all_unreserved 1
我看了几点都符合还是不行
4.设置阿里云安全组目录
2.11 使用rz和sz工具
VSFTP安装太麻烦,那么就使用rz上传 和sz下载
yum install lrzsz -y
即可
使用的时候
上传 输入 rz 会弹出文件选择框
3.安装mysql
3.1 安装源
yum localinstall http://dev.mysql.com/get/mysql57-community-release-el7-7.noarch.rpm
3.2 安装mysql
yum install mysql-community-server
3.3 启动
service mysqld start
3.4 查看状态
service mysqld status
3.5 查看初始密码
[root@iZbp1edef2k4kmoqb9ypfvZ ~]# grep "password" /var/log/mysqld.log

2019-04-03T13:52:00.811914Z 1 [Note] A temporary password is generated for root@localhost:
3.6 修改初次密码
mysql> alter user user() identified by 'xxxxxxxx';
3.7 创建数据库
CREATE DATABASE IF NOT EXISTS fpshop default charset utf8 COLLATE utf8_general_ci;
3.8 开启远程登录
有的时候,需要开启远程登录
#查询当前用户host

select user,host from user;

#新建允许远程链接mysql数据库的用户

grant all on *.* to sa@'%' identified by '123456' with grant option;

flush privileges;
4.安装PHP7
4.1 添加最新版本7.3到本地仓储
sudo yum -y install http://rpms.remirepo.net/enterprise/remi-release-7.rpm

sudo yum -y install epel-release yum-utils
4.2 禁用老版本php 5.4
sudo yum-config-manager --disable remi-php54

sudo yum-config-manager --enable remi-php73
4.3 安装php7.3
sudo yum -y install php php-cli php-fpm php-mysqlnd php-zip php-devel php-gd php-mcrypt php-mbstring php-curl php-xml php-pear php-bcmath php-json
$ php -v

 PHP 7.3.1 (cli) (built: Jan  8 2019 13:55:51) ( NTS )

 Copyright (c) 1997-2018 The PHP Group

 Zend Engine v3.3.1, Copyright (c) 1998-2018 Zend Technologies
4.4 安装php7.3扩展
sudo yum install php-<entension-name>
例如安装mysqld
sudo yum install php-mysql
5.Nginx、PHP、Mysql的 Web站点综合配置
5.1 编辑nginx.conf 增加站点配置文件
#转到nginx配置文件

cd /etc/nginx/conf
#增加conf.d文件夹
mkdir conf.d

#编辑nginx配置文件

vi nginx.conf
#在nginx.conf末尾增加
include /usr/local/etc/nginx/conf.d/*.conf;
这里设置单独的站点配置文件,增加站点conf,default.conf
#增加一个server节点的配置
server {

  listen    80;#这里是您的外网开放的端口

  server_name www.youdomain.com;#这里是您的域名

	error_page   405 =200 @405;#可忽略,做了405处理

  root /Users/jiaojunkang/Documents/project/baihuiyuan/src/source/xshop/; # 该项要修改为你准备存放相关网页的路径

  #设置location根节点

  location / {

    index index.php;

    autoindex on;

  }

  #proxy the php scripts to php-fpm php的代理php-fpm设置

  location ~ \.php$ {

   include /usr/local/etc/nginx/fastcgi.conf;

   proxy_redirect off;

  proxy_set_header Host $http_host;

  proxy_set_header X-Forwarded-Proto $scheme;

  proxy_set_header X-Real-IP $remote_addr;

  proxy_set_header Upgrade $http_upgrade;

  proxy_set_header X-Forwarded-For $proxy_add_x_forwarded_for;

   proxy_connect_timeout 18000;

  proxy_send_timeout 18000;

  proxy_read_timeout 18000;

    fastcgi_intercept_errors on;

    fastcgi_pass  127.0.0.1:9000;#fpm代理端口

  }

  location @405{

  add_header Content-Length 0;

  add_header Content-Type text/plain;

  add_header Access-Control-Allow-Headers *;

  add_header Access-Control-Allow-Methods *;

  add_header Access-Control-Allow-Origin *;

  return 200;

  }

}
5.2 在站点文件中增加test.php
<?

phpinfo();

?>
问题:
Nginx出现could not build the server_names_hash 解决办法
在配置文件的http{}段增加一行配置
server_names_hash_bucket_size 512;
nginx: [warn] conflicting server name "localhost" on 0.0.0.0:80, ignored
这个警告可以忽略
connect() failed (111: Connection refused) while connecting to upstream
php-fpm没有启动,启动就好了
service php-fpm start
nginx 403
目标文件夹没有设置权限
chmod -R 777 floder
三、Centos安全配置
参考文档
https://computingforgeeks.com/how-to-install-php-7-3-on-centos-7-fedora/ (php7.3)
https://www.cnblogs.com/leoxuan/p/8329998.html (vsftp)
https://www.cnblogs.com/kai364/p/6250816.html (mysql)
阿里云上的Centos 7.6的一次Nginx+Mysql+PHP7.3 部署的更多相关文章
- 阿里云服务器Linux CentOS安装配置(八)nginx安装、配置、域名绑定
阿里云服务器Linux CentOS安装配置(八)nginx安装.配置.域名绑定 1.安装nginx yum -y install nginx 2.启动nginx service nginx star ...
- 阿里云Linux CentOS8.1 64位服务器安装LNMP(Linux+Nginx+MySQL+PHP)
LNMP环境和软件版本: 名称 版本号 查询命令 Linux系统 CentOS Linux release 8.1.1911 (Core) cat /etc/redhat-release Nginx ...
- 阿里云Linux CentOS8.1 64位服务器安装LNMP(Linux+Nginx+MySQL+PHP) 并发调试之Nginx配置
搭建好LNMP环境之后,接着要考虑的就是整个系统的并发能力了. 一.Nginx的配置 Nginx有很好的并发能力.但是要想使它的并发能力能够施展出来,需要在初步安装好的Nginx上做一些配置.主要需要 ...
- 阿里云Linux CentOS8.1 64位服务器安装LNMP(Linux+Nginx+MySQL+PHP) 并发调试之调试工具ab(apache bench)
ab 测试工具,全称是 apache bench ,是 Apache 提供的一款测试工具,具有简单易上手的特点,在测试 Web 服务时非常实用. ab 可以在 Windows 系统中使用,也可以在 L ...
- 阿里云Linux CentOS8.1 64位服务器安装LNMP(Linux+Nginx+MySQL+PHP) 并发调试之MySQL配置
mysql高并发配置 要在mysqld下设置 1. 修改back_log参数值:由默认的50修改为500.(每个连接256kb,占用:125M) back_log=500 back_log值指出MyS ...
- 阿里云Linux CentOS8.1 64位服务器安装LNMP(Linux+Nginx+MySQL+PHP) 并发调试之php-fpm配置及其与Nginx的通信
一.php-fpm的配置 1. php-fpm的配置,首先要关注进程数量. php-fpm的进程管理方式有三种:static.dynamic.ondemand. static方式,开启固定数量(pm. ...
- 阿里云服务器Linux CentOS安装配置(零)目录
阿里云服务器Linux CentOS安装配置(零)目录 阿里云服务器Linux CentOS安装配置(一)购买阿里云服务器 阿里云服务器Linux CentOS安装配置(二)yum安装svn 阿里云服 ...
- 阿里云服务器Linux CentOS安装配置(九)shell编译、打包、部署
阿里云服务器Linux CentOS安装配置(九)shell编译.打包.部署 1.查询当前目录以及子目录下所有的java文件,并显示查询结果 find . -name *.java -type f - ...
- 阿里云服务器Linux CentOS安装配置(七)域名解析
阿里云服务器Linux CentOS安装配置(七)域名解析 1.购买域名 登录阿里云,左侧菜单点击[域名],然后[域名注册],完成域名购买.(一般首年45元) 2.添加域名解析 在域名列表里点击你的域 ...
随机推荐
- 利用Python爬去囧网福利(多线程、urllib、request)
import os; import urllib.request; import re; import threading;# 多线程 from urllib.error import URLErro ...
- ASP.NET Core SignalR中的流式传输
什么是流式传输? 流式传输是这一种以稳定持续流的形式传输数据的技术. 流式传输的使用场景 有些场景中,服务器返回的数据量较大,等待时间较长,客户端不得不等待服务器返回所有数据后,再进行相应的操作.这时 ...
- Spring中bean实例化的三种方式
之前我已经有好几篇博客介绍Spring框架了,不过当时我们都是使用注解来完成注入的,具体小伙伴可以参考这几篇博客(Spring&SpringMVC框架案例).那么今天我想来说说如何通过xml配 ...
- Android模拟器Genymotion使用详解
介绍 Genymotion是一款出色的跨平台的Android模拟器,具有容易安装和使用.运行速度快的特点,是Android开发.测试等相关人员的必备工具. 官网地址:https://www.genym ...
- 优雅的启动、停止、重启你的SpringBoot项目
前言 你是如何启动.关闭你的SpringBoot项目的?还是使用java -jar xxxx.jar启动? 还在用ps -ef找到你的pid去kill你的应用吗? 让我们来看看还有什么更加优雅的一键启 ...
- 使用RESTful风格开发Java Web
什么是RESTful风格? REST是REpresentational State Transfer的缩写(一般中文翻译为表述性状态转移),REST 是一种体系结构,而 HTTP 是一种包含了 RES ...
- leetcode — symmetric-tree
import java.util.Stack; /** * Source : https://oj.leetcode.com/problems/symmetric-tree/ * * * Given ...
- -1-5 java 多线程 概念 进程 线程区别联系 java创建线程方式 线程组 线程池概念 线程安全 同步 同步代码块 Lock锁 sleep()和wait()方法的区别 为什么wait(),notify(),notifyAll()等方法都定义在Object类中
本文关键词: java 多线程 概念 进程 线程区别联系 java创建线程方式 线程组 线程池概念 线程安全 同步 同步代码块 Lock锁 sleep()和wait()方法的区别 为什么wait( ...
- 如何解决svn清理失败 不能更新 cleanup失败 cleanup乱码 更新乱码 svn更新提示清理 清理乱码不能清理 svn故障修复SVN cleanup 陷入死循环 svn cleanup时遇到错误怎么办
平时使用svn的过程中,有的时候由于自己操作故障或者系统原因,导致svn不能更新,提示cleanup也不能成功,陷入了死循环 原因是;svn的数据库队列原因 1,下载sqlite3.exe,googl ...
- Python机器学习笔记 异常点检测算法——Isolation Forest
Isolation,意为孤立/隔离,是名词,其动词为isolate,forest是森林,合起来就是“孤立森林”了,也有叫“独异森林”,好像并没有统一的中文叫法.可能大家都习惯用其英文的名字isolat ...