基于mykernel完成多进程的简单内核
学号351
原创作品转载请注明出处 + https://github.com/mengning/linuxkernel/
mykernel简介
mykernel是由孟宁老师建立的一个用于开发您自己的操作系统内核的平台,基于Linux Kernel 3.9.4 source code mykernel的源代码 https://github.com/mengning/mykernel ,
你可以按照上面的指南部署到你的操作系统,也可以使用实验楼提供的虚拟机,该虚拟机上已经部署好这个平台,只需按照实验二的步骤即可运行这个平台框架。本文实验完成于实验楼。
具体操作:
cd LinuxKernel/linux-3.9.4
rm -rf mykernel
patch -p1 < ../mykernel_for_linux3.9.4sc.patch
make allnoconfig
make
qemu -kernel arch/x86/boot/bzImage
就可以在qemu上看到运行结果
如图: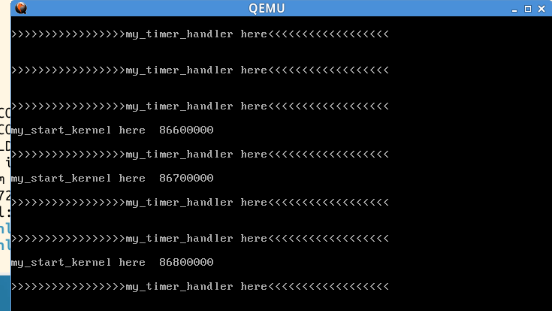
可以看出:
>>>>>>>>>>>>>>>my_timer_handler here<<<<<<<<<<和>>>>>>>>>>>>>>>my_start_kernel here<<<<<<<<<<<<<<<<会无限循环输出。
接着查看mymian.c和myinterrupt.c文件
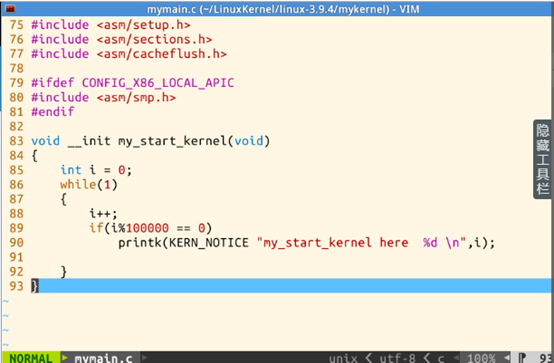
其中的my_start_kernel函数中有一个循环,不断输出my_start_kernel here
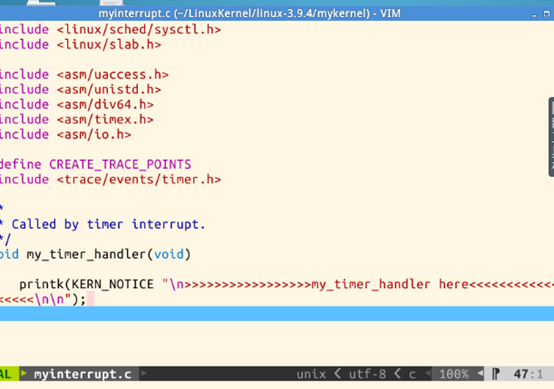
有一个会被时钟中断周期调用的函数my_timer_handler。在这个函数里,会输出类似>>>>>my_timer_handler here<<<<< 的字符串。
这两个函数的输出就是我们在窗口看到的内容,
当mykernel系统启动后,就会调用my_start_kernel函数(满足条件i%10000==0),周期性调用my_timer_handler函数
实现一个简单的时间片轮转多道程序
接下来我们通过扩展my_start_kernel和my_timer_handler函数,模拟了一个基于时间片轮转的多道程序。
1,实验步骤:
(1)从实验用的源代码,https://github.com/mengning/mykernel通过git-clone命令下载到mykernel平台。主要就这三个文件:mypcb.h,myinterrupt.c和mymain.c
(2)回到LinuxKernel/linux-3.9.4文件夹,使用下面的命令编译、运行
具体操作如下:
cd ../ #回到linux-3.9.4目录
make allnoconfig
make
qemu -kernel arch/x86/boot/bzImage
2,运行结果如图:

3,源码分析
mypcb. h:进程控制块PCB结构体定义。
- /*
- * linux/mykernel/mypcb.h
- *
- * Kernel internal PCB types
- *
- * Copyright (C) 2013 Mengning
- *
- */
- #define MAX_TASK_NUM 4
- #define KERNEL_STACK_SIZE 1024*2 # unsigned long
- /* CPU-specific state of this task */
- struct Thread { //用于保存erp,esp
- unsigned long ip;
- unsigned long sp;
- };
- typedef struct PCB{
- int pid;
- volatile long state; /* -1 unrunnable, 0 runnable, >0 stopped */
- unsigned long stack[KERNEL_STACK_SIZE];
- /* CPU-specific state of this task */
- struct Thread thread;
- unsigned long task_entry;
- struct PCB *next;
- }tPCB;
- void my_schedule(void);
其中各个字段含义如下:
pid:进程号
state:进程状态,在模拟系统中,所有进程控制块信息都会被创建出来,其初始化值就是-1,如果被调度运行起来,其值就会变成0
stack:进程使用的堆栈
thread:当前正在执行的线程信息
task_entry:进程入口函数
next:指向下一个PCB,模拟系统中所有的PCB是以链表的形式组织起来的。
my_schedule:函数声明,在my_interrupt.c中实现,在mymain.c中的各个进程函数会根据一个全局变量的状态来决定是否调用它,从而实现主动调度。
mymain.c: 初始化各个进程并启动0号进程。
- /*
- * linux/mykernel/mymain.c
- *
- * Kernel internal my_start_kernel
- *
- * Copyright (C) 2013 Mengning
- *
- */
- #include <linux/types.h>
- #include <linux/string.h>
- #include <linux/ctype.h>
- #include <linux/tty.h>
- #include <linux/vmalloc.h>
- #include "mypcb.h"
- tPCB task[MAX_TASK_NUM];
- tPCB * my_current_task = NULL;
- volatile int my_need_sched = ;
- void my_process(void);
- void __init my_start_kernel(void)
- {
- int pid = ;
- int i;
- /* Initialize process 0*/
- task[pid].pid = pid;
- task[pid].state = ;/* -1 unrunnable, 0 runnable, >0 stopped */
- task[pid].task_entry = task[pid].thread.ip = (unsigned long)my_process;
- task[pid].thread.sp = (unsigned long)&task[pid].stack[KERNEL_STACK_SIZE-];
- task[pid].next = &task[pid];
- /*fork more process,每个进程都有自己的堆栈,并指向下一个进程 */
- for(i=;i<MAX_TASK_NUM;i++)
- {
- memcpy(&task[i],&task[],sizeof(tPCB));
- task[i].pid = i;
- //*(&task[i].stack[KERNEL_STACK_SIZE-1] - 1) = (unsigned long)&task[i].stack[KERNEL_STACK_SIZE-1];
- task[i].thread.sp = (unsigned long)(&task[i].stack[KERNEL_STACK_SIZE-]);
- task[i].next = task[i-].next;
- task[i-].next = &task[i];
- }
- /* 从第0个进程开始 */
- pid = ;
- my_current_task = &task[pid];
- asm volatile(
- "movl %1,%%esp\n\t" /* set task[pid].thread.sp to esp */
- "pushl %1\n\t" /* push ebp */
- "pushl %0\n\t" /* push task[pid].thread.ip */
- "ret\n\t" /* pop task[pid].thread.ip to eip */
- :
- : "c" (task[pid].thread.ip),"d" (task[pid].thread.sp) /* input c or d mean %ecx/%edx*/
- );
- }
- int i = ;
- void my_process(void)
- {
- while()
- {
- i++;
- if(i% == )
- {
- printk(KERN_NOTICE "this is process %d -\n",my_current_task->pid);
- if(my_need_sched == ) //ny_need_sched=1时才会调度
- {
- my_need_sched = ;
- my_schedule();
- }
- printk(KERN_NOTICE "this is process %d +\n",my_current_task->pid);
- }
- }
- }
系统启动后,最先调用函数my_start_kernel,在这个函数里完成了0号进程的初始化和启动,并创建了其它的进程PCB,以方便后面的调度。在模拟系统里,每个进程的入口函数都是 my_process,在执行的时候,会打印出当前进程的 id。
另外,在 my_process 会检查一个全局标志变量 my_need_sched,一旦发现其值为 1 ,就调用 my_schedule 完成进程的调度。
myinterrupt.c:时钟中断处理和进程调度算法。
- /*
- * linux/mykernel/myinterrupt.c
- *
- * Kernel internal my_timer_handler
- *
- * Copyright (C) 2013 Mengning
- *
- */
- #include <linux/types.h>
- #include <linux/string.h>
- #include <linux/ctype.h>
- #include <linux/tty.h>
- #include <linux/vmalloc.h>
- #include "mypcb.h"
- extern tPCB task[MAX_TASK_NUM];
- extern tPCB * my_current_task;
- extern volatile int my_need_sched;
- volatile int time_count = ;
- /*
- * Called by timer interrupt.
- * it runs in the name of current running process,
- * so it use kernel stack of current running process
- */
- void my_timer_handler(void)
- {
- #if 1
- if(time_count% == && my_need_sched != ) //设置时间片大小,时间片用完设置调度标志
- {
- printk(KERN_NOTICE ">>>my_timer_handler here<<<\n");
- my_need_sched = ;
- }
- time_count ++ ;
- #endif
- return;
- }
- void my_schedule(void)
- {
- tPCB * next;把当前
- tPCB * prev;
- if(my_current_task == NULL
- || my_current_task->next == NULL)
- {
- return;
- }
- printk(KERN_NOTICE ">>>my_schedule<<<\n");
- /* schedule */
- next = my_current_task->next; //把当前进程的下一个进程赋值给next
- prev = my_current_task;
- if(next->state == )/* 下一个进程正在执行*/
- {
- my_current_task = next;
- printk(KERN_NOTICE ">>>switch %d to %d<<<\n",prev->pid,next->pid);
- /* switch to next process */
- asm volatile( //切换进程
- "pushl %%ebp\n\t" /* save ebp */
- "movl %%esp,%0\n\t" /* 把当前进程的esp赋给prev->thread.sp,保存*/
- "movl %2,%%esp\n\t" /* 把下一进程的next->thread.sp赋给esp */
- "movl $1f,%1\n\t" /* save eip */
- "pushl %3\n\t"
- "ret\n\t" /*把下一进程的next->thread.ip进栈*/
- "1:\t" /* 下一进程开始执行*/
- "popl %%ebp\n\t"
- : "=m" (prev->thread.sp),"=m" (prev->thread.ip)
- : "m" (next->thread.sp),"m" (next->thread.ip)
- );
- }
- return;
- }
内核周期性调用my_timer_handler 函数,每调用1000次,就去将全局变量my_need_sched的值修改为1,通知正在执行的进程执行调度程序my_schedule。在my_schedule函数中,完成进程的切换。
总结
经过该次试验,我们对操作系统的进程调度机制和中断机制有了更新的认识,也对之前学的内容作了一次复习。Linux操作系统由内核来实现它的具体工作的,系统通过调用fork()函数来创建的一个进程,他先是将先前CPU正在运行的进程的进程上下文保存在内核态堆栈中,包括有eip,esp,ebp,cs等寄存器的数据;然后加载创建的进程的上下文信息到相应的寄存器中,运行当前新建进程;运行完毕后根据系统的调度继续执行相应的进程。同时,操作系统以一种中断的机制实现与用户的交互。操作系统中的IDT描述好各个中断对应的处理程序,当发生相对应的中断时,由硬件来实现中断信号的传递,CPU接收到相应的IRQ信号后,由操作系统如调度进程那样调度相应的处理程序,来完成相应的中断请求,实现与用户的交互。
基于mykernel完成多进程的简单内核的更多相关文章
- 基于mykernel完成时间片轮询多道进程的简单内核
基于mykernel完成时间片轮询多道进程的简单内核 原创作品转载请注明出处+中科大孟宁老师的linux操作系统分析:https://github.com/mengning/linuxkernel/ ...
- web 框架的本质及自定义web框架 模板渲染jinja2 mvc 和 mtv框架 Django框架的下载安装 基于Django实现的一个简单示例
Django基础一之web框架的本质 本节目录 一 web框架的本质及自定义web框架 二 模板渲染JinJa2 三 MVC和MTV框架 四 Django的下载安装 五 基于Django实现的一个简单 ...
- 基于TINY4412的Andorid开发-------简单的LED灯控制【转】
本文转载自:http://www.cnblogs.com/pengdonglin137/p/3857724.html 基于TINY4412的Andorid开发-------简单的LED灯控制 阅读 ...
- 基于mykernel 2.0编写一个操作系统内核
一.配置mykernel 2.0,熟悉Linux内核的编译 1.实验环境:VMware 15 Pro,Ubuntu 18.04.4 2.配置环境 1)在电脑上先下载好以下两个文件,之后通过共享文件夹, ...
- 基于Server-Sent Event的简单聊天室 Web 2.0时代,即时通信已经成为必不可少的网站功能,那实现Web即时通信的机制有哪些呢?在这门项目课中我们将一一介绍。最后我们将会实现一个基于Server-Sent Event和Flask简单的在线聊天室。
基于Server-Sent Event的简单聊天室 Web 2.0时代,即时通信已经成为必不可少的网站功能,那实现Web即时通信的机制有哪些呢?在这门项目课中我们将一一介绍.最后我们将会实现一个基于S ...
- 基于Python使用SVM识别简单的字符验证码的完整代码开源分享
关键字:Python,SVM,字符验证码,机器学习,验证码识别 1 概述 基于Python使用SVM识别简单的验证字符串的完整代码开源分享. 因为目前有了更厉害的新技术来解决这类问题了,但是本文作 ...
- Python 基于Python及zookeeper实现简单分布式任务调度系统设计思路及核心代码实现
基于Python及zookeeper实现简单分布式任务调度系统设计思路及核心代码实现 by:授客 QQ:1033553122 测试环境 功能需求 实现思路 代码实践(关键技术点实现) 代码模块组织 ...
- 炸金花游戏(3)--基于EV(期望收益)的简单AI模型
前言: 炸金花这款游戏, 从技术的角度来说, 比德州差了很多. 所以他的AI模型也相对简单一些. 本文从EV(期望收益)的角度, 来尝试构建一个简单的炸金花AI. 相关文章: 德州扑克AI--Prog ...
- 《Linux设备驱动开发具体解释(第3版)》(即《Linux设备驱动开发具体解释:基于最新的Linux 4.0内核》)网购链接
<Linux设备驱动开发具体解释:基于最新的Linux 4.0内核> china-pub spm=a1z10.3-b.w4011-10017777404.30.kvceXB&i ...
随机推荐
- jenkins 构建nodejs-pipeline流水风格的任务
Step3 上图代码如下 node("master"){ //warp([$class:'BuildUser']) {BUILD_USER = BUILD_USER} GIT_NA ...
- 二.误删除MySQL用户,恢复方法
误删除MySQL用户导致无法进入数据库 一.方法一 1.停止数据库 [root@db02 ~]# /etc/init.d/mysqld stop 2.跳过授权表,跳过网络启动数据库 [root@db0 ...
- linux基础之CentOS7新特性
CentOS7开机启动顺序: POST --> Boot Sequence --> Bootloader --> kernel + initramfs(initrd) --> ...
- combineReducers
const reactInit = '@@react/Init' const combineReducers = (reducers) => { const finalReducers = {} ...
- UVA11020 Efficient Solutions
思路 先判断一个点能不能插入,能插入的话删除所有因为它而没有优势的点 注意 写 S.erase(it); it++; 会RE 要写 S.erase(it++); 代码 #include <cst ...
- Linux常用命令——软件包管理
Linux常用命令--软件包管理 Linux 模块依赖查询网址http://www.rpmfind.net/ ISO挂载 将所需ISO文件添加到虚拟机 建立挂载文件夹mkdir /mnt/cdrom ...
- vim中文乱码问题
问题如下: 修改 /etc/vimrc 文件 添加: ,ucs-bom,gb18030,gbk,gb2312,cp936 把/etc/vimrc复制到你自己的根目录下面:复制为.vimrc(前面有个点 ...
- css中绝对定位和相对定位的区别
先说个技巧一般用:子绝父相,即相对定位是给父级的,绝对定位的时候是给子级的. 一:绝对定位 position: absolute;绝对定位:绝对定位是相对于元素最近的已定位的祖先元素(即是设置了绝对定 ...
- Jenkins去GitLab拉取Java代码自动打包
jenkins的部署 一.部署git 1)先检查系统是否已经自带了git,如果有,就卸载 $ rpm -qa | grep git && rpm -e git --nodeps 2)开 ...
- shell 的多进程
例子 #!/bin/bash temp_fifo_file=$$.info #以当前进程号,为临时管道取名 mkfifo $temp_fifo_file #创建临时管道 exec <>$t ...