Restrramework源码(包含组件)分析
1.总体流程分析
rest_framework/view.py
请求通过url分发,触发as_view方法,该方法在ViewSetMixin类下

点进去查看as_view源码说明,可以看到它在正常情况下是zhix执行了self.dispatch(request, *args, **kwargs)方法
 @classonlymethod

    def as_view(cls, actions=None, **initkwargs):

        """

        Because of the way class based views create a closure around the

        instantiated view, we need to totally reimplement `.as_view`,

        and slightly modify the view function that is created and returned.

        """

        # The suffix initkwarg is reserved for displaying the viewset type.

        # eg. 'List' or 'Instance'.

        cls.suffix = None

        # The detail initkwarg is reserved for introspecting the viewset type.

        cls.detail = None

        # Setting a basename allows a view to reverse its action urls. This

        # value is provided by the router through the initkwargs.

        cls.basename = None

        # actions must not be empty

        if not actions:

            raise TypeError("The `actions` argument must be provided when "

                            "calling `.as_view()` on a ViewSet. For example "

                            "`.as_view({'get': 'list'})`")

        # sanitize keyword arguments

        for key in initkwargs:

            if key in cls.http_method_names:

                raise TypeError("You tried to pass in the %s method name as a "

                                "keyword argument to %s(). Don't do that."

                                % (key, cls.__name__))

            if not hasattr(cls, key):

                raise TypeError("%s() received an invalid keyword %r" % (

                    cls.__name__, key))

        def view(request, *args, **kwargs):

            self = cls(**initkwargs)

            # We also store the mapping of request methods to actions,

            # so that we can later set the action attribute.

            # eg. `self.action = 'list'` on an incoming GET request.

            self.action_map = actions

            # Bind methods to actions

            # This is the bit that's different to a standard view

            for method, action in actions.items():

                handler = getattr(self, action)

                setattr(self, method, handler)

            if hasattr(self, 'get') and not hasattr(self, 'head'):

                self.head = self.get

            self.request = request

            self.args = args

            self.kwargs = kwargs

            # And continue as usual

            return self.dispatch(request, *args, **kwargs)

        # take name and docstring from class

        update_wrapper(view, cls, updated=())

        # and possible attributes set by decorators

        # like csrf_exempt from dispatch

        update_wrapper(view, cls.dispatch, assigned=())

        # We need to set these on the view function, so that breadcrumb

        # generation can pick out these bits of information from a

        # resolved URL.

        view.cls = cls

        view.initkwargs = initkwargs

        view.suffix = initkwargs.get('suffix', None)

        view.actions = actions

        return csrf_exempt(view)
通过查找可以看到dispatch方法在这个class APIView(View)类里
class APIView(View):

    # The following policies may be set at either globally, or per-view.

    renderer_classes = api_settings.DEFAULT_RENDERER_CLASSES

    parser_classes = api_settings.DEFAULT_PARSER_CLASSES

    authentication_classes = api_settings.DEFAULT_AUTHENTICATION_CLASSES

    throttle_classes = api_settings.DEFAULT_THROTTLE_CLASSES

    permission_classes = api_settings.DEFAULT_PERMISSION_CLASSES

    content_negotiation_class = api_settings.DEFAULT_CONTENT_NEGOTIATION_CLASS

    metadata_class = api_settings.DEFAULT_METADATA_CLASS

    versioning_class = api_settings.DEFAULT_VERSIONING_CLASS

    # Allow dependency injection of other settings to make testing easier.

    settings = api_settings
从源码介绍我们可以看到,相关的组件,这里做了全局配置

请求到dispatch后,做了封装request和认证两件事,
def dispatch(self, request, *args, **kwargs):

    """

    `.dispatch()` is pretty much the same as Django's regular dispatch,

    but with extra hooks for startup, finalize, and exception handling.

    """

    self.args = args

    self.kwargs = kwargs

    # 对原始request进行加工,封装request

    request = self.initialize_request(request, *args, **kwargs)

    self.request = request

    self.headers = self.default_response_headers  # deprecate?

    try:

        # 认证

        self.initial(request, *args, **kwargs)

        # Get the appropriate handler method

        if request.method.lower() in self.http_method_names:

            handler = getattr(self, request.method.lower(),

                              self.http_method_not_allowed)

        else:

            handler = self.http_method_not_allowed

        response = handler(request, *args, **kwargs)

    except Exception as exc:

        response = self.handle_exception(exc)

    self.response = self.finalize_response(request, response, *args, **kwargs)

    return self.response
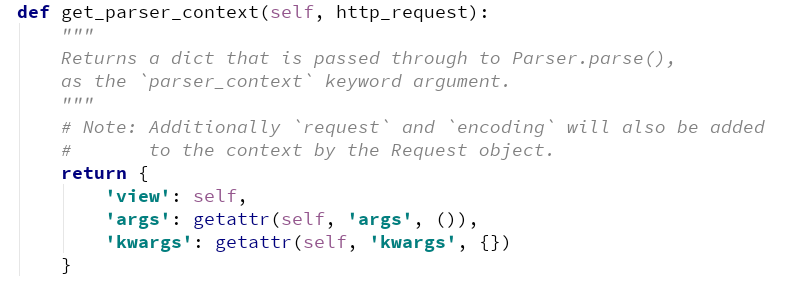
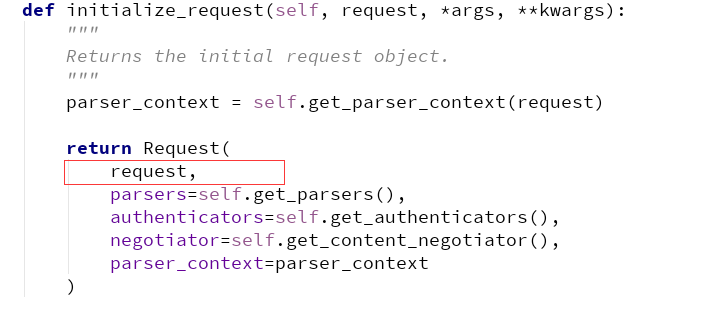
self.initialize_request(request, *args, **kwargs):--->封装request
def initialize_request(self, request, *args, **kwargs):

"""

Returns the initial request object.

"""

parser_context = self.get_parser_context(request)

return Request(

    request,

    parsers=self.get_parsers(),

    authenticators=self.get_authenticators(),

    negotiator=self.get_content_negotiator(),

    parser_context=parser_context

)
这里它返回了初始请求对象Request,它继承了Request类
其中的几个方法:


这里要说明的是最终的authentication_classes它到了全局去查找
接下来执行self.initial(request, *args, **kwargs),我们点进去,这是运行之前需要执行的方法
def initial(self, request, *args, **kwargs):

    """

    Runs anything that needs to occur prior to calling the method handler.

    """

    self.format_kwarg = self.get_format_suffix(**kwargs)

    # Perform content negotiation and store the accepted info on the request

    neg = self.perform_content_negotiation(request)

    request.accepted_renderer, request.accepted_media_type = neg

    # Determine the API version, if versioning is in use.

    version, scheme = self.determine_version(request, *args, **kwargs)

    request.version, request.versioning_scheme = version, scheme

    # Ensure that the incoming request is permitted

    self.perform_authentication(request)

    self.check_permissions(request)

    self.check_throttles(request)
调用方法处理程序之前,依次执行了四个restframework给我们的组件,版本管理,用户认证,权限,节流

这里自上而下执行,版本就没啥说了,先来看用户认证:
def perform_authentication(self, request):

    """

    Perform authentication on the incoming request.

    Note that if you override this and simply 'pass', then authentication

    will instead be performed lazily, the first time either

    `request.user` or `request.auth` is accessed.

    """

    request.user
需要说明的是,这里的request其实是封装之后的request,读者一般第一次看到这里可能会比较纳闷,request.user是啥,其实这里的user调用了property属性


这里的user方法说明,返回与当前请求关联的用户,由提供给请求的身份验证类进行身份验证。
对于这里的self._authenticate():
 def _authenticate(self):

        """

        Attempt to authenticate the request using each authentication instance

        in turn.

        """

        for authenticator in self.authenticators:

            try:

                user_auth_tuple = authenticator.authenticate(self)

            except exceptions.APIException:

                self._not_authenticated()

                raise

            if user_auth_tuple is not None:

                self._authenticator = authenticator

                self.user, self.auth = user_auth_tuple

                return

        self._not_authenticated()
这里循环我们的authenticator,如果有返回值则执行authenticate(self)方法,最终返回的是个元祖,其中有user,token两个值
如果上面方法执行抛出异常,则执行self._not_authenticated()方法,设置表示未经身份验证的请求的authenticator,user和authtoken。默认为None,AnonymousUser&None。
整个restframework声明周期在这里在说明一下:
发送请求-->Django的wsgi-->中间件-->路由系统_执行CBV的as_view(),就是执行内部的dispath方法-->在执行dispath之前,有版本分析 和 渲染器
在dispath内,对request封装-->版本-->认证-->权限-->限流-->视图-->如果视图用到缓存( request.data or request.query_params )就用到了 解析器-->视图处理数据,用到了序列化(对数据进行序列化或验证) -->视图返回数据可以用到分页
2.用户登录认证
对于rest_framework给我们提供的这个内置认证组件
在authentication.py文件下包含的认证类:

包含了这么多,但我们其实也是基于上面的BaseAuthentication来重写我们的用户认证,先来看看源码:
class BaseAuthentication(object):

    """

    All authentication classes should extend BaseAuthentication.

    """

    def authenticate(self, request):

        """

        Authenticate the request and return a two-tuple of (user, token).

        """

        raise NotImplementedError(".authenticate() must be overridden.")

    def authenticate_header(self, request):

        """

        Return a string to be used as the value of the `WWW-Authenticate`

        header in a `401 Unauthenticated` response, or `None` if the

        authentication scheme should return `403 Permission Denied` responses.

        """

        pass
说了一大堆东西,最终也只是解释性说明,还是需要我们自己来写相关的用户认证,官方只给我们提供了这么一个框架而已
这里相关具体使用方法可以参考我的这篇博客
具体流程:
创建认证类,继承BaseAuthentication,重写authenticate方法和authenticate_header方法
对于authenticate()方法的返回值:
可以返回 raise AuthenticationFailed({'code':1000,'error':'认证失败'}) 需要导入:from rest_framework.exceptions import AuthenticationFailed
可以返回一个元祖 return (token_obj.user, token_obj)
token_obj.user赋值给了request.user
token_obj赋值给了request.auth
这里还要注意它的使用,可以在全局配制,亦可以在局部配制:
对于局部,直接在上面加上authentication_classes = [BaseAuthentication,]
对于全局,需要在我们方setting下进行restframework全局设置
REST_FRAMEWORK = {

    "DEFAULT_AUTHENTICATION_CLASSES":['API.utils.auth.Authentication',]

}
3. 权限认证
permissions.py:
class BasePermission(object):

    """

    A base class from which all permission classes should inherit.

    """

    def has_permission(self, request, view):

        """

        Return `True` if permission is granted, `False` otherwise.

        """

        return True

    def has_object_permission(self, request, view, obj):

        """

        Return `True` if permission is granted, `False` otherwise.

        """

        return True
这里BasePermission类给我们提供了has_permission方法,和has_has_object_permission两个方法,都是让我们自己重写,最终返回值都是都是布尔值,以此判定是否具有权限
我们需要编写自己的类,来继承BasePermission
使用样式伪代码:
class TestView(APIView):

    # 认证的动作是由request.user触发

    authentication_classes = [TestAuthentication, ]

    # 权限

    # 循环执行所有的权限

    permission_classes = [TestPermission, ]

    def get(self, request, *args, **kwargs):

        # self.dispatch

        print(request.user)

        print(request.auth)

        return Response('GET请求,响应内容')

    def post(self, request, *args, **kwargs):

        return Response('POST请求,响应内容')
以上是在局部配置,全局配置只需在配置文件中写入即可
细节详情参考博客
4.节流
throttling.py:
class BaseThrottle(object):

    """

    Rate throttling of requests.

    """

    def allow_request(self, request, view):

        """

        Return `True` if the request should be allowed, `False` otherwise.

        """

        raise NotImplementedError('.allow_request() must be overridden')

    def get_ident(self, request):

        """

        Identify the machine making the request by parsing HTTP_X_FORWARDED_FOR

        if present and number of proxies is > 0. If not use all of

        HTTP_X_FORWARDED_FOR if it is available, if not use REMOTE_ADDR.

        """

        xff = request.META.get('HTTP_X_FORWARDED_FOR')

        remote_addr = request.META.get('REMOTE_ADDR')

        num_proxies = api_settings.NUM_PROXIES

        if num_proxies is not None:

            if num_proxies == 0 or xff is None:

                return remote_addr

            addrs = xff.split(',')

            client_addr = addrs[-min(num_proxies, len(addrs))]

            return client_addr.strip()

        return ''.join(xff.split()) if xff else remote_addr

    def wait(self):

        """

        Optionally, return a recommended number of seconds to wait before

        the next request.

        """

        return None
可以看出这是一个父类,它只提供了返回值,这里具体就是代码的编写了,怎么才能做到时间段内的固定访问次数呢,肯定需要用到时间模块以及该用户的ip了,通过
RECORD = {

    '用户IP': [12312139, 12312135, 12312133, ]

}
的形式来做判断
代码演示:
from rest_framework.throttling import BaseThrottle

import time

D = {}  # {'127.0.0.1': [1533302442, 1533302439,...]}

class MyThrottle(BaseThrottle):

    # 点进源码直接看当中携带的参数

    def allow_request(self, request, view):

        """

        Return `True` if the request should be allowed, `False` otherwise.

        """

        # 访问当前IP

        ip = request.META.get('REMOTE_ADDR')

        print(ip)

        now = time.time()

        if ip not in D:

            D[ip] = []  # 初始化一个空的访问历史列表

        history = D[ip]

        # 当历史列表中有元素,并且当前时间戳减去最后一个元素的时间戳大于10

        while history and (now - history[-1]) > 10:

            history.pop()

        # 判断最近10秒内的访问次数是否超过了阈值(3次)

        if len(history) >= 3:

            return False

        else:

            # 把这一次的访问时间加到访问历史列表的第一位

            D[ip].insert(0,now)

            return True
具体操作链接
这里也能使用它内部封装好的子类进行操作
class SimpleRateThrottle(BaseThrottle):

    """

    A simple cache implementation, that only requires `.get_cache_key()`

    to be overridden.

    The rate (requests / seconds) is set by a `rate` attribute on the View

    class.  The attribute is a string of the form 'number_of_requests/period'.

    Period should be one of: ('s', 'sec', 'm', 'min', 'h', 'hour', 'd', 'day')

    Previous request information used for throttling is stored in the cache.

    """

    cache = default_cache

    timer = time.time

    cache_format = 'throttle_%(scope)s_%(ident)s'

    scope = None

    THROTTLE_RATES = api_settings.DEFAULT_THROTTLE_RATES

    def __init__(self):

        if not getattr(self, 'rate', None):

            self.rate = self.get_rate()

        self.num_requests, self.duration = self.parse_rate(self.rate)

    def get_cache_key(self, request, view):

        """

        Should return a unique cache-key which can be used for throttling.

        Must be overridden.

        May return `None` if the request should not be throttled.

        """

        raise NotImplementedError('.get_cache_key() must be overridden')

    def get_rate(self):

        """

        Determine the string representation of the allowed request rate.

        """

        if not getattr(self, 'scope', None):

            msg = ("You must set either `.scope` or `.rate` for '%s' throttle" %

                   self.__class__.__name__)

            raise ImproperlyConfigured(msg)

        try:

            return self.THROTTLE_RATES[self.scope]

        except KeyError:

            msg = "No default throttle rate set for '%s' scope" % self.scope

            raise ImproperlyConfigured(msg)

    def parse_rate(self, rate):

        """

        Given the request rate string, return a two tuple of:

        <allowed number of requests>, <period of time in seconds>

        """

        if rate is None:

            return (None, None)

        num, period = rate.split('/')

        num_requests = int(num)

        duration = {'s': 1, 'm': 60, 'h': 3600, 'd': 86400}[period[0]]

        return (num_requests, duration)

    def allow_request(self, request, view):

        """

        Implement the check to see if the request should be throttled.

        On success calls `throttle_success`.

        On failure calls `throttle_failure`.

        """

        if self.rate is None:

            return True

        self.key = self.get_cache_key(request, view)

        if self.key is None:

            return True

        self.history = self.cache.get(self.key, [])

        self.now = self.timer()

        # Drop any requests from the history which have now passed the

        # throttle duration

        while self.history and self.history[-1] <= self.now - self.duration:

            self.history.pop()

        if len(self.history) >= self.num_requests:

            return self.throttle_failure()

        return self.throttle_success()

    def throttle_success(self):

        """

        Inserts the current request's timestamp along with the key

        into the cache.

        """

        self.history.insert(0, self.now)

        self.cache.set(self.key, self.history, self.duration)

        return True

    def throttle_failure(self):

        """

        Called when a request to the API has failed due to throttling.

        """

        return False

    def wait(self):

        """

        Returns the recommended next request time in seconds.

        """

        if self.history:

            remaining_duration = self.duration - (self.now - self.history[-1])

        else:

            remaining_duration = self.duration

        available_requests = self.num_requests - len(self.history) + 1

        if available_requests <= 0:

            return None

        return remaining_duration / float(available_requests)
只用它的好处在于省去了大量代码,只要实现逻辑层相关业务即可
自己写的throttle.py:
from rest_framework.throttling import SimpleRateThrottle

class VisitThrottle(SimpleRateThrottle):

    '''匿名用户60s只能访问三次(根据ip)'''

    scope = 'OP'   #这里面的值,自己随便定义,settings里面根据这个值配置Rate

    def get_cache_key(self, request, view):

        #通过ip限制节流

        return self.get_ident(request)    # 远程IP地址

class UserThrottle(SimpleRateThrottle):

    '''登录用户60s可以访问10次'''

    scope = 'OA'    #这里面的值,自己随便定义,settings里面根据这个值配置Rate

    def get_cache_key(self, request, view):

        return request.user.username    # 返回用户名
setting.py下的配制
REST_FRAMEWORK = {

    #节流

    "DEFAULT_THROTTLE_CLASSES":['API.utils.throttle.UserThrottle'],   #全局配置,登录用户节流限制(10/m)

    "DEFAULT_THROTTLE_RATES":{

        'OP':'3/m',         #没登录用户3/m,

        'OA':'10/m',    #登录用户10/m,

    }

}
5.版本
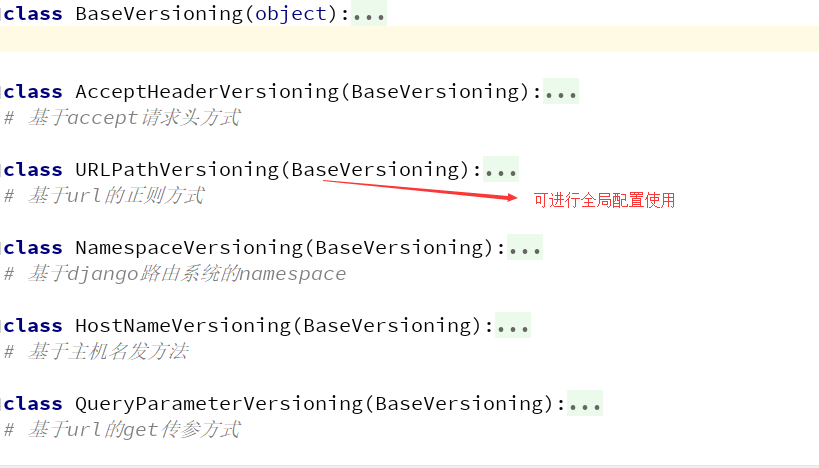
这里总共有五个类供我们使用
versioning.py

我们一把常用的就是全局使用,其他的用法详见wusir博客
6.分页
这里抛开基类,提供了三个类供我们去使用,每种都具有同的效果
pagination.py

Restrramework源码(包含组件)分析的更多相关文章
- 从源码的角度分析ViewGruop的事件分发
从源码的角度分析ViewGruop的事件分发. 首先我们来探讨一下,什么是ViewGroup?它和普通的View有什么区别? 顾名思义,ViewGroup就是一组View的集合,它包含很多的子View ...
- java基础解析系列(十)---ArrayList和LinkedList源码及使用分析
java基础解析系列(十)---ArrayList和LinkedList源码及使用分析 目录 java基础解析系列(一)---String.StringBuffer.StringBuilder jav ...
- qt creator源码全方面分析(3-3)
目录 qtcreatordata.pri 定义stripStaticBase替换函数 设置自定义编译和安装 QMAKE_EXTRA_COMPILERS Adding Compilers 示例1 示例2 ...
- qt creator源码全方面分析(3-5)
目录 qtcreatorlibrary.pri 使用实例 上半部 下半部 结果 qtcreatorlibrary.pri 上一章节,我们介绍了src.pro,这里乘此机会,把src目录下的所有项目文件 ...
- 安卓图表引擎AChartEngine(二) - 示例源码概述和分析
首先看一下示例中类之间的关系: 1. ChartDemo这个类是整个应用程序的入口,运行之后的效果显示一个list. 2. IDemoChart接口,这个接口定义了三个方法, getName()返回值 ...
- 第九节:从源码的角度分析MVC中的一些特性及其用法
一. 前世今生 乍眼一看,该标题写的有点煽情,最近也是在不断反思,怎么能把博客写好,让人能读下去,通俗易懂,深入浅出. 接下来几个章节都是围绕框架本身提供特性展开,有MVC程序集提供的,也有其它程序集 ...
- 通过官方API结合源码,如何分析程序流程
通过官方API结合源码,如何分析程序流程通过官方API找到我们关注的API的某个方法,然后把整个流程执行起来,然后在idea中,把我们关注的方法打上断点,然后通过Step Out,从内向外一层一层分析 ...
- HTTP请求库——axios源码阅读与分析
概述 在前端开发过程中,我们经常会遇到需要发送异步请求的情况.而使用一个功能齐全,接口完善的HTTP请求库,能够在很大程度上减少我们的开发成本,提高我们的开发效率. axios是一个在近些年来非常火的 ...
- 如何实现一个HTTP请求库——axios源码阅读与分析 JavaScript
概述 在前端开发过程中,我们经常会遇到需要发送异步请求的情况.而使用一个功能齐全,接口完善的HTTP请求库,能够在很大程度上减少我们的开发成本,提高我们的开发效率. axios是一个在近些年来非常火的 ...
随机推荐
- SpringSecurity 3.2入门(5)自定义登录页面
增加spring-security.xml文件配置如下 <!-- 配置SpringSecurity的http安全服务 --> <security:http auto-config=& ...
- java实例初始化块
实例初始化程序块用于初始化实例数据成员. 它在每次创建类的对象时运行.实例变量的初始化可以是直接的,但是可以在初始化实例初始化块中的实例变量时执行额外的操作. 什么是实例初始化块的使用,我们可以直接分 ...
- sql:无法解决 equal to 操作中 "Chinese_PRC_CI_AS" 和 "Chinese_Taiwan_Stroke_CI_AS" 之间的排序规则冲突。
--无法解决 equal to 操作中 "Chinese_PRC_CI_AS" 和 "Chinese_Taiwan_Stroke_CI_AS" 之间的排序规则冲 ...
- 前端之CSS——盒子模型和浮动
一.CSS盒子模型 HTML文档中的每个元素都被描绘成矩形盒子,这些矩形盒子通过一个模型来描述其占用空间,这个模型称为盒子模型. 盒子模型通过四个边界来描述:margin(外边距),border(边框 ...
- Django——stark组件
stark组件是仿照django的admin模块开发的一套组件,它的作用是在网页上对注册的数据表进行增删改查操作. 一.配置 1.创建stark应用,在settings.py中注册stark应用 st ...
- css一个很好用的hover显示
之前一直想在样式实现,hover时显示其他div,今天终于找到了,(*^▽^*) .a悬停时显示.b .a:hover .b { display: block; }
- Linux服务器性能评估与优化(二)
网络内容总结(感谢原创) 1.Linux内核参数优化 内核参数是用户和系统内核之间交互的一个接口,通过这个接口,用户可以在系统运行的同时动态更新内核配置,而这些内核参数是通过Linux Proc文件系 ...
- 怎样在vs2013和vs2015中实现自动编译sass
Visual Studio不论是2013版本还是2015版本要自动编译都需要添加扩展. 添加扩展的方法,路径“工具”->“扩展和更新”,在打开的窗口“搜索”你需要的扩展根据提示“下载”和“安装” ...
- Ubuntu上使用vnc服务
http://www.aichengxu.com/linux/8479752.htm 1. sudo apt-get install x11vnc 2. sudo x11vnc -storepassw ...
- Android DiskLruCache完全解析,硬盘缓存的最佳方案 --转载
概述 记得在很早之前,我有写过一篇文章 Android高效加载大图.多图解决方案,有效避免程序OOM,这篇文章是翻译自Android Doc的,其中防止多图OOM的核心解决思路就是使用LruCache ...
