吴裕雄--天生自然python Google深度学习框架:Tensorflow基础应用


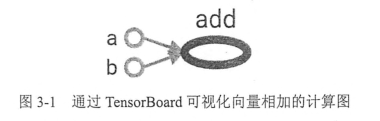


- import tensorflow as tf
- a = tf.constant([1.0, 2.0], name="a")
- b = tf.constant([2.0, 3.0], name="b")
- result = a + b
- print(result)


- import tensorflow as tf
- g1 = tf.Graph()
- with g1.as_default():
- v = tf.get_variable("v", [1], initializer = tf.zeros_initializer()) # 设置初始值为0
- g2 = tf.Graph()
- with g2.as_default():
- v = tf.get_variable("v", [1], initializer = tf.ones_initializer()) # 设置初始值为1
- with tf.Session(graph = g1) as sess:
- tf.global_variables_initializer().run()
- with tf.variable_scope("", reuse=True):
- print(sess.run(tf.get_variable("v")))
- with tf.Session(graph = g2) as sess:
- tf.global_variables_initializer().run()
- with tf.variable_scope("", reuse=True):
- print(sess.run(tf.get_variable("v")))


- # 创建一个会话。
- sess = tf.Session()
- # 使用会话得到之前计算的结果。
- print(sess.run(result))
- # 关闭会话使得本次运行中使用到的资源可以被释放。
- sess.close()

- with tf.Session() as sess:
- print(sess.run(result))


- sess = tf.Session()
- with sess.as_default():
- print(result.eval())
- sess = tf.Session()
- # 下面的两个命令有相同的功能。
- print(sess.run(result))
- print(result.eval(session=sess))
- sess = tf.InteractiveSession ()
- print(result.eval())
- sess.close()
- config=tf.ConfigProto(allow_soft_placement=True, log_device_placement=True)
- sess1 = tf.InteractiveSession(config=config)
- sess2 = tf.Session(config=config)
吴裕雄--天生自然python Google深度学习框架:Tensorflow基础应用的更多相关文章
- 吴裕雄--天生自然python Google深度学习框架:Tensorflow实现迁移学习
import glob import os.path import numpy as np import tensorflow as tf from tensorflow.python.platfor ...
- 吴裕雄--天生自然python Google深度学习框架:经典卷积神经网络模型
import tensorflow as tf INPUT_NODE = 784 OUTPUT_NODE = 10 IMAGE_SIZE = 28 NUM_CHANNELS = 1 NUM_LABEL ...
- 吴裕雄--天生自然python Google深度学习框架:图像识别与卷积神经网络
- 吴裕雄--天生自然python Google深度学习框架:MNIST数字识别问题
import tensorflow as tf from tensorflow.examples.tutorials.mnist import input_data INPUT_NODE = 784 ...
- 吴裕雄--天生自然python Google深度学习框架:深度学习与深层神经网络
- 吴裕雄--天生自然python Google深度学习框架:TensorFlow实现神经网络
http://playground.tensorflow.org/
- 吴裕雄--天生自然python Google深度学习框架:人工智能、深度学习与机器学习相互关系介绍
- 吴裕雄--天生自然神经网络与深度学习实战Python+Keras+TensorFlow:Bellman函数、贪心算法与增强性学习网络开发实践
!pip install gym import random import numpy as np import matplotlib.pyplot as plt from keras.layers ...
- 吴裕雄--天生自然神经网络与深度学习实战Python+Keras+TensorFlow:使用TensorFlow和Keras开发高级自然语言处理系统——LSTM网络原理以及使用LSTM实现人机问答系统
!mkdir '/content/gdrive/My Drive/conversation' ''' 将文本句子分解成单词,并构建词库 ''' path = '/content/gdrive/My D ...
随机推荐
- go简单文件服务器
go文件服务器 go语言实现的简单文件服务器 github
- [GXYCTF2019]禁止套娃
0x00 知识点 无参数RCE eval($_GET['exp']); 参考链接: https://skysec.top/2019/03/29/PHP-Parametric-Function-RCE/ ...
- 快速排序_python
def quicksort(ls,result): if len(ls)<=1: result+=ls # return result else: flag=ls[0] left=[x for ...
- 解决configure: error: C++ compiler cannot create executables问题
参考 yum install gcc gcc++ 呵呵,这样的话还是有组件没有安装完整的.再执行一下这个命令就可以解决问题. yum install gcc gcc-c++ gcc-g77
- golang实现单链表
package main import "fmt" type Object interface{} type Node struct { data Object next *Nod ...
- tfield的字段名和显示名
unit Unit1; interface uses Windows, Messages, SysUtils, Variants, Classes, Graphics, Controls, Forms ...
- 7)给tab下面添加一个子非模态对话框
1)还是沿袭(6)那个代码 2)下面是步骤: ~~~~~~~~~~~~~~~~~~~~~~~~~~~~~~~~~~~~~~~~·~~~~~~~~~~~~~~~~~~~~~~~~~~~ 然后,修改这个对 ...
- python刷LeetCode:1.两数之和
难度等级:简单 题目描述: 给定一个整数数组 nums 和一个目标值 target,请你在该数组中找出和为目标值的那 两个 整数,并返回他们的数组下标. 你可以假设每种输入只会对应一个答案.但是,你不 ...
- linux 离线安装mysql7或者8
安装方式:官网下载压缩包进行安装 1.下载jdk8 登录网址:http://www.oracle.com/technetwork/java/javase/downloads/jdk8-download ...
- 系统 win 10 专业版 下载地址
thunder://QUFodHRwOi8veHoyLjgxMDg0MC5jb20vY25fd2luZG93c18xMF9jb25zdW1lcl9lZGl0aW9uc192ZXJzaW9uXzE4MD ...