入门大数据---通过Flume、Sqoop分析日志
一、Flume安装
二、Sqoop安装
参考:Sqoop简介与安装
三、Flume和Sqoop结合使用案例
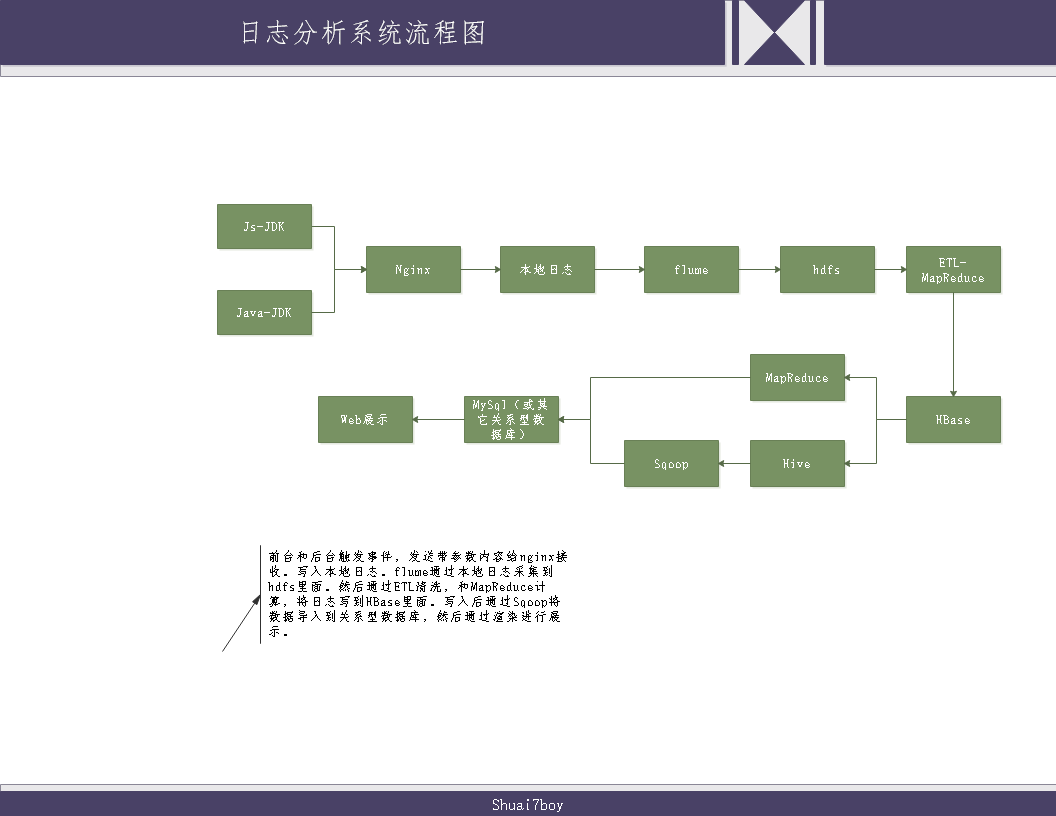
日志分析系统整体架构图:
3.1配置nginx环境
请参考菜鸟教程: https://www.runoob.com/linux/nginx-install-setup.html
按照上述步骤安装完后,需要对nginx配置下访问日志格式:
编辑nginx.conf,默认安装路径在/etc/nginx下
cd /etc/nginx
vim nginx.conf
在http模块下面添加:
解析:(以^A为日志分隔符,remote_addr代表远程地址,msec代表访问时间,http_host代表访问主机名,request_uri代表访问资源)
log_format my_format '$remote_addr^A$msec^A$http_host^A$request_uri';
在server模块下面添加:
解析:(访问地址 域名/log.gif,请求格式是image,存放地址是/opt/data/access.log )
location =/log.gif {

         default_type image/gif;

         access_log /opt/data/access.log my_format;

}
这样访问nginx的时候就会生成类似下面的内容:
192.168.40.1^A1577365502.563^Atuge1^A/log.gif?en=e_crt&oid=123456&on=%E6%B5%8B%E8%AF%95%E8%AE%A2%E5%8D%95123456&cua=524.01&cut=RMB&pt=alipay&ver=1&pl=website&sdk=js&u_ud=039F6588-ED65-4187-87CF-9DBBC9F19645&u_mid=zhangsan&u_sd=605DECAA-93C0-46B7-AC47-7B1898DBD6BC&c_time=1577365502881&l=zh-CN&b_iev=Mozilla%2F5.0%20(Windows%20NT%2010.0%3B%20WOW64)%20AppleWebKit%2F537.36%20(KHTML%2C%20like%20Gecko)%20Chrome%2F78.0.3904.97%20Safari%2F537.36&b_rst=1536*86
3.2编写触发事件传输代码
代码思路:
- 前端通过触发事件,生成image格式数据发送。
- 后端通过API接口直接发送Get请求。
代码连接: https://gitee.com/shuai7boy/BIG_DATA_LOG
3.3运行Flume,将本地日志写入HDFS
编写flume代码,参考官方案例: http://flume.apache.org/releases/content/1.6.0/FlumeUserGuide.html
在安装Linux的服务器上,创建一个监控文件(姑且取名optionHdfs.conf):
# example.conf: A single-node Flume configuration

# Name the components on this agent

a1.sources = r1

a1.sinks = k1

a1.channels = c1

# Describe/configure the source

a1.sources.r1.type = exec

a1.sources.r1.command = tail -F /opt/data/access.log --监控文件路径,新增加内容就会往hdfs里面写。

# Describe the sink

a1.sinks.k1.type = hdfs

a1.sinks.k1.hdfs.path =hdfs://tuge2:9000/flume/webdata/%Y-%m-%d  --填写active NameNode

a1.sinks.k1.hdfs.useLocalTimeStamp = true

a1.sinks.k1.hdfs.filePrefix = events-

a1.sinks.k1.hdfs.round = true

a1.sinks.k1.hdfs.roundValue = 10

a1.sinks.k1.hdfs.roundUnit = minute

# Use a channel which buffers events in memory

a1.channels.c1.type = memory

a1.channels.c1.capacity = 1000

a1.channels.c1.transactionCapacity = 100

# Bind the source and sink to the channel

a1.sources.r1.channels = c1

a1.sinks.k1.channel = c1
运行flume,同样参考官方来就行:flume-ng agent --conf conf --conf-file optionHdfs.conf --name a1 -Dflume.root.logger=INFO,console
运行后就按照文件规则将日志里面的内容导入hdfs里了。
3.4编写ETL代码,将HDFS内容导入到HBase里面
代码思路:
- 使用Map/Reduce将hdfs中的内容提取出来进行分割处理,然后Map到HBase里面。
代码连接:https://gitee.com/shuai7boy/BIG_DATA_ETL
第一种分析方案:
3.5使用Map/Reduce将HBase数据分析处理后导入到MySql
数据和维度:
- 用户某段时间活跃量
- 用户某段时间基于某个浏览器的活跃量
- 用户某段时间新增人数
- 用户某段时间基于某个浏览器的新增人数
主要拿用户时间活跃量和用户某段时间基于某个浏览器的活跃量来讨论。
代码思路:
定义来源:
在Runner类里面定义来源为HBase。
定义维度
将基于用户活跃度,基于某平台的用户活跃度,新增用户数,基于某平台的新增用户数等维度进行设定类。
进行Map:
继承TableMapper
根据查询的数据来源,映射成 维度+用户信息。
进行Reduce:
继承Reducer
计算成 维度+用户去重。
进行To MySql:
继承OutputFormat重写getRecordWriter,checkOutputSpecs,getOutputCommitter
继承RecordWriter重写write和close
继承IDimensionConverter重写getDimensionIdByValue,executeSql
在Runner里面定义写入MySql。SQL语句都定义在了配置文件里面,根据维度进行调用。
首先判断各个维度是否存在,不存在先写入维度信息。 然后就是写入更新统计信息(每映射10条更新一次。)
第二种分析方案:
3.6在Hive里面创建数据表进行存数据
HBase表结构:Row,Name(列族+限定符),timestamp,Value
- 在hive中创建hbase的eventlog对应表,并进行hive表和hbase表关联
hive和hbase表关联官方文档: https://cwiki.apache.org/confluence/display/Hive/HBaseIntegration
CREATE EXTERNAL TABLE event_logs(

key string, pl string, en string, s_time bigint, p_url string, u_ud string, u_sd string

) ROW FORMAT SERDE 'org.apache.hadoop.hive.hbase.HBaseSerDe'

STORED BY 'org.apache.hadoop.hive.hbase.HBaseStorageHandler'

with serdeproperties('hbase.columns.mapping'=':key,log:pl,log:en,log:s_time,log:p_url,log:u_ud,log:u_sd')

tblproperties('hbase.table.name'='eventlog');
- 创建一个中间表(PS:要和MySql表结构保持一致,计算结果存放此表并同步MySql)
 CREATE TABLE stats_view_depth (

  platform_dimension_id bigint ,

  data_dimension_id bigint ,

  kpi_dimension_id bigint ,

  pv1 bigint ,

  pv2 bigint ,

  pv3 bigint ,

  pv4 bigint ,

  pv5_10 bigint ,

  pv10_30 bigint ,

  pv30_60 bigint ,

  pv60_plus bigint ,

  created string

) row format delimited fields terminated by '\t';
- 创建一个临时表(PS:存放中间结果)
CREATE TABLE stats_view_depth_tmp(pl string, date string, col string, ct bigint);
3.7编写platformdimension和datedimension(日期维度处理类)
注:要继承udf
/**

 * 操作日期dimension 相关的udf

 *

 * @author root

 *

 */

public class DateDimensionUDF extends UDF {

    private IDimensionConverter converter = new DimensionConverterImpl();

        /**

     * 根据给定的日期(格式为:yyyy-MM-dd)至返回id

     *

     * @param day

     * @return

     */

    public IntWritable evaluate(Text day) {

        DateDimension dimension = DateDimension.buildDate(TimeUtil.parseString2Long(day.toString()), DateEnum.DAY);

        try {

        	//根据日期查找时间维度表,如果有数据则返回表ID,没有数据,则插入后返回表ID。

            int id = this.converter.getDimensionIdByValue(dimension);

            return new IntWritable(id);

        } catch (IOException e) {

            throw new RuntimeException("获取id异常");

        }

    }

}
将编写的内容进行打包上传到linux服务器
3.8创建hive的function
create function date_convert as 'shuai7boy.vip.transformer.hive.DateDimensionUDF' using jar 'hdfs://tuge2:9000/transform/transform-0.0.1.jar';
其中一开始没加端口号报错:java.lang.IllegalArgumentException: java.net.UnknownHostException: transform ,然后参考博文 https://blog.csdn.net/heming621/article/details/53317562 解决了。
3.9编写HQL语句进行计算
- 根据用户的角度统计每个页面的浏览量
上面我们将HDFS数据导入到了HBase里面,并且做了Hive表和HBase表同步,又因为Hive表支持HQL语句。所在在Hive里面使用HQL语句就能进行分析。
计算用户的浏览深度
from (

  select

    pl, from_unixtime(cast(s_time/1000 as bigint),'yyyy-MM-dd') as day, u_ud,

    (case when count(p_url) = 1 then "pv1"

      when count(p_url) = 2 then "pv2"

      when count(p_url) = 3 then "pv3"

      when count(p_url) = 4 then "pv4"

      when count(p_url) >= 5 and count(p_url) <10 then "pv5_10"

      when count(p_url) >= 10 and count(p_url) <30 then "pv10_30"

      when count(p_url) >=30 and count(p_url) <60 then "pv30_60"

      else 'pv60_plus' end) as pv

  from event_logs

  where

    en='e_pv'

    and p_url is not null

    and pl is not null

    and s_time >= unix_timestamp('2016-06-08','yyyy-MM-dd')*1000

    and s_time < unix_timestamp('2016-06-09','yyyy-MM-dd')*1000

  group by

    pl, from_unixtime(cast(s_time/1000 as bigint),'yyyy-MM-dd'), u_ud

) as tmp

insert overwrite table stats_view_depth_tmp

  select pl,day,pv,count(distinct u_ud) as ct where u_ud is not null group by pl,day,pv;

--将行转列

with tmp as

(

select pl,date as date1,ct as pv1,0 as pv2,0 as pv3,0 as pv4,0 as pv5_10,0 as pv10_30,0 as pv30_60,0 as pv60_plus from stats_view_depth_tmp where col='pv1' union all

select pl,date as date1,0 as pv1,ct as pv2,0 as pv3,0 as pv4,0 as pv5_10,0 as pv10_30,0 as pv30_60,0 as pv60_plus from stats_view_depth_tmp where col='pv2' union all

select pl,date as date1,0 as pv1,0 as pv2,ct as pv3,0 as pv4,0 as pv5_10,0 as pv10_30,0 as pv30_60,0 as pv60_plus from stats_view_depth_tmp where col='pv3' union all

select pl,date as date1,0 as pv1,0 as pv2,0 as pv3,ct as pv4,0 as pv5_10,0 as pv10_30,0 as pv30_60,0 as pv60_plus from stats_view_depth_tmp where col='pv4' union all

select pl,date as date1,0 as pv1,0 as pv2,0 as pv3,0 as pv4,ct as pv5_10,0 as pv10_30,0 as pv30_60,0 as pv60_plus from stats_view_depth_tmp where col='pv5_10' union all

select pl,date as date1,0 as pv1,0 as pv2,0 as pv3,0 as pv4,0 as pv5_10,ct as pv10_30,0 as pv30_60,0 as pv60_plus from stats_view_depth_tmp where col='pv10_30' union all

select pl,date as date1,0 as pv1,0 as pv2,0 as pv3,0 as pv4,0 as pv5_10,0 as pv10_30,ct as pv30_60,0 as pv60_plus from stats_view_depth_tmp where col='pv30_60' union all

select pl,date as date1,0 as pv1,0 as pv2,0 as pv3,0 as pv4,0 as pv5_10,0 as pv10_30,0 as pv30_60,ct as pv60_plus from stats_view_depth_tmp where col='pv60_plus' union all

select 'all' as pl,date as date1,ct as pv1,0 as pv2,0 as pv3,0 as pv4,0 as pv5_10,0 as pv10_30,0 as pv30_60,0 as pv60_plus from stats_view_depth_tmp where col='pv1' union all

select 'all' as pl,date as date1,0 as pv1,ct as pv2,0 as pv3,0 as pv4,0 as pv5_10,0 as pv10_30,0 as pv30_60,0 as pv60_plus from stats_view_depth_tmp where col='pv2' union all

select 'all' as pl,date as date1,0 as pv1,0 as pv2,ct as pv3,0 as pv4,0 as pv5_10,0 as pv10_30,0 as pv30_60,0 as pv60_plus from stats_view_depth_tmp where col='pv3' union all

select 'all' as pl,date as date1,0 as pv1,0 as pv2,0 as pv3,ct as pv4,0 as pv5_10,0 as pv10_30,0 as pv30_60,0 as pv60_plus from stats_view_depth_tmp where col='pv4' union all

select 'all' as pl,date as date1,0 as pv1,0 as pv2,0 as pv3,0 as pv4,ct as pv5_10,0 as pv10_30,0 as pv30_60,0 as pv60_plus from stats_view_depth_tmp where col='pv5_10' union all

select 'all' as pl,date as date1,0 as pv1,0 as pv2,0 as pv3,0 as pv4,0 as pv5_10,ct as pv10_30,0 as pv30_60,0 as pv60_plus from stats_view_depth_tmp where col='pv10_30' union all

select 'all' as pl,date as date1,0 as pv1,0 as pv2,0 as pv3,0 as pv4,0 as pv5_10,0 as pv10_30,ct as pv30_60,0 as pv60_plus from stats_view_depth_tmp where col='pv30_60' union all

select 'all' as pl,date as date1,0 as pv1,0 as pv2,0 as pv3,0 as pv4,0 as pv5_10,0 as pv10_30,0 as pv30_60,ct as pv60_plus from stats_view_depth_tmp where col='pv60_plus'

)

from tmp

insert overwrite table stats_view_depth

select 2,date_convert(date1),6,sum(pv1),sum(pv2),sum(pv3),sum(pv4),sum(pv5_10),sum(pv10_30),sum(pv30_60),sum(pv60_plus),'2017-01-10' group by pl,date1;
执行可能出现异常:Failed to recognize predicate 'xxx'. Failed rule: 'identifier' in column specification。
解决方案:主要原因是使用了date关键字导致的,弃用保留关键字即可。
在hive-site.xml里面添加如下命令:
<property>

    <name>hive.support.sql11.reserved.keywords</name>

    <value>false</value>

</property>
参考博客: https://blog.csdn.net/sjf0115/article/details/73244762
4.0使用Sqoop将hive中的数据同步到MySql里面
退出hive命令,执行以下语句:
sqoop export --connect jdbc:mysql://tuge1:3306/result_db --username root --password 123456 --table stats_view_depth --export-dir /user/hive/warehouse/stats_view_depth/* --input-fields-terminated-by "\\t" --update-mode allowinsert --update-key platform_dimension_id,data_dimension_id,kpi_dimension_id;
然后就能在MySql里面看到数据了,以后的事情就是把数据在平台渲染下,这里就不演示了。
入门大数据---通过Flume、Sqoop分析日志的更多相关文章
- Druid:一个用于大数据实时处理的开源分布式系统——大数据实时查询和分析的高容错、高性能开源分布式系统
转自:http://www.36dsj.com/archives/28590 Druid 是一个用于大数据实时查询和分析的高容错.高性能开源分布式系统,旨在快速处理大规模的数据,并能够实现快速查询和分 ...
- 【大数据技巧】日均2TB日志数据在线快速处理之法
[大数据技巧]日均2TB日志数据在线快速处理之法 http://click.aliyun.com/m/8958/
- 大数据技术之Sqoop
大数据技术之Sqoop 一.Sqoop简介 Apache Sqoop(TM)是一种旨在有效地在Apache Hadoop和诸如关系数据库等结构化数据存储之间传输大量数据的工具. Sqoop于2012 ...
- 零起点PYTHON足彩大数据与机器学习实盘分析
零起点PYTHON足彩大数据与机器学习实盘分析 第1章 足彩与数据分析 1 1.1 “阿尔法狗”与足彩 1 1.2 案例1-1:可怕的英国足球 3 1.3 关于足彩的几个误区 7 1.4 足彩·大事件 ...
- 入门大数据---Spark_Streaming整合Flume
一.简介 Apache Flume 是一个分布式,高可用的数据收集系统,可以从不同的数据源收集数据,经过聚合后发送到分布式计算框架或者存储系统中.Spark Straming 提供了以下两种方式用于 ...
- 入门大数据---Flume整合Kafka
一.背景 先说一下,为什么要使用 Flume + Kafka? 以实时流处理项目为例,由于采集的数据量可能存在峰值和峰谷,假设是一个电商项目,那么峰值通常出现在秒杀时,这时如果直接将 Flume 聚合 ...
- 入门大数据---Flink学习总括
第一节 初识 Flink 在数据激增的时代,催生出了一批计算框架.最早期比较流行的有MapReduce,然后有Spark,直到现在越来越多的公司采用Flink处理.Flink相对前两个框架真正做到了高 ...
- 大数据(9) - Flume的安装与使用
Flume简介 --(实时抽取数据的工具) 1) Flume提供一个分布式的,可靠的,对大数据量的日志进行高效收集.聚集.移动的服务,Flume只能在Unix环境下运行. 2) Flume基于流式架构 ...
- 入门大数据---ClouderaManager和CDH是什么?
1.CDH概述 CDH(Cloudra's Distribution Apache Of Hadoop)是Apache Hadoop和相关项目的最完整,经过测试和最流行的发行版.CDH提供Hadoop ...
随机推荐
- 深入理解JVM(③)——之HotSpot虚拟机对象探秘
前言 上篇文章介绍了Java虚拟机的运行时数据区域,大致明白了Java虚拟机内存模型的概况,下面就基于实用优先的原则,以最常用的虚拟机HotSpot和最常用的内存区域Java堆为例,升入探讨一下Hot ...
- HashMap1.7和1.8,红黑树原理!
jdk 1.7 概述 HashMap基于Map接口实现,元素以键值对的方式存储,并允许使用null键和null值,但只能有一个键作为null,因为key不允许重复,另外HashMap不能保证放入元素的 ...
- Redis 单节点百万级别数据 读取 性能测试.
个人博客网:https://wushaopei.github.io/ (你想要这里多有) 这里先进行造数据,向redis中写入五百万条数据,具体方式有如下三种: 方法一:(Lua 脚本) vim ...
- Redis 入门到分布式 (八)Redis Sentinel
个人博客网:https://wushaopei.github.io/ (你想要这里多有) sentinel-目录 主从复制高可用 安装配置 实现原理 架构说明 客户端连接 常见开发运维问题 一. ...
- Java实现 蓝桥杯VIP 算法训练 递归求二进制表示位数
问题描述 给定一个十进制整数,返回其对应的二进制数的位数.例如,输入十进制数9,其对应的二进制数是1001,因此位数是4. 样例输入 一个满足题目要求的输入范例. 9 样例输出 与上面的样例输入对应的 ...
- Java实现最大连续乘积子数组
1 问题描述 给定一个浮点数组,任意取出数组中的若干个连续的数相乘,请找出其中乘积最大的子数组. 2 解决方案 2.1 蛮力法 该方法的时间复杂度为O(n^2). package com.liuzhe ...
- Linux 源码包安装过程
安装准备 安装gcc编译器 下载源码包 源代码保存位置:/usr/local/src/ 软件安装位置:/usr/local/ 解压缩下载的源码包 进入解压缩目录 软件配置与检查:./configure ...
- CentOS8.1中搭建Gitlab服务器
依旧是写在前面的话♠:很多IT人从业N年也许都还没有亲自搭过一次Gitlab服务器,是不是?有木有?!通常都是背着自己的笔记电脑到一家公司入职,或入职后领到公司分配的电脑,然后分配了Git账号,拿了将 ...
- tensorflow2.0学习笔记第一章第二节
1.2常用函数 本节目标:掌握在建立和操作神经网络过程中常用的函数 # 常用函数 import tensorflow as tf import numpy as np # 强制Tensor的数据类型转 ...
- iOS -NSOperation——高级的并发处理方法
NSOperation是Objective-C中一种高级的并发处理方法,现在对GCD的封装;功能比GCD更强大! 两个概念 操作: 操作队列: NSOperation多线 ...