Centos上安装FastDFS
更新yum源
cd /etc/yum.repos.d
wget http://mirrors.aliyun.com/repo/Centos-7.repo
yum update
安装gcc(编译时需要)
FastDFS是C语言开发,安装FastDFS需要先将官网下载的源码进行编译,编译依赖gcc环境,如果没有gcc环境,需要安装gcc;
yum install -y gcc gcc-c++
安装libevent(运行时需求)
若安装了桌面图形界面,就不需要安装;FastDFS依赖libevent库;
yum -y install libevent
安装libfastcommon
libfastcommon是FastDFS官方提供的,libfastcommon包含了FastDFS运行所需要的一些基础库。
(1)上传libfastcommon-master.zip到Centos机器上;
(2)将libfastcommon-master.zip移至/usr/local/下并解压:
unzip libfastcommon-master.zip
(3)切换目录到:/usr/local/libfastcommon-master/下,接着进行编译和安装;
cd libfastcommon-masteryum install binutils #重要!否则下面编译出错!
./make.sh
./make.sh install
安装后的返回信息:
[root@node3 libfastcommon-master]# ./make.sh install
mkdir -p /usr/lib64
mkdir -p /usr/lib
 libfastcommon.so /usr/lib64
 libfastcommon.so /usr/lib
mkdir -p /usr/include/fastcommon
 common_define.h hash.h chain.h logger.h base64.h shared_func.h pthread_func.h ini_file_reader.h _os_define.h sockopt.h sched_thread.h http_func.h md5.h local_ip_func.h avl_tree.h ioevent.h ioevent_loop.h fast_task_queue.h fast_timer.h process_ctrl.h fast_mblock.h connection_pool.h fast_mpool.h fast_allocator.h fast_buffer.h skiplist.h multi_skiplist.h flat_skiplist.h skiplist_common.h system_info.h fast_blocked_queue.h php7_ext_wrapper.h id_generator.h char_converter.h char_convert_loader.h /usr/include/fastcommon
(4)libfastcommon安装好后会在/usr/lib64 目录下生成 libfastcommon.so 库文件;
注意:由于FastDFS程序引用usr/lib目录所以需要将/usr/lib64下的库文件拷贝至/usr/lib下。
cp libfastcommon.so /usr/lib
安装tracker
(1)上传 fastdfs-master.zip 到 centos 上;
(2)将 fastdfs-master.zip解压至/usr/local/下
unzip fastdfs-master.zip
(3)切换目录到: /usr/local/fastdfs-master/ 下,编译和安装;
cd fastdfs-master
./make.sh && ./make.sh install
安装后的返回信息:
mkdir -p /usr/include/fastdfs
cp -f ../common/fdfs_define.h ../common/fdfs_global.h ../common/mime_file_parser.h ../common/fdfs_http_shared.h ../tracker/tracker_types.h ../tracker/tracker_proto.h ../tracker/fdfs_shared_func.h ../storage/trunk_mgr/trunk_shared.h tracker_client.h storage_client.h storage_client1.h client_func.h client_global.h fdfs_client.h /usr/include/fastdfs
if [ ! -f /etc/fdfs/client.conf.sample ]; then cp -f ../conf/client.conf /etc/fdfs/client.conf.sample; fi
(4)安装成功将安装目录下的conf下的文件拷贝到/etc/fdfs/下;
cp /usr/local/fastdfs-master/conf/* /etc/fdfs/
配置和启动tracker
(1)切换目录到: /etc/fdfs/ 目录下;
(2)拷贝一份新的tracker配置文件;
cp tracker.conf.sample tracker.conf
(3)修改tracker.conf ;
vim tracker.conf
base_path=/home/yuqing/fastdfs 改为: base_path=/home/fastdfshttp.server_port 改为: 80
base_path=/home/fastdfs
http.server_port=  #配置http端口
(4)创建 /home/fastdfs 目录:
mkdir /home/fastdfs
(5)启动tracker,运行如下命令:
/usr/bin/fdfs_trackerd /etc/fdfs/tracker.conf restart
注意:在/home/fastdfs/ 目录下生成两个目录, 一个是数据,一个是日志;
配置和启动storage
由于上面已经安装过FastDFS(由于失误,秘node3上的FastDFS安装文件夹为/root/cf/fastdfs-master/,因此拷贝命令为: cp /root/cf/fastdfs-master/conf/* /etc/fdfs/ ),这里只需要配置storage就好了;
(1)切换目录到: /etc/fdfs/ 目录下;
(2)拷贝一份新的storage配置文件
cp storage.conf.sample storage.conf
(3)修改storage.conf ; vim storage.conf
group_name=group1 #配置组名base_path=/home/yuqing/fastdfs    改为:  base_path=/home/fastdfs#store存放文件的位置(store_path)store_path0=/home/yuqing/fastdfs  改为: store_path0=/home/fdfs_storage #如果有多个挂载磁盘则定义多个store_path,如下#store_path1=.....#store_path2=......

#配置tracker服务器:IPtracker_server=10.200.101.133:22122#如果有多个则配置多个tracker#tracker_server=192.168.101.4:22122

#配置http端口http.server_port=88(4)创建 /home/fdfs_storage 目录
mkdir /home/fdfs_storage
(5)启动storage, 运行命令如下:
/usr/bin/fdfs_storaged /etc/fdfs/storage.conf restart
启动完成后进入 /home/fdfs_storage/data 目录下,显示目录如下:

使用FastDFS自带工具测试
(1)切换目录到 /etc/fdfs/ 目录下;
(2)拷贝一份新的client配置文件
cp client.conf.sample client.conf
(3)修改client.conf ; vim client.conf,修改基本路径和tracker_server如下:
base_path=/home/fdfs_client
tracker_server=10.200.101.133:22122
注意:若tracker有多个,可以配置多个,如下:
#tracker_server=......
#tracker_server=......
(4)拷贝一张图片Koala.jpg到Centos服务器上的/home/cf/img目录下;
(5)进行测试,运行如下:(运行测试程序,读取/etc/fdfs/client.conf 文件,上传/home/cf/img目录下的Koala.jpg文件)
/usr/bin/fdfs_test /etc/fdfs/client.conf upload /home/cf/img/Koala.jpg
结果如下,表示搭建成功;
[root@node5 fdfs]# /usr/bin/fdfs_test /etc/fdfs/client.conf upload /home/cf/img/Koala.jpg
This is FastDFS client test program v5.

Copyright (C) , Happy Fish / YuQing

FastDFS may be copied only under the terms of the GNU General
Public License V3, which may be found in the FastDFS source kit.
Please visit the FastDFS Home Page http://www.csource.org/
for more detail.

[-- ::] DEBUG - base_path=/home/fdfs_client, connect_timeout=, network_timeout=, tracker_server_count=, anti_steal_token=, anti_steal_secret_key length=, use_connection_pool=, g_connection_pool_max_idle_time=3600s, use_storage_id=, storage server

tracker_query_storage_store_list_without_group:
        server . group_name=, ip_addr=
        server . group_name=, ip_addr=

group_name=group1, ip_addr=
storage_upload_by_filename
group_name=group1, remote_filename=M00///CshlhlzmGV6APvHtAAvqH_kipG8314.jpg
source ip address: 10.200.101.134
-- ::

example file url: http://10.200.101.134/group1/M00/00/00/CshlhlzmGV6APvHtAAvqH_kipG8314.jpg
storage_upload_slave_by_filename
group_name=group1, remote_filename=M00///CshlhlzmGV6APvHtAAvqH_kipG8314_big.jpg
source ip address: 10.200.101.134
-- ::

example file url: http://10.200.101.134/group1/M00/00/00/CshlhlzmGV6APvHtAAvqH_kipG8314_big.jpg
以上返回信息中的文件地址:http://10.200.101.134/group1/M00/00/00/CshlhlzmGV6APvHtAAvqH_kipG8314_big.jpg 对应storage服务器上的/home/fdfs_storage/data/00/00/CshlhlzmGV6APvHtAAvqH_kipG8314_big.jpg 文件;
由于现在还没有和nginx整合无法使用http下载。
附内网中安装时测试的信息:
[root@node2 cf]# /usr/bin/fdfs_test /etc/fdfs/client.conf upload /home/cf/img/Koala.jpg
This is FastDFS client test program v5.

Copyright (C) , Happy Fish / YuQing

FastDFS may be copied only under the terms of the GNU General
Public License V3, which may be found in the FastDFS source kit.
Please visit the FastDFS Home Page http://www.csource.org/
for more detail.

[-- ::] DEBUG - base_path=/home/fdfs_client, connect_timeout=, network_timeout=, tracker_server_count=, anti_steal_token=, anti_steal_secret_key length=, use_connection_pool=, g_connection_pool_max_idle_time=3600s, use_storage_id=, storage server

tracker_query_storage_store_list_without_group:
    server . group_name=, ip_addr=
    server . group_name=, ip_addr=

group_name=group1, ip_addr=
storage_upload_by_filename
group_name=group1, remote_filename=M00///CmQEDF2A52qARueZAAvqH_kipG8075.jpg
source ip address: 10.100.4.12
-- ::

example file url: http://10.100.4.12/group1/M00/00/00/CmQEDF2A52qARueZAAvqH_kipG8075.jpg
storage_upload_slave_by_filename
group_name=group1, remote_filename=M00///CmQEDF2A52qARueZAAvqH_kipG8075_big.jpg
source ip address: 10.100.4.12
-- ::

example file url: http://10.100.4.12/group1/M00/00/00/CmQEDF2A52qARueZAAvqH_kipG8075_big.jpg
FastDFS 和nginx整合
在tracker上安装 nginx
在每个tracker上安装nginx,的主要目的是做负载均衡及实现高可用。如果只有一台tracker可以不配置nginx。
一个tracker对应多个storage,通过nginx对storage负载均衡;
在storage 上安装nginx
(1)上传 fastdfs-nginx-module-master.zip 到Centos服务器上;
(2)解压 fastdfs-nginx-module-master.zip 到 /usr/local目录下;
(3)切换目录到: /usr/local/fastdfs-nginx-module-master/src/ 目录下;
(4)将fastdfs-nginx-module-master/src下的mod_fastdfs.conf拷贝至/etc/fdfs/下
cp mod_fastdfs.conf /etc/fdfs/
(5)并修改 /etc/fdfs/mod_fastdfs.conf 的内容;vi /etc/fdfs/mod_fastdfs.conf
base_path=/tmp 修改为 base_path=/home/fastdfs
base_path=/home/fastdfs
tracker_server=
#tracker_server= #(多个tracker配置多行)
url_have_group_name=true        #url中包含group名称
store_path0=/home/fdfs_storage  #指定文件存储路径(上面配置的store路径)
(6)创建nginx/client目录
mkdir -p /var/temp/nginx/client
Nginx的安装
(1)上传 nginx-1.12.2.tar.gz 到Centos服务器上;
(2)解压 nginx-1.12.2.tar.gz 到 /usr/local目录下;
tar -zxvf nginx-1.12.2.tar.gz -C /usr/local/
(3)安装nginx的依赖库
yum install pcre
yum install pcre-devel
yum install zlib
yum install zlib-devel
yum install openssl
yum install openssl-devel
(4)进入nginx解压的目录下:cd /usr/local/nginx-1.12.2/
(5)加入模块命令配置
./configure \
--prefix=/usr/local/nginx \
--pid-path=/var/run/nginx/nginx.pid \
--lock-path=/var/lock/nginx.lock \
--error-log-path=/var/log/nginx/error.log \
--http-log-path=/var/log/nginx/access.log \
--with-http_gzip_static_module \
--http-client-body-temp-path=/var/temp/nginx/client \
--http-proxy-temp-path=/var/temp/nginx/proxy \
--http-fastcgi-temp-path=/var/temp/nginx/fastcgi \
--http-uwsgi-temp-path=/var/temp/nginx/uwsgi \
--http-scgi-temp-path=/var/temp/nginx/scgi \
--add-module=/usr/local/fastdfs-nginx-module-master/src
注意:上边将临时文件目录指定为/var/temp/nginx,需要在/var下创建temp及nginx目录;
(6)编译并安装
make && make install
安装成功后查看生成的目录,如下所示:
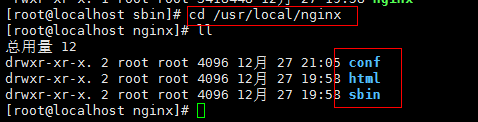
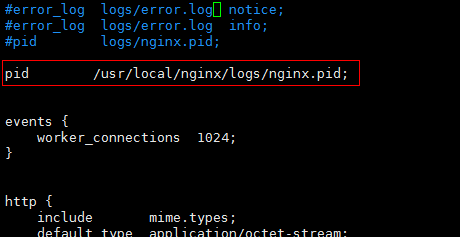
(7)修改nginx配置文件
mkdir /usr/local/nginx/logs # 创建logs目录
cd /usr/local/nginx/conf/
vim nginx.conf
做如下的修改:
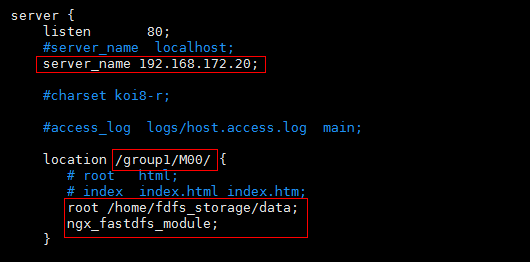
说明:
(a.) server_name指定本机ip;
(b.) location /group1/M00/:group1为nginx 服务FastDFS的分组名称,M00是FastDFS自动生成编号,对应store_path0=/home/fdfs_storage,如果FastDFS定义store_path1,这里就是M01
(9)nginx的启动
cd /usr/local/nginx/sbin/
./nginx
(10)如果端口被占用
查询进程:
lsof -i :
杀掉进程:
PID
查询nginx进程:
ps -ef|grep nginx

(11) fastdfs 和 nginx 服务的开机自启动: http://www.cnblogs.com/yufeng218/p/8215381.html
在浏览器中访问上传到fastDFS的图片
因为Centos系统有防火墙,需要先关闭掉,才可以在浏览器中访问;
(1)CentOS 7.0默认使用的是firewall作为防火墙;若没有启用iptables 作为防火墙,则使用以下方式关闭防火墙:
systemctl stop firewalld.service #停止firewall
systemctl disable firewalld.service #禁止firewall开机启动
firewall-cmd --state #查看默认防火墙状态(关闭后显示notrunning,开启后显示running)
(2)若已经启用iptables作为防火墙,则使用以下方式关闭:
service iptables stop  #临时关闭防火墙
chkconfig iptables off #永久关闭防火墙
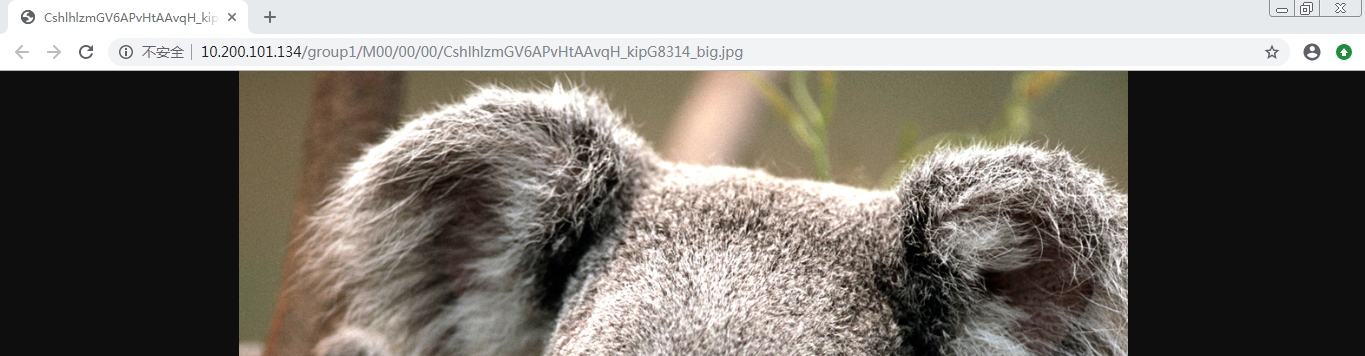
(3)在谷歌浏览器中访问刚才上传的图片:
刚才上传的图片地址为:http://10.200.101.134/group1/M00/00/00/CshlhlzmGV6APvHtAAvqH_kipG8314_big.jpg
参考:
https://www.cnblogs.com/yufeng218/p/8111961.html
Centos上安装FastDFS的更多相关文章
- CentOS上安装FastDFS分布式文件系统
鱼大自己写的项目简介:http://bbs.chinaunix.net/thread-1920470-1-1.html 架构简介:http://www.programmer.com.cn/4380/ ...
- LiunxCentos7 上安装 FastDFS
Centos7 上安装 FastDFS 1.安装gcc(编译时需要) FastDFS是C语言开发,安装FastDFS需要先将官网下载的源码进行编译,编译依赖gcc环境,如果没有gcc环境,需要安装gc ...
- Centos7 上安装FastDFS
Centos7 上安装 FastDFS 本文章摘抄于 风止鱼歇 博客地址:https://www.cnblogs.com/yufeng218/p/8111961.html 1.安装gcc(编译时需要 ...
- NoSql1 在Linux(CentOS)上安装memcached及使用
前言: 今天是初五,生活基本要从过年的节奏中回归到正常的生活了,所以想想也该想想与工作有关的事情了.我之前在工作中会经常使用memcached和redis,但是自己一直没有时间系统的好好看 ...
- 在Ubuntu|CentOS上安装Shutter截图工具及快捷键设置
简介 Shutter前身叫GScrot,它是一款相当棒的截图软件. 通过Shutter,你可以截取包括选定区域.全屏幕.窗口.窗口内的控件甚至网页的图像.通过内置的强大插件机制,你可以在截图后,对图像 ...
- 在CentOS上安装rabbitmq-server
***在 CentOS 6.4上安装python*** 注意啊,自己手动安装python2.7.5,不要动系统上面其他的版本 1,先安装GCC,用如下命令yum install gcc gcc-c++ ...
- CentOS上安装软件错误提示:configure: error: no acceptable C compiler found in $PATH
CentOS上安装软件错误提示:configure: error: no acceptable C compiler found in $PATH 因为是centos linux,默认可以采用yum方 ...
- 如何在centos上安装epel源
一.EPEL是什么? EPEL (Extra Packages for Enterprise Linux,企业版Linux的额外软件包) 是Fedora小组维护的一个软件仓库项目,为RHEL/Cent ...
- 在Centos上安装RabbitMQ流程(转)
在Centos上安装RabbitMQ流程------------------------ 1. 需求 由于项目中要用到消息队列,经过ActiveMQ与RabbitMQ的比较,最终选择了RabbbitM ...
随机推荐
- 前端学习 之 JavaScript基础
一. JavaScript简介 1. JavaScript的历史背景介绍 1994年,网景公司(Netscape)发布了Navigator浏览器0.9版.这是历史上第一个比较成熟的网络浏览器,轰动一时 ...
- C++关键字总结【新手必学】
const 关键字——常量const 与definedefine是预编译器的编译指令,它从C语言兼容下来,工作方式与文本编辑器中的全局搜索和替换相似.define定义的常量的意义在它开始的地方持续到文 ...
- Android获取当前时间的3中方法总结
今天听了一在线公开课,任务是做一个数字时钟,其中最关键的自然是获取当前的系统时间.做个简单的记录,如下: 1. Time time = new Time("GMT+8"); tim ...
- Django中defer和only区别
defer('id', 'name'):取出对象,字段除了id和name都有 only('id', 'name'):取出对象, 只有id和name ret=models.Author.objects. ...
- 9 HTML DOM事件监听&版本兼容&元素(节点)增删改查
事件监听: 语法:element.addEventListener(event, function, useCapture); event:事件的类型,触发什么事件,注意不需要on作为前缀,比如cli ...
- 5 JSON&与JavaScript转换&JavaScript:void(0)&JavaScript代码规范
JSON:JavaScript Object Notation JS对象简谱 一种轻量级的数据交换格式,用于存储和传输数据的格式,通常用于服务端向网页传递数据 是独立的语言,易于理解 JSON语法 ...
- Caffe2 手册(Intro Tutorial)[2]
Caffe2的相关概念 接下来你可以学到更多Caffe2中主要的概念,这些概念对理解和开发Caffe2相当重要. Blobs and Workspace,Tensors Caffe2中,数据是 ...
- HDU1029 简单DP
"OK, you are not too bad, em... But you can never pass the next test." feng5166 says. &quo ...
- Python学习第十课——文件的基本操作
文件基本操作 文件读操作 #读出路径下的测试.txt文件 f = open('测试.txt', encoding='utf-8') # 打开要读文件 data = f.read() # 读取内容 pr ...
- windows网络编程-C语言实现简单的UDP协议聊天
与TCP协议下编写服务端程序代码类似,但因为是无连接的形式,所以不需要监听. 这次,我用了一点不同的想法:我建立一个服务端,用了两个端口和两个套接字,把服务端作为一个数据转发的中转站,使得客户机之间进 ...