开启Android Apk调试与备份选项的Xposed模块的编写
本文博客地址:https://blog.csdn.net/QQ1084283172/article/details/80963610
在进行Android应用程序逆向分析的时候,经常需要进行Android应用程序的动态调试,一般情况下基于Android应用程序的安全性考虑,发布版的Android应用程序都会关闭它的调试选项,因此只有开启该Android应用程序的调试选项,才能在Android应用程序的Activity界面显示之前(即Application类的attach函数和onCreate函数执行之前)使Android应用程序处于暂停等待调试的状态,并且没有开启调试选项的Android应用程序通过DDMS工具是看不到进程的。
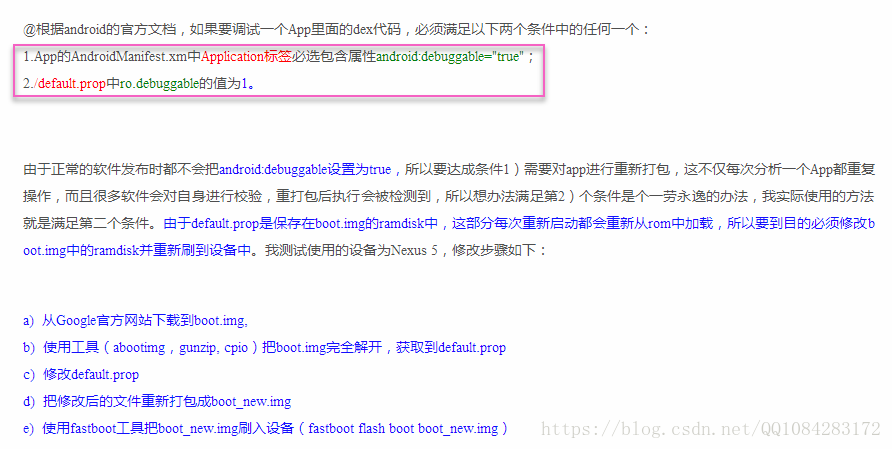
Android应用程序支持dex代码调试的条件:
上面提到的两种开启Android应用程序调试选项的方法都不是最佳的,作者泉哥编写了一个基于Xposed框架实现的开启APK调试与备份选项的Xposed模块,只要在Android系统上成功安装了Xposed框架,再安装和激活泉哥编写的 BDOpener插件 重启Android系统就可以开启Android应用的dex代码调试模式。之前我曾尝试过修改Android系统源码的方法开启Android应用的dex代码调试模式,但是效果不好,影响到Android系统app的启动,需要过滤Android系统应用。
BDOpener插件的下载地址:https://security.tencent.com/index.php/opensource/down/17
BDOpener插件的Xposed Hook代码编写原理如下:
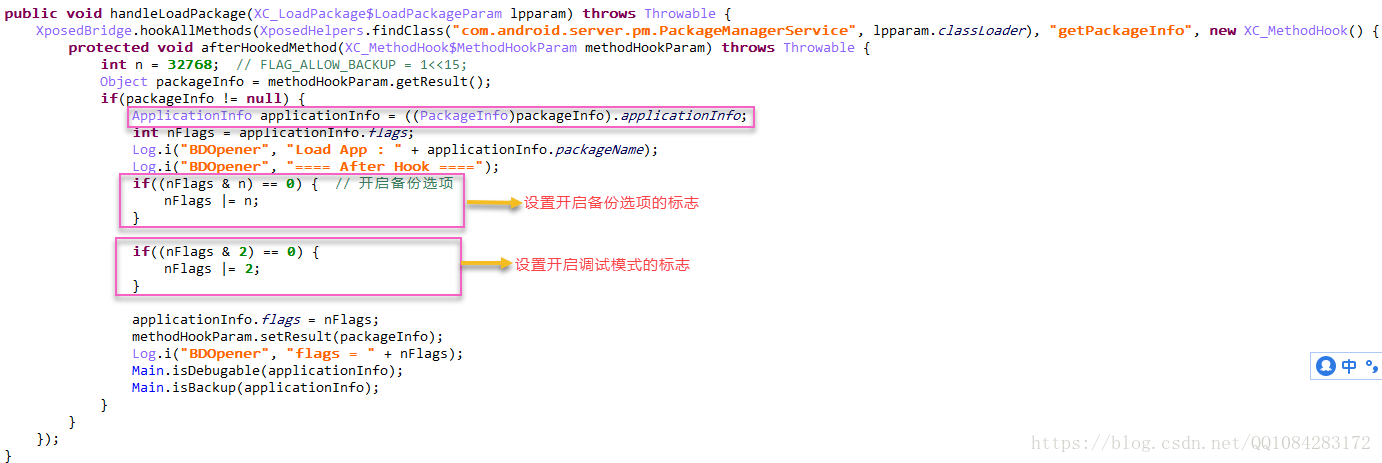
java Hook处理类"com.android.server.pm.PackageManagerService"中所有名称为"getPackageInfo"的类方法,修改该类方法的函数返回值PackageInfo,为返回值PackageInfo对象中的实例成员变量applicationInfo的flags增加调试模式选项和备份模式选项,这用每次调用类PackageManagerService的类方法"getPackageInfo"获取到的Android应用程序的包信息中都带有调试模式选项和备份模式选项的信息。
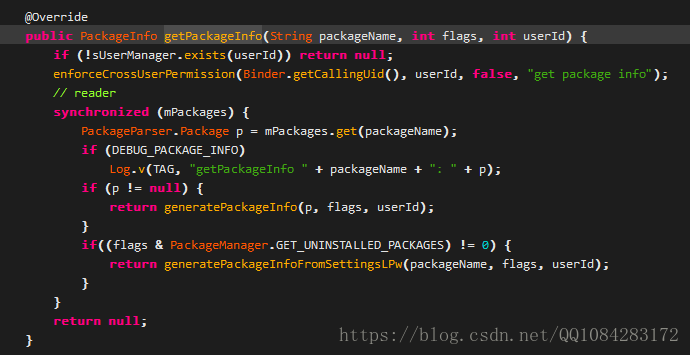
源码路径:/frameworks/base/services/java/com/android/server/pm/PackageManagerService.java
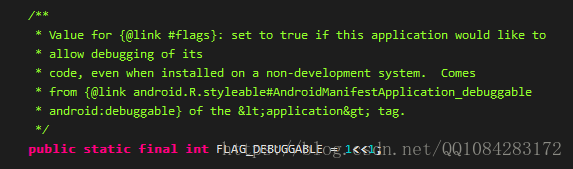
源码路径:/frameworks/base/core/java/android/content/pm/ApplicationInfo.java
Android调试模式选项的flags定义:
Android备份模式选项的flags定义:
源码路径:/frameworks/base/core/java/android/app/ActivityThread.java
Android应用的调试模式运行判断是在类ActivityThread的函数handleBindApplication中进行的。
Android应用的调试模式运行判断是在Android应用的dex文件加载完成以后,类Application的attach函数和onCreate函数执行之前,因此在进行Android应用程序的dex代码调试时,Apk程序会暂停等待调试于类Application的代码执行之前,此时Android应用程序的Activity界面还没有开始显示。
// 在apk程序的Activity显示之前执行的代码
private void handleBindApplication(AppBindData data) {
mBoundApplication = data;
mConfiguration = new Configuration(data.config);
mCompatConfiguration = new Configuration(data.config);
mProfiler = new Profiler();
mProfiler.profileFile = data.initProfileFile;
mProfiler.profileFd = data.initProfileFd;
mProfiler.autoStopProfiler = data.initAutoStopProfiler;
// send up app name; do this *before* waiting for debugger
Process.setArgV0(data.processName);
android.ddm.DdmHandleAppName.setAppName(data.processName,
UserHandle.myUserId());
if (data.persistent) {
// Persistent processes on low-memory devices do not get to
// use hardware accelerated drawing, since this can add too much
// overhead to the process.
if (!ActivityManager.isHighEndGfx()) {
HardwareRenderer.disable(false);
}
}
if (mProfiler.profileFd != null) {
mProfiler.startProfiling();
}
// If the app is Honeycomb MR1 or earlier, switch its AsyncTask
// implementation to use the pool executor. Normally, we use the
// serialized executor as the default. This has to happen in the
// main thread so the main looper is set right.
if (data.appInfo.targetSdkVersion <= android.os.Build.VERSION_CODES.HONEYCOMB_MR1) {
AsyncTask.setDefaultExecutor(AsyncTask.THREAD_POOL_EXECUTOR);
}
/*
* Before spawning a new process, reset the time zone to be the system time zone.
* This needs to be done because the system time zone could have changed after the
* the spawning of this process. Without doing this this process would have the incorrect
* system time zone.
*/
TimeZone.setDefault(null);
/*
* Initialize the default locale in this process for the reasons we set the time zone.
*/
Locale.setDefault(data.config.locale);
/*
* Update the system configuration since its preloaded and might not
* reflect configuration changes. The configuration object passed
* in AppBindData can be safely assumed to be up to date
*/
mResourcesManager.applyConfigurationToResourcesLocked(data.config, data.compatInfo);
mCurDefaultDisplayDpi = data.config.densityDpi;
applyCompatConfiguration(mCurDefaultDisplayDpi);
///////////////////////////////////////////////////////////////////
// LoadedApk info;
// 对Android应用的dex文件进行加载返回LoadedApk实例对象
data.info = getPackageInfoNoCheck(data.appInfo, data.compatInfo);
///////////////////////////////////////////////////////////////////
/**
* Switch this process to density compatibility mode if needed.
*/
if ((data.appInfo.flags&ApplicationInfo.FLAG_SUPPORTS_SCREEN_DENSITIES)
== 0) {
mDensityCompatMode = true;
Bitmap.setDefaultDensity(DisplayMetrics.DENSITY_DEFAULT);
}
updateDefaultDensity();
// 创建并初始化Android应用程序的Context
final ContextImpl appContext = new ContextImpl();
appContext.init(data.info, null, this);
if (!Process.isIsolated()) {
final File cacheDir = appContext.getCacheDir();
if (cacheDir != null) {
// Provide a usable directory for temporary files
System.setProperty("java.io.tmpdir", cacheDir.getAbsolutePath());
setupGraphicsSupport(data.info, cacheDir);
} else {
Log.e(TAG, "Unable to setupGraphicsSupport due to missing cache directory");
}
}
/**
* For system applications on userdebug/eng builds, log stack
* traces of disk and network access to dropbox for analysis.
*/
if ((data.appInfo.flags &
(ApplicationInfo.FLAG_SYSTEM |
ApplicationInfo.FLAG_UPDATED_SYSTEM_APP)) != 0) {
StrictMode.conditionallyEnableDebugLogging();
}
/**
* For apps targetting SDK Honeycomb or later, we don't allow
* network usage on the main event loop / UI thread.
*
* Note to those grepping: this is what ultimately throws
* NetworkOnMainThreadException ...
*/
if (data.appInfo.targetSdkVersion > 9) {
StrictMode.enableDeathOnNetwork();
}
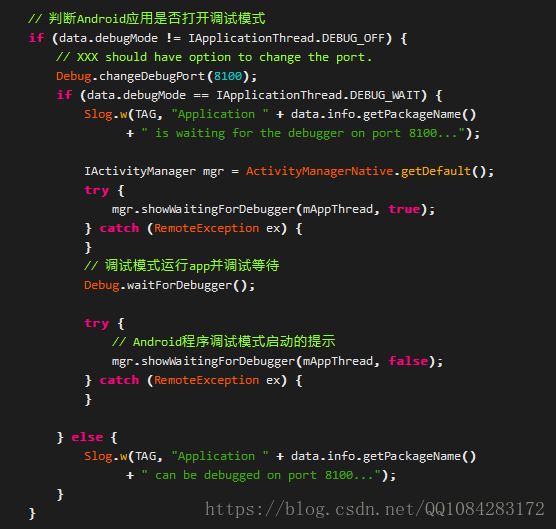
// 判断Android应用是否打开调试模式
if (data.debugMode != IApplicationThread.DEBUG_OFF) {
// XXX should have option to change the port.
Debug.changeDebugPort(8100);
if (data.debugMode == IApplicationThread.DEBUG_WAIT) {
Slog.w(TAG, "Application " + data.info.getPackageName()
+ " is waiting for the debugger on port 8100...");
IActivityManager mgr = ActivityManagerNative.getDefault();
try {
mgr.showWaitingForDebugger(mAppThread, true);
} catch (RemoteException ex) {
}
// 调试模式运行app并调试等待
Debug.waitForDebugger();
try {
// Android程序调试模式启动的提示
mgr.showWaitingForDebugger(mAppThread, false);
} catch (RemoteException ex) {
}
} else {
Slog.w(TAG, "Application " + data.info.getPackageName()
+ " can be debugged on port 8100...");
}
}
// Enable OpenGL tracing if required
if (data.enableOpenGlTrace) {
GLUtils.setTracingLevel(1);
}
// Allow application-generated systrace messages if we're debuggable.
boolean appTracingAllowed = (data.appInfo.flags&ApplicationInfo.FLAG_DEBUGGABLE) != 0;
Trace.setAppTracingAllowed(appTracingAllowed);
/**
** Initialize the default http proxy in this process for the reasons we set the time zone.
**/
IBinder b = ServiceManager.getService(Context.CONNECTIVITY_SERVICE);
if (b != null) {
// In pre-boot mode (doing initial launch to collect password), not
// all system is up. This includes the connectivity service, so don't
// crash if we can't get it.
IConnectivityManager service = IConnectivityManager.Stub.asInterface(b);
try {
ProxyProperties proxyProperties = service.getProxy();
Proxy.setHttpProxySystemProperty(proxyProperties);
} catch (RemoteException e) {}
}
if (data.instrumentationName != null) {
InstrumentationInfo ii = null;
try {
ii = appContext.getPackageManager().
getInstrumentationInfo(data.instrumentationName, 0);
} catch (PackageManager.NameNotFoundException e) {
}
if (ii == null) {
throw new RuntimeException(
"Unable to find instrumentation info for: "
+ data.instrumentationName);
}
mInstrumentationAppDir = ii.sourceDir;
mInstrumentationAppLibraryDir = ii.nativeLibraryDir;
mInstrumentationAppPackage = ii.packageName;
mInstrumentedAppDir = data.info.getAppDir();
mInstrumentedAppLibraryDir = data.info.getLibDir();
ApplicationInfo instrApp = new ApplicationInfo();
instrApp.packageName = ii.packageName;
instrApp.sourceDir = ii.sourceDir;
instrApp.publicSourceDir = ii.publicSourceDir;
instrApp.dataDir = ii.dataDir;
instrApp.nativeLibraryDir = ii.nativeLibraryDir;
// 得到Android应用dex文件加载后的LoadedApk实例
LoadedApk pi = getPackageInfo(instrApp, data.compatInfo,
appContext.getClassLoader(), false, true);
ContextImpl instrContext = new ContextImpl();
instrContext.init(pi, null, this);
try {
java.lang.ClassLoader cl = instrContext.getClassLoader();
mInstrumentation = (Instrumentation)
cl.loadClass(data.instrumentationName.getClassName()).newInstance();
} catch (Exception e) {
throw new RuntimeException(
"Unable to instantiate instrumentation "
+ data.instrumentationName + ": " + e.toString(), e);
}
mInstrumentation.init(this, instrContext, appContext,
new ComponentName(ii.packageName, ii.name), data.instrumentationWatcher,
data.instrumentationUiAutomationConnection);
if (mProfiler.profileFile != null && !ii.handleProfiling
&& mProfiler.profileFd == null) {
mProfiler.handlingProfiling = true;
File file = new File(mProfiler.profileFile);
file.getParentFile().mkdirs();
Debug.startMethodTracing(file.toString(), 8 * 1024 * 1024);
}
} else {
// 构建Instrumentation对象实例
mInstrumentation = new Instrumentation();
}
if ((data.appInfo.flags&ApplicationInfo.FLAG_LARGE_HEAP) != 0) {
dalvik.system.VMRuntime.getRuntime().clearGrowthLimit();
}
// Allow disk access during application and provider setup. This could
// block processing ordered broadcasts, but later processing would
// probably end up doing the same disk access.
final StrictMode.ThreadPolicy savedPolicy = StrictMode.allowThreadDiskWrites();
try {
// If the app is being launched for full backup or restore, bring it up in
// a restricted environment with the base application class.
////////////////////////////////////////////////////////////////
// 创建Android应用的Application类对象的实例并调用其attach方法
// 间接通过调用attach方法调用Android应用的attachBaseContext方法
Application app = data.info.makeApplication(data.restrictedBackupMode, null);
// 在类ActivityThread的成员变量mInitialApplication中保存创建的Application类对象实例(3)
// 将第1个Application视为进程的初始化Application
mInitialApplication = app;
////////////////////////////////////////////////////////////////
// don't bring up providers in restricted mode; they may depend on the
// app's custom Application class
if (!data.restrictedBackupMode) {
// 获取当前Android应用的ContentProvider
List<ProviderInfo> providers = data.providers;
if (providers != null) {
// 安装该Android应用程序的ContentProvider
installContentProviders(app, providers);
// For process that contains content providers, we want to
// ensure that the JIT is enabled "at some point".
mH.sendEmptyMessageDelayed(H.ENABLE_JIT, 10*1000);
}
}
// Do this after providers, since instrumentation tests generally start their
// test thread at this point, and we don't want that racing.
try {
// 调用Instrumentationde的OnCreate方法
mInstrumentation.onCreate(data.instrumentationArgs);
} catch (Exception e) {
throw new RuntimeException(
"Exception thrown in onCreate() of "
+ data.instrumentationName + ": " + e.toString(), e);
}
try {
// 调用Application的OnCreate方法
mInstrumentation.callApplicationOnCreate(app);
} catch (Exception e) {
if (!mInstrumentation.onException(app, e)) {
throw new RuntimeException(
"Unable to create application " + app.getClass().getName()
+ ": " + e.toString(), e);
}
}
} finally {
StrictMode.setThreadPolicy(savedPolicy);
}
}整理一下BDOpener插件的逆向代码,Xposed Hook的插件代码编写如下所示:
import android.content.pm.ApplicationInfo;
import android.content.pm.PackageInfo;
import android.util.Log;
......
@Override
public void handleLoadPackage(final LoadPackageParam lpparam) throws Throwable {
// 打开Android应用的调试模式和备份选项
openDB(lpparam);
......
boolean isDebugable(ApplicationInfo applicationInfo) {
if((applicationInfo.flags & 2) != 0) {
Log.i("BDOpener", "Open Debugable");
return true;
}
Log.i("BDOpener", "Close Debugable");
return false;
}
public boolean isBackup(ApplicationInfo applicationInfo) {
if((applicationInfo.flags & 32768) != 0) {
Log.i("BDOpener", "Open Backup");
return true;
}
Log.i("BDOpener", "Close Backup");
return false;
}
// 开启Android应用的调试和备份选项
void openDB(LoadPackageParam lpparam) {
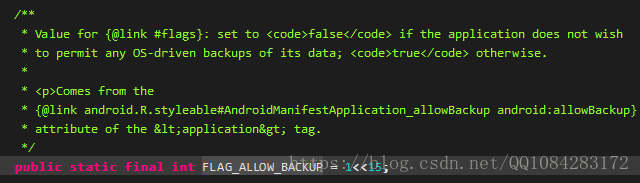
/**
* Value for {@link #flags}: set to <code>false</code> if the application does not wish
* to permit any OS-driven backups of its data; <code>true</code> otherwise.
*
* <p>Comes from the
* {@link android.R.styleable#AndroidManifestApplication_allowBackup android:allowBackup}
* attribute of the <application> tag.
*/
final int FLAG_ALLOW_BACKUP = 1<<15;
/**
* Value for {@link #flags}: set to true if this application would like to
* allow debugging of its
* code, even when installed on a non-development system. Comes
* from {@link android.R.styleable#AndroidManifestApplication_debuggable
* android:debuggable} of the <application> tag.
*/
final int FLAG_DEBUGGABLE = 1<<1;
Class<?> packageManagerService =
XposedHelpers.findClass("com.android.server.pm.PackageManagerService", lpparam.classLoader);
XC_MethodHook callback = new XC_MethodHook() {
@Override
protected void beforeHookedMethod(MethodHookParam param)
throws Throwable {
}
@Override
protected void afterHookedMethod(MethodHookParam param)
throws Throwable {
PackageInfo packageInfo = (PackageInfo) param.getResult();
if (packageInfo != null) {
ApplicationInfo applicationInfo = packageInfo.applicationInfo;
int nFlags = applicationInfo.flags;
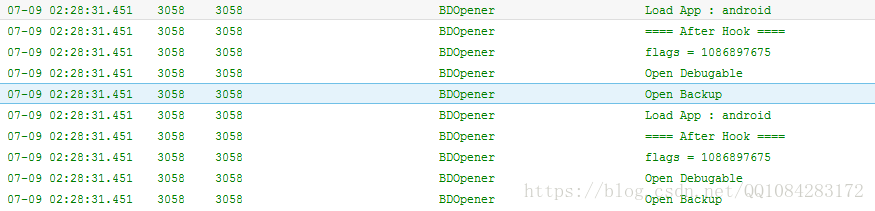
Log.i("BDOpener", "Load App : " + applicationInfo.packageName);
Log.i("BDOpener", "==== After Hook ====");
// 判断当前Android应用是否开启调试模式选项
if ((nFlags & FLAG_DEBUGGABLE) == 0) {
nFlags |= FLAG_DEBUGGABLE;
}
// 判断当前Android应用是否开启备份选项
if ((nFlags & FLAG_ALLOW_BACKUP) == 0) {
nFlags |= FLAG_ALLOW_BACKUP;
}
applicationInfo.flags = nFlags;
// 修改函数的返回值
param.setResult(packageInfo);
Log.i("BDOpener", "flags = " + nFlags);
isDebugable(applicationInfo);
isBackup(applicationInfo);
}
}
};
// 执行java Hook操作
XposedBridge.hookAllMethods(packageManagerService, "getPackageInfo", callback);
}效果截图:
开启了Android应用的调试模式选项以后,通过DDMS能够看到很多Android应用的进程名称和列表,如下图所示:
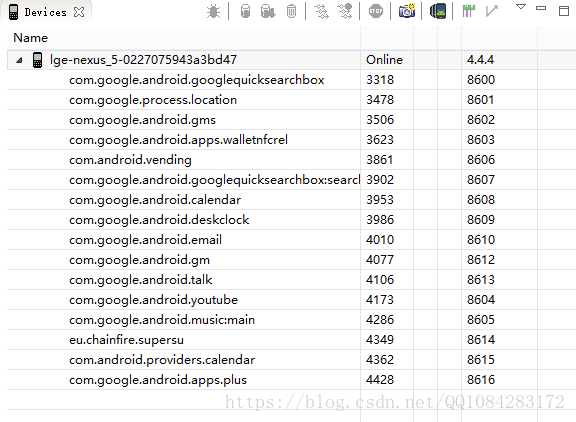
开启了调试模式选项的Android应用,可以使用下面的命令进行调试模式的启动,让Android应用程序等待调试:
adb shell am start -W -D -n 包名/主Activity类名称字符串开启Android Apk调试与备份选项的Xposed模块的编写的更多相关文章
- 开启Android应用调试选项的工具XDebug的介绍
本文博客地址:https://blog.csdn.net/QQ1084283172/article/details/81187769 最近这段时间比较郁闷,就不分享和学习比较复杂的Android逆向技 ...
- Android 开发调试最优选项
1 开发环境 VS2019 16.4.5 2 开发调试选项 Android 选项
- Android APK程序的smali动态调试
本文博客地址:http://blog.csdn.net/qq1084283172/article/details/71250622 一.Apktool的下载和安装 Apktool是Android逆向分 ...
- Android——内存调试
因调试某个重大问题,怀疑到了内存,专门写了个測试脚本.记录一下. 撰写不易,转载请注明出处:http://blog.csdn.net/jscese/article/details/37928823 一 ...
- Android动态调试so库JNI_Onload函数-----基于IDA实现
之前看过吾爱破解论坛一个关于Android'逆向动态调试的经验总结帖,那个帖子写的很好,对Android的脱壳和破解很有帮助,之前我们老师在上课的时候也讲过集中调试的方法,但是现在不太实用.对吾爱破解 ...
- Android调试系列—使用android studio调试smali代码
1.工具介绍 使用工具 android killer:用于反编译apk包,得到smali代码 android studio:调试smali代码工具,或者使用idea,android studio就是在 ...
- Android WebView 调试方法
调试Android WebView中的h5页面,通常就是通过alert和抓包工具来定位问题,效率低且无法直接调试样式或打断点,可谓是事倍功半.本文介绍一下我在项目中使用的新方法,能够通过chrome的 ...
- Win7 32位下cocos2dx android开发调试环境
1.使用环境 win7 32位 + vs2010 2.软件准备(下方绿色文字带链接) cocos2dx-v2.2.2 jdk7 android sdk android ndk adt bundle a ...
- 【转】Android Eclipse调试技巧
原文地址:https://www.cnblogs.com/tianchunming/p/5423942.html Android Eclipse调试技巧 在Android 应用程序开发中我们经常需 ...
随机推荐
- C#正则实现匹配一块代码段
最近项目,生成聚合网关,但是生成的网关文件中,存在着不必要的代码段,比如一个类A,类B等 之前一直使用手动删除,这么做劳民伤财,浪费时间,考虑使用正则写一个工具实现自动删除. 正则写法: string ...
- ReactElement源码笔记
ReactElement 源码笔记 ReactElement通过 createElement创建,调用该方法需要 传入三个参数: type config children type指代这个ReactE ...
- 剑指 Offer 19. 正则表达式匹配 + 动态规划
剑指 Offer 19. 正则表达式匹配 题目链接 一. 字符串匹配大致可以分为三种情况: 第一种:正则串的最后一个字符为正常字符,此时根据主串的最后一个字符是否和它相同来判断是否匹配, 如果相同,则 ...
- spring基础:什么是框架,框架优势,spring优势,耦合内聚,什么是Ioc,IOC配置,set注入,第三方资源配置,综合案例spring整合mybatis实现
知识点梳理 课堂讲义 1)Spring简介 1.1)什么是框架 源自于建筑学,隶属土木工程,后发展到软件工程领域 软件工程中框架的特点: 经过验证 具有一定功能 半成品 1.2)框架的优势 提高开发效 ...
- 如何在 C# 中使用 ArrayPool 和 MemoryPool
对资源的可复用是提升应用程序性能的一个非常重要的手段,比如本篇要分享的 ArrayPool 和 MemoryPool,它们就有效的减少了内存使用和对GC的压力,从而提升应用程序性能. 什么是 Arra ...
- git配置,以及简单的命令
在 window 平台需要安装对应的客户端 git 配置全局用户名git config --global user.name "xxx"配置全局邮箱git config --glo ...
- springmvc 最权威的知识点
1.什么是Spring MVC ?简单介绍下你对springMVC的理解? Spring MVC是一个基于Java的实现了MVC设计模式的请求驱动类型的轻量级Web框架,通过把Model,View,C ...
- 微信小程序应用开发-手动创建
基础知识: index.wxml的代码为 Html,有很多标签,如等 index.wwss相当于css 即样式 index.js中有很多函数,可自定义 操作步骤: 删除app.json文件中page/ ...
- Hznu_0j 1557
题目链接:http://acm.hznu.edu.cn/OJ/problem.php?id=1557 题解:将两个数组分别升序和降序排序后,累加差的绝对值. Ac代码: #include<std ...
- 京东 vue3 组件库震撼升级,如约而至!
京东零售开源项目 NutUI 是一套京东风格的轻量级移动端 Vue 组件库,是开发和服务于移动 Web 界面的企业级产品.经过长时间的开发与打磨,NutUI 3.0 终于和大家见面了!3.0 版本在技 ...