Creating LVM Logical Volumes
LVM-Logical Volume Manager逻辑卷管理的一些基本概念:
用途:
在零停机前提下可以自如对文件系统的大小进行调整,可以方便实现文件系统跨越不同磁盘和分区。
当系统添加了新的磁盘,通过LVM机制,管理员就不必将磁盘的文件移动到新的磁盘上以充分利用新的存储空间,而是直接扩展文件系统跨越磁盘即可。
基本术语:
物理卷pv(Physical Volume)
物理卷就是指硬盘分区或从逻辑上与磁盘分区具有同样功能的设备(如RAID),是LVM的基本存储逻辑块,
但和基本的物理存储介质(如分区、磁盘等)比较,却包含有与LVM相关的管理参数.
●卷组vg(Volume Group)
卷组由物理卷组成,类似于非LVM系统中的物理硬盘,可以在卷组上创建一个或多个"LVM分区"(逻辑卷).
●逻辑卷lv(Logical Volume)
LVM的逻辑卷类似于非LVM系统中的硬盘分区,在逻辑卷之上可以建立文件系统(比如/home或者/usr等).
●PE(Physical Extent)
每一个物理卷被划分为称为PE(Physical Extents)的基本单元,具有唯一编号的PE是可以被LVM寻址的
最小单元.PE的大小是可配置的,默认为4MB.
●LE(Logical Extent)
逻辑卷也被划分为被称为LE(Logical Extents) 的可被寻址的基本单位.在同一个卷组中,LE的大小和
PE是相同的,并且一一对应.
和非LVM系统将包含分区信息的元数据保存在位于分区的起始位置的分区表中一样,逻辑卷以及卷 组相关的元数据也是保存在位于物理卷起始处的VGDA(卷组描述符区域)中.VGDA包括以下内容: PV描述符、VG描述符、LV描述符、和一些PE描述符 .
系统启动LVM时激活VG,并将VGDA加载至内存,来识别LV的实际物理存储位置.当系统进行I/O操作 时,就会根据VGDA建立的映射机制来访问实际的物理位置.
===========================
Creating LVM logical volumes involves creating the three layers in the LVM architecture. You first have to take care of the physical volume (PV), then you need to create the volume group (VG) and assign physical volumes to it. As the last step, the logical volume (LV) itself has to be created. In this section, you learn what is involved in creating these three layers. Different utilities exist for creating LVM. This chapter focuses on using the command-line utilities. They are relatively easy to use, and they are available in all environments (whether you are running a graphical interface or not). 顺序:PV--->VG--->LV
TIP You absolutely do not need to learn the commands discussed in this chapter by heart. All you really need to remember is pv , vg , lv . Open a command line, type pv and press the Tab key twice. This will show all commands that start with pv, which are all commands that are used for managing physical volumes. After you have found the command you need, run this command with the --help option. This shows a usage summary that lists everything that needs to be done to create the element you need.
一、Creating the Physical Volume --创建物理卷PV
In this exercise, you create a physical volume. To do this exercise, you need a hard disk that has free (unpartitioned) disk space available. The recommended method to make disk space available is by adding a new hard disk in your virtual machine environment. In this exercise, I use a clean /dev/vdb device to create the partition. You may have to change the device name to match your configuration. If you do not have a dedicated hard disk available to create this configuration, you might want to consider attaching a USB key to your machine. (我用的是Oracle VirtulBox虚拟机,添加一块虚拟磁盘用于测试)
1. Open a root shell and type fdisk /dev/sdc .
2. Type n to create a new partition. Select p to make it a primary partition, and use the partition number that is suggested as a default. If you are using a clean device, this will be partition number 1.
3. Press Enter when asked for the first sector and type +100M to accept the last sector.
4. Once you are back on the fdisk prompt, type t to change the partition type. Because there is one partition only, fdisk does not ask which partition to use this partition type on. You may have to select a partition if you are using a different configuration.
5. The partitioner asks for the partition type you want to use. Type 8e . Then, press w to write changes to disk and quit fdisk.
If you are getting a message that the partition table could not be updated while writing the changes to disk, reboot your system.
(首先,你得有一块未分区有磁盘,然后在这个磁盘上创建一个LVM类型的分区; 之后再为创建物理卷PV)
- fdisk -l查看分区情况:可以看到此时的/dev/sdc是没有分区的。
Disk /dev/sdc:  MB,  bytes,  sectors

Units = sectors of  *  =  bytes

Sector size (logical/physical):  bytes /  bytes

I/O size (minimum/optimal):  bytes /  bytes

Disk label type: dos

Disk identifier: 0x0c16d904

   Device Boot      Start         End      Blocks   Id  System
- 为/dev/sdc磁盘分出一个区sdc1,大小为100M,类型为LVM
[root@rhel7 ~]# fdisk /dev/sdc

Welcome to fdisk (util-linux 2.23.).

Changes will remain in memory only, until you decide to write them.

Be careful before using the write command.

Command (m for help): n

Partition type:

   p   primary ( primary,  extended,  free)

   e   extended

Select (default p): p

Partition number (-, default ):

First sector (-, default ):

Using default value

Last sector, +sectors or +size{K,M,G} (-, default ): +100M

Partition  of type Linux and of size  MiB is set

Command (m for help): t

Selected partition

Hex code (type L to list all codes): L

   Empty             NEC DOS           Minix / old Lin bf  Solaris

   FAT12             Hidden NTFS Win   Linux swap / So c1  DRDOS/sec (FAT-

   XENIX root        Plan             Linux           c4  DRDOS/sec (FAT-

   XENIX usr       3c  PartitionMagic    OS/ hidden C:  c6  DRDOS/sec (FAT-

   FAT16 <32M        Venix        Linux extended  c7  Syrinx

   Extended          PPC PReP Boot     NTFS volume set da  Non-FS data

   FAT16             SFS               NTFS volume set db  CP/M / CTOS / .

   HPFS/NTFS/exFAT 4d  QNX4.x            Linux plaintext de  Dell Utility

   AIX             4e  QNX4.x 2nd part 8e  Linux LVM       df  BootIt

   AIX bootable    4f  QNX4.x 3rd part   Amoeba          e1  DOS access

 a  OS/ Boot Manag   OnTrack DM        Amoeba BBT      e3  DOS R/O

 b  W95 FAT32         OnTrack DM6 Aux 9f  BSD/OS          e4  SpeedStor

 c  W95 FAT32 (LBA)   CP/M            a0  IBM Thinkpad hi eb  BeOS fs

 e  W95 FAT16 (LBA)   OnTrack DM6 Aux a5  FreeBSD         ee  GPT

 f  W95 Ext'd (LBA) 54  OnTrackDM6      a6  OpenBSD         ef  EFI (FAT-12/16/

  OPUS              EZ-Drive        a7  NeXTSTEP        f0  Linux/PA-RISC b

  Hidden FAT12      Golden Bow      a8  Darwin UFS      f1  SpeedStor

  Compaq diagnost 5c  Priam Edisk     a9  NetBSD          f4  SpeedStor

  Hidden FAT16 <   SpeedStor       ab  Darwin boot     f2  DOS secondary

  Hidden FAT16      GNU HURD or Sys af  HFS / HFS+      fb  VMware VMFS

  Hidden HPFS/NTF   Novell Netware  b7  BSDI fs         fc  VMware VMKCORE

  AST SmartSleep    Novell Netware  b8  BSDI swap       fd  Linux raid auto

1b  Hidden W95 FAT3   DiskSecure Mult bb  Boot Wizard hid fe  LANstep

1c  Hidden W95 FAT3   PC/IX           be  Solaris boot    ff  BBT

1e  Hidden W95 FAT1   Old Minix

Hex code (type L to list all codes): 8e

Changed type of partition 'Linux' to 'Linux LVM'

Command (m for help): w

The partition table has been altered!

Calling ioctl() to re-read partition table.

Syncing disks.

[root@rhel7 ~]#
- fdisk -l 命令查看分区后的/dev/sdc
...略...

Disk /dev/sdc:  MB,  bytes,  sectors

Units = sectors of  *  =  bytes

Sector size (logical/physical):  bytes /  bytes

I/O size (minimum/optimal):  bytes /  bytes

Disk label type: dos

Disk identifier: 0x0c16d904

   Device Boot      Start         End      Blocks   Id  System

/dev/sdc1                           8e  Linux LVM

.....略...
6. Now that the partition has been created, you need to flag it as an LVM physical volume.---分区创建完成后,可以使用命令partprobe使修改的分区生效,不用重启。
[root@rhel7 ~]# partprobe
To do this, type pvcreate /dev/sdc1 . You should now get this prompt: Physical volume “/dev/vbd1” successfully created.
7. Now type pvs to verify that the physical volume has been created successfully. The output may look like bellow .
[root@rhel7 ~]# pvcreate /dev/sdc1

WARNING: ext4 signature detected on /dev/sdc1 at offset . Wipe it? [y/n]: y

  Wiping ext4 signature on /dev/sdc1.

  Physical volume "/dev/sdc1" successfully created

[root@rhel7 ~]# pvs

  PV         VG   Fmt  Attr PSize   PFree

  /dev/sda2  rhel lvm2 a--   .51g  40.00m

  /dev/sdc1       lvm2 ---  100.00m 100.00m

[root@rhel7 ~]#
As an alternative to the pvs command, which shows a summary of the physical volumes and their attributes, you can also use the pvdisplay command to show some more details.
pvdisplay命令:
[root@rhel7 ~]# pvdisplay

  --- Physical volume ---

  PV Name               /dev/sda2

  VG Name               rhel

  PV Size               19.51 GiB / not usable 3.00 MiB

  Allocatable           yes

  PE Size               4.00 MiB

  Total PE

  Free PE

  Allocated PE

  PV UUID               OjqvZk-KS1b-YegW-zb4b-uaNV-zGt7-npfsjU

  "/dev/sdc1" is a new physical volume of "100.00 MiB"

  --- NEW Physical volume ---

  PV Name               /dev/sdc1

  VG Name

  PV Size               100.00 MiB

  Allocatable           NO

  PE Size

  Total PE

  Free PE

  Allocated PE

  PV UUID               mf29mQ-wx2f-L94K-AFWH-rwA1-23oj-YE4yoV
二、Creating the Volume Groups --创建卷组VG
Now that the physical volume has been created, you can assign it to a volume group. It is possible to add a physical volume to an existing volume group , but you will now learn how to create a new volume group and add the physical volume to it.This is a simple one-command procedure. Just type vgcreate followed by the name of the volume group you want to create and the name of the physical device you want to add to it. So, if the physical volume name is /dev/sdc1, the complete command is vgcreate vgdata /dev/sdc1 (语法:vgcreate 卷组名 设备名). You are completely free in your choice of name for the volume group. I like to start all volume group names with vg, which makes it easy to find the volume groups if there are many, but you are free to choose anything you like.
After creating the volume group, you can request details about the volume group using the vgs command for a short summary, or the vgdisplay command to get more information.
[root@rhel7 ~]# vgcreate vgdate /dev/sdc1

  Volume group "vgdate" successfully created

[root@rhel7 ~]# vgs

  VG     #PV #LV #SN Attr   VSize  VFree

  rhel            wz--n- .51g 40.00m

  vgdate          wz--n- 96.00m 96.00m

[root@rhel7 ~]# vgdisplay

  --- Volume group ---

  VG Name               rhel

  System ID

  Format                lvm2

  Metadata Areas

  Metadata Sequence No

  VG Access             read/write

  VG Status             resizable

  MAX LV

  Cur LV

  Open LV

  Max PV

  Cur PV

  Act PV

  VG Size               19.51 GiB

  PE Size               4.00 MiB

  Total PE

  Alloc PE / Size        / 19.47 GiB

  Free  PE / Size        / 40.00 MiB

  VG UUID               RisrnE-lJIv-XM6h-47zQ-rsiU-JVP6-9ZexZO

  --- Volume group ---

  VG Name               vgdate

  System ID

  Format                lvm2

  Metadata Areas

  Metadata Sequence No

  VG Access             read/write

  VG Status             resizable

  MAX LV

  Cur LV

  Open LV

  Max PV

  Cur PV

  Act PV

  VG Size               96.00 MiB

  PE Size               4.00 MiB

  Total PE

  Alloc PE / Size        /

  Free  PE / Size        / 96.00 MiB

  VG UUID               hNTqaY-c0Hi-v5wk-p7lQ-TIbc-oSpm-TIOcHs

[root@rhel7 ~]#
In this procedure, you learned how to create a volume group in a two-step procedure where first the physical volume is created with the pvcreate command, after which the volume group is added using the vgcreate command. You can do this in a one-step procedure as well (where using a separate pvcreate command will not be necessary). If you are adding a partition to the volume group, however, it must be marked as partition type 8e already.
The one-step procedure is particularly useful for adding a complete disk device (which does not need to be marked as anything). If you want to add the disk / dev/ sdc, for instance, just type vgcreate vgdata /dev/sdc to create a volume group vgdata that contains the /dev/sdc device. When you are doing this to add a device that has not been marked as a physical volume yet, the vgcreate utility will automatically flag it as a physical volume. When creating volume groups, a physical extent size is used. The physical extent size defines the size of the building blocks used to create logical volumes. A logical volume always has a size that is a multiple of the physical extent size. If you need to create huge logical volumes, it is more efficient to use a big physical extent size. If you do not specify anything, a default extent size of 4.00 MiB is used. The physical extent size is always specified as a multiple of 2 MiB, with a maximum size of 128 MiB. Use the vgcreate -s option to specify the physical extent size you want to use.
NOTE When working with LVM, there is the physical extent size to consider. This is the size of the basic building blocks used in the LVM configuration. When working with an ext4 file system, logical extents are used. The extent size on LVM are in no way related to the extent sizes that are used on the file systems.
三、Creating the Logical Volumes and File Systems 创建逻辑卷和文件系统
Now that the volume group has been created, you can start creating logical volumes from it. This procedure is slightly more complicated than the creation of physical volumes or volume groups because there are more choices to be made. While creating the logical volume, you must specify a volume name and a size.
The volume size can be specified as an absolute value using the -L option. Use, for instance, -L 5G to create an LVM volume with a 5GB size. Alternatively, you can use relative sizes using the -l option. For instance, use -l 50%FREE to use half of all available disk space. You’ll further need to specify the name of the volume group that the logical volume is assigned to, and optionally (but highly recommended), you can use -n to specify the name of the logical volume. For instance, use lvcreate -n lvvol1 -L 100M vgdata to create a logical volume with the name lvvol1 and add that to the vgdata volume group.
[root@rhel7 ~]# vgs

  VG     #PV #LV #SN Attr   VSize  VFree

  rhel            wz--n- .51g 40.00m

  vgdate          wz--n- 96.00m 96.00m

[root@rhel7 ~]# lvcreate -n lvvol1 -L 100M vgdate

  Volume group "vgdate" has insufficient free space ( extents):  required.

[root@rhel7 ~]# lvcreate -n lvvol1 -L 90M vgdate

  Rounding up size to full physical extent 92.00 MiB

  Logical volume "lvvol1" created.

[root@rhel7 ~]#
create file systems创建文件系统:
- At this point, you are ready to create a file system on top of the logical volume. Type mkfs.xfs /dev/vgdata/lvdata to create the file system.
- Type mkdir /lvmFiles to create a folder on which the volume can be mounted.
- Add the following line to /etc/fstab: ----开机自动挂载
/dev/vgdata/lvdata /lvmFiles xfs defaults 1 2
- Type mount -a to verify that the mount works and mount the file system.
[root@rhel7 ~]# mkfs.xfs /dev/vgdate/lvvol1

meta-data=/dev/vgdate/lvvol1     isize=    agcount=, agsize= blks

         =                       sectsz=   attr=, projid32bit=

         =                       crc=        finobt=

data     =                       bsize=   blocks=, imaxpct=

         =                       sunit=      swidth= blks

naming   =version               bsize=   ascii-ci= ftype=

log      =internal log           bsize=   blocks=, version=

         =                       sectsz=   sunit= blks, lazy-count=

realtime =none                   extsz=   blocks=, rtextents=

[root@rhel7 ~]# mkdir /lvmFiles

[root@rhel7 ~]# mount /dev/vgdate/lvvol1  /lvmFiles/  -手动挂载看看

[root@rhel7 ~]# df -h

Filesystem                 Size  Used Avail Use% Mounted on

/dev/mapper/rhel-root       18G  .5G   13G  % /

devtmpfs                   911M       911M   % /dev

tmpfs                      921M       921M   % /dev/shm

tmpfs                      921M  8.4M  912M   % /run

tmpfs                      921M       921M   % /sys/fs/cgroup

/dev/sda1                  497M  124M  374M  % /boot

tmpfs                      185M       185M   % /run/user/

/dev/mapper/vgdate-lvvol1   89M  4.8M   84M   % /lvmFiles

[root@rhel7 ~]#
添加到/etc/fstab,加下如一行,使其开机自动挂载:
/dev/vgdate/lvvol1 /lvmFiles/ xfs defaults
===============
LVM一些常用的命令:


步骤总结:
1.fdisk --磁盘分区为lvm类型(-t修改分区格式为8e、w写入分区表)
2.partprobe --让kernel重新读取分区表,使分区生效,无需重启系统
3.pvcreate /dev/sda1 ----创建物理卷PV
4.vgcreate VGname /dev/sda1 ---创建卷组VG,可以使用已经存在的VG名,把上一步创建的物理卷加入到这个VG里;一个VG可以包括多个PV.
5.lvcreate -n LVname -L 200MB VGname ---创建逻辑卷LV,要指定逻辑卷的名字LVname、大小以及从哪个卷组VG划分
6.mkfs.xfs /dev/VGname/LVname ---格式化逻辑卷LVname
7.mount /dev/VGname/LVname /lvmFiles ---mount挂载后就可以使用了
8.vi /etc/fstab --加入开机自动挂载即可
==============================================================
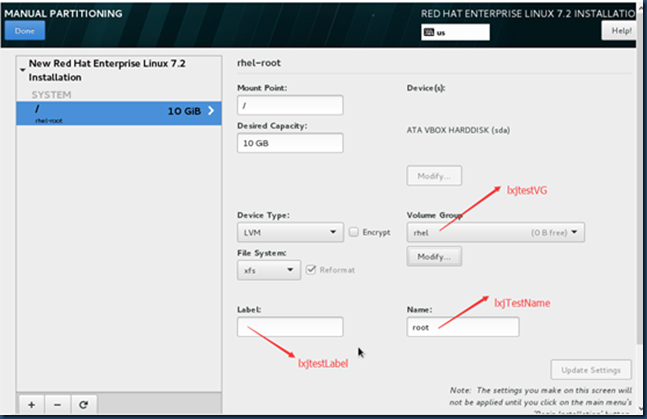
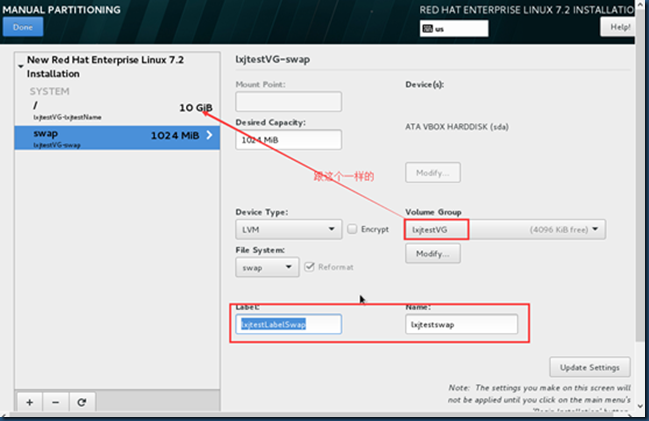
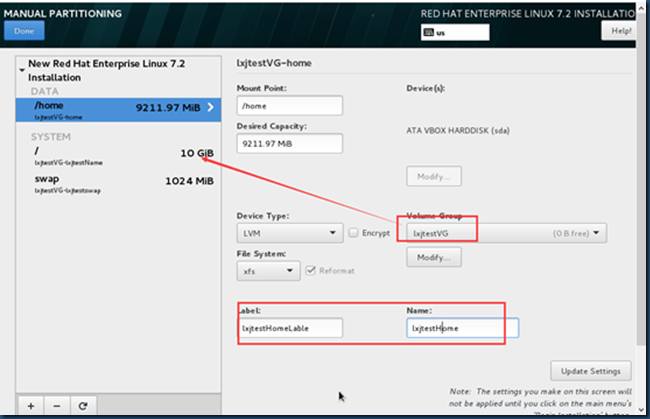
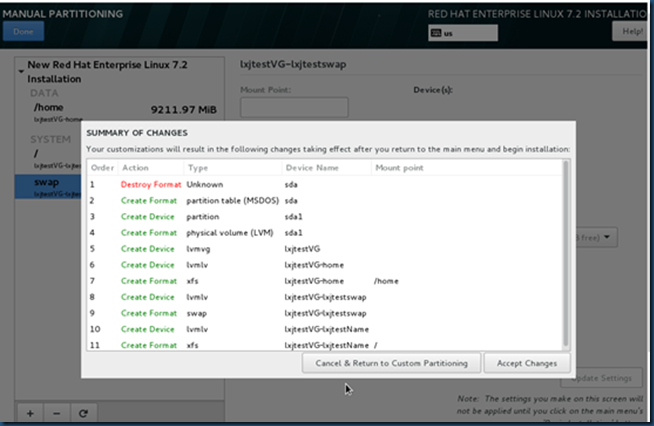
测试:这是在安装系统设置分区的过程中,创建PV、VG及LV的情况:
disk size:20GB


[root@rhel7Oracle ~]# pvs ---整个disk,共20GB作为一个PV

  PV         VG        Fmt  Attr PSize  PFree

  /dev/sda1  lxjtestVG lvm2 a--  .00g

[root@rhel7Oracle ~]# vgs  ----创建了一个卷组VG:lxjtestVG

  VG        #PV #LV #SN Attr   VSize  VFree

  lxjtestVG          wz--n- .00g

[root@rhel7Oracle ~]# lvs  ----创建了三个逻辑卷:home,lxjtestName,lxjtestswap

  LV          VG        Attr       LSize  Pool Origin Data%  Meta%  Move Log Cpy%Sync Convert

  home        lxjtestVG -wi-ao----  .00g

  lxjtestName lxjtestVG -wi-ao---- .00g

  lxjtestswap lxjtestVG -wi-ao----  .00g

[root@rhel7Oracle ~]# pvdisplay

  --- Physical volume ---

  PV Name               /dev/sda1

  VG Name               lxjtestVG

  PV Size               20.00 GiB / not usable 3.00 MiB

  Allocatable           yes (but full)

  PE Size               4.00 MiB

  Total PE

  Free PE

  Allocated PE

  PV UUID               UIy2Bp-54uT-WUaz-fDo1-ljqd-u1uD-dlSpGn

[root@rhel7Oracle ~]# vgdisplay

  --- Volume group ---

  VG Name               lxjtestVG

  System ID

  Format                lvm2

  Metadata Areas

  Metadata Sequence No

  VG Access             read/write

  VG Status             resizable

  MAX LV

  Cur LV

  Open LV

  Max PV

  Cur PV

  Act PV

  VG Size               20.00 GiB

  PE Size               4.00 MiB

  Total PE

  Alloc PE / Size        / 20.00 GiB

  Free  PE / Size        /

  VG UUID               2TbtUe-e34q-p36b-u9XA-OkfJ-EDvS-0Oel35

[root@rhel7Oracle ~]# lvdisplay

  --- Logical volume ---

  LV Path                /dev/lxjtestVG/home

  LV Name                home

  VG Name                lxjtestVG

  LV UUID                sOHWsQ-dsya-p1cM-p4no-pVPf-KX6g-E9SmsA

  LV Write Access        read/write

  LV Creation host, time localhost, -- :: +

  LV Status              available

  # open

  LV Size                9.00 GiB

  Current LE

  Segments

  Allocation             inherit

  Read ahead sectors     auto

  - currently set to

  Block device           :

  --- Logical volume ---

  LV Path                /dev/lxjtestVG/lxjtestswap

  LV Name                lxjtestswap

  VG Name                lxjtestVG

  LV UUID                OUroIn-GQih-o2zB-dHUO-qH1W-ahWb-bCJuQB

  LV Write Access        read/write

  LV Creation host, time localhost, -- :: +

  LV Status              available

  # open

  LV Size                1.00 GiB

  Current LE

  Segments

  Allocation             inherit

  Read ahead sectors     auto

  - currently set to

  Block device           :

  --- Logical volume ---

  LV Path                /dev/lxjtestVG/lxjtestName

  LV Name                lxjtestName

  VG Name                lxjtestVG

  LV UUID                2zpdZg-GFCo-NI6B-Kmfo-LjC5-jwYf-RZtcMA

  LV Write Access        read/write

  LV Creation host, time localhost, -- :: +

  LV Status              available

  # open

  LV Size                10.00 GiB

  Current LE

  Segments

  Allocation             inherit

  Read ahead sectors     auto

  - currently set to

  Block device           :

[root@rhel7Oracle ~]#
Creating LVM Logical Volumes的更多相关文章
- LVM Linear vs Striped Logical Volumes
转自:https://sysadmincasts.com/episodes/27-lvm-linear-vs-striped-logical-volumes About Episode - Durat ...
- 逻辑卷管理LVM (Logical Volume Manager)
什么是LVM? LVM(Logical Volume Manager)逻辑卷管理,是一种将一个或多个硬盘的分区在逻辑上集合,相当于一个大硬盘来使用,当硬盘的空间不够使用的时候,可以继续将其它的硬盘的 ...
- Resizing LVM Logical Volumes-lvextend
1. fdisk命令/dev/sdc再分出一个sdc2分区 [root@rhel7 ~]# fdisk /dev/sdc Welcome to fdisk (util-linux ). Changes ...
- 逻辑卷管理-LVM(Logical Volume Manager)
一. 概念与由来 LVM:逻辑卷管理(Logical Volume Manager) 普通的磁盘分区管理方式在逻辑分区划分好之后就无法改变其大小,当一个逻辑分区存放不下某文件时,这个文件因为受上层文件 ...
- lvm - Logical Volume Manager - 逻辑卷管理
下午突然感觉 lvm 相关的知识忘记了,恰好机房里的fedora服务器上 挂了4个500GB的HDD 硬盘没有使用,就拿来操作了一番: 下面有几篇关于lvm不错的文章,进行了链接,网上也有很多不错的博 ...
- Linux LVM Logical Volume Management 逻辑卷的管理
博主是一个数据库DBA,但是一般来说,是不做linux服务器LVM 逻辑卷的创建.扩容和减容操作的,基本上有系统管理员操作,一是各司其职,专业的事专业的人做,二是做多了你的责任也多了,哈哈! 但是li ...
- Linux使用图形LVM(Logical Volume Manager)工具进行分区的动态扩展
- LVM学习
LVM Logical Volume Manager Volume management creates a layer of abstraction over physical storage, a ...
- LVM学习笔记
LVM Logical Volume Manager Volume management creates a layer of abstraction over physical storage, a ...
随机推荐
- XML约束
XML约束--能够看懂约束内容,根据约束内容写出符合规则的xml文件. DTD约束 1)导入dtd方式 内部导入 <!DOCTYPE note [ <!ELEMENT note (to,f ...
- openstack VM可以ping外部网络,但是外部网络ping不通VM
经过无数次的尝试,终于搭建好了完整的Openstack,本来VM可以获取到IP地址,但是等到我大功告成的时候,突然发现外部网络却不能ping进VM,我可是整整折腾了我几个通宵,这是哭啊.然而,皇天不负 ...
- 织梦安装过后出现"...www/include/templets/default/index.htm Not Found!"
在织梦网站搬家之后再整站更新,往往会遇到访问首页的时候出现www/include/templets/default/index.htm Not Found!,这个问题我遇到过两次,都是这样解决的: 进 ...
- IIS 7.5 部署ASP.Net MVC 网站
請務必註冊 ASP.NET 4.0:若是 32 位元則是 %WINDIR%\Microsoft.NET\Framework\v4.0.30319\aspnet_regiis -ir 1.首先确定已经安 ...
- linux常用svn命令(转载)
原地址:http://www.rjgc.net/control/content/content.php?nid=4418 1.将文件checkout到本地目录svn checkout p ...
- 探究Android SQLite3多线程
最近做项目时在多线程读写数据库时抛出了异常,这自然是我对SQlite3有理解不到位的地方,所以事后仔细探究了一番. 关于getWriteableDataBase()和getReadableDataba ...
- 谈谈依赖注入DI
控制反转(Inversion of Control,英文缩写为IoC)是一个重要的面向对象编程的法则来削减计算机程序的耦合问题,也是轻量级的Spring框架的核心. 控制反转一般分为两种类型,依赖注入 ...
- Solr4.8.0源码分析(2)之Solr的启动(一)
上文写到Solr的启动过程是在SolrDispatchFilter的init()里实现,当Tomcat启动时候会自动调用init(); Solr的启动主要在 this.cores = createCo ...
- 求帮看!!!!BZOJ 1014 [JSOI2008]火星人prefix
1014: [JSOI2008]火星人prefix Time Limit: 10 Sec Memory Limit: 162 MBSubmit: 4164 Solved: 1277[Submit] ...
- BZOJ 1020 [SHOI2008]安全的航线flight
1020: [SHOI2008]安全的航线flight Time Limit: 1 Sec Memory Limit: 162 MBSubmit: 847 Solved: 286[Submit][ ...
