基于CentOS6.5下如何正确安装和使用Tcpreplay来重放数据(图文详解)
前期博客
基于CentOS6.5下snort+barnyard2+base的入侵检测系统的搭建(图文详解)(博主推荐)
tcpreplay是什么?
简单的说, tcpreplay是一种pcap包的重放工具, 它可以将用ethreal, wireshark工具抓下来的包原样或经过任意修改后重放回去. 它允许你对报文做任意的修改(主要是指对2层, 3层, 4层报文头), 指定重放报文的速度等, 这样tcpreplay就可以用来复现抓包的情景以定位bug, 以极快的速度重放从而实现压力测试。
tcpreplay本身包含了几个辅助工具(tcpprep、tcprewrite、tcpreplay和tcpbridge), 用于准备发包的cache, 重写报文等。这也是 Tcpreplay 的第一个字母大写T的原因 。
* tcpprep -
简单的说就是划分哪些包是client的, 哪些是server的, 一会发包的时候client的包从一个网卡发, server的包可能从另一个网卡发。
即区分pcap数据包的流向,即区分出客户端和服务器。
* tcprewrite
- 简单的说就是修改2层, 3层, 4层报文头部。
即改写pcap数据包的2-4层的头部信息,即MAC地址、IP地址和PORT等。
* tcpreplay
- 真正发包, 可以选择主、从网卡, 发包速度等。
即回放pcap文件中的数据包。
* tcpreplay-edit-更写pcap数据并回放,将tcprewrite和tcpreplat一条命令实现。
* tcpbridge
- bridge two network segments with the power of tcprewrite。
以下是官网的原文。
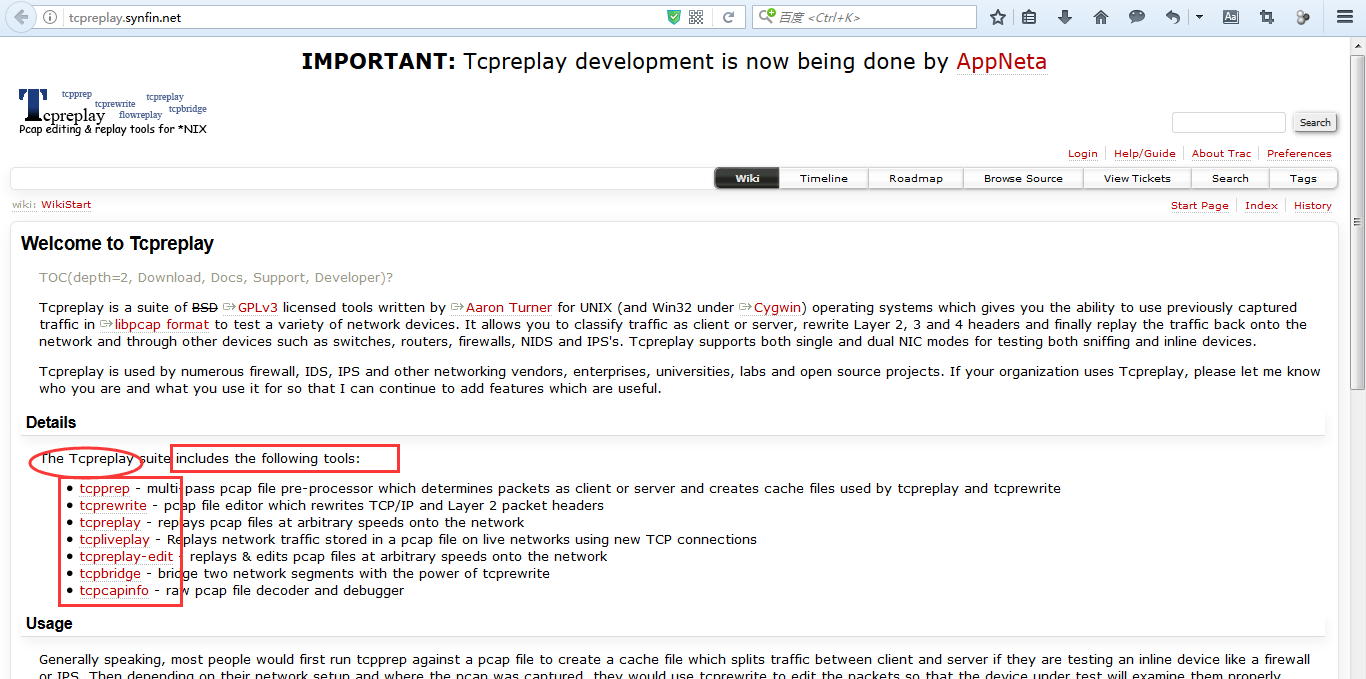
The Tcpreplay suite includes the following tools:
- tcpprep - multi-pass pcap file pre-processor which determines packets as client or server and creates cache files used by tcpreplay and tcprewrite
- tcprewrite - pcap file editor which rewrites TCP/IP and Layer 2 packet headers
- tcpreplay - replays pcap files at arbitrary speeds onto the network
- tcpliveplay - Replays network traffic stored in a pcap file on live networks using new TCP connections
- tcpreplay-edit - replays & edits pcap files at arbitrary speeds onto the network
- tcpbridge - bridge two network segments with the power of tcprewrite
- tcpcapinfo - raw pcap file decoder and debugger
官网
- http://tcpreplay.synfin.net/
在CentOS里安装tcpreplay,总的来说,有如下两种安装方法。
第一种安装方法:(推荐)
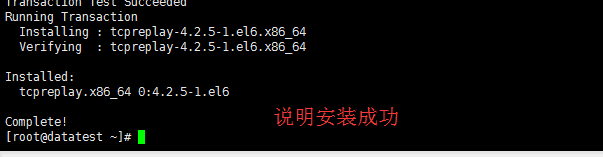
直接yum -y install tcpreplay即可。

- [root@datatest ~]# yum -y install tcpreplay
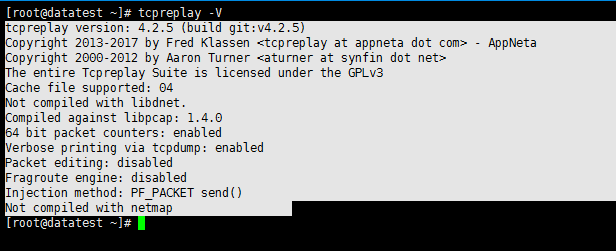
- [root@datatest ~]# tcpreplay -V
- tcpreplay version: 4.2. (build git:v4.2.5)
- Copyright - by Fred Klassen <tcpreplay at appneta dot com> - AppNeta
- Copyright - by Aaron Turner <aturner at synfin dot net>
- The entire Tcpreplay Suite is licensed under the GPLv3
- Cache file supported:
- Not compiled with libdnet.
- Compiled against libpcap: 1.4.
- bit packet counters: enabled
- Verbose printing via tcpdump: enabled
- Packet editing: disabled
- Fragroute engine: disabled
- Injection method: PF_PACKET send()
- Not compiled with netmap
- [root@datatest ~]#
第二种安装方法:
在Centos中安装TCPReplay
Tcpreplay的初步使用
1、查看Tcpreplay里的tcpreplay的帮助文档命令

- [root@datatest ~]# tcpreplay -h
- tcpreplay (tcpreplay) - Replay network traffic stored in pcap files
- Usage: tcpreplay [ -<flag> [<val>] | --<name>[{=| }<val>] ]... <pcap_file(s)>
- -q, --quiet Quiet mode
安静模式- -a
精确的时间(使用高速 cpu 发包)
-d
输出调试信息(0-5,默认 0)- -T, --timer=str Select packet timing mode: select, ioport, gtod, nano
- --maxsleep=num Sleep for no more then X milliseconds between packets
- -v, --verbose Print decoded packets via tcpdump to STDOUT
可选参数,每发送一个报文都以 tcpdump 风格打印对应信息- -A, --decode=str Arguments passed to tcpdump decoder
可选参数,在使用 tcpdump 风格打印输出信息时,同时再调用 tcpdump 中的参数- -K, --preload-pcap Preloads packets into RAM before sending
- -c
双网卡回放报文必选参数,后跟文件名- -C, --cachefile=str Split traffic via a tcpprep cache file
把报文存在内部缓存中- -N
获得网络接口和出口- -, --dualfile Replay two files at a time from a network tap
- -i, --intf1=str Client to server/RX/primary traffic output interface
- 双网卡回放报文必选参数,指定从接口
- -I, --intf2=str Server to client/TX/secondary traffic output interface
--listnics List available network interfaces and exit
- 双网卡回放报文必选参数,指定主接口
- -l, --loop=num Loop through the capture file X times
--loopdelay-ms=num Delay between loops in milliseconds
--pktlen Override the snaplen and use the actual packet len
可选参数,指定循环次数- -S
制定包长度- -L, --limit=num Limit the number of packets to send
- --duration=num Limit the number of seconds to send
限制发包数量- -x, --multiplier=str Modify replay speed to a given multiple
- -p, --pps=str Replay packets at a given packets/sec
可选参数,指定每秒发送报文的个数。制定该参数,其他速率相关的参数被忽略,
打印信息不会有速率和每秒发送报文的统计- -M, --mbps=str Replay packets at a given Mbps
以 Mbps(兆字节每秒)发送报文- -m
可选参数,指定一个倍数值,比默认发送速度快多少倍发送报文- -t, --topspeed Replay packets as fast as possible
以最快的速度回放报文- -o, --oneatatime Replay one packet at a time for each user input
- --pps-multi=num Number of packets to send for each time interval
- --unique-ip Modify IP addresses each loop iteration to generate unique flows
- --unique-ip-loops=str Number of times to loop before assigning new unique ip
- --no-flow-stats Suppress printing and tracking flow count, rates and expirations
- --flow-expiry=num Number of inactive seconds before a flow is considered expired
一次回放一个报文- -P, --pid Print the PID of tcpreplay at startup
- --stats=num Print statistics every X seconds, or every loop if ''
可选参数,表示在输出信息中打印 PID 信息,用于单用户和单账户模式下暂停和重
启程序- -V, --version Print version information
现实版本号- -h, --less-help Display less usage information and exit
- -H, --help display extended usage information and exit
- -!, --more-help extended usage information passed thru pager
- --save-opts[=arg] save the option state to a config file
- --load-opts=str load options from a config file
- Options are specified by doubled hyphens and their name or by a single
- hyphen and the flag character.
- tcpreplay is a tool for replaying network traffic from files saved with
- tcpdump or other tools which write pcap() files.
- Please send bug reports to: <tcpreplay-users@lists.sourceforge.net>
- [root@datatest ~]#
Tcpreplay 根据 cach 文件来回放 pcap 文件中的数据。
tcpreplay小例子
- [root@datatest ~]# tcpreplay --intf1=eth1 --intf2=eth0 –t --cachfile=cach_test.cach http_rewrite_pcap
--intf1=eth1 是指主接口是 eth1, 服务器-> 客户端的数据包通过这个接口发送。
服务器和客户端的区分是从 tcpprep 的处理结果 cach_test.cach 中得到的。
--intf2=eth0 是指从接口是 eth0,客户端->服务器的数据包通过这个接口发送。
--cachfile=cach_test_cach 是指 tcpreplay 用 下面的tcpprep 的处理结果--cach_test.cach 来区分方向。
http_rewrite.pcap 是指 tcpreplay 发送的是来自 http_rewrite.pcap 这个文件中的数据包
。
- [root@datatest ~]# tcpreplay –i eth1 –I eth0 –c ceshiftp.cach ceshiftp.pcap
-i, --intf1这是数据重放的时候,的从接口。 -I, --intf2这是数据重放的时候,的主接口。 –c是双网卡回放报文必选参数,后跟文件名
在linux下, 用ifconfig命令可以获得接口的名字。
但在cygwin下必须用下面的命令获得接口的名字。
在cygwin下获得接口的名字:
- $ tcpreplay --listnics
假设在windows下的cygwin里安装的tcpreplay
- $ tcpreplay --listnics
- |Available network interfaces:
- |Alias Name Description
- |% \Device\NPF_GenericDialupAdapter
- | Adapter for generic dialup and VPN capture
- |% \Device\NPF_{6B508B29-B3E3-4D0B-892F-02914AC9A668}
- | Intel(R) 82566DM Gigabit Network Connection (Microsoft's Packet
- | Scheduler)
- |% \Device\NPF_{CBCE38CA-1FAD-4AEB-89DF-FD2D8EF861FA}
- | D-Link DFE-530TX PCI Fast Ethernet Adapter (rev.C)
- | (Microsoft's Packet Scheduler)
- |% \Device\NPF_{ABB813FE-3C51-49A3--16CD2C4507C3}
- | D-Link DFE-530TX PCI Fast Ethernet Adapter (rev.C)
- | (Microsoft's Packet Scheduler)
从中可以看出这台机器有两块网卡, 一块叫做%1, 另一块叫做%2. 下面就可以指定网卡重发包了:
用tcpreplay发包:
- [root@datatest ~]# tcpreplay -c mgcp.cach -i %1 -I %2 out.pcap
这条命令是把out.pcap包, 按照mgcp.cach里划分的主机包和客户端包的方式, 将主机包从网卡%1发出去, 将客户端包从网卡%2发出去.
注:修改目的IP的MAC地址的时候,MAC地址不是目的机网卡物理地址,而是源机器所连接的交换机MAC地址。
2、查看Tcpreplay里的tcprewrite的帮助文档命令
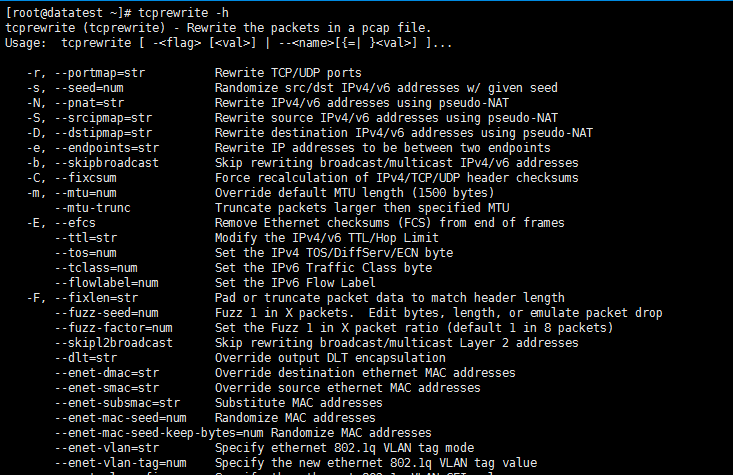
- [root@datatest ~]# tcprewrite -h
- tcprewrite (tcprewrite) - Rewrite the packets in a pcap file.
- Usage: tcprewrite [ -<flag> [<val>] | --<name>[{=| }<val>] ]...
- -r, --portmap=str Rewrite TCP/UDP ports
重写 tcp/udp 端口- -s, --seed=num Randomize src/dst IPv4/v6 addresses w/ given seed
随机改写 IP 地址- -N, --pnat=str Rewrite IPv4/v6 addresses using pseudo-NAT
通过伪 NAT 重写 ip 地址- -S, --srcipmap=str Rewrite source IPv4/v6 addresses using pseudo-NAT
- -D, --dstipmap=str Rewrite destination IPv4/v6 addresses using pseudo-NAT
- -e, --endpoints=str Rewrite IP addresses to be between two endpoints
- 在最后 2 个点之间重写 ip 地址
- -b, --skipbroadcast Skip rewriting broadcast/multicast IPv4/v6 addresses
不重写广播/多播 IP 地址- -C, --fixcsum Force recalculation of IPv4/TCP/UDP header checksums
强制重新计算 TP/RCP/UDP 校验和- -m, --mtu=num Override default MTU length ( bytes)
- --mtu-trunc Truncate packets larger then specified MTU
指定 MTU- -E, --efcs Remove Ethernet checksums (FCS) from end of frames
- --ttl=str Modify the IPv4/v6 TTL/Hop Limit
- --tos=num Set the IPv4 TOS/DiffServ/ECN byte
- --tclass=num Set the IPv6 Traffic Class byte
- --flowlabel=num Set the IPv6 Flow Label
删除以太网最后一帧的校验和(删除最后 2 个字节)- -F, --fixlen=str Pad or truncate packet data to match header length
- --fuzz-seed=num Fuzz in X packets. Edit bytes, length, or emulate packet drop
- --fuzz-factor=num Set the Fuzz in X packet ratio (default in packets)
- --skipl2broadcast Skip rewriting broadcast/multicast Layer addresses
- --dlt=str Override output DLT encapsulation
- --enet-dmac=str Override destination ethernet MAC addresses
- --enet-smac=str Override source ethernet MAC addresses
- --enet-subsmac=str Substitute MAC addresses
- --enet-mac-seed=num Randomize MAC addresses
- --enet-mac-seed-keep-bytes=num Randomize MAC addresses
- --enet-vlan=str Specify ethernet .1q VLAN tag mode
- --enet-vlan-tag=num Specify the new ethernet .1q VLAN tag value
- --enet-vlan-cfi=num Specify the ethernet .1q VLAN CFI value
- --enet-vlan-pri=num Specify the ethernet .1q VLAN priority
- --hdlc-control=num Specify HDLC control value
- --hdlc-address=num Specify HDLC address
- --user-dlt=num Set output file DLT type
- --user-dlink=str Rewrite Data-Link layer with user specified data
- 填充或截取包的数据以匹配包头长度
- -i, --infile=str Input pcap file to be processed
处理输出 pcap 文件- -o, --outfile=str Output pcap file
输出 pcap 文件- -c, --cachefile=str Split traffic via tcpprep cache file
使用 tcpprep cach 文件分离流量- -v, --verbose Print decoded packets via tcpdump to STDOUT
tcpdump 风格打印对应信息- -A, --decode=str Arguments passed to tcpdump decoder
- --skip-soft-errors Skip writing packets with soft errors
可选参数,在使用 tcpdump 风格输出信息时,同时再调用 tcpdump 中的参数- -V, --version Print version information
显示版本号- -h, --less-help Display less usage information and exit
- -H, --help display extended usage information and exit
- -!, --more-help extended usage information passed thru pager
- --save-opts[=arg] save the option state to a config file
- --load-opts=str load options from a config file
- Options are specified by doubled hyphens and their name or by a single
- hyphen and the flag character.
- Please send bug reports to: <tcpreplay-users@lists.sourceforge.net>
- [root@datatest ~]#
简单地说, tcprewrite 就是改写 pcap 包里的报文头部, 包括 2 层, 3 层, 4 层,即 MAC 地址、IP 地址和PORT 等。tcpreplay 只保证能把包送出去, 至于包真正能到达的地址, 我认为还是根据原来的包的 IP 和 mac,
如果是在同一网段,可能需要把 mac 地址改成测试设备的 mac,如果需要经过网关, 就得将 IP 地址改为测试设备的 IP 以及端口号 。
tcpreplay只保证能把包送出去, 至于包真正能到达的地址, 我认为还是根据原来的包的IP和mac. 如果是在同一网段, 可能需要把mac地址改成测试设备的mac, 如果需要经过网关, 就得将IP地址改为测试设备的IP以及端口号。
tcprewrite的基本格式是(请注意命令中是没有换行符的, 只为了阅读的方便添加了换行符): 详请可以用tcprewrite ?命令查询详情。
- [root@datatest ~]# tcprewrite --enet-smac=host_src_mac,client_src_mac \
- --enet-dmac=host_dst_mac, client_dst_mac \
- --endpoints=host_dst_ip:client_dst_ip \
- --portmap=old_port1:new_port1,old_port2, new_port2 \
- | -i input.pcap -c input.cach -o out.pcap
解释一下:
该命令的输入参数是input.pcap和input.cach文件, 结果将另存为out.pcap文件。
该命令将所有input.pcap包里的主机包(由input.cach文件指定哪些包是主机包, 哪些包是客户端包)的源mac地址, 目的mac地址。
目的IP地址分别改为 :host_src_mac,host_dst_mac和host_dst_ip。
客户端包源mac地址, 目的mac地址。
目的IP地址分别改为 :client_src_mac, client_dst_mac和client_dst_ip。
将端口号由old_port1改为 new_port1, 将端口号由old_port2改为new_port2。
举个小例子
- [root@datatest ~]# tcprewrite --enet-smac=:::::,:::::22 \
- --enet-dmac=FF:FF:FF:FF:FF:FF \
- --endpoints=192.168.0.1:192.168.0.11 \
- --portmap=:,:5060 \
- -i success.pcap -o out.pcap -c success.cach
该命令将修改后的包的
主机端的二层, 三层, 四层头分别为: 11:22:22:22:22:22,192.168.0.1,5061,
客户端包的二层, 三层, 四层头分别为: 22:22:22:22:22:22,192.168.0.11, 5060。
- [root@datatest ~]# tcprewrite --seed= -i success.pcap -o out.pcap -c success.cach
该命令将根据数字 6 按特征算法生成一个新的 server_ip 和 client_ip。
- [root@datatest ~]# tcprewrite --pmap=192.168.0.0/:10.77.0.0/,172.16.0.0/:10.1.0.0/24 \
- -i success.pcap -o out.pcap -c success.cach
该命令将把主机端和客户端 192.168.0.0/16、172.16.0.0/12 网段的 ip 地址分别改为 10.77.0.0/16、10.1.0.0/24。
- [root@datatest ~]# tcprewrite --srcipmap=192.168.0.0/:10.77.0.0/16 \
- -i success.pcap -o out.pcap -c success.cach
该命令将把主机端和客户端的源 ip 为 192.168.0.0/16 网段改为 10.77.0.0/16 网段
- [root@datatest ~]# tcprewrite --dstipmap=172.16.0.0/:10.1.0.0/
- -i success.pcap -o out.pcap -c success.cach
该命令将把主机端和客户端的目的 ip 为 192.168.0.0/16 网段改为 10.77.0.0/16 网段。
修改2层头
1) 修改MAC地址
如果不指定cache文件, 将把所有包的源mac地址和目的mac地址都改写成00:44:66:FC:29:AF和00:55:22:AF:C6:37:
- [root@datatest ~]# tcprewrite --enet-dmac=:::AF:C6: --enet-smac=:::FC::AF --infile=input.pcap --outfile=output.pcap
指定cache文件后, 将server包的目的/源mac地址改写成00:44:66:FC:29:AF/00:66:AA:D1:32:C2,
将client的目的/源mac地址改成:00:55:22:AF:C6:37/00:22:55:AC:DE:AC, 注意是server地址在前.
- [root@datatest ~]# tcprewrite --enet-dmac=:::FC::AF,:::AF:C6: --enet-smac=::AA:D1::C2,:::AC:DE:AC --cachefile=input.cache --infile=input.pcap --outfile=output.pcap
2) 修改802.1q VLAN
经常客户的抓包带有VLAN头域, 这些包如果不去掉VLAN头是没有办法在自己的交换机上replay的, tcprewrite提了去掉或添加VLAN的方法:
去掉vlan很简单:
- [root@datatest ~]# tcprewrite --enet-vlan=del --infile=input.pcap --outfile=output.pcap
添加vlan也很简单, 下面的命令将VLAN tag设成40, CFI设成1, VLAN priority设成4.
- [root@datatest ~]# tcprewrite --enet-vlan=add --enet-vlan-tag= --enet-vlan-cfi= --enet-vlan-pri= --infile=input.pcap --outfile=output.pcap
3) 修改二层协议名:
好像是将Ethernet协议头转成Cisco HDLC或其它二层协议? 这部分没有真正用过, 需要的
人自行参考tcpreplay官方网站: http://tcpreplay.synfin.net/wiki/manual
修改3层头
从版本3.4.2开始, tcprewrite开始支持ipv6协议, tcpreplay升级蛮快。 tcprewrite修改IP地址后会自动帮你计算校验和, 这点还是蛮周到的。
命令行传入IPv6地址的时候要使用方括号, 例如: [2001::dead:beef]或[2001::/16]
1) 修改目的IP
根据cache文件里的标识, 将server的IP改为10.10.1.1, client的IP改为10.10.1.2:
- [root@datatest ~]# tcprewrite --endpoints=10.10.1.1:10.10.1.2 --cachefile=input.cache --infile=input.pcap --outfile=output.pcap --skipbroadcast
2)修改IP地址的网络部分
注: 2)和3)没有验证过。
众所周知, IP地址同网络部分和主机部分组成, 下面的命令可以将子网地址为10.0.0.0/8或192.168.0.0/16的IP改成子网为172.16.0.0/12:
- [root@datatest ~]# tcprewrite --pnat=10.0.0.0/:172.16.0.0/,192.168.0.0/:172.16.0.0/ --infile=input.pcap --outfile=output.pcap --skipbroadcast
下面的命令是基于client包或server包修改子网地址:
- [root@datatest ~]# tcprewrite --pnat=10.0.0.0/:192.168.0.0/ --pnat=10.0.0.0/:192.168.1.0/ --cachefile=input.cache --infile=input.pcap --outfile=output.pcap --skipbroadcast
3) 修改IP头的其它部分:
修改IPv4头的TOS为50
- [root@datatest ~]# tcprewrite --tos= --infile=input.pcap --outfile=output.pcap
将IPv6头Traffic Class值改为33
- [root@datatest ~]# tcprewrite --tclass= --infile=input.pcap --outfile=output.pcap
修改Flow Label field:
- [root@datatest ~]# tcprewrite --flowlabel= --infile=input.pcap --outfile=output.pcap
修改4层头
和修改IP头一样, 修改4层头的时候tcpwrite会自动计算校验和, 这个就不需要担心了.
1) 修改端口号
将80端口号改为8080, 22改为8022:
- [root@datatest ~]# tcprewrite --portmap=:,: --infile=input.pcap --outfile=output.pcap
2) 强制计算传输层校验和:
有些应用可能不计算传输层的校验和, 可以让tcpwrite强制计算一下:
- [root@datatest ~]# tcprewrite --fixcsum --infile=input.pcap --outfile=output.pcap
修改5-7层数据
tcpwrite对5-7层的修改非常有限, 顶多也就是抓包没有抓全, 中间的应用层数据丢了。tcpwrite将没有抓到的数据补成全0, 或者修改tcp/udp的长度字节, 或者将该包丢弃. 有需要的直接参考官方资料吧。
3、查看Tcpreplay里的tcpprep的帮助文档命令
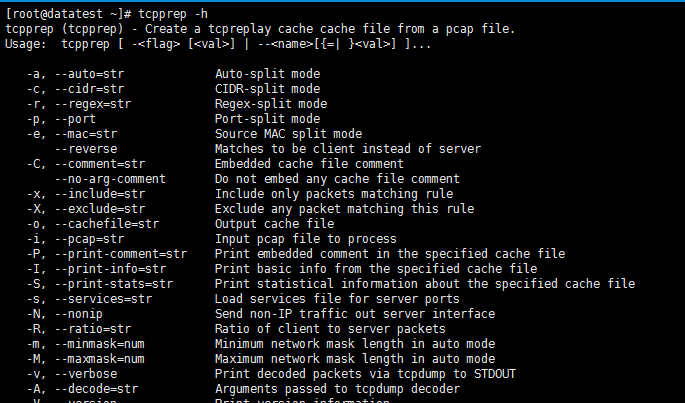
- [root@datatest ~]# tcpprep -h
- tcpprep (tcpprep) - Create a tcpreplay cache cache file from a pcap file.
- Usage: tcpprep [ -<flag> [<val>] | --<name>[{=| }<val>] ]...
- -a, --auto=str Auto-split mode
一般情况下都需要的参数,表示按模式自动分离通信流量生成 cach 文件- -c, --cidr=str CIDR-split mode
可选参数, 表示分离流量时采用 CIDR(无类别域间路由选择,是一个在 internet
上创建附加地址的方法,这些地址提供给服务提供商,再由服务提供商分配给客户。
CIDR 将路由集中起来,使一个 IP 地址代表主要骨干提供商提供的几千个 IP 地址,
从而减轻 internet 路由器的负担)- -r, --regex=str Regex-split mode
可选参数,表示使用 regex 模式分离通信流量,有点类似于 CIDR 模式,但是它匹
配的是服务器源 IP- -p, --port Port-split mode
可选参数,基于目的端口来分离通信流量,它区分的依据是任何 0-1023 端口都是
服务器的端发出的报文,其他的端口都是客户端发出的报文- -e, --mac=str Source MAC split mode
表示基于服务器源 MAC 地址分离通信流量- --reverse Matches to be client instead of server
- -C, --comment=str Embedded cache file comment
可选参数,表示在 cach 文件中嵌入注释内容,用于注释说明 cach 文件的内容。使用位置不要放在最后,生成 cach 后可以使用-P 查看写入的内容。- --no-arg-comment Do not embed any cache file comment
- -x, --include=str Include only packets matching rule
重要可选参数,表示按照参数定义的需求来定义发送报文- -X, --exclude=str Exclude any packet matching this rule
可选参数,是-x 的取反- -o, --cachefile=str Output cache file
生成 cach 文件必带参数,后跟 cach 后缀的文件名,表示这个输出的 cach 文
件以这个文件名命名
- -i, --pcap=str Input pcap file to process
生成 cach 文件必带参数,后跟 pcap 文件名,表示这个 pcap 文件需要处理
- -P, --print-comment=str Print embedded comment in the specified cache file
可选参数,表示查看 cach 文件的内容- -I, --print-info=str Print basic info from the specified cache file
表示打印 cach 文件的基本信息- -S, --print-stats=str Print statistical information about the specified cache file
表示打印 cach 文件的统计信- -s, --services=str Load services file for server ports
表示从服务器端口下载服务文件
- -N, --nonip Send non-IP traffic out server interface
表示从服务器端口发送无 IP 流量- -R, --ratio=str Ratio of client to server packets
可选参数,一个比例值。服务器端发起的连接数和客户端发起的连接数的比例,值
大于 2 就视为服务器端
- -m, --minmask=num Minimum network mask length in auto mode
可选参数,在选用 router 模式时使用,表示最小掩码,掩码默认是 30- -M, --maxmask=num Maximum network mask length in auto mode
可选参数,在选用 router 模式时使用,表示最大掩码,默认是 8- -v, --verbose Print decoded packets via tcpdump to STDOUT
可选参数,显示 tcpprep 生成 cach 文件的处理过程。信息的随时大于- -A, --decode=str Arguments passed to tcpdump decoder
可选参数,在实验 tcpdump 风格打印输出信息时,同时再调用 tcpdump 中的参数- -V, --version Print version information
- -h, --less-help Display less usage information and exit
- -H, --help display extended usage information and exit
- -!, --more-help extended usage information passed thru pager
- --save-opts[=arg] save the option state to a config file
- --load-opts=str load options from a config file
- Options are specified by doubled hyphens and their name or by a single
- hyphen and the flag character.
- tcpprep is a 'pcap(3)' file pre-processor which creates a cache file which
- provides "rules" for 'tcprewrite(1)' and 'tcpreplay(1)' on how to process
- and send packets.
- Please send bug reports to: <tcpreplay-users@lists.sourceforge.net>
- [root@datatest ~]#
tcpprep 是一个在 tcprewrite 和 tcpreplay 之前使用的 pcap 文件的处理程序。使用 tcpprep 的目的就是建立一个 cach 文件,用于分离通信流量中的两方(通常叫做 主要的/次要的 或者 客户端/服务器),为 tcprewrite 和 tcpreplay 处理与发送报文做准备。
如果你正打算在两块网卡上使用 tcpreplay 的话,那么 tcpprep 就是用来决定每一个报文(packet)从哪一个接口发出。通过使用这样一个分离的程序来建立一个 cach 文件,tcpreplay 就可以根据这个 cach 文件通过自身的计算来分离流量,高速率的发送报文。cach 文件的作用主要是加速报文的发送,cach 文件中存放着 pcap 文件中每个帧的编号和时间戳等信息,以达到 tcpreplay 回放时可以更加快速的发送报文的目的。
举个例子, 如果你用 wireshark 或者ethereal抓了一个 pcap 文件,里面可能既有 A 地址发给 B 地址的包,也有 B地址发给 A 址的包,用 tcpprep 工具可以指定从 A 到 B 的包从主网卡发出, 从 B 到 A 的包从次网卡发出。
tcpprep 用法举例
1、根据报文源 IP 确定 client/server 报文
- [root@datatest ~]# tcpprep -c 172.22.64.2/24 -i mgcp.pcap -o mgcp.cach
上面的命令指定所有源 IP 为 172.22.64.2/24 的包, 都将从主网卡发出, 其它的从次网卡发出 。输入文件是mgcp.pcap, 输出文件为mgcp.cach。
2、使用自动模式确定 client/server 报文
- [root@datatest ~]# tcpprep -a client -i mgcp.pcap -o mgcp.cach
上面的命令采用自动/client 模式指定分包模式。
自动模式这里按我的理解解释一下:
tcpprep 在自动模式下认为有下面行为的 IP 为 client 端:
1、发 TCP SYN 包的一方
2、发 DNS 包的一方
3、 收入到 ICMP-Port Unreachable 的一方;
认为有下面行为的一方为 server 端:
1、发 TCPSyn/Ack 的一方
2、发 DNS 应答的一方
3、发 ICMP-Port Unreachable 的一方
而被认定为 server 的那一方发的那些包, 将从主网卡发出, 被认定为 client 的包则从次网卡发出. 而自动/client 模式将所有没有认出的包都归为 client, 同理自动/server 模式将没有认出的包都归为 server.这种模式貌似不如按 IP 地址分类的方式好用 。
4、查看Tcpreplay里的tcpreplay-edit的帮助文档命令
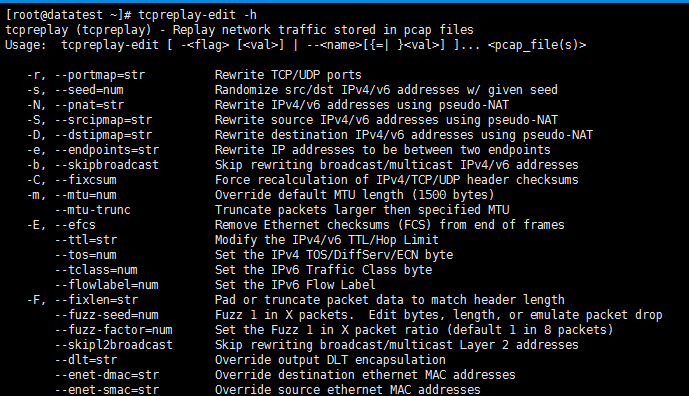
- [root@datatest ~]# tcpreplay-edit -h
- tcpreplay (tcpreplay) - Replay network traffic stored in pcap files
- Usage: tcpreplay-edit [ -<flag> [<val>] | --<name>[{=| }<val>] ]... <pcap_file(s)>
- -r, --portmap=str Rewrite TCP/UDP ports
- -s, --seed=num Randomize src/dst IPv4/v6 addresses w/ given seed
- -N, --pnat=str Rewrite IPv4/v6 addresses using pseudo-NAT
- -S, --srcipmap=str Rewrite source IPv4/v6 addresses using pseudo-NAT
- -D, --dstipmap=str Rewrite destination IPv4/v6 addresses using pseudo-NAT
- -e, --endpoints=str Rewrite IP addresses to be between two endpoints
- -b, --skipbroadcast Skip rewriting broadcast/multicast IPv4/v6 addresses
- -C, --fixcsum Force recalculation of IPv4/TCP/UDP header checksums
- -m, --mtu=num Override default MTU length ( bytes)
- --mtu-trunc Truncate packets larger then specified MTU
- -E, --efcs Remove Ethernet checksums (FCS) from end of frames
- --ttl=str Modify the IPv4/v6 TTL/Hop Limit
- --tos=num Set the IPv4 TOS/DiffServ/ECN byte
- --tclass=num Set the IPv6 Traffic Class byte
- --flowlabel=num Set the IPv6 Flow Label
- -F, --fixlen=str Pad or truncate packet data to match header length
- --fuzz-seed=num Fuzz in X packets. Edit bytes, length, or emulate packet drop
- --fuzz-factor=num Set the Fuzz in X packet ratio (default in packets)
- --skipl2broadcast Skip rewriting broadcast/multicast Layer addresses
- --dlt=str Override output DLT encapsulation
- --enet-dmac=str Override destination ethernet MAC addresses
- --enet-smac=str Override source ethernet MAC addresses
- --enet-subsmac=str Substitute MAC addresses
- --enet-mac-seed=num Randomize MAC addresses
- --enet-mac-seed-keep-bytes=num Randomize MAC addresses
- --enet-vlan=str Specify ethernet .1q VLAN tag mode
- --enet-vlan-tag=num Specify the new ethernet .1q VLAN tag value
- --enet-vlan-cfi=num Specify the ethernet .1q VLAN CFI value
- --enet-vlan-pri=num Specify the ethernet .1q VLAN priority
- --hdlc-control=num Specify HDLC control value
- --hdlc-address=num Specify HDLC address
- --user-dlt=num Set output file DLT type
- --user-dlink=str Rewrite Data-Link layer with user specified data
- -q, --quiet Quiet mode
- -T, --timer=str Select packet timing mode: select, ioport, gtod, nano
- --maxsleep=num Sleep for no more then X milliseconds between packets
- -v, --verbose Print decoded packets via tcpdump to STDOUT
- -A, --decode=str Arguments passed to tcpdump decoder
- -K, --preload-pcap Preloads packets into RAM before sending
- -c, --cachefile=str Split traffic via a tcpprep cache file
- -, --dualfile Replay two files at a time from a network tap
- -i, --intf1=str Client to server/RX/primary traffic output interface
- -I, --intf2=str Server to client/TX/secondary traffic output interface
- --listnics List available network interfaces and exit
- -l, --loop=num Loop through the capture file X times
- --loopdelay-ms=num Delay between loops in milliseconds
- --pktlen Override the snaplen and use the actual packet len
- -L, --limit=num Limit the number of packets to send
- --duration=num Limit the number of seconds to send
- -x, --multiplier=str Modify replay speed to a given multiple
- -p, --pps=str Replay packets at a given packets/sec
- -M, --mbps=str Replay packets at a given Mbps
- -t, --topspeed Replay packets as fast as possible
- -o, --oneatatime Replay one packet at a time for each user input
- --pps-multi=num Number of packets to send for each time interval
- --unique-ip Modify IP addresses each loop iteration to generate unique flows
- --unique-ip-loops=str Number of times to loop before assigning new unique ip
- -!, --no-flow-stats Suppress printing and tracking flow count, rates and expirations
- -", --flow-expiry=num Number of inactive seconds before a flow is considered expired
- -P, --pid Print the PID of tcpreplay at startup
- -#, --stats=num Print statistics every X seconds, or every loop if ''
- -V, --version Print version information
- -h, --less-help Display less usage information and exit
- -H, --help display extended usage information and exit
- -!, --more-help extended usage information passed thru pager
- -$, --save-opts[=arg] save the option state to a config file
- -%, --load-opts=str load options from a config file
- Options are specified by doubled hyphens and their name or by a single
- hyphen and the flag character.
- tcpreplay is a tool for replaying network traffic from files saved with
- tcpdump or other tools which write pcap() files.
- Please send bug reports to: <tcpreplay-users@lists.sourceforge.net>
- [root@datatest ~]#
tcpreplay-edit 实时修改包数据并回放,它是将 tcprewrite 和 tcpreplay 用一条命令实现。其好处是修改包数据不会新生成 pcap 文件。如果是需要不断的改写一个包文件并回放建议使用 tcpreplay-edit,如果是需要一次改写一个包文件并多次回放建议使用 tcprewrite 和 tcpreplay 的结合,这样具有更好的回放速率。
tcpreplay-edit小例子
编写脚本,不断改写包文件的 IP 地址并回放:
比如,你自己写个test.sh脚本,然后赋予chmod 777 test.sh。执行就是
- for i in {..}
- do
- tcpreplay-edit --endpoints=1.1..$i:1.1.1.2 -t -i eth2 -I eth1 -c edit.cach edit.pcap
- done
5、查看Tcpreplay里的tcpliveplay的帮助文档命令

- [root@datatest ~]# tcpliveplay -H
- tcpliveplay (tcpliveplay) - Replays network traffic stored in a pcap file on live networks using new TCP connections
- Usage: tcpliveplay [ -<flag> [<val>] | --<name>[{=| }<val>] ]... \
- <eth0/eth1> <file.pcap> <Destinatin IP [1.2.3.4]> <Destination mac [0a:1b:2c:3d:4e:5f]> <'random' dst port OR specify dport #>
- -V, --version Print version information
- -h, --less-help Display less usage information and exit
- -H, --help display extended usage information and exit
- -!, --more-help extended usage information passed thru pager
- --save-opts[=arg] save the option state to a config file
- --load-opts=str load options from a config file
- - disabled as '--no-load-opts'
- - may appear multiple times
- Options are specified by doubled hyphens and their name or by a single
- hyphen and the flag character.
- This program, 'tcpliveplay' replays a captured set of packets using new TCP
- connections with the captured TCP payloads against a remote host in order
- to do comprehensive vulnerability testings.
- The following option preset mechanisms are supported:
- - reading file /usr/bin/.tcpliveplayrc
- The basic operation of tcpliveplay is it rewrites the given pcap file in a
- scheduled event format and responds with the apporiate packet if the remote
- host meets tcp protocal's SEQ/ACK expectation. Once expectations are met,
- then the local packets are sent with the same payload except with new tcp
- SEQ & ACK numbers meeting the response from the remote hose.
- The inputted pcap file are rewritten to start at the first encounter of the
- SYN packet for correct operation making this packet be the first action in
- the event schedule of local host doing the replay.
- For more details, please see the Tcpreplay Manual at:
- http://tcpreplay.appneta.com
- [root@datatest ~]#
6、查看Tcpreplay里的tcpbridge的帮助文档命令

- [root@datatest ~]# tcpbridge -h
- tcpbridge (tcpbridge) - Bridge network traffic across two interfaces
- Usage: tcpbridge [ -<flag> [<val>] | --<name>[{=| }<val>] ]...
- -r, --portmap=str Rewrite TCP/UDP ports
- -s, --seed=num Randomize src/dst IPv4/v6 addresses w/ given seed
- -N, --pnat=str Rewrite IPv4/v6 addresses using pseudo-NAT
- -S, --srcipmap=str Rewrite source IPv4/v6 addresses using pseudo-NAT
- -D, --dstipmap=str Rewrite destination IPv4/v6 addresses using pseudo-NAT
- -b, --skipbroadcast Skip rewriting broadcast/multicast IPv4/v6 addresses
- -C, --fixcsum Force recalculation of IPv4/TCP/UDP header checksums
- -m, --mtu=num Override default MTU length ( bytes)
- --mtu-trunc Truncate packets larger then specified MTU
- -E, --efcs Remove Ethernet checksums (FCS) from end of frames
- --ttl=str Modify the IPv4/v6 TTL/Hop Limit
- --tos=num Set the IPv4 TOS/DiffServ/ECN byte
- --tclass=num Set the IPv6 Traffic Class byte
- --flowlabel=num Set the IPv6 Flow Label
- -F, --fixlen=str Pad or truncate packet data to match header length
- --fuzz-seed=num Fuzz in X packets. Edit bytes, length, or emulate packet drop
- --fuzz-factor=num Set the Fuzz in X packet ratio (default in packets)
- --skipl2broadcast Skip rewriting broadcast/multicast Layer addresses
- --dlt=str Override output DLT encapsulation
- --enet-dmac=str Override destination ethernet MAC addresses
- --enet-smac=str Override source ethernet MAC addresses
- --enet-subsmac=str Substitute MAC addresses
- --enet-mac-seed=num Randomize MAC addresses
- --enet-mac-seed-keep-bytes=num Randomize MAC addresses
- --enet-vlan=str Specify ethernet .1q VLAN tag mode
- --enet-vlan-tag=num Specify the new ethernet .1q VLAN tag value
- --enet-vlan-cfi=num Specify the ethernet .1q VLAN CFI value
- --enet-vlan-pri=num Specify the ethernet .1q VLAN priority
- --hdlc-control=num Specify HDLC control value
- --hdlc-address=num Specify HDLC address
- --user-dlt=num Set output file DLT type
- --user-dlink=str Rewrite Data-Link layer with user specified data
- -i, --intf1=str Primary interface (listen in uni-directional mode)
- -I, --intf2=str Secondary interface (send in uni-directional mode)
- -u, --unidir Send and receive in only one direction
- --listnics List available network interfaces and exit
- -L, --limit=num Limit the number of packets to send
- -M, --mac=str MAC addresses of local NIC's
- -x, --include=str Include only packets matching rule
- -X, --exclude=str Exclude any packet matching this rule
- -P, --pid Print the PID of tcpbridge at startup
- -v, --verbose Print decoded packets via tcpdump to STDOUT
- -A, --decode=str Arguments passed to tcpdump decoder
- -V, --version Print version information
- -h, --less-help Display less usage information and exit
- -H, --help display extended usage information and exit
- -!, --more-help extended usage information passed thru pager
- --save-opts[=arg] save the option state to a config file
- --load-opts=str load options from a config file
- Options are specified by doubled hyphens and their name or by a single
- hyphen and the flag character.
- tcpbridge is a tool for selectively briding network traffic across two
- interfaces and optionally modifying the packets in between
- Please send bug reports to: <tcpreplay-users@lists.sourceforge.net>
- [root@datatest ~]#
7、查看Tcpreplay里的tcppcpinfo的帮助文档命令

- [root@datatest ~]# tcpcapinfo -h
- /usr/bin/tcpcapinfo: illegal option -- h
- tcpcapinfo (Tcpreplay Suite) - Pcap file dissector for debugging broken pcap files
- Usage: tcpcapinfo [ -<flag> [<val>] | --<name>[{=| }<val>] ]... <pcap_file(s)>
- -V, --version Print version information
- -H, --help display extended usage information and exit
- -!, --more-help extended usage information passed thru pager
- Options are specified by doubled hyphens and their name or by a single
- hyphen and the flag character.
- tcpcapinfo is a tool for decoding the structure of a pcap() file with a
- focus on finding broken pcap files and determining how two related pcap
- files might differ.
- Please send bug reports to: <tcpreplay-users@lists.sourceforge.net>
- [root@datatest ~]#
Tcpreplay总结 (以下只是一个小例子来完整跑一遍)
通过 Tcpreplay 来修改、转发通信流量需要考虑的一共需要考虑以下 3 点:
1、 确定哪有数据包是从客户端到服务器端的,哪有是从服务器端到客户端的
2 、确定新的 MAC、IP、Port
3、确定回放速率、循环次数、执行方式
第一步:
用 tcpreplay 分离源/目的端口的流量。
- tcpprep --port --cachfile=example.cach --pcap=example.pcap
这种情况下,认为所有目的端口小于1024 的,将被视为客户端->服务器的包。
认为所有目的端口大于1024 的,否则视为服务器->客户端的包。
该信息被存储在 tcpprp 的一个名叫 example.cach 的文件夹中。
--port 根据端口号区分数据包的流向。
--cachfile 指定输出的 cach 文件的名字,即在这里要输出为example.cach
--pcap 指定要处理的数据包文件,即在这里要处理的是example.pcap。
其实。tcpprep 支持许多的其他的模式,分离端口模式是其中的一种
。也就是说,第一步,大家自行选择。
第二步:
使用 tcprewrite 更改 ip 地址到本地网络:
- $ tcprewrite --endpoints=172.16.0.1:172.16.5.35 --cachfile=example.cach --infile=example.pcap --outfile=new.pcap
这个例子里,我们想要所有的流量来自于 172.16.0.1 和 172.16.5.35。我们想要一个 IP 是“客户端”,一个 IP 是“服务器端 。
tcprewrite 改写数据包:
--endpoints 指定数据包的 client、server 端的 ip 地址
--cachfie 上一步预处理的输出文件,即example.cach
--infile 输入 pcap 文件,即example.pcap。
--outfile 改写后的 pcap 文件
,即new.pcap。
第三步:用 tcpreplay,发送流量通过服务提供商
- tcpreplay --intf1=eth0 --intf2=eth1 --cachfile=example.cach new.pcap
因为我们要分离 2 个接口(eth0 和 eth1)之间的通信,我们使用第一步中创建的 cach 文件,第二步中创建的 new.pacp。
然后使用 tcpreplay 重发数据包。
如果大家还是不明白,我就再详细的讲个案例。
见
基于CentOS6.5下如何正确安装和使用Tcpreplay来重放数据(图文详解)的更多相关文章
- 基于CentOS6.5下snort+barnyard2+base的入侵检测系统的搭建(图文详解)(博主推荐)
为什么,要写这篇论文? 是因为,目前科研的我,正值研三,致力于网络安全.大数据.机器学习研究领域! 论文方向的需要,同时不局限于真实物理环境机器实验室的攻防环境.也不局限于真实物理机器环境实验室的大数 ...
- 如何在Eclipse中正确安装Jetty插件并初步使用(图文详解)
不多说,直接上干货! 最近在做一个Storm项目,需要用到Jetty来进行展示.它类似于Tomcat. 一.eclipse中jetty插件安装 打开eclipse,依次点击菜单Help->Ecl ...
- Git学习系列之Windows上安装Git之后的一些配置(图文详解)
不多说,直接上干货! 前面博客 Git学习系列之Windows上安装Git详细步骤(图文详解) 第一次使用Git时,需要对Git进行一些配置,以方便使用Git. 不过,这种配置工作只需要进行一次便可, ...
- 全网最详细的Sublime Text 3的安装Package Control插件管理包(图文详解)
不多说,直接上干货! 全网最详细的Windows里下载与安装Sublime Text *(图文详解) 全网最详细的Sublime Text 3的激活(图文详解) 全网最详细的Sublime Text ...
- CentOS 6.6下JDK1.7安装与配置(Linux)经典入门详解案例
最近用的linux较多,在网站找了一些关于linux环境下jdk安装的教程,过程是有的但是好多细节都没有表现出来,所以我花了点时间总结了一下,希望对大家都有帮助... CentOS下JDK1.7安装与 ...
- 全网最全的Windows下Anaconda2 / Anaconda3里正确下载安装用来定时任务apscheduler库(图文详解)
不多说,直接上干货! Anaconda2 里 PS C:\Anaconda2\Scripts> PS C:\Anaconda2\Scripts> pip.exe install apsc ...
- Vmware workstation12里如何正确快速安装可视化IDS系统Security Onion(图文详解)
不多说,直接上干货! 首先,大家要明确: 问:安全洋葱能阻止入侵吗? 答:这一点,和OSSIM一样,不能阻止入侵. Security Onion基于Ubuntu,包含了入侵检测.网络安全监控.日志管理 ...
- Ubuntu14.04下编译安装或apt-get方式安装搭建Apache或Httpd服务(图文详解)
不多说,直接上干货! 写在前面的话 对于 在Ubuntu系统上,编译安装Apache它默认路径是在/usr/local/apache2/htdocs 或者编译安装httpd它默认路径是在/usr/lo ...
- IDEA里如何安装Python插件打造开发环境(图文详解)
前言 python是一种功能强大和适用面很广的开发语言,在大数据应用和机器学习日益流行的年代,python凭借其简洁.易用和可扩展性获得很多用户的支持,近年来使用率高速增长.python环境下,集成了 ...
随机推荐
- ufldl学习笔记与编程作业:Logistic Regression(逻辑回归)
ufldl学习笔记与编程作业:Logistic Regression(逻辑回归) ufldl出了新教程,感觉比之前的好,从基础讲起.系统清晰,又有编程实践. 在deep learning高质量群里面听 ...
- Webapp兼容性布局
- Poi 操作 Excel
http://blog.csdn.net/chenglc1612/article/details/53413445 一. POI简介 Apache POI是Apache软 ...
- JDBC+XML+DOM4J
利用xml文件封装数据库配置信息xml文件放在src目录下/testjdbc1/src/DBUtil.xml <?xml version="1.0" encoding=&qu ...
- leetcode 656. Coin Path
Given an array A (index starts at 1) consisting of N integers: A1, A2, ..., AN and an integer B. The ...
- bzoj5333: [Sdoi2018]荣誉称号
请不要去改题目给的输入,不然你会wa穿... 这么故弄玄虚的题目,肯定要先转换问题 看到这个不断的除2想起别人家的线段树的写法...x的两个孩子是x<<1和x<<1|1 然后问 ...
- 关于数论【polya计数法】
可以预见数论推公式是有多么蛋疼. 让我简明扼要的讲讲吧(多都说不出来,毕竟才做了两道题)其实呢,这个算法应该归入群论,有个有用的东西:置换群,它表示一个集合包括很多的置换.先讲讲置换吧:↓(这是个置换 ...
- ZOJ1610 Count the Colors —— 线段树 区间染色
题目链接:https://vjudge.net/problem/ZOJ-1610 Painting some colored segments on a line, some previously p ...
- 工作笔记——sqlserver引号的运用
一. sqlserver引号问题:因为要使用远程连接,所以sql语句要用单引号括起来 SELECT * FROM OPENQUERY ([192.168.***.***] ,'select * fro ...
- 软件开发-MSF方法(《构建之法》读书笔记2)
MSF-微软解决方案框架,是一套大型系统开发指南,它描述了如何用组队模型.过程模型和应用模型来开发Client/Server结构的应用程序,是在微软的工具和技术的基础上建立并开发分布式企业系统应用的参 ...