MyBatis初级实战之五:一对一关联查询
欢迎访问我的GitHub
https://github.com/zq2599/blog_demos
内容:所有原创文章分类汇总及配套源码,涉及Java、Docker、Kubernetes、DevOPS等;
本篇概览
- 本文是《MyBatis初级实战》系列的第五篇,从多表获取数据是个常见的场景,一般有以下两种方式:
- 联表查询:join操作,一次查询完成
- 多次查询:用第一次查询的结果作为条件,再做查询(MyBatis中叫做嵌套查询)
- 本篇的内容就是学习MyBatis对上述两种查询的支持,全文由以下章节组成:
- 准备数据;
- 本次实战的java工程
- 最简单的联表(两个表的数据保存在一个实体类的不同字段);
- 一对一联表查询(两个表的数据分别保存在不同实体类,假设是A和B,A是B的成员变量)
- 一对一嵌套查询(两个表的数据分别保存在不同实体类,假设是A和B,A是B的成员变量)
源码下载
- 如果您不想编码,可以在GitHub下载所有源码,地址和链接信息如下表所示(https://github.com/zq2599/blog_demos):
| 名称 | 链接 | 备注 |
|---|---|---|
| 项目主页 | https://github.com/zq2599/blog_demos | 该项目在GitHub上的主页 |
| git仓库地址(https) | https://github.com/zq2599/blog_demos.git | 该项目源码的仓库地址,https协议 |
| git仓库地址(ssh) | git@github.com:zq2599/blog_demos.git | 该项目源码的仓库地址,ssh协议 |
- 这个git项目中有多个文件夹,本章的应用在mybatis文件夹下,如下图红框所示:
3. mybatis是个父工程,里面有数个子工程,本篇的源码在relatedoperation子工程中,如下图红框所示:

准备数据
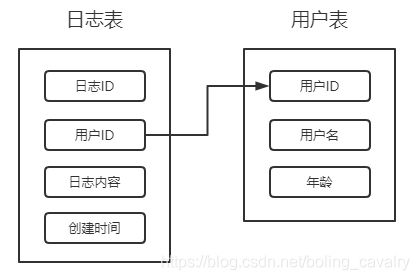
- 本次实战,在名为mybatis的数据库中建立两个表(和前面几篇文章中的表结构一模一样):user和log表;
- user表记录用户信息,非常简单,只有三个字段:主键、名称、年龄
- log表记录用户行为,四个字段:主键、用户id、行为描述、行为时间
- user和log的关系如下图:
5. 建表和添加数据的语句如下:
use mybatis;

DROP TABLE IF EXISTS `user`;

CREATE TABLE `user` (

  `id` int(32) NOT NULL AUTO_INCREMENT,

  `name` varchar(32) NOT NULL,

  `age` int(32) NOT NULL,

  PRIMARY KEY (`id`)

) ENGINE=InnoDB AUTO_INCREMENT=3 DEFAULT CHARSET=utf8;

DROP TABLE IF EXISTS `log`;

CREATE TABLE `log` (

  `id` int(32) NOT NULL AUTO_INCREMENT,

  `user_id` int(32),

  `action` varchar(255) NOT NULL,

  `create_time` datetime not null,

  PRIMARY KEY (`id`)

) ENGINE=InnoDB AUTO_INCREMENT=3 DEFAULT CHARSET=utf8;

INSERT INTO mybatis.user (id, name, age) VALUES (3, 'tom', 11);

INSERT INTO mybatis.log (id, user_id, action, create_time) VALUES (3, 3, 'read book', '2020-08-07 08:18:16');

INSERT INTO mybatis.log (id, user_id, action, create_time) VALUES (4, 3, 'go to the cinema', '2020-09-02 20:00:00');

INSERT INTO mybatis.log (id, user_id, action, create_time) VALUES (5, 3, 'have a meal', '2020-10-05 12:03:36');

INSERT INTO mybatis.log (id, user_id, action, create_time) VALUES (6, 3, 'have a sleep', '2020-10-06 13:00:12');

INSERT INTO mybatis.log (id, user_id, action, create_time) VALUES (7, 3, 'write', '2020-10-08 09:21:11');
本次实战的java工程
- 在父工程mybatis下新建子工程relatedoperation,pom.xml如下:
<?xml version="1.0" encoding="UTF-8"?>

<project xmlns="http://maven.apache.org/POM/4.0.0" xmlns:xsi="http://www.w3.org/2001/XMLSchema-instance"

         xsi:schemaLocation="http://maven.apache.org/POM/4.0.0 https://maven.apache.org/xsd/maven-4.0.0.xsd">

    <modelVersion>4.0.0</modelVersion>

    <parent>

        <groupId>com.bolingcavalry</groupId>

        <artifactId>mybatis</artifactId>

        <version>1.0-SNAPSHOT</version>

        <relativePath>../pom.xml</relativePath>

    </parent>

    <groupId>com.bolingcavalry</groupId>

    <artifactId>relatedoperation</artifactId>

    <version>0.0.1-SNAPSHOT</version>

    <name>relatedoperation</name>

    <description>Demo project for Mybatis related operation in Spring Boot</description>

    <properties>

        <java.version>1.8</java.version>

    </properties>

    <dependencies>

        <dependency>

            <groupId>org.projectlombok</groupId>

            <artifactId>lombok</artifactId>

        </dependency>

        <dependency>

            <groupId>org.springframework.boot</groupId>

            <artifactId>spring-boot-starter-web</artifactId>

        </dependency>

        <dependency>

            <groupId>org.mybatis.spring.boot</groupId>

            <artifactId>mybatis-spring-boot-starter</artifactId>

        </dependency>

        <dependency>

            <groupId>mysql</groupId>

            <artifactId>mysql-connector-java</artifactId>

            <scope>runtime</scope>

        </dependency>

        <dependency>

            <groupId>org.springframework.boot</groupId>

            <artifactId>spring-boot-starter-test</artifactId>

            <scope>test</scope>

        </dependency>

        <dependency>

            <groupId>io.springfox</groupId>

            <artifactId>springfox-swagger2</artifactId>

        </dependency>

        <!-- swagger-ui -->

        <dependency>

            <groupId>io.springfox</groupId>

            <artifactId>springfox-swagger-ui</artifactId>

        </dependency>

        <dependency>

            <groupId>com.alibaba</groupId>

            <artifactId>druid-spring-boot-starter</artifactId>

        </dependency>

        <dependency>

            <groupId>junit</groupId>

            <artifactId>junit</artifactId>

            <scope>test</scope>

        </dependency>

    </dependencies>

    <build>

        <plugins>

            <plugin>

                <groupId>org.springframework.boot</groupId>

                <artifactId>spring-boot-maven-plugin</artifactId>

            </plugin>

        </plugins>

    </build>

</project>
- 基本配置文件application.yml:
server:

  port: 8080

spring:

  #1.JDBC数据源

  datasource:

    username: root

    password: 123456

    url: jdbc:mysql://192.168.50.43:3306/mybatis?useUnicode=true&characterEncoding=utf-8&useSSL=true&serverTimezone=UTC

    driver-class-name: com.mysql.cj.jdbc.Driver

    #2.连接池配置

    druid:

      #初始化连接池的连接数量 大小,最小,最大

      initial-size: 5

      min-idle: 5

      max-active: 20

      #配置获取连接等待超时的时间

      max-wait: 60000

      #配置间隔多久才进行一次检测,检测需要关闭的空闲连接,单位是毫秒

      time-between-eviction-runs-millis: 60000

      # 配置一个连接在池中最小生存的时间,单位是毫秒

      min-evictable-idle-time-millis: 30000

      # 配置一个连接在池中最大生存的时间,单位是毫秒

      max-evictable-idle-time-millis: 300000

      validation-query: SELECT 1 FROM user

      test-while-idle: true

      test-on-borrow: true

      test-on-return: false

      # 是否缓存preparedStatement,也就是PSCache  官方建议MySQL下建议关闭   个人建议如果想用SQL防火墙 建议打开

      pool-prepared-statements: true

      max-pool-prepared-statement-per-connection-size: 20

      # 配置监控统计拦截的filters,去掉后监控界面sql无法统计,'wall'用于防火墙

      filters: stat,wall,slf4j

      filter:

        stat:

          merge-sql: true

          slow-sql-millis: 5000

      #3.基础监控配置

      web-stat-filter:

        enabled: true

        url-pattern: /*

        #设置不统计哪些URL

        exclusions: "*.js,*.gif,*.jpg,*.png,*.css,*.ico,/druid/*"

        session-stat-enable: true

        session-stat-max-count: 100

      stat-view-servlet:

        enabled: true

        url-pattern: /druid/*

        reset-enable: true

        #设置监控页面的登录名和密码

        login-username: admin

        login-password: admin

        allow: 127.0.0.1

        #deny: 192.168.1.100

# mybatis配置

mybatis:

  # 配置文件所在位置

  config-location: classpath:mybatis-config.xml

  # 映射文件所在位置

  mapper-locations: classpath:mappers/*Mapper.xml

# 日志配置

logging:

  level:

    root: INFO

    com:

      bolingcavalry:

        relatedoperation:

          mapper: debug
- 再准备名为application-test.yml的配置文件,这是执行单元测试时用到的,和application.yml的不同之处是spring.datasource.druid.web-stat-filter.enabled配置设置成false;
- mybatis的配置文件mybatis-config.xml如下:
<!DOCTYPE configuration

        PUBLIC "-//mybatis.org//DTD Config 3.0//EN"

        "http://mybatis.org/dtd/mybatis-3-config.dtd">

<configuration>

    <typeAliases>

        <!-- 映射文件中的类不用写全路径了-->

        <package name="com.bolingcavalry.relatedoperation.entity"/>

    </typeAliases>

</configuration>
- 数据源配置类DruidConfig.java:
package com.bolingcavalry.relatedoperation;

import com.alibaba.druid.pool.DruidDataSource;

import org.slf4j.Logger;

import org.slf4j.LoggerFactory;

import org.springframework.beans.factory.annotation.Value;

import org.springframework.context.annotation.Bean;

import org.springframework.context.annotation.Configuration;

@Configuration

public class DruidConfig {

    private static final Logger logger = LoggerFactory.getLogger(DruidConfig.class);

    @Value("${spring.datasource.url}")

    private String dbUrl;

    @Value("${spring.datasource.username}")

    private String username;

    @Value("${spring.datasource.password}")

    private String password;

    @Value("${spring.datasource.driver-class-name}")

    private String driverClassName;

    @Value("${spring.datasource.druid.initial-size}")

    private int initialSize;

    @Value("${spring.datasource.druid.max-active}")

    private int maxActive;

    @Value("${spring.datasource.druid.min-idle}")

    private int minIdle;

    @Value("${spring.datasource.druid.max-wait}")

    private int maxWait;

    @Value("${spring.datasource.druid.pool-prepared-statements}")

    private boolean poolPreparedStatements;

    @Value("${spring.datasource.druid.max-pool-prepared-statement-per-connection-size}")

    private int maxPoolPreparedStatementPerConnectionSize;

    @Value("${spring.datasource.druid.time-between-eviction-runs-millis}")

    private int timeBetweenEvictionRunsMillis;

    @Value("${spring.datasource.druid.min-evictable-idle-time-millis}")

    private int minEvictableIdleTimeMillis;

    @Value("${spring.datasource.druid.max-evictable-idle-time-millis}")

    private int maxEvictableIdleTimeMillis;

    @Value("${spring.datasource.druid.validation-query}")

    private String validationQuery;

    @Value("${spring.datasource.druid.test-while-idle}")

    private boolean testWhileIdle;

    @Value("${spring.datasource.druid.test-on-borrow}")

    private boolean testOnBorrow;

    @Value("${spring.datasource.druid.test-on-return}")

    private boolean testOnReturn;

    @Value("${spring.datasource.druid.filters}")

    private String filters;

    @Value("{spring.datasource.druid.connection-properties}")

    private String connectionProperties;

    /**

     * Druid 连接池配置

     */

    @Bean

    public DruidDataSource dataSource() {

        DruidDataSource datasource = new DruidDataSource();

        datasource.setUrl(dbUrl);

        datasource.setUsername(username);

        datasource.setPassword(password);

        datasource.setDriverClassName(driverClassName);

        datasource.setInitialSize(initialSize);

        datasource.setMinIdle(minIdle);

        datasource.setMaxActive(maxActive);

        datasource.setMaxWait(maxWait);

        datasource.setTimeBetweenEvictionRunsMillis(timeBetweenEvictionRunsMillis);

        datasource.setMinEvictableIdleTimeMillis(minEvictableIdleTimeMillis);

        datasource.setMaxEvictableIdleTimeMillis(minEvictableIdleTimeMillis);

        datasource.setValidationQuery(validationQuery);

        datasource.setTestWhileIdle(testWhileIdle);

        datasource.setTestOnBorrow(testOnBorrow);

        datasource.setTestOnReturn(testOnReturn);

        datasource.setPoolPreparedStatements(poolPreparedStatements);

        datasource.setMaxPoolPreparedStatementPerConnectionSize(maxPoolPreparedStatementPerConnectionSize);

        try {

            datasource.setFilters(filters);

        } catch (Exception e) {

            logger.error("druid configuration initialization filter", e);

        }

        datasource.setConnectionProperties(connectionProperties);

        return datasource;

    }

}
- swagger配置类:
package com.bolingcavalry.relatedoperation;

import springfox.documentation.service.Contact;

import org.springframework.context.annotation.Bean;

import org.springframework.context.annotation.Configuration;

import springfox.documentation.builders.ApiInfoBuilder;

import springfox.documentation.builders.PathSelectors;

import springfox.documentation.builders.RequestHandlerSelectors;

import springfox.documentation.service.ApiInfo;

import springfox.documentation.service.Tag;

import springfox.documentation.spi.DocumentationType;

import springfox.documentation.spring.web.plugins.Docket;

import springfox.documentation.swagger2.annotations.EnableSwagger2;

@Configuration

@EnableSwagger2

public class SwaggerConfig {

    @Bean

    public Docket createRestApi() {

        return new Docket(DocumentationType.SWAGGER_2)

                .apiInfo(apiInfo())

                .tags(new Tag("UserController", "用户服务"), new Tag("LogController", "日志服务"))

                .select()

                // 当前包路径

                .apis(RequestHandlerSelectors.basePackage("com.bolingcavalry.relatedoperation.controller"))

                .paths(PathSelectors.any())

                .build();

    }

    //构建 api文档的详细信息函数,注意这里的注解引用的是哪个

    private ApiInfo apiInfo() {

        return new ApiInfoBuilder()

                //页面标题

                .title("MyBatis CURD操作")

                //创建人

                .contact(new Contact("程序员欣宸", "https://github.com/zq2599/blog_demos", "zq2599@gmail.com"))

                //版本号

                .version("1.0")

                //描述

                .description("API 描述")

                .build();

    }

}
- springboot引导类:
package com.bolingcavalry.relatedoperation;

import org.mybatis.spring.annotation.MapperScan;

import org.springframework.boot.SpringApplication;

import org.springframework.boot.autoconfigure.SpringBootApplication;

@SpringBootApplication

@MapperScan("com.bolingcavalry.relatedoperation.mapper")

public class RelatedOperationApplication {

    public static void main(String[] args) {

        SpringApplication.run(RelatedOperationApplication.class, args);

    }

}
- 用户表的实体类:
package com.bolingcavalry.relatedoperation.entity;

import io.swagger.annotations.ApiModel;

import io.swagger.annotations.ApiModelProperty;

import lombok.Data;

import lombok.NoArgsConstructor;

@Data

@NoArgsConstructor

@ApiModel(description = "用户实体类")

public class User {

    @ApiModelProperty(value = "用户ID")

    private Integer id;

    @ApiModelProperty(value = "用户名", required = true)

    private String name;

    @ApiModelProperty(value = "用户地址", required = false)

    private Integer age;

}
- 日志表的实体类:
package com.bolingcavalry.relatedoperation.entity;

import io.swagger.annotations.ApiModel;

import io.swagger.annotations.ApiModelProperty;

import lombok.Data;

import lombok.NoArgsConstructor;

import java.sql.Date;

@Data

@NoArgsConstructor

@ApiModel(description = "日志实体类")

public class Log {

    @ApiModelProperty(value = "日志ID")

    private Integer id;

    @ApiModelProperty(value = "用户ID")

    private Integer userId;

    @ApiModelProperty(value = "日志内容")

    private String action;

    @ApiModelProperty(value = "创建时间")

    private Date createTime;

}
- 以上就是本篇的准备代码,接下来在此基础上实现各种多表关联查询
最简单的联表
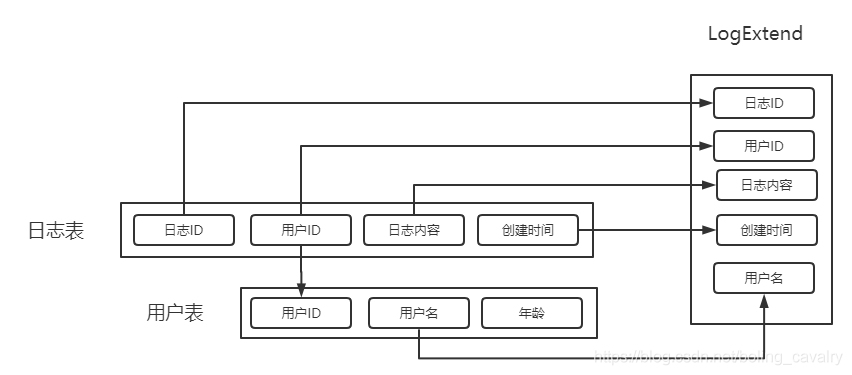
- 先实战的是最普通的联表,如下图所示,查询结果是名为LogExtend的实体类,这个类有5个字段,其中四个来自日志表log,一个来自用户表user:
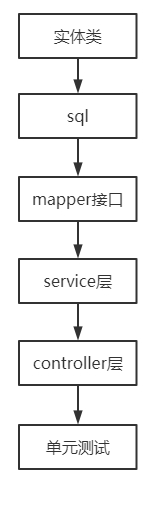
- 下图是开发步骤:
- 实体类LogExtend的源码如下,可见和Log相比多了个userName字段:
package com.bolingcavalry.relatedoperation.entity;

import io.swagger.annotations.ApiModel;

import io.swagger.annotations.ApiModelProperty;

import lombok.Data;

import lombok.NoArgsConstructor;

@Data

@NoArgsConstructor

@ApiModel(description = "日志实体类(含用户表的字段)")

public class LogExtend extends Log {

    @ApiModelProperty(value = "用户名")

    private String userName;

}
- 新建log表对应的映射文件LogMapper.xml,如下所示,里面是通过left join语法执行的简单的联表查询,以及查询结果对应的resultMap定义:
<?xml version="1.0" encoding="UTF-8"?>

<!DOCTYPE mapper PUBLIC "-//mybatis.org//DTD Mapper 3.0//EN" "http://mybatis.org/dtd/mybatis-3-mapper.dtd">

<mapper namespace="com.bolingcavalry.relatedoperation.mapper.LogMapper">

    <!--联表查询,返回log对象,该对象有个userName字段,值是user表的user_name字段-->

    <select id="oneObjectSel" parameterType="int" resultMap="logExtendResultMap">

        select l.id as id,

               l.user_id as user_id,

               l.action as action,

               l.create_time as create_time,

               u.name as user_name

        from log as l

                 left join user as u

                           on l.user_id = u.id

        where l.id = #{id}

    </select>

    <resultMap id="logExtendResultMap" type="logExtend">

        <id property="id" column="id"/>

        <result column="user_id" jdbcType="INTEGER" property="userId"/>

        <result column="action" jdbcType="VARCHAR" property="action"/>

        <result column="create_time" jdbcType="TIMESTAMP" property="createTime"/>

        <result column="user_name" jdbcType="VARCHAR" property="userName"/>

    </resultMap>

</mapper>
- mapper接口代码:
package com.bolingcavalry.relatedoperation.mapper;

import com.bolingcavalry.relatedoperation.entity.LogAssociateUser;

import com.bolingcavalry.relatedoperation.entity.LogExtend;

import org.springframework.stereotype.Repository;

@Repository

public interface LogMapper {

    LogExtend oneObjectSel(int id);

}
- service层的代码在LogService.java文件中:
package com.bolingcavalry.relatedoperation.service;

import com.bolingcavalry.relatedoperation.entity.LogAssociateUser;

import com.bolingcavalry.relatedoperation.entity.LogExtend;

import com.bolingcavalry.relatedoperation.mapper.LogMapper;

import org.springframework.beans.factory.annotation.Autowired;

import org.springframework.stereotype.Service;

@Service

public class LogService {

    @Autowired

    LogMapper logMapper;

    public LogExtend oneObjectSel(int id){

        return logMapper.oneObjectSel(id);

    }

}
- controller层的代码在LogController.java文件中:
@RestController

@RequestMapping("/log")

@Api(tags = {"LogController"})

public class LogController {

    @Autowired

    private LogService logService;

    @ApiOperation(value = "根据ID查找日志记录,带userName字段,该字段通过联表查询实现", notes="根据ID查找日志记录,带userName字段,该字段通过联表查询实现")

    @ApiImplicitParam(name = "id", value = "日志ID", paramType = "path", required = true, dataType = "Integer")

    @RequestMapping(value = "/aggregate/{id}", method = RequestMethod.GET)

    public LogExtend oneObjectSel(@PathVariable int id){

        return logService.oneObjectSel(id);

    }
- 编写单元测试的代码ControllerTest.java,由于今天的测试涉及到user和log两个表,因此在测试类ControllerTest的内部准备了两个内部类,分别用于测试user和log表:
package com.bolingcavalry.relatedoperation.controller;

import lombok.extern.slf4j.Slf4j;

import org.junit.jupiter.api.*;

import org.springframework.beans.factory.annotation.Autowired;

import org.springframework.boot.test.autoconfigure.web.servlet.AutoConfigureMockMvc;

import org.springframework.boot.test.context.SpringBootTest;

import org.springframework.http.MediaType;

import org.springframework.test.context.ActiveProfiles;

import org.springframework.test.web.servlet.MockMvc;

import org.springframework.test.web.servlet.request.MockMvcRequestBuilders;

import static org.springframework.test.web.servlet.result.MockMvcResultHandlers.print;

import static org.springframework.test.web.servlet.result.MockMvcResultMatchers.jsonPath;

import static org.springframework.test.web.servlet.result.MockMvcResultMatchers.status;

@SpringBootTest

@DisplayName("Web接口的单元测试")

@AutoConfigureMockMvc

@ActiveProfiles("test")

@Slf4j

public class ControllerTest {

    /**

     * 查询方式:联表

     */

    final static String SEARCH_TYPE_LEFT_JOIN = "leftjoin";

    /**

     * 查询方式:嵌套

     */

    final static String SEARCH_TYPE_NESTED = "nested";

    final static int TEST_USER_ID = 3;

    final static String TEST_USER_NAME = "tom";

    @Autowired MockMvc mvc;

    @Nested

    @TestMethodOrder(MethodOrderer.OrderAnnotation.class)

    @DisplayName("用户服务")

    class User {

    }

    @Nested

    @TestMethodOrder(MethodOrderer.OrderAnnotation.class)

    @DisplayName("日志服务")

    class Log {

        final static int TEST_LOG_ID = 5;

        @Test

        @DisplayName("通过日志ID获取日志信息,带userName字段,该字段通过联表查询实现")

        @Order(1)

        void oneObjectSel() throws Exception {

            mvc.perform(MockMvcRequestBuilders.get("/log/aggregate/" + TEST_LOG_ID)

                    .accept(MediaType.APPLICATION_JSON))

                    .andExpect(status().isOk())

                    .andExpect(jsonPath("$.id").value(TEST_LOG_ID))

                    .andExpect(jsonPath("$.userName").value(TEST_USER_NAME))

                    .andDo(print());

        }

    }

}
- 执行上述单元测试方法,结果如下图,红框中就是controller层返回的数据,可见已通过Mybatis成功取得LogExtend实例:
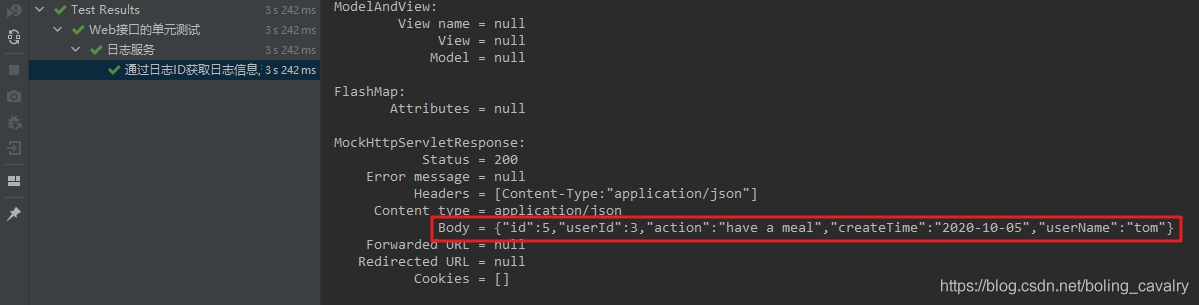
- 下一站是一对一联表查询;
关于一对一关联的两种方式
- 前面的查询有个特点:尽管查询了两个表,但结果都在同一实体类的不同字段,而更符合业务逻辑的关系应该是log类中有个user类的成员变量,即如下形式:
@Data

@NoArgsConstructor

@ApiModel(description = "日志实体类")

public class LogAssociateUser {

    @ApiModelProperty(value = "日志ID")

    private Integer id;

    @ApiModelProperty(value = "用户对象")

    private User user;

    @ApiModelProperty(value = "日志内容")

    private String action;

    @ApiModelProperty(value = "创建时间")

    private Date createTime;

}
- 接下来的实战就是如何用MyBatis查询得到上述LogAssociateUser 类型的结果;
- 一对一关联的实现有联表和嵌套查询两种,它们的差异在Mybatis中体现在association的子节点上:
- 联表时,association内使用result子节点,将联表查询的结果映射到关联对象;
- 嵌套时,association内使用select子节点,触发一次新的查询;
一对一(联表)
所谓一对一,就是一个对象关联了另一个对象,例如一条log记录中,带有对应的user信息;
- 下面是新的实体类LogAssociateUser,该类对应的是log表记录,有个user字段,类型是User对象:
@Data

@NoArgsConstructor

@ApiModel(description = "日志实体类")

public class LogAssociateUser {

    @ApiModelProperty(value = "日志ID")

    private Integer id;

    @ApiModelProperty(value = "用户对象")

    private User user;

    @ApiModelProperty(value = "日志内容")

    private String action;

    @ApiModelProperty(value = "创建时间")

    private Date createTime;

}
- 映射文件LogMapper.xml中,sql和resultMap如下,可见查询的时候将user表的字段都查出来了,然后在resultMap中用association节点去处理sql中查出的user表的数据,通过javaType属性转为User类的实例:
    <!--联表查询,返回log对象,它的成员变量中有user对象-->

    <select id="leftJoinSel" parameterType="int" resultMap="leftJoinResultMap">

        select l.id as log_id,

               l.action as log_action,

               l.create_time as log_create_time,

               u.id as user_id,

               u.name as user_name,

               u.age as user_age

        from log as l

               left join user as u

               on l.user_id = u.id

        where l.id = #{id}

    </select>

    <resultMap id="leftJoinResultMap" type="LogAssociateUser">

        <id property="id" column="log_id"/>

        <result  property="action" column="log_action" jdbcType="VARCHAR"/>

        <result property="createTime" column="log_create_time" jdbcType="TIMESTAMP" />

        <association property="user" javaType="User">

            <id property="id" column="user_id"/>

            <result property="name" column="user_name"/>

            <result property="age" column="user_age"/>

        </association>

    </resultMap>
- 以上就是一对一(联表)的关键点,接下来按部就班的在LogMapper、LogService、LogController中添加方法即可,下面是LogController中对应的web接口,稍后会在单元测试中调用这个接口进行验证:
    @ApiOperation(value = "根据ID查找日志记录,带用户对象,联表查询实现", notes="根据ID查找日志记录,带用户对象,联表查询实现")

    @ApiImplicitParam(name = "id", value = "日志ID", paramType = "path", required = true, dataType = "Integer")

    @RequestMapping(value = "/leftjoin/{id}", method = RequestMethod.GET)

    public LogAssociateUser leftJoinSel(@PathVariable int id){

        return logService.leftJoinSel(id);

    }
- 最后是单元测试的代码(ControllerTest.java文件),用来测试上述代码是否有效,注意下面的queryAndCheck私有方法,该方法中发起请求并验证结果:
        /**

         * 通过日志ID获取日志信息有两种方式:联表和嵌套查询,

         * 从客户端来看,仅一部分path不同,因此将请求和检查封装到一个通用方法中,

         * 调用方法只需要指定不同的那一段path

         * @param subPath

         * @throws Exception

         */

        private void queryAndCheck(String subPath) throws Exception {

            String queryPath = "/log/" + subPath + "/" + TEST_LOG_ID;

            log.info("query path [{}]", queryPath);

            mvc.perform(MockMvcRequestBuilders.get(queryPath)

                    .accept(MediaType.APPLICATION_JSON))

                    .andExpect(status().isOk())

                    .andExpect(jsonPath("$.id").value(TEST_LOG_ID))

                    .andExpect(jsonPath("$.user.id").value(TEST_USER_ID))

                    .andDo(print());

        }

        @Test

        @DisplayName("通过日志ID获取日志信息(关联了用户),联表查询")

        @Order(2)

        void leftJoinSel() throws Exception {

            queryAndCheck(SEARCH_TYPE_LEFT_JOIN);

        }
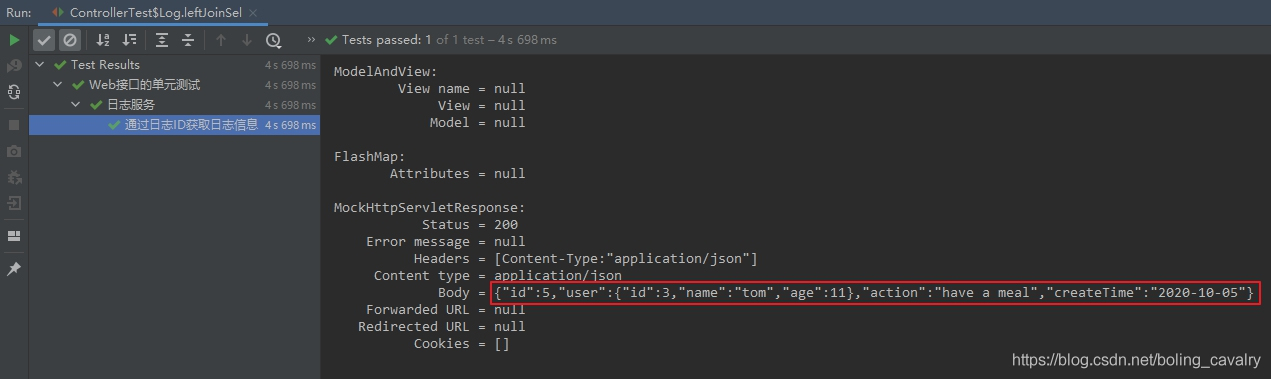
- 执行单元测试结果如下,可见:内部嵌套了一个json对象,就是user表的数据:
一对一(嵌套)
- 接下来试试嵌套的方式;
- LogMapper.xml中对应的sql:
    <!--嵌套-->

    <select id="nestedSel" parameterType="int" resultMap="nestedResultMap">

        select

            l.id as log_id,

            l.user_id as log_user_id,

            l.action as log_action,

            l.create_time as log_create_time

        from mybatis.log as l

        where l.id = #{id}

    </select>
- 上述sql对应的resultMap如下,可见association节点中有个select属性,这就是MyBatis支持嵌套查询的关键,该属性的值是个select节点:
    <!-- association节点的select属性会触发嵌套查询-->

    <resultMap id="nestedResultMap" type="LogAssociateUser">

        <!-- column属性中的log_id,来自前面查询时的"l.id as log_id" -->

        <id property="id" column="log_id"/>

        <!-- column属性中的log_action,来自前面查询时的"l.action as log_action" -->

        <result  property="action" column="log_action" jdbcType="VARCHAR"/>

        <!-- column属性中的log_create_time,来自前面查询时的"l.create_time as log_create_time" -->

        <result property="createTime" column="log_create_time" jdbcType="TIMESTAMP" />

        <!-- select属性,表示这里要执行嵌套查询,将log_user_id传给嵌套的查询 -->

        <association property="user" column="log_user_id" select="selectUserByUserId"></association>

    </resultMap>
- 上述节点中select属性的值,对应一个select节点,如下:
    <select id="selectUserByUserId" parameterType="int" resultType="User">

        select

            u.id,

            u.name,

            u.age

        from mybatis.user as u

        where u.id = #{log_user_id}

    </select>
- 以上就是一对一(嵌套)的关键点,接下来按部就班的在LogMapper、LogService、LogController中添加方法即可,下面是LogController中对应的web接口,稍后会在单元测试中调用这个接口进行验证:
    @ApiOperation(value = "根据ID查找日志记录,带用户对象,嵌套查询实现", notes="根据ID查找日志记录,带用户对象,嵌套查询实现")

    @ApiImplicitParam(name = "id", value = "日志ID", paramType = "path", required = true, dataType = "Integer")

    @RequestMapping(value = "/nested/{id}", method = RequestMethod.GET)

    public LogAssociateUser nestedSel(@PathVariable int id){

        return logService.nestedSel(id);

    }
- 最后是单元测试的代码(ControllerTest.java文件),用来测试上述代码是否有效,如下可见,直接调用了前面的queryAndCheck来验证:
        @Test

        @DisplayName("通过日志ID获取日志信息(关联了用户),嵌套查询")

        @Order(3)

        void nestedSel() throws Exception {

            queryAndCheck(SEARCH_TYPE_NESTED);

        }
- 执行上述单元测试代码,结果如下,可见嵌套查询的方式也能将user表的数据成功获取,放入log实例的成员变量中:

8. 最后是对比联表和嵌套查询的差异,先看联表查询的MyBatis日志,如下图红框所示,只有一次sql查询:

9. 再看嵌套查询的日志,如下图,红框是第一次查询,结果中的userid作为绿框中的第二次查询的条件:

- 至此,一对一的多表查询实战就完成了,本篇的逻辑是一条log记录关联一条user记录,下一篇文章,咱们学习一对多关联,即一个user有多条log记录;
你不孤单,欣宸原创一路相伴
欢迎关注公众号:程序员欣宸
微信搜索「程序员欣宸」,我是欣宸,期待与您一同畅游Java世界...
https://github.com/zq2599/blog_demos
MyBatis初级实战之五:一对一关联查询的更多相关文章
- MyBatis初级实战之六:一对多关联查询
欢迎访问我的GitHub https://github.com/zq2599/blog_demos 内容:所有原创文章分类汇总及配套源码,涉及Java.Docker.Kubernetes.DevOPS ...
- MyBatis从入门到放弃三:一对一关联查询
前言 简单来说在mybatis.xml中实现关联查询实在是有些麻烦,正是因为起框架本质是实现orm的半自动化. 那么mybatis实现一对一的关联查询则是使用association属性和resultM ...
- MyBatis:一对一关联查询
MyBatis从入门到放弃三:一对一关联查询 前言 简单来说在mybatis.xml中实现关联查询实在是有些麻烦,正是因为起框架本质是实现orm的半自动化. 那么mybatis实现一对一的关联查询则是 ...
- Mybatis学习4——一对一关联查询方法2------实体作为属性
实体order和user采用resultMap order package pojo; import java.util.Date; public class Order { private Inte ...
- Mybatis学习4——一对一关联查询方法1--创建实体
创建一个实体继承两个实体之一,另一个实体作为属性 实体1. order package pojo; import java.util.Date; public class Order { privat ...
- mybatis一对一关联查询——(八)
1.需求 查询所有订单信息,关联查询下单用户信息. 注意: 因为一个订单信息只会是一个人下的订单,所以从查询订单信息出发关联查询用户信息为一对一查询.如果从用户信息出发查询用户下的订单信息则为一对多查 ...
- mybatis 使用接口增删改查和两表一对一关联查询
导包 总配置文件 <?xml version="1.0" encoding="UTF-8"?> <!DOCTYPE configuration ...
- MyBatis学习(四)MyBatis一对一关联查询
一对一关联查询即.两张表通过外键进行关联.从而达到查询外键直接获得两张表的信息.本文基于业务拓展类的方式实现. 项目骨架 配置文件conf.xml和db.properties前几节讲过.这里就不细说了 ...
- MyBatis关联查询,一对一关联查询
数据库E-R关系 实体类 public class City { Long id; String name; Long countryId; Date lastUpdate; } public cla ...
随机推荐
- C#知识结构
C#知识结构 对于一个工作多年的程序员而言,接口.反射.索引器.事件.委托这些耳熟能详的词汇,提起来别说多简单了,但是让老司机坐在那一个人拿起一支笔,把脑海中对C#知识结构进行梳理一下,大抵是写不了多 ...
- 安卓和ios的app证书过期的相关问题汇总
一,ios的APP的发布流程请见:ios的APP的发布流程 http://www.jianshu.com/p/b1b77d804254 这篇文章写得很好很全面 二,app证书过期了怎么办: IOS的情 ...
- js下 Day19、综合案例
一.吸顶楼层 效果图: 功能思路分析: 1. 面向对象框架 2. 渲染导航 \1. 数据 \2. 对象结构的数据用for in遍历 \3. 渲染时将属性名设为锚点(a标签的href) 3. 渲染车系 ...
- C语言中++*x和*++x的区别
++跟*的优先级一样,如果两个同时出现,运算是从右往左(不是常规的从左往右),所以: ++*x即++(*x),先取x的值,然后让值自加1:(地址没变,指针指向的值变了.搞不懂的话自己用快递做例子) * ...
- Eureka系列(九)Eureka自我保护机制
因为本篇简文并不是自己总结的,而是当了下搬运工,所以直接直接附上原作者博客链接. 参考链接: 1.SpringCloud Eureka自我保护机制 2.Spring Cloud Eurek ...
- 阿里云Centos7.6上面部署基于redis的分布式爬虫scrapy-redis将任务队列push进redis
Scrapy是一个比较好用的Python爬虫框架,你只需要编写几个组件就可以实现网页数据的爬取.但是当我们要爬取的页面非常多的时候,单个服务器的处理能力就不能满足我们的需求了(无论是处理速度还是网络请 ...
- 为什么放弃Hibernate、JPA、Mybatis,最终选择JDBCTemplate
一.前言 因为项目需要选择数据持久化框架,看了一下主要几个流行的和不流行的框架,对于复杂业务系统,最终的结论是,JOOQ是总体上最好的,可惜不是完全免费,最终选择JDBC Template. Hibe ...
- Python简单的验证码生成
用python生成简单的四位数验证码: 1 import random 2 3 if __name__ == "__main__": #这句话简单的理解就是,只有在本文件下以下的代 ...
- docker 使用笔记
docker 使用笔记 1. 与宿主机之间拷贝文件 docker cp test.html 99f952ac05e6cd879f14aa6c9d0db02aaf498634edc4f6cdc9953c ...
- Java学习日报7.9
今日内容 阅读了构建之法第一章 工程师的宗旨:我构建,故我在. 哲学家的宗旨:我思,故我在. 科学家的宗旨:我发现故我在. 明天继续研究构建之法这本书!