Scrapy网络爬虫框架的开发使用
1.安装
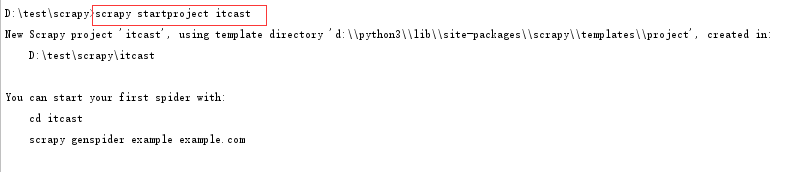
2.使用scrapy startproject project_name 命令创建scrapy项目
如图:
3.根据提示使用scrapy genspider spider_name domain_url 创建一个spider程序
如图:

注意spider_name 不能和project_name 同名;可以采用关键字加_spider的方式命名spider_name
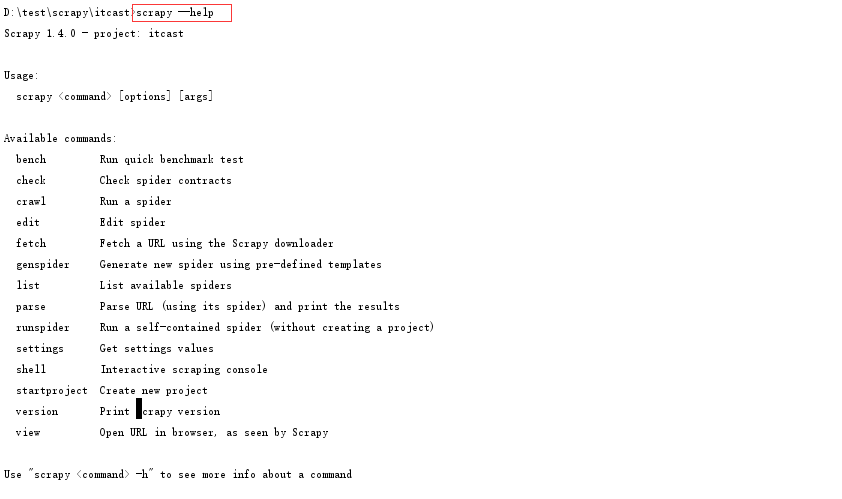
4. 使用scrapy list命令查看所有的spider程序名称,及使用scrapy --help查看命令列表

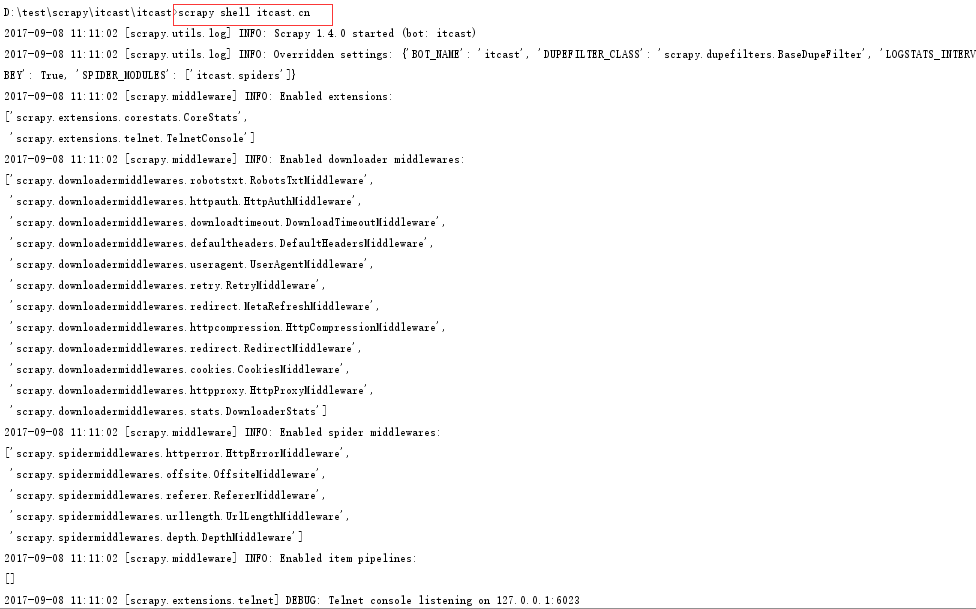
5. 使用scrapy shell url 调试selector
首先,使用scrapy shell url 打开scrapy shell调试工具
如图:
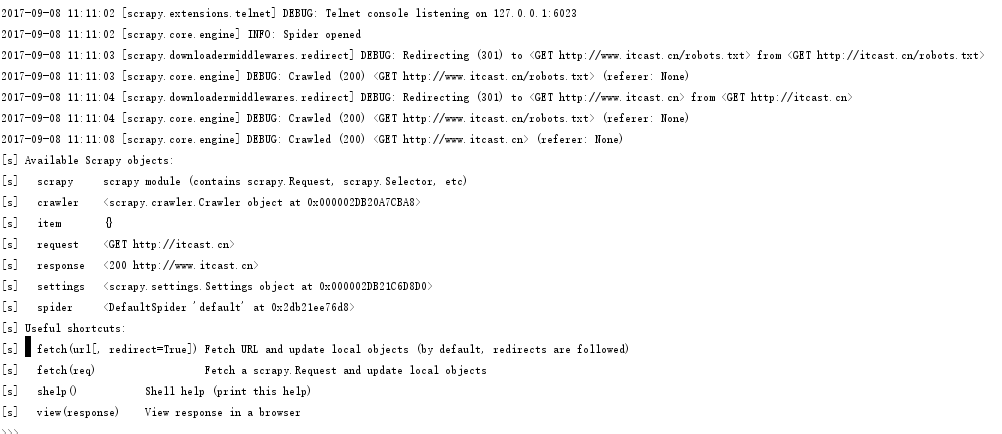
在scrapy shell里面输入要查找的selector
如图:


6. 定义items.py中的字段
所需要的字段有image_url和title
# -*- coding: utf-8 -*-

# Define here the models for your scraped items
#
# See documentation in:
# http://doc.scrapy.org/en/latest/topics/items.html

import scrapy

class ItcastItem(scrapy.Item):
    # define the fields for your item here like:
    image_url = scrapy.Field()
    title = scrapy.Field()
    pass
7. 在创建好的spider程序中itcast_spider.py中修改代码
首先,修改配置文件settings.py
将ROBOTSTXT_OBEY = True改为ROBOTSTXT_OBEY = False
在次,修改itcast_spider.py
# -*- coding: utf-8 -*-import scrapyfrom itcast.items import ItcastItem

class ItcastSpiderSpider(scrapy.Spider):    name = 'itcast_spider'    allowed_domains = ['itcast.cn']    start_urls = ['http://itcast.cn/']

    def parse(self, response):        node_list = response.xpath("//li[@class='a_gd']")        for index, node in enumerate(node_list):            item = ItcastItem()

            if(len(node.xpath("./p[@class='img_box']/a/img/@src"))):                item['image_url'] = node.xpath("./p[@class='img_box']/a/img/@src").extract()[0]            else:                item['image_url'] = ""

            if(len(node.xpath("./p/a[@se_prerender_url='complete']/text()"))):                item['title'] = node.xpath("./p/a[@se_prerender_url='complete']/text()").extract()[0]            else:                item['title'] = ""

            if(item['image_url'] or item['title']):                yield item
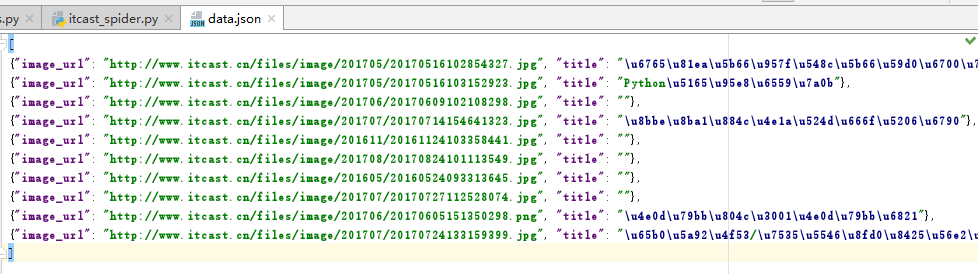
8. 使用scrapy crawl spider_name 生成json数据文件
首先,使用scrapy runspider spider_file_name试运行spider程序
如图:
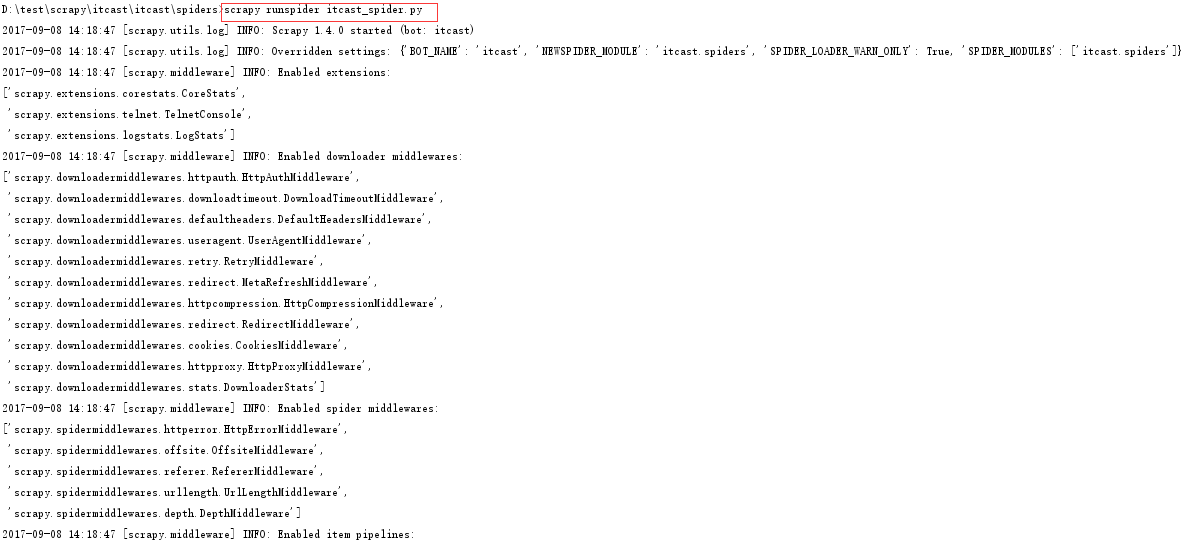
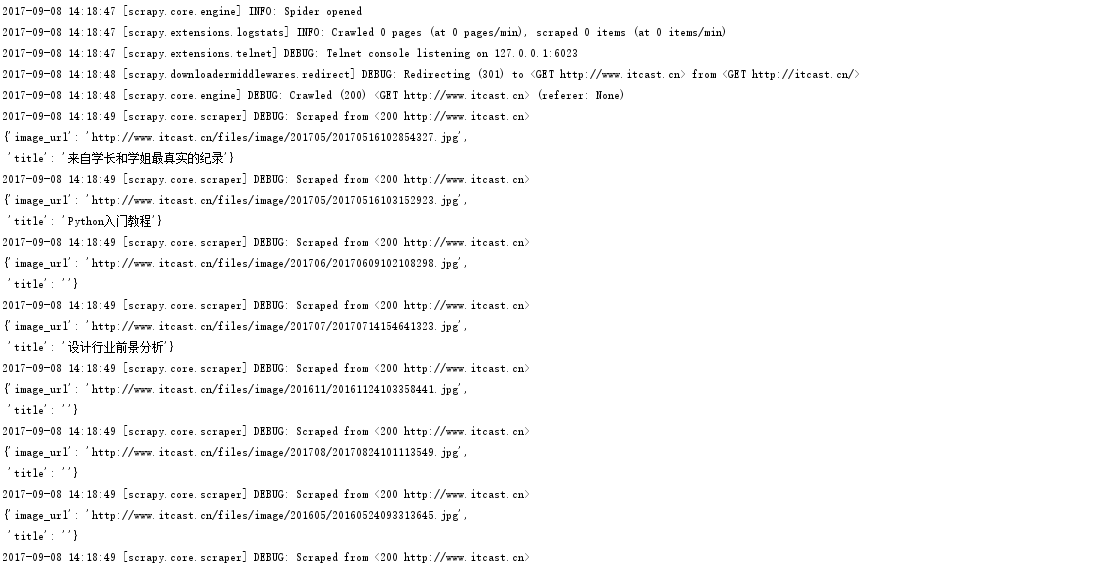
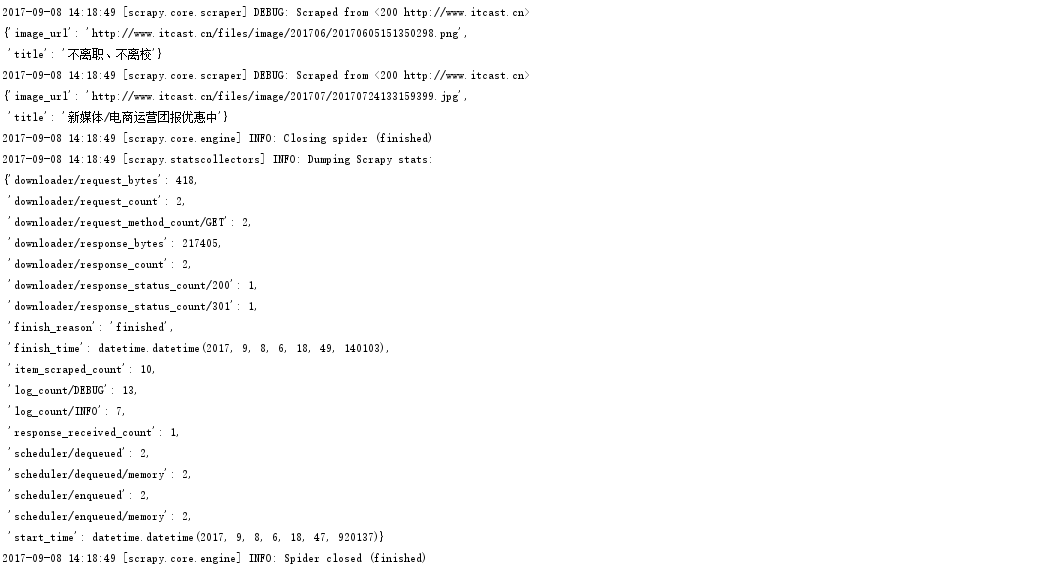
试运行发现已经打印出了数据
然后,使用scrapy crawl spider_name -o data.json生成json数据文件
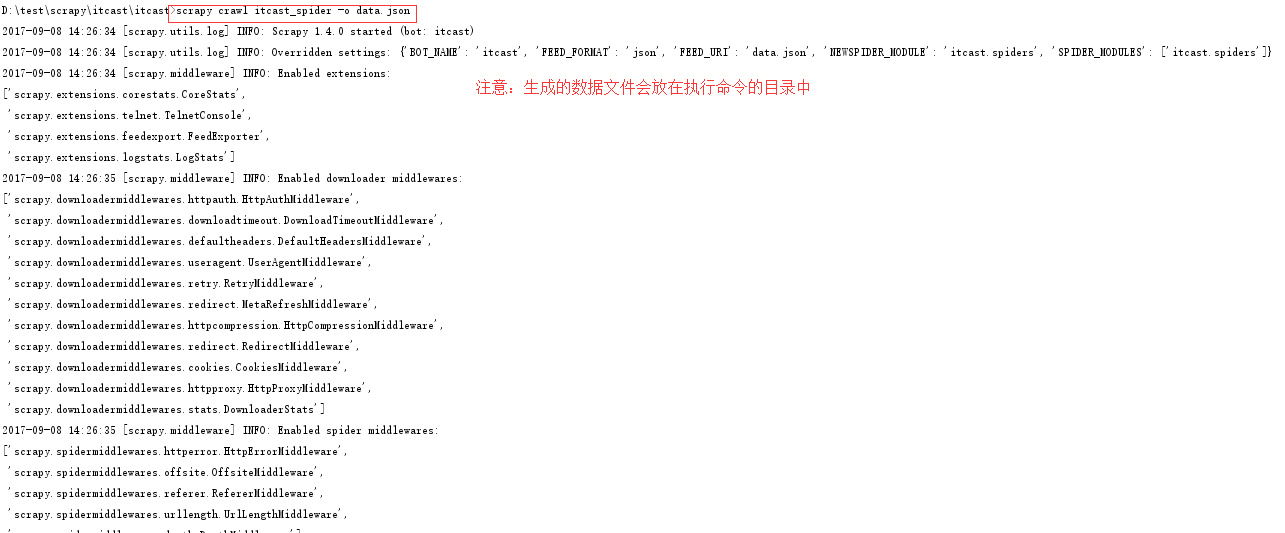
查看生成的数据文件data.json
9. 使用管道将数据持久化到mysql
首先, 创建好的数据库名为:
主机:127.0.0.1
用户名:root
密码:root
数据库名称:test
数据表结构:
CREATE TABLE `itcast` (
`image_url` varchar(255) NOT NULL,
`title` varchar(255) DEFAULT NULL
) ENGINE=InnoDB DEFAULT CHARSET=utf8;
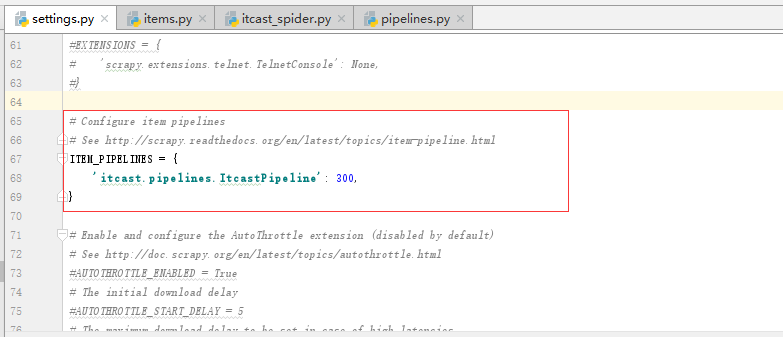
然后,在配置文件settings.py中打开pipelines功能:
然后,编写pipelines.py中的持久化数据处理逻辑
# -*- coding: utf-8 -*-

import pymysqlimport jsonclass ItcastPipeline(object):    def __init__(self):        self.conn = pymysql.connect(host='127.0.0.1', user='root', passwd='root', db='test', charset='UTF8')        self.cursor = self.conn.cursor()    def process_item(self, item, spider):        item = dict(item)        image_url = item['image_url']        title = item['title']

        sql = "insert into itcast(image_url, title) values('%s', '%s')" % (image_url, title)        self.cursor.execute(sql)        self.conn.commit()        return item    def close_spider(self, spider):        self.conn.close()
应用1,使用scrapy抓取腾讯招聘的工作招聘信息,并存储在本地json文件中
步骤:
1.创建一个scrapy项目
scrapy startproject tencert
2.创建一个spider类
cd tencert
scrapy genspider tencert_hr
3.定义item字段
# -*- coding: utf-8 -*-

import scrapy

class TencertItem(scrapy.Item):
    position_name = scrapy.Field()
    position_link = scrapy.Field()
    position_category = scrapy.Field()
    position_person_count = scrapy.Field()
    position_city = scrapy.Field()
    created_at = scrapy.Field()
4.编写spider程序
# -*- coding: utf-8 -*-
import scrapy
from tencert.items import TencertItem

class TencertHrSpider(scrapy.Spider):
    name = 'tencert_hr'
    allowed_domains = ['http://hr.tencent.com/']
    start_urls = ['http://hr.tencent.com/position.php?keywords=%E8%AF%B7%E8%BE%93%E5%85%A5%E5%85%B3%E9%94%AE%E8%AF%8D&lid=0&tid=0']

    def parse(self, response):
        node_list = response.xpath("//tr[@class='even' or @class='odd']")
        for node in node_list:
            item = TencertItem()
            if len(node.xpath("./td[1]/a/text()")):
                item['position_name'] = node.xpath("./td[1]/a/text()").extract()[0]
            else:
                item['position_name'] = ""

            if len(node.xpath("./td[1]/a/@href")):
                item['position_link'] = node.xpath("./td[1]/a/@href").extract()[0]
            else:
                item['position_link'] = ""

            if len(node.xpath("./td[2]/text()")):
                item['position_category'] = node.xpath("./td[2]/text()").extract()[0]
            else:
                item['position_category'] = ""

            if len(node.xpath("./td[3]/text()")):
                item['position_person_count'] = node.xpath("./td[3]/text()").extract()[0]
            else:
                item['position_person_count'] = ""

            if len(node.xpath("./td[4]/text()")):
                item['position_city'] = node.xpath("./td[4]/text()").extract()[0]
            else:
                item['position_city'] = ""

            if len(node.xpath("./td[5]/text()")):
                item['created_at'] = node.xpath("./td[5]/text()").extract()[0]
            else:
                item['created_at'] = ""

            yield item

        if(len(response.xpath("//a[@id='next' and @class='noactive']")) == 0):
            url = "http://hr.tencent.com/" + response.xpath("//a[@id='next']/@href").extract()[0]
            yield scrapy.Request(url, callback=self.parse, dont_filter=True)
注意:
a. 不要在spider程序中对字段的值encode("UTF-8"), 这样会导致出现byte错误; 正确的方式是在pipelines.py中打开文件的句柄中指定编码为UTF-8
b. 需要对字段的值做是否为空的判断,如果字段值为空,则取不到下标为0的值
c. 在spider程序中生成一个request使用yield scrapy.Request(url, callback=self.parse, dont_filter=True)
5.编写pipeline管道程序
# -*- coding: utf-8 -*-
import json

class TencertPipeline(object):
    def __init__(self):
        self.f = open("data.json", "w", encoding="UTF-8")
    def process_item(self, item, spider):
        json_str = json.dumps(dict(item), ensure_ascii=False) + ", \n"
        self.f.write(json_str)
        return item
    def close_spider(self, spider):
        self.f.close()
注意:
a. 在管道的构造方法中打开文件的模式使用w 和使用 a的效果是一样的,因为spider通过yield生成器将数据传给管道,这样的通信方式生生不息,这样管道类只需执行一次构造方法
b. 打开问价时指定编码为UTF-8
6.修改配置文件开启管道
# -*- coding: utf-8 -*-

BOT_NAME = 'tencert'

SPIDER_MODULES = ['tencert.spiders']
NEWSPIDER_MODULE = 'tencert.spiders'

# Crawl responsibly by identifying yourself (and your website) on the user-agent
#USER_AGENT = 'tencert (+http://www.yourdomain.com)'

# Obey robots.txt rules
#ROBOTSTXT_OBEY = True

# Configure maximum concurrent requests performed by Scrapy (default: 16)
#CONCURRENT_REQUESTS = 32

# Configure a delay for requests for the same website (default: 0)
# See http://scrapy.readthedocs.org/en/latest/topics/settings.html#download-delay
# See also autothrottle settings and docs
#DOWNLOAD_DELAY = 3
# The download delay setting will honor only one of:
#CONCURRENT_REQUESTS_PER_DOMAIN = 16
#CONCURRENT_REQUESTS_PER_IP = 16

# Disable cookies (enabled by default)
#COOKIES_ENABLED = False

# Disable Telnet Console (enabled by default)
#TELNETCONSOLE_ENABLED = False

# Override the default request headers:
#DEFAULT_REQUEST_HEADERS = {
#   'Accept': 'text/html,application/xhtml+xml,application/xml;q=0.9,*/*;q=0.8',
#   'Accept-Language': 'en',
#}

# Enable or disable spider middlewares
# See http://scrapy.readthedocs.org/en/latest/topics/spider-middleware.html
#SPIDER_MIDDLEWARES = {
#    'tencert.middlewares.TencertSpiderMiddleware': 543,
#}

# Enable or disable downloader middlewares
# See http://scrapy.readthedocs.org/en/latest/topics/downloader-middleware.html
#DOWNLOADER_MIDDLEWARES = {
#    'tencert.middlewares.MyCustomDownloaderMiddleware': 543,
#}

# Enable or disable extensions
# See http://scrapy.readthedocs.org/en/latest/topics/extensions.html
#EXTENSIONS = {
#    'scrapy.extensions.telnet.TelnetConsole': None,
#}

# Configure item pipelines
# See http://scrapy.readthedocs.org/en/latest/topics/item-pipeline.html
ITEM_PIPELINES = {
   'tencert.pipelines.TencertPipeline': 300,
}

# Enable and configure the AutoThrottle extension (disabled by default)
# See http://doc.scrapy.org/en/latest/topics/autothrottle.html
#AUTOTHROTTLE_ENABLED = True
# The initial download delay
#AUTOTHROTTLE_START_DELAY = 5
# The maximum download delay to be set in case of high latencies
#AUTOTHROTTLE_MAX_DELAY = 60
# The average number of requests Scrapy should be sending in parallel to
# each remote server
#AUTOTHROTTLE_TARGET_CONCURRENCY = 1.0
# Enable showing throttling stats for every response received:
#AUTOTHROTTLE_DEBUG = False

# Enable and configure HTTP caching (disabled by default)
# See http://scrapy.readthedocs.org/en/latest/topics/downloader-middleware.html#httpcache-middleware-settings
#HTTPCACHE_ENABLED = True
#HTTPCACHE_EXPIRATION_SECS = 0
#HTTPCACHE_DIR = 'httpcache'
#HTTPCACHE_IGNORE_HTTP_CODES = []
#HTTPCACHE_STORAGE = 'scrapy.extensions.httpcache.FilesystemCacheStorage'
注意:
a. 需要在配置文件中开启管道
b. 需要在配置文件中关闭ROBOTSTXT_OBEY 或指定ROBOTSTXT_OBEY = False
7.运行spider程序
scrapy crawl tencert_hr
应用2,使用scrapy爬取手机端动态ajax页面的图片数据,并通过图片管道下载图片到本地,并重命名
1. 创建scrapy项目
scrapy startproject douyu
2. 生成spider程序
cd douyu
scrapy genspider douyu_girl
3. 定义item字段
# -*- coding: utf-8 -*-

import scrapy

class DouyuItem(scrapy.Item):
    nickname = scrapy.Field()
    imageurl = scrapy.Field()
    city = scrapy.Field()
4. 编写spider程序
# -*- coding: utf-8 -*-
import scrapy
import json

from douyu.items import DouyuItem

class DouyuGirlSpider(scrapy.Spider):
    name = 'douyu_girl'
    allowed_domains = ['douyucdn.cn']

    base_url = 'http://capi.douyucdn.cn/api/v1/getVerticalroom?limit=20&offset='
    offset = 0
    start_urls = [base_url + str(offset)]

    def parse(self, response):
        girl_list = json.loads(response.body)['data']
        if(len(girl_list) == 0):
            return
        for girl in girl_list:
            item = DouyuItem()
            item['imageurl'] = girl['vertical_src']
            item['nickname'] = girl['nickname']
            item['city'] = girl['anchor_city']

            yield item

        self.offset += 20
        url = self.base_url + str(self.offset)
        yield scrapy.Request(url, callback=self.parse)
5. 编写管道处理程序
# -*- coding: utf-8 -*-
import scrapy
import os

from douyu.settings import IMAGES_STORE
from scrapy.pipelines.images import ImagesPipeline

class DouyuPipeline(ImagesPipeline):
    def get_media_requests(self, item, info):
        yield scrapy.Request(item['imageurl'])

    def item_completed(self, results, item, info):
        isok = results[0][0]
        if(isok):
            path = results[0][1]['path']
            nickname = item['nickname']
            city = item['city']
            old_path = IMAGES_STORE + path
            new_path = IMAGES_STORE + nickname + "_" + city + ".jpg"
            os.rename(old_path, new_path)
        return item
注意:
a. 图片的下载直接使用ImagePipeline管道类, 可直接在get_media_requests(self, item, info) 方法中下载图片;
直接在item_completed(self, results, item, info): 方法中重命名图片
b. 涉及图片需要python安装pillow模块, 没有安装会报错:
ModuleNotFoundError: No module named 'PIL'
则使用pip install pil 提示没有该模块
查资料发现pil已被pillow代替,则使用pip install pillow 问题解决
6. 修改配置文件
# -*- coding: utf-8 -*-

BOT_NAME = 'douyu'

SPIDER_MODULES = ['douyu.spiders']
NEWSPIDER_MODULE = 'douyu.spiders'

# Crawl responsibly by identifying yourself (and your website) on the user-agent
#USER_AGENT = 'douyu (+http://www.yourdomain.com)'

# Obey robots.txt rules
ROBOTSTXT_OBEY = False

IMAGES_STORE = "D:/test/scrapy/douyu/images/"

USER_AGENT = "Mozilla/5.0 (Linux; U; Android 2.3.7; en-us; Nexus One Build/FRF91) AppleWebKit/533.1 (KHTML, like Gecko) Version/4.0 Mobile Safari/533.1"

# Configure maximum concurrent requests performed by Scrapy (default: 16)
#CONCURRENT_REQUESTS = 32

# Configure a delay for requests for the same website (default: 0)
# See http://scrapy.readthedocs.org/en/latest/topics/settings.html#download-delay
# See also autothrottle settings and docs
#DOWNLOAD_DELAY = 3
# The download delay setting will honor only one of:
#CONCURRENT_REQUESTS_PER_DOMAIN = 16
#CONCURRENT_REQUESTS_PER_IP = 16

# Disable cookies (enabled by default)
#COOKIES_ENABLED = False

# Disable Telnet Console (enabled by default)
#TELNETCONSOLE_ENABLED = False

# Override the default request headers:
#DEFAULT_REQUEST_HEADERS = {
#   'Accept': 'text/html,application/xhtml+xml,application/xml;q=0.9,*/*;q=0.8',
#   'Accept-Language': 'en',
#}

# Enable or disable spider middlewares
# See http://scrapy.readthedocs.org/en/latest/topics/spider-middleware.html
#SPIDER_MIDDLEWARES = {
#    'douyu.middlewares.DouyuSpiderMiddleware': 543,
#}

# Enable or disable downloader middlewares
# See http://scrapy.readthedocs.org/en/latest/topics/downloader-middleware.html
#DOWNLOADER_MIDDLEWARES = {
#    'douyu.middlewares.MyCustomDownloaderMiddleware': 543,
#}

# Enable or disable extensions
# See http://scrapy.readthedocs.org/en/latest/topics/extensions.html
#EXTENSIONS = {
#    'scrapy.extensions.telnet.TelnetConsole': None,
#}

# Configure item pipelines
# See http://scrapy.readthedocs.org/en/latest/topics/item-pipeline.html
ITEM_PIPELINES = {
   'douyu.pipelines.DouyuPipeline': 300,
}

# Enable and configure the AutoThrottle extension (disabled by default)
# See http://doc.scrapy.org/en/latest/topics/autothrottle.html
#AUTOTHROTTLE_ENABLED = True
# The initial download delay
#AUTOTHROTTLE_START_DELAY = 5
# The maximum download delay to be set in case of high latencies
#AUTOTHROTTLE_MAX_DELAY = 60
# The average number of requests Scrapy should be sending in parallel to
# each remote server
#AUTOTHROTTLE_TARGET_CONCURRENCY = 1.0
# Enable showing throttling stats for every response received:
#AUTOTHROTTLE_DEBUG = False

# Enable and configure HTTP caching (disabled by default)
# See http://scrapy.readthedocs.org/en/latest/topics/downloader-middleware.html#httpcache-middleware-settings
#HTTPCACHE_ENABLED = True
#HTTPCACHE_EXPIRATION_SECS = 0
#HTTPCACHE_DIR = 'httpcache'
#HTTPCACHE_IGNORE_HTTP_CODES = []
#HTTPCACHE_STORAGE = 'scrapy.extensions.httpcache.FilesystemCacheStorage'
注意:
a. 这里的请求url返回的是json,这是手机端的ajax请求,需要模拟手机浏览器发出请求,即使用user_agent, 直接在配置文件中配置USER_AGENT常量
b. 开启了使用ImagePipeline则需要在配置文件中指定图片存放目录, 直接在配置文件中定义常量IMAGES_STORE
7. 运行spider程序
scrapy crawl douyu_girl
应用3,使用scrapy爬取易网财经的所有上市公司的财务报表
对易网财经的网站进行分析,易网财经的报表url为:
http://quotes.money.163.com/hs/marketdata/service/cwsd.php?host=/hs/marketdata/service/cwsd.php&page=10&query=date:2017-06-30&fields=NO,SYMBOL,SNAME,PUBLISHDATE,MFRATIO28,MFRATIO18,MFRATIO20,MFRATIO10,MFRATIO4,MFRATIO2,MFRATIO12,MFRATIO23,MFRATIO25,MFRATIO24,MFRATIO122&sort=MFRATIO28&order=desc&count=25&type=query&initData=[object%20Object]&callback=callback_1488472914&req=31556
其中page为页面分页编号, page=0为第一页
步骤:
1. 创建scrapy项目
项目名称为yimoney
scrapy startproject yimoney
2. 创建spider程序
spider名称为yimoney_account
cd yimoney
scrapy genspider yimongy_account "quotes.money.163.com"
3. 定义item数据结构
# -*- coding: utf-8 -*-

import scrapy

class YimoneyItem(scrapy.Item):
    # 股票代码
    symbol = scrapy.Field()
    # 股票名称
    sname = scrapy.Field()
    # 报告日期
    publishdate = scrapy.Field()
    # 基本每股收益
    income_one = scrapy.Field()
    # 每股净资产
    income_one_clean = scrapy.Field()
    # 每股经营现金流
    cash_one = scrapy.Field()
    # 主营业务收入(万元)
    income_main = scrapy.Field()
    # 主营业务利润(万元)
    profit_main = scrapy.Field()
    # 净利润(万元)
    profit_clean = scrapy.Field()
    # 总资产(万元)
    property_all = scrapy.Field()
    # 流动资产(万元)
    property_flow = scrapy.Field()
    # 总负债(万元)
    debt_all = scrapy.Field()
    # 流动负债(万元)
    debt_flow = scrapy.Field()
    # 净资产(万元)
    property_clean = scrapy.Field()
4. 编写spider程序
# -*- coding: utf-8 -*-
import scrapy
import json

from yimoney.items import YimoneyItem

class YimongyAccountSpider(scrapy.Spider):
    name = 'yimongy_account'
    allowed_domains = ['quotes.money.163.com']

    page = 0
    account_url = 'http://quotes.money.163.com/hs/marketdata/service/cwsd.php?host=/hs/marketdata/service/cwsd.php&page=' \
                  + str(page) + \
                  '&query=date:2017-06-30&fields=NO,SYMBOL,SNAME,PUBLISHDATE,MFRATIO28,MFRATIO18,MFRATIO20,MFRATIO10,MFRATIO4,MFRATIO2,MFRATIO12,MFRATIO23,MFRATIO25,MFRATIO24,MFRATIO122&sort=MFRATIO28&order=desc&count=25&type=query&initData=[object%20Object]&callback=callback_1488472914&req=31556'
    start_urls = [account_url]

    def parse(self, response):
        data_dict = response.body[20:-1].decode('UTF-8')
        list = dict(json.loads(data_dict))['list']
        if(len(list) == 0):
            return
        for one in list:
            item = YimoneyItem()

            item['symbol'] = one['SYMBOL']
            item['sname'] = one['SNAME']
            item['publishdate'] = one['PUBLISHDATE']

            if 'MFRATIO28' in one:
                item['income_one'] = one['MFRATIO28']
            else:
                item['income_one'] = ''

            if 'MFRATIO18' in one:
                item['income_one_clean'] = one['MFRATIO18']
            else:
                item['income_one_clean'] = ''

            if 'MFRATIO20' in one:
                item['cash_one'] = one['MFRATIO20']
            else:
                item['cash_one'] = ''

            item['income_main'] = one['MFRATIO10']
            if 'MFRATIO10' in one:
                item['income_main'] = one['MFRATIO10']
            else:
                item['income_main'] = ''

            item['profit_main'] = one['MFRATIO4']
            if 'MFRATIO4' in one:
                item['profit_main'] = one['MFRATIO4']
            else:
                item['profit_main'] = ''

            item['profit_clean'] = one['MFRATIO2']
            if 'MFRATIO2' in one:
                item['profit_clean'] = one['MFRATIO2']
            else:
                item['profit_clean'] = ''

            item['property_all'] = one['MFRATIO12']
            if 'MFRATIO12' in one:
                item['property_all'] = one['MFRATIO12']
            else:
                item['property_all'] = ''

            item['property_flow'] = one['MFRATIO23']
            if 'MFRATIO23' in one:
                item['property_flow'] = one['MFRATIO23']
            else:
                item['property_flow'] = ''

            item['debt_all'] = one['MFRATIO25']
            if 'MFRATIO25' in one:
                item['debt_all'] = one['MFRATIO25']
            else:
                item['debt_all'] = ''

            item['debt_flow'] = one['MFRATIO24']
            if 'MFRATIO24' in one:
                item['debt_flow'] = one['MFRATIO24']
            else:
                item['debt_flow'] = ''

            item['property_clean'] = one['MFRATIO122']
            if 'MFRATIO122' in one:
                item['property_clean'] = one['MFRATIO122']
            else:
                item['property_clean'] = ''

            yield item

        self.page += 1
        url = account_url = 'http://quotes.money.163.com/hs/marketdata/service/cwsd.php?host=/hs/marketdata/service/cwsd.php&page=' \
                  + str(self.page) + \
                  '&query=date:2017-06-30&fields=NO,SYMBOL,SNAME,PUBLISHDATE,MFRATIO28,MFRATIO18,MFRATIO20,MFRATIO10,MFRATIO4,MFRATIO2,MFRATIO12,MFRATIO23,MFRATIO25,MFRATIO24,MFRATIO122&sort=MFRATIO28&order=desc&count=25&type=query&initData=[object%20Object]&callback=callback_1488472914&req=31556'
        yield scrapy.Request(url, callback=self.parse)
5. 编写管道处理程序
# -*- coding: utf-8 -*-

import json

class YimoneyPipeline(object):
    def __init__(self):
        self.f = open("data.josn", "w", encoding="UTF-8")

    def process_item(self, item, spider):
        json_str = json.dumps(dict(item), ensure_ascii=False)
        self.f.write(json_str + ",\r\n")
        return item

    def close_spider(self, spider):
        self.f.close()
6. 修改配置文件
# -*- coding: utf-8 -*-

BOT_NAME = 'yimoney'

SPIDER_MODULES = ['yimoney.spiders']
NEWSPIDER_MODULE = 'yimoney.spiders'

# Crawl responsibly by identifying yourself (and your website) on the user-agent
#USER_AGENT = 'yimoney (+http://www.yourdomain.com)'

# Obey robots.txt rules
ROBOTSTXT_OBEY = False

# Configure maximum concurrent requests performed by Scrapy (default: 16)
#CONCURRENT_REQUESTS = 32

# Configure a delay for requests for the same website (default: 0)
# See http://scrapy.readthedocs.org/en/latest/topics/settings.html#download-delay
# See also autothrottle settings and docs
#DOWNLOAD_DELAY = 3
# The download delay setting will honor only one of:
#CONCURRENT_REQUESTS_PER_DOMAIN = 16
#CONCURRENT_REQUESTS_PER_IP = 16

# Disable cookies (enabled by default)
#COOKIES_ENABLED = False

# Disable Telnet Console (enabled by default)
#TELNETCONSOLE_ENABLED = False

# Override the default request headers:
#DEFAULT_REQUEST_HEADERS = {
#   'Accept': 'text/html,application/xhtml+xml,application/xml;q=0.9,*/*;q=0.8',
#   'Accept-Language': 'en',
#}

# Enable or disable spider middlewares
# See http://scrapy.readthedocs.org/en/latest/topics/spider-middleware.html
#SPIDER_MIDDLEWARES = {
#    'yimoney.middlewares.YimoneySpiderMiddleware': 543,
#}

# Enable or disable downloader middlewares
# See http://scrapy.readthedocs.org/en/latest/topics/downloader-middleware.html
#DOWNLOADER_MIDDLEWARES = {
#    'yimoney.middlewares.MyCustomDownloaderMiddleware': 543,
#}

# Enable or disable extensions
# See http://scrapy.readthedocs.org/en/latest/topics/extensions.html
#EXTENSIONS = {
#    'scrapy.extensions.telnet.TelnetConsole': None,
#}

# Configure item pipelines
# See http://scrapy.readthedocs.org/en/latest/topics/item-pipeline.html
ITEM_PIPELINES = {
   'yimoney.pipelines.YimoneyPipeline': 300,
}

# Enable and configure the AutoThrottle extension (disabled by default)
# See http://doc.scrapy.org/en/latest/topics/autothrottle.html
#AUTOTHROTTLE_ENABLED = True
# The initial download delay
#AUTOTHROTTLE_START_DELAY = 5
# The maximum download delay to be set in case of high latencies
#AUTOTHROTTLE_MAX_DELAY = 60
# The average number of requests Scrapy should be sending in parallel to
# each remote server
#AUTOTHROTTLE_TARGET_CONCURRENCY = 1.0
# Enable showing throttling stats for every response received:
#AUTOTHROTTLE_DEBUG = False

# Enable and configure HTTP caching (disabled by default)
# See http://scrapy.readthedocs.org/en/latest/topics/downloader-middleware.html#httpcache-middleware-settings
#HTTPCACHE_ENABLED = True
#HTTPCACHE_EXPIRATION_SECS = 0
#HTTPCACHE_DIR = 'httpcache'
#HTTPCACHE_IGNORE_HTTP_CODES = []
#HTTPCACHE_STORAGE = 'scrapy.extensions.httpcache.FilesystemCacheStorage'
7. 运行spider程序
scrapy crawl yimongy_account
Scrapy网络爬虫框架的开发使用的更多相关文章
- 一篇文章教会你理解Scrapy网络爬虫框架的工作原理和数据采集过程
今天小编给大家详细的讲解一下Scrapy爬虫框架,希望对大家的学习有帮助. 1.Scrapy爬虫框架 Scrapy是一个使用Python编程语言编写的爬虫框架,任何人都可以根据自己的需求进行修改,并且 ...
- 网络爬虫框架Scrapy简介
作者: 黄进(QQ:7149101) 一. 网络爬虫 网络爬虫(又被称为网页蜘蛛,网络机器人),是一种按照一定的规则,自动地抓取万维网信息的程序或者脚本:它是一个自动提取网页的程序,它为搜索引擎从万维 ...
- Golang 网络爬虫框架gocolly/colly 四
Golang 网络爬虫框架gocolly/colly 四 爬虫靠演技,表演得越像浏览器,抓取数据越容易,这是我多年爬虫经验的感悟.回顾下个人的爬虫经历,共分三个阶段:第一阶段,09年左右开始接触爬虫, ...
- Golang 网络爬虫框架gocolly/colly 三
Golang 网络爬虫框架gocolly/colly 三 熟悉了<Golang 网络爬虫框架gocolly/colly一>和<Golang 网络爬虫框架gocolly/colly二& ...
- Golang 网络爬虫框架gocolly/colly 二 jQuery selector
Golang 网络爬虫框架gocolly/colly 二 jQuery selector colly框架依赖goquery库,goquery将jQuery的语法和特性引入到了go语言中.如果要灵活自如 ...
- Golang 网络爬虫框架gocolly/colly 一
Golang 网络爬虫框架gocolly/colly 一 gocolly是用go实现的网络爬虫框架,目前在github上具有3400+星,名列go版爬虫程序榜首.gocolly快速优雅,在单核上每秒可 ...
- Golang 网络爬虫框架gocolly/colly 五 获取动态数据
Golang 网络爬虫框架gocolly/colly 五 获取动态数据 gcocolly+goquery可以非常好地抓取HTML页面中的数据,但碰到页面是由Javascript动态生成时,用goque ...
- 基于java的网络爬虫框架(实现京东数据的爬取,并将插入数据库)
原文地址http://blog.csdn.net/qy20115549/article/details/52203722 本文为原创博客,仅供技术学习使用.未经允许,禁止将其复制下来上传到百度文库等平 ...
- [原创]一款基于Reactor线程模型的java网络爬虫框架
AJSprider 概述 AJSprider是笔者基于Reactor线程模式+Jsoup+HttpClient封装的一款轻量级java多线程网络爬虫框架,简单上手,小白也能玩爬虫, 使用本框架,只需要 ...
随机推荐
- pytorch学习-WHAT IS PYTORCH
参考:https://pytorch.org/tutorials/beginner/blitz/tensor_tutorial.html#sphx-glr-beginner-blitz-tensor- ...
- 2018.11.10 FCC java分享大会
一.<android热修复背后的java技术> 1.类是如何被jvm加载的 (1)由类加载器加载 (2)类加载器分类,基于双亲委派原则(建议) (3)关键代码 先去判断是否已经加载,如果没 ...
- 深入剖析kafka架构内部原理
1 概述 Kakfa起初是由LinkedIn公司开发的一个分布式的消息系统,后成为Apache的一部分,它使用Scala编写,以可水平扩展和高吞吐率而被广泛使用.目前越来越多的开源分布式处理系统如Cl ...
- python:unittest之跳过测试和预期失败的用例
在利用单元测试框架执行测试用例的过程中,有时只需要执行一部分用例,或者跳过某些暂不需要执行的用例,python的unittest框架就内置这样的功能. 前面的博客介绍了unittest框架的测试用例加 ...
- adaboost-笔记(1)
1 - 加法模型 加法模型,就是通过训练集不断的得到不同的分类器(回归),然后将这些分类器组合成一个新的分类器的过程. 假设有\(N\)个样本,且我们的加法模型如下: \[f(x)=\sum_{m=1 ...
- kafka模型理解
1.消息发送至一个topic,而这个topic可以由多个partition组成,每条消息在partition中的位置称为offset 2.消息存在有效期,如果设置为2天,则消息2天后会被删除 3.每个 ...
- JavaEE学习之Maven配置文件pom.xml详解(转)
一.引言 (本文转载自:http://blog.csdn.net/longeremmy/article/details/9670619) 使用maven有一些时间了,一直没有好好将pom配置文件每个节 ...
- 高效、易用、功能强大的 api 管理平台
前言导读 实际环境的需求可以说是:只有你没想到,没有实现不了的,征对于目前实际开发.测试.生产等环境中,需要用到各类的接口可达几十.甚至上百个,因此,必须需要一个统一管理的工具平台来统一管理这类接口, ...
- DSL 系列(1) - 扩展点的论述与实现
前言 DSL 全称为 domain-specific language(领域特定语言),本系列应当会很长,其中包含些许不成熟的想法,欢迎私信指正. 1. DSL 简述 我理解的 DSL 的主要职能是 ...
- Java Arrays工具类的使用
Arrays 类 java.util.Arrays类能方便地操作数组,它提供的所有方法都是静态的.具有以下功能: 给数组赋值:通过fill方法. 对数组排序:通过sort方法,按升序. 比较数组:通过 ...