自定义分页及Cookie、Session机制
分页
自定义分页
- data = []
- , ):
- tmp = {"id": i, "name": "alex-{}".format(i)}
- data.append(tmp)
- print(data)
- def user_list(request):
- # user_list = data[:]
- # user_list = data[:]
- try:
- current_page = int(request.GET.get("page"))
- except Exception as e:
- current_page =
- per_page =
- # 数据总条数
- total_count = len(data)
- # 总页码
- total_page, more = divmod(total_count, per_page)
- if more:
- total_page +=
- # 页面最多显示多少个页码
- max_show =
- half_show = )/)
- if current_page <= half_show:
- show_start =
- show_end = max_show
- else:
- if current_page + half_show >= total_page:
- show_start = total_page - max_show
- show_end = total_page
- else:
- show_start = current_page - half_show
- show_end = current_page + half_show
- # 数据库中获取数据
- data_start = (current_page - ) * per_page
- data_end = current_page * per_page
- user_list = data[data_start:data_end]
- # 生成页面上显示的页码
- page_html_list = []
- # 加首页
- first_li = '<li><a href="/user_list/?page=1">首页</a></li>'
- page_html_list.append(first_li)
- # 加上一页
- :
- prev_li = '<li><a href="#">上一页</a></li>'
- else:
- prev_li = )
- page_html_list.append(prev_li)
- ):
- if i == current_page:
- li_tag = '<li class="active"><a href="/user_list/?page={0}">{0}</a></li>'.format(i)
- else:
- li_tag = '<li><a href="/user_list/?page={0}">{0}</a></li>'.format(i)
- page_html_list.append(li_tag)
- # 加下一页
- if current_page == total_page:
- next_li = '<li><a href="#">下一页</a></li>'
- else:
- next_li = )
- page_html_list.append(next_li)
- # 加尾页
- page_end_li = '<li><a href="/user_list/?page={}">尾页</a></li>'.format(total_page)
- page_html_list.append(page_end_li)
- page_html = "".join(page_html_list)
- return render(request, "user_list.html", {"user_list": user_list, "page_html": page_html})
稳扎稳打版
- class Pagination(object):
- def __init__(self, current_page, total_count, base_url, per_page=, max_show=):
- """
- :param current_page: 当前页
- :param total_count: 数据库中数据总数
- :param per_page: 每页显示多少条数据
- :param max_show: 最多显示多少页
- """
- try:
- current_page = int(current_page)
- except Exception as e:
- current_page =
- self.current_page = current_page
- self.total_count = total_count
- self.base_url = base_url
- self.per_page = per_page
- self.max_show = max_show
- # 总页码
- total_page, more = divmod(total_count, per_page)
- if more:
- total_page +=
- half_show = ) / )
- self.half_show = half_show
- self.total_page = total_page
- @property
- def start(self):
- ) * self.per_page
- @property
- def end(self):
- return self.current_page * self.per_page
- def page_html(self):
- if self.current_page <= self.half_show:
- show_start =
- show_end = self.max_show
- else:
- if self.current_page + self.half_show >= self.total_page:
- show_start = self.total_page - self.max_show
- show_end = self.total_page
- else:
- show_start = self.current_page - self.half_show
- show_end = self.current_page + self.half_show
- # 生成页面上显示的页码
- page_html_list = []
- # 加首页
- first_li = '<li><a href="{}?page=1">首页</a></li>'.format(self.base_url)
- page_html_list.append(first_li)
- # 加上一页
- :
- prev_li = '<li><a href="#">上一页</a></li>'
- else:
- prev_li = )
- page_html_list.append(prev_li)
- ):
- if i == self.current_page:
- li_tag = '<li class="active"><a href="{0}?page={1}">{1}</a></li>'.format(self.base_url, i)
- else:
- li_tag = '<li><a href="{0}?page={1}">{1}</a></li>'.format(self.base_url, i)
- page_html_list.append(li_tag)
- # 加下一页
- if self.current_page == self.total_page:
- next_li = '<li><a href="#">下一页</a></li>'
- else:
- next_li = )
- page_html_list.append(next_li)
- # 加尾页
- page_end_li = '<li><a href="{0}?page={1}">尾页</a></li>'.format(self.base_url, self.total_page)
- page_html_list.append(page_end_li)
- return "".join(page_html_list)
封装保存版
- def user_list(request):
- pager = Pagination(request.GET.get("page"), len(data), request.path_info)
- user_list = data[pager.start:pager.end]
- page_html = pager.page_html()
- return render(request, "user_list.html", {"user_list": user_list, "page_html": page_html})
封装使用指南
Django内置分页
- from django.shortcuts import render
- from django.core.paginator import Paginator, EmptyPage, PageNotAnInteger
- L = []
- ):
- L.append(i)
- def index(request):
- current_page = request.GET.get('p')
- paginator = Paginator(L, )
- # per_page: 每页显示条目数量
- # count: 数据总个数
- # num_pages:总页数
- # page_range:总页数的索引范围,如: (,),(,)
- # page: page对象
- try:
- posts = paginator.page(current_page)
- # has_next 是否有下一页
- # next_page_number 下一页页码
- # has_previous 是否有上一页
- # previous_page_number 上一页页码
- # object_list 分页之后的数据列表
- # number 当前页
- # paginator paginator对象
- except PageNotAnInteger:
- posts = paginator.page()
- except EmptyPage:
- posts = paginator.page(paginator.num_pages)
- return render(request, 'index.html', {'posts': posts})
内置分页view部分
- <!DOCTYPE html>
- <html>
- <head lang="en">
- <meta charset="UTF-8">
- <title></title>
- </head>
- <body>
- <ul>
- {% for item in posts %}
- <li>{{ item }}</li>
- {% endfor %}
- </ul>
- <div class="pagination">
- <span class="step-links">
- {% if posts.has_previous %}
- <a href="?p={{ posts.previous_page_number }}">Previous</a>
- {% endif %}
- <span class="current">
- Page {{ posts.number }} of {{ posts.paginator.num_pages }}.
- </span>
- {% if posts.has_next %}
- <a href="?p={{ posts.next_page_number }}">Next</a>
- {% endif %}
- </span>
- </div>
- </body>
- </html>
内置分页HTML部分
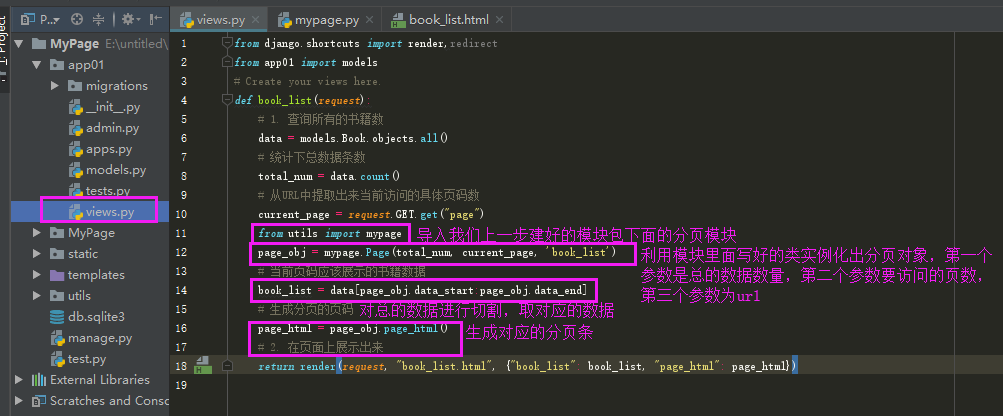
自定义分页具体使用方法
Django给我们提供的分页并不是很理想,以后遇到分页的问题,可以直接使用我们自定义写好的分页系统,也就是我们自定义写的分页系统就算你不会写,也没有关系,我们只需要能掌握怎么用即可,敬遵一句话:'能复制粘贴的绝对不会动手去写!!!'。


cookie
先声明一下,学cookie不需要你具体掌握代码如何编写,因为现在基本都是session与cookie配合使用,也就是说一定要会session,学cookie更注重由来和概念
Cookie的由来
大家都知道HTTP协议是无状态的。
无状态的意思是每次请求都是独立的,它的执行情况和结果与前面的请求和之后的请求都无直接关系,它不会受前面的请求响应情况直接影响,也不会直接影响后面的请求响应情况。
一句有意思的话来描述就是人生只如初见,对服务器来说,每次的请求都是全新的。
状态可以理解为客户端和服务器在某次会话中产生的数据,那无状态的就以为这些数据不会被保留。会话中产生的数据又是我们需要保存的,也就是说要“保持状态”。因此Cookie就是在这样一个场景下诞生。
什么是Cookie
Cookie具体指的是一段小信息,它是服务器发送出来存储在浏览器上的一组组键值对,下次访问服务器时浏览器会自动携带这些键值对,以便服务器提取有用信息。
Cookie的原理
cookie的工作原理是:由服务器产生内容,浏览器收到请求后保存在本地;当浏览器再次访问时,浏览器会自动带上Cookie,这样服务器就能通过Cookie的内容来判断这个是“谁”了。
查看Cookie
我们使用Chrome浏览器,打开开发者工具。

Django中操作Cookie
获取Cookie
- request.COOKIES['key']
- request.get_signed_cookie(key, default=RAISE_ERROR, salt='', max_age=None)
参数:
- default: 默认值
- salt: 加密盐
- max_age: 后台控制过期时间
设置Cookie
- rep = HttpResponse(...)
- rep = render(request, ...)
- rep.set_cookie(key,value,...)
- rep.set_signed_cookie(key,value,salt='加密盐',...)
参数:
- key, 键
- value='', 值
- max_age=None, 超时时间
- expires=None, 超时时间(IE requires expires, so set it if hasn't been already.)
- path='/', Cookie生效的路径,/ 表示根路径,特殊的:根路径的cookie可以被任何url的页面访问
- domain=None, Cookie生效的域名
- secure=False, https传输
- httponly=False 只能http协议传输,无法被JavaScript获取(不是绝对,底层抓包可以获取到也可以被覆盖)
删除Cookie
- def logout(request):
- rep = redirect("/login/")
- rep.delete_cookie("user") # 删除用户浏览器上之前设置的usercookie值
- return rep
Cookie版登陆校验
- def check_login(func):
- @wraps(func)
- def inner(request, *args, **kwargs):
- next_url = request.get_full_path()
- if request.get_signed_cookie("login", salt="SSS", default=None) == "yes":
- # 已经登录的用户...
- return func(request, *args, **kwargs)
- else:
- # 没有登录的用户,跳转刚到登录页面
- return redirect("/login/?next={}".format(next_url))
- return inner
- def login(request):
- if request.method == "POST":
- username = request.POST.get("username")
- passwd = request.POST.get("password")
- if username == "xxx" and passwd == "dashabi":
- next_url = request.GET.get("next")
- if next_url and next_url != "/logout/":
- response = redirect(next_url)
- else:
- response = redirect("/class_list/")
- response.set_signed_cookie("login", "yes", salt="SSS")
- return response
- return render(request, "login.html")
cookie版登录
Session
Session的由来
Cookie虽然在一定程度上解决了“保持状态”的需求,但是由于Cookie本身最大支持4096字节,以及Cookie本身保存在客户端,可能被拦截或窃取,因此就需要有一种新的东西,它能支持更多的字节,并且他保存在服务器,有较高的安全性。这就是Session。
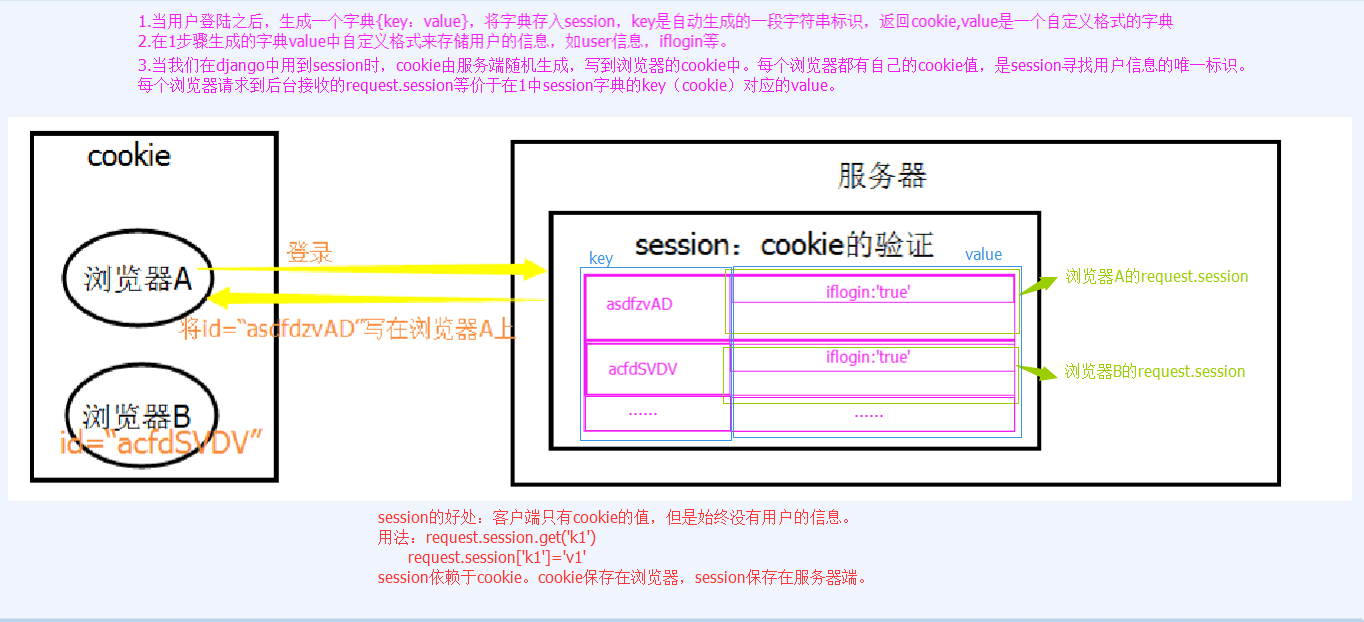
问题来了,基于HTTP协议的无状态特征,服务器根本就不知道访问者是“谁”。那么上述的Cookie就起到桥接的作用。
我们可以给每个客户端的Cookie分配一个唯一的id,这样用户在访问时,通过Cookie,服务器就知道来的人是“谁”。然后我们再根据不同的Cookie的id,在服务器上保存一段时间的私密资料,如“账号密码”等等。
总结而言:Cookie弥补了HTTP无状态的不足,让服务器知道来的人是“谁”;但是Cookie以文本的形式保存在本地,自身安全性较差;所以我们就通过Cookie识别不同的用户,对应的在Session里保存私密的信息以及超过4096字节的文本。
另外,上述所说的Cookie和Session其实是共通性的东西,不限于语言和框架。
Django中Session相关方法
- # 获取、设置、删除Session中数据
- request.session['k1']
- request.session.get('k1',None)
- request.session[
- request.session.setdefault() # 存在则不设置
- del request.session['k1']
- # 所有 键、值、键值对
- request.session.keys()
- request.session.values()
- request.session.items()
- request.session.iterkeys()
- request.session.itervalues()
- request.session.iteritems()
- # 会话session的key
- request.session.session_key
- # 将所有Session失效日期小于当前日期的数据删除
- request.session.clear_expired()
- # 检查会话session的key在数据库中是否存在
- request.session.exists("session_key")
- # 删除当前会话的所有Session数据
- request.session.delete()
- # 删除当前的会话数据并删除会话的Cookie。
- request.session.flush()
- 这用于确保前面的会话数据不可以再次被用户的浏览器访问
- 例如,django.contrib.auth.logout() 函数中就会调用它。
- # 设置会话Session和Cookie的超时时间
- request.session.set_expiry(value)
- * 如果value是个整数,session会在些秒数后失效。
- * 如果value是个datatime或timedelta,session就会在这个时间后失效。
- * 如果value是0,用户关闭浏览器session就会失效。
- * 如果value是None,session会依赖全局session失效策略。
Session流程解析

Session版登陆验证
- from functools import wraps
- def check_login(func):
- @wraps(func)
- def inner(request, *args, **kwargs):
- next_url = request.get_full_path()
- if request.session.get("user"):
- return func(request, *args, **kwargs)
- else:
- return redirect("/login/?next={}".format(next_url))
- return inner
- def login(request):
- if request.method == "POST":
- user = request.POST.get("user")
- pwd = request.POST.get("pwd")
- if user == "alex" and pwd == "alex1234":
- # 设置session
- request.session["user"] = user
- # 获取跳到登陆页面之前的URL
- next_url = request.GET.get("next")
- # 如果有,就跳转回登陆之前的URL
- if next_url:
- return redirect(next_url)
- # 否则默认跳转到index页面
- else:
- return redirect("/index/")
- return render(request, "login.html")
- @check_login
- def logout(request):
- # 删除所有当前请求相关的session
- request.session.delete()
- return redirect("/login/")
- @check_login
- def index(request):
- current_user = request.session.get("user", None)
- return render(request, "index.html", {"user": current_user})
Session版登录验证
Session示例讲解


CBV版本


Django中的Session配置
Django中默认支持Session,其内部提供了5种类型的Session供开发者使用。
- . 数据库Session
- SESSION_ENGINE = 'django.contrib.sessions.backends.db' # 引擎(默认)
- . 缓存Session
- SESSION_ENGINE = 'django.contrib.sessions.backends.cache' # 引擎
- SESSION_CACHE_ALIAS = 'default' # 使用的缓存别名(默认内存缓存,也可以是memcache),此处别名依赖缓存的设置
- . 文件Session
- SESSION_ENGINE = 'django.contrib.sessions.backends.file' # 引擎
- SESSION_FILE_PATH = None # 缓存文件路径,如果为None,则使用tempfile模块获取一个临时地址tempfile.gettempdir()
- . 缓存+数据库
- SESSION_ENGINE = 'django.contrib.sessions.backends.cached_db' # 引擎
- . 加密Cookie Session
- SESSION_ENGINE = 'django.contrib.sessions.backends.signed_cookies' # 引擎
- 其他公用设置项:
- SESSION_COOKIE_NAME = "sessionid" # Session的cookie保存在浏览器上时的key,即:sessionid=随机字符串(默认)
- SESSION_COOKIE_PATH = "/" # Session的cookie保存的路径(默认)
- SESSION_COOKIE_DOMAIN = None # Session的cookie保存的域名(默认)
- SESSION_COOKIE_SECURE = False # 是否Https传输cookie(默认)
- SESSION_COOKIE_HTTPONLY = True # 是否Session的cookie只支持http传输(默认)
- SESSION_COOKIE_AGE = # Session的cookie失效日期(2周)(默认)
- SESSION_EXPIRE_AT_BROWSER_CLOSE = False # 是否关闭浏览器使得Session过期(默认)
- SESSION_SAVE_EVERY_REQUEST = False # 是否每次请求都保存Session,默认修改之后才保存(默认)
Django中Session相关设置
CBV中加装饰器相关
CBV实现的登录视图
- class LoginView(View):
- def get(self, request):
- """
- 处理GET请求
- """
- return render(request, 'login.html')
- def post(self, request):
- """
- 处理POST请求
- """
- user = request.POST.get('user')
- pwd = request.POST.get('pwd')
- if user == 'alex' and pwd == "alex1234":
- next_url = request.GET.get("next")
- # 生成随机字符串
- # 写浏览器cookie -> session_id: 随机字符串
- # 写到服务端session:
- # {
- # "随机字符串": {'user':'alex'}
- # }
- request.session['user'] = user
- if next_url:
- return redirect(next_url)
- else:
- return redirect('/index/')
- return render(request, 'login.html')
要在CBV视图中使用我们上面的check_login装饰器,有以下三种方式:
from django.utils.decorators import method_decorator
1. 加在CBV视图的get或post方法上
- from django.utils.decorators import method_decorator
- class HomeView(View):
- def dispatch(self, request, *args, **kwargs):
- return super(HomeView, self).dispatch(request, *args, **kwargs)
- def get(self, request):
- return render(request, "home.html")
- @method_decorator(check_login)
- def post(self, request):
- print("Home View POST method...")
- return redirect("/index/")
2. 加在dispatch方法上
- from django.utils.decorators import method_decorator
- class HomeView(View):
- @method_decorator(check_login)
- def dispatch(self, request, *args, **kwargs):
- return super(HomeView, self).dispatch(request, *args, **kwargs)
- def get(self, request):
- return render(request, "home.html")
- def post(self, request):
- print("Home View POST method...")
- return redirect("/index/")
因为CBV中首先执行的就是dispatch方法,所以这么写相当于给get和post方法都加上了登录校验。
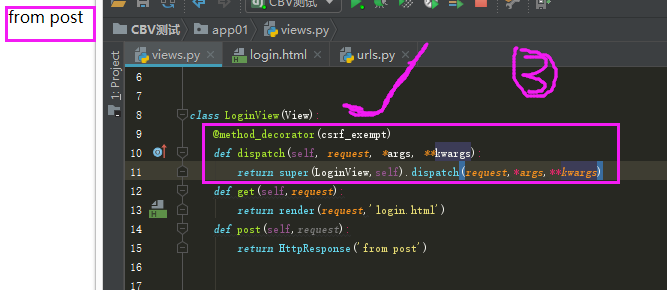
3. 直接加在视图类上,但method_decorator必须传 name 关键字参数
如果get方法和post方法都需要登录校验的话就写两个装饰器。
- from django.utils.decorators import method_decorator
- @method_decorator(check_login, name="get")
- @method_decorator(check_login, name="post")
- class HomeView(View):
- def dispatch(self, request, *args, **kwargs):
- return super(HomeView, self).dispatch(request, *args, **kwargs)
- def get(self, request):
- return render(request, "home.html")
- def post(self, request):
- print("Home View POST method...")
- return redirect("/index/")
补充
CSRF Token相关装饰器在CBV只能加到dispatch方法上
备注:
- csrf_protect,为当前函数强制设置防跨站请求伪造功能,即便settings中没有设置全局中间件。
- csrf_exempt,取消当前函数防跨站请求伪造功能,即便settings中设置了全局中间件。
- from django.views.decorators.csrf import csrf_exempt, csrf_protect
- class HomeView(View):
- @method_decorator(csrf_exempt)
- def dispatch(self, request, *args, **kwargs):
- return super(HomeView, self).dispatch(request, *args, **kwargs)
- def get(self, request):
- return render(request, "home.html")
- def post(self, request):
- print("Home View POST method...")
- return redirect("/index/")
针对CBV给方法加上是否需要csrf_token校验的功能装饰器的时候,有一个官方承认的bug,就是这个装饰器只有装在dispatch方法上才会生效


自定义分页及Cookie、Session机制的更多相关文章
- 【转】Cookie/Session机制详解
Cookie/Session机制详解 会话(Session)跟踪是Web程序中常用的技术,用来跟踪用户的整个会话.常用的会话跟踪技术是Cookie与Session.Cookie通过在客户端记录信息 ...
- Chrome的cookie放在哪里了,Cookie/Session机制详解
Chrome的cookie放在哪里了,Cookie/Session机制详解:https://blog.csdn.net/u010002184/article/details/82082951
- Cookie/Session机制详解
会话(Session)跟踪是Web程序中常用的技术,用来跟踪用户的整个会话.常用的会话跟踪技术是Cookie与Session.Cookie通过在客户端记录信息确定用户身份,Session通过在服务器端 ...
- Cookie/Session机制
这些都是基础知识,不过有必要做深入了解.先简单介绍一下. 二者的定义: 当你在浏览网站的时候,WEB 服务器会先送一小小资料放在你的计算机上,Cookie 会帮你在网站上所打的文字或是一些选择, 都纪 ...
- [转]Cookie/Session机制详解
原文地址:http://blog.csdn.net/fangaoxin/article/details/6952954 会话(Session)跟踪是Web程序中常用的技术,用来跟踪用户的整个会话.常用 ...
- Cookie/Session机制具体解释
会话(Session)跟踪是Web程序中经常使用的技术,用来跟踪用户的整个会话.经常使用的会话跟踪技术是Cookie与Session.Cookie通过在client记录信息确定用户身份,Session ...
- Cookie/Session机制详解(转载)
原文链接:http://blog.csdn.net/fangaoxin/article/details/6952954 会话(Session)跟踪是Web程序中常用的技术,用来跟踪用户的整个会话.常用 ...
- Cookie/Session机制详解(非原创)
会话(Session)跟踪是Web程序中常用的技术,用来跟踪用户的整个会话.常用的会话跟踪技术是Cookie与Session.Cookie通过在客户端记录信息确定用户身份,Session通过在服务器端 ...
- Cookie/Session机制详解 <转>
会话(Session)跟踪是Web程序中常用的技术,用来跟踪用户的整个会话.常用的会话跟踪技术是Cookie与Session.Cookie通过在客户端记录信息确定用户身份,Session通过在服务器端 ...
随机推荐
- 【软件需求工程与建模 - 小组项目】第6周 - 成果展示2 - 软件需求规格说明书V4.3
成果展示2 - 软件需求规格说明书V4.3
- svn状态与常见错误
TortoiseSVN 1.6.16是最后一个目录独立管理自身cache的svn版本(每个目录下都有一个隐藏的.svn文件夹) 之后的版本会则会根目录上统一进行管理(只有根目录下有一个隐藏的.svn文 ...
- [20170604]12c Top Frequency histogram补充.txt
[20170604]12c Top Frequency histogram补充.txt 1.环境:SCOTT@test01p> @ ver1PORT_STRING ...
- mysql中导入导出sql文件
1.导出整个数据库: mysqldump -u用户名 -p密码 数据库名 > 导出的文件名 例:mysqldump -uroot -proot user > user.sql 2.导出一个 ...
- 转:修改IIS虚拟目录名称bat脚本
@echo off echo ------------------------------------------------------------------------------ echo - ...
- Windows10家庭版连接远程桌面出现credssp加密oracle修正问题
我发现我的win10不能连接别人的远程桌面,问题如下: 1.windows10家庭版需要修改注册表,家庭版没有组织策略: 2.win+R打开快速启动命令行输入"regedit": ...
- PHP匿名函数
PHP匿名函数 匿名函数(Anonymous functions),也叫闭包函数(closures),允许临时创建一个没有指定名称的函数.最经常用作回调函数(callback)参数的值. 举例: &l ...
- 【2018.05.10 智能驾驶/汽车电子】AutoSar Database-ARXML及Vector Database-DBC的对比
最近使用python-canmatrix对can通信矩阵进行编辑转换时,发现arxml可以很容易转换为dbc,而dbc转arxml却需要费一番周折,需要额外处理添加一些信息. 注意:这里存疑,还是需要 ...
- python自动化测试之异常及日志
为了保持自动化测试用例的健壮性,异常的捕获及处理,日志的记录对掌握自动化测试执行情况尤为重要,这里便详细的介绍下在自动化测试中使用到的异常及日志,并介绍其详细的用法. 一.日志 打印日志是很多程序的重 ...
- nginx相关命令
https://www.cnblogs.com/zdz8207/p/CentOS-nginx-yum.html
