Restful framework【第七篇】权限组件
基本使用
-写一个类:

class MyPer(BasePermission):

	message='您没有权限'

	def has_permission(self, request, view):

	  # 取出当前登录用户

	  user = request.user

	  # 取出当前登录用户类型的中文

	  tt = user.get_user_type_display()

	  if user.user_type == 0:

		return True

	  else:

		return False

-局部使用

	permission_classes=[MyPer]

-全局使用

  在setting中

  "DEFAULT_PERMISSION_CLASSES":['app01.auth.MyPer'],
添加权限
(1)API/utils文件夹下新建premission.py文件,代码如下:
- message是当没有权限时,提示的信息
# utils/permission.py class SVIPPremission(object):
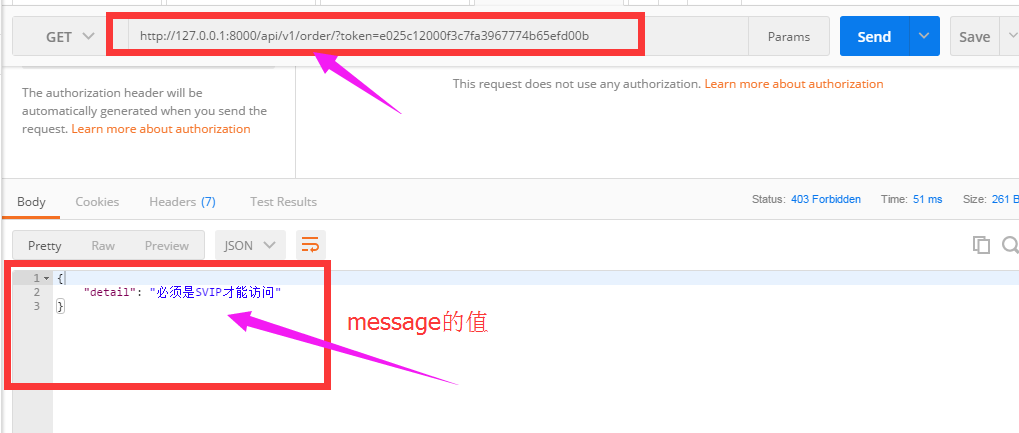
message = "必须是SVIP才能访问"
def has_permission(self,request,view):
if request.user.user_type != 3:
return False
return True class MyPremission(object):
def has_permission(self,request,view):
if request.user.user_type == 3:
return False
return True
(2)settings.py全局配置权限
#全局

REST_FRAMEWORK = {

    "DEFAULT_AUTHENTICATION_CLASSES":['API.utils.auth.Authentication',],

    "DEFAULT_PERMISSION_CLASSES":['API.utils.permission.SVIPPremission'],

}
(3)views.py添加权限
- 默认所有的业务都需要SVIP权限才能访问
- OrderView类里面没写表示使用全局配置的SVIPPremission
- UserInfoView类,因为是普通用户和VIP用户可以访问,不使用全局的,要想局部使用的话,里面就写上自己的权限类
- permission_classes = [MyPremission,] #局部使用权限方法
from django.shortcuts import render,HttpResponse

from django.http import JsonResponse

from rest_framework.views import APIView

from API import models

from rest_framework.request import Request

from rest_framework import exceptions

from rest_framework.authentication import BaseAuthentication

from API.utils.permission import SVIPPremission,MyPremission

ORDER_DICT = {

    1:{

        'name':'apple',

        'price':15

    },

    2:{

        'name':'dog',

        'price':100

    }

}

def md5(user):

    import hashlib

    import time

    #当前时间,相当于生成一个随机的字符串

    ctime = str(time.time())

    m = hashlib.md5(bytes(user,encoding='utf-8'))

    m.update(bytes(ctime,encoding='utf-8'))

    return m.hexdigest()

class AuthView(APIView):

    '''用于用户登录验证'''

    authentication_classes = []      #里面为空,代表不需要认证

    permission_classes = []          #不里面为空,代表不需要权限

    def post(self,request,*args,**kwargs):

        ret = {'code':1000,'msg':None}

        try:

            user = request._request.POST.get('username')

            pwd = request._request.POST.get('password')

            obj = models.UserInfo.objects.filter(username=user,password=pwd).first()

            if not obj:

                ret['code'] = 1001

                ret['msg'] = '用户名或密码错误'

            #为用户创建token

            token = md5(user)

            #存在就更新,不存在就创建

            models.UserToken.objects.update_or_create(user=obj,defaults={'token':token})

            ret['token'] = token

        except Exception as e:

            ret['code'] = 1002

            ret['msg'] = '请求异常'

        return JsonResponse(ret)

class OrderView(APIView):

    '''

    订单相关业务(只有SVIP用户才能看)

    '''

    def get(self,request,*args,**kwargs):

        self.dispatch

        #request.user

        #request.auth

        ret = {'code':1000,'msg':None,'data':None}

        try:

            ret['data'] = ORDER_DICT

        except Exception as e:

            pass

        return JsonResponse(ret)

class UserInfoView(APIView):

    '''

       订单相关业务(普通用户和VIP用户可以看)

       '''

    permission_classes = [MyPremission,]    #不用全局的权限配置的话,这里就要写自己的局部权限

    def get(self,request,*args,**kwargs):

        print(request.user)

        return HttpResponse('用户信息')
urls.py
from django.contrib import admin

from django.urls import path

from API.views import AuthView,OrderView,UserInfoView

urlpatterns = [

    path('admin/', admin.site.urls),

    path('api/v1/auth/',AuthView.as_view()),

    path('api/v1/order/',OrderView.as_view()),

    path('api/v1/info/',UserInfoView.as_view()),

]
auth.py
# API/utils/auth/py

from rest_framework import exceptions

from API import models

from rest_framework.authentication import BaseAuthentication

class Authentication(BaseAuthentication):

    '''用于用户登录验证'''

    def authenticate(self,request):

        token = request._request.GET.get('token')

        token_obj = models.UserToken.objects.filter(token=token).first()

        if not token_obj:

            raise exceptions.AuthenticationFailed('用户认证失败')

        #在rest framework内部会将这两个字段赋值给request,以供后续操作使用

        return (token_obj.user,token_obj)

    def authenticate_header(self, request):

        pass
(4)测试
普通用户访问OrderView,提示没有权限
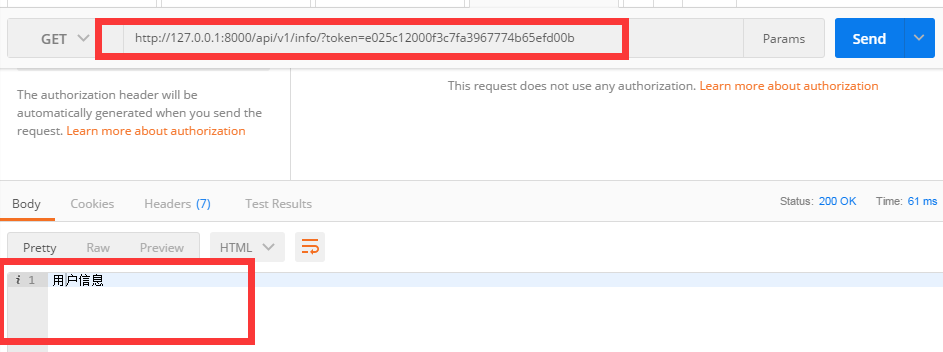
普通用户访问UserInfoView,可以返回信息
权限源码流程
(1)dispatch
def dispatch(self, request, *args, **kwargs):

	"""

	`.dispatch()` is pretty much the same as Django's regular dispatch,

	but with extra hooks for startup, finalize, and exception handling.

	"""

	self.args = args

	self.kwargs = kwargs

	#对原始request进行加工,丰富了一些功能

	#Request(

	#     request,

	#     parsers=self.get_parsers(),

	#     authenticators=self.get_authenticators(),

	#     negotiator=self.get_content_negotiator(),

	#     parser_context=parser_context

	# )

	#request(原始request,[BasicAuthentications对象,])

	#获取原生request,request._request

	#获取认证类的对象,request.authticators

	#1.封装request

	request = self.initialize_request(request, *args, **kwargs)

	self.request = request

	self.headers = self.default_response_headers  # deprecate?

	try:

		#2.认证

		self.initial(request, *args, **kwargs)

		# Get the appropriate handler method

		if request.method.lower() in self.http_method_names:

			handler = getattr(self, request.method.lower(),

							  self.http_method_not_allowed)

		else:

			handler = self.http_method_not_allowed

		response = handler(request, *args, **kwargs)

	except Exception as exc:

		response = self.handle_exception(exc)

	self.response = self.finalize_response(request, response, *args, **kwargs)

	return self.response
(2)initial
def initial(self, request, *args, **kwargs):

	"""

	Runs anything that needs to occur prior to calling the method handler.

	"""

	self.format_kwarg = self.get_format_suffix(**kwargs)

	# Perform content negotiation and store the accepted info on the request

	neg = self.perform_content_negotiation(request)

	request.accepted_renderer, request.accepted_media_type = neg

	# Determine the API version, if versioning is in use.

	version, scheme = self.determine_version(request, *args, **kwargs)

	request.version, request.versioning_scheme = version, scheme

	# Ensure that the incoming request is permitted

	#4.实现认证

	self.perform_authentication(request)

	#5.权限判断

	self.check_permissions(request)

	self.check_throttles(request)
(3)check_permissions
里面有个has_permission这个就是我们自己写的权限判断
def check_permissions(self, request):

	"""

	Check if the request should be permitted.

	Raises an appropriate exception if the request is not permitted.

	"""

	#[权限类的对象列表]

	for permission in self.get_permissions():

		if not permission.has_permission(request, self):

			self.permission_denied(

				request, message=getattr(permission, 'message', None)

			)
(4)get_permissions
 def get_permissions(self):

        """

        Instantiates and returns the list of permissions that this view requires.

        """

        return [permission() for permission in self.permission_classes]
(5)permission_classes

所以settings全局配置就如下
#全局

REST_FRAMEWORK = {

   "DEFAULT_PERMISSION_CLASSES":['API.utils.permission.SVIPPremission'],

}
内置权限
django-rest-framework内置权限BasePermission
默认是没有限制权限
class BasePermission(object):

    """

    A base class from which all permission classes should inherit.

    """

    def has_permission(self, request, view):

        """

        Return `True` if permission is granted, `False` otherwise.

        """

        return True

    def has_object_permission(self, request, view, obj):

        """

        Return `True` if permission is granted, `False` otherwise.

        """

        return True
我们自己写的权限类,应该去继承BasePermission,修改之前写的permission.py文件
# utils/permission.py

from rest_framework.permissions import BasePermission

class SVIPPremission(BasePermission):

    message = "必须是SVIP才能访问"

    def has_permission(self,request,view):

        if request.user.user_type != 3:

            return False

        return True

class MyPremission(BasePermission):

    def has_permission(self,request,view):

        if request.user.user_type == 3:

            return False

        return True
总结:
(1)使用
- 自己写的权限类:1.必须继承BasePermission类; 2.必须实现:has_permission方法
(2)返回值
- True 有权访问
- False 无权访问
(3)局部
- permission_classes = [MyPremission,]
(4)全局
REST_FRAMEWORK = {

   #权限

    "DEFAULT_PERMISSION_CLASSES":['API.utils.permission.SVIPPremission'],

}
Restful framework【第七篇】权限组件的更多相关文章
- Django-CRM项目学习(七)-权限组件的设置以及权限组件的应用
开始今日份整理 1.利用自定制标签,增加展示权限,权限分级设定 1.1 在权限组件中创建自定义标签 使用自定义标签的目的,使各个数据进行分离 1.2 导入自定义标签包 自定义标签复习(自定义标签有三种 ...
- Restful framework【第一篇】RESTful 规范
什么是RESTful REST与技术无关,代表的是一种软件架构风格,REST是Representational State Transfer的简称,中文翻译为“表征状态转移” REST从资源的角度类审 ...
- Restful framework【第二篇】APIView
安装djangorestframework 方式一:pip3 install djangorestframework 方式二:pycharm图形化界面安装 方式三:pycharm命令行下安装(装在当前 ...
- Entity Framework 第七篇 简化排序
上篇介绍了EF的分页实现,分页的时候会用到排序,但是使用起来表达式写的似乎很繁琐 , ); 如果直接使用排序字符串,不更直观简便么? respository.GetPaged<S_Users&g ...
- Restful framework【第九篇】分页器
基本使用 分页 -简单分页 page_size = api_settings.PAGE_SIZE :每页显示条数 page_query_param = 'page' :查询的页码数 page_size ...
- CRM第一篇:权限组件之权限控制
一.权限组件(1):一级菜单 二.权限组件(2):二级菜单 三.权限组件(3):默认选中非菜单(二级菜单) 四.权限组件(4):给动态菜单增加面包屑导航 五.权限组件(5):权限粒度控制到按钮 六.权 ...
- Django高级篇三。restful的解析器,认证组件,权限组件
一.rest=framework之解析器 1)解析器作用. 根据提交的数据.只解析某些特定的数据.非法数据不接收,为了系统安全问题 比如解析的数据格式有 有application/json,x-www ...
- restful framework之权限组件
一.权限简介 只用超级用户才能访问指定的数据,普通用户不能访问,所以就要有权限组件对其限制 二.局部使用 from rest_framework.permissions import BasePerm ...
- Django REST framework —— 权限组件源码分析
在上一篇文章中我们已经分析了认证组件源码,我们再来看看权限组件的源码,权限组件相对容易,因为只需要返回True 和False即可 代码 class ShoppingCarView(ViewSetMix ...
- drf:restful概念,类继承关系,drf请求封装,drf请求流程,版本控制组件,认证组件(token),权限组件
1.restful规范 resfful规范的概念最重要: 是一套规范,规则,用于程序之间进行数据交换的约定. 他规定了一些协议,对我们感受最直接的就是,以前写增删改查的时候需要些四个视图寒素,rest ...
随机推荐
- Git-什么是分支
为了理解什么是分支,我们先要回顾Git是如何存储数据的. Git并不会保存文件的差异值或者说变化量,而是直接保存文件的快照. 在Git中提交时,会保存一个commit对象,该对象包含一个指向暂存内容快 ...
- html5-嵌入图片
<!DOCTYPE html><html lang="en"><head> <meta charset="UTF-8&qu ...
- 获取数据库连接对象Connection
2018-11-04 19:50:52 开始写 public Connection getConn() {//返回类型为Connection try { Class.forName("co ...
- jQuery事件--blur()和focus()
blur([[data],fn]) 概述 当元素失去焦点时触发 blur 事件. 这个函数会调用执行绑定到blur事件的所有函数,包括浏览器的默认行为.可以通过返回false来防止触发浏览器的默 ...
- 计算属性(computed)、方法(methods)和侦听属性(watch)的区别与使用场景
1,computed 能实现的,methods 肯定也能够实现. 2,不同之处在于,computed 是基于他的依赖进行缓存的,computed 只有在他的的相关依赖发生改变的时候才会重新计算. 如果 ...
- Spring 默认的 AopProxy
Spring 默认的 AopProxy JdkDynamicAopProxy Spring xml 文件默认解析器 DefaultDocumentLoader 采用 standard JAXP-con ...
- new sh file
创建新文件 sbash='#!/bin/bash' sauth='# auth: xiluhua' sdate="# date: $(date +%Y-%m-%d)" shead= ...
- js异步计时器
js中同步和异步的区别: 1.同步会阻塞代码执行,而异步不会 2.alert 是同步,setTimeout 是异步 何时需要异步 1.在可能发生等待的情况 2.等待过程中不能像 alert 一样阻塞程 ...
- java == 与 equals 相同与不同点
java中与很多有意思又值得深究的点. 写这篇文章呢,是由于在百度知道中看到一个问题:怎样比较两个对象是否相同.这又使我想到了另外一个问题,== 和 equals有什么不同?写了几行代码,看了几篇文章 ...
- CAT Caterpillar ET is really a exceptional obd2 solution
As a excellent obd2 solutions,Heavy Duty Diagnostic CAT Caterpillar ET Diagnostic Adapter features a ...