用Keras搭建神经网络 简单模版(二)——Classifier分类(手写数字识别)
# -*- coding: utf-8 -*-

import numpy as np

np.random.seed(1337) #for reproducibility再现性

from keras.datasets import mnist

from keras.utils import np_utils

from keras.models import Sequential#按层

from keras.layers import Dense, Activation#全连接层

import matplotlib.pyplot as plt

from keras.optimizers import RMSprop
从mnist下载手写数字图片数据集,图片为28*28,将每个像素的颜色(0到255)改为(0倒1),将标签y变为10个长度,若为1,则在1处为1,剩下的都标为0。
#dowmload the mnisst the path '~/.keras/datasets/' if it is the first time to be called

#x shape (60000 28*28),y shape(10000,)

(x_train,y_train),(x_test,y_test) = mnist.load_data()#0-9的图片数据集

#data pre-processing

x_train = x_train.reshape(x_train.shape[0],-1)/255 #normalize 到【0,1】

x_test = x_test.reshape(x_test.shape[0],-1)/255

y_train = np_utils.to_categorical(y_train, num_classes=10) #把标签变为10个长度,若为1,则在1处为1,剩下的都标为0

y_test = np_utils.to_categorical(y_test,num_classes=10)
搭建神经网络,Activation为激活函数。由于第一个Dense传出32.所以第二个的Dense默认传进32,不用特意设置。
#Another way to build neural net

model = Sequential([

        Dense(32,input_dim=784),#传出32

        Activation('relu'),

        Dense(10),

        Activation('softmax')

        ])

#Another way to define optimizer

rmsprop = RMSprop(lr=0.001,rho=0.9,epsilon=1e-08,decay=0.0)

# We add metrics to get more results you want to see

model.compile( #编译

        optimizer = rmsprop,

        loss = 'categorical_crossentropy',

        metrics=['accuracy'], #在更新时同时计算一下accuracy

        )
训练和测试
print("Training~~~~~~~~")

#Another way to train the model

model.fit(x_train,y_train, epochs=2, batch_size=32) #训练2大批,每批32个

print("\nTesting~~~~~~~~~~")

#Evalute the model with the  metrics we define earlier

loss,accuracy = model.evaluate(x_test,y_test)

print('test loss:',loss)

print('test accuracy:', accuracy)
全代码:
# -*- coding: utf-8 -*-

import numpy as np

np.random.seed(1337) #for reproducibility再现性

from keras.datasets import mnist

from keras.utils import np_utils

from keras.models import Sequential#按层

from keras.layers import Dense, Activation#全连接层

import matplotlib.pyplot as plt

from keras.optimizers import RMSprop

#dowmload the mnisst the path '~/.keras/datasets/' if it is the first time to be called

#x shape (60000 28*28),y shape(10000,)

(x_train,y_train),(x_test,y_test) = mnist.load_data()#0-9的图片数据集

#data pre-processing

x_train = x_train.reshape(x_train.shape[0],-1)/255 #normalize 到【0,1】

x_test = x_test.reshape(x_test.shape[0],-1)/255

y_train = np_utils.to_categorical(y_train, num_classes=10) #把标签变为10个长度,若为1,则在1处为1,剩下的都标为0

y_test = np_utils.to_categorical(y_test,num_classes=10)

#Another way to build neural net

model = Sequential([

        Dense(32,input_dim=784),#传出32

        Activation('relu'),

        Dense(10),

        Activation('softmax')

        ])

#Another way to define optimizer

rmsprop = RMSprop(lr=0.001,rho=0.9,epsilon=1e-08,decay=0.0)

# We add metrics to get more results you want to see

model.compile( #编译

        optimizer = rmsprop,

        loss = 'categorical_crossentropy',

        metrics=['accuracy'], #在更新时同时计算一下accuracy

        )

print("Training~~~~~~~~")

#Another way to train the model

model.fit(x_train,y_train, epochs=2, batch_size=32) #训练2大批,每批32个

print("\nTesting~~~~~~~~~~")

#Evalute the model with the  metrics we define earlier

loss,accuracy = model.evaluate(x_test,y_test)

print('test loss:',loss)

print('test accuracy:', accuracy)
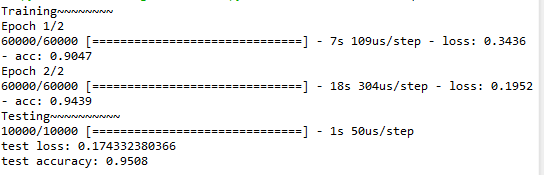
结果为:

用Keras搭建神经网络 简单模版(二)——Classifier分类(手写数字识别)的更多相关文章
- 机器学习(二)-kNN手写数字识别
一.kNN算法是机器学习的入门算法,其中不涉及训练,主要思想是计算待测点和参照点的距离,选取距离较近的参照点的类别作为待测点的的类别. 1,距离可以是欧式距离,夹角余弦距离等等. 2,k值不能选择太大 ...
- 用Keras搭建神经网络 简单模版(三)—— CNN 卷积神经网络(手写数字图片识别)
# -*- coding: utf-8 -*- import numpy as np np.random.seed(1337) #for reproducibility再现性 from keras.d ...
- 用Keras搭建神经网络 简单模版(六)——Autoencoder 自编码
import numpy as np np.random.seed(1337) from keras.datasets import mnist from keras.models import Mo ...
- 用Keras搭建神经网络 简单模版(四)—— RNN Classifier 循环神经网络(手写数字图片识别)
# -*- coding: utf-8 -*- import numpy as np np.random.seed(1337) from keras.datasets import mnist fro ...
- 用Keras搭建神经网络 简单模版(一)——Regressor 回归
首先需要下载Keras,可以看到我用的是TensorFlow 的backend 自己构建虚拟数据,x是-1到1之间的数,y为0.5*x+2,可视化出来 # -*- coding: utf-8 -*- ...
- 用Keras搭建神经网络 简单模版(五)——RNN LSTM Regressor 循环神经网络
# -*- coding: utf-8 -*- import numpy as np np.random.seed(1337) import matplotlib.pyplot as plt from ...
- 吴裕雄 python 神经网络TensorFlow实现LeNet模型处理手写数字识别MNIST数据集
import tensorflow as tf tf.reset_default_graph() # 配置神经网络的参数 INPUT_NODE = 784 OUTPUT_NODE = 10 IMAGE ...
- 吴裕雄 python 神经网络——TensorFlow实现AlexNet模型处理手写数字识别MNIST数据集
import tensorflow as tf # 输入数据 from tensorflow.examples.tutorials.mnist import input_data mnist = in ...
- 【问题解决方案】Keras手写数字识别-ConnectionResetError: [WinError 10054] 远程主机强迫关闭了一个现有的连接
参考:台大李宏毅老师视频课程-Keras-Demo 在载入数据阶段报错: ConnectionResetError: [WinError 10054] 远程主机强迫关闭了一个现有的连接 Google之 ...
随机推荐
- 宇宙最帅叉叉——第五周博客 for 测试与发布(Alpha版本)
Alpha版本测试报告 1.在测试过程中总共发现了多少Bug?每个类别的Bug分别为多少个? a.修复的BUG UDP传输 recvfrom 当没有消息来的时候一直循环等待因其阻塞 ,时间戳无效了. ...
- ASP.NET下跨应用共享Session和使用Redis进行Session托管
在之前的博客中,我说到了Session的共享问题,其中说到了Web Farm和Web Garden两种情况下Session的处理.在ASP.NET提供的Session处理方法中,有以下四种模式: 1. ...
- settype和gettype
settype — 设置变量的类型 <?php$foo = "5bar"; // string$bar = true; // boolean settype($foo, ...
- Nexus私服的安装与配置
Nexus的安装与配置 仅以此文,献给陷入懒癌晚期的小伙伴们. 本文基于nexus 3.xx .0. What?Why?When?Who?Where? Sonatype Nexus是一款maven仓库 ...
- select 从应用层到内核实现解析
在一个应用中,如果需要读取多个设备文件,这其中有多种实现方式: 1.使用一个进程,并采用同步查询机制,不停的去轮询每一个设备描述符,当设备描述符不可用时,进程睡眠. 2:使用多个进程或者线程分别读取一 ...
- c++ 与 java 中的 继承
C++ 代码: #include <iostream> #include <string> using namespace std; class Parent { public ...
- Linux下你需要了解的10个网络和监控命令
我下面列出来的10个基础的每个linux用户都应该知道的网络和监控命令.网络和监控命令类似于这些: hostname, ping, ifconfig, iwconfig, netstat, nsloo ...
- CodeForces - 1093F:Vasya and Array (DP&计数)
题意:N,K,L,以及给定长度为N的序列,表示其对应的颜色,-1表示还没有涂色,现在让你去涂色,使得最后没有大于等于L的连续的同色的情况. 思路:我们用dp[i][j]表示第i个位置颜色为j的合法方案 ...
- win32 MSG 值
转自:https://autohotkey.com/docs/misc/SendMessageList.htm WM_NULL = 0x00 WM_CREATE = 0x01 WM_DESTROY = ...
- pandas 基础用法
pandas 是一个基于 Numpy 构建, 强大的数据分析工具包 主要功能 独特的数据结构 DataFrame, Series 集成时间序列功能 提供丰富的数学运算操作 灵活处理缺失数据 Serie ...